1
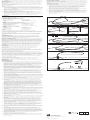
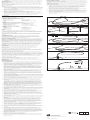
26. P lug in the adapter of choice (universal or bolus) and close the caps. (See fig. 7) Note: The adapter may be secured to the tube with a cable tie. 27. N ote the centimeter marking on the tube that is closest to the bolster and record it on the patient’s chart and on the patient information sheet in the Patient Care Manual. Note: The Patient Care Manual enclosed in the kit is intended as a reference for caregivers of the patient. It is essential for the Patient Care Manual to accompany the patient and be explained to all people responsible for the care of the patient. MEDICAL 28. Dispose of residual kit materials per institutional guidelines for biohazardous medical waste. 29. R ecord physician’s instructions for feeding and administration of prescribed medications in the Patient Care Manual. 30. The patient should remain NPO for 24 hours unless otherwise directed by a physician. TUBE REMOVAL The PEG tube has been designed for removal using the external/traction method shown below. If this method of removal is not possible, another method such as endoscopic or surgical should be utilized. EN Percutaneous Endoscopic Gastrostomy Systems - FLOW / PEG Push Technique PT Sistemas de gastrostomia endoscópica percutânea - Técnica de empurrar FLOW/PEG ES Sistemas de gastrostomía endoscópica percutánea - Técnica de presión FLOW / PEG Caution: If a replacement tube is desired, it must be placed immediately after removal. External tube removal may result in minimal trauma or bleeding that may require treatment. External/Traction Method The feeding tube may be removed without the need for endoscopy in the following manner: 1. G rasp the gastric feeding tube near the stoma site. While slowly rotating the tube, gently push 1-2 cm of the tube into the stomach to separate the tube from the stoma tract. Warning: If the tube does not rotate freely within the tract, do not attempt to use traction as a method of removal. 2. H old the gastric tube near the stoma site and apply counter pressure by placing the fingers of the other hand around the base of the tube. 3. Loosely cover the stoma site with either a towel or a drape. 4. H olding the gastric feeding tube straight, apply steady traction to the tube until the internal dome emerges through the abdominal wall. Caution: The tube must be pulled straight out of the stoma tract. 5. D ispose of the feeding tube per institutional guidelines for biohazardous medical waste. The stoma tract should heal and close within 24 hours. PORTUGUÊS INTENÇÃO DE USO O sistema PEG é destinado à colocação de gastrostomia endoscópica percutânea para fornecer nutrição enteral a paciente que necessitam de auxílio nutricional. *18980/0112* ENGLISH INTENDED USE The PEG System is intended for percutaneous endoscopic gastrostomy placement to provide enteral nutrition to patients requiring nutritional support. GASTROSTOMY SET CONTENTS • 1 Silicone Feeding Tube • 1 Prep Tray • 5 Gauze Pads • 1 Instruction Manual • 1 Cold Snare PREP TRAY CONTENTS • 1 Syringe • 1 25 gauge 5/8” Needle (not available in Safety Sharps Kit) • 1 Needle Cannula • 1 22 gauge 1 1/2” Needle • 1 #11 Scalpel BOLSTER KIT CONTENTS • 1 Bolster • 1 Cable Tie • 1 Universal Adapter • Hemostats • • • • 1 Wire Guide 1 Bolster Kit 1 Drape 1 Patient Care Manual • 1 Local Anesthetic with Instruction • 1 Pk. Antiseptic Swabsticks with Instruction • 1 Pk. Antiseptic Ointment • 2 Pks. Water Soluble Lubricant • • • • 1 Twist Lock 1 Pr. Scissors 1 Bolus Adapter Tubing Clamp NOTES Do not use this device for any purpose other than the stated intended use. Inventory rotation of sterile products is essential. Verify the expiration date on the package label prior to using the product. If the expiration date has lapsed, do not use or resterilize this device. If the product package is open or damaged when received, do not use the device. Cook devices must be stored in a dry location, away from temperature extremes. CONTRAINDICATIONS Contraindications associated with placement and use of a PEG tube include, but are not limited to: sepsis, severe gastroesophageal reflux, ascites, or diffuse inflammatory, infectious, or neoplastic disease involving the walls of the abdomen or anterior stomach, gastrointestinal obstruction or proximal small bowel fistulae. POTENTIAL COMPLICATIONS Potential complications associated with placement and use of a PEG tube include, but are not limited to: bronchopulmonary aspiration and pneumonia, respiratory distress or airway obstruction, peritonitis or septic shock, colocutaneous, gastrocolocutaneous or small bowel fistula, gastric dilatation, sigmoid intra-abdominal herniation and volvulus, persistent fistula following PEG removal, esophageal injury, necrotizing fasciitis, candida cellulitis, improper placement or inability to place PEG tube, tube dislodgment or migration, hemorrhage, and tumor metastasis. Additional complications include, but are not limited to: pneumoperitoneum, peristomal wound infection and purulent drainage, stomal leakage, bowel obstruction, gastroesophageal reflux (GERD), and blockage or deterioration of the PEG tube. Note: Patients with cirrhosis have an increased risk of developing ascites which is a contraindication to PEG placement. PRECAUTIONS The benefit of a PEG tube to the patient must be weighed against the risks associated with any indwelling gastrostomy feeding tube. During placement and use, care must be taken to avoid cutting, crimping, or damaging components. Do not modify the PEG tube or adapters in any way. Follow the instructions and the Patient Care Manual supplied with each kit. It is essential for the Patient Care Manual to accompany the patient and be explained to all people responsible for the care of the patient. The PEG system is radiopaque. Proper location and integrity of any internal component can be visualized by x-ray. Manufacturer guidelines are not intended to replace physician’s recommendations. A thorough understanding of the technical principles, clinical applications and risks associated with placement and/or removal of a PEG tube is necessary before using this device. Placement and/or removal of the PEG tube should only be performed by, or under the supervision of, physicians thoroughly trained in the procedure. When placing a PEG tube in obese patients, all anatomical structures must be identified prior to placement. When placing a PEG tube, observe all institutional guidelines regarding gastroscopy, including removal of dentures. PEG replacement is recommended every three months or at the discretion of the physician. WARNING Excessive traction on the gastric feeding tube may cause premature removal, fatigue or failure of the device. INSTRUCTIONS FOR USE Tube Placement 1. Upon removing the device and its components from the package, visually inspect with particular attention to kinks, bends or breaks in the feeding tube assembly. If an abnormality is detected that would prohibit proper working condition, do not use. Please notify Cook for return authorization. 2. A fter introducing the gastroscope, insufflate the stomach and examine the mucosa. Determine if the mucosa is free of ulcerations or bleeding before proceeding. CONTEÚDO DO CONJUNTO DE GASTROSTOMIA • 1 sonda de alimentação de silicone • 1 fio-guia • 1 bandeja de preparação • 1 kit de suporte • 5 compressas de gaze • 1 campo • 1 manual de instruções • 1 manual de cuidados do paciente • 1 laço frio CONTEÚDO DA BANDEJA DE PREPARAÇÃO • 1 seringa • 1 anestésico local com instruções • 1 agulha de 5/8" (1,6 cm) de calibre 25 • 1 pacote de cotonetes antissépticos (não disponível no kit de cortantes com instruções de segurança) • 1 cânula de agulha • 1 pacote de pomada antisséptica • 1 agulha de 1 1/2" (3,8 cm) de calibre 22 • 2 pacotes de lubrificante solúvel em água • 1 bisturi #11 CONTEÚDO DO KIT DO SUPORTE • 1 suporte • 1 trava de torção • 1 amarra • 1 tesoura • 1 adaptador universal • 1 adaptador de bolus • Hemostatos • Clamp de tubulação OBSERVAÇÕES Não utilize este dispositivo para qualquer propósito que não ao que se destina. A rotação do inventário de produtos estéreis é essencial. Verifique a data de validade na etiqueta da embalagem antes de usar o produto. Caso a data de validade tenha expirado, não use nem esterilize novamente este dispositivo. Caso a embalagem do produto esteja aberta ou danificada ao receber, não use o dispositivo. Dispositivos da Cook devem ser armazenados em local seco e afastado de temperaturas extremas. CONTRAINDICAÇÕES Contraindicações associadas à colocação e uso de um tubo PEG incluem, mas não se limitam a: sépsis, refluxo gastroesofágico grave, ascite, doença inflamatória, infecciosa ou neoplásica difusa envolvendo as paredes do abdome ou a parte anterior do estômago, obstrução gastrointestinal ou fístula no intestino delgado proximal. POSSÍVEIS COMPLICAÇÕES Possíveis complicações associadas à colocação e uso de um tubo PEG incluem, mas não se limitam a: aspiração broncopulmonar e pneumonia, dificuldades respiratórias ou obstrução das vias aéreas, peritonite ou choque séptico, fístula colocutânea, gastrocolocutânea ou do intestino delgado, dilatação gástrica, hérnia e vólvulo intra-abdominal sigmoide, fístula persistente seguida de remoção da PEG, danos esofágicos, fascite necrosante, celulite de cândida, colocação inadequada ou incapacidade de colocar o tubo de PEG, deslocamento do tubo ou migração, hemorragia e metástase tumoral. Complicações adicionais incluem, mas não se limitam a: pneumoperitôneo, infecção e drenagem purulenta de ferimento peristomal, vazamento estomal, obstrução intestinal, refluxo gastroesofágico e bloqueio ou deterioração do tubo de PEG. Observação: Pacientes com cirrose possuem maior risco de desenvolver ascite, que é contraindicação para colocação de PEG. PRECAUÇÕES Os benefícios de um tubo de PEG para o paciente devem ser ponderados em relação aos riscos associados a qualquer sonda de alimentação interna por gastrostomia. Durante a colocação e o uso, deve-se tomar cuidado para evitar cortes, dobras ou danos aos componentes. Não modifique de qualquer maneira o tubo de PEG ou os adaptadores. Siga as instruções e o manual de cuidados do paciente fornecidos com cada kit. É essencial que o manual de cuidados do paciente acompanhe o paciente e seja explicado a todas as pessoas responsáveis por cuidar do paciente. O sistema PEG é radiopaco. O posicionamento e a integridade adequados de qualquer componente interno podem ser visualizados por raio x. As orientações do fabricante não devem substituir as recomendações médicas. Antes de usar este dispositivo, é necessária uma compreensão completa dos princípios técnicos, das aplicações clínicas e dos riscos associados à colocação e/ou remoção de um tubo de PEG. Colocação e/ou remoção de um tubo de PEG deve ser realizada apenas por médicos totalmente treinados no procedimento, ou sob supervisão destes. Ao colocar um tubo de PEG em pacientes obesos, todas as estruturas anatômicas devem ser identificadas antes da colocação. Ao colocar um tubo de PEG, observe todas as diretrizes institucionais a respeito de gastroscopia, incluindo a remoção de dentaduras. A substituição de PEG é recomendada a cada três meses ou de acordo com as orientações médicas. ADVERTÊNCIA Tração excessiva da sonda de alimentação gástrica pode causar remoção prematura, fadiga ou falha do dispositivo. INSTRUÇÕES DE USO Colocação do tubo 1. Ao remover o dispositivo e seus componentes da embalagem, inspecione visualmente com atenção especial para torções, dobras ou quebras no conjunto da sonda de alimentação. Caso seja detectada anormalidade que impeça condições de operação adequadas, não utilize. Notifique a Cook para obter autorização de devolução. 2. Após introduzir o gastroscópio, insufle o estômago e examine a mucosa. Determine se a mucosa está livre de ulcerações ou sangramentos antes de prosseguir. 3. Posicione a ponta do gastroscópio e ilumine a parede anterior esquerda do estômago. Observação: Pode ser necessário diminuir as luzes na sala de procedimento para melhor visualização da luz pela parede abdominal. Importante: Em condições ideais, a colocação de PEG deve situar-se baixa no corpo do estômago ou alta no antro em direção ao piloro para permitir inserção mais fácil da sonda de alimentação de PEG-J (jejunal) no PEG, caso indicado como opção. 4. Manipule a ponta do gastroscópio até que a luz transilumine a posição PEG desejada. (Consulte a fig. 1) 5. Pressione levemente a área iluminada com um dedo enquanto visualiza o local com o gastroscópio. A pressão sobre essa área deve ser visualizada nitidamente com o gastroscópio. Após determinar que a mucosa está saudável, prossiga com esse procedimento. 6. Prepare o local seguindo as diretrizes cirúrgicas conforme determinado por sua instituição. Posicione o campo cirúrgico da embalagem sobre a área. Injete o anestésico local na localização de PEG. 3. P osition the tip of the gastroscope and illuminate the left anterior wall of the stomach. Note: It may be necessary to dim the lights in the procedure room to better visualize the light through the abdominal wall. Important: Ideally, placement of the PEG should be low in the body of the stomach or high in the antrum towards the pylorus to allow for easier insertion of the PEG-J (jejunal) feeding tube into the PEG, if indicated as an option. 7. Usando o bisturi fornecido, efetue uma incisão de 1 cm de comprimento pela pele e pelo tecido subcutâneo. Cuidado: Um incisão menor pode contribuir para resistência extrema da sonda de alimentação de gastrostomia ao sair da fáscia. 4. M anipulate the gastroscope tip until the light trans-illuminates the desired PEG position. (See fig. 1) 9. Enquanto mantém a insuflação do estômago, insira a agulha e a unidade de cânula pela incisão na pele para o interior do estômago. Deixe a cânula posicionada para manter acesso ao estômago enquanto remove a agulha interna. 5. L ightly depress the illuminated area with a finger while viewing the site with the gastroscope. The depression of this area should be clearly visualized with the scope. After determining that the mucosa is healthy, proceed with this procedure. 8. Observe o local por endoscopia. 10. Posicione a ponta flexível do fio-guia pela cânula da agulha e para o interior do estômago. 8. Endoscopically observe the site. 11. Mantenha insuflação do estômago para obter proximidade estreita entre as paredes estomacal e abdominal. Posicione um laço ou fórceps de biópsia sem dentes pelo canal do gastroscópio e agarre a extremidade do fio-guia. Cuidado: Não aperte o laço em volta da cânula da agulha após a remoção do estilete interno, pois isso pode interferir na passagem do fio-guia. Observação: Para remoção do fio-guia, agarre o fio com um laço ou com um fórceps de biópsia sem dentes a pelo menos 5 cm de distância da ponta do fio-guia. (Consulte a fig. 2) Puxe o fio-guia para a ponta do endoscópio, não para dentro do canal do endoscópio. (Consulte a fig. 3) 9. W hile maintaining stomach insufflation, insert the needle and cannula unit through the skin incision and into the stomach. Leave the cannula in place to maintain access to the stomach while removing the inner needle. 12. Enquanto mantém o laço e o fórceps de biópsia sem dentes preso ao redor do fio-guia, remova o gastroscópio e o fio da boca do paciente. O fio-guia estará agora se projetando da boca do paciente e do local da incisão. 10. Place the floppy tip of the wire guide through the needle cannula and into the stomach. 13. Usando o lubrificante solúvel em água e gaze, lubrifique completamente o dilatador e toda a extensão externa do tubo, incluindo a saliência interna. 6. P repare the site following surgical guidelines as determined by your institution. Drape the area using the enclosed surgical drape. Inject local anesthetic into the PEG site. 7. U sing the enclosed scalpel, make a 1 cm long incision through the skin, subcutaneous tissue. Caution: A smaller incision may contribute to extreme resistance of the gastrostomy feeding tube when exiting the fascia. 11. M aintain stomach insufflation to obtain close proximity of the stomach and abdominal walls. Place a snare or non-spiked biopsy forceps through the channel of the gastroscope and grasp the end of the wire guide. Caution: Do not tighten the snare around the needle cannula after removal of the inner stylet as this may interfere with passage of the wire guide. Note: For wire guide removal, grasp the wire with a snare or non-spiked biopsy forceps at least 5 cm from the tip of the wire guide (See fig. 2). Pull the wire guide to the tip of the endoscope, not into the endoscope channel. (See fig. 3) 12. W hile maintaining the snare or non-spiked biopsy forceps securely around the wire guide, remove the gastroscope and wire from the patient’s mouth. The wire guide will now be protruding from both the patient’s mouth and incision site. 13. U sing water-soluble lubricant and gauze, thoroughly lubricate the dilator and entire external length of the tube including the internal bumper. 14. A dvance the dilator tip over the wire guide and through the patient’s mouth. (See fig. 4) Note: Firm tension on both ends of the wire guide will ease passage through the oropharynx. 15. W hen the end of the dilator meets the cannula in the stomach, push the dilator through the abdominal wall. Note: Maintaining wire guide tension will aid this process. 16. A fter the tapered end of the dilator passes through the abdominal wall, release the wire guide and gently pull the tube and wire guide through the abdominal wall. 17. W hen the internal bumper of the PEG tube enters the mouth, reintroduce the gastroscope and view the tip as it advances through the esophagus and into the stomach. Monitor the patient for respiratory distress as you advance the internal bumper through the esophagus. (See fig. 5) 18. W hile observing centimeter increments, slowly pull the dilating portion of the tube through the abdominal incision. 19. B ring the internal bumper in contact with the abdominal wall, carefully avoiding excess tension. 20. A pply gentle pressure to the exiting portion of the feeding tube and remove the wire guide. Caution: Blanching of the site indicates excessive pressure on the mucosa and should be avoided. 21. S lide the bolster onto the tube and toward the skin surface. (See fig. 6) The hemostats provided with the kit may be used to facilitate placement of the bolster over the PEG tube. Note: Antiseptic ointment may be applied to the surrounding tissue prior to sliding the bolster into position. Warning: The bolster should sit close to the skin but not tight against the skin. Excessive traction on the tube may cause premature removal, fatigue or failure of the device. 22. Cut the tube at the X mark. 23. S ecure the twist lock or cable tie around the bolster collar, being careful not to crimp it. Important: Use the twist lock or cable tie to secure the bolster to the tube. This will help prevent future migration of the tube and reduce the need to constantly reposition or pull on the tube. 24. C ut off the excess length of the cable tie (if applicable) using the scissors provided. 25. If desired, slide the tubing clamp onto the tube leaving a gap between bolster and tubing clamp. 14. Avance a ponta do dilatador sobre o fio-guia e pela boca do paciente. (Consulte a fig. 4) Observação: Tensão firme em ambas as extremidades do fio-guia facilitará a passagem pela orofaringe. 15. Quando a extremidade do dilatador atingir a cânula no estômago, empurre o dilatador pela parede abdominal. Observação: Manter o fio-guia sob tensão auxiliará nesse processo. 16. Após a extremidade cônica do dilatador passar pela parede abdominal, libere o fio-guia e puxe gentilmente o tubo e o fio-guia pela parede abdominal. 17. Quando a saliência interna do tubo de PEG entrar na boca, introduza novamente o gastroscópio e visualize a ponta conforme ela avança pelo esôfago e para dentro do estômago. Monitore o paciente em busca de dificuldades respiratórias conforme avança a saliência interna pelo esôfago. (Consulte a fig. 5) 18. Mantendo incrementos de centímetros, puxe lentamente a porção dilatada do tubo pela incisão abdominal. 19. Coloque a saliência interna em contato com a parede abdominal, evitando cuidadosamente excesso de tensão. 20. Aplique pressão suave na parte da sonda de alimentação que está saindo e remova o fioguia. Cuidado: Palidez no local indica pressão excessiva da mucosa e deve ser evitada. 21. Deslize o suporte no tubo em direção à superfície da pele. (Consulte a fig. 6) Os hemostatos fornecidos com o kit devem ser usados para facilitar a colocação do suporte sobre o tubo de PEG. Observação: Uma pomada antisséptica pode ser aplicada no tecido circundante antes de deslizar o suporte para a posição. Advertência: O suporte deve ficar próximo à pele, mas não apertado sobre ela. Tração excessiva do tubo pode causar remoção prematura, desgaste ou falha do dispositivo. 22. Corte o tubo na marca de X. 23. Prenda a trava de torção ou a amarra ao redor do aro do suporte, tomando cuidado para não dobrá-lo. Importante: Use a trava de torção ou a amarra para prender o suporte ao tubo. Isso ajudará a impedir migração futura do tubo e reduzirá a necessidade de reposicionamento constante ou tração no tubo. 24. Corte o comprimento em excesso da amarra (se aplicável) usando a tesoura fornecida. 25. Se desejar, deslize o clamp de tubulação no tubo deixando um espaço entre o suporte e o clamp de tubulação. 26. Conecte o adaptador desejado (universal ou bolus) e feche as tampas. (Consulte a fig. 7) Observação: O adaptador deve ser preso ao tubo com uma amarra. 27. Observe a marca de centímetro no tubo mais próxima ao suporte e registre-a no prontuário do paciente e na folha de informação do paciente no manual de cuidados do paciente. Observação: O manual de cuidados do paciente incluso no kit serve como referência para cuidadores do paciente. É essencial que o manual de cuidados do paciente acompanhe o paciente e seja explicado a todas as pessoas responsáveis por cuidar do paciente. 28. Descarte os materiais restantes do kit de acordo com as diretrizes institucionais para descartes médicos de risco biológico. 29. Registre as instruções do médico para alimentação e administração de medicamentos prescritos no manual de cuidados do paciente.