1
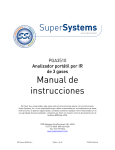
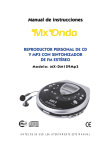
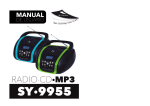
MANUAL DE INSTRUCCIONES Radio-Reproductor de CD SX-2124C ESTIMADO CLIENTE Con el fin de que obtenga el mayor desempeño de su producto, por favor lea este manual de instrucciones cuidadosamente antes de comenzar a utilizarlo, y guárdelo para su futura referencia. Si necesita soporte adicional, no dude en escribir a: [email protected] 1 INSTRUCCIONES IMPORTANTES DE SEGURIDAD ADVERTENCIA: PARA PREVENIR PELIGRO DE INCENDIO O DE ELECTROCUCIÓN NO USE ESTE ENCHUFE CON UN CABLE DE EXTENSION, RECEPTÁCULO U OTRA TOMA DE CORRIENTE A MENOS QUE LAS HOJAS PUEDAN SER TOTALMENTE INSERTADAS PARA PREVENIR EXPOSICIÓN DE LAS HOJAS. PARA PREVENIR PELIGRO DE INCENDIO O DE ELECTROCUCIÓN NO EXPONGA ESTE APARATO A LLUVIA O HUMEDAD. LÍNEAS DE SERVICIO AL CLIENTE PREMIER Venezuela: Colombia: Panamá: Sitio Web: E-mail: 0800 – ELECTRIC (353-2874) 01-900-331-PEJC (7352) 300-5185 www.premiermundo.com [email protected] NOTA Nos reservemos el derecho de modificar las especificaciones, características y/u operación de esta unidad sin previo aviso, con el fin de continuar las mejoras y desarrollo del mismo. 1. 2. 3. 4. 5. 6. 7. Lea estas instrucciones. Guarde estas instrucciones. Tenga en cuenta todas las advertencias. Siga todas las instrucciones. No use este aparato cerca del agua. Limpiar sólo con un trapo seco. No bloquear ninguna apertura de ventilación. Instalar de acuerdo con las instrucciones de fabricación. 8. No instalar cerca de fuentes de calor como radiadores, calentadores, estufas, u otros aparatos (incluidos los amplificadores) que produzcan calor. 9. No frustre la finalidad de seguridad del tipo de clavija polarizada o básica. Una clavija polarizada tiene dos hojas con una más ancha que la otra. Un tipo de clavija básica tiene dos hojas y un tercer diente básico. La hoja ancha o el tercer diente son incluidos para su seguridad. Si la clavija proporcionada no cabe en su salida, consulte con un electricista para reemplazar la salida obsoleta. 10. Proteja el cable de corriente de ser pisado o pinchado particularmente en las clavijas, receptáculos de conveniencia, y en el punto donde sale del aparato. 11. Use sólo extras/accesorios especificados por el fabricante. 12. Desenchufe el aparato durante tormentas o cuando no lo vaya a usar durante un tiempo. 13. Remita todas las reparaciones a personal cualificado. Se requiere reparación cuando el aparato ha sido dañado en cualquier forma, como por ejemplo si el cable de corriente o la clavija están dañados, si se ha derramado líquido o han caído objetos en el aparato, el aparato ha sido expuesto a lluvia o humedad, no funciona normalmente, o se ha dejado caer. 14. Este aparato no debe ser expuesto a goteo o salpicaduras de agua, ni objetos llenos de líquidos como jarrones deben ser colocados encima del aparato. Advertencia de goteo: Los productos no deben ser expuestos a goteo o salpicaduras, ni objetos llenos de líquidos, como por ejemplo jarrones, deben ser colocados encima del aparato. Advertencia de ventilación: La ventilación normal del producto no debe ser bloqueada para el uso. P-1 2 NOMBRES DE LOS CONTROLE 1. MANIJA PLEGABLE 2. COMPARTIMENTO DE CD 3. INDICADOR DE PROGRAMA 4. INDICADOR DE POTENCIA 5. PANTALLA DEL LED 6. INDICADOR FM ESTÉREO 7. INDICADOR DE REPEAT 8. BOTÓN DE BASS BOOST 9. BOTÓN 'PROGRAM' (PROGRAMA) DEL CD 10. BOTÓN 'SKIP/SEARCH BACKWARD' (SALTAR ATRÁS) DEL CD 11. BOTÓN 'REPEAT' (REPETIR) DEL CD 12. BOTÓN ALEATORIO CD 13. BOTÓN 'SKIP/SEARCH FORWARD' (SALTAR ADELANTE)DEL CD 14. 15. ALTAVOZ BOTÓN 'PLAY/PAUSE' (REPRODUCCIÓN/PAUSA) DEL CD 16. BOTÓN 'STOP' (PARAR) DEL CD 17. SELECTOR DE BANDA 18. FM ANTENA TELESCÓPICA 19. BOTÓN DE FUNCIÓN 20. ESCALA DE DIAL 21. CONTROL DE SINTONÍA ('TUNING') 22. CONTROL DE VOLUMEN 23. ENTRADA AC 24. COMPARTIMENTO DE BATERÍAS 25. TOMA AUX/MP3-IN 26. SELECTOR DE VOLTAJE (VERSIÓN DE VOLTAJE DUAL) 27. PUERTA 'OPEN/CLOSE' (ABRIR/ CERRAR) DEL CD 28. CONECTOR DC 9V P-2 2 INTRODUCCIÓN: Gracias por comprar este producto. Por favor lea estas instrucciones de uso, así sabrá cómo utilizar su equipo apropiadamente. Cuando termine de leer el manual de instrucciones, póngalo en lugar seguro para futuras referencias. PRECAUCIÓN: No obstruya las aperturas de ventilación o ranuras. No coloque fuentes inflamables, tales como velas encendidas sobre el equipo. Cuando cambie las pilas, debe considerar los problemas medioambientales y se debe seguir estrictamente las reglas o leyes locales para deshacer de estas pilas. Radicación láser invisible al abrir o, si se producen fallos en el sistema de bloqueo. Evite la exposición directa al haz láser. Para evitar el riesgo de fuego o descargas eléctricas, no exponga la unidad a la lluvia o humedad. NOTA: El fabricante no se hace responsable de cualquier interferencia de radio o TV causada por modificaciones no autorizadas que puedan impedir la autoridad del usuario para manejar el equipo. IMPORTANTE PARA PRODUCTOS LÁSER REPRODUCCIÓN DE ETIQUETAS 1. ETIQUETA DE CLASIFICACIÓN, SITUADA EN EL RECINTO TRASERO. 2. ETIQUETA DE AVISO, SITUADA DENTRO DE LA UNIDAD. PRECAUCIÓN: No abra la unidad. No hay partes que puedan ser reparadas por el usuario dentro de la unidad; consulte todas las intervenciones a personal de servicio cualificado. Discos que se pueden reproducir Este sistema puede reproducir cualquier CD de audio digital, discos de audio digital CD-Grabable (CD-R) finalizados, discos de audio digital CD-Regrabable (CD-RW) finalizados y discos de audio digital CD/CD-R/CD-RW de formato CD-DA. FUENTE DE ENERGÍA Esta unidad está diseñada para ser manejada en AC/DC. FUNCIONAMIENTO AC Conecte el extremo más pequeño del cable AC en la clavija AC de la unidad y el otro extremo más grande en la salida AC de la pared. Las baterías se desconectarán automáticamente. FUNCIONAMIENTO DC Abra la PUERTA DEL COMPARTIMENTO DE LAS BATERÍAS. Instale 6 baterías pcs UM-2/C (no incluidas) en el compartimento. Por favor, siga correctamente las polaridades como se indica. PRECAUCIÓN Retire las baterías si están gastadas o sin usar por un largo periodo de tiempo. Las baterías contienen sustancias químicas, así que deben ser desechadas de manera adecuada. P-3 3 FUNCIONAMIENTO BÁSICO ENCENDER LA UNIDAD Ponga el interruptor 'FUNCTION' (funcionamiento) en CD/AUX/MP3-IN o 'TUNER' (INTONÍA). AJUSTAR EL VOLUMEN Rote el 'VOLUME CONTROL' (control de volumen) hacia atrás o delante para subir y bajar el volumen. SONIDOS GRAVES Presione el botón BASS BOOST para reproducir los sonidos más graves, púlselo nuevamente para desactivar los graves. OERACÓN DEL CONECTOR AUX/MP3-IN Esta unidad tiene incorporado un conector AUX/MP3-IN, a travé del cual otras fuentes de audio pueden ser conectadas para ser amplificadas. 1. Ajuste el selector de función en posición CD/AUX/MP3-IN. 2. Conecte el cable de audio en el conector AUX/MP3-IN y el otro extreme en la salida de audio de su dispositivo externo, la unidad cambiará al modo de conector AUX automáticamente. 3. Ajuste el volumen de la unidad principal al volumen deseado. 4. Presione PLAY en el dispositivo externo,(Ej, Reproductor MP3) para iniciar la reproducción. FUNCIONAMIENTO DE LA RADIO SINTONIZACIÓN DE EMISORAS DE RADIO 1. Mueva el SELECTOR DE FUNCIÓN a la posición 'TUNER' (INTONÍA) El indicador 'POWER' (energía) se encenderá. 2. Deslice el SELECTOR DE BANDA para seleccionar la banda: AM, FM ST. 3. Sintonice la emisora deseada girando el botón de la sintonía. 4. Ajuste el CONTROL DE VOLUMEN al nivel de volumen deseado. 5. Extienda totalmente la ANTENA TELESCÓPICA si está escuchando una emisora de FM. Si está escuchando una señal de AM deberá girar su unidad hasta obtener una buena recepción, o colocar el equipo en un lugar abierto. Nota: El indicador 'FM STEREO' estará encendido cuando reciba programación en FM estéreo. 6. Apague la radio deslizando el SELECTOR DE FUNCIÓN a la posición "OFF" de la unidad. ESCUCHAR DISCOS COMPACTOS Mueva el REGULADOR DE FUNCIÓN a la posición “ CD/AUX/MP3-IN ”. Oprime el botón ABRIR/CERRAR para abrir la bandeja CD a fin de poner un disco compacto. Cierre la bandeja y el aparato empezará a leer. El indicador LED siempre muestra las pistas del disco a leer. Leer el Disco Entero 1. Presione el botón LEER/PAUSAR para comenzar la reproducción. La reproducción comenzará con la pista 1, se iluminará el indicador LEER/PAUSAR en el ángulo inferior derecho del visor. Para interrumpir la reproducción, presione el botón LEER/PAUSAR. Para retomar la reproducción, presione el botón LEER/PAUSAR nuevamente. 2. Para detener la reproducción, presione el botón STOP. P-4 4 Seleccionar una Pista Diferente durante la Lectura 1. Oprime sin cesar los botones SALTAR/BUSCAR HACIA ADELANTE/ATRÁS DE CD en el aparato hasta el número de la pista que quiere aparezca en la pantalla. 2. Empieza a leer desde la pista que quiere. (Oprime el botón LEER/PAUSAR CD para empezar la lectura en el modo parado). Repetir la pista que está leyendo 1. Oprime una vez el botón SALTAR/BUSCAR HACIA ATRÁS DE CD. 2. Empezará a leer desde el inicio de la pista. Buscar la lectura 1. Oprime y no deje libre el botón SALTAR/BUSCAR HACIA ADELANTE DE CD para que lea rápidamente hacia adelante el CD. Empezará a leer el CD desde el punto donde libere el botón. 2. Oprime y no deje libre el botón SALTAR/BUSCAR HACIA ATRÁS DE CD para que lea rápidamente hacia atrás el CD. Empezará a leer el CD desde el punto donde libere el botón. Terminar la lectura 1. Oprime el botón PARAR CD si quiere terminar la lectura. El número total de las pistas que puede leer aparecerá en la pantalla. 2. Abra la bandeja CD en el aparato para sacar el CD. REPETICIÓN DE LA REPRODUCCIÓN Cuando este reproduciendo, presione el boton de REPETIR una vez. EI INDICADOR DE REPETIR se encenderá e intermitirá para reproducción de la misma pista solamente. Si quiere repetir todas las pistas, presione el boton de REPETIR de Nuevo, el INDICADOR DE REPETIR se encendera. Para cancelar la reproducción de repetir, presione el boton de REPETIR hasta que el indicador desaparezca. PROGRAMAR CANCIONES 1. 2. 3. 4. 5. 6. 7. 8. 9. Pulsar “PROGRAM” para colocar el programa de memoria en el modo stop. “01” aparecerá parpadeando en el visualizador. El indicador de programas se encenderá parpadeará. Pulsar SALTAR CD HACIA ARRIBA/ABAJO para seleccionar un número de canción. Pulsar el botón “PROGRAM” para guardar el número de canción. “02” y el indicador de programas parpadearán de muevo. Repetir los pasos del (3) al (4) para programar las pistas seleccionadas. El total de programas disponibles es de 20. Después de finalizar la programación pulsar el botón “PROGRAM” una vez más y aparecerán todos los números de las pistas uno por uno. Pulsar LEER/PAUSAR CD y se empezará a escuchar la primera canción programada. Para seleccionar otras pistas guardas en la memoria pulsar el botón SALTAR CD HACIA ARRIBA/ABAJO. En el modo stop plsar STOP para cancelar la programación y el indicador se apagara. REPRODUCCION ALEATORIA Pulse el botón RANDOM en CD de reproducción / modo de parada, el número de pista actual y "- -" va a parpadear una y otra vez. Y a continuación, pulse el CD PLAY/PAUSE. La reproducción se iniciará desde cualquier pista (no en el orden del disco). Para cancelar la función, pulse el botón RANDOM de nuevo. P-5 5 MANTENIMIENTO DE DISCO COMPACTO 1. Siempre use un disco compacto con la marca establecida. 2. Notas de como manejar discos: Remueva el disco de su compartimiento y coloquelo. No toque la superficie donde se ha grabado. No pegue papel o escriba en la superficie. No doble el disco. 3. Guardar Guarde el disco en su caja. No exponga su disco a la luz solar directa o a altas temperaturas, alta humedad o lugares polvosos. 4. Limpiando un Disco El disco debe ser limpiado de polvo, tierra, o huellas con un paño suave. El disco debe ser limpiado del centro a la orilla. CORRECTO INCORRECTO DESDE EL CENTRO A LOS BORDES Nunca use Benzeno, tinner, fluidos limpiadores de discos, o aerosoles anti estaticos. Asegurese de cerrar la puerta del CD, para que el lente no se contamine con polvo. No toque el lente. P-6 6 ESPECIFICACIONES SECCIÓN CD Requerimiento de Poder Consumo de Poder Peso Dimensiones de la Unidad Temperatura ca 110/220V (Seleccionable) o 120/220V (Seleccionable) o 120/230V (Seleccionable) o 127/220V (Seleccionable) o 110V o 220V o 230V o 240V (LA POTENCIA AC EXACTA PUEDE SER REVISADA EN LA PLACA POSTERIOR DE LA UNIDAD) DC 9V UM-2 x 6 AC 14 Watts 1.5 Kg Aprox.235mm (L) x 220 mm (W) x 130mm (H) +5°C - + 35°C RECEPCION Bandas de Recepcion Rango de Sintonia AM/FM AM 540 – 1600 KHz FM 88 – 108MHz SECCION DEL DISCO COMPACTO Lector Optico Frecuencia de Respuesta 3- Haz de Laser 100 Hz – 16 KHz SECCION DE AUDIO Potencia de Salida (Unidad Principal) Maximo 1.2Watts x 2 ACCESORIOS Manual de Instrucciones Cable AC Cable Conector AUX/MP3 1 1 1 Nota: Las especificaciones están sujetas a cambios por continuas mejoras sin previo aviso. P-7 7 INSTRUCTION MANUAL PORTABLE CD PLAYER WITH STEREO RADIO SX-2124C DEAR CUSTOMER In order to achieve the best performance of your product, please read this instruction manual carefully before using, and keep it for future reference. If you need extra support, please write to [email protected] 3 WARNING: IMPORTANT SAFETY INSTRUCTIONS TO PREVENT FIRE OR SHOCK HAZARD DO NOT USE THIS PLUG WITH AN EXTENSION CORD, RECEPTACLE OR OTHER OUTLET UNLESS THE BLADES CAN BE FULLY INSERTED TO PREVENT BLADE EXPOSURE. TO PREVENT FIRE OR SHOCK HAZARD. DO NOT EXPOSE THIS APPLIANCE TO RAIN OR MOISTURE. PREMIER CUSTOMER SERVICE Venezuela: Colombia: Panama: Website E-mail: 0800 – ELECTRIC (353-2874) 01-900-331-PEJC (7352) 300-5185 www.premiermundo.com [email protected] NOTE This unit may be submitted to changes in specifications, characteristics and/or operation without prior notice to the user, in order to continue improving and developing its technology. 1. 2. 3. 4. 5. 6. 7. 8. Read these instructions. Keep these instructions. Heed all warnings. Follow all instructions. Do not use this apparatus near water. Clean only with dry cloth. Do not block any ventilation openings. Install in accordance with the manufactures instructions. Do not install near any heat sources such as radiators, heat registers, stoves, or other apparatus (including amplifiers) that produce heat. 9. Do not defeat the safety purpose of the polarized or grounding type plug. A polarized plug has two blades with one wider than the other. A grounding type plug has two blades and a third grounding prong. The wide blade or the third prong is provided for your safety. If the provided plug does not fit into your outlet, consult an electrician for replacement of the obsolete outlet. 10. Protect the power cord from being walked on or pinched particularly at the plugs, convenience receptacles, and at the point where it exits from the apparatus. 11. Only use attachments/accessories specified by the manufacturer. 12. Unplug the apparatus during lightening storms or when unused for long periods of time. 13. Refer all servicing to qualified personnel. Servicing is required when the apparatus has been damaged in any way, such as power supply cord or plug is damaged, liquid has been spilled or objects have fallen into the apparatus, the apparatus has been exposed to rain or moisture, does not operate normally, or has been dropped. 14. This appliance should not be exposed to dripping or splashing water and no objects filled with liquids such as vases should be placed on apparatus. Dripping warning: The products should not be exposed to dripping or splashing and that no objects filled with liquids, such as vases, shall be placed on the product. Ventilation warning: The normal ventilation of the product should not be impeded for intended use. P-1 4 NAMES OF CONTROLS 1. FOLDING HANDLE 2. CD COMPARTMENT 3. CD PROGRAM INDICATOR 4. POWER INDICATOR 5. LED DISPLAY 6. FM STEREO INDICATOR 7. CD REPEAT INDICATOR 8. BASS BOOST BUTTON 9. CD PROGRAM BUTTON 10. CD SKIP/SEARCH BACKWARD BUTTON 11. CD REPEAT BUTTON 12. CD RANDOM BUTTON 13. CD SKIP/SEARCH FORWARD BUTTON 14. SPEAKERS 15. CD PLAY/PAUSE BUTTON 16. CD STOP BUTTON 17. BAND SELECTOR 18. FM TELESCOPIC ANTENNA 19. FUNCTION SWITCH 20. DIAL SCALE 21. TUNING CONTROL 22. VOLUME CONTROL 23. AC SOCKET 24. BATTERY COMPARTMENT 25. AUX/MP3-IN JACK 26. AC VOLTAGE SELECTOR (For dual voltage version only) 27. CD DOOR PUSH TO OPEN 28. DC 9V JACK P-2 5 INTRODUCTION Thank you for purchasing this product. Please read through these operating instructions, so you will know how to operate your equipment properly. After you finished reading the instructions manual, put it away in a safe place for future reference. CAUTION: Do not block the ventilation openings or holes. Do not place any naked flame sources, such as lighted candles, on the apparatus. When discarding batteries, environmental problems must be considered and local rules or laws governing the disposal of these batteries must be followed strictly. Invisible laser radiation when open and interlock failed or defeated. Avoid direct exposure to beam. To prevent fire or shock hazard, do not expose this appliance to rain or moisture. NOTE: The manufacturer is not responsible for any radio or TV interference caused by unauthorized modifications could void the user's authority to operate the equipment. IMPORTANT FOR LASER PRODUCTS REPRODUCTION OF LABELS 1. CLASSIFICATION LABEL, PLACED ON REAR ENCLOSURE. 2. WARNING LABEL, PLACED INSIDE THE UNIT. CAUTION: Do not open the unit. There are no user serviceable parts inside the unit; consult all servicing to qualified service personnel. Discs for Playback This system can playback all digital audio CD, finalized digital audio CD-Recordable (CD-R) discs, finalized digital audio CD-Rewritable (CD-RW) discs and CD-DA format digital audio CD/CD-R/CD-RW discs. POWER SOURCE This unit is designed to be operated on AC/DC. AC OPERATION Plug the smaller end of AC power cord into AC jack on unit and the other bigger end into AC wall outlet. The batteries will be automatically disconnected. DC OPERATION Open the BATTERY COMPARTMENT DOOR. Install 6 pcs UM-2/C size batteries (not included) into compartment. Please follow correct polarities as indicated. CAUTION Remove batteries if they are flat or not being used for a long period of time. Batteries contain chemical substances, so they should be disposed of properly. P-3 4 BASIC FUNCTION SWITCHING ON THE UNIT Set the FUNCTION switch to CD/AUX/MP3-IN or TUNER. TO ADJUST VOLUME Rotate the VOLUME CONTROL back and forth to increase and decrease volume. BASS BOOST SYSTEM For more extra bass, press the BASS BOOST button. Press again to turn off bass. AUX/MP3-IN OPERATION This unit has provided special AUX/MP3-IN jack, through this jack other audio sources can be connected to this unit and be amplified. 1. Set the FUNCTION switch to CD/AUX/MP3-IN position. 2. Connect the audio cable into the AUX/MP3-IN jack and the other end connect to the AUDIO OUT jack of the external audio source. The unit will change to AUX mode automatically. 3. Adjust the volume of the main unit to your desired level. Press PLAY of the external audio source (eg. MP3 player) to start playback. USING THE RADIO TUNING IN RADIO STATIONS 1. 2. 3. 4. 5. Move the FUNCTION switch to TUNER position, the POWER indicator will illuminate. Slide the BAND switch to select the desired wave band: AM/FM.ST.. Tune to required station by rotating the TUNING KNOB. Rotate the VOLUME CONTROL to comfortable volume level. Extend the TELESCOPIC ANTENNA to its full length if you are listening to FM broadcasting. Gently rock the unit back and forth to get the best reception when you are listening to AM program, or place the unit in an open place. Note: The FM STEREO indicator will be on if you are receiving FM stereo program. 6. Turn off the radio by switching the FUNCTION switch to "OFF" position. LISTENING TO COMPACT DISC Set the FUNCTION SWITCH to “CD/AUX/MP3-IN” position. Press the CD door PUSH TO OPEN to open the CD door to put in a compact disc. Close it and start reading. The LED display always shows the tracks of a disc which are still to be played. Playing The Entire Disc 1. Playback will start by pressing CD PLAY/PAUSE button, playback starts with the first track. The display will show the current track number. 2. To interrupt playback, press CD PLAY/PAUSE button. 3. To resume playback, press CD PLAY/PAUSE button once again. 4. To stop playback, press CD STOP button. Selecting A Different Track During Play 1. Press CD SKIP SEARCH FORWARD/BACKWARD button on the unit continuously until the desired track number appears in the display. 2. Playback starts from the desired track. (Press CD PLAY/PAUSE button to start playback in stop mode). P-4 5 Starting Again With the Track That Is Currently Playing 1. Press CD SKIP SEARCH BACKWARD button once. 2. The playback will start again from the beginning of the track. Searching Play 1. Press and hold the CD SKIP/SEARCH UP button for CD fast forward. The CD play will start from when you release the button. 2. Press and hold the CD SKIP/SEARCH DOWN button for CD fast backward. The CD play will start from when you release the button. Stopping Play 1. Press CD STOP button if you wish to stop play. The total track number which can be played will now appear in the display. 2. Open the CD door on the unit to remove the CD. REPEAT PLAY When playing, press REPEAT button once. REPEAT INDICATOR will light up and flash for playing the same track only. If repeat all tracks, press the REPEAT button again, REPEAT INDICATOR will light up. To cancel repeat play, press the REPEAT button until the repeat indicator disappears. PROGRAM PLAY 1. Press “PROG” button to make program memory in stop mode. 2. “ 01 ” will be shown flashing on the display, Program indicator will light up and flash. 3. Press CD SKIP SEARCH FORWARD/BACKWARD button to select a track number. The track number will show on display. 4. Press the “PROG” button to store the track number. 5. “ 02 ” flashes again. Repeat step (3) to (4) to program other desired tracks. 6. Press “PROG” button once more after 20 track in programmed and all the programmed track numbers will be shown one by one 7. Press CD PLAY/PAUSE button, playback will start from the first programmed track. 8. You can press CD SKIP SEARCH FORWARD/BACKWARD button to select the track number in memory. 9. In stop mode, press STOP button to cancel the program play and the program indicator will disappear. RANDOM PLAY Press the CD RANDOM button in Play/Stop mode, the current track number and“- - ” will flashing again and again. And then press the CD PLAY/PAUSE button. Playback will start from any one track (not in the order of the disc). To cancle the RANDOM, press the RANDOM button again. P-5 6 COMPACT DISC MAINTENANCE 1. Always use a compact disc bearing the mark as shown. 2. Notes on handing discs Removing the disc from its storage case and loading it. Do not touch the reflective recorded surface. Do not stick paper or write anything on the surface. Do not bend the disc. 3. Storage Store the disc in its case. DO not expose discs to direct sunlight or high temperatures, high humidity or dusty places. 4. Cleaning a disc Should the disc become soiled, wipe off dust, dirt and fingerprints with a sort cloth. The disc should be cleaned from the center to the edge. Never use benzene, thinners, record cleaner fluid or anti-static spray. Be sure to close the CD door, so the lens is not contaminated by dust. Do not touch the lens. P-6 7 SPECIFICATIONS GENERAL Power Requirement Power Consumption Weight Dimensions Operation Temperature AC 110/220V (Selectable) or 120/220V (Selectable) or 120/230V (Selectable) or 127/220V (Selectable) or 110V or 220V or 230V or 240V (YOUR EXACT AC POWER CAN BE CHECKED FROM THE BACK PLATE OF UNIT) DC 9V UM-2 x 6 AC 14 Watts 1.5 kg Approx.235mm (L) x 220 mm (W) x 130mm (H) +5°C +35° C RECEIVER SECTION Receiving Bands Tuning Range AM/FM AM 540 - 1600 KHz FM 88 - 108 MHz COMPACT DISC SECTION Optical Pickup Frequency Response 3-Beam Laser 100Hz - 16KH z AUDIO SECTION Power Output 1.2 Watts x 2 ACCESSORIES Instruction Booklet AC Cord AUX/MP3-IN CONNECTOR CABLE 1 1 1 Specifications are subject to change for continuous improvement, we reserve the right to modification without prior notice. 8 P-7 P-8 P-9