1
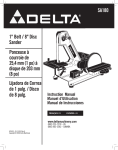
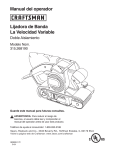
WP107B ManualENSP 050108.qxp
6/24/2008
9:13 AM
Page 4
Controles y características
• Maintain tools with care. Keep cutting tools sharp and clean. Properly maintained tools, with sharp cutting esges are less likely to
bind and are easier to control.
• Check for misalignment or binding of moving parts, breakage of parts and any other condition that may affect the tool’s
operation. If damaged, have the tool services before using. Many accidents are caused by poorly maintained tools.
• Use only accessories that are recommended by the manufacturer for your model. Accessories that may be suitable for one tool
may become hazardous when used on another tool.
Almacenamiento
Almacene la enceradora con la "almohadilla hacia arriba" para evitar que ésta se comprima o se coloque en una posición incorrecta.
Servicio Técnio
All Black & Decker Service Centers are staffed with trained personnel to provide customers with efficient and reliable power tool service.
Whether you need technical advice, repair, or genuine factory replacement parts, contact the Black & Decker location nearest you. To
find your local service location, refer to the yellow page directory under "Tools—Electric" or call: 1-800-544-6986 or visit
www.blackanddecker.com.
LLAVE
TUERCA DE RETENCIÓN COJÍN BAJO
VISTAS SUPERIORES Y
LATERALES
EJE DEL PERNO
ACCESORIOS
Los accesorios de repuesto están disponibles en su distribuidor local o centro de mantenimiento autorizado. Si necesita asistencia en
relación con los accesorios, llame al: 1-800-544-6986.
ADVERTENCIA: El uso de accesorios no recomendados para utilizar con esta herramienta puede ser peligroso.
COLOCACIÓN AUXILIAR DE
LA MANIJA (AGUJERO
IZQUIERDO DEMOSTRADO - LOS
AGUJEROS ADICIONALES PARA LA
COLOCACIÓN SE LOCALIZAN EN EL
DERECHO SUPERIOR Y DE LA
UNIDAD)
CERRADURA DEL
DISPARADOR (BOTÓN)
Y DISPARADOR CON./
DESC. (EN MANIJA)
• Tool service must be performed only by qualified repair personnel. Service or maintenance performed by unqualified personnel
could result in a risk of injury.
• When servicing a tool, use only identical replacement parts. Follow instructions in the “Maintenance” section of this manual.
Use of unauthorized parts or failure to follow Maintenance instructions may create a risk of electric shock or injury.
SPECIFIC SAFETY RULES AND/OR SYMBOLS
• Accessories must be rated for at least the speed recommended on the tool warning label. Wheels and other accessories running
over rated speed can fly apart and cause injury.
• Hold tool by insulated gripping surfaces when performing an operation where the cutting tool may contact hidden wiring or its own
cord. Contact with a "live" wire will make exposed metal parts of the tool "live" and shock the operator.
WARNING: Read all instructions before operating product. Failure to follow all instructions listed below may result in electric shock,
fire and/or serious injury.
• GROUND FAULT CIRCUIT INTERRUPTER (GFCI) protection should be provided on the circuits or outlets to be used. Receptacles are
available having built in GFCI protection and may be used for this measure of safety.
• EXTENSION CORDS. Make sure your extension cord is in good condition. When using an extension cord, be sure to use one heavy
enough to carry the current your product will draw. An undersized cord will cause a drop in line voltage resulting in loss of power and
overheating. The accompanying table shows the correct size to use depending on cord length and nameplate ampere rating. If in
doubt, use the next heavier gage. The smaller the gage number, the heavier the cord.
GARANTÍA COMPLETA DE DOS AÑOS PARA USO EN EL HOGAR
Black & Decker (Estados Unidos) Inc. ofrece una garantía de dos años por cualquier defecto del material o de fabricación de este
producto. El producto defectuoso se reparará o reemplazará sin costo alguno de dos maneras.
La primera opción, el reemplazo, es devolver el producto al comercio donde se lo adquirió (siempre y cuando se trate de un comercio
participante). Las devoluciones deben realizarse conforme a la política de devolución del comercio (generalmente, entre 30 y 90 días
posteriores a la venta). Le pueden solicitar comprobante de compra. Consulte en el comercio acerca de la política especial sobre
devoluciones una vez excedido el plazo establecido.
La segunda opción es llevar o enviar el producto (con flete pago) a un Centro de mantenimiento propio o autorizado de Black & Decker
para su reparación o reemplazo según nuestro criterio. Le pueden solicitar comprobante de compra. Encontrará una lista de los Centros
de mantenimiento autorizados y de propiedad de Black & Decker bajo "Herramientas eléctricas" (Tools-Electric) en las páginas amarillas
de la guía telefónica y también en nuestro sitio Web www.blackanddecker.com.
Esta garantía no se aplica a los accesorios. Esta garantía le concede derechos legales específicos; usted puede tener otros derechos que
pueden variar según el estado o la provincia. Si tiene alguna pregunta, comuníquese con el Centro de mantenimiento de Black & Decker
más cercano. Este producto no está diseñado para uso comercial.
REEMPLAZO GRATUITO DE LAS ETIQUETAS DE ADVERTENCIA: Si las etiquetas de advertencia se tornan ilegibles o faltan, llame al 1800-544-6986 para reemplazarlas gratuitamente.
AUXILIARY HANDLE
DIAL DE CONTROL DE
LA VELOCIDAD
SERVICE
VARIABLE SPEED SANDER/POLISHER
INSTRUCTION MANUAL
CAPUCHA DE
ENCERADO/PULIDO
GUÍA DE USO GENERAL
PRECAUCIÓN: PARA REDUCIR EL RIESGO DE LESIONES PERSONALES O DAÑO A LA PROPIEDAD:
• ASEGÚRESE QUE EL LUSTRADOR INDICA “APAGADO” ANTES DE ENCHUFAR A LA CORRIENTE ELÉCTRICA.
• Coloque el cable de alimentación sobre su hombro para evitar el contacto con el cabezal de la pulidora o la superficie mientras la
unidad está en funcionamiento.
• Siempre encienda y apague la lijadora/pulidora sobre o contra la superficie de trabajo. Si ENCIENDE la lijadora/pulidora sin que la
capucha aplicadora o la almohadilla de lijado toque la superficie de trabajo, la capucha o la almohadilla de lijado puede desprenderse y
provocar lesiones o daños a la propiedad. Asegúrese de que la lijadora/pulidora con la capucha bien conectada se apoye suavemente
en todo momento sobre la superficie que desea pulir, cuando el interruptor de encendido/apagado está en la posición de ENCENDIDO
(o el bloqueador del interruptor está trabado).
• Utilice sólo las capuchas provistas por el fabricante con esta unidad.
Interruptor de encendido/apagado y bloqueador del interruptor
ESPECIFICACIONES
Potencia:
Voltaje:
Velocidad:
Diámetro clasificado máximo de la almohadilla:
Longitud del cable:
Catalog Number WP107B
Importado por:
Black & Decker (U.S.) Inc.,
701 E. Joppa Rd.
Towson, MD 21286 EE. UU.
120V
More
Than
0 6 10 12 -
BEFORE YOU CALL, HAVE THE CATALOG No, AND DATE CODE AVAILABLE. IN MOST CASES,
A BLACK & DECKER REPRESENTATIVE CAN RESOLVE THE PROBLEM OVER THE PHONE. IF
YOU HAVE A SUGGESTION OR COMMENT, GIVE US A CALL. YOUR FEEDBACK IS VITAL TO
BLACK & DECKER.
Presione el interruptor de encendido/apagado para ENCENDER la unidad. Libérelo para APAGARLA.
Para bloquear la unidad en la posición de ENCENDIDO, presione el interruptor de encendido/apagado y el bloqueador del interruptor al
mismo tiempo.
Al presionar nuevamente el interruptor de encendido/apagado (con el bloqueador del interruptor trabado) se libera el bloqueador del
interruptor y la unidad se APAGA.
Dial de control de velocidad
SAVE THIS MANUAL FOR FUTURE REFERENCE.
El dial de control de velocidad tiene 6 posiciones (numeradas de 1 a 6 en el dial) que le permiten aumentar o disminuir la velocidad
entre 1.000 y 3.000 RPM. La velocidad óptima para cada aplicación depende de la superficie de trabajo y de las preferencias personales;
sin embargo, el fabricante recomienda utilizar las velocidades más bajas (de 1 a 3) para encerar o pulir y las velocidades más altas (de 4
a 6) para lijar.
Como norma general, al lijar generalmente preferirá una velocidad más alta para los materiales más duros y una velocidad más baja
para los materiales más suaves. Se recomienda también que pruebe primero en una pieza de descarte del mismo material que la
superficie de trabajo para determinar cuál es la mejor combinación de calidad de acabado y tasa de remoción para su aplicación.
Cat. # WP107B
May 2008
ASAMBLEA
MONTAJE DE LA UNIDAD
1. ASEGÚRESE DE QUE LA UNIDAD ESTÉ APAGADA Y DESCONECTADA DE CUALQUIER FUENTE DE ENERGÍA.
2. Para conectar el mango auxiliar, atorníllelo en el orificio deseado (superior, izquierdo o derecho).
3. Seleccione la almohadilla de lijado de 178 mm (7") (no incluida) o la capucha de encerado/pulido (aplicadora de cera, removedora
de cera o pulidora; provistas con la unidad) adecuada para el trabajo.
4. Ajuste la almohadilla de lijado o la capucha de encerado/pulido al centro de la almohadilla base.
5. Conecte la almohadilla base al perno/eje y fíjela con la tuerca de retención. Asegúrese de que el reborde de la tuerca de retención
mire hacia el interior de la almohadilla base para ajustarla en su lugar.
6. Con la llave provista, ajuste la tuerca de retención al perno/eje. Asegúrese de que la conexión sea buena.
Form # 90527868
Copyright © 2008 Black & Decker
Printed in China
SAFETY GUIDELINES / DEFINITIONS
DANGER: Indicates an imminently hazardous situation which, if not avoided, will result in death or serious injury.
WARNING: Indicates a potentially hazardous situation which, if not avoided, could result in death or serious injury.
CAUTION: Indicates a potentially hazardous situation which, if not avoided, may result in minor or moderate injury.
CAUTION: Used without the safety alert symbol indicates potentially hazardous situation which, if not avoided, may result in property
damage.
RISK OF UNSAFE OPERATION. When using tools or equipment, basic safety precautions should always be followed to reduce the risk
of personal injury. Improper operation, maintenance or modification of tools or equipment could result in serious injury and property
damage. There are certain applications for which tools and equipment are designed. Black & Decker strongly recommends that this
product NOT be modified and/or used for any application other than for which it was designed. Read and understand all warnings and
operating instructions before using any tool or equipment.
The label on your tool may contain the following symbols:
1. Monte la unidad como se describe en este manual de instrucciones y conecte la almohadilla de lijado de 178 mm (7") adecuada
para el trabajo.
2. Invierta la lijadora/pulidora y sostenga la herramienta de modo que un ángulo de 10° de 15° exista entre el disco y el trabajo. Si
solamente el borde externo del disco que enarena se utiliza, un corte áspero resultará. Si el disco que enarena se presiona
completamente contra el trabajo, la acción que enarena será irregular y desigual, y la herramienta será difícil de controlar.
3. Presione el interruptor de encendido/apagado para ENCENDER la unidad (y presione el bloqueador del interruptor para trabarlo en
la posición de ENCENDIDO, si así lo desea).
IMPORTANTE: NO APLIQUE PRESIÓN A LA UNIDAD. El peso de la pulidora es la lijador para realizar el trabajo correctamente.
USO DE LA UNIDAD COMO ENCERADORA/PULIDORA
Es muy importante que el automóvil esté limpio y seco antes de aplicar la cera. Cualquier cera protectora tendrá una mayor duración y
brindará una mejor protección si se aplica directamente sobre la pintura.
Se recomienda utilizar una cera líquida de buena calidad por su facilidad de aplicación, pero también puede utilizar una cera en pasta
con un mayor esfuerzo. Sin embargo, la cera en pasta dura debe aplicarse manualmente y retirarse después con esta unidad.
Todas las zonas a las que la lijadora/pulidora no pueda acceder deben encerarse y terminarse manualmente.
Paso 1: Preparación de la superficie
1. Monte la unidad según lo descrito en este manual de instrucción, uniendo el capucha de encerado/pulido.
2. Aplique la cera directamente en el capo, adecuadamente cubriendo el capo entero, y también separe una cantidad pequeña de cera a
los bordes del capucha.
3. Invierta la lijadora/pulidora y coloque la capucha directamente sobre la superficie sobre la que desea aplicar la cera antes de
presionar el interruptor de encendido/apagado para ENCENDER la unidad.
Nota: También puede emplear un compuesto de limpieza de buena calidad en este paso si la superficie está oxidada.
4.Presione el interruptor de encendido/apagado para ENCENDER la unidad (y presione el bloqueador del interruptor para trabarlo en la
posición de ENCENDIDO, si así lo desea). Conduzca la lijadora/pulidora con movimientos amplios, barriendo la superficie en un
patrón entrecruzado en forma de ocho para colocar la cera o el limpiador en la superficie.
IMPORTANTE: DO NOT APPLY PRESSURE TO THE UNIT. NO APLIQUE PRESIÓN A LA UNIDAD. El peso de la pulidora es el
adecuado para realizar el trabajo correctamente.
5. Aplique la cantidad necesaria de cera a la capucha para mantener una capa delgada y uniforme sobre la superficie pulida.
Notas: La aplicación de mayor cantidad de cera que la necesaria no brinda mayor protección a la superficie y dificulta el Paso 3
(remoción de la cera).
Es más fácil aplicar cera a la superficie completa antes de comenzar la etapa de remoción. Para obtener mejores resultados,
consulte las recomendaciones específicas de la cera utilizada.
Paso 3: Remoción de la cera
1. Monte la unidad según lo descrito en este manual de instrucción, uniendo el capucha de encerado/pulido.
2. Invierta la lijadora/pulidora y coloque la capucha directamente sobre la superficie de la que desea remover la cera antes de
presionar el interruptor de encendido/apagado para ENCENDER la unidad.
3. Presione el interruptor de encendido/apagado para ENCENDER la unidad (y presione el bloqueador del interruptor para trabarlo en
la posición de ENCENDIDO, si así lo desea). Siga los mismos movimientos amplios de barrido en un patrón entrecruzado en forma
de ocho como el descrito anteriormente. Deslice la pulidora sobre la superficie y permita nuevamente que el peso de la unidad
realice el trabajo.
4. En ocasiones, es necesario retirar la capucha y sacudir los residuos de pulido seco para evitar la formación de vetas. Asegúrese de
que la pulidora se apoye suavemente sobre la superficie, y permanezca allí al apagar la unidad y antes de encenderla nuevamente.
5. Luego de remover la cera de las principales superficies planas, utilice el borde de la almohadilla para llegar a las superficies curvas
o cóncavas.
READ ALL INSTRUCTIONS
GENERAL SAFETY RULES
WARNING! Read and understand all instructions.
Failure to follow all instructions listed below may result in electric shock, fire and/or serious personal injury.
SAVE THESE INSTRUCTIONS
WORK AREA
• Keep your work area clean and well lit. Cluttered benches and dark areas invite accidents.
• Do not operate power tools in explosive atmospheres, such as in the presence of flammable liquids, gases or dust. Power tools
create sparks which may ignite the dust or fumes.
• Keep bystanders, children and visitors away while operating a power tool. Distractions can cause you to lose control.
ELECTRICAL SAFETY
• Double insulated tools are equipped with a polarized plug (one blade is wider than the other). This plug will fit in a polarozed
outlet only one way. If the plug does not fit fully in the outlet, reverse the plug. If it still does not fit, contact a qualified
electrician to install a polarized outlet. Do not change the plug in any way. Double insulation eliminates the need for the
three-wire grounded power cord and grounded power supply system.
• Avoid body contact with grounded surfaces such as pipes, radiators, ranges and refrigerators. There is an increased risk of
electric shock if your body is grounded.
• Don’t expose power tools to rain or wet conditions. Water entering a power tool will increase the risk of electric shock.
• Do not abuse the cord. Never use the cord to carry the tool or pull the plug from an outlet. Keep cord away from heat, oil, sharp
edges or moving parts. Replace damaged cords immediately. Damaged cords increase the risk of electric shock.
• When operating a power tool outside, use an outdoor extension cord marked “W-A” or “W”. These cords are rated for outdoor
use and reduce the risk of electric shock.
1. Monte la unidad según lo descrito en este manual de instrucción, uniendo el capucha de encerado/pulido.
2. Invierta la lijadora/pulidora y coloque la capucha directamente sobre la superficie que desea pulir antes de presionar el interruptor
de encendido/apagado para ENCENDER la unidad.
3. Presione el interruptor de encendido/apagado para ENCENDER la unidad (y presione el bloqueador del interruptor para trabarlo en la
posición de ENCENDIDO, si así lo desea). Siga el mismo movimiento en forma de ocho descrito previamente. Deslice la pulidora
sobre la superficie y permita nuevamente que el peso de la unidad realice el trabajo.
4. El acabado de las áreas pequeñas, como las que se encuentran cerca y en torno a los espejos, debe realizarse manualmente.
MANTENIMIENTO
INTRODUCTION
Thank you for choosing the Black and Decker® Variable Speed Sander/Polisher. This lightweight and easy to use angled
sander/polisher is a professional tool that can both sand and polish, imitating a hand polishing motion that leaves an even finish
with no hot spots, streaks or swirls. Please read this guide carefully before use to ensure optimum performance and avoid damage
to the unit or items that you are using it with.
• Stay alert, watch what you are doing and use common sense when operating a power tool. Do not use tool while tired or under the
influence of drugs, alcohol or medication. A moment of inattention while operating power tools may result in serious personal injury.
• Dress properly. Do not wear loose clothing or jewelry. Contain long hair. Keep your hair, clothing and gloves away from moving
parts. Loose clothes, jewelry or long hair can be caught in moving parts.
• Avoid accidental starting. Be sure switch is OFF before plugging in. Carrying tools with your finger on the switch or pluggin in
tools that have the switch ON invites accidents.
• Remove adjusting keys or switches before turning the tool ON. A wrench or a key that is left attached to a rotating part of the tool
may result in personal injury.
• Do not overreach. Keep proper footing and balance at all times. Proper footing and balance enables better control of the tool in
unexpected situations.
• Use safety equipment. Always wear eye protection. Dust mask, non-skid safety shoes, hard hat or hearing protection must be used
for appropriate conditions.
FEATURES
• Adjustable speed, high performance, quiet running motor
• Powerful sander for sanding wood, metal, fiberglass and body filler
• Includes one Waxing/Polishing Bonnet for buffing cars, boats, trucks, SUVs and recreational vehicles
• Adjustable, ergonomic auxiliary handle
• Use clamps or other practical way to secure and support the workpiece to a stable platform. Holding the work by hand or against
your body is unstable and may lead to loss of control.
• Do not force tool. Use correct tool for your application. The correct tool will do the job better and safer at the rate for witch it was
designed.
• Do not use tool if switch does not turn it ON and OFF. Any tool that cannot be controlled with the switch is dangerous and must be
repaired.
• Disconnect the plug from the power source before making any adjustments, changing accessories or storing the tool. Such
preventive safety measures reduce the risk of starting the tool accidentally.
• Store idle tools out of reach of children and other untrained persons. Tools are dangerous in the hands of untrained users.
Los rodamientos con lubricación automática se utilizan en la herramienta y no se requiere una relubricación periódica. No obstante, se
recomienda que, una vez al año, lleve o envíe la herramienta a un centro de mantenimiento para que le realicen una limpieza e
inspección completas. Consulte la sección "Información de mantenimiento" de este manual de instrucciones.
Limpieza
El capucha puede ser a mano el lavarse con seguridad limpiado en agua jabonosa caliente. Deje secar completamente la capucha antes
de utilizar la unidad.
Las piezas plásticas deben limpiarse con un paño suave y húmedo. NUNCA utilice solventes al limpiar piezas plásticas, ya que puede
dañar el acabado. NO SUMERJA LA ENCERADORA NI LA ALMOHADILLA DE GOMA ESPUMA EN EL AGUA.
4
16
14
14
12
14
12
Not Recommended
FUNCTIONAL DESCRIPTION
TOOL USE AND CARE
Lubricación
16
16
16
12
• Read And Understand This Instruction Manual Before Using This Unit.
PERSONAL SAFETY
Paso 4: Pulido de terminación
American Wire Gage
18
18
16
14
ADDITIONAL SPECIFIC SAFETY INSTRUCTIONS
USO DE LA UNIDAD COMO LIJADORA
Paso 2: Aplicación de la cera
Not more
Than
6
10
12
16
• Clean your tool out periodically.
WARNING: Always wear proper personal hearing protection that conforms to ANSI S12.6 (S3.19) during use. Under some
conditions and duration of use, noise from this product may contribute to hearing loss.
WARNING: ALWAYS use safety glasses. Everyday eyeglasses are NOT safety glasses. Also use face or dust mask if cutting operation
is dusty. ALWAYS WEAR CERTIFIED SAFETY EQUIPMENT:
• ANSI Z87.1 eye protection (CAN/CSA Z94.3),
• ANSI S12.6 (S3.19) hearing protection,
• NIOSH/OSHA/MSHA respiratory protection.
WARNING: Some dust created by power sanding, sawing, grinding, drilling, and other construction activities contains chemicals
known to cause cancer, birth defects or other reproductive harm. Some examples of these chemicals are:
• lead from lead-based paints,
• crystalline silica from bricks and cement and other masonry products, and
• arsenic and chromium from chemically-treated lumber (CCA).
Your risk from these exposures varies, depending on how often you do this type of work. To reduce your exposure to these chemicals:
work in a well ventilated area, and work with approved safety equipment, such as those dust masks that are specially designed to filter
out microscopic particles.
• Avoid prolonged contact with dust from power sanding, sawing, grinding, drilling, and other construction activities. Wear protective
clothing and wash exposed areas with soap and water. Allowing dust to get into your mouth, eyes, or lay on the skin may promote
absorption of harmful chemicals.
WARNING: Use of this tool can generate and/or disburse dust, which may cause serious and permanent respiratory or other injury.
Always use NIOSH/OSHA approved respiratory protection appropriate for the dust exposure. Direct particles away from face and body.
CAUTION: Wear appropriate hearing protection during use. Under some conditions and duration of use, noise from this product may
contribute to hearing loss.
WARNING: RISK OF PERSONAL INJURY:
• Use only accessories rated at least 3000/min.
• DO NOT use string tie (or drawstring) polishing pads or bonnets with this unit. Extreme personal injury may result if fingers are
caught by rotating string tie. USE ONLY bonnets with elastic bands.
• Failure to properly seat the bonnet to the pad may result in the bonnet being thrown from the pad.
• Always maintain a firm grip on the sander/polisher handle(s) to prevent loss of control.
CAUTION: TO REDUCE THE RISK OF INJURY OR PROPERTY DAMAGE:
• Make sure that adjusting keys and wrenches are detached from the unit before turning it ON.
• Use clamps or another practical way to secure and support the work piece to a stable platform. Holding the work by hand or against
your body is unstable and may lead to loss of control.
• Do not use tool if ON/OFF Trigger does not turn it ON or OFF. Any tool that cannot be controlled with the power switch is dangerous
and must be repaired.
• Operate this sander/polisher ONLY on AC current on which the voltage is within correct limits (120 volts). Never attempt to operate on
DC current. To do so may seriously damage the sander/polisher.
• Always disconnect the unit’s cord plug from power source before making any adjustments, changing bonnets or storing the tool to
reduce the risk of accidentally starting the sander/polisher.
• Check for misalignment or binding of moving parts, breakage of parts, and any other condition that may affect the sander/polisher’s
operation. If damaged, have the tool serviced before using.
• Use only accessories that are supplied or recommended by the manufacturer for this model. Refer to the “Accessories” section of this
Instruction Manual for more information.
• NEVER allow Gasoline, Brake Fluids or any petroleum-based products to come in contact with plastic parts or power cord. They
contain chemicals that can damage, weaken or destroy plastic and insulation.
OPERACIÓN
• Lave bien el automóvil o la superficie para eliminar el polvo y el aceite. Preste especial atención a las zonas que atraen capas excesivas
de polvo como, por ejemplo, las zonas en torno a las cavidades de las ruedas y junto a los parachoques.
• Después del lavado, mueva el automóvil o la superficie a una zona seca, alejada de la luz solar directa y deje que la superficie se seque
y enfríe.
101-150
(30,4-45,7m)
201-300
(60,9-91,4m)
WARNING:This product or its power cord contains lead, a chemical known to the State of California to cause cancer and birth defect
or other reproductive harm. Wash hands after handling.
WARNING: RISK OF ELECTRICAL SHOCK:
Hold tool by insulated gripping surface when performing an operation where the tool may contact hidden wiring or its own cord.
Contact with “live” wire will make exposed metal parts of the tool “live” and shock the operator.
CAUTION: TO REDUCE THE RISK OF INJURY OR PROPERTY DAMAGE:
• THIS UNIT IS NOT FOR USE BY CHILDREN AND SHOULD ONLY BE OPERATED BY ADULTS.
• Do not immerse unit in water.
• Do not drop or throw unit.
• Pull cord by plug rather than cord when disconnecting the unit from power source.
• Make sure the ON/OFF Trigger is not depressed and the Trigger Lock is not engaged before connection to a power source.
• Do not crush, cut, pull or expose cord to extreme heat.
• Position cords so they do not become entangled or become a safety hazard. Keep cords away from sharp edges.
• Use in a dry location only.
• Do not open body casing. There are no user-serviceable parts inside. Opening the body casing will void manufacturer’s warranty.
• Do not use any accessory that is not recommended or provided by the manufacturer.
• To avoid possible damage that may shorten the unit’s working life, protect it from direct sunlight, direct heat and/or moisture.
• Do not allow power cord to contact the rotating bonnet.
• Allowing dust to get into mouth, eyes, or lay on skin may promote absorption of harmful chemicals.
1-800-544-6986
RD043008
51-100
(15,2-30,4m)
101-200
(30,4-60,9m)
Ampere Rating
BEFORE RETURNING THIS PRODUCT
FOR ANY REASON PLEASE CALL
Consulte las Páginas Amarillas
para más información de
servicio y ventas
0-25
26-50
(0-7,6m) (7,6-15,2m)
0-50
51-100
(0-15,2m) (15,2-30,4m)
240V
Thank you for choosing Black & Decker!
Go to www.BlackandDecker.com/NewOwner
to register your new product
11 A
120 V
1000-3000/MIN
178 mm (7")
3m
Minimum Gage for Cord Sets
Total Length of Cord in Feet
Volts
1
WP107B ManualENSP 050108.qxp
6/24/2008
9:13 AM
Page 2
Controls and Features
• Desconecte el enchufe de la fuente de energía antes de hacer cualesquiera accesorios de los ajustes, el cambiar o almacenar
la herramienta. Tales medidas de seguridad preventivas reducen el riesgo de encender la herramienta accidentalmente.
• Almacene las herramientas ociosas fuera del alcance de niños y de otras personas inexperimentadas. Las herramientas son
peligrosas en las manos de usuarios inexperimentados.
• Mantenga las herramientas con cuidado. Mantenga las herramientas de corte agudas y limpias. Las herramientas correctamente
mantenidas, con los esges agudos del corte son menos probables atar y son más fáciles de controlar.
• Compruebe para saber si hay desalineamiento o atascamiento de las piezas móviles, de la fractura de piezas y de cualquier
otra condición que puedan afectar la operación de la herramienta. Si está dañado, tenga los servicios de la herramienta antes
de usar. Muchos accidentes son causados por las herramientas mal mantenidas.
• Utilice solamente los accesorios que son recomendados por el fabricante para su modelo. Los accesorios que pueden ser
convenientes para una herramienta pueden llegar a ser peligrosos cuando están utilizados en otra herramienta.
find your local service location, refer to the yellow page directory under "Tools—Electric" or call: 1-800-544-6986 or visit
www.blackanddecker.com.
ACCESSORIES
Replacement accessories are available from your local dealer or authorized service center.
If you need assistance regarding accessories, please call: 1-800-544-6986.
WARNING: The use of any accessory not supplied for use with this tool could be hazardous.
WRENCH
RETAINING NUT
BASE PAD
FULL TWO-YEAR HOME USE WARRANTY
BOLT/SHAFT
Black & Decker (U.S.) Inc. warrants this product for two years against any defects in material or workmanship. The defective product
will be replaced or repaired at no charge in either of two ways.
The first, which will result in exchanges only, is to return the product to the retailer from whom it was purchased (provided that the
store is a participating retailer). Returns should be made within the time period of the retailer’s policy for exchanges (usually 30 to 90
days after the sale). Proof of purchase may be required. Please check with the retailer for their specific return policy regarding returns
that are beyond the time set for exchanges.
The second option is to take or send the product (prepaid) to a Black & Decker owned or authorized Service Center for repair or
replacement at our option. Proof of purchase may be required. Black & Decker owned and authorized Service Centers are listed under
"Tools-Electric" in the yellow pages of the phone directory and on our website www.blackanddecker.com.
This warranty does not apply to accessories. This warranty gives you specific legal rights and you may have other rights which vary
from state to state or province to province. Should you have any questions, contact the manager of your nearest Black & Decker Service
Center. This product is not intended for commercial use.
FREE WARNING LABEL REPLACEMENT: If your warning labels become illegible or are missing, call
1-800-544-6986 for a free replacement.
TOP AND SIDE VIEWS
AUXILIARY HANDLE
PLACEMENT (LEFT HOLE
SHOWN – ADDITIONAL
HOLES FOR PLACEMENT ARE
LOCATED ON THE TOP AND
RIGHT SIDE OF UNIT)
AUXILIARY HANDLE
SPECIFICATIONS
SPEED CONTROL
DIAL
TRIGGER LOCK
(BUTTON) AND
ON/OFF TRIGGER
Power:
Voltage:
Speed:
Max. Rated Diameter of Polishing Pad:
Cable length:
WAXING/POLISHING
BONNET
(IN HANDLE)
GENERAL USAGE GUIDE
CAUTION: TO AVOID THE RISK OF PERSONAL INJURY OR PROPERTY DAMAGE:
• MAKE SURE THE POLISHER IS IN THE OFF POSITION BEFORE PLUGGING THE POLISHER INTO AN APPROPRIATE POWER OUTLET.
• Place the power cord over your shoulder to avoid contact with the polisher head or the surface while the unit is running.
• Always start and stop sander/polisher on or against the work surface. If you turn the sander/polisher ON without the applicator bonnet
or sanding pad touching your work surface, the bonnet or sanding pad may fly loose and cause injury or property damage. Make sure
the sander/polisher with bonnet securely attached is lightly resting on the surface you intend to polish at all times when the ON/OFF
Trigger is in the ON position (or the Trigger Lock is engaged).
• Use only manufacturer-supplied bonnets with this unit.
LIJADORA Y PULIDOR
VARIABLES DE LA VELOCIDAD
MANUAL DE INSTRUCCIONES
• El servicio de la herramienta se debe realizar solamente por el personal cualificado de la reparación. El servicio o el
mantenimiento se realizó por el personal incompetente podía dar lugar a un riesgo de lesión.
• Al mantener una herramienta, utilice solamente las piezas de recambio idénticas. Siga las instrucciones en la sección del
"mantenimiento" de este manual. El uso de piezas desautorizadas o la falta de seguir instrucciones del mantenimiento puede crear
un riesgo de la descarga eléctrica o de lesión.
REGLAS Y/O SÍMBOLOS ESPECÍFICOS DE SEGURIDAD
11A
120V
1,000-3,000/MIN
7"
3m
Imported by
Black & Decker (U.S.) Inc.,
701 E. Joppa Rd.
Towson, MD 21286 U.S.A.
RD043008
SERVICIO
• Los accesorios deben ser clasificados para por lo menos la velocidad recomendada en la etiqueta amonestadora de la
herramienta. Las ruedas y otros accesorios que funcionan velocidad clasificada excesiva pueden volar aparte y causar lesión.
• Sostenga la herramienta al lado de las superficies conmovedoras aisladas al realizar una operación donde la herramienta de
corte puede entrar en contacto con el cableado ocultado o su propia cuerda. El contacto con un alambre "vivo" hará que las partes
expuestas del metal de la herramienta "viven" y dan una sacudida eléctrica a operador.
ADVERTENCIA: Lea todas las instrucciones antes de operar el producto. El incumplimiento de todas las instrucciones
enumeradas a continuación puede provocar una descarga eléctrica, un incendio o lesiones graves.
• LA PROTECCIÓN DEL INTERRUPTOR DE CORTE POR FALLA A TIERRA (GFCI) debe aplicarse a los circuitos o los tomacorrientes
que se utilizarán. Hay tomacorrientes con protección GFCI incorporada que pueden utilizarse para tomar esta medida de seguridad.
• CABLES PROLONGADORES. Asegúrese de que el cable prolongador esté en buenas condiciones. Cuando utilice un cable
prolongador, cerciórese de que tenga la capacidad para conducir la corriente que su producto exige. Un cable de menor capacidad
provocará una disminución en el voltaje de la línea, lo cual producirá una pérdida de potencia y sobrecalentamiento. La siguiente tabla
muestra la medida correcta que debe utilizar según la longitud del cable y la capacidad nominal en amperios indicada en la placa. En
caso de duda, utilice el calibre inmediatamente superior. Cuanto menor es el número de calibre, más grueso es el cable.
Número de catálogo WP107B
¡Gracias por elegir Black & Decker!
Vaya a www.BlackandDecker.com/NewOwner
para registrar su nuevo producto.
120V
ANTES DE DEVOLVER ESTE PRODUCTO
POR CUALQUIER MOTIVO, LLAME AL
ON/OFF Trigger and Trigger Lock
Speed Control Dial
The Speed Control Dial features 6 settings (numbered 1 to 6 on the dial), allowing you to increase or decrease speed from 1,000 to
3,000 RPM. Optimal speed setting for each application is dependent on work surface and personal preference; however manufacturer
recommends using lower settings (1-3) for waxing/polishing and higher settings (4-6) for sanding.
As a rule, when sanding, you will generally want to use a higher setting on harder materials and lower setting on softer materials. It is
also recommended that you first experiment on a piece of scrap of the same material as your work surface to determine what gives you
the best combination of finish quality and removal rate for your application.
ASSEMBLY
Más
que
0 6 10 12 -
Impreso en China
NORMAS DE SEGURIDAD/DEFINICIONES
ASSEMBLING THE UNIT
1.
2.
3.
4.
5.
Make sure the unit is turned OFF and disconnected from any power source.
Attach the Auxiliary Handle by screwing it into the desired hole (top, left or right).
Select the appropriate 7" sanding pad (not included) or waxing/polishing bonnet for the task.
Fit the sanding pad or waxing/polishing bonnet to the center of the Base Pad.
Attach the Base Pad to the Bolt/Shaft and secure with the Retaining Nut. Make sure the lip on the Retaining Nut faces the inside of
the Base Pad to lock it in place.
6. Using the supplied Wrench, secure the Retaining Nut to the Bolt/Shaft. Make sure this connection is tight.
OPERATION
CAUTION: TO AVOID THE RISK OF PERSONAL INJURY OR PROPERTY DAMAGE:
• MAKE SURE THE POLISHER IS IN THE OFF POSITION BEFORE PLUGGING THE POLISHER INTO AN APPROPRIATE POWER OUTLET.
• Place the power cord over your shoulder to avoid contact with the polisher head or the surface while the unit is running.
• Always start and stop sander/polisher on or against the work surface. If you turn the sander/polisher ON without the applicator bonnet
or sanding pad touching your work surface, the bonnet or sanding pad may fly loose and cause injury or property damage. Make sure
the sander/polisher with bonnet securely attached is lightly resting on the surface you intend to polish at all times when the ON/OFF
Trigger is in the ON position (or the Trigger Lock is engaged).
• Use only manufacturer-supplied bonnets with this unit.
PELIGRO: Indica una situación de peligro inminente que, si no se evita, provocará la muerte o lesiones graves.
ADVERTENCIA: Indica una situación de peligro potencial que, si no se evita, podría provocar la muerte o lesiones graves.
PRECAUCIÓN: Indica una situación de peligro potencial que, si no se evita, provocará lesiones leves o moderadas.
PRECAUCIÓN: Cuando se utiliza sin el símbolo de alerta de seguridad indica una situación de peligro potencial que, si no se evita, puede provocar
daños a la propiedad.
RIESGO DE OPERACIÓN INSEGURA. Cuando se utilizan herramientas o equipos, siempre se deben respetar las precauciones de seguridad para
reducir el riesgo de lesiones personales. La operación, la modificación o el mantenimiento incorrectos de herramientas o equipos pueden
provocar lesiones graves y daños a la propiedad. Las herramientas y los equipos están diseñados para determinados usos. Black & Decker
recomienda enfáticamente que NO se modifique este producto y que NO se utilice para ningún otro uso que aquél para el que fue diseñado. Lea
y comprenda todas las instrucciones operativas y las advertencias antes de utilizar cualquier herramienta o equipo.
La etiqueta en su herramienta puede contener los símbolos siguientes:
USING THE UNIT AS A SANDER/POLISHER
It is very important that your car be clean and dry before applying wax. Any wax protection will wear longer and protect better if applied
directly to the paint.
A good quality liquid wax is recommended because of its ease of application, but a paste wax will also work with a little more effort.
Hard paste wax, however, should be applied by hand, then removed using this unit.
Any areas inaccessible to the sander/polisher should be waxed and finished by hand.
Step 1: Surface Preparation
LEA TODAS LAS INSTRUCCIONES
REGLAS GENERALES DE SEGURIDA
1. Assemble the unit as described in this Instruction Manual, attaching the supplied Waxing/Polishing Bonnet.
2. Apply wax directly on the bonnet, adequately covering the entire bonnet, and also spread a small amount of wax to the bonnet
edges.
3. Invert the sander/polisher and place the bonnet directly on the surface you want to apply the wax to before pressing the ON/OFF
Trigger to turn the unit ON.
Note: You can also substitute a good grade of cleaning compound at this step if the surface is oxidized.
4. Press the ON/OFF Trigger to turn the unit ON position (and press the Trigger Lock to lock it in the ON position, if desired). Steer the
sander/polisher in long sweeping strokes in a criss-cross figure-eight pattern, working the wax/cleaner into the surface.
¡ADVERTENCIA! Lea y entienda todas las instrucciones.
La falta de seguir todas las instrucciones enumeradas abajo puede dar lugar a descarga eléctrica, a fuego y/o a daños corporales serios.
CONSERVE ESTAS INSTRUCCIONES
ÁREA DE TRABAJO
• Mantenga su área de trabajo limpia y bien se encendió. Los bancos estorbados y las áreas oscuras invitan accidentes.
• No funcione las herramientas eléctricas en atmósferas explosivas, por ejemplo en la presencia de líquidos inflamables, de
gases o del polvo. Las herramientas eléctricas crean las chispas que pueden encender el polvo o los humos.
• Mantenga a las personas presentes, a los niños y a visitantes ausentes mientras que funciona una herramienta eléctrica. Las
distracciones pueden hacerle perder control.
IMPORTANT: DO NOT APPLY PRESSURE TO THE UNIT. The weight of the polisher is adequate to do the task
correctly.
5. Apply more wax to the bonnet as necessary to maintain a thin even coat on the surface being polished.
Notes: Applying more wax than necessary adds no more protection to the surface and makes the Step 3 (wax removal) more
difficult.
It’s easiest to apply wax to the entire surface before starting the removal phase. For best results, refer to the specific
application recommendations of the wax product being used.
SEGURIDAD ELÉCTRICA
• Doble las herramientas aisladas se equipan de un enchufe polarizado (una lámina es más ancha que la otra). Este enchufe
cabrá en a polarozed el enchufe solamente unidireccional. Si el enchufe no cabe completamente en el enchufe, invierta el
enchufe. Si todavía no cabe, entre en contacto con a electricista cualificado para instalar un enchufe polarizado. No cambie el
enchufe de ninguna manera. El aislamiento doble elimina la necesidad del cable eléctrico puesto a tierra tres-alambre y del
sistema puesto a tierra de la fuente de alimentación.
• Evite el contacto del cuerpo con las superficies puestas a tierra tales como pipas, radiadores, gamas y refrigeradores. Hay un
riesgo creciente de la descarga eléctrica si se pone a tierra su cuerpo..
• No exponga las herramientas eléctricas a la lluvia o a las condiciones mojadas. El agua que entra en una herramienta eléctrica
aumentará el riesgo de la descarga eléctrica.
• No abuse de la cuerda. Nunca utilice la cuerda para llevar la herramienta o para tirar del enchufe de un enchufe. Mantenga la
cuerda ausente de calor, de aceite, de bordes agudos o de piezas móviles. Substituya las cuerdas dañadas inmediatamente.
Las cuerdas dañadas aumentan el riesgo de la descarga eléctrica.
• Al funcionar una herramienta eléctrica afuera, utilice una extensión al aire libre "W-A marcado cuerda" o "W". Estas cuerdas son
clasificadas para el uso al aire libre y reducen el riesgo de la descarga eléctrica.
Step 3: Wax Removal
1. Assemble the unit as described in this Instruction Manual, attaching the supplied Waxing/Polishing Bonnet.
2. Invert the sander/polisher and place the bonnet directly on the surface you want to remove the wax from before pressing the
ON/OFF Trigger to turn the unit ON.
3. Press the ON/OFF Trigger to turn the unit ON position (and press the Trigger Lock to lock it in the ON position, if desired). Follow
the same long sweeping strokes in a criss-cross figure-eight motion previously described, gliding the polisher over the surface,
again permitting the weight of the unit to do the work.
4. Occasionally it becomes necessary to remove the bonnet and shake out the dried polish residue to avoid streaking. Make sure the
polisher is lightly resting on the surface and remains on the surface when stopping the unit and before powering up the unit again.
5. After removing the wax from all the major flat surfaces, use the edge of the pad to reach curved or concave surfaces.
Step 4: Finish Polishing
1. Assemble the unit as described in this Instruction Manual, attaching the supplied Waxing/Polishing Bonnet.
2. Invert the sander/polisher and place the bonnet directly on the surface you want to polish pressing the ON/OFF Trigger to turn the
unit ON.
3. Press the ON/OFF Trigger to turn the unit ON position (and press the Trigger Lock to lock it in the ON position, if desired). Follow the
same figure-eight motion described previously, gliding the polisher over the surface, again permitting the weight of the unit to do
the work.
4. Small areas, such as near and around mirrors, should be finished by hand.
MAINTENANCE
Lubrication
Self lubricating bearings are used in this tool and periodic relubrication is not required. However, it is recommended that, once a year,
you take or send the tool to a service center for a thorough cleaning and inspection. Refer to the “Service Information” section of this
Instruction Manual.
Cleaning
The bonnet can be safely cleaned by hand washing in warm soapy water. Allow bonnet to fully dry before use.
Plastic parts may be wiped clean with a soft damp cloth. NEVER use solvents when cleaning any plastic part as this may damage the
finish. DO NOT IMMERSE THE UNIT OR DETACHABLE BASE PAD IN WATER.
SEGURIDAD PERSONAL
• Permanezca la alarma, el reloj qué usted está haciendo y utilice el sentido común al funcionar una herramienta eléctrica. No
utilice la herramienta mientras que es cansado o bajo influencia de drogas, del alcohol o de la medicación. Un momento de la
inatención mientras que las herramientas eléctricas de funcionamiento pueden dar lugar a daños corporales serios.
• Vestido correctamente. No use la ropa o la joyería floja. Contenga el pelo largo. Mantenga su pelo, ropa y guantes ausentes de
piezas móviles. Las ropas flojas, la joyería o el pelo largo se pueden coger en piezas móviles.
• Evite comenzar accidental. Sea seguro que el interruptor está APAGADO antes de enchufar. Llevar las herramientas con su dedo
en el interruptor o el pluggin en las herramientas que tienen el interruptor ENCENDIDO invita accidentes.
• Quite el ajuste de llaves o de los interruptores antes de girar la herramienta. Una llave o una llave que se deja unida a una pieza
que rota de la herramienta puede dar lugar a daños corporales.
• No el alcance del excedente. Pie y equilibrio apropiados de la subsistencia siempre. El pie y el equilibrio apropiados permite un
control mejor de la herramienta en situaciones inesperadas.
• Utilice el equipo de seguridad. Use siempre la protección de ojo. Saque el polvo de la máscara, zapatos antideslizantes de
seguridad, sombrero duro o la protección de oído se debe utilizar para las condiciones apropiadas.
All Black & Decker Service Centers are staffed with trained personnel to provide customers with efficient and reliable power tool service.
Whether you need technical advice, repair, or genuine factory replacement parts, contact the Black & Decker location nearest you. To
2
16
16
16
12
16
14
14
12
14
12
No recomendado
DESCRIPCIÓN FUNCIONAL
INTRODUCCIÓN
Gracias por elegir la lijadora/pulidora de variables de la velocidad de Black and Decker®. Esta lijadora/pulidora angular, liviana y
fácil de utilizar es una herramienta de uso profesional que puede lijar y pulir. Imita el movimiento de pulido manual y logra un
acabado parejo sin áreas de brillo excesivo, vetas ni marcas. Por favor lea esta guía cuidadosamente antes de usar la unidad para
asegurarse el rendimiento óptimo de ésta y evitar daños a la unidad o a los artículos con los cuales la está usando.
CARACTERÍSTICAS
• Motor silencioso, de velocidad ajustable y alto rendimiento
• Potente lijadora para lijar madera, metales, fibra de vidrio y masilla para carrocerías
• Incluye un capucha de encerado/pulido para los coches que pulimentan, los barcos, los carros, SUVs y los vehículos recreacionales
• Mango auxiliar ergonómico y ajustable
USO Y CUIDADO DE LA HERRAMIENTA
Service Information
Medida de conductor estadounidense
18
18
16
14
INSTRUCCIONES DE SEGURIDAD ADICIONALES ESPECÍFICAS
1. Assemble the unit as described in this Instruction Manual, attaching the 7" sanding pad appropriate to the task.
2. Invert the sander/polisher and hold the tool so that an angle of 10° to 15° exists between the disc and the work. If only the outer
edge of the sanding disc is used, a rough cut will result. If the sanding disc is pressed flat against the work, the sanding action will
be irregular and bumpy, and the tool will be difficult to control.
3. Press the ON/OFF Trigger to turn the unit ON position (and press the Trigger Lock to lock it in the ON position, if desired).
IMPORTANT: DO NOT APPLY PRESSURE TO THE UNIT. The weight of the sander is adequate to do the task correctly.
Step 2: Wax Application
No mas
que
6
10
12
16
• Limpie su herramienta periódicamente.
ADVERTENCIA: Use siempre la protección de oído personal apropiada que se conforma con ANSI S12.6 (S3.19) durante uso. Bajo
ciertas condiciones y duración del uso, el ruido de este producto puede contribuir a la pérdida de oído.
ADVERTENCIA: Utilice SIEMPRE las gafas de seguridad. Los eyeglasses diarios no son gafas de seguridad. También utilice la cara o
saque el polvo de la máscara si la operación que corta es polvorienta. USE SIEMPRE EL EQUIPO CERTIFICADO DE SEGURIDAD:
• Protección de ojo del ANSI Z87.1 (CAN/CSA Z94.3),
• Protección de oído del ANSI S12.6 (S3.19),
• Protección respiratoria de NIOSH/OSHA/MSHA.
ADVERTENCIA: Parte del polvo creado al lijar, aserruchar, moler o perforar con máquina, así como al realizar otras actividades de la
construcción, contiene substancias químicas que se sabe producen cáncer, defectos congénitos u otras afecciones reproductivas.
Algunos ejemplos de esas substancias químicas son:
• plomo de pinturas a base de plomo,
• sílice cristalizado de ladrillos y cemento y otros productos de albañilería, y
• arsénico y cromo de la madera químicamente tratada (CCA).
El riesgo al contacto con estas substancias varía, según la frecuencia en que se haga este tipo de trabajo. Para reducir la exposición a
esas substancias químicas: trabaje en un área bien ventilada, y trabaje con equipos de seguridad aprobados, tales como máscaras
contra el polvo especialmente diseñadas para filtrar las partículas microscópicas.
• Evite el contacto prolongado con polvos originados por lijar, aserrar, esmerilar, taladrar y otras actividades constructivas. Vista ropas
protectoras y lave las áreas expuestas con agua y jabón. Permitir que el polvo se introduzca en su boca, ojos, o dejarlo sobre la piel
promueve la absorción de químicos dañinos.
ADVERTENCIA: La utilización de esta herramienta puede originar polvo o dispersarlo, lo que podría causar daños graves y
permanentes al sistema respiratorio, así como otras lesiones. Siempre use protección respiratoria aprobada por NIOSH/OSHA, apropiada
para su uso en condiciones de exposición al polvo. Procure que las partículas no se proyecten directamente sobre su rostro o su cuerpo.
PRECAUCION: Utilice la protección auditiva apropiada durante el uso. Bajo ciertas condiciones de duración de uso, el ruido producido
por este producto puede contribuir a la pérdida auditiva.
ADVERTENCIA: RIESGO DE LESIONES PERSONALES:
• Utilice solamente los accesorios clasificó por lo menos los 3000/min.
• NO utilice almohadillas o capuchas pulidoras con cuerdas (o correas) con esta unidad. Si los dedos se enganchan al girar la cuerda, se
pueden producir lesiones personales graves. UTILICE SÓLO capuchas con bandas elásticas.
• Si la capucha no se asienta correctamente en la almohadilla, puede desprenderse de ella.
• Siempre sostenga el o los mangos de la lijadora/pulidor con firmeza para no perder el control de la herramienta.
ADVERTENCIA: RIESGO DE LESIONES PERSONALES O DAÑO A LA PROPIEDAD:
• Antes de ENCENDER la herramienta, asegúrese de que se hayan retirado las llaves de ajuste.
• Utilice abrazaderas u otra forma práctica para asegurar y sostener la pieza de trabajo en una plataforma estable. Sostener el trabajo
con la mano o contra el cuerpo no brinda la estabilidad requerida y puede llevar a la pérdida del control.
• No utilice la herramienta si no puede ENCENDERLA o APAGARLA con el interruptor de encendido/apagado. Toda herramienta que no
puede ser controlada mediante el interruptor de encendido es peligrosa y debe ser reparada.
• Opere esta lijadora/pulidor SÓLO con corriente CA cuyo voltaje esté dentro de los límites correctos (120 voltios). Nunca intente
operarla con corriente CC. Si lo hace, puede ocasionarle daños graves.
• Siempre desconecte el enchufe del cable de la unidad de la fuente de energía antes de realizar ajustes, cambiar las capuchas o
almacenar la unidad, para reducir el riesgo de arranque accidental de la enceradora/pulidora.
• Revise que no haya piezas en movimiento mal alineadas o trabadas, piezas rotas o cualquier otra situación que pueda afectar el
funcionamiento de la enceradora/pulidora. Si encuentra daños, haga reparar la herramienta antes de utilizarla.
• Utilice sólo accesorios provistos o recomendados por el fabricante para este modelo. Consulte la sección "Accesorios" de este manual
de instrucciones para obtener más información.
• NUNCA permita que las piezas plásticas o el cable de alimentación entren en contacto con gasolina, líquido de frenos o cualquier
producto a base de petróleo. Contienen sustancias químicas que pueden dañar, debilitar o destruir el plástico y el aislamiento.
• Lea y comprenda este manual de instrucciones antes de utilizar esta unidad.
USING THE UNIT AS A SANDER
• Wash your car or surface thoroughly to remove all dirt and oil. Pay special attention to areas that attract excessive layers of dirt such
as, areas around wheel wells and next to bumpers.
• After washing, move the car or surface you’re working on to a dry area out of direct sunlight and allow the surface to dry and cool.
101-150
(30,4-45,7m)
201-300
(60,9-91,4m)
ADVERTENCIA: Este producto o su cable de alimentación contiene plomo, una sustancia química reconocida por el Estado de
California como causante de cáncer, defectos de nacimiento u otros problemas reproductivos. Lávese las manos después de utilizarlo.
ADVERTENCIA: RIESGO DEL CHOQUE ELÉCTRICO:
Sostenga la herramienta al lado de la superficie conmovedora aislada al realizar una operación donde la herramienta puede entrar en
contacto con el cableado ocultado o su propia cuerda. El contacto con el alambre "vivo" hará que las partes expuestas del metal de la
herramienta "viven" y dan una sacudida eléctrica a operador.
PRECAUCIÓN: PARA REDUCIR EL RIESGO DE LESIONES O DAÑO A LA PROPIEDAD:
• LOS NIÑOS NO DEBEN UTILIZAR ESTA UNIDAD. SÓLO LOS ADULTOS PUEDEN OPERARLA.
• No sumerja la unidad en agua.
• No arroje ni tire la unidad.
• Al desconectar la unidad de la fuente de energía, tire del enchufe y no del cable.
• El interruptor de encendido debe estar en la posición de APAGADO cuando la unidad no esté en uso. Asegúrese de que el interruptor
esté en la posición de APAGADO antes de realizar la conexión a una fuente de energía.
• No aplaste, corte, arrastre ni exponga el cable al calor extremo.
• Coloque los cables de manera que no se enreden ni impliquen un riesgo de seguridad. Mantenga los cables alejados de los bordes filosos.
• Sólo use en lugares secos.
• No abra la cubierta. No incluye elementos a los que el usuario pueda hacerles mantenimiento. Abrir la cubierta anulará la garantía del
fabricante.
• No utilice ningún accesorio que no esté recomendado o provisto por el fabricante.
• Para evitar daños posibles que puedan acortar la duración de la unidad, protéjala de la luz solar directa, el calor directo o la humedad.
• No permita que el cable eléctrico entre en contacto con el capo que rota.
• Permitiendo que el polvo consiga en boca, los ojos, o la endecha en piel pueden promover la absorción de productos químicos dañosos.
CONSERVE ESTE MANUAL PARA FUTURAS CONSULTAS.
Formulario Nº 90527868
Copyright © 2008 Black & Decker
51-100
(15,2-30,4m)
101-200
(30,4-60,9m)
Capacidad nominal en amperios
ANTES DE LLAMAR, TENGA A MANO EL Nº DE CATÁLOGO Y EL CÓDIGO DE LA
FECHA. EN LA MAYORÍA DE LOS CASOS, EL REPRESENTANTE DE BLACK & DECKER
PUEDE SOLUCIONAR SU PROBLEMA POR TELÉFONO. SI DESEA REALIZAR UNA
SUGERENCIA O COMENTARIO, LLÁMENOS. SU OPINIÓN ES FUNDAMENTAL PARA
BLACK & DECKER.
Nº de Catálogo WP107B
Abril 2008
0-25
26-50
(0-7,6m) (7,6-15,2m)
0-50
51-100
(0-15,2m) (15,2-30,4m)
240V
1-800-544-6986
Press the ON/OFF Trigger to turn the unit ON. Release it to turn the unit OFF.
To lock the unit in the ON position, press the ON/OFF Trigger and Trigger Lock at the same time.
Pressing the ON/OFF Trigger again (with the Trigger Lock engaged) releases the Trigger Lock and turns the unit OFF.
Calibre mínimo para los juegos de cables
Longitud total del cable en pies
Voltios
• Utilice las abrazaderas o la otra manera práctica de asegurar y de apoyar el objeto a una plataforma estable. Celebrar el trabajo
a mano o contra su cuerpo es inestable y puede conducir a la pérdida de control.
• No fuerce la herramienta. Utilice la herramienta correcta para su uso. La herramienta correcta hará el trabajo mejor y más seguro
en la tarifa para la bruja que fue diseñada.
• No utilice la herramienta si el interruptor no le da vuelta por intervalos. Cualquier herramienta que no se pueda controlar con el
interruptor es peligrosa y debe ser reparada.
3