1
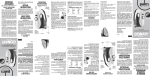
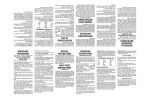
Importante
INSTRUCCIONES
DE OPERACIÓN
Transparent Cover
INSTRUCCIONES DE OPERACIÓN
PARA USO DOMÉSTICO
SOLAMENTE
Caution
Do not immerse any part of the unit in water or
other liquids.
The outer foils and cutters are delicate and must
be handled very carefully.
Before Shaving
1. Be certain that your skin is clean. If you
have sensitive skin, you may want to apply
talcum powder before and after you shave.
2. Clean your shaver after each use. This will
ensure the best performance. (Please refer to
“How to Clean Your Shaver” section for
further instructions.)
Lift Here
Lift Here
FIG. 1
3. Rinse the shaver cutter and foil frame under
running water or in a sink. Do not use hot water.
Use only warm or cold water.
4. After wet cleaning, allow the foil frame and
cutters to air-dry before closing foil frame and
shaver head. Replace shaver head back onto the
shaver until it clicks into place. Wipe the surface
of the main unit with a dry towel. Do not dry the
foil area. Let the shaving head air-dry.
5. If the body of the shaver becomes dirty, wipe
Le felicitamos por haber comprado esta
máquina de afeitar. Para lograr resultados
óptimos, siempre lea las instrucciones de uso
y mantenimiento que se encuentran a
continuación. Gracias por elegir Conair, el
no. 1 en aparatos de cuidado personal.
1. Make sure unit is in the OFF position before
cleaning your shaver.
2. Hold shaver head and lift up from both sides,
revealing the cutter. (FIG. 1)
Be careful not to push on the foils. They are
delicate and can easily be damaged.
GUARDE ESTAS
INSTRUCCIONES
How to Clean Your Shaver
ADVERTENCIA
Alzar aquí
1. Asegúrese de que la piel esté limpia. Si su
piel es sensible, puede aplicar talco antes y
después del afeitado si desea.
2. Limpie el aparato después de cada uso.
Esto asegurará un rendimiento óptimo. Para
más información, véase la sección
"Instrucciones de limpieza".
Preparación
No sumerja el aparato en agua u otro líquido.
Las hojas de afeitar y las cuchillas internas son
delicadas y deben manipularse con mucho
cuidado.
Precaución:
1. Remove the battery compartment cover by
pushing in and down toward the bottom of the
shaver.
2. Align the two AAA batteries with the positive
and negative positions indicated inside the
battery compartment. Being careful not to
bend the clips, insert the negative end of each
battery first so it will slip easily into place.
3. Return the battery cover to its original
position by pushing it in and up until you hear
a small click as it locks into place.
4. To use your shaver, remove the transparent
cover and push ON/OFF switch upwards to
the ON position.
5. After you finish using your shaver, push
down on the ON/OFF switch to turn the
shaver off.
6. Ensure the batteries are installed correctly
with regard to polarity (+ and -).
7. Remove the batteries if the batteries are no
longer functional or if the shaver is left
unused for an extended period of time.
8. Clean the battery contacts and also those
of the device prior to battery installation.
9. Remove used batteries promptly.
Este aparato ha sido diseñado para
proporcionar un afeitado al ras suave y
preciso. Requiere 2 pilas AAA (no incluidas).
Le aconsejamos que utilice pilas alcalinas,
las cuales son más duraderas. Retire la(s)
pila(s) al final de su vida útil o si no va a usar
el aparato durante un largo período de
tiempo.
FIG. 1
Alzar aquí
1. Si tiene que sacudir el aparato para eliminar
el exceso de agua, sosténgalo firmemente para
no dejarlo caer o desarmar el cabezal.
2. No utilice un secador o un calentador para
secar el aparato. Esto podría dañarlo o impedir
su buen funcionamiento.
Tapa transparente
1. Asegúrese de que el aparato esté apagado
(OFF).
2. Sosteniendo firmemente el cabezal, alce el
cabezal. (FIG. 1)
Tenga cuidado de no presionar las hojas. Son
delicadas y pueden dañarse fácilmente.
Instrucciones de limpieza
Precaución:
sequen al aire.
5. Si el cuerpo del aparato está sucio, límpielo
con un paño ligeramente humedecido con
agua jabonosa, o detergente suave. Nunca
utilice disolvente, solventes o limpiadores
fuertes.
6. Regrese el protector de hojas sobre el
cabezal.
1. Men whose skin is sensitive or easily irritated
by shaving, or who suffer from a skin allergy,
should test one section on the leg or arm before
using the shaver.
2. The foils are thin and precisely finished
pieces. Do not press hard against the foils
or drop foils. A warped or distorted foil will
produce poor shaving results. Also a
damaged foil may cause skin injury. A
damaged foil should be replaced
immediately.
This shaver has been engineered to give you
a clean, close, smooth shave. It requires 2
AAA batteries (not included). We recommend
using longer-lasting alkaline batteries in your
shaver. If you are not going to use your
shaver for a long period of time or if the
batteries are dead, remove or replace the
batteries from the unit.
At first, your shave might not be as close as
you expect. However, this is normal. It takes
time for your skin and hair to adjust to the
new procedure and for you to learn how to
effectively use the shaver. Caution: Most
blade users will push too hard and therefore
not get a satisfactory shave. You must press
gently so the hair can get into the holes of the
foil; pressing too hard makes the hair flat.
Please be patient; use your shaver 10 to 12
times before you judge its performance.
OPERATING INSTRUCTIONS
10. Always purchase the correct size and grade
of battery most suitable for the intended use.
11. Replace all batteries of a set at the same
time.
12. Do not mix old and new batteries. Do not
mix alkaline, standard (carbon-zinc), or
rechargeable (nickel cadmium or nickel metal
hydride) batteries.
Puede que sus primeros intentos no sean
perfectos. Esto es normal. Su piel y sus vellos
necesitan tiempo para acostumbrarse a esta
nueva técnica de afeitado. Precaución:
Presionar las hojas mucho contra la piel no
producirá resultados satisfactorios. Se debe
pasar la máquina suavemente sobre la piel;
presionar mucho aplasta los vellos e impide
el afeitado. Sea paciente; utilice el aparato
10–12 veces antes de juzgar su rendimiento.
WARNING
Important
FOR HOUSEHOLD
USE ONLY
1. Si su piel es sensible o se irrita fácilmente
cuando se afeita, o si padece de alergia,
pruebe el aparato sobre una pequeña sección
del brazo o de la pierna antes de usarlo.
2. Las hojas de afeitar son delgadas y
precisas. No las apriete mucho sobre la
piel ni las deje caer. Una hoja lastimada o
deformada impedirá el buen
funcionamiento del aparato y puede
provocar heridas. Reemplace las hojas
defectuosas inmediatamente.
3. Enjuague las cuchillas internas y las hojas
bajo agua corriente. No utilice agua caliente.
Utilice agua fría o tibia solamente.
4. Permita que las cuchillas y las hojas
sequen al aire antes de volver a ensamblar el
cabezal. Una vez seco, vuelva a instalar el
cabezal, presionando hasta que encaje en su
lugar. Limpie el cuerpo del aparato con una
toalla seca. No seque las hojas. Permita que
SAVE THESE
INSTRUCTIONS
Operating
Instructions
1. Deslice la cubierta del compartimiento de
la(s) pila(s) hacia abajo para abrirlo.
2. Instale dos pilas AAA, respetando los
signos de polaridad. Introduzca el polo
negativo primero, teniendo cuidado de no
doblar las patas de contacto.
3. Cierre la cubierta del compartimiento de
la(s) pila(s), empujando hasta que haga clic.
4. Para usar el aparato, retire la tapa y deslice
el interruptor hacia arriba (ON).
5. Para apagar el aparato, deslice el
interruptor hacia abajo (OFF).
6. Siempre respete los signos de polaridad
(+/-) al instalar la(s) pila(s).
7. Retire las pilas al final de su vida útil o si
no va a usar el aparato durante un largo
período de tiempo.
8. Limpie los contactos del aparato y los de
la(s) pila(s) antes de instalarlas.
9. Retire las pilas usadas sin demora.
10. No utilice pilas que no sean del tamaño o
de la potencia indicada para uso con este
aparato.
11. Cambie todas las pilas al mismo tiempo.
12. No junte pilas nuevas con pilas usadas.
No junte pilas alcalinas con pilas regulares
(carbono-zinc) o pilas recargables (NiCd o
NiMH).
Congratulations on the purchase of your new
Men’s foil shaver. For maximum satisfaction
when using this quality product, please take a
minute to read the following operating and care
instructions. Thank you for choosing Conair, the
#1 brand in personal care appliances.
off with a damp cloth and mild detergent or soap.
Never use thinners, other solvents, or any harsh
cleaners.
6. Once dried, carefully replace the protective cap.
Caution
1. When shaking off excess water, hold the main
unit firmly to prevent releasing the head
assembly or dropping the unit.
2. Do not use a dryer or heater to dry the shaver.
This may result in malfunction or damage to the
shaver.
13PG001039
IB-12432
©2013 Conair Corporation
Service Center
Conair Corporation
Service Department
7475 North Glen Harbor Blvd.
Glendale, AZ 85307
Model SHV1
Instruction Booklet
Please register this product at
www.conair.com/registration
battery operated
This warranty gives you specific legal rights,
and you may also have other rights, which
vary from state to state.
Cómo reemplazar
las hojas y las cuchillas
internas
Si siente que debe hacer fuerza para afeitarse
o si debe pasar la máquina sobre la misma
zona varias veces para conseguir un
resultado suave, cambie las cuchillas
internas. Cambie las hojas si irritan la piel. La
vida útil de las cuchillas/hojas dependerá de
la frecuencia de uso del aparato.
Precaución: Siempre reemplace las cuchillas
y las hojas al mismo tiempo.
GARANTÍA LIMITADA DE DOS AÑOS
FIG. 4
3. Sostenga las cuchillas por los costados e
insértelas sobre el cabezal, un lado tras otro.
(FIG. 4)
Alzar
Sostener aquí
Sostener aquí
FIG. 5
FIG. 2
4. Presione firmemente hasta que encaje.
5. Vuelva a instalar el cabezal. (FIG. 5)
1. Retire el cabezal (FIG. 2)
Sostener aquí
Sostener aquí
Resorte
Resorte
FIG. 3
Limited Two-Year Warranty
Conair reparará o remplazará (a su opción) su
aparato sin cargo por un período de 24 meses
a partir de la fecha de compra si presentara
defectos de materiales o fabricación.
Para obtener servicio técnico bajo esta
garantía, regrese su aparato al Centro de
Servicio indicado al dorso, junto con su recibo
de compra y un cheque o giro postal de
US$3.00 por gastos de manejo y envío. Los
residentes de California sólo necesitan dar
una prueba de compra y deben llamar al
1-800-3-CONAIR para recibir instrucciones de
envío. En ausencia del recibo de compra, el
período de garantía será de 24 meses a partir
de la fecha de fabricación.
CUALQUIER GARANTÍA, OBLIGACIÓN O
RESPONSABILIDAD IMPLÍCITAS,
INCLUYENDO PERO NO LIMITADAS A LA
GARANTÍA IMPLÍCITA DE
COMERCIABILIDAD Y APTITUD PARA UN
PROPÓSITO ESPECÍFICO, ESTARÁN
LIMITADAS POR LOS 24 MESES DE LA
PRESENTE GARANTÍA ESCRITA. Algunos
Estados no permiten limitaciones sobre la
duración de una garantía implícita, de modo
que las limitaciones mencionadas pueden no
regir para usted.
CONAIR NO SERÁ RESPONSABLE, EN NINGÚN
CASO, POR NINGÚN DAÑO ESPECIAL,
INCIDENTAL O CONSECUENTE DEBIDO AL
INCUMPLIMIENTO DE ESTA O CUALQUIER
OTRA GARANTÍA, EXPRESA O IMPLÍCITA.
Spring
Hold Here
FIG. 5
Hold Here
3. Hold the new cutter firmly on the sides and
guide it gently into the inner cutter mount until
it locks into place. (FIG. 4)
FIG. 4
Conair will repair or replace (at our option)
your unit free of charge for 24 months from
the date of purchase if the appliance is
defective in workmanship or materials.
To obtain service under this warranty, return the
defective product to the service center listed on
back, together with your purchase receipt and
$3.00 for postage and handling. California
residents need only provide proof of purchase
and should call 1-800-3-CONAIR for shipping
instructions. In the absence of a purchase
receipt, the warranty period shall be 24 months
from the date of manufacture.
ANY IMPLIED WARRANTIES, OBLIGATIONS,
OR LIABILITIES, INCLUDING BUT NOT
LIMITED TO THE IMPLIED WARRANTY OF
MERCHANTABILITY AND FITNESS FOR A
PARTICULAR PURPOSE, SHALL BE LIMITED
IN DURATION TO THE 24-MONTH DURATION
OF THIS WRITTEN, LIMITED WARRANTY.
Some states do not allow limitations on how
long an implied warranty lasts, so the above
limitations may not apply to you.
IN NO EVENT SHALL CONAIR BE LIABLE FOR
ANY SPECIAL, INCIDENTAL, OR
CONSEQUENTIAL DAMAGES FOR BREACH OF
THIS OR ANY OTHER WARRANTY, EXPRESS OR
IMPLIED, WHATSOEVER. Some states do not
allow the exclusion or limitation of special,
incidental, or consequential damages, so the
above limitation may not apply to you.
2. Presione el costado de las cuchillas para
liberarlas y retírelas (Fig. 3) Tenga cuidado de
no perder el resorte; lo necesitará para
instalar las nuevas cuchillas.
2. Push one side of the cutter to unlock it and
take it out. (Fig. 3) Be careful not to lose the
small spring, as it will be needed with the
new cutter.
FIG. 3
Spring
Hold Here
4. Press firmly until the cutter snaps into place.
5. Replace the foil frame. (FIG. 5)
1. Remove the foil frame. (FIG. 2)
FIG. 2
Hold Here
Lift
Replace the foil frame when you find you
have to push harder on the shaver to get a
close shave, or if you have to go over an area
more often to get a smooth result. It is also
time to replace the foils if you experience skin
irritation. Replacement time will depend on
how often you use your shaver and how
quickly your hair grows.
Caution: Never replace the cutters without
replacing the foil as well.
Replacing the
Foil frame & cutter
MÁQUINA
DE AFEITAR
Algunos Estados no permiten la exclusión o
limitación de daños especiales, incidentales o
consecuentes, de modo que las limitaciones
mencionadas pueden no regir para usted.
Esta garantía le otorga derechos legales
específicos y usted puede tener otros
derechos que varían de un Estado a otro.
alimentadA por pilas
Para registrar su producto, visítenos en:
www.conair.com/registration
Manual de instrucciones
©2013 Conair Corporation
Centro de servicio
Conair Corporation
Service Department
7475 North Glen Harbor Blvd.
Glendale, AZ 85307
13PG001039
Modelo SHV1
IB-12432