1
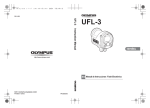
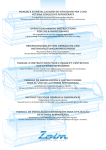
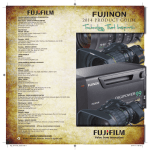
•
•
•
•
•
Fujinon 38-90mm Auto Focus Zoom Lens
Automatic Exposure and Automatic Flash Operation
Self-Timer
Red-Eye Reduction Flash
Date/Time Imprinting
ENGLISH/ESPAÑOL
OWNER’S MANUAL
MANUAL DE INSTRUCCIONES
202B10229520
U
CONTENTS
FEATURES ............................................................................... 2
PART NAMES ........................................................................... 4
Liquid Crystal Display ............................................................. 6
Viewfinder ............................................................................... 7
1. PRELIMINARY STEPS
ATTACHING THE STRAP ........................................................ 8
LOADING THE BATTERIES .................................................... 9
TURNING ON YOUR CAMERA ............................................. 11
CHECKING YOUR BATTERY ................................................ 12
SETTING THE DATE
(YEAR-MONTH-DAY/HOUR-MINUTE) .................................. 13
SELECTING THE DATE MODE ............................................. 16
2. USING YOUR CAMERA
LOADING THE CAMERA ....................................................... 17
USING YOUR CAMERA ......................................................... 21
USING THE AUTO-FOCUS LOCK ........................................ 26
UNLOADING THE FILM OR REMOVING
FILM IN MID-ROLL ................................................................. 28
3. ADVANCED TECHNIQUES
SELECTING THE EXPOSURE MODE .................................. 32
Effective flash range ............................................................. 34
2
ENGLISH
USING THE SELF-TIMER ...................................................... 40
TROUBLE SHOOTING ........................................................... 42
COMMON SENSE CAMERA CARE ...................................... 48
SPECIFICATIONS .................................................................. 50
IMPORTANT SAFETY NOTICE ............................................. 54
FEATURES
•
•
•
•
•
Fujinon 38-90mm Auto Focus Zoom Lens
Automatic Exposure and Automatic Flash Operation
Self-Timer
Red-Eye Reduction Flash
Date/Time Imprinting
The “CE” mark certifies that this product satisfies the
requirements of the EU (European Union) regarding
safety, public health, environment and consumer
protection.(“CE” is the abbreviation of Conformité
Européenne.)
This product is in conformity with Directive 89/336/EEC.
ÍNDICE
CARACTERÍSTICAS ................................................................ 3
NOMBRE DE LAS PARTES ..................................................... 4
Panel de Cristal Líquido (LCD) .............................................. 6
Visor ........................................................................................ 7
1. OPERACIONES PRELIMINARES
COLOCACIÓN DE LA CORREA .............................................. 8
COLOCACIÓN DE LAS PILAS ................................................. 9
PARA ACTIVAR/DESACTIVAR LA CÁMARA ....................... 11
COMPROBACIÓN DE LAS PILAS ......................................... 12
AJUSTE DE LA FECHA
(AÑO-MES-DÍA/HORA-MINUTOS) ........................................ 13
SELECCIÓN DEL MODO DE LA FECHA .............................. 16
2. UTILIZACIÓN DE LA CÁMARA
COLOCACIÓN DE LA PELÍCULA .......................................... 17
UTILIZACIÓN DE LA CÁMARA ............................................. 21
USO DEL BLOQUEO AF (ENFOQUE AUTOMÁTICO) ........ 26
EXTRACCIÓN DE LA PELÍCULA/ EXTRACCIÓN DE
LA PELÍCULA A MITAD DE ROLLO ...................................... 28
3. OPERACIONES AVANZADAS
SELECCIÓN DEL MODO DE EXPOSICIÓN ......................... 32
Gama de alcance del flash ................................................... 34
ESPAÑOL
EL DISPARADOR AUTOMÁTICO ......................................... 40
FALLOS, CAUSAS POSIBLES Y SOLUCIONES .................. 44
CONSERVACIÓN DE LA CÁMARA Y PRECAUCIONES ..... 49
CARACTERÍSTICAS TÉCNICAS ........................................... 52
ADVERTENCIAS Y PRECAUCIONES .................................. 56
CARACTERÍSTICAS
•
•
•
•
•
Objetivo autofocus Fujinon con Zoom de 38-90mm
Exposición y flash automáticos
Autodisparador
Reducción del efecto “ojos rojos”
Impresión de fecha/hora
La marca “CE” certifica que este producto cumple los
requisitos de la UE (Unión Europea) en lo que se refiere a la seguridad, la salud pública y la protección del
medio ambiente y del consumidor. (“CE” es la abreviatura de Conformité Européenne).
Producto conforme con la Normativa 89/336/EEC.
3
PART NAMES/NOMBRE DE LAS PARTES
7(→p.30)
1(→p.32)
2(→p.11)
3(→p.23)
4
5
8(→p.40,13,15)
9(→p.13,16)
0(→p.6)
A(→p.32)
B(→p.35,41)
C
6(→p.8)
D(→p.11)
ENGLISH
1
2
3
4
5
6
7
8
9
0
A
B
C
D
Exposure Mode Button
Power Button
Shutter Release Button
Viewfinder Window
AE Light Sensor
Strap Lug
Mid-Roll Rewind Button
Self-timer/SET (Date Set)
Button
DATE/SEL (Date Select)
Button
Liquid Crystal Display
Flash
Red-eye Reduction/
Self-Timer Lamp
AF (Auto-Focus) Window
Fujinon Lens/ Lens Cover
ESPAÑOL
1
2
3
4
5
6
7
8
9
0
A
B
C
D
4
Botón de modo de exposición
Botón de alimentación
Disparador
Ventanilla del visor
Fotosensor de exposición
automática
Anclaje de Ia correa
Botón de rebobinado a
mitad de rollo
Botón de disparador automático/SET (Ajuste de la
fecha)
Botón DATE(Fecha)/SEL
(Selección de la fecha)
Panel de Cristal Líquido (LCD)
Flash
Piloto de reducción del
efecto “ojos rojos”/
Disparador automático
Ventanilla AF (enfoque
automático)
Objetivo Fujinon/Tapa del
objetivo
ENGLISH
E(→p.23)
I(→p.22)
J(→p.18)
K
F(→p.7)
E
F
G
H
I
J
K
L
M
G(→p.19)
N
O
P
H(→p.19)
L(→p.18,29)
M(→p.9)
N
AF Lamp (green)
Viewfinder Eye-piece
FILM TIP Mark
Film Take-up Spool
Zoom Button
Film Confirmation
Window
Film Pressure Plate
Camera Back
Battery Compartment
Cover
Film Chamber
Tripod Socket
Camera Back Lock
ESPAÑOL
E Piloto AF (verde)
F Ocular del visor
G Marca del extremo de la
película
H Bobina de recogida de la
película
I Botón del zoom
J Ventanilla de verificación
de la película
K Placa de presión de la
película
L Tapa posterior de la
cámara
M Tapa del compartimento
de las pilas
N Compartimento de la
película
O Zapata para trípode
P Cierre de la tapa
posterior de la cámara
O
P(→p.18,29)
5
ENGLISH
Liquid Crystal Display/
Panel de Cristal Liquido (LCD)
Q(→p.38)
U(→p.12)
R(→p.35)
V(→p.20,40)
S(→p.37,23)
T(→p.39)
W(→p.40)
X(→p.13,16)
6
Q Landscape Mode
R Red-eye Reduction Flash
Mode
S Back Light Compensation Flash Mode
Flash-off Mode
Flash Charging
T Night Portrait (Slow Sync)
Mode
U Battery Status
V Picture Counter/Selftimer Count
W Self-timer Mode
X Date Display
ESPAÑOL
Q Indicador del modo paisajes
R Indicador del modo de
reducción del efecto “ojos
rojos”
S Flash de compensación
de contraluz
Flash desactivado
Carga del flash
T Indicador del modo de
retrato nocturno
(sincronización lenta)
U Indicador de capacidad
de las pilas
V Contador de exposiciones/
Contador del disparador
automático
W Indicador del modo del
disparador automático
X Visualización de la fecha
ENGLISH
Viewfinder/Visor
A : Framing area
Compose the image within this area.
C
B : AF (Auto-focus) spot
Position this spot over the main subject
in your picture.
C : Parallax correction guides
A
B
When taking pictures at close distances
(Closer than 1.5 m/4.9 ft.), use these indicators as a guide when composing your
picture. (→p.24)
ESPAÑOL
A : Área de encuadre
Componga la imagen dentro de esta
zona.
B : Recuadro AF (enfoque automático)
Coloque este recuadro sobre el sujeto
principal de la fotografía.
C : Marcas de corrección de paralaje
Cuando se toma una fotografía de un
primer plano, utilice estas marcas como
una guía para componer la fotografía.
(→pág.24)
7
ENGLISH
1
1. PRELIMINARY STEPS
ESPAÑOL
1. OPERACIONES PRELIMINARES
ATTACHING THE STRAP
COLOCACIÓN DE LA CORREA
Slip the thin piece of the camera-strap
through the small hole on the left side of
the camera and leave a loop. Slide the
thick part of the strap through this loop
and pull tight. Take up any slack to make
sure the strap is tightly on the camera.
Pase el extremo de la correa por el ojal
situado en el lateral de la cámara y sujételo como indica la ilustración.
Do not use a strap made for cellular phones
or other similar electronic products. These
straps are usually too weak to hold your camera securely. For safety, use only straps designed for cameras.
Al usar una correa de tipo convencional, confirme que esté en buenas condiciones y compruebe su resistencia. Tenga mucho cuidado
al utilizarla porque generalmente son usadas
para artículos de bajo peso.
2
8
ENGLISH
1
2
3
ESPAÑOL
LOADING THE BATTERIES
COLOCACIÓN DE LAS PILAS
Your camera requires two alkaline
batteries (Size AA/LR6) for reliable
service.
To load the batteries:
1 Flip open the battery compartment
cover.
Su cámara utiliza dos pilas alcalinas
(LR6 de tamaño AA) o equivalentes.
Para cargar las pilas:
1 Abra la tapa del compartimento de
las pilas.
2 Load the batteries following the instructions shown in the diagram on
the inside of the battery compartment cover. Important: Pay careful
attention to the polarity of the batteries as indicated by the , and .
markings on the battery. The batteries must be loaded the correct way
or the camera will not work.
3 When the batteries are loaded correctly, close the battery compartment
cover by pressing it until it snaps into
place. If it does not snap into place,
do not force it but recheck the position
of the batteries.
2 Inserte las pilas siguiendo las instrucciones que se indican en la parte interior de la tapa del compartimento de
las pilas, prestando especial atención
a la posición de los polos , y ..
3 Una vez insertadas las pilas de forma correcta, cierre la tapa del compartimento de las pilas de modo que
quede bien trabada.
9
ENGLISH
∗
∗
∗
∗
∗
∗
∗
∗
10
Do not apply force when opening or closing the battery compartment cover.
Make sure that new replacement batteries are both same brand
and type.
Do not use Ni-Cd batteries.
Two alkaline batteries should be enough for about 240 pictures
(based on our test conditions).
When traveling, take extra batteries in the event the batteries stop
working. This is important if you visit areas where new batteries
may be difficult to get.
Check the battery capacity before you use your camera. (→p.12)
After changing the batteries, reset the date to get the right date/
time recording. (→p.13)
When it is cold, batteries will not work as well. Warm the batteries,
e.g. in your pocket, before using them.
ESPAÑOL
∗
∗
∗
∗
∗
∗
∗
∗
No ejerza demasiada fuerza sobre la tapa del compartimento de
las pilas.
Asegúrese de que las nuevas pilas sean ambas de la misma marca y tipo.
No utilice pilas Ni-Cd.
Dos pilas alcalinas son suficientes para realizar 240 fotografías
aproximadamente (dato basado en nuestras condiciones de prueba).
Si se utilizan muchas películas, por ejemplo al realizar un viaje, se
recomienda llevar pilas de reserva (especialmente en zonas en las
que podría ser difícil adquirirlas).
Compruebe el indicador de capacidad de las pilas antes de utilizar
la cámara. (→pág.12)
Después de cambiar las pilas, vuelva a fijar la fecha. (→pág.13)
A baja temperatura se reduce la capacidad de las pilas. Caliéntelas, por ejemplo en el bolsillo, antes de utilizarlas.
ENGLISH
TURNING ON YOUR CAMERA
Before you can use your camera, you
must turn the power on. First press the
power supply button which turns on the
power. Pressing this button a second time
will turn the power off.
☞ When you turn your camera on, the lens
ESPAÑOL
PARA ACTIVAR/DESACTIVAR
LA CÁMARA
Pulse el botón de alimentación para activar la cámara y vuélvalo a pulsar para
desactivarla.
☞ Cuando se activa la cámara, la tapa del objetivo se abre y en el panel LCD aparecen
las indicaciones de inicio.
cover will open and the initial display will
appear on the LCD.
∗
When you are finished using your camera,
turn the power off to keep your battery working well longer. If the power supply is left on
for more than 7 minutes without the camera
being used, the camera will turn itself off.
Before you turn the camera on, make sure that
the lens is not blocked by anything that would
interfere with the lens extending into picturetaking position.
∗
Si la cámara permanece activada sin utilizarse durante más de 7 minutos, se desactivará
de forma automática.
Antes de activar la cámara, asegúrese de que
el objetivo no esté obstruido para facilitar así
su extensión a la posición de toma de fotografías.
11
ENGLISH
12
ESPAÑOL
CHECKING YOUR BATTERY
COMPROBACIÓN DE LAS PILAS
To determine the capacity of the battery
in your camera, turn the camera on and
check the battery indicator on the LCD
panel.
1 Lit
: Battery is OK.
2 Lit
: Battery is low. Replace with
new batteries.
3 Blinks: Shutter cannot be released
because battery is dead. Replace with new batteries.
Active la cámara y compruebe el indicador de capacidad de las pilas en el panel
LCD.
1 Iluminado : La carga de las pilas es
correcta.
2 Iluminado : La carga de las pilas es
insuficiente. Coloque
pilas nuevas.
3 Parpadea : El obturador no dispara
porque las pilas están
agotadas. Sustitúyala.
∗
∗
∗
∗
Check the battery capacity before you use
your camera.
The battery can be replaced even while there
is a partially exposed roll of film in the camera.
Compruebe el indicador de capacidad de las
pilas antes de utilizar la cámara.
Las pilas se pueden sustituir aunque haya
película parcialmente expuesta.
ENGLISH
SETTING THE DATE
(YEAR-MONTH-DAY/
HOUR-MINUTE)
1
2
2
Setting the date when loading or changing the batteries.
Ajuste de la fecha cuando se colocan
o cambian las pilas.
Turn the camera on and then press the
DATE button.
Active la cámara y pulse el botón DATE.
☞ The “Year” blinks and the camera will enter
1
ESPAÑOL
AJUSTE DE LA FECHA
(AÑO-MES-DÍA/
HORA-MINUTOS)
the date setting mode.
Year : ’02 to ’32 (2002 to 2032)
Month : 1 to 12
Day : 1 to 31
Time : 0 to 23 hours; 00 to 59 minutes
(Based on a 24-hour clock)
1 Press the SET button to change the
blinking setting.
2 Press the SEL button to select the
next part of the date/time information.
☞ Each press of the SEL button selects a different element in the date/time information
in the following order:
Year→Month→Day→Hours→Minutes
☞ El “Año” parpadea y la cámara entra en el
modo de ajuste de fecha.
• Ajuste
Año : ’02 a ’32 (2002 a 2032)
Mes : 1 a 12.
Día : 1 a 31
Horas : 0 a 23.
Minutos : 00 a 59
1 Pulse el botón SET para modificar el
valor que esté parpadeando.
2 Pulse el botón SEL para seleccionar
el siguiente elemento de la fecha u
hora.
☞ Cada vez que pulse el botón SEL, seleccionará un elemento distinto de la indicación
de fecha y hora en el orden siguiente:
año→mes→día→horas→minutos
13
ENGLISH
3
Pulse el botón DATE/SEL después de
haber modificado los “Minutos” para salir del modo de ajuste de fecha y hora.
press the DATE/SEL button when the time
signal indicates zero.
radio, pulse el botón DATE/SEL cuando la
señal horaria anuncie cero.
☞ To set the time (hour or minute) by the radio,
∗
14
ESPAÑOL
To cancel the date/time setting mode,
press the DATE/SEL button after changing the “Minutes”.
The year, month, and day will change together with the hour and minute.
☞ Para ajustar la hora o los minutos según la
∗
El año, el mes y el día cambian conjuntamente en función de la hora y de los minutos.
ENGLISH
Changing the date after setting it.
1
Turn the camera on and then hold down
the DATE button for at least 2 seconds
or longer.
☞ The “Day” blinks and the date change mode
is entered.
ESPAÑOL
Cambio de la fecha después de haberla
puesto.
Active la cámara y mantenga pulsado el
botón DATE durante 2 segundos aproximadamente o más.
☞ El “Día” Parpadea y se activa el modo de
cambio de la fecha.
2
2
Using the process described in steps 2
1 to 2 on page 13, set the date with the
SET and SEL buttons.
Ajuste la fecha con los botones SET y
SEL siguiendo el procedimiento descrito
en los pasos 2 1 a 2, en la página 13.
ferent element in the date/time information
in the following order:
Day→Hours→Minutes→Year→Month
☞ Press the DATE/SEL button after changing
the “Month”.
nará un elemento distinto de la indicación
de fecha y hora en el orden siguiente:
día→horas→minutos→año→mes
☞ Pulse el botón DATE/SEL después de haber modificado el “Mes”.
☞ Each press of the SEL button selects a dif-
1
☞ Cada vez que pulse el botón SEL, seleccio-
15
ENGLISH
SELECTING THE DATE MODE
The date and time (year-month-day/ hourminute) will be printed at the lower right
of the picture.
∗
∗
Y
M
D
M
D
Y
D
M
D
16
The date display printed on the front of the
picture may not be clearly visible against a
dark background.
Since the date is printed on the film when the
picture is being advanced, the date may not
be printed on the last frame when more than
the standard number of frames are taken.
ESPAÑOL
SELECCIÓN DEL MODO DE LA
FECHA
La fecha y la hora (año-mes-día/horaminutos) se imprimirán en la parte inferior derecha de la fotografía.
∗
∗
La fecha impresa en la cara de la copia, será
más o menos visible en función del fondo de
la foto.
Como la fecha se imprime en la película
cuando ésta se bobina, puede que no aparezca en el último fotograma si se han realizado más fotos de lo normal.
Y : Year M : Month D : Day T : Time
Turn the camera on, and then press the
DATE button to enter date/time mode. The
date/time mode changes in the order
shown in the picture.
Y : Año M : Mes D : Día T : Hora
Active la cámara y pulse el botón DATE
para entrar en el modo de fecha y hora.
El modo de fecha y hora cambia en el
orden indicado en la ilustración.
∗
∗
Y
T
If “- - - - - -” is chosen, no date will appear on
the photograph.
Si elige “- - - - - - ”, la fecha no aparecerá en
la fotografía.
ENGLISH
A
B
2. USING YOUR CAMERA
C
ESPAÑOL
2. UTILIZACIÓN DE LA CÁMARA
LOADING THE CAMERA
COLOCACIÓN DE LA PELÍCULA
Your camera uses standard 35mm film
available anywhere. Almost all 35mm
films will have a DX coding symbol on
the film box and on the cassette itself.
Information you will see includes:
A : Number of pictures
B : DX code symbol
C : Film speed (sensitivity to light or ISO
rating)
Utilice una película de 35 mm que lleve
el símbolo DX en el envoltorio y en el
chasis de película. Encontrará la siguiente información:
A : Número de exposiciones
B : Símbolo de código DX
C : Sensibilidad de la película
• If non-DX coded film is used, the camera’s
automatic exposure system sets itself to ISO
100.
• Always load and remove film from your camera away from direct sunlight.
• En las películas sin símbolo de código DX
la sensibilidad se ajustará a ISO 100.
• Cargue y extraiga la película en un lugar
resguardado de la luz solar directa.
17
ENGLISH
Check that there is no film in the camera
and that the picture counter is not displayed.
1
∗
2
2
1
18
Never open the camera back while film is
in your camera. Before replacing the film,
refer to page 30.
ESPAÑOL
Compruebe que no haya una película
cargada en la cámara y que no se visualice el contador de exposiciones.
∗
No abra nunca la tapa posterior de la cámara mientras esté cargada la película.
Consulte la página 30 antes de cambiar la
película.
1 To load the film, slide camera back
lock in the direction of the arrow as
shown in the picture at left.
2 Open the camera back as shown.
1 Deslice el cierre de la tapa posterior
de la cámara en la dirección indicada
por la flecha.
2 Abra la tapa posterior de la cámara
en la dirección indicada por la flecha.
∗
∗
Never apply force when opening or closing
the camera back.
No aplique fuerza innecesaria en la tapa
posterior de la cámara.
ENGLISH
To load the roll of film keep the long end
of the spool in the film cassette at the
top of the film compartment as shown in
the drawing. Drop the film in the camera.
3
4
A : FILM TIP mark
B : Film take-up spool
C : Film cassette
While holding the film in place, pull the
end of the film out to the FILM TIP mark
and place it on top of the spool.
A
∗
∗
∗
B
C
Hold the film down so that it does not pop
out of the film compartment.
Make sure the end of the film is correctly
threaded onto the spool.
If you should pull the film out too far, remove
the film and turn the longer end of the spool
slowly to rewind some of the exposed film
and adjust the end to the correct length to
reach the FILM TIP mark. Be careful not to
rewind the end of the film completely into the
cassette.
ESPAÑOL
Inserte el rollo de película.
A : Marca del extremo de la película
B : Bobina de recogida de la película
C : Chasis de película
Mientras sostiene el chasis de película
en su lugar, tire del extremo de la película hacia afuera hasta la marca del extremo de la película y colóquela sobre la
bobina.
∗
∗
∗
Encaje el chasis de forma que no se salga.
Compruebe que el extremo de la película
quede enrollado en la bobina.
Si extrae demasiada película, saque el chasis y corrija la cantidad de película extraída. 19
ENGLISH
5
Close the camera back.
☞ The film is wound to the first frame.
∗
6
20
The type, number of pictures, and speed of
the film that has been loaded may be checked
with the film confirmation window.
ESPAÑOL
Cierre la tapa posterior de la cámara.
☞ La película se rebobina automáticamente
hasta el primer fotograma.
∗
A través de la ventanilla de verificación de
la película podrá comprobar el tipo, número de exposiciones y la sensibilidad de la
película que haya cargado.
Check that the picture counter “ ” appears on the LCD.
Compruebe que en el panel LCD aparezca el contador de exposiciones “ ”.
If the film is not correctly loaded, “ ” blinks
on the LCD. In this case, load the film again.
Si la película no está correctamente cargada,
“ ” parpadea. Inserte un rollo de película
correctamente para poder tomar fotografías.
ENGLISH
1
ESPAÑOL
USING YOUR CAMERA
UTILIZACIÓN DE LA CÁMARA
Turn the camera on and hold it firmly using both hands as shown in the picture.
Active la cámara y sosténgala firmemente
utilizando ambas manos tal y como se
muestra en la ilustración.
☞ When taking vertical pictures, hold the camera with the flash unit at the top.
☞ Cuando realice tomas de imágenes verticales, sostenga la cámara con la lámpara del
flash hacia arriba.
2
Before taking important, once-in-a-lifetime pictures such as weddings or special events, take
a few test shots to make sure your camera is
working correctly. If you purchased your camera before going on a trip, shoot a roll or two to
get familiar with the operation of the camera.
Bring an extra set of batteries and keep this
instruction book with you for handy reference.
Antes de efectuar tomas fotográficas importantes, como las pertenecientes a una boda
o a algún acontecimiento especial, realice algunas tomas de prueba para verificar que la
cámara funcione correctamente. Si adquirió
la cámara antes de emprender un viaje, dispare uno o dos rollos para familiarizarse con
su funcionamiento.
Make sure that nothing is blocking the
lens, the flash, the AF (Auto-Focus) windows or the AE (Automatic exposure) light
sensor.
Asegúrese de no tapar con los dedos ni
con la correa de la cámara el objetivo, el
flash, las ventanillas AF (enfoque automático) o el sensor luminoso AE.
21
ENGLISH
3
4
22
ESPAÑOL
To use the zoom lens, press the
mark
until you see the composition you want
in the finder. Pressing the
mark will
set the lens at the shorter focal lengths
to obtain wide-angle coverage.
Cuando quiera acercarse al sujeto prehasta obtesione la marca del zoom
ner el acercamiento deseado. Para
obtener un zoom gran angular, pulse la
marca
.
∗
∗
The focusing range for clear pictures is a
minimum of 0.9 m (3.0 ft.) with no maximum.
Aim the camera at your subject so that
the whole AF frame covers it.
La distancia mínima a la que se puede
fotografiar es de 0,9 m (3,0 ft.) – ∞.
Apunte al sujeto para que quede en el
centro del área de recuadro AF.
ENGLISH
5
Press down the shutter release button
halfway.
☞ Focusing is complete when the AF lamp
ESPAÑOL
Pulse el disparador hasta la mitad.
☞ El enfoque termina cuando se ilumina el piloto AF (verde).
(green) lights up.
∗
6
If you are closer than 90 cm (35 in.) to the
subject, the AF lamp will start blinking to warn
you that the subject cannot be focused. If you
are closer than 45 cm (18 in.) to the subject,
the AF lamp turns on but the subject cannot
be focused.
Press the shutter release button down
completely the picture is taken.
☞ The film is advanced to the next frame.
☞ The number shown in the picture counter will
increase by 1 with each picture taken.
∗
∗
The AF lamp and red-eye reduction/self-timer
lamp will go off once and reappear immediately after the shutter is released.
During the charging time of the flash (when
the alarm sign is blinking “ ”) the shutter
cannot be released.
∗
Si está a menos de 90 cm (35 in.) del sujeto,
el piloto AF parpadeará para avisarle de que
el sujeto no puede ser enfocado. Observe que
cuando está a una distancia inferior a 45 cm
(18 in.), el piloto AF se ilumina, pero el enfoque no es nítido.
Pulse el disparador hasta el fondo.
☞ La película avanza hasta el siguiente fotograma.
☞ El número indicado en el contador de expo-
∗
∗
siciones se incrementará en 1 cada vez que
se realice una toma fotográfica.
El piloto AF y el de reducción del efecto “ojos
rojos”/disparador automático se apagan y
vuelven a encenderse inmediatamente después de dispararse el obturador.
Durante la carga del flash (mientras la señal
de alarma “ ” parpadea), el obturador no
se puede disparar.
23
ENGLISH
Close-up photography
C
A
24
B
A : Viewfinder
B : Print finishing
C : Parallax correction guides
When photographing a subject that is
closer than about 1.5 m (4.9 ft.) from the
camera, the area within the frame shown
in the diagram on the left will be in the
picture. Compose the picture so that the
subject that you want to photograph is
within the frame.
When taking close ups, the area seen through
the viewfinder and the area seen by the lens
for the photographed subject will be different.
This is because the viewfinder and lens are
not in the same position, a difference known
as “parallax”. The parallax correction guides
indicates the difference between what the
viewfinder sees and what the lens sees when
the picture is taken.
ESPAÑOL
Fotografías en primer plano
A : Visor
B : Copia impresa
C : Marcas de corrección de paralaje
Cuando se fotografía un sujeto que está
a menos de aproximadamente 1,5 m (4,9
ft.) de la cámara, la imágen fotografiada
corresponderá al área que engloba el
marco de la ilustración de la izquierda.
Componga la imagen de tal manera que
el sujeto que desea fotografiar se encuentre dentro del marco.
Cuando se realizan primeros planos, el área
observada a través del visor y el área fotografiada serán diferentes (ya que el visor y el objetivo están situados en diferente posición).
Las marcas de corrección de paralaje indican
la diferencia entre el área observada a través
del visor y el área fotografiada realmente.
ENGLISH
There are a few conditions when the camera’s autofocus
system may not function accurately. At these times, you
should use the “Auto-Focus Lock” settings (→p.26) or the
“Landscape Mode” setting (→p.38). Conditions requiring
these settings include:
•
•
•
•
•
A bright light source within the picture such as the sun near your
subject, a strong light reflection such as from water or from the
windshield of a car;
A mirror or other strongly reflective surface near the center of the
picture;
Shooting black light-absorbing subjects such as hair;
Presence of flames, smoke or gaseous substances;
Photographing through glass.
ESPAÑOL
En los casos siguientes puede que la cámara no pueda
enfocar un sujeto. Estos sujetos deben fotografiarse con la
función “Bloqueo AF” (→pág.26) o con el “modo paisajes”.
(→pág.38)
•
•
•
•
•
Si cerca del sujeto que se desea fotografiar hay una fuente luminosa potente, como el sol, o hay luz reflejada procedente del parabrisas de un vehículo, olas, etc.
Si hay un espejo u otras superficies que reflejen la luz, como metales, cerca del centro de la imagen.
Si se fotografían sujetos de color negro, como el cabello, que absorban la luz.
Si hay llamas, humo o substancias gaseosas.
Si se está fotografiando a través de un cristal.
25
ENGLISH
1
2
26
USING THE AUTO-FOCUS LOCK
In the example shown at left, the AF frame
is off the subject (in this case, the people). It covers the background. In this case
the lens will not focus on the subject but
the background.
Move the camera to position the AF frame
over the subject.
ESPAÑOL
USO DEL BLOQUEO AF
(ENFOQUE AUTOMÁTICO)
En la composición que se muestra a la
izquierda, el recuadro AF no está centrado sobre el sujeto (en este caso la persona). En consecuencia, el objetivo no
enfoca el sujeto que se desea fotografiar.
Mueva la cámara hasta que el recuadro
AF quede sobre el sujeto.
ENGLISH
3
With the AF frame positioned over the
subject, press down the shutter release
button halfway to set the Auto-Focus lock.
☞ Check that the AF lamp (green) lights up.
4
ESPAÑOL
Con el recuadro AF sobre el sujeto, pulse el disparador hasta la mitad para fijar
el bloqueo AF.
☞ Compruebe que el piloto AF (verde) está iluminado.
While holding the shutter release button
halfway down to keep the Auto-focus lock
on, move the camera back to the original
position to recompose your picture, then
press the shutter release button all the way
down.
Mientras mantiene pulsado hasta la mitad el disparador para mantener el bloqueo AF activado, vuelva a colocar la
cámara en su posición inicial para recomponer la imagen; luego, pulse totalmente
el disparador.
∗
∗
The Auto-Focus lock operation can be repeated any number of times before the shutter trips.
Se puede repetir el bloqueo AF tantas veces como sea necesario antes de disparar
el obturador.
27
ENGLISH
1
UNLOADING THE FILM OR
REMOVING FILM IN MID-ROLL
To Unload the Film
When the last frame in the film has been
exposed, the lens part is stored in the
camera body and the film automatically
rewinds.
☞ When rewinding is complete, the picture
counter will read “ ”.
ESPAÑOL
EXTRACCIÓN DE LA PELÍCULA/
EXTRACCIÓN DE LA PELÍCULA
A MITAD DE ROLLO
Extracción de la película
Una vez expuesto el último fotograma de
la película, la parte del objetivo se meterá en el cuerpo de la cámara y la película
será rebobinada automáticamente.
☞ Una vez completado el rebobinado, el contador de exposiciones indicará “ ”.
∗
28
Sometimes more photographs can be taken
than the stated number of pictures, but the
final frame may not be printed.
Check that the motor has stopped and that
“ ” is displayed. If the camera back is opened
before “ ” is displayed, the following may occur. (→p.31)
• The film is exposed to the light.
• When the next film is loaded, it is immediately rewound and “ ” is displayed.
∗
A veces es posible tomar más fotografías
que la cantidad indicada, pero es posible que
el último fotograma no sea impreso.
Compruebe que el motor se haya detenido y
que se muestre “ ”. Si abre la tapa posterior
de la cámara antes de que se muestre “ ”,
puede ocurrir lo siguiente. (→pág.31)
• La película será expuesta a la luz.
• Al cargar el siguiente rollo, éste se rebobinará inmediatamente y se visualizará “ ”.
ENGLISH
2
2
ESPAÑOL
1 Slide the camera back lock in the direction indicated by the arrow.
2 Open the camera back in the direction indicated by the arrow.
1 Deslice el cierre de la tapa posterior
de la cámara en la dirección indicada
por la flecha.
2 Abra la tapa posterior de la cámara
en la dirección indicada por la flecha.
∗
∗
1
3
Never apply force when opening or closing
the camera back.
Remove the film.
No aplique fuerza innecesaria en la tapa
posterior de la cámara.
Extraiga la película.
29
ENGLISH
Removing film in mid-roll
Press the
button with the point of a
pen or something similar.
☞ When rewinding is complete, the picture
counter will read “ ”.
∗
30
Do not press the
button with any object
that has a sharp point such as a pin, needle
or a very sharp pencil.
ESPAÑOL
Extracción de la película a mitad de rollo
Presione el botón
con la punta de
un bolígrafo u objeto similar.
☞ Una vez completado el rebobinado, el contador de exposiciones indicará “ ”.
∗
No presione el botón
con ningún objeto de punta muy aguda.
Check that the motor has stopped and
that “ ” is displayed before removing the
film.
Antes de extraer la película, compruebe
que el motor se haya detenido y que se
visualice “ ”.
Film cannot be reused once it has been rewound. Do not press the
button except
when removing the film for developing.
La película no puede volverse a utilizar una
vez rebobinada. No presione el botón
excepto cuando quiera extraer la película para revelarla.
ENGLISH
ESPAÑOL
◆ Do not open the camera back while there is a film in
mid-roll in the camera.
◆ No abra la tapa posterior de la cámara si hay cargada una película a mitad de rollo.
camera, the film may be exposed to the light.
☞ The picture counter is reset to “ ”.
☞ El contador de exposiciones se vuelve a situar en “
☞ If the camera back is opened while there is a film in mid-roll in the
If the camera back is opened by mistake:
1 Close the camera back without removing the film.
2 The remaining frames can be used.
☞ Si se abre la tapa posterior de la cámara y hay una película cargada a mitad de rollo, ésta podría ser expuesta a la luz.
”.
Si se abre la tapa posterior de la cámara por error:
1 Cierra la tapa posterior de la cámara sin extraer la película.
2 Pueden utilizarse los fotogramas restantes.
∗
∗
Since the picture counter is reset to “ ” when the camera back is
opened, the correct film count is not displayed. However, you can
continue to make pictures until the roll is finished at which time you
will feel a resistance in the film. At this point, rewind the film and
remove it from the camera. DO NOT TRY TO ADVANCE THE FILM
ONCE THIS RESISTANCE IS FELT.
Puesto que el contador de exposiciones se vuelve a situar a cero
siempre que la parte posterior de la cámara se abre, no se podrá
visualizar la cantidad correcta de fotogramas restantes. Sin embargo usted puede seguir fotografiando hasta que se termine el
carrete, momento en que notará resistencia en el avance de la
película. En ese punto, debe rebobinar la película dentro del chasis
y extraerla de la cámara. NO INTENTE HACER AVANZAR LA
PELÍCULA UNA VEZ HAYA NOTADO DICHA RESISTENCIA. 31
ENGLISH
ESPAÑOL
3. ADVANCED TECHNIQUES
SELECTING THE EXPOSURE
MODE
SELECCIÓN DEL MODO DE
EXPOSICIÓN
Your camera offers 6 exposure modes
to give you successful pictures under a
wide range of photographic situations
with various subjects. These modes are:
La cámara tiene 6 modos de exposición
para permitir disfrutar de la fotografía
según las circunstancias. Dichos modos
son los siguientes:
(
(
(
(
(
(
(
32
3.OPERACIONES AVANZADAS
) Automatic flash for low light situations
) Red-eye reduction flash for more
pleasing pictures of people
) Back light compensation flash
mode
) Flash-off mode for natural light pictures
) Landscape mode for pictures of
distant subjects
) Night portrait (slow sync) mode for
fill-flash pictures
(
(
(
(
(
) Flash automático en situaciones
de poca iluminación
) Modo de reducción del efecto
“ojos rojos”
) Modo de flash de compensación
de contraluz
) Modo de flash desactivado
) Modo paisajes
) Modo de retrato nocturno
(sincronización lenta)
ENGLISH
Each press of the
button changes
the exposure mode in the following order:
☞
→
→
→
→
→
• The automatic flash mode and red-eye reduction flash mode are maintained even
when the power is turned off.
• The back light compensation flash mode
and flash-off mode are cancelled when the
power in the camera is turned off.
• The landscape mode and night portrait
modes are stopped after a photo is taken
or the camera is turned off.
ESPAÑOL
Cada vez que pulse el botón
, el
modo de exposición cambiará en el orden siguiente:
☞
→
→
→
→
→
• El modo de flash automático y el modo de
reducción del efecto “ojos rojos” se mantienen incluso después de haber desactivado
la cámara.
• Los modos de flash de compensación de
contraluz y flash desactivado se anulan
automáticamente al desactivar la cámara.
• El modo paisajes y retrato nocturno se anulan automáticamente después de tomar la
fotografía o al desactivar la cámara.
33
ENGLISH
La distancia de alcance del flash varía según la sensibilidad de la película. Cuando haga fotografías en un lugar
oscuro, mantenga al sujeto dentro del alcance de la luz del
flash.
Effective flash range
Film speed
Wide angle
(38 mm)
Telephoto
(90 mm)
Gama de alcance del flash
Sensibilidad
Gran angular
de la película
(38 mm)
0.9 – 2.6 m
3.0 – 8.5 ft.
0.9 – 5.2 m
3.0 – 17.1 ft.
0.9 – 7.3 m
3.0 – 24.0 ft.
0.9 – 10.4 m
3.0 – 34.1 ft.
0.9 – 2.0 m
3.0 – 6.6 ft.
0.9 – 4.0 m
3.0 – 13.1 ft.
0.9 – 5.6 m
3.0 – 18.4 ft.
0.9 – 8.0 m
3.0 – 26.2 ft.
ISO 100
ISO 400
ISO 800
ISO 1600
(Using color negative film)
34
ESPAÑOL
The operating range of the film (flash distance) will vary depending upon the film’s sensitivity (ISO speed). When using
the flash, keep your subject within the range of the flash as
indicated in the chart below.
ISO 100
ISO 400
ISO 800
ISO 1600
0,9 – 2,6 m
3,0 – 8,5 ft.
0,9 – 5,2 m
3,0 – 17,1 ft.
0,9 – 7,3 m
3,0 – 24,0 ft.
0,9 – 10,4 m
3,0 – 34,1 ft.
Teleobjetivo
(90 mm)
0,9 – 2,0 m
3,0 – 6,6 ft.
0,9 – 4,0 m
3,0 – 13,1 ft.
0,9 – 5,6 m
3,0 – 18,4 ft.
0,9 – 8,0 m
3,0 – 26,2 ft.
(Utilizando película negativo color)
ENGLISH
(
: no display) Automatic flash at low
brightness mode
ESPAÑOL
(
Used for general photography.
: Sin indicación) Flash automático
en el modo de baja iluminación
Se utiliza para realizar fotografías normales.
The flash lamp fires automatically when
the brightness of the subject is lower than
the predetermined level.
La lámpara del flash se dispara automáticamente cuando la luminosidad del motivo es inferior a un nivel predeterminado.
(
(
) Red-eye reduction flash mode
Reduce red-eye.
The red-eye reduction lamp turns on for
about 1 second, then the camera takes a
picture when the flash fires.
The AF lamp continues to be lit while the redeye reduction lamp is lit. Do not move the camera from the time the AF lamp lights to the
time the flash fires.
) Modo de reducción del efecto
“ojos rojos”
Reducir el efecto “ojos rojos”.
El piloto de reducción del efecto “ojos rojos” se ilumina durante 1 segundo aproximadamente, y luego la cámara hace una
foto cuando el flash se dispara.
El piloto AF continúa iluminado mientras el
piloto de reducción de “ojos rojos” está encendido. No mueva la cámara desde el momento en que se ilumine el piloto AF hasta
que se dispara el flash.
35
ENGLISH
Dealing with red-eye
When you photograph a person in dim light using the flash,
the pupil of the eye will sometimes appear red. Under low
light, the pupils of the eye dilate for better vision. Red-eye is
caused by light from the flash entering the dilated pupils and
being reflected back to the lens. Red-eye reduction causes
a preliminary flash to fire before the actual picture is taken.
This causes the pupil to contract, reducing this reflection.
When the actual flash exposure is made, the degree of reflection is minimized, thus reducing red-eye.
When using red-eye reduction mode
•
•
36
Ask your subject to look directly into the camera.
Approach as closely as possible to make your picture.
ESPAÑOL
Unas palabras sobre el efecto “ojos rojos”
Cuando se realiza una fotografía con flash, de una persona
en un lugar con poca luz, a veces los ojos aparecen rojos.
Esto ocurre cuando la luz del flash entra en los ojos y se
vuelve a reflejar en el objetivo. Con el modo de reducción
del efecto “ojos rojos”, la pupila del sujeto se contrae antes
de que el flash se dispare. Cuando use este modo, tome las
siguientes precauciones:
•
•
Procure que la persona fotografiada centre su mirada directamente en el objetivo de la cámara.
Tome la fotografía acercándose lo más posible a la persona que
desea fotografiar.
ENGLISH
(
) Back light compensation flash
mode
Use this mode to avoid deep shadows when
photographing against the light such as a
person standing in front of a window or under
a tree with a very bright background. This produces more natural looking flash photographs.
Flash pictures taken even in a bright
place.
(
) Flash-off mode
Used when taking pictures under normal room
lighting or taking pictures of subject beyond the
flash range such as in a theatre or a stadium.
The flash stops firing.
∗
When taking pictures under low light, use a
tripod or other steady camera support whenever possible to avoid unclear pictures resulting from camera shake.
ESPAÑOL
(
) Modo de flash de compensación de contraluz
Se utiliza cuando se toman fotografías a contraluz, como por ejemplo una persona situada al lado de una ventana o debajo de un
árbol con un fondo muy luminoso.
Fotografías con flash tomadas incluso en
un lugar iluminado.
(
) Modo de flash desactivado
Se utiliza para tomar fotografías en locales
iluminados o de objetos alejados fuera del
alcance del flash, como en teatros o estadios.
El flash se desactivará.
∗
Cuando se fotografía en un lugar oscuro, recomendamos el uso de un trípode para evitar que la cámara se mueva.
37
ENGLISH
(
) Landscape mode
) Modo paisajes
Used when taking landscape pictures or photographing remote (night) scenes through window glass.
Este modo se utiliza para realizar fotografías
de paisajes o de escenas alejadas (nocturnas)
a través de cristales.
The lens is focused for the distant subjects. The flash does not fire in this mode.
El objetivo se enfoca para sujetos alejados. En este modo el flash no se dispara.
∗
∗
38
ESPAÑOL
(
This mode is cancelled after each shot.
When taking pictures under low light, use a
tripod or other steady camera support whenever possible to avoid unclear pictures resulting from camera shake.
∗
∗
Este modo se desactiva automáticamente en
cada disparo.
Cuando se fotografía en un lugar oscuro, recomendamos el uso de un trípode para evitar que la cámara se mueva.
ENGLISH
(
) Night portrait (slow sync) mode
Used when taking portraits to record the background in a night scene.
The slow shutter speed/red-eye reduction
flash mode can be used to make sure that
both people and nighttime background
scenery are photographed clearly. (After
the red-eye reduction lamp has lit for
about 1 seconds, the flash fires.)
∗
This mode is cancelled after each shot.
As a slow shutter speed is used with the night
portrait mode, be sure to place your camera on
a tripod or other solid support to prevent camera shake. It is also important that your subject
remain still during the complete exposure.
ESPAÑOL
(
) Modo de retrato nocturno
(sincronización lenta)
Este modo se utiliza para tomar fotografías
de personas con fondo iluminado, cuando
está oscuro.
El modo de velocidad baja del obturador/
reducción del efecto “ojos rojos” se puede utilizar para asegurarse de que tanto
las personas como el escenario de fondo nocturno se fotografíen claramente.
(Una vez que el piloto de reducción del
efecto “ojos rojos” se haya iluminado durante aproximadamente 1 segundo, el
flash se disparará.)
∗
Este modo se desactiva automáticamente
en cada disparo.
Dado que con el modo de retrato nocturno se
utiliza una velocidad lenta del obturador, asegúrese de utilizar un trípode para evitar que la
cámara se mueva. También es importante que
el sujeto no se mueva durante la exposición. 39
ENGLISH
1
EL DISPARADOR AUTOMÁTICO
Turn the camera on and press the
button.
Active la cámara y pulse el botón
☞ The self-timer can be used to take up to 3
consecutive exposures.
button changes the
self-timer mode in the following order:
→
→
☞ Each press of the
∗
2
The exposure modes can also be selected
in the self-timer mode.
Compose the picture and press the shutter release button.
☞ The camera focuses on the subject that the
AF frame is positioned over, and then the
self-timer starts.
∗
40
ESPAÑOL
USING THE SELF-TIMER
You can select the Auto-Focus lock mode
also. (→p.26)
When pressing the shutter release button, do
not stand in front of the camera. This may
cause a focusing error or underexposure.
.
☞ Con el disparador automático puede realizar hasta 3 exposiciones seguidas.
☞ Cada vez que pulse el botón , el modo
del disparador automático cambiará en el
orden siguiente:
→
→
∗
Los modos de exposición también se pueden seleccionar cuando el modo del disparador automático está activado.
Componga la imagen y pulse el disparador.
☞ La cámara enfoca el sujeto indicado por el
recuadro AF y pone en marcha el disparador automático.
∗
Se puede elegir también el modo de bloqueo
AF. (→pág.26)
No pulse el disparador mientras esté delante
de la cámara. Podría generar un error de enfoque o una subexposición.
ENGLISH
3
After the self-timer lamp remains lit for
about 7 seconds, it blinks for about 3 seconds, and then the shutter is released.
When taking consecutive exposures, the
shutter is released the set number of
times at an interval of between 3 and 10
seconds.
• To stop the self-timer mode after the selftimer has started, press the
button.
• The self-timer mode is cancelled after a
photo is taken or the camera is turned off.
ESPAÑOL
El piloto del disparador automático se
mantiene iluminado durante aproximadamente 7 segundos, luego parpadea durante aproximadamente 3 segundos y,
por último, se dispara el obturador. Al tomar exposiciones seguidas, el obturador
se dispara el número de veces fijado en
intervalos de 3-10 segundos.
• Para cancelar el modo de disparador automático una vez iniciado, pulse el botón
.
• El modo de disparador automático se cancela automáticamente después de tomar
la fotografía o al desactivar la cámara.
41
TROUBLE SHOOTING
ENGLISH
During operation
Problems
The shutter release won’t
trip.
Possible Causes
1 “
” symbol is blinking.
2 Power switch is not on.
3 Is “ ” blinking on the LCD?
4 “ ” is displayed on the picture counter.
42
Solutions
Page
1 Replace the new batteries.
2 Press the POWER button.
3 The flash is charging. Wait until “ ” stops blinking
and is displayed. (The flash takes about 7 seconds
to charge.)
4 Remove the film, and load an unused roll.
12
11
23
17
17
“ ” is blinking after loading
the film and closing the
camera back.
●
Did you pull the end of the film out to
the FILM TIP mark when loading the
film?
●
Pull the end of the film out to the FILM TIP mark
and correctly load the film.
After loading the film and
closing the camera back,
the film is rewound and “ ”
is displayed.
●
Did you open the camera back so as
to remove the film without checking that
the motor has stopped and that “ ” is
displayed?
●
Check that the motor has stopped and that “ ” is 28,31
displayed. After that, open the camera back and
remove the film.
The film rewound during
photographing.
●
Did you press the
middle of the film?
●
Be sure not to move the
loaded in the camera.
The self-timer cannot be
set.
●
Is the date correction mode on?
●
Cancel the date correction mode.
“ ” is blinking and the shutter can not be released.
●
The camera is broken.
●
Please contact a FUJIFILM authorized distributor.
button in the
button while film is
30
13
ENGLISH
Printed pictures
Problems
Possible Causes
Solutions
Page
1 Was your finger on the AF windows
when shooting?
2 Did you aim the subject properly?
1 When shooting a picture, hold your camera correctly so that your finger is not on the AF windows.
2 Compose the picture in the AF frame and shoot,
or shoot using AF Lock.
3 Clean the lens.
4 Hold the camera firmly and press the shutter release button gently. Use a tripod for slow shutter
speeds.
5 Select a mode other than
mode.
21
1 Subject was too far from the camera
for flash photography in a dark place.
2 Was your finger over the flash?
3 Was the subject backlit from being
taken next to a window, etc.?
1 Shoot within specified coverage distance of electronic flash.
2 Do not cover the flash with your finger.
3 Turn on mode and press the shutter release button.
34
Printed date/time is incorrect.
●
●
13
The date is not printed on
the front./The date is not
printed clearly.
1 Was “- - - - - -” selected before taking
pictures?
2 Is there something light-colored (white,
yellow, orange) where the date appears?
Picture is not sharp.
3 Is the lens dirty?
4 Is the camera moving?
5 You selected
mode when shooting
at a close distance.
Picture is too dark.
You didn’t set correct date and time after replacing batteries.
Set date and time after replacing batteries.
1 Select a date mode other than “- - - - - -” before
taking pictures.
2 Try to arrange that there is no light colored background where the date appears.
26
48
21
32
21
37
16
16
43
FALLOS, CAUSAS POSIBLES Y SOLUCIONES
ESPAÑOL
Durante el funcionamiento
Fallo
Causa posible
El disparador no funciona.
1 El símbolo “
” parpadea.
2 El conmutador de alimentación no está
en la posición ON.
3 ¿ Parpadea el símbolo “ ” en el
panel LCD ?
Solución
Página
1 Sustituya las pilas por otras nuevas.
2 Pulse el botón POWER.
12
11
23
4 En el contador de exposiciones se
visualiza “ ”.
3 El flash se está cargando. Espere hasta que el signo “ ” deje de parpadear. (El flash tarda aprox. 7
segundos en cargarse.)
4 Extraiga la película y cargue un película sin exponer.
“ ” parpadea después de
cargar la película y de cerrar la tapa posterior de la
cámara.
●
¿Al cargar película, arrastró el extremo hasta la marca del extremo de la
película?
●
Para cargar la película correctamente debe arrastrar la película hasta la marca del extremo de la
película.
17
Después de cargar la película y de cerrar la tapa
posterior de la cámara, la
película se rebobina y se
visualiza “ ”.
●
¿Abrió usted la tapa posterior de la
cámara para retirar la película sin verificar antes que el motor estaba parado y que se visualizaba “ ”?
●
Verifique que el motor se haya parado y que se 28,31
visualice “ ”. Después, abra la tapa posterior de
la cámara y retire la película.
La película se rebobinó
durante la realización de
fotografías.
●
¿Utilizó el botón
película?
a mitad de la
●
Tenga cuidado de no presionar el botón
cuando la cámara está cargada con película.
No se puede accionar el
44 disparador automático.
●
¿Está activado el modo de corrección
de fecha?
●
Cancele el modo de corrección de fecha.
,
17
30
13
ESPAÑOL
Durante el funcionamiento
Fallo
“ ” está parpadeando y
el obturador no se puede
disparar.
Causa posible
●
Solución
La cámara está estropeada.
●
Página
Por favor contacte con un distribuidor autorizado
de FUJIFILM.
Copias impresas
Fallo
Causa posible
Solución
Página
La fotografía está borrosa.
1 ¿Tapó con el dedo la ventanilla AF
cuando realizó la fotografía?
1 Cuando realice una fotografía, sostenga la cámara correctamente de modo que su dedo no tape la
ventanilla AF.
2 Componga la imagen dentro del recuadro AF y
dispare, o dispare utilizando el bloqueo AF.
3 Limpie el objetivo.
4 Sostenga la cámara firmemente y pulse suavemente el disparador. Utilice un trípode para velocidades de obturación lentas.
5 Seleccione un modo distinto al modo .
21
2 ¿Apuntó correctamente al sujeto?
3 ¿Está el objetivo sucio?
4 ¿Se movió la cámara?
5 Ud. seleccionó el modo
do a corta distancia.
fotografian-
26
49
21
32
45
ESPAÑOL
Copias impresas
46
Fallo
Causa posible
Solución
Página
La fotografía es demasiado oscura.
1 El sujeto estaba demasiado lejos de
la cámara cuando utilizó el flash en un
lugar oscuro.
2 ¿Cubría el flash con los dedos?
3 ¿Tomó la fotografía del sujeto con luz
de fondo proveniente de una ventana,
etc.?
1 Realice las fotografías observando las distancias
de alcance especificadas para el flash electrónico.
2 No cubra el flash con los dedos.
3 Active el modo y pulse el disparador.
34
La fecha y la hora impresas son incorrectas.
●
●
Fije la fecha y la hora cada vez que cambie las
pilas.
13
La fecha no se imprime en
la cara delantera./La fecha
no está impresa claramente.
1 ¿Se ha seleccionado “- - - - - -” antes
de fotografiar?
2 ¿El fondo donde aparece la fecha es de
color claro (blanco, amarillo, naranja)?
1 Seleccione un modo de fecha diferente de
“- - - - - -” antes de fotografiar.
2 Cuando fotografíe intente que allí donde aparece
la fecha, el fondo no sea claro.
16
Después de cambiar las pilas no fijó
la fecha y la hora correctas.
21
37
16
ENGLISH
47
COMMON SENSE CAMERA CARE
1
5
It is recommended that undeveloped film and cameras containing film be carried as hand luggage when flying. If included
in checked baggage, X-ray inspections may cause overprinting or other effects.
1 If you use your camera at the beach or in a light rain, protect it from moisture. Do not let your camera get wet. Be
particularly careful to avoid sand and salt spray at the beach.
6
Remove soil and dust from the lens, the AF window and the
finder with an air blower and by wiping lightly with a piece of
soft cloth. If that is not enough, wipe off gently with Lens Cleaning Paper, moistened slightly with Lens Cleaning Liquid. Do
not use organic solvents such as alcohol and benzene.
7
Dust and debris in the film compartment can scratch the film.
Use a blower brush to clean it.
8
9
Load and remove film away from direct sunlight.
0
Since the performance of the batteries will drop in cold weather,
warm the battery by placing it inside your pockets, etc. before
use. The performance of a battery whose performance has
temporarily dropped can be restored by returning the batteries to normal temperature.
2 Dropping your camera or letting it strike a hard surface
could result in damage even though the camera was in a
case. Never subject the camera to vibration such as in the
trunk of a car. Never keep your camera in the trunk or the
glove compartment of a car: the heat build-up can damage
it.
48
ENGLISH
Although your camera is designed for many years of service,
it is a precision instrument and requires thoughtful handling.
In particular, avoid exposing it to shock, moisture or physical
abuse such as dropping it on the floor.
2
Your camera is computer-controlled so it seldom, if ever, will it
work incorrectly. If you should experience incorrect operation,
remove the batteries and then reload it.
3
If you will not be using your camera for some time, store it
where it will be safe from heat, moisture, dust and harmful
gases such as naphthalene (those caused by moth balls and
moth flakes).
4
Never store the camera in a closed automobile for an extended
period.
The operating temperature range of the camera is from –10°C
to +40°C.
With a few common sense precautions, your camera will give you
years of faithful service, great pleasure and wonderful pictures.
CONSERVACIÓN DE LA CÁMARA Y PRECAUCIONES
1
Su cámara es un equipo de precisión que requiere un cuidadoso manejo. Evite los choques, los líquidos y no la deje caer.
ESPAÑOL
6
Limpie la suciedad y el polvo del objetivo, de la ventanilla AF
y del visor con un soplador de aire y pasando un paño suave. Si esto es insuficiente, límpielos con Lens Cleaning Paper
(papel para la limpieza de objetivos) ligeramente humedecido en Lens Cleaning Liquid (líquido para la limpieza de objetivos). No utilice solventes orgánicos tales como alcohol o
benceno.
7
El polvo y la suciedad en el compartimento de la película
pueden rayar la película. Utilice un cepillo soplador para limpiarlo.
8
Cargue y extraiga la película en un lugar resguardado de la
luz solar directa.
9
La gama de temperaturas de funcionamiento de la cámara
está entre –10°C y +40°C.
0
Puesto que el rendimiento de las pilas se reduce en ambientes fríos, caliéntelas colocándolas dentro de su ropa, etc. antes de su uso. El rendimiento de una pila que se ha reducido
temporalmente puede ser recuperado devolviendo las pilas
a una temperatura normal.
1 Si utiliza la cámara en la playa o bajo la lluvia, procure no
mojarla. Asimismo tenga cuidado de no colocar la cámara
en lugares en los que podría entrar arena o agua salada.
2 Aunque la cámara se encuentre dentro de su estuche,
podría no funcionar correctamente si se cae al suelo o si
se le golpea con algún objeto duro. Asimismo, no deje la
cámara en lugares sujetos a vibraciones (como el maletero de un coche).
2
Puesto que esta cámara está controlada por modos preprogramados, casi nunca funciona erróneamente. Si funcionara mal,
extraiga las pilas y vuélvalas a cargar.
3
Si deja de utilizar la cámara durante un periodo prolongado,
guárdela en un lugar que la proteja del calor, de la humedad,
del polvo y de los gases nocivos (tales como la naftalina).
4
No deje la cámara en un coche cerrado durante mucho tiempo.
5
Cuando se viaja en avión, se recomienda llevar las películas
sin revelar y la cámara que contenga película, como equipaje de mano. Si se incluyen entre el equipaje a facturar, las
inspecciones de rayos X podrían provocar sobreimpresión u
otros defectos.
Si toma las debidas precauciones, la cámara puede proporcionarle un servicio seguro durante años y permitirle efectuar excelentes fotografías.
49
SPECIFICATIONS
• Film
135 (35 mm) DX roll film
ENGLISH
• Film Speed Setting
Automatic (DX roll film) for speeds from ISO 50-3200
• Picture Size
• Film Loading
• Lens
• Film Advance
24 mm × 36 mm
Fujinon lens, 4 components, 4 elements, f=38 – 90 mm 1:7.0 –
1:11.5
• Viewfinder
Real image zoom finder, 0.42 – 0.87 × magnification, with AF
frame, parallax correction guides, AF lamp
• Focusing
Active type auto focus, 0.9 m (3.0 ft.) – ∞ , with AF lock,
landscape mode (long distance lens position setting, flash off
setting), AF lamp (on: range OK, blinking: over range alarm)
• Shutter Release
Programmed electronic shutter release, 1/1.4 – 1/360 sec. shutter
speeds
• Exposure Control
Automatic
Interlocking range (ISO 100), EV (wide-angle): 11.5 (∗6.5) –
16.3, EV (telephoto): 13.9 (∗7.9) – 17.0
50 (∗ = values for the flash off mode)
Automatic
Automatic (motorized), film wind and rewind system, provision
for mid-roll rewinding (Use the mid-roll rewind button)
• Flash
Zoom flash, approx. 7 seconds recycle time, automatic flash
at low brightness mode, red-eye reduction flash mode, back
light compensation flash mode, flash-off mode, night portrait
(slow sync) mode
Red-eye reduction flash mode system: LED pre-flash
• Self-Timer
Electronically controlled, up to 3 consecutive exposures, approx.
10 second delay, can be stopped mid-run, self-timer on lamp
• Liquid Crystal Display
Picture counter (additive type), exposure mode index, self-timer
mode sign, date sign, battery capacity sign, flash charging sign
• Power Supply
Two alkaline batteries (LR6/AA size) or comparable batteries
ENGLISH
• Others
Date/Time Imprinting, Tripod socket
• Dimensions & Weight
115.0 × 67.5 × 45.5 mm/4.5 × 2.7 × 1.8 in. (main unit),
180 g/6.3 oz. (without batteries)
∗ Specifications are subject to change without notice.
51
CARACTERÍSTICAS TÉCNICAS
• Película
Película en rollo 135 (35mm) codificada DX
• Tamaño del fotograma
24 mm × 36 mm
• Objetivo
Objetivo Fujinon, 4 componentes, 4 elementos, f=38 – 90 mm
1:7,0 – 1:11,5
• Visor
Visor zoom de imagen real, aumento 0,42 – 0,87 ×, con recuadro
AF, marcas de corrección de paralaje, piloto AF
• Enfoque
Enfoque automático active, 0,9 m (3,0 ft.) – ∞, con bloqueo AF,
modo paisajes (ajuste de la posición del objetivo a larga distancia,
desactivación del flash), piloto AF (iluminado: alcance correcto,
parpadea: alarma de fuera de zona de enfoque)
• Obturador
Obturador electrónico programado, valores comprendidos entre
1/1,4 y 1/360 seg
52
ESPAÑOL
• Control de la exposición
Gama de interbloqueo automático (ISO 100), EV (gran angular):
11,5 (∗6,5) – 16,3, EV (teleobjetivo): 13,9 (∗7,9) – 17,0
(∗= valores para el modo de flash desactivado)
• Ajuste de la sensibilidad de la película
Automático (con películas DX) para películas de 50-3200 ISO
• Carga de la película
Automática
• Avance de la película
Sistema automático motorizado para eliminate, para bobinar y
rebobinar la película. Posibilidad de rebobinar a mitad de rollo
(Utilice el botón de rebobinado a mitad de rollo)
• Flash
Flash de zoom con 7 segundos aprox. de recarga. Modos de
flash: flash automático en el modo de baja iluminación,
reducción del efecto “ojos rojos”, flash de compensación de
contraluz, flash desactivado y modo de retrato nocturno
(sincronización lenta)
Sistema del modo de reducción del efecto “ojos rojos”: Predestello
LED
ESPAÑOL
• Disparador automático
Controlado electrónicamente, hasta 3 exposiciones consecutivas
con cuenta atrás de 10 segundos aprox., puede detenerse a
medio recorrido, piloto indicador de funcionamiento
• Panel LCD
Contador de exposiciones (tipo aditivo), índice del modo de
exposición. Indicadores: modo de disparador automático, fecha,
carga de las pilas, carga del flash
• Alimentación
Dos pilas alcalinas (LR6 de tamaño AA) o similar
• Varios
Impresión de fecha/hora, zapata para trípode
• Dimensiones y peso
115,0 × 67,5 × 45,5 mm/4,5 × 2,7 × 1,8 in. (unidad principal),
180 g/6,3 oz. (sin las pilas)
∗ Las características técnicas están sujetas a posibles cambios
sin previo aviso.
53
IMPORTANT SAFETY NOTICE
ENGLISH
This product has been developed to be as safe as possible when used for its designed purposes. Under normal circumstances, this product
will provide long, safe service when handled correctly. It is important, however, that this product is handled properly and used only for
photographic purposes. For your convenience and safety, please follow the recommendations listed below. It is also a good idea to keep
this manual in a safe, convenient place where you can refer to it easily if necessary.
WARNING
CAUTION
This symbol indicates a potentially dangerous situation, which could
result in serious injury or even death if these instructions are not
followed.
This symbol indicates a potentially damaging situation, which could
result in injury to other people or damage to object, if these instructions are not followed and the product is handled improperly.
WARNING
Never attempt to take this part apart. There is a serious danger of a powerful electric shock.
If this product is dropped or damaged so that the interior is exposed, do not touch anything. There is danger of a severe electric
shock.
If the camera or the batteries within become hot, begin to smoke, produce a burning smell or display any sign of abnormal or
unusual condition, remove the batteries immediately. Use gloves to prevent the possibility of burning your hands. Failure to remove
batteries under these conditions could result in burns or even fire.
Using a flash too close to a person’s eyes may temporarily affect the eyesight. Take particular care when photographing infants
and young children.
If your camera gets wet or if foreign objects such as pieces of metal get inside, remove the batteries immediately to avoid any
possible heat buildup or of fire starting inside the camera.
54
ENGLISH
WARNING
Do not use this camera in locations with a high concentration of flammable gas or near open gasoline, Benzine, paint thinner or
other volatile substances which can give off dangerous vapors. Failure to observe this precaution could result in explosion or fire.
Store your camera out of the reach of infants and young children. Failure to follow this recommendation could result in serious
injury. (For example, the strap could become entwined around their necks with potentially serious consequences.)
Never dismantle the batteries when they are removed from the camera. Do not subject them to heat, throw them into an open fire,
attempt to recharge them or to short-circuit them. Failure to follow this recommendation could result in the batteries exploding or
splitting open.
Use only the type of batteries specified in your camera’s instructions. Failure to do so may result in excessive heat buildup or even
in a fire.
Make sure batteries are stored in a safe, secure place and well out of the reach of any infants, young children or pets. Improper
storage could result in a child swallowing a battery. (If a child does swallow a battery, call a doctor or nearest hospital immediately.)
CAUTION
Never get this product wet or handle it with wet hands. Doing so may result in an electric shock.
Never take flash photographs of people riding bicycles, driving cars or riding a horse. The flash can distract the driver and frighten
the animal, possibly causing a serious accident.
Observe correct polarity when inserting batteries. Never insert batteries with the + and - poles back to front. Failure to handling
correctly might result in the batteries splitting open and leaking, possibly resulting in fire, burns or damage to surrounding objects.
55
ADVERTENCIAS Y PRECAUCIONES
ESPAÑOL
Este producto ha sido desarrollado para ser lo más seguro posible cuando es utilizado con el propósito para el cual ha sido diseñado.
Bajo circunstancias normales, este producto le brindará un servicio prolongado y seguro, siempre y cuando se utilice correctamente. De
todas maneras es importante que este producto sea manipulado correctamente y utilizado solamente con propósitos fotográficos. Para su
conveniencia y seguridad, por favor siga las recomendaciones que se especifican a continuación. También es una buena idea guardar este
manual en un lugar seguro y conveniente, donde pueda consultarlo con facilidad.
ADVERTENCIA
PRECAUCION
Este icono indica situaciones que podrían ocasionar la muerte o
heridas graves a personas que no tuvieran en cuenta estas instrucciones y manipulasen el producto de forma incorrecta.
Este icono indica situaciones que podrían ocasionar heridas a personas o daños físicos o materiales si no se tuvieran en cuenta estas
instrucciones y se manipulase el producto de forma incorrecta.
ADVERTENCIA
No intente desmontar el producto. Existe el peligro de descarga eléctrica.
No toque el interior del producto si éste ha quedado descubierto, por ejemplo, en una caida. Existe el peligro de descarga
eléctrica.
Si la cámara o las pilas se calientan en exceso, despiden humo, olor a quemado o muestran cualquier otra anomalía, extraiga las
pilas de la cámara inmediatamente. El incumplimiento de esta recomendación puede provocar fuego o quemaduras. (Tenga
cuidado de no quemarse al extraer las pilas.)
Utilizar un flash demasiado cerca de los ojos de una persona puede afectar su vista momentáneamente. Tenga especial cuidado
al fotografiar a niños pequeños.
56
Extraiga las pilas inmediatamente si la cámara ha entrado en contacto con el agua o la humedad, o si han entrado en su interior
objetos de metal u otros cuerpos extraños. El incumplimiento de esta recomendación podría provocar una acumulación de calor
o un conato de incendio.
ESPAÑOL
ADVERTENCIA
No utilice la cámara en lugares con alta concentración de gases inflamables o cerca de gasolina, benceno, diluyente de pintura u
otros químicos inflamables. El incumplimiento de esta recomendación podría provocar explosiones o un conato de incendio.
Guarde la cámara en un lugar seguro, lejos del alcance de los niños pequeños. La mala colocación o el uso indebido de la correa
en el cuello podría causarles asfixia.
No intente desmontar las pilas, ni las exponga al calor, ni las arroje al fuego, ni las recargue, ni provoque un corto circuito. El
incumplimiento de esta recomendación podría hacer que las pilas se abrieran.
No utilice pilas que no sean las especificadas. El incumplimiento de esta recomendación podría provocar una acumulación de
calor o un conato de incendio.
Guarde las pilas en un lugar seguro, bien lejos del alcance de los niños pequeños, para que éstos no corran el peligro de
ingerirlas. Si esto ocurriese, acuda al médico inmediatamente.
PRECAUCION
No moje el producto, ni lo toque con las manos mojadas. Existe el peligro de descarga eléctrica.
No tome fotografías con flash de personas que conducen un vehículo (bicicleta, coche, tren, etc.) o monten un animal. El flash
podría distraer al conductor o asustar al animal y causar un grave accidente.
Tenga cuidado de no colocar las pilas con los polos + y - intercambiados. El incumplimiento de esta recomendación podría
hacer que las pilas se abriesen y goteasen provocando un incendio, quemaduras o daños materiales.
57
Memo
....................................................................................................................................................................................................................
....................................................................................................................................................................................................................
....................................................................................................................................................................................................................
....................................................................................................................................................................................................................
....................................................................................................................................................................................................................
....................................................................................................................................................................................................................
....................................................................................................................................................................................................................
....................................................................................................................................................................................................................
....................................................................................................................................................................................................................
....................................................................................................................................................................................................................
....................................................................................................................................................................................................................
1-324 UETAKE, KITA-KU, SAITAMA CITY, SAITAMA 330-8624, JAPAN
Printed in Indonesia
FGS-204112-Ci-02