1
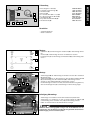
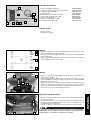
Scope of delivery
4
2x
1x
1x
2x
2x
2x
1x
2x
1x
9b
8
9a
2
3
5
69007040030
76012935020
60012035160
62512035070
0021050003
0081050181
44011076305
0912040203
60012035185
Preparations
- Take off the seat.
- Remove the battery.
ENGLISH
1
7
6
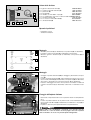
rubber spacers 18x8 (1)
retaining bracket for alarm system (2)
cable sleeve (3)
bushes (4)
washers DIN 9021 A 5.3(5)
oval head tapping screws K 50x18 (6)
cable tie (7)
cap head screws M4x20 (8)
reed switch (9)
5
3
4
Assembly
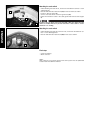
- Mount the cable sleeves (3) (included) on the retaining bracket (2)
(included).
- Insert the bushes (4) (included) into the cable sleeves from below.
- Mount the rubber spacer (1) (included) on the retaining bracket (2)
(included).
2
1
Assembly
1
7
2
10
8
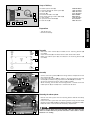
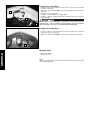
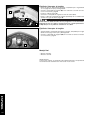
- Connect the alarm system (10) to the wiring harness and position on the
retaining bracket (2).
- Fasten the alarm system (10) as shown in the figure onto the retaining
bracket (2) (included) using cap head screws M4x20 (8) (included).
- Secure the connector using the cable tie (7) (included).
- When mounting, ensure that the retaining bracket is turned so that the
rubber spacers (1) (included) face in the direction of travel.
Fastening the alarm system
6
5
6
5
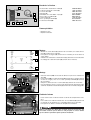
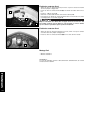
- Position the alarm system with the retaining bracket behind the battery
compartment.
- Fasten the alarm system with the retaining bracket using the oval head
tapping screw (K 50x18) (6) (included) and washers A 5.3 (5) (included).
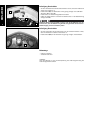
- Route the cable in the rear area of the battery compartment.
Properly route all cables and secure them with cable ties. Ensure that the
cables are neither kinked nor pinched. Check the routed cables to ensure
that there is no chafing.