1
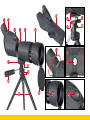
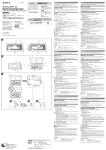
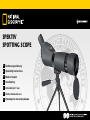
SPEKTIV
SPOTTING SCOPE
DE
Bedienungsanleitung
EN
Operating Instructions
FR
Mode d’emploi
NL
Handleiding
IT
Istruzioni per l’uso
ES
Instrucciones de uso
RU
Руководство по эксплуатации
DE
Bedienungsanleitung..............................................4
EN
Operating Instructions............................................8
FR
Mode d’emploi...................................................... 12
NL
Handleiding........................................................... 16
IT
Istruzioni per l’uso................................................ 20
ES
Instrucciones de uso............................................ 24
RU
Руководство по эксплуатации.......................... 28
1%
B C
d G E
i
C
g
J
g
h
j
1)
1@
1#
1!
1$
i
d
F
1)
Allgemeine Informationen
Zu dieser Anleitung
Lesen Sie bitte aufmerksam die Sicherheitshinweise in dieser
Anleitung. Verwenden Sie dieses Produkt nur wie in der Anleitung beschrieben, um Schäden am Gerät oder Verletzungen zu
vermeiden.
Bewahren Sie die Bedienungsanleitung auf, damit Sie sich jederzeit über alle Bedienungsfunktionen informieren können.
GEFAHR!
Dieses Zeichen steht vor jedem Textabschnitt,
der auf Gefahren hinweist, die bei unsachgemäßer Anwendung zu leichten bis schweren Verletzungen führen.
Verwendungszweck
Dieses Produkt dient ausschließlich der privaten Nutzung. Es
wurde entwickelt zur vergrößerten Darstellung von Naturbeobachtungen.
Allgemeine Warnhinweise
GEFAHR von Körperschäden!
Schauen Sie mit diesem Gerät niemals direkt
in die Sonne oder in die Nähe der Sonne. Es
besteht ERBLINDUNGSGEFAHR!
4
GEFAHR!
Kinder dürfen das Gerät nur unter Aufsicht benutzen. Verpackungsmaterialien (Plastiktüten, Gummibänder, etc.) von Kindern fernhalten! Es besteht ERSTICKUNGSGEFAHR!
GEFAHR!
Setzen Sie das Gerät – speziell die Linsen – keiner direkten Sonneneinstrahlung aus! Durch die Lichtbündelung könnten Brände
verursacht werden.
HINWEIS!
Bauen Sie das Gerät nicht auseinander! Wenden Sie sich im
Falle eines Defekts an Ihren Fachhändler. Er nimmt mit dem
Service-Center Kontakt auf und kann das Gerät ggf. zwecks Reparatur einschicken.
Setzen Sie das Gerät keinen Temperaturen über 60° C aus!
SCHUTZ der Privatsphäre!
Das Gerät ist für den Privatgebrauch gedacht.
Achten Sie die Privatsphäre Ihrer Mitmenschen
– schauen Sie mit diesem Gerät zum Beispiel nicht in
Wohnungen!
DE EN FR NL IT ES RU
Spektivteile im Überblick
Spektiv auf dem Stativ befestigen
1. Okular mit faltbarer Gummi-Augenmuschel
2. Zoomeinstellung (Zoomrad)
3. Feineinstellung (Fokusrad)
4. Optischer Tubus
5. Stativanschlussgewinde
6. Tubusschelle
7. Feststellschraube für die Tubusschelle
8. Sonnenblende
9. Stativkopf mit Gewindeschraube
10. Befestigungsschraube am Stativkopf
11. Stativbeine
12. Achsen für vertikale (hoch/runter)
und horizontale (rechts/links) Bewegung
13. Handführung mit Feststellfunktion
14. Integrierte Staubschutzkappe
15. Transporttasche mit Trageriemen
Nehmen Sie das mitgelieferte Stativ aus der Verpackung und
ziehen die Stativbeine (11) so weit wie möglich auseinander.
Stellen Sie das Stativ auf einen festen, ebenen Untergrund
(z.B. auf einen Tisch).
Lieferumfang
Spektiv
Nylontasche
Tischstativ
Putztuch
Das Spektiv verfügt über ein Stativanschlussgewinde (5),
an der Adapterplatte der Tubusschelle (6).Stellen Sie das
Spektiv mit dem Anschlussgewinde (5) gerade auf die Gewindeschraube am Stativkopf (9) des Stativs und ziehen Sie
die Befestigungsschraube (10) unterhalb des Stativkopfes
handfest an.
Spektiv auf dem Stativ bewegen
Lösen Sie die Feststellung der Achsen für die vertikale und
horizontale Bewegung (12) durch drehen des Führungsgriffes (13) entgegen dem Uhrzeigersinn, um das Spektiv
auf das Beobachtungsobjekt auszurichten. Arretieren Sie
anschließend die eingestellte Beobachtungsposition durch
„handfestes“ Drehen des Führungsgriffes im Uhrzeigersinn
(13).
5
Bedienung
• Fokussieren
Schauen Sie in das Okular (1) und drehen Sie das Fokusrad
(3) in eine der beiden Richtungen bis das Beobachtungsobjekt scharf abgebildet wird.
• Zoom
Durch drehen am Zoomrad (2), läßt sich der Bildausschnitt
individuell einstellen. Nach jeder Drehung am Zoomrad
müssen Sie anschließend die Schärfe am Focusrad (3) neu
einstellen.
• Bewegen des Tubus
Das Spektiv besitzt eine Tubusschelle (6) mit entsprechender Feststellschraube (7). Drehen Sie die Feststellschraube
(7) gegen den Uhrzeigersinn, um den gesamten Tubus (4)
um die eigene Achse drehen zu können. So lässt sich die
Position des Okulars (1) individuell verändern. Durch leichtes Anziehen der Feststellschraube (7) im Uhrzeigersinn
bleibt der Tubus in der eingestellten Position.
6
• Benutzung Innen und Außen
Bei Beobachtungen aus dem Wohnbereich wird die Abbildungsqualität durch Fensterglas stark beeinträchtigt. Ein
optimales Ergebnis erreichen Sie nur bei geöffnetem Fenster. Auch unterschiedliche Innen- und Außentemperaturen
reduzieren die Abbildungsqualität.
• Sonnenblende
Bei starker Sonneneinstahlung oder bei schräg einfallendem Licht ziehen Sie die Sonnenblende (8) bis
zum Anschlag nach vorne um Reflexionen zu vermeiden. Schauen Sie niemals direkt in oder in die Nähe der
Sonne! Erblindungsgefahr!
Beobachtung der Landschaft/Natur
Beim Betrachten von Landschaften oder weit entfernten
Objekten kann bei sommerlichen Temperaturen durch
Luftflimmern ein unruhiges Bild entstehen. Dieser Effekt ist
physikalisch bedingt und kann, wie Nebel oder Dunst, die
Abbildungsqualität beeinflussen. Um in diesen Situationen
die Abbildungsleistung zu steigern, empfiehlt es sich die
Vergrößerung zu reduzieren oder die frühen Morgenstunden
des Tages für Ihre Beobachtungen zu nutzen.
DE EN FR NL IT ES RU
HINWEISE zur Reinigung
Reinigen Sie die Linsen (Okulare und/oder Objektive) nur
mit einem weichen und fusselfreien Tuch (z. B. Microfaser).
Das Tuch nicht zu stark aufdrücken, um ein Verkratzen der
Linsen zu vermeiden.
Zur Entfernung stärkerer Schmutzreste befeuchten Sie das
Putztuch mit einer Brillen-Reinigungsflüssigkeit und wischen
damit die Linsen mit wenig Druck ab.
Schützen Sie das Gerät vor Staub und Feuchtigkeit! Lassen
Sie es nach der Benutzung – speziell bei hoher Luftfeuchtigkeit – bei Zimmertemperatur einige Zeit akklimatisieren,
so dass die Restfeuchtigkeit abgebaut werden kann. Setzen
Sie die Staubschutzkappen auf und bewahren Sie es in der
mitgelieferten Tasche auf.
ENTSORGUNG
Entsorgen Sie die Verpackungsmaterialien sortenrein. Informationen zur ordnungsgemäßen Entsorgung erhalten Sie beim kommunalen Entsorgungsdienstleister oder Umweltamt.
Beachten Sie bei der Entsorgung des Geräts die aktuellen
gesetzlichen Bestimmungen!
Informationen zur fachgerechten Entsorgung erhalten Sie
bei den kommunalen Entsorgungsdienstleistern oder dem
Umweltamt.
7
General Information
About this Instruction Manual
Please read the safety instructions in this manual carefully. To
avoid damage to the unit and the risk of injury, only use this product as described in the manual.
Keep the instruction manual handy so that you can easily look up
information on all the functions.
DANGER!
You will find this symbol before every section of
text that deals with the risk of minor to severe injuries resulting from improper use.
Intended Use
This product is intended only for private use. It was developed for
the magnified display of things in nature.
General Warning
Risk of bodily injury!
Never use this device to look directly at the sun
or in the direct proximity of the sun. This will
result in a risk of blindness.
8
DANGER!
Children should only use the device under adult supervision.
Keep packaging material, like plastic bags and rubber bands,
out of the reach of children, as they pose a choking hazard.
DANGER!
Do not place the device, particularly the lenses, in direct sunlight. The concentration of light could cause a fire.
NOTE!
Do not disassemble the device. In the event of a defect, please
contact your dealer. The dealer will contact the Service Centre
and can send the device in to be repaired, if necessary.
Do not expose the device to temperatures above 45°C.
Privacy PROTECTION!
The device is intended only for private use.
Please heed the privacy of other people. Do
not use the device to look into apartments, for
example.
DE EN FR NL IT ES RU
Parts Overview
Fastening the scope on the tripod
1. Eyepiece/rubber eyecups
2. Zoom
3. Focus wheel, focus ring
4. Optical tube
5. Tripod adapter thread
6. Main tube clamp
7. Fastening screw
8. Sun shield
9. Tripod head with thread screw
10. Fixing screw for tripod head
11. Tripod legs
12. Axes for vertical and horizontal movement
13. Panhandle with locking function
14. Attached dust cap
15. Soft carry case with carrying strap
Take the scope out of the packaging and pull out the tripod
legs (11) as far as they can go. Place the tripod on an even,
stable base, like a table.
Scope of supply
Your scope has a normed tripod adaptor thread (5), which
can be screwed onto the tripod adapter thread screw (9)
on the tripod. After attaching, tighten the fixing screw (10)
beneath the tripod head.
Aligning the scope for viewing
Unlock the vertical and horizontal axes (12) by turning the
panning handle (13) anticlockwise.
Now you can move scope, attached to the tripod head, on
both axes (vertical and horizontal), for optimal positioning.
When you have reached the desired observing position, the
scope can be locked by turning the panning handle (13)
clockwise.
Spotting scope
Table tripod
Nylon carry case
Cleaning cloth
9
Controls
• Focus:
Look into the eyepiece (1) and rotate the focus wheel (3)
in either direction to focus on an object. Keep turning the
wheel until you can see the image clearly.
• Zoom:
Rotate the zoom control (2) to zoom in or out on an object;
then use the focus knob (3) to refocus.
• Moving the main tube:
This spotting scope has a main tube clamp (6) and fastening
screw (7). Turn the screw (7) anticlockwise to unfasten the
main tube clamp. You can then turn the entire main tube (4)
about its own axis to vary the eyepiece (1) position.
To fasten the main tube in the desired position, turn the fastening screw (7) clockwise.
• Indoor versus outdoor:
Although you may casually observe through an open or
closed window, observing outdoors ensures optimal viewing
conditions. Temperature differences between indoor and
outdoor air and the low quality of window glass can blur images seen through the spotting scope.
10
• Sun shield:
Extend the sun shield (8) when strong sunshine affects your visibility. Put your hand around the spotting scope aperture ring and simply push the shield
out. But you should never look at or near the sun! To find out
more, read the warnings in this manual.
Observing land objects
When viewing objects on land, you will be observing through
air with varying levels of refractivity due to varying air temperatures. This phenomenon causes things to look wavy,
causing a loss of image quality. You may have noticed this
phenomenon when driving down a highway on a hot day.
If this optical phenomenon interferes with your viewing, try
focusing at low power to see a steadier, higher-quality image. Also, try observing in the early morning, when air temperature is relatively uniform.
DE EN FR NL IT ES RU
NOTES on cleaning
Clean the eyepieces and lenses only with a soft, lint-free
cloth, like a microfibre cloth. Do not apply excess pressure
to the cloth to avoid scratching the lenses.
To remove more stubborn dirt, moisten the cleaning cloth
with an eyeglass-cleaning solution, and wipe the lenses
gently.
Protect the device from dust and moisture. After use, particularly in high humidity, let the device acclimatize for a short
period of time before storing so that the residual moisture
can dissipate. Remove the dust cover and store it in the included bag during use.
DISPOSAL
Dispose of the packaging materials properly, according to their type, such as paper or cardboard. Contact
your local waste-disposal service or environmental
authority for information on the proper disposal.
Please take the current legal regulations into account when
disposing of your device. You can get more information on
the proper disposal from your local waste-disposal service
or environmental authority.
11
Informations générales
A propos de ce manuel
Veuillez lire attentivement les consignes de sécurité présentées
dans ce manuel. N’utilisez ce produit comme décrit dans ce manuel, afin d’éviter tout risque de blessure ou de dommage sur
l’appareil.
Conservez le manuel d’utilisation afin de pouvoir revoir à tout moment les informations concernant certaines fonctionnalités.
DANGER !
Ce symbole précède un passage destiné à mettre
l’utilisateur en garde face à un danger susceptible
de résulter d’un usage inapproprié et pouvant entraîner des blessures légères ou graves.
Utilisation conforme / destination du produit
Ce produit est exclusivement destiné pour un usage privé. Il a
été conçu pour l’agrandissement d’images dans le cadre d’expériences d’observation de la nature.
Consignes générales de sécurité
RISQUE de dommages corporels !
Ne jamais regarder directement le soleil à travers cet
appareil en le pointant directement en sa direction.
L’observateur court un RISQUE DE CECITE !
12
DANGER !
Les enfants ne doivent utiliser cet appareil que sous surveillance.
Maintenez les enfants éloignés des matériaux d’emballage (sacs
plastiques, bandes en caoutchouc, etc.) ! RISQUE D’ETOUFFEMENT !
DANGER !
Ne jamais orienter l’appareil – en particuliers les lentilles – de
manière à capter directement les rayons du soleil ! La focalisation de la lumière peut déclencher des incendies.
REMARQUE !
Ne pas démonter l’appareil ! En cas de défaut, veuillez vous
adresser à votre revendeur spécialisé. Celui-ci prendra contact
avec le service client pour, éventuellement, envoyer l’appareil en
réparation.
Ne jamais exposer l’appareil à des températures de plus de
60° C !
PROTECTION de la sphère privée !
Les dispositif sont destinées à un usage privé.
Respectez la sphère privée de vos concitoyens
et n’utilisez pas ces dispositif pour, par exemple, observer
ce qui se passe dans un appartement !
DE EN FR NL IT ES RU
Descriptif des éléments
Fixation de la longue-vue sur le trépied
1. Oculaire/Bonnette en caoutchouc
2. Zoom
3. Molette de mise au point, bague de mise au point
4. Tube optique
5. Pas de vis pour adaptation trépied
6. Attache du tube principal
7. Vis de serrage
8. Pare-solely
9. Tête de trépied avec vis
10. Vis de fixation pour tête de trépied
11. Jambes du trépied
12. Axes pour mouvements vertical et horizontal
13. Poignée avec fonction verrouillage
14. Cache poussère
15. Etui souple avec courroie de transport
Sortez la longue-vue de son emballage et dépliez les jambes du trépied (11) au maximum. Placez le trépied sur une
surface stable et plane (comme une table). Votre longue-vue
possède un adaptateur pour trépied au pas de vis standard
(5), qui permet de la fixer exactement sur la vis (9) de la tête
du trépied. Serrez ensuite la vis de fixation (10) sous la tête
du trépied.
Volume de livraison
Longue-vue
Trépied de table
Sac de transport
Chiffon de nettoyage
Déplacer la longue-vue à partir du trépied
Desserrez les axes (12) verticaux (haut et bas) et and horizontaux (gauche et droite) en tournant la poignée (13) dans
le sens inverse des aiguilles d’une montre. Vous pouvez
maintenant déplacer la tête du trépied sur les deux axes
(haut/bas et droite/gauche), à partir de la longue vue fixée.
Lorsque la position d’observation désirée est atteinte, l’instrument peut être verrouillé en tournant la poignée (13) dans
le sens des aiguilles d’une montre.
Contrôles
• Molette de mise au point :
Regardez dans l’oculaire (1) et tournez la molette de mise au
point (3) dans un sens ou dans l’autre, afin de faire la mise
au point sur un objet. Continuez à tourner la molette jusqu’à
l’obtention d’une image Claire et nette.
13
• Zoom :
Tournez le zoom (2) pour rapprocher ou éloigner un objet;
Utilisez ensuite à nouveau la molette de mise au point (3)
pour parfaire la netteté.
• Déplacement du tube principal :
Ces longues-vues possèdent un système de déplacement
du tube (6) avec une vis de serrage (7). Tournez la vis (7)
dans le sens contraire des aiguilles d’une montre pour libérez le mouvement du tube principal. Vous pouvez à présent
faire tourner le tube principal (4) sur son axe et faire varier la
position de l’oculaire (1). Pour bloquer le tube principal dans
la position désirée, tourner la vis de serrage (7) dans le sens
des aiguilles d’une montre.
• Observation en intérieur / Observation en extérieur :
Vous pouvez en certaines occasions observer à l’intérieur
d’une pièce à travers une fenêtre ouverte ou fermée, le
mieux étant de privilégier l’observation en extérieur. Les
différences de température entre l’intérieur et l’extérieur et
la mauvaise qualité de transparence de certaines fénêtres
peuvent affecter la netteté et la qualité de l’objet observé à
travers la longue-vue.
14
• Pare Soleil:
Etirez le pare-soleil (8) en cas de fort Soleil pouvant
affecter la visibilité. Mettez votre main autour de la
bague du tube coté ouverture et étirez simplement le
pare-soleil vert l’avant. Mais vous ne devez jamais regarder
le Soleil ou ses alentours immédiats ! Lire attentivement le
manuel pour obtenir plus d’informations sur les avertissements.
Observation des objets terrestres
En observant des objets terrestres, vous observerez à travers les ondes de chaleur de la surface de la Terre. Vous
pouvez par exemple observer ce type d’ondes lorsque vous
êtes sur l’autoroute pendant l’Eté. Les ondes de chaleur peuvent provoquer une perte de qualité de l’image. Si les ondes
de chaleur interfèrent avec votre observation, essayez de
refaire la mise au point avec un grossissement plus faible
pour obtenir une image plus Claire et plus stable. Observez
le matin de bonne heure, avant que la Terre n’ait emmagasiné trop de chaleur d’interne.
DE EN FR NL IT ES RU
REMARQUE concernant le nettoyage
Les lentilles (oculaires et/ou objectifs) ne doivent être nettoyé qu’avec un chiffon doux et ne peluchant pas (p. ex.
microfibres). Le chiffon doit être passé sans trop le presser
sur la surface, afin d’éviter de rayer les lentilles.
Pour éliminer les traces plus coriaces, le chiffon peut être
humidifié avec un produit liquide destiné au nettoyage de
lunettes de vue avant d’essuyer la lentille avec le chiffon en
exerçant une pression légère.
Protégez l’appareil de la poussière et de l’humidité ! Après
usage, et en particulier lorsque l’humidité de l’air est importante, il convient de laisser l’appareil reposer quelques minutes à température ambiante, de manière à ce que l’humidité
restante puisse se dissiper. Equipez l’appareil des bouchons
destinés à le protéger de la poussière et ranger le dans son
sac de transport fournis.
ELIMINATION
Eliminez l’emballage en triant les matériaux. Pour plus
d’informations concernant les règles applicables en
matière d’élimination de ce type des produits, veuillez
vous adresser aux services communaux en charge
de la gestion des déchets ou de l’environnement.
Lors de l’élimination de l’appareil, veuillez respecter les lois
applicables en la matière. Pour plus d’informations concernant l’élimination des déchets dans le respect des lois et
réglementations applicables, veuillez vous adresser aux services communaux en charge de la gestion des déchets.
15
Algemene informatie
Over deze handleiding
Leest u aandachtig de veiligheidsinstructies in deze handleiding.
Gebruik dit product, om schade aan het apparaat of verwondingen te voorkomen, alleen zoals in de handleiding is beschreven.
Bewaar deze gebruikershandleiding zodat u zich op elk moment
weer kunt informeren over alle bedieningsfuncties.
GEVAAR!
Dit teken staat voor elk stuk tekst dat op gevaren duidt die door onkundig gebruik tot lichte tot
zware verwondingen kunnen leiden.
Gebruiksdoel
Dit product is uitsluitend geschikt voor privé-gebruik. Het is ontwikkeld om natuurwaarnemingen te vergroten.
Algemene waarschuwingen
GEVAAR voor verwondingen!
Kijk met dit toestel nooit direct naar de zon
of naar de omgeving van de zon. Er bestaat
VERBLINDINGSGEVAAR!
16
GEVAAR!
Kinderen mogen dit toestel alleen onder toezicht gebruiken. Verpakkingsmaterialen (Plastic zakken, elastiekjes, etc.) uit de buurt
van kinderen houden! Er bestaat VERSTIKKINGSGEVAAR!
GEVAAR!
Stel het toestel – met name de lenzen – niet aan direct zonlicht
bloot! Door de lichtbundeling kan brand ontstaan.
OPMERKING!
Neem het toestel niet uit elkaar! Neem bij defecten a.u.b. contact op met de verkoper. Deze zal contact opnemen met een
servicecenter en kan het toestel indien nodig voor reparatie terugsturen.
Stel het toestel niet aan temperaturen boven 60°C bloot!
BESCHERMING van privacy!
Deze toestel is alleen bedoeld voor privé-gebruik. Houd altijd de privacy van uw medemens
in gedachten – kijk met dit toestel bijvoorbeeld
niet in de woningen van anderen!
DE EN FR NL IT ES RU
Alle onderdelen van het spectief op een rij
Spectief op het statief bevestigen
1. Oculair met inklapbare rubberen oogschelp
2. Zoominstelling (zoomwiel)
3. Fijnafstelling (focuswiel)
4. Optische tubus
5. Schroefdraad voor statief
6. Tubusring
7. Blokkeerschroef voor de tubusring
8. Dauwkap
9. Statiefkop met draadschroef
10. Schroef voor de bevestiging aan de kop van het statief
11. Statiefbenen
12. Assen voor verticale (omhoog/omlaag) en horizontale (rechts/links) beweging
13. Handbesturing met vergrendelfunctie
14. Geïntegreerde stofkap
15. Reistas met draagriem
Haal het meegeleverde statief uit de verpakking en trek de
benen ervan (11) zover mogelijk uit elkaar. Zet het statief op
een vaste, vlakke ondergrond neer (bijv. op een tafel).
Het spectief heeft een statiefaansluitschroefdraad (5), die
zich in de adapterplaat van de tubusring (6) bevindt.Zet
het spectief met de aansluitschroefdraad (5) recht op de
draadschroef aan de kop (9) van het statief en draai de bevestigingsschroef (10) aan de onderkant van de statiefkop
handvast aan.
Omvang van de levering
Spottingtelescoop
Tafeldriepoot
Nylon Carry Case
Reinigingsdoek
Spectief met het statief bewegen
Maak de vastgezette assen voor de verticale (omhoog en
omlaag) en horizontale (links en rechts) beweging (12) los,
door de handgreep (13) tegen de klok in te draaien. Hierdoor kun je de statiefkop met het daarop bevestigde statief
nu in beide assen (omhoog/omlaag en links/rechts) bewegen.
Zodra het spectief in de juiste positie voor observaties staat,
zet je de assen weer vast door de handgreep (13) andersom
(met de klok mee) handvast aan te draaien.
17
Gebruik
• Focuswiel:
Kijk in het oculair (1) en draai aan het focuswiel (3) in een
van beide richtingen om scherp te stellen op een te observeren object. Draai net zolang aan het wiel tot het beeld
scherp is.
• Zoom:
Draai aan het zoomwiel (2) om een object dichterbij of verderweg te zoomen. Gebruik dan weer het focuswiel (3) om
scherp te stellen.
• Bewegen van de tubus:
dit spectief heeft een tubusring (6) met een blokkeerschroef
(7). Draai tegen de klok in aan de blokkeerschroef (7) om
de tubusring los te draaien. Je kunt dan de hele tubus (4)
om de eigen as draaien; hierdoor kun je de positie van het
oculair (1) veranderen. Om de tubus weer in de gewenste
positie vast te zetten, draai je de blokkeerschroef met de
klok mee vast.
• Gebruik binnen en buiten:
ook als bepaalde dingen beter vanachter een geopend of
gesloten raam geobserveerd kunnen worden, krijg je de
beste resultaten altijd nog in de open lucht. Temperatuurs18
verschillen tussen de lucht binnen en buiten en de geringe
kwaliteit van vensterglas kunnen ervoor zorgen, dat de beelden door het spectief onscherp worden.
• Dauwkap:
Bij slecht zicht door veel zonlicht kun je de zonneklep
(8) uitschuiven. Houd daarvoor de ring rond de opening van het spectief met een hand vast en trek hem
langzaam naar voren tot je een weerstand voelt. Maar kijk
nooit direct in of in de buurt van de zon zelf! Lees hiervoor
ook de waarschuwingen in deze handleiding.
Observeren van het landschap/de natuur
Bij het bekijken van landschappen of dingen in de natuur
kijk je vaak door hittegolven heen, die zich boven het aardoppervlak vormen. Dit soort hittegolven heb je misschien al
eens in de zomer boven een straat zien trillen. Door deze
hittegolven kan je beeld soms niet goed zijn. Als je last hebt
van hittegolven, kun je proberen om de scherpte iets te veranderen, om een gelijkmatiger en beter beeld te krijgen.
Een andere goede tip is om het spectief vooral vroeg in de
ochtend te gebruiken, voordat het aardoppervlak te zeer
verwarmd is geraakt.
DE EN FR NL IT ES RU
TIPS voor reiniging
Reinig de lenzen (oculair en/of objectief) alleen met een
zachte en pluisvrije doek (b. v. microvezel). Druk niet te hard
op de doek om het bekrassen van de lens te voorkomen.
Om sterke bevuiling te verwijderen kunt u de poetsdoek met
een brillenreinigingsvloeistof bevochtigen en daarmee de
lens poetsen zonder veel kracht te zetten.
Bescherm het toestel tegen stof en vocht! Laat het toestel
na gebruik – zeker bij hoge luchtvochtigheid – enige tijd op
kamertemperatuur acclimatiseren zodat alle restvocht geëlimineerd wordt. Plaats de stofkappen terug en berg het
toestel op in de meegeleverde tas.
AFVAL
Scheid het verpakkingsmateriaal voordat u het weggooit. Informatie over het correct scheiden en weggooien van afval kunt u bij uw gemeentelijke milieudienst inwinnen.
Let bij het weggooien van een apparaat altijd op de huidige
wet- en regelgeving. Informatie over het correct scheiden en
weggooien van afval kunt u bij uw gemeentelijke milieudienst
inwinnen.
19
Informazioni generali
Informazioni sul presente manuale
Leggere con attenzione le avvertenze di sicurezza riportate nel
manuale. Per evitare danni all‘apparecchio o possibili lesioni, utilizzare questo prodotto soltanto come descritto manuale.
Conservare il manuale di istruzioni per poter attingere alle informazioni riguardanti tutte le funzioni di comando dell’apparecchio
anche in un secondo momento.
ATTENZIONE!
Questo simbolo precede sempre le porzioni di
testo che avvisano di eventuali pericoli legati a un
utilizzo non conforme che può comportare lesioni
da leggere a gravi.
Scopo di utilizzo
Questo prodotto è destinato esclusivamente all’utilizzo privato.
È stato progettato per ingrandire le immagini legate alle osservazioni in natura.
Avvertenze di sicurezza generali
PERICOLO di danni alla persona!
Mai utilizzare questo apparecchio per fissare
direttamente il sole o altri oggetti nelle sue
vicinanze. PERICOLO PER LA VISTA!
20
ATTENZIONE!
I bambini possono utilizzare l’apparecchio soltanto sotto la vigilanza di un adulto. Tenere i materiali di imballaggio (sacchetti di
plastica, elastici, ecc.) fuori dalla portata dei bambini! PERICOLO DI SOFFOCAMENTO!
ATTENZIONE!
Non esporre l’apparecchio, in particolare le lenti, ai raggi solari
diretti. La compressione della luce può provocare un incendio.
NOTA!
Non smontare l’apparecchio! In caso di guasto, rivolgersi al
proprio rivenditore specializzato. Egli provvederà a contattare il
centro di assistenza e se necessario a spedire l’apparecchio in
riparazione.
Non esporre l’apparecchio a temperature superiori ai 60° C!
PROTEZIONE della privacy!
Il dispositivo è stata realizzato solo per l’uso privato. Rispettare la privacy delle altre persone:
ad esempio non utilizzare l’apparecchio per guardare negli appartamenti altrui.
DE EN FR NL IT ES RU
Panoramica di tutte le parti che compongono
Fissaggio del telescopio terrestre al treppiede
1. Oculare con conchiglia in gomma pieghevole
2. Regolazione dello zoom
3. Regolazione di precisione (ruota della messa a fuoco)
4. Tubo ottico
5. Attacco filettato per treppiede
6. Morsetto del tubo ottico
7. Vite di arresto del morsetto del tubo ottico
8. Paraluce con funzione antiappannamento
9. Testa del treppiede con vite filettata
10. Vite di fissaggio della testa del treppiede
11. Gambe del treppiede
12. Assi per movimento verticale (alto/basso) e orizzontale
(destra/sinistra)
13. Guida manuale con funzione di arresto
14. Protezione antipolvere integrata
15. Borsa di trasporto con cinghia a tracolla
Estrai il treppiede in dotazione dalla confezione e, tirandole
verso l’esterno, apri il più possibile le gambe del treppiede
(1). Appoggia il treppiede su una superficie piana e stabile
(per es. su un tavolo). Il tuo telescopio terrestre è dotato di
un attacco filettato per il treppiede (5), incastrato nella piastra adattatrice del morsetto del tubo ottico (6). Tenendolo
in posizione diritta, metti il telescopio terrestre con l’attacco
filettato (5) sulla vite filettata della testa del treppiede (9) e
stringi la vite di fissaggio (10) situata sotto la testa del treppiede senza però serrarla eccessivamente.
Estensione della fornitura
Spotting Scope
Treppiedi da tavolo
Valigetta per il trasporto
Panno di pulizia
Movimento del telescopio terrestre con il
treppiede
Allenta il dispositivo di arresto degli assi per il movimento
verticale (alto/basso) e orizzontale (destra/sinistra) (12) ruotando in senso antiorario l’impugnatura della guida (13). Ora
puoi muovere la testa del treppiede con lo stativo ad essa
fissato in entrambi gli assi (alto/basso e destra/sinistra).
Non appena il telescopio terrestre raggiunge la posizione di
osservazione giusta, blocca nuovamente gli assi, ruotando
l’impugnatura della guida (13) in senso opposto (in senso
orario), evitando però di stringere eccessivamente.
21
Uso
• Ruota della messa a fuoco:
guarda attraverso l’oculare (1) e gira la ruota della messa
a fuoco (3) in una delle due direzioni per mettere a fuoco
l‘oggetto da osservare. Continua a girare la ruota finché l‘immagine non ti apparirà nitida.
• Zoom:
gira la ruota dello zoom (2) per ingrandire o diminuire le dimensioni dell’oggetto. Utilizza la ruota della messa a fuoco
(3) per regolare la nitidezza dell‘immagine.
• Movimento del tubo ottico:
questo telescopio terrestre è dotato di morsetto (6) per il
tubo ottico con la relativa vite di arresto (7). Gira la vite di
arresto (7) in senso antiorario per allentare il morsetto del
tubo ottico. Puoi ruotare poi l’intero tubo (4) sul suo asse per
variare la posizione dell’oculare (1). Per poter fissare nuovamente il tubo nella posizione desiderata, stringi la vite di
arresto girandola in senso orario.
• Utilizzo in ambienti chiusi e all’aperto:
anche se è possibile compiere osservazioni attraverso
la finestra aperta o chiusa, i migliori risultati si ottengono
all‘aperto. La differenza di temperatura tra l’aria interna ad
22
una stanza e l’aria esterna e la scarsa qualità del vetro della
finestra possono compromettere la nitidezza delle immagini
osservate con il telescopio terrestre.
• Paraluce con funzione antiappannamento:
in presenza di cattive condizioni di visibilità a causa
della forte luce solare, puoi estrarre il paraluce (8).
Afferra l’anello dell’apertura del telescopio terrestre
con una mano. Tiralo lentamente in avanti finché non avvertirai una resistenza. Non puntare mai il telescopio direttamente sul sole o nelle sue immediate vicinanze! Leggi in
proposito le avvertenze riportate in queste istruzioni.
Osservazione del paesaggio e della natura
Quando osservi un paesaggio o la natura, spesso guardi
attraverso delle onde di calore che si formano sulla superficie terrestre. Queste onde di calore sono le stesse che
probabilmente hai già visto sollevarsi in estate dalle strade
asfaltate. A causa delle onde di calore può succedere che
non sempre l’immagine sia buona. Quando le onde di calore
compromettono la visibilità, prova a cambiare leggermente la
regolazione della messa a fuoco per ottenere un‘immagine
migliore e più uniforme. Cerca di compiere le tue osservazioni nelle prime ore della mattinata, prima che la superficie
terrestre si riscaldi eccessivamente.
DE EN FR NL IT ES RU
NOTE per la pulizia
Pulire le lenti (gli oculari e/o gli obiettivi) soltanto con un
panno morbido e privo di pelucchi (es. in microfibra). Non
premere troppo forte il panno per evitare di graffiare le lenti.
Per rimuovere eventuali residui di sporco più resistenti, inumidire il panno per la pulizia con un liquido per lenti e utilizzarlo per pulire le lenti esercitando una leggera pressione.
Proteggere l’apparecchio dalla polvere e dall’umidità! Dopo
l’uso, in particolare in presenza di un’elevata percentuale di
umidità dell’aria, lasciare acclimatare l’apparecchio a temperatura ambiente in modo da eliminare l’umidità residua.
Applicare i copri-obiettivo e conservare l’apparecchio nella
borsa fornita.
SMALTIMENTO
Smaltire i materiali di imballaggio in maniera differenziata. Le informazioni su uno smaltimento conforme
sono disponibili presso il servizio di smaltimento comunale o l’Agenzia per l’ambiente locale.
Per lo smaltimento dell’apparecchio osservare le disposizioni di legge attuali. Le informazioni su uno smaltimento
conforme sono disponibili presso il servizio di smaltimento
comunale o l’Agenzia per l’ambiente locale.
23
Informaciones de carácter general
Sobre este manual
Lea atentamente las indicaciones de seguridad recogidas en
este manual. Emplee este producto exclusivamente de la forma
descrita en el manual, con el fin de evitar daños en el aparato
o lesiones.
Conserve el manual de instrucciones para poder volver a informarse en todo momento sobre las funciones de manejo.
¡PELIGRO!
Este signo se encuentra delante de cualquier
sección de texto que indica peligros provocados
por el uso indebido que tienen como consecuencia lesiones de leves a graves.
Uso previsto
Este producto sirve exclusivamente para el uso privado. Se ha
desarrollado para ampliar la representación de observaciones
naturales.
Advertencias de carácter general
¡PELIGRO de lesiones corporales!
No mire nunca directamente al sol o cerca
de él con este aparato. ¡Existe PELIGRO DE
CEGUERA!
24
¡PELIGRO!
Los niños solo deberían utilizar el aparato bajo supervisión. Mantener los materiales de embalaje (bolsas de plástico, bandas de
goma) alejadas del alcance de los niños. ¡Existe PELIGRO DE
ASFIXIA!
¡PELIGRO!
No exponer el aparato – especialmente las lentes – a la radiación directa del sol. La concentración de la luz puede provocar
incendios.
¡ADVERTENCIA!
No desmonte el aparato. En caso de que exista algún defecto, le rogamos que se ponga en contacto con su distribuidor
autorizado. Este se pondrá en contacto con el centro de servicio técnico y, dado el caso, podrá enviarle el aparato para su
reparación.
No exponga nunca el aparato a una temperatura superior a los
60 °C.
¡PROTECCIÓN de la privacidad!
Los aparato están concebidos para el uso privado. Respete la privacidad de las personas de su
entorno – por ejemplo, no utilice este aparato para mirar
en el interior de viviendas.
DE EN FR NL IT ES RU
Descripcion de todas las piezas de tu telescopio terrestre
1. Ocular con visor plegable de goma
2. Ajuste de zoom (rueda de zoom)
3. Ajuste de precisión (rueda de enfoque)
4. Tubo óptico
5. Rosca de empalme para trípode
6. Abrazadera de tubo
7. Tornillo de sujeción de la abrazadera de tubo
8. Tapa antiempañamiento
9. Cabeza del trípode con tornillo roscado
10. Tornillo de sujeción en la cabeza del trípode
11. Patas de trípode
12. Ejes de movimiento vertical (arriba/abajo) y horizontal
(derecha/izquierda)
13. Guía manual con función de ajuste
14. Tapa de protección contra el polvo integrada
15. Bolso de transporte con correa sujetadora
Volumen de suministro
Telescopio de observación
Trípode de mesa
Bolso de nylon
Un paño de limpieza
Sujetar el telescopio terrestre sobre el trípode
Extrae del embalaje el trípode suministrado y extiende las
patas del trípode (11) separándolas lo máximo posible. Coloca el trípode sobre una superficie firme y nivelada (p. ej.
en una mesa).
Tu telescopio terrestre dispone de una rosca de empalme
para trípode (5) introducida en la placa adaptadora junto a la
abrazadera de tubo (6). Coloca el telescopio terrestre junto
con la rosca de empalme (5) recto en el tornillo roscado que
hay en la cabeza (9) del trípode y aprieta firmemente el tornillo de sujeción (10) por debajo de la cabeza del trípode.
Mover el telescopio terrestre con el trípode
Suelta la fijación de los ejes de movimiento vertical (arriba/
abajo) y horizontal (derecha/izquierda) (12) girando el mango de guía (13) en el sentido contrario al de las agujas del
reloj. Ahora puedes mover en ambos ejes (arriba/abajo y
derecha/izquierda) la cabeza del trípode junto con el propio
trípode sujetado a ella. Una vez que el telescopio terrestre
se encuentre en la posición de observación correcta, vuelve
a fijar los ejes apretando firmemente el mango de guía (en el
sentido de las agujas del reloj).
25
Manejo
• Rueda de enfoque:
mira por el ocular (1) y gira la rueda de enfoque (3) en una
de las dos direcciones a fin de enfocar con nitidez un objeto de observación. Gira la rueda hasta que veas la imagen
nítida.
• Zoom:
gira la rueda de zoom (2) para acercar el zoom sobre un
objeto o alejarlo de él. Usa la rueda de enfoque (3) para
enfocar la imagen con nitidez.
• Movimiento del tubo:
este telescopio terrestre dispone de una abrazadera de tubo
(6) con su correspondiente tornillo de sujeción (7). Gira el
tornillo de sujeción (7) en sentido contrario al de las agujas
del reloj hasta que se afloje la abrazadera del tubo. A continuación, puedes girar todo el tubo (4) sobre su propio eje
y modificar así la posición del ocular (1). Para volver a fijar
el tubo en la posición deseada, debes apretar el tornillo de
sujeción girándolo en el sentido de las agujas del reloj.
• Uso en interior y exterior:
aunque muchas veces tendrás que observar las cosas a
través de una ventana abierta o cerrada, los mejores re26
sultados se obtienen siempre al aire libre. Las diferencias
de temperatura entre el aire interior y el exterior, así como
la escasa calidad de los cristales de las ventanas, pueden
provocar que las imágenes que captas con tu telescopio terrestre no sean tan nítidas como debieran.
• Tapa antiempañamiento:
si hay unas malas condiciones de visibilidad en caso
de un brillo muy intenso del sol, puedes sacar el parasol (8). Para ello, coge con una mano el aro que
hay en la abertura de tu telescopio terrestre y tira de él lentamente hacia delante hasta que notes una resistencia. ¡No
mires nunca directamente al sol ni a sus proximidades! Para
ello, consulta las advertencias recogidas en estas instrucciones.
Observación del paisaje/naturaleza
Cuando observes paisajes u objetos de la naturaleza, a menudo tendrás que mirar a través de las olas de calor que se
forman sobre la superficie terrestre. Seguro que ya has visto
alguna vez estas olas difuminar las imágenes cuando ibas
en coche por la carretera. Es posible que por su culpa la
imagen no siempre sea buena. Si te encuentras con olas
de calor que perjudican la observación, intenta modificar
un poco la nitidez para obtener una imagen mejor y más
uniforme. Aprovecha las primeras horas de la mañana para
DE EN FR NL IT ES RU
tus observaciones, ya que en ese momento la superficie terrestre aún no se ha calentado en exceso.
INDICACIONES de limpieza
Limpie las lentes (oculares y/o objetivos) exclusivamente
con un paño suave y sin hilachas (p. ej. de microfibras). No
presione el paño con demasiada fuerza para evitar arañazos
en las lentes.
Para retirar los restos de suciedad intensa, humedezca el
paño de limpieza con un producto limpiador para gafas y
frote las lentes ejerciendo poca presión.
ELIMINACIÓN
Elimine los materiales de embalaje separados por tipos. Obtendrá información sobre la eliminación reglamentaria en los proveedores de servicios de eliminación comunales o en la agencia de protección
medioambiental.
Por favor, tenga en cuenta las disposiciones legales vigentes a la hora de eliminar el aparato. Obtendrá información
sobre la eliminación reglamentaria en los proveedores de
servicios de eliminación comunales o en la agencia de protección medioambiental.
¡Proteja el aparato del polvo y la humedad! Tras el uso a la
temperatura del cuarto – especialmente en condiciones de
humedad del aire elevada – deje que se aclimate durante
un tiempo, de modo que se pueda eliminar la humedad residual. Coloque la cobertura de protección contra el polvo y
guárdelo en la bolsa incluida en el envío.
27
Общая информация
О данном руководстве
Внимательно прочитайте инструкции по технике безопасности
в данном руководстве. Используйте данное устройство только в соответствии с описаниями в руководстве для исключения риска его повреждения или травмирования.
Сохраните руководство по эксплуатации, чтобы всегда иметь
возможность обращаться к содержащейся в нем информации по функциям управления.
ОСТОРОЖНО!
Этот символ располагается перед каждым
фрагментом текста, в котором имеется
указание на риски, которые при ненадлежащем
использовании могут привести к легким или
тяжким телесным повреждениям.
Назначение
Это устройство предназначено исключительно для личного
использования.
Оно было разработано для наблюдения за природой в увеличенном виде.
Общие предупреждения
ОПАСНОСТЬ травмирования!
Ни в коем случае не смотрите через этот
прибор прямо на солнце или в направлении
солнца. Опасность ПОТЕРИ ЗРЕНИЯ!
ОПАСНОСТЬ!
Дети должны использовать прибор только под присмотром
взрослых. Исключите доступ детей к упаковочным материалам (пластиковые пакеты, резиновые ленты и т.д.)! ОПАСНОСТЬ УДУШЬЯ!
ОПАСНОСТЬ!
Не прибор – в особенности линзы – под прямыми солнечными лучами! Из-за фокусировки солнечных лучей может возникнуть пожар!
УКАЗАНИЕ!
Не разбирайте прибор! В случае неисправности обращайтесь
к дилеру. Он свяжется с сервисным центром и может переслать прибор для выполнения ремонта.
Не допускайте нагревания прибора до высокой температуры!
28
DE EN FR NL IT ES RU
ЗАЩИТА сферы личной жизни!
Бинокли
предназначены
для
личного
использования. Соблюдайте права на личную
жизнь окружающих Вас людей – не используйте этот
прибор, например, для заглядывания в окна жилых
помещений!
Комплект поставки
Зрительная труба
Настольный штатив
Нейлоновая сумка для переноски
Салфетка
Установка трубы на штатив
Детали
1. Окуляр/Резиновый наглазник
2. Кольцо приближения
3. Колесо фокусировки
4. Оптическая труба
5. Резьбовой адаптер для штатива
6. Зажим трубы
7. Винт фиксации
8. Выдвижная бленда
9. Головка штатива с винтом
10. Винт фиксации головки штатива
11. Ножки штатива
12. Оси перемещения по горизонтали и вертикали
13. Ручка механизма тонких движений
14. Пылезащитная крышка
15. Мягкая сумка с ремешком для переноски
Возьмите штатив и вытяните его ножки (11) на максимальную длину. Установите штатив на ровную поверхность, например, на стол.
Резьбовой адаптер в основании трубы (5) навинчивается
на винт головки штатива (9). Накрутите трубу на винт и
закрепите конструкцию винтом фиксации (10).
Управление трубой на штативе
Поверните ручку механизма тонких движений (13) против часовой стрелки. Это позволит вам поворачивать
конструкцию влево или вправо, а также изменять угол
наклона (12). Направив трубу в нужную сторону, вы можете закрепить конструкцию в этом положении поворотом ручки (13) по часовой стрелке.
29
Использование прибора
• Фокусировка
Глядя в окуляр (1), сфокусируйтесь на объекте, поворачивая колесо фокусировки (3) в нужную сторону до тех пор,
пока не увидите четкое изображение.
• Приближение
Поворачивайте кольцо приближения (2), чтобы изменить
увеличение зрительной трубы. Затем снова сфокусируйте
изображение при помощи колеса фокусировки (3).
• Поворот оптической трубы
Чтобы изменить положение окуляра (1), открутите винт
фиксации (7), ослабив тем самым зажим трубы (6), затем
поверните оптическую трубу (4) вокруг собственной оси.
Выбрав нужное положение трубы, закрепите ее, повернув винт (7) по часовой стрелке.
30
• Уличные наблюдения и наблюдения из дома
Несмотря на то, что трубой можно пользоваться где угодно, желательно проводить любые наблюдения на улице.
Разница температур внутри помещения и снаружи, а
также низкое качество оконных стекол могут сильно исказить качество получаемых изображений.
• Выдвижная бленда
Если яркое солнце мешает наблюдениям, вы можете воспользоваться выдвижной блендой (8).
Возьмитесь за переднюю часть трубы и с небольшим усилием выдвиньте бленду вперед. Ни в коем случае не смотрите в трубу на солнце во избежание повреждения глаз.
Наблюдение наземных объектов
Во время наблюдения наземных объектов вы смотрите
на них через толщу воздушных масс, которая колышется
от испаряющегося тепла. Подобный эффект можно наблюдать в жаркий день на шоссе. Эти испарения сильно
ухудшают качество изображения.
Если из-за колебаний воздуха в трубу ничего не видно,
уменьшите увеличение и сфокусируйте изображение заново. Лучшее время для наблюдений — раннее утро,
когда земля ещё не успела нагреться.
DE EN FR NL IT ES RU
УКАЗАНИЯ по чистке
Используйте для чистки линз (окуляры и/или объективы)
только мягкую салфетку из нетканого материала (например, микроволокно). Не нажимайте на салфетку слишком сильно, чтобы исключить вероятность образования
царапин на линзах.
Для удаления более сильных загрязнений смочите чистящую салфетку в жидкости для чистки очков и протрите
линзы с небольшим усилием.
УТИЛИЗАЦИЯ
Выполняйте утилизацию упаковочных материалов
по их типам. Информацию по правильной утилизации можно получить в коммунальной службе утилизации или в отделе по защите окружающей среды.
При утилизации прибора соблюдайте действующие законодательные нормы. Информацию по правильной утилизации можно получить в коммунальной службе утилизации или в отделе по защите окружающей среды.
Защищайте прибор от пыли и влаги! После использования – в особенности при высокой влажности воздуха
– подержите прибор некоторое время при комнатной
температуре, чтобы дать испариться остаточной влаге.
Наденьте пылезащитные колпачки и поместите прибор в
сумку, входящую в комплект поставки.
31
SPEKTIV
SPOTTING SCOPE
Experience the National Geographic Channel.
Visit our website: www.nationalgeographic.com
Meade Instruments Europe
GmbH & Co. KG
Gutenbergstr. 2 · DE-46414 Rhede
www.bresser.de · [email protected]
ANL9057000MSP0612NG
© 2012 National Geographic Society
NATIONAL GEOGRAPHIC and Yellow Border Design
are trademarks of the National Geographic Society.
All rights reserved.
Irrtümer und technische Änderungen vorbehalten.
Errors and technical changes reserved.