1
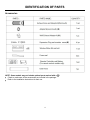
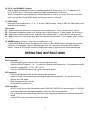
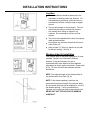
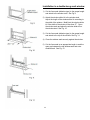
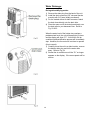
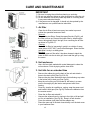
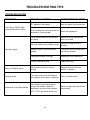
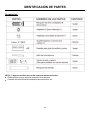
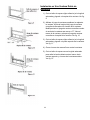
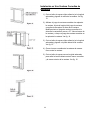
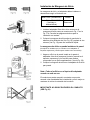
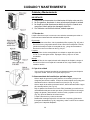
User’s Manual Portable Air Conditioner 8000 BTU Model No.: NPPAC8KW Inside, you will find many helpful hints on how to use and maintain your air conditioner properly. Just a little preventative care on your part can save you a great deal of time and money over the life of your air conditioner. Before operating this product, please read the instructions carefully and save this manual for future use. CONTENTS SAFETY PRECAUTIONS Safety Rules ……………………………………………………………….……………………………………..…….….2 Energy Save ……………………………………………………………….……………………………………..…….….2 Operating Condition ………………………………………………………………....………………………..…….…….3 For Your Safety …………………………………………………………………..………………………...….……….....3 Electrical Information ……………………………………………………………..…………………………..…………..3 IDENTIFICATION OF PARTS Accessories ……………………………………………………………………………………..……..……..……...…….4 Names of Parts ………………………………………………………………………………..………....…………….….5 AIR CONDITIONER FEATURES Electronic Control Operating Instructions ………………………………………………..………....…………….…….6 OPERATING INSTRUCTIONS Operating Instructions ………………………………………………………………………..………....…………….….8 Other Features …………………….…………………………………………………………..……….....……………..10 INSTALLATION INSTRUCTIONS Location …………..………………………………………………………….…………………..………..…...…………11 Window Slider Kit Installation ………………………………………………………………..………..…….………….11 Installation in a Double-Hung Sash Window ……………………………………………..………..…..….………….12 Installation in a Sliding Sash Window ……………………………………………………..………..…..….………….13 Exhaust Hose Installation ……..……………………………………………………………..………..…….……….…14 Water Drainage ….……………………….……….……………………………………………..………………….…...15 CARE AND MAINTENANCE Care and Maintenance ……………………………………………………………………..………..……...….……….16 TROUBLESHOOTING TIPS Troubleshooting ……………………………….…………………………………………..………..………..………..…17 NOTE The rating data indicated on the energy label is based on tests of the unit installed with the un-extended air exhaust duct WITHOUT Adaptor A & B (The duct and the Adaptor A & B are listed in the accessories chart of the Instruction Manual 1 SAFETY PRECAUTIONS Safety Rules To prevent injury to the user or other people and property damage, the following instructions must be followed. Incorrect operation due to ignoring of instructions may cause harm or damage. Your air conditioner should be used in such a way that it is protected from moisture (i.e. condensation, water, etc.). Do not place or store your air conditioner where it can fall or be pulled into water or any other liquid. If this occurs, immediately unplug the unit. Always transport your air conditioner in a vertical position and place on a stable, level surface during use. Turn off the air conditioner when not in use. Always contact a qualified service technician to carry out any repairs. If the supply cord is damaged, it must only be repaired by a qualified service technician. Keep an open area of at least 12” all around the unit (i.e. walls, furniture, curtains, etc.). If the air conditioner is knocked over during use, immediately turn off the unit and unplug from the main power supply Do not operate your air conditioner in a wet room such as a bathroom or laundry room. Do not touch or operate the unit with wet or damp hands or when barefoot Do not press the buttons on the control panel with anything other than your fingers. Do not remove any fixed covers. Never use this air conditioner if it is not working properly or if it has been dropped or damaged. Never use the plug to start and stop the unit. Always use the switch on the control panel. Do not cover or obstruct the inlet or outlet grills. Do not use hazardous chemicals to clean or come into contact with the air conditioner. Do not operate the air conditioner in the presence of flammable substances or vapors such as alcohol, insecticides, gasoline, etc. Do not allow children to operate the air conditioner unsupervised. Do not use this air conditioner for anything other than its intended purpose and as described in this instruction manual. Energy Save Use the air conditioner in the recommended room size. Place the air conditioner in a location where the air flow will not be obstructed (i.e. furniture). Keep blinds/curtains closed during the sunniest part of the day. Keep the filter clean. Keep doors and windows closed to keep cool air in and warm air out. 2 Operating Condition The air conditioner must be operated within the temperature range indicated below: MODE ROOM TEMPERATURE COOL 62°F (17°C) ~ 95°F (35°C) DRY 55°F (13°C) ~ 95°F (35°C) Suggested tools for window kit installation 1) 2) 3) 4) Screwdriver (medium size Phillips) Tape measure or ruler Knife or scissors Saw (In the event the window kit needs to be cut down in size for narrow windows) For Your Safety Do not store or use gasoline or other flammable vapors and liquids in the vicinity of this or any other appliance. Avoid fire hazard or electric shock. Do not use an extension cord or an adaptor plug. Do not remove any prong from the power cord. Electrical Information Be sure your electrical service is adequate for the model you have chosen. This information can be found on the serial plate, which is located on the side of the cabinet and behind the grill. Be sure the air conditioner is properly grounded. To minimize shock and fire hazards, proper grounding is important. The power cord is equipped with a three-prong grounding plug for protection against shock hazards. Your air conditioner must be used in a properly grounded wall outlet. If the wall outlet you intend to use is not adequately grounded or protected by a time delay fuse or circuit breaker, have a qualified electrician install the proper outlet. Ensure the outlet is accessible after the unit is installed. 3 IDENTIFICATION OF PARTS Accessories NOTE: Some models may not include optional parts marked with a ( ). Check to make sure all the accessories are included in the package. Refer to the Installation Instructions for their use. 4 Names of Parts 5 AIR CONDITIONER FEATURES Electronic Control Operating Instructions Before you begin, thoroughly familiarize yourself with the control panel and remote control and all its functions. The unit can be controlled by the control panel alone or with the remote control. NOTE: This manual does not include instructions for the remote control. The Remote Control Instructions are packed separately with the unit. Control Panel of the Air Conditioner (1) MODE select button Selects the appropriate operating mode. Each time this button is pressed, the model will change from AUTO, COOL, DRY, FAN AND HEAT (on some models). The mode indicator light will illuminate under the different mode settings. Fig. 3 (2) TIMER button Used to initiate the AUTO ON and AUTO OFF features, in conjunction with the (▲) and (▼) buttons. (3) POWER button Power switch ON/OFF. (4) SLEEP button Used to initiate the SLEEP feature. (5) FAN button Used to control the fan speed. Press to select between four speeds – LOW, MED, HI, and AUTO. The selected fan speed indicator light will illuminate except for AUTO speed. When AUTO fan speed is selected, all fan indicator lights turn dark. 6 (6) UP (▲) and DOWN (▼) buttons. Used to adjust (increase/decrease) the temperature setting by increments of 2°F (1°C) between 62°F (17°C) to 88°F (30)°C. Also used to adjust the TIMER setting between 0-24 hours. NOTE: Temperatures can be displayed in either Fahrenheit or Celsius. To convert from one to the other, press and hold the UP and DOWN buttons at the same time for 3 seconds. (7) LED Display Displays the set temperature in “°C” or “°F” and the TIMER settings. While on DRY and FAN modes, room temperature is displayed. Error codes: E1 – Room temperature sensor error. Unplug the unit and plug back in. If error repeats, call for service E2 – Evaporator temperature sensor error. Unplug the unit and plug back in. If error repeats, call for service E4 – Display panel communication error. Unplug the unit and plug back in. If error repeats, call for service P1 – Bottom tray is full. Connect the drain hose and drain the collected water. If error repeats, call for service (8) SWING button (Applicable for models with AUTO SWING feature only) Press the SWING button to turn this feature ON. Each time the SWING button is pressed, the louver will angle up in 6° increments. Hold the SWING button down for 2 seconds to initiate the AUTO SWING feature. During AUTO SWIGN, press the SWING button again to stop the louver at the desired angle. OPERATING INSTRUCTIONS COOL operation - Press the MODE button until the COOL indicator light illuminates. - Press the ADJUST buttons “↑” or “↓” to select your desired room temperature. The temperature can be set within a range of 62°F (17°C) - 88°F (30°C). - Press the FAN SPEED button to choose the desired fan speed. DRY operation - Press the MODE button until the DRY indicator light illuminates. - Under this mode, you cannot select a fan speed or adjust the temperature. The fan motor will only operate at a LOW speed. - Keep windows and doors closed. - Do not install the window duct. AUTO operation - In AUTO mode, the unit will automatically select COOLING, HEATING (on some models) or FAN ONLY mode depending on the selected temperature setting and the room temperature. - The air conditioner will automatically control the room temperature based on the selected temperature setting. - Under AUTO mode, you cannot select the fan speed. 7 FAN operation - Press the MODE button until the FAN indicator light illuminates. - Press the FAN SPEED button to choose the desired fan speed. - Under FAN mode, the temperature cannot be adjusted. - Do not install the window duct. TIMER operation - While the unit is on, press the TIMER button. The TIMER OFF indicator light will illuminate. This indicates the AUTO STOP feature has been initiated - While the unit is off, press the TIMER button. The TIMER ON indicator light will illuminate. This indicates the AUTO START feature has been initiated - Press or hold the UP or DOWN button to change the AUTO time by 30 minute increments (up to 10 hours), then at 1 hour increments (up to 24 hours). The control will count down the time remaining until start. - The selected time will register for 5 seconds and then the system will automatically revert back to display the previous temperature setting. - Turning the unit ON or OFF at any time or adjusting the timer setting to 0.0 will cancel the AUTO START/STOP timed program. - When an error occurs (E1 or E2), the AUTO START/STOP timed program will also be cancelled. SLEEP operation - Press the SLEEP button to activate the sleep feature. - Within 30 minutes, the selected temperature will increase (cooling) or decrease (heating – on some models) by 2°F (1-2°C). - After an additional 30 minutes, the temperature will again increase (cooling) or decrease (heating – on some models) by 2°F (1-2°C). - The new temperature will be maintained for an additional 7 hours before the unit returns to the originally selected temperature setting. - At this time, the SLEEP mode will end and the unit will continue to operate as originally programmed. NOTE: This feature is unavailable under FAN or DRY mode. 8 Other Features Power Outage In case of a power outage or interruption, the unit will automatically restart, with the last setting, after the power is restored. Wait 3 minutes before resuming operation. After the unit has stopped, it cannot be restarted for 3 minutes. This is to protect the unit and its components. Operation will automatically start after 3 minutes. Air flow direction adjustment The louver can be adjusted manually or automatically according to the different models. Adjust the air flow direction manually (Fig.4) - The louver can be set to the desired position manually. The maximum angle for the louver is 60°. DO NOT FORCE THE LOUVER PAST THE MAXIMUM ANGLE. - Do not place any heavy objects or other loads on the louver. This will damage the unit. - Ensure the louver is fully opened under heating operation (on some models). - Keep the louver fully opened during operation. Adjust the air flow direction automatically (Fig.5) - When the unit is ON, the louver will open fully. Use the SWING button on the remote control or control panel to stop the louver at the desired angle. - The lover will angle up in 6° increments each time the SWING button is pressed until it reaches the maximum angle. Once the louver reaches the maximum angle, it will automatically change the swing direction. - If the SWING button is pressed for more than 2 seconds, the AUTO SWING feature will activate. The louver swings as shown in Fig. 5. 9 INSTALLATION INSTRUCTIONS Location The air conditioner should be placed on a firm foundation to minimize noise and vibration. For safe and secure positioning, place the unit on a smooth and level floor strong enough to support the unit. The unit has castors to aid movement. The unit should only be rolled on smooth flat surfaces. Use caution when rolling on carpet or rug surfaces. Do not attempt to roll the unit over objects. The unit must be placed within reach of a properly rated grounded socket. Never place any obstacles around the air inlet or outlet of the unit. Allow at least 12” (30cm) of space from the wall for efficient cooling. See Fig. 6. Window slider kit installation Your window slider kit has been designed to fit most standard “Vertical” and “Horizontal” windows. However, it may be necessary for you to improvise/modify some aspects of the installation procedures for certain types of windows. Please refer to Fig. 7 & 8 for minimum and maximum window dimensions. NOTE: The adjusted length of the window slider kit can be fixed with a bolt. See Fig. 8a. NOTE: If the window opening is less than the recommended minimum length of the window slider kit, the window slider kit can be modified (or cut) to fit the window opening. If such a modification is required, only cut the part that has the exhaust hole. NEVER CUT OUT THE HOLE IN THE WINDOW SLIDER KIT. 10 Installation in a double-hung sash window 1) Cut the foam seal (adhesive type) to the proper length and attach to the window stool. See Fig 9. 2) Attach the window slider kit to the window stool. Adjust the length of the window slider kit according to the width of the window. Modify/cut the window slider kit if the width of the window is less than 27”. Open the window sash and place the window slider kit on the window stool. See Fig. 10. 3) Cut the foam seal (adhesive type) to the proper length and attach to the top of the window. See Fig. 11. 4) Close the window sash securely against the window. 5) Cut the foam seal to an appropriate length to seal the open gap between the top window sash and outer window sash. See Fig. 12. 11 Installation in a sliding sash window 1) Cut the foam seal (adhesive type) to the proper length and attach to the window frame. See Fig. 13. 2) Attach the window slider kit to the window stool. Adjust the length of the window slider kit according to the height of the window. Modify/cut the window slider kit if the height of the window is less than 27”. Open the window sash and place the window slider kit on the window stool. See Fig. 14 . 3) Cut the foam seal (adhesive type) to the proper length and attach to the side of the window. See Fig. 15. 4) Close the sliding sash securely against the window. 5) Cut the foam seal to an appropriate length to seal the open gap between the sliding sash and outer window sash. See Fig. 16. 12 Exhaust hose installation: The exhaust hose and adaptor must be installed or removed in accordance with the usage mode. COOL mode Install FAN or DEHUMIDIFY mode Remove 1) Install the window Exhaust Adaptor B onto the exhaust hose as shown in Fig. 17a or Fig. 17b. Refer to the previous pages for window kit installation. 2) Place the exhaust hose over the air outlet opening (See Fig. 18). Push in to form a tight fit. Flatten the other end for quick installation (See Fig. 19). The exhaust hose can be installed into the wall (Not applicable for units without Exhaust Adaptor A, expansion plugs and wooden screws from Accessories) 1) Prepare a hole in the wall. Install the wall Exhaust Adaptor A on the wall (outside) by using the four (4) expansion plugs and wooden screws. Be sure to affix thoroughly (See Fig. 20). 2) Attach the exhaust hose to wall Exhaust Adaptor A. NOTE: Cover the hole using the adaptor cap when not in use. The duct can be compressed or extended moderately according to the installation requirements. However, it is recommended to keep the duct length to a minimum. IMPORTANT: DO NOT OVER BEND THE DUCT (See Fig. 21) 13 Water Drainage: During dehumidifying modes: 1) Remove the drain plug from the back of the unit 2) Install the drain connector (5/8” universal female mender) with 3/4" hose (locally purchased). 3) For the models without a drain connector, attach the drain hose directly onto the drain hole. 4) Place the open end of the drain hose directly over the drain area in your basement floor. Refer to Fig. 22 & 23. When the water level of the bottom tray reaches a predetermined level, the unit will beep eight (8) times and the display will show “P1”. At this time, the air conditioning/dehumidification process will immediately stop. However, the fan motor will continue to operate (this is normal). 1) Carefully move the unit to a drain location, remove the bottom drain plug and let the water drain away. Refer to Fig. 24. 2) Restart the air conditioner until the “P1” no longer appears on the display. If the error repeats call for service. 14 CARE AND MAINTENANCE IMPORTANT 1) Be sure to unplug the unit before cleaning or servicing. 2) Do not use gasoline, thinner or other chemicals to clean the unit. 3) Do not wash the unit directly under tap water or a running hose. It may cause electrical danger. 4) If the power cord is damaged, it should only be repaired by the manufacturer or a qualified service technician. 1. Air filter - Clean the air filter at least once every two weeks to prevent - - - inferior fan operation because of dust. Removal This unit has two filters. Grasp the upper filter tab (Fig.25), pull the filter out then up. Remove the lower filter by loosening the screw, taking down the air inlet grill, then removing the air filter as shown in Fig.26 & 27. Cleaning Wash the air filter by immersing it gently in a solution of warm water (about 104°F /40°C) and neutral detergent. Rinse the filter and allow it to dry in a shady place. Mounting Insert the upper air filter after it has been cleaned, attach the lower air filter onto the air inlet grill, then install the grill by using the screw. 2. Unit enclosure - Use a lint-free cloth soaked with neutral detergent to clean the unit enclosure. Finish by drying with a clean cloth. 3. Unit idle for an extended time - Remove the rubber plug on the back of the unit and attach a - hose to the drain outlet (See Fig.22 & 23). Remove the plug from the bottom drain outlet allowing any water in the bottom tray to drain out (See Fig.24). Keep the unit running on FAN mode for half a day in a warm room to thoroughly dry the interior and prevent mold from forming. Once dry, stop the air conditioner, unplug, wrap the power cord and bundle it with tape (See Fig.28). Remove the batteries from the remote control. Clean the air filter and reinstall it. Unscrew the exhaust hose by turning to the right or left and pull out for un-installation (See Fig.30). Keep in a safe location. Cover the window (wall) hole with the adaptor cap. Place the open end of the drain hose directly over the drain area in your basement floor 15 TROUBLESHOOTING TIPS TROUBLESHOOTING PROBLEM POSSIBLE CAUSES SUGGESTED SOLUTION “P1” appears in the display. Drain the water in the bottom tray. Room temperature is lower than the set temperature (Cooling mode). Reset the temperature. The windows or doors in the room are not closed. Make sure all the windows and doors are closed. There are heat sources inside the room. Remove the heat sources, if possible. Exhaust air duct is not connected or blocked. Connect the duct and make sure it can function properly. Temperature setting is too high. Decrease the set temperature. Air filter is blocked by dust. Clean the air filter. Noisy or Vibration sound The ground is not level or not flat enough. Place the unit on a flat, level surface, if possible Gurgling sound The sound comes from the flowing of the refrigerant inside the air conditioner This is a normal sound Power shut off at Heating Mode The automatic over-heat protection function has initiated. When the temperature at the air outlet exceeds 158°F (70°C), the device will shut off. Switch on again after the unit has cooled down. Unit does not START when pressing the ON/OFF button Not cool enough 16 WINDOW AIR CONDITIONER WARRANTY MC Appliance Corporation warrants each new Portable Air Conditioner to be free from defects in material and workmanship and agrees to remedy any such defect or to furnish a new part(s) (at the company’s option) for any part(s) of the unit that has failed during the warranty period. Parts and labor expenses are covered on this unit for a period of one year from the date of purchase. In addition, MC Appliance Corporation warrants the compressor (part only) to be free from defects in material and workmanship for a period of 5 years. The consumer is responsible for all labor and transportation expenses related to the diagnosis and replacement of the compressor after the initial one-year warranty expires. A copy of the dated sales receipt / invoice is required to receive warranty service or a refund. This warranty covers appliances in use within the continental United States, Puerto Rico and Hawaii. The warranty does not cover the following: Damages due to shipping damage or improper installation. Damages due to misuse or abuse. Content losses due to failure of the unit. Inside components such as filter, etc. Repairs performed by unauthorized service agents. Service calls that do not involve defects in material and workmanship such as instruction on proper use of the product or improper installation. Replacement or resetting of house fuses or circuit breakers. Failure of this product if used for other than for its intended purpose. Disposal costs for any failed unit not returned to our factory. Any delivery costs incurred as the result of a unit that fails to perform as specified. Expenses for travel and transportation for product service if your appliance is located in a remote area where service by an authorized service technician is not available. The removal and reinstallation of your appliance if it is installed in an inaccessible location or is not installed in accordance with published installation instructions. This warranty is in lieu of all warranties expressed or implied and no representative or person is authorized to assume for us any other liability in connection with the sale of this product. Under no circumstances is the consumer permitted to return this unit to the factory without prior written consent from MC Appliance Corporation. Model Parts NPPAC8KW One-Year Labor One-Year Compressor (Part Only) Five Years Type of Service Carry In For Service or Assistance please call 888 775-0202. Or visit us on the web at www.mcappliance.com to request warranty service or order parts. 18 19 Manual del propietario ACONDICIONADOR DE AIRE PORTÁTIL Modelo No.: NPPAC8KW En este manual hallará muchos consejos útiles para mantener y usar correctamente su acondicionador de aire. Si aplica unos pocos cuidados preventivos puede ahorrar mucho tiempo y dinero a lo largo de la vida útil de su acondicionador de aire. Antes de usar este producto, lea con cuidado las instrucciones y guarde este manual para consultarlo en el futuro. ÍNDICE INSTRUCCIONES DE SEGURIDAD Normas de Seguridad ………………..………………………………………………………………………..........…. Ahorro de Energía ………………………………………………………….…………………………….….….….…... Condiciones de Funcionamiento ………………………………………………....…………………………………... Por su Seguridad …………………………………………………………..…………..…………...…...……......……. Información Eléctrica ……………………………………………………………..…………………………...…..……. 22 22 23 23 23 IDENTIFICACIÓN DE PARTES Accesorios ………………………………………………………………………………..……..……..……..…..……... 24 Identificación de Partes ………………..……………………………………………...……..………....……………… 25 FUNCIONES DEL ACONDICIONADOR DE AIRE Instrucciones de Operación del Control Electrónico …………………………………………...…....…….……….. 26 INSTRUCCIONES DE USO Instrucciones de Uso ………………………………………………………………..…………...……………............. 28 Otras Funciones …………………….……………………………………………………..……….....…..……………. 30 INSTALACIÓN Ubicación…………..……………………………………………………….…………………..………..….....………… Instalación del Juego de Ventana Corrediza ……………………………………………………..………..…..……. Instalación en Una Ventana Doble de Guillotina ……………………………………………..………...….…….….. Instalación en Una Ventana Corrediza de Guillotina ……………………………..…………..………..…..…..…… Instalación de Manguera de Alivio ..…………………………………………………………..………..…….……..… Drenado de Agua ….……………………….……….…………………………………………..……………….……… 31 31 32 33 34 35 CUIDADO Y MANTENIMIENTO Cuidado y Mantenimiento ……………………………………………………………………..…….……...…..……… 36 SOLUCIÓN DE PROBLEMAS Solución de Problemas ……………………….………………………………………..………..……………...……... 37 INFORMACIÓN DE LA GARANTÍA Garantía Página ………………….………….…………………………………………..………..………..…………… 38 NOTA El valor nominal indicado en la etiqueta de energía se basa en condiciones de prueba con una instalación a la que no se le ha agregado un conducto de salida de aire y que no tiene adaptador A/B (el conducto y el adaptador A/B se enlistan en el cuadro de accesorios del Manual de Instrucciones). 21 INSTRUCCIONES DE SEGURIDAD Normas de Seguridad Para evitar lesiones en el usuario u otras personas y daños a la propiedad, se deben seguir las siguientes instrucciones. El funcionamiento incorrecto debido al desconocimiento de estas instrucciones puede causar daños o lesiones. No utilice el aparato acondicionador de aire en un cuarto húmedo como el baño o el cuarto de lavandería. No toque ni opere la unidad con las manos mojadas o húmedas, ni con los pies descalzos. No presione los botones del panel de control con algo diferente de los dedos. No retire ninguna cubierta fija. Nunca utilice el acondicionador de aire si no está funcionando adecuadamente, si se ha caído o si está dañado. Nunca utilice el enchufe para prender y apagar la unidad. Utilice el interruptor en el panel de control. No cubra ni obstruya las rejillas de entrada o salida. No utilice productos químicos fuertes para limpiar la unidad ni deje que éstos entren en contacto con el aparato. No utilice la unidad en presencia de sustancias o vapores inflamables como alcohol, insecticidas, gasolina, etc. No permita que los niños operen el aparato sin supervisión. Sólo utilice este aparato acondicionador de aire para los propósitos previstos y como se describe en este manual de instrucciones. Su acondicionador de aire debe ser utilizado de tal manera que quede protegido de la humedad (condensación, agua, etc.). No coloque ni guarde el aparato acondicionador de aire donde pueda caerse o ser jalado dentro del agua o cualquier otro líquido. Si esto ocurre, desconecte inmediatamente la unidad. Transporte siempre su acondicionador de aire en posición vertical y colóquelo sobre una superficie estable y nivelada durante el uso. Apague el acondicionador de aire cuando no esté en uso. Siempre contacte a un técnico de servicio calificado para llevar a cabo cualquier reparación. Si el cable de alimentación está dañado, sólo debe ser reparado por un técnico de servicio calificado. Mantenga un área abierta de por lo menos 12" alrededor de la unidad (lejos de paredes, muebles, cortinas, etc.). Si el aparato acondicionador de aire se cae durante el uso, apague inmediatamente la unidad y desconéctela de la fuente de alimentación principal. Ahorro de energía Utilice la unidad en habitaciones con el tamaño recomendado. Coloque el aparato acondicionador de aire en un lugar donde el flujo de aire no se vea obstruido por muebles, etc. Mantenga las persianas y cortinas cerradas durante la parte más soleada del día. Mantenga el filtro limpio. Mantenga las puertas y ventanas cerradas para conservar el aire fresco adentro y el aire caliente afuera. 22 Condiciones de funcionamiento El acondicionador de aire debe funcionar dentro del rango de temperatura que se indica a continuación: MODO DE FUNCIONAMIENTO FRÍO SECO TEMPERATURA DE LA HABITACIÓN 62°F (17°C) ~ 95°F (35°C) 55°F (13°C) ~ 95°F (35°C) Herramientas recomendadas para la instalación del juego de ventana 1) Destornillador de cruz Phillips tamaño medio) 2) Cinta métrica o regla 3) Cuchillo o tijeras 4) Sierra (en caso de que se deba recortar el tamaño del juego de ventana para ventanas estrechas) Por su Seguridad No almacene o use gasolina ni otros vapores o líquidos inflamables junto a este o cualquier otro aparato. Evite los riesgos de incendio o descarga eléctrica. No use un cable de extensión o un adaptador para la clavija. No quite ninguna terminal de la clavija del cable de alimentación eléctrica. Información Eléctrica Compruebe que el servicio eléctrico sea el adecuado para el modelo que ha escogido. Esta información la puede encontrar en la placa con el número de serie que se localiza al lado del gabinete y detrás de la parrilla. Verifique que el acondicionador de aire tenga una conexión adecuada a tierra. Para minimizar los riesgos de descarga e incendio, es importante contar con una conexión a tierra apropiada. El cable de alimentación eléctrica está equipado con una clavija trifásica como protección contra riesgos eléctricos. Su acondicionador de aire se debe usar en un receptáculo para pared correctamente conectado a tierra. Si el receptáculo para pared que pretende usar no tiene una conexión adecuada a tierra o no está protegido con un fusible retardador o un interruptor de circuito, contrate un electricista calificado para que instale el receptáculo correcto. Al instalar la unidad, asegúrese de hacerlo dejando espacio de forma que más adelante sea posible el acceso al receptáculo. 23 IDENTIFICACIÓN DE PARTES Accessorios NOTA: (*) Algunos modelos no cuentan con estas partes opcionales. Revise que se incluyan todos los accesorios en el paquete. Consulte las instrucciones de instalación para conocer su uso. 24 Identificación de Partes Panel de operación Rejillas horizontales (giro automático) Ruedas Mango para transporte (ambos lados) Filtro de aire superior (detrás de la rejilla) Salida de aire Salida del cable del tomacorriente Salida de drenado Entrada de aire Entrada de aire Filtro de aire inferior (detrás de la rejilla) Salida de drenado de la bandeja inferior 25 FUNCIONES DEL ACONDICIONADOR DE AIRE Instrucciones de Operación del Control Electrónico Antes de empezar, familiarícese completamente con el panel de control y el control remoto y todas sus funciones, luego siga la simbología de las funciones que desee utilizar. La unidad se puede controlar indistintamente con el panel de control o el control remoto. NOTA: Este manual no incluye las instrucciones del control remoto, consulte <<Instrucciones del control remoto>> que se entrega con la unidad para más detalles. PANEL DE OPERACIÓN DEL ACONDICIONADOR DE AIRE (1) Botón de selección de MODO Selecciona el modo de operación apropiado. Cada vez que presione un botón, se seleccionará un modo en una secuencia que va de AUTO, COOL, DRY, FAN y HEAT (Automático, Enfriamiento, Seco, Ventilador y Calefacción) (sólo enfriamiento en modelos sin función HEAT). La luz indicadora de modo se ilumina bajo las distintas funciones de modo. Fig. 3. (2) Botón TIMER (Cronómetro) Se usa para iniciar el tiempo de inicio AUTO ON (Encendido automático) y programar la hora de paro AUTO OFF (Apagado automático) junto con los botones (▲) y (▼). (3) Botón POWER (Encendido) Enciende y corta la corriente. (4) Botón SLEEP (Dormir) Se usa para iniciar la operación SLEEP (Dormir) 26 (5) Botón FAN (Ventilador) Controla la velocidad del ventilador. Presione para seleccionar la velocidad del ventilador en cuatro pasos: LOW, MED, HI y AUTO (BAJA, MEDIA, ALTA y AUTOMÁTICA). La luz indicadora de velocidad del ventilador se ilumina debajo de las diferentes funciones del ventilador, excepto en la velocidad AUTO. Cuando se selecciona la velocidad AUTO, se apagan todas las luces indicadoras del ventilador. (6) Botón ARRIBA (▲) y ABAJO (▼) Se usa para ajustar (aumentar/disminuir) la configuración de la temperatura (incrementos de 1º C o 2º F) en un rango que va de 62º F (17º C) a 88º F (30º C) o la función TIMER (CRONÓMETRO) en un rango de 0 a 24 horas. NOTA: El control es capaz de mostrar la temperatura en grados Fahrenheit o Centígrados. Para convertir de uno a otro, presione y sostenga los botones Arriba y Abajo al mismo tiempo durante 3 segundos. (7) Pantalla LED Muestra la temperatura configurada en grados C o F y las funciones de cronómetro automático. Cuando está en los modos DRY (Seco) y FAN (Ventilador), muestra la temperatura de la habitación. Códigos de error: E-1 – Error del sensor de temperatura de la habitación – Desconecte la unidad y conéctela de nuevo. Si el error persiste, llame para solicitar servicio de reparación. E-2 – Error del sensor de temperatura del evaporador – Desconecte la unidad y conéctela de nuevo. Si el error persiste, llame para solicitar servicio de reparación. E4 – Error de comunicación del panel de la pantalla – Desconecte la unidad y conéctela de nuevo. Si el error persiste, llame para solicitar servicio de reparación. P1 – La bandeja inferior está llena – Conecte la manguera de drenado y drene el agua acumulada. Si el error persiste, llame para solicitar servicio de reparación. (8) Botón "SWING" (Aplica sólo para los modelos con función "AUTO SWING") Presione el botón "SWING" para activar esta función. Cada vez que se presione el botón "SWING", la persiana aumentará su ángulo en incrementos de 6 grados. Mantenga presionado el botón "SWING" durante 2 segundos para iniciar la función "AUTO SWING". Durante el "AUTO SWING", presione el botón "SWING" de nuevo para ubicar la persiana en el ángulo deseado. 27 INSTRUCCIONES DE USO Instrucciones de Uso Funcionamiento FRÍO - Presione el botón "MODE" hasta que se ilumine la luz indicadora "COOL". - Presione los botones de ajuste (▲) o (▼) para seleccionar la temperatura deseada. La temperatura se puede ajustar dentro de un rango de 62 ° F (17 ° C) - 88 ° F (30 ° C). - Presione el botón "FAN SPEED" para seleccionar la velocidad deseada del ventilador. Funcionamiento SECO - Presione el botón "MODE" hasta que se ilumine la luz indicadora "DRY" (Seco). - En este modo, no se puede seleccionar una velocidad para el ventilador o ajustar la temperatura. El motor del ventilador sólo funcionará a velocidad BAJA. - Mantenga las ventanas y puertas cerradas. - No instale el conducto de ventana. Funcionamiento AUTOMÁTICO - En el modo "AUTO", la unidad seleccionará automáticamente el modo "COOLING" (Enfriamiento) "HEATING" (Calefacción) (en algunos modelos) o "FAN ONLY" (Solo ventilador) dependiendo del ajuste de temperatura y la temperatura de la habitación que haya seleccionado. - El acondicionador de aire controlará automáticamente la temperatura de la habitación dependiendo del ajuste de temperatura que haya seleccionado. - En modo "AUTO" (Automático), no se puede seleccionar una velocidad para el ventilador. Funcionamiento FAN (Ventilador) - Presione el botón "MODE" hasta que se ilumine la luz indicadora "FAN". - Presione el botón "FAN SPEED" para seleccionar la velocidad deseada. - En modo "FAN", no se puede ajustar la temperatura. - No instale el conducto de ventana. 28 Funcionamiento TIMER (Cronómetro) - Mientras que la unidad esté encendida, presione el botón "TIMER". La luz indicadora "TIMER OFF" se iluminará. Esto indica que la función de parada automática (AUTO STOP) se ha iniciado. - Mientras que la unidad esté apagada, presione el botón "TIMER". La luz indicadora "TIMER ON" se iluminará. Esto indica que la función de inicio automático (AUTO START) se ha iniciado. - Presione o mantenga presionado el botón ARRIBA/ABAJO para cambiar el tiempo de la función AUTO en incrementos de 30 minutos (hasta 10 horas), luego en incrementos de 1 hora (hasta 24 horas). El control hará la cuenta regresiva hasta la hora de inicio. - El tiempo seleccionado se registrará durante 5 segundos y luego el sistema automáticamente volverá a mostrar los ajustes previos de temperatura. - Mediante el encendido o apagado de la unidad en cualquier momento, o al ajustar la configuración del temporizador en 0.0 se cancelará la programación del AUTO START/ STOP. - Cuando se produzca un error (E1 ó E2), la programación del AUTO START/STOP también será cancelada. Funcionamiento SLEEP (Dormir) - Presione el botón SLEEP para activar la función SLEEP. - En 30 minutos, la temperatura seleccionada aumentará (enfriamiento) o disminuirá (calefacción, en algunos modelos) en 2° F (1-2 °C). - Luego de otros 30 minutos, la temperatura volverá a aumentar (enfriamiento) o a disminuir (calefacción, en algunos modelos) en 2 °F (1-2 °C). - La nueva temperatura se mantendrá por un período adicional de 7 horas antes de que la unidad vuelva al ajuste de temperatura seleccionado originalmente. - Después de esto, el modo SLEEP terminará y la unidad seguirá funcionando como se había programado. NOTA: Esta función no está disponible en el modo "FAN" o "DRY". 29 Otras Funciones Corte del fluido eléctrico En caso de un corte o interrupción de energía, la unidad se reiniciará automáticamente con los ajustes de la última configuración, después de que la energía sea restablecida. Espere 3 minutos antes de que se reanude el funcionamiento. Cuando la unidad se ha detenido, no puede reiniciarse durante 3 minutos. Esto es con el fin de proteger la unidad y sus componentes. El funcionamiento iniciará automáticamente después de 3 minutos. Ajuste de la dirección del flujo de aire La persiana se puede ajustar manualmente o automáticamente, según los diferentes modelos. Ajuste de la dirección del flujo de aire de forma manual (Fig. 4) - - - La persiana se puede ajustar en la posición deseada de forma manual. El ángulo máximo de la persiana es de 60°. NO FORZAR LA PERSIANA MÁS ALLÁ DEL ÁNGULO MÁXIMO. No coloque objetos pesados u otras cargas en la persiana. Puede dañar la unidad. Asegúrese de que la persiana esté abierta por completo mientras esté en modo de calefacción (en algunos modelos). Mantenga la persiana abierta completamente mientras esté en funcionamiento. Ajuste automático de la dirección del flujo de aire (Fig. 5) - - - Cuando la unidad está encendida, la persiana se abre completamente. Utilice el botón "SWING" (Giro) en el control remoto o en el panel de control para detener la persiana en el ángulo deseado. La persiana aumentará el ángulo en 6 grados cada vez que se presiona el botón "SWING" hasta alcanzar el ángulo máximo. Una vez que la persiana alcanza el ángulo máximo, cambiará la dirección de oscilación automáticamente. Si el botón "SWING" se presiona por más de 2 segundos, se activará la función "AUTO SWING". La persiana oscilará como se muestra en la figura. 5. 30 INSTALACIÓN Ubicación El acondicionador de aire debe estar puesto sobre una base firme para minimizar el ruido y las vibraciones. Para una ubicación segura y estable, coloque la unidad sobre una superficie lisa y nivelada, lo suficientemente firme como para soportar la unidad. La unidad dispone de ruedas para facilitar el movimiento. La unidad debe ser transportada sobre sus ruedas sólo en superficies lisas y planas. Tenga cuidado al moverla sobre alfombras o superficies similares. No trate de mover la unidad por encima de objetos. La unidad debe estar al alcance de un tomacorriente adecuado conectado a tierra. Nunca coloque elementos que puedan obstruir la entrada o salida de aire de la unidad. Permita que haya una distancia mínima de 12" (30cm) desde la pared para un enfriamiento eficiente. (Ver fig. 6). Instalación del Juego de Ventana Corrediza El juego de ventana corrediza ha sido diseñado para adaptarse a la mayoría de ventanas estándar de tipo "vertical" y "horizontal". Sin embargo, puede que sea necesario improvisar y modificar algunas características de los procedimientos de instalación para ciertos tipos de ventanas. Por favor, consulte la figura 7 y 8 para saber las dimensiones min. /máx. de las ventanas. NOTA: La longitud apropiada de la ventana corrediza puede ajustarse con un tornillo. (Ver fig. 8a). NOTA: Si la abertura de la ventana es menor que la longitud mínima recomendada del juego de ventana corrediza, esta última puede ser modificada (o cortada) para ajustarse a la abertura de la ventana. Si tal modificación es necesaria, sólo corte la parte que tiene el orificio de escape. NUNCA CORTE EL AGUJERO EN EL JUEGO DE VENTANA CORREDIZA. 31 Instalación en Una Ventana Doble de Guillotina 1) Corte el sello de espuma (tipo adhesivo) a la longitud adecuada y péguelo a la repisa de la ventana. Ver fig. 9. 2) Adhiera el juego de ventana corrediza a la repisa de la ventana. Ajuste la longitud del juego de ventana corrediza de acuerdo con el ancho de la ventana. Modifique/corte el juego de ventana corrediza cuando el ancho de la ventana sea menor a 27". Abra el marco de la ventana y coloque el juego de ventana corrediza en la repisa de la ventana. Ver fig. 10. 3) Corte el sello de espuma (tipo adhesivo) a la longitud adecuada y péguelo a la parte superior de la ventana. Ver fig. 11. 4) Cierre el marco de manera firme contra la ventana. 5) Corte el sello de espuma a una longitud adecuada para sellar la brecha abierta entre el marco de la ventana superior y el marco de la ventana exterior. Ver fig. 12. 32 Instalación en Una Ventana Corrediza de Guillotina 1) Corte el sello de espuma (tipo adhesivo) a la longitud adecuada y péguelo al marco de la ventana. Ver fig. 13. 2) Adhiera el juego de ventana corrediza a la repisa de la ventana. Ajuste la longitud del juego de ventana corrediza de acuerdo a la altura de la ventana. Modifique/corte el juego de ventana corrediza si la altura de la ventana es menor a 27". Abra el marco de la ventana y coloque el juego de ventana corrediza en la repisa de la ventana. Ver fig. 14. 3) Corte el sello de espuma (tipo adhesivo) a la longitud adecuada y péguelo a la parte lateral de la ventana. Ver fig. 15. 4) Cierre el marco corredizo de la ventana de manera firme contra la ventana. 5) Corte el sello de espuma a una longitud adecuada para sellar la brecha abierta entre el marco corredizo y el marco exterior de la ventana. Ver fig. 16. 33 Instalación de Manguera de Alivio La manguera de alivio y el adaptador deben instalarse o desmontarse según el modo de uso. Modo COOL (enfriamiento) Instalar Modo FAN o DEHUMIDIFY (Ventilador o deshumidificar) Desmontar 1. Instale el adaptador B de alivio de la ventana en la manguera de alivio como se muestra en la Fig. 17a o la Fig. 17b. Consulte las páginas anteriores para la instalación en ventana. 2. Coloque la manguera de alivio sobre el gancho de la abertura de la salida de aire (Ver Fig. 18) y aplaste el otro extremo (Ver Fig. 19) para una instalación rápida. La manguera de alivio se puede instalar en la pared (No aplica en unidades que no cuenten con el adaptador A, taquetes expansores y tornillos para madera como accesorios) 1. Haga un orificio en la pared. Instale en la pared el adaptador A de alivio para pared (exterior) usando los 4 taquetes. expansores y los tornillos para madera, compruebe que se fijen completamente. (Vea la Fig. 20). 2. Coloque la manguera de alivio en el adaptador A de alivio para pared. Nota: Cubra el orificio con el tapón del adaptador cuando no esté en uso. El conducto se puede comprimir o extender un poco de acuerdo a las necesidades de la instalación, pero lo mejor es mantener al mínimo la extensión del conducto. IMPORTANTE: NO DOBLE EN EXCESO EL CONDUCTO (VER Fig. 21) 34 Drenado de Agua: En los modos de deshumidificación: 1) Quite el tapón de drenado de la parte posterior de la unidad. 2) Instale el conector de drenado (adaptador hembra universal de 5/8”) con la manguera de 3/4" (se requiere comprarla). 3) En los modelos sin conector de drenado, sólo coloque la manguera de drenado en el orificio. 4) Coloque el extremo abierto en la manguera directamente sobre el área de drenado en el piso. Consulte las Fig. 22 y 23. Cuando el agua de la bandeja inferior alcanza un nivel determinado, la unidad emite 8 bips y la pantalla digital muestra P1. En ese momento, el proceso de deshumidificación / acondicionamiento del aire se detendrá de inmediato. Sin embargo, el motor del ventilador continuará funcionando (esto es normal). 1) Mueva con cuidado la unidad a un sitio para drenado, quite el tapón de drenado inferior y deje que el agua salga (Fig. 24). 2) Vuelva a encender la máquina hasta que el símbolo P1 desaparezca. Si el error persiste, llame para solicitar servicio de reparación. 35 CUIDADO Y MANTENIMIENTO Cuidado y Mantenimiento IMPORTANTE: 1. Asegúrese de desconectar la unidad antes de limpiar o dar servicio. 2. No use gasolina, disolvente ni otros químicos para limpiar la unidad. 3. No limpie la unidad directamente debajo de un grifo o usando una manguera. Habría peligro de descargas eléctricas. 4. Si el cable de corriente está dañado, deberá repararse. 1. Filtro de aire Limpie el filtro de aire por lo menos una vez cada dos semanas para evitar un funcionamiento inadecuado del ventilador debido al polvo. Desmontaje Esta unidad tiene dos filtros. Jale la pestaña del filtro superior (Fig. 25), jale el filtro hacia fuera y luego hacia arriba. Quite el filtro inferior aflojando el tornillo, jalando hacia abajo la rejilla de la entrada de aire, y luego desmontando el filtro de aire como se muestra en las Fig. 26 y 27. Limpieza Limpie el filtro de aire sumergiéndolo con cuidado en agua tibia (unos 40º C/104º F) con detergente neutro. Enjuague el filtro y seque en un sitio sombreado. Montaje Inserte el filtro de aire superior desde arriba después de limpiarlo, coloque el filtro de aire inferior en la rejilla de la entrada de aire, luego instale la rejilla usando el tornillo. 2. Caja de la unidad - Use un paño sin pelusa humedecido con detergente neutro para limpiar la caja de la unidad. Termine con un paño limpio y seco. 3. Almacenamiento de la unidad por periodos largos - - Quite el tapón de goma de la parte posterior de la unidad y coloque una manguera para drenar la salida. Coloque el extremo abierto de la manguera directamente sobre el área de drenado en el piso (Ver Fig. 22 y 23). Quite el tapón de la salida de drenado inferior, deberá drenarse toda el agua de la bandeja inferior (Ver Fig. 24). Deje el aparato funcionando en el modo FAN (Ventilador) por medio día en una habitación tibia para secarlo por dentro y evitar la formación de hongos. Apague el aparato y desconéctelo, enrolle el cable y sujételo con la cinta (Fig. 28). Quite las baterías del control remoto. Limpie el filtro de aire y vuelva a colocarlo. Desatornille la manguera de alivio a la derecha o izquierda y jálela hacia fuera para desinstalarla (Fig. 29), asegúrela y cubra el orificio de la ventana (pared) con la tapa del adaptador. 36 SOLUCIÓN DE PROBLEMAS Solución de Problemas PROBLEMAS La unidad no enciende cuando se presiona el botón ON/OFF No enfría lo suficiente Ruido o vibración Sonido de borboteo La corriente se corta en el modo Heating (Calefacción) CAUSAS PROBABLES SOLUCIONES SUGERIDAS - Aparece P1 en la ventana Drene el agua de la bandeja de la pantalla. inferior. - La temperatura de la habitación es más baja que la temperatura establecida Reconfigure la temperatura. (modo de enfriamiento). - Las ventanas o puertas de Compruebe que las ventanas la habitación no están y puertas estén cerradas. cerradas. - Hay fuentes de calor dentro Elimine las fuentes de calor de la habitación. si es posible. - El conducto de salida de Conecte el conducto y aire no está conectado o está asegúrese de que puede bloqueado. funcionar adecuadamente. - La temperatura está Disminuya la configuración configurada a un nivel muy de la temperatura. alto. - El filtro de aire está Limpie el filtro de aire. bloqueado por polvo. - El piso no está nivelado o Coloque la unidad en una suficientemente plano. superficie plana y nivelada si es posible. - El sonido proviene del flujo de refrigerante dentro del Esto es normal. acondicionador de aire. - Se activó la función de protección automática contra Encienda de nuevo la unidad sobrecalentamiento. Cuando cuando se haya enfriado. la temperatura de la salida de aire pasa de 70o C/158oF, el aparato se apagará. 37 Acondicionador de Aire Portátil MC Appliance Corporation garantiza que todas las unidades de acondicionador de aire portátil carecen de defectos en el material o mano de obra y acuerda solucionar cualquier posible defecto o instalar la(s) parte(s) nueva(s) (a elección de la compañía) en caso de que se presenten fallas durante el periodo de garantía. Las partes y gastos de reparación están cubiertos en esta unidad por un periodo de un año a partir de la fecha de compra. Además MC Appliance Corporation garantiza que el compresor (sólo la pieza) carece de defectos en el material y la mano de obra que lo puedan afectar durante un periodo de 5 años. El consumidor es responsable de todos los gastos de trabajo y transporte relacionados con el diagnóstico y reemplazo del compresor después de que expire la garantía inicial de un año. Se requiere una copia de la factura o recibo de compra para recibir el servicio de garantía o un reembolso. Esta garantía cubre los aparatos que se usen dentro de los Estados Unidos continentales, Puerto Rico y Hawaii. La garantía no cubre lo siguiente: Daños causados por embarque o por instalación inadecuados. Daños debido al mal uso o abuso. Pérdidas de contenido debido a falla de la unidad. Componentes internos como filtro, etc. Reparaciones hechas por agentes de servicio no autorizados. Llamadas a servicio no relacionadas con defectos en el material o mano de obra como uso instalación inadecuada del producto. Reemplazo o restablecimiento de fusibles o interruptores de circuito. Falla de este producto si se usa con fines distintos a los que fue diseñado. Gastos de eliminación por unidades con falla no regresadas a nuestra fábrica. Cualquier costo de envío en que se incurra como resultado de una unidad que no funcione como se especificó. Gastos por transporte para trabajos de servicio del producto si su aparato está ubicado en un área remota donde no esté disponible el trabajo de servicio de un técnico autorizado. La desinstalación y reinstalación de su aparato si está instalado en un sitio inaccesible o no está instalado de acuerdo con las instrucciones publicadas. Esta garantía representa todas las garantías expresas o implícitas y ningún representante o persona tiene autorización para asumir ninguna otra responsabilidad por nosotros en relación con la venta de este producto. Bajo ninguna circunstancia se le permite al consumidor regresar esta unidad a la fábrica sin consentimiento previo por escrito de MC Appliance Corporation. Modelo Partes Mano de obra NPPAC8KW Un año Un año Compresor (Sólo parte) Cinco años Tipo de servicio Transporte Para Servicio o Asistencia, llame por favor al 888 775-0202. O visítenos en www.mcappliance.com para solicitar el servicio de garantía u ordenar piezas. 38 MC Appliance Corporation. Todos los derechos reservados. Norpole® es una marca registrada de CNA International Inc. d/b/a MC Appliance Corporation. Distribuida de MC Appliance Corporation. 777 Mark Street, Wood Dale, IL 60191 Para información sobre el servicio, soporte y garantía, visítenos en www.mcappliance.com o en los Estados Unidos, llame al 888 775-0202. 39