1
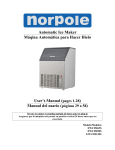
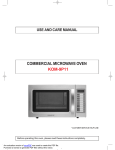
1
USER’S MANUAL
Commercial Ice Maker
Model: EWCIM350S
PLEASE READ THIS MANUAL CAREFULLY BEFORE USING YOUR COMMERCIAL ICE MAKER
AND KEEP IT FOR FUTURE REFERENCE.
2
PRODUCT REGISTRATION
Thank you for purchasing a Norpole™ product. The first step to protect your new product is to
complete the product registration on our website: www.norpoleinc.com/register. The benefits
of registering your product include the following:
1. Registering your product will allow us to contact you regarding a safety notification or
product update.
2. Registering your product will allow for more efficient warranty service processing when
warranty service is required.
3. Registering your product could act as your proof of purchase in the event of insurance loss.
Once again, thank you for purchasing a Norpole™ product.
EN - 2
3
CONTENTS
Product Registration .…………………………………………………………………………………….…....… 02
Important Safeguards …………………………………………………..………………………………………. 04
Important Safety Instructions ………………………………………………………………………………… 05
Parts and Features ………………………………………………………………………………………………… 06
Specifications ………………………………………………………………………………………………………... 07
Installation …………………………………………………………………………………………………………….. 08
Operation ……………………………………………………………………………………………………………… 09
Cleaning and Maintenance ………………………………………………………………………………….. 10
Troubleshooting Guide …………………………………………………………………………………………. 14
Warranty ……………………………………………………………………………………………………………….. 15
EN - 3
4
IMPORTANT SAFEGUARDS
Read and understand all safety precautions. Failure to follow all instructions described in this manual
may result in electric shock, fire and/or serious personal injury. The warnings, cautions and instructions
discussed in this manual cannot cover all possible conditions and situations that may occur. It must be
understood by the user that common sense and caution are attributes which cannot be built into the
appliance, but must be supplied by the user.
Electric Power
If an electrical circuit is overloaded with other appliances, the commercial ice maker may not operate
properly. The commercial ice maker should be operated on a separate electrical circuit from other
operating appliances.
3-Prong Plug (NEMA 6-20P)
Plug Receptacle
This appliance must be grounded. In the event of an electrical short
circuit, the grounding plug reduces the risk of electric shock by providing
an escape wire for electric current. This appliance is equipped with a
power cord that has a grounding wire with a grounding plug. The plug
must be plugged into an electrical outlet that is properly installed and
grounded. Improper use of the grounding plug and/or outlet can result in
a risk of electric shock. Consult a qualified electrician or serviceman if the
grounding instructions are not completely understood.
NOTE: This plug type (NEMA 6-20P) will not fit into a standard 3-prong
outlet.
A short power supply cord is provided to reduce the risk of becoming entangled in or tripping over a
longer cord. If it is necessary to use an extension cord, use only a 3-wire extension cord that has a 3blade grounding plug, and a 3-slot receptacle that will accept the plug on the appliance. The marked
rating of the extension cord shall be equal to or greater than the electrical rating of the appliance. DO
NOT alter the plug of the appliance or any extension cord used with this appliance. Arrange the
extension cord so that it will not drape over the countertop or tabletop where it can be tripped over or
pulled.
EN - 4
5
IMPORTANT SAFETY INSTRUCTIONS
Caution: Risk of Fire
When using your ice maker, basic safety precautions should be observed, including the following:
1. Read all instructions before using the ice maker.
2. As this unit has ETL sanitation, it can be used in residential and commercial settings. This appliance
is intended to be used in the household and in similar applications such as:
•
•
•
Staff kitchens in shops, offices and other working environments
Farm houses and by clients in hotels, motels and other residential-type environments
Catering and similar non-retail applications
3.
This appliance is not intended for use by persons (including children) with reduced physical,
sensory or mental capabilities, or lack of experience and knowledge, unless they have been given
supervision or instruction concerning use of the appliance by a person responsible for their
safety. Children should be supervised to ensure they do not play with the appliance.
4.
DO NOT store explosive substances such as aerosol cans with a flammable propellant in this
appliance.
5.
If the power supply cord is damaged, it must be replaced by the manufacturer, its service agent,
or similarly qualified persons in order to avoid a hazard. Please contact our Customer Service
department toll free at 1 888-775-0202 for more information.
6.
DO NOT unplug the ice maker by puling the cord. DO NOT put any stress on the power cord
where it connects to the product.
EN - 5
6
PARTS AND FEATURES
Please check to make sure you have the accessories listed below. If you are missing any of the
below items, please contact our Customer Service Department toll-free at 888-775-0202.
a. Water Inlet Hose (1)
b. Water Drainage Hose (1)
c. Leveling Legs (4)
d. Ice Scooper (1)
Unit
1. Top Faceplate
2. Evaporator
3. Control Panel
4. Block Water Board
5. Water Box
6. Ice Storage Bin Door
7. Ice Scooper
8. Ice Storage Bin
9. Flank Intake
10. Water Inlet Valve
11. Water Inlet Hose
12. Switch
13. Plug
14. Water Drainage Hose
15. Adjustable Leveling Legs
16. Sprinkler
Control Panel
EN - 6
7
SPECIFICATIONS
Model Number
EWCIM350S
Ice Making Bin Dimensions
22.3”W x 18.8”H x 22.6”D
Ice Storage Bin Dimensions
22.6”W x 29.8”H x 31.3”D
Weight
167.6 Lbs.
Ice Making Capacity
330 Lbs./Day
Storage Capacity
209 Lbs.
Voltage Rating
115V AC
Power Rating
980 Watts
Plug Type
NEMA 6-20P
Safety Standard
ETL Sanitation
EN - 7
8
INSTALLATION
Connect to a potable water supply only. It is recommended to install a water filter. The
water inlet hose would connect to the filter and to the inlet valve on the machine.
1. During transportation, the incline angle of the ice maker should not exceed 45°. To prevent
damage to the compressor or refrigeration systems, the ice maker should always remain right side
up.
2. Unpack the ice maker and remove all documents and spare parts.
3. Place the ice maker in a well-ventilated area on a level and structurally sound surface away from
sources of heat and corrosive gas. Allow at least 6 inches of space all around the exterior of the ice
maker for proper ventilation.
4. Adjust the leveling legs after placing the ice maker. Doing so will ensure the water level and ice
shape will be unaffected. The outlet of the drainage tube should be lower than the cabinet to drain
water easily. Wait approximately 12 hours after positioning the ice maker before use.
5. Connect one end of a flexible, plastic corrugated pipe with the water drainage hose on the
underside of the ice maker. The other end of the pipe should be placed in a container or sewer that
can capture surplus water. We do not recommend draining into a bucket. An air gap will likely be
required between the water drainage hose and the drain/waste receptacle. This must be prepared
by the user.
6. Connect one end of the water inlet hose (supplied with the ice maker) with the ¾” screw type
connector to the potable water supply or filter. The water pressure of the water inlet hose is 1~8
kg/cm². The other end of the water inlet hose should be connected with the screw type connector
of the water inlet valve on the rear of the ice maker.
7. Be sure the gaskets are installed in both ends of the water inlet hose before connecting.
EN - 8
9
OPERATION
Note: If there is something wrong with the water supply system, the ice maker will restart
automatically in 24 hours. Otherwise, you will need to stop the ice maker and restart it.
Note: DO NOT remove the block water board while the ice maker is running.
Note: Never keep anything other than ice in the ice storage bin. Objects like wine and beer should not
be stored in the ice bin as these bottles are unsanitary and the labels may slip off and plug up the
drain.
1. Plug in the ice maker, turn on the switch and the run indicator light will illuminate.
2. When the ice maker is being used for the first time or reused after being left idle for a long time,
the first and second ice making cycles are meant to clean the tube system; DO NOT use this ice.
After the water is drained, the normal ice making procedures can begin.
3. All of the functions – water inlet, ice making, ice dropping and ice storing - are controlled
automatically for continuous ice-making.
4. If the ice storage bin is full, the ice full indicator light will illuminate and the ice maker will stop
automatically. If there is a water shortage or something wrong with the water supply system, the
water low indicator light will illuminate and the ice maker will stop operation. The ice maker will
restart automatically in 24 hours. Otherwise, you will need to stop the unit and restart it again.
5. Use potable water as a water source. If the water low indicator light is illuminated and no ice is
being made when the ice maker begins, there may be air in the water inlet tube. If the hydraulic
pressure is low, after 5 minutes, the machine will add water automatically. The water low indicator
light will turn off when the water is full and the ice maker will begin operating.
EN - 9
10
CLEANING AND MAINTENANCE
Periodic cleaning and proper maintenance will ensure efficiency, top performance and long life.
There are four areas to keep clean:
a. The exterior
b. The interior
c. The sprinkler
d. The ice making system
Note: If the ice maker is left unused for a long time, it must be thoroughly cleaned before the next use.
Carefully follow any instructions provided for cleaning or use of sanitizing solution. DO NOT leave any
solution inside the ice maker after cleaning.
Note: Before proceeding with cleaning and maintenance operations, ensure the power supply is
disconnected and the water line is shut off (the exception to this rule is ice maker system cleaning
detailed on page 12).
Please read the detailed instructions below to properly clean each of the aforementioned areas.
Exterior Cleaning
1. The door and cabinet may be cleaned with a mild detergent and warm water solution such as one
ounce of dishwashing liquid mixed with two gallons of warm water. DO NOT use solvent-based or
abrasive cleaners. Use a soft sponge and rinse with clean water. Wipe with a soft clean towel to
prevent spotting.
2. Stainless steel should be cleaned as it can discolor when exposed to chlorine gas. Clean stainless
steel surfaces with a mild detergent, warm water solution and a damp cloth. Never use abrasive
cleaning agents.
Note: Stainless steel exposed to chlorine gas and moisture, such as in areas with spas or swimming
pools, may show some discoloration. Discoloration from chlorine gas is normal.
EN - 10
11
CLEANING AND MAINTENANCE
Interior Cleaning
Note: The ice storage bin should be sanitized occasionally. Clean the bin before the ice maker is used
for the first time and before it is reused after an extended period of time. It is typically convenient to
sanitized the bin after the ice making system has been cleaned and the storage bin is empty. The ice
scoop should be washed regularly. Wash it just like any other food container.
1. Disconnect the power supply cord.
2. Open the ice storage bin door and with a clean cloth, wipe down the interior with a sanitizing
solution made of 1 ounce household bleach or chlorine and two gallons of hot water (95-115°F / 3546°C).
3. Rinse thoroughly with clean water. The waste water will drain through the drainage tube.
4. Plug in the ice maker.
Sprinkler Cleaning
Note: The sprinkler should only be cleaned when you find that some ice cubes are improperly shaped.
You should clean the ice making system after cleaning the sprinkler.
Note: DO NOT use solvent-based cleaning agents or abrasives on the interior. These cleaners may
transmit taste to the ice cubes or damage or discolor the interior.
1. Disconnect the power supply cord.
2. Open the door and remove the block water board by snapping one end up and pulling forward.
3. Remove the block water board from the evaporator.
4. Find the sprinkler arm and raise it. Disconnect it from the water tube which is connected at the back
of the sprinkler arm.
5. A de-scaling solution may be prepared in a plastic basin with Nu-Calgon Nickel-Safe Ice Machine
Cleaner. Mix four ounces of the ice machine cleaner per gallon of warm water.
6. Remove the sprinkler arm from the interior. Thoroughly clean the sprinkler arm by soaking it in the
basin filled with the de-scaling solution until it is free of any deposits. Use a soft brush to remove any
thick or stubborn residue to help the dissolving action. Rinse under a stream of tap water.
EN - 11
12
CLEANING AND MAINTENANCE
7. Wipe down the interior of the water sump with the de-scaling solution and warm water. Rinse
thoroughly with clear water.
8. Reassemble the sprinkler arm, evaporator and block water board.
9. Perform steps 1, 3-5 of the Ice Making System Cleaning procedure detailed below.
Ice Making System Cleaning
1. Unplug the ice maker ensuring the water connection remains intact.
2. Open the door of the top cabinet, and making sure there are no ice cubes on the evaporator,
remove all ice cubes from the ice storage bin.
3. Remove the water box and dispose of any water before reinstalling. Then, fill the ice maker cleaner
into the water box. Plug in the unit and press the clean button (5 seconds). The machine will
automatically go into cleaning mode which lasts for 30 minutes. At the same time, clean the ice
storage bin with the cleaner.
4. After the ice maker completes the cleaning mode, remove the water box, drain the water, clean the
water box and evaporator cover according to the instructions in this manual (see step 6 below).
Lastly, reinstall the water box, press the clean button (5 seconds) to begin the water cycle mode
and clean all residual cleaning solution.
5. Repeat the process detailed in step 4 three times to ensure the cleaning solution has discharged
completely.
6. After completing step 5, remove the water box and evaporator cover. Clean these parts with water
between 95-122°F (35-50°C). Flush and clean the inner liner of the ice storage bin.
7. Once you have completed the above processes, throw away the ice cubes.
EN - 12
13
CLEANING AND MAINTENANCE
Maintenance Notes
a. If the compressor stops for any reason like water shortage, too much ice, etc. DO NOT restart the
unit right away. To protect the compressor, wait five minutes before restarting.
b. Regularly check the connectors of the water inlet and outlet tubes. Drain the little surplus water
that may occur.
c. When not used for a long period of time, remove all items from the compartment and disconnect
the power supply cord from the wall outlet. Clean the interior compartment and wipe away all
water. Remove the water inlet tube from the back of the unit and drain all water. To prevent the
formation of mold, leave the door open to dry the compartment completely.
d. Clean the condenser once every six months to keep it well-ventilated. Disconnect the ice maker
and let the condenser cool before cleaning. DO NOT touch the aliform (wing-shaped) pieces during
cleaning to avoid injury. After removing the flank intake faceplate, use a cleaner or a brush to clean
it.
e. Clean the evaporator and sprinkler once every three months to keep it clean.
EN - 13
14
TROUBLESHOOTING GUIDE
Please reference the below table to identify the cause and solution of your particular problem. If you
cannot solve the problem on your own, please contact our Customer Service Department toll-free at
888-775-0202.
PROBLEM
POSSIBLE CAUSE
SOLUTION
The ice
maker does
not work.
The voltage is lower than
98V.
Turn off the ice maker. Restart the unit only when
the voltage is normal.
The ambient temperature
is too low (< 50°F / 10°C).
Try using the ice maker again when the ambient
temperature is above 50°F / 10°C.
The
compressor
is
functioning,
however no
ice was
made.
The refrigerant leaks.
Refill the refrigerant and test for leakage.
The refrigerating system is
blocked.
Replace the filter for the N₂ filling system.
Solenoid valve opens
constantly.
Replace the solenoid valve.
The condensing fan does
not work.
Check whether the condensing fan works.
The hall element is located
on the sprinkler. It is a
sensor that detects ice
thickness and ice level. It
may not be functioning.
Verify that the hall element is in its proper position
(you may find the hall element on the lower right
corner of the sprinkler) and is functioning.
Water shortage.
Check the water supply system (water inlet valve
and water inlet tube).
Ice full.
Remove some ice.
The shell temperature
is too high.
Turn off the ice maker. Restart the unit in
approximately 1 hour.
There is a water shortage in
the water supply system.
Ensure the water supply system is connected to a
potable water supply and there are no obstructions.
Then restart the ice maker.
The water inlet valve is
damaged.
Check the water inlet valve.
Water pressure is too
low.
The water pressure should not be lower
than 1 kg/cm².
The
compressor
does not
work.
The water
low
indicator
light is
illuminated.
EN - 14
15
LIMITED WARRANTY
MC Appliance Corporation warrants each new Commercial Ice Maker to be free from defects in material and
workmanship and agrees to remedy any such defect or to furnish a new part(s) (at the company’s option) for
any part(s) of the unit that has failed during the warranty period. Parts and labor expenses are covered on this
unit for a period of one year from the date of purchase. In addition, MC Appliance Corporation warrants the
compressor (part only) to be free from defects in material and workmanship for a period of 5 years. The
consumer is responsible for all labor and transportation expenses related to the diagnosis and replacement of
the compressor after the initial one-year warranty expires. In the event the unit requires replacement or
refund under this warranty, the consumer is responsible for all transportation costs to return the unit to our
factory before receiving a replacement or refund. A copy of the dated sales receipt/invoice is required to
receive warranty service or a refund.
This warranty covers appliances in use within the contiguous United States, Alaska, Hawaii and Puerto Rico.
The warranty does not cover the following:
• Damages due to shipping damage or improper installation. Damages due to misuse or abuse.
• Content losses due to failure of the unit.
• Inside components such as door panels, door shelves, racks, evaporator, etc.
• Punctures to the evaporator system due to improper defrosting of the unit.
• Repairs performed by unauthorized service agents.
• Service calls that do not involve defects in material and workmanship as instructions on proper
use of the product or improper installation.
• Replacement or resetting of house fuses or circuit breakers.
• Failure of this product if used for other than for its intended purpose.
• Disposal costs for any failed unit not returned to our factory.
• Any delivery costs incurred as the result of a unit that fails to perform as specified.
• Expenses for travel and transportation for product service if your appliance is located in a
remote area where service by an authorized service technician is not available.
• The removal and reinstallation of your appliance if it is installed in an inaccessible location or is
not installed in accordance with published installation instructions.
• Refunds for non-repairable products are limited to the price paid for the unit per the sales receipt.
• This warranty is non-transferable. This warranty applies only to the original purchaser and does
not extend to any subsequent owners.
LIMITATIONS OF REMEDIES AND EXCLUSIONS
Product repair in accordance with the terms herein, is your sole and exclusive remedy under this limited
warranty. Any and all implied warranties including merchantability and fitness for a particular purpose are
hereby limited to one year or the shortest period allowed by law. MC Appliance Corporation is not liable for
incidental or consequential damages and no representative or person is authorized to assume for us any other
liability in connection with the sale of this product. Under no circumstances is the consumer permitted to
return this unit to the factory without the prior written consent of MC Appliance Corporation.
Some states prohibit the exclusion or limitation of incidental or consequential damages, or limitations on
implied warranties. This warranty gives you specific legal rights, and you may also have other rights which vary
from state to state.
Model
Parts & Labor
Compressor (Part Only)
Type of Service
EWCIM350S
One Year
Five Years
On Site
For Service or Assistance, please contact us toll-free at 888-775-0202.
Or visit us on the web at www.mcappliance.com to request warranty service or order parts.
EN - 15
CNA International, Inc. d/b/a Norpole Inc. All rights reserved.
Norpole™ is a registered trademark of CNA International, Inc.
www.mcappliance.com
Printed In China
1
MANUAL DEL USUARIO
Máquina para fabricar hielo comercial
Modelo: EWCIM350S
LEA ESTE MANUAL ANTES DE UTILIZAR SU MÁQUINA PARA FABRICAR HIELO COMERCIAL
Y GUÁRDELO PARA FUTURA REFERENCIA.
2
REGISTRACIÓN DEL PRODUCTO
Gracias por comprar el producto Norpole™. El primer paso para proteger su nuevo producto es
completar la forma de registración en nuestra pagina web: www.norpoleinc.com/register. Los
beneficios de registrar su producto incluyen lo siguiente:
1. Al registrar su producto nos permite contactarle para notificarle de un cambio de seguridad
o actualización del producto.
2. Si llegara a necesitar servicio bajo garantía, registrando su producto nos permite ser más
eficiente en procesar el servicio.
3. En el evento que usted tenga una perdida que esta cubierto por un seguro, registrando su
producto puede servir como prueba de su compra.
Una vez más gracias por comprar un producto marca Norpole™.
SP - 2
3
ÍNDICE
Registración del producto …………………………………………………………………………….…....… 02
Medidas de seguridad importantes ………………………………..……………………………………. 04
Las instrucciones importantes de la seguridad .…………………………………………………… 05
Partes y características ………………………………………………………………………………………… 06
Especificaciones ………………………………………………………………………………………………...
07
Instalación …….…………………………………………………………………………………………………….. 08
Operación …………………………………………………………………………………………………………… 09
Limpieza y mantenimiento ………………………………………………………………………………….. 10
Guía de resolución de problemas …………………………………………………………………………. 14
Garantía ……………………………………………………………………………………………………………..
SP - 3
15
4
MEDIDAS DE SEGURIDAD IMPORTANTES
Lea y comprenda todas las precauciones de seguridad. No seguir las instrucciones descritas en el
presente manual para el usuario puede producir una descarga eléctrica, incendios y/o lesiones
personales graves. Las advertencias, precauciones e instrucciones descritas en el presente manual no
pueden cubrir todas las condiciones y situaciones posibles que pueden ocurrir. El usuario debe
comprender que el sentido común y el cuidado son atributos que no pueden incluirse en el
electrodoméstico, sino que debe suministrarlos el usuario.
Potencia eléctrica
Si se sobrecarga un circuito eléctrico con otros electrodomésticos, es posible que el máquina para
fabricar hielo comercial no funcione correctamente. El máquina para fabricar hielo comercial debe
funcionar en un circuito eléctrico separado de otros electrodomésticos.
Clavija de 3 puntas (NEMA 6-20P)
Receptáculo del
enchufe
Este equipo debe de estar conectado a tierra; ya que en caso de un corto
circuito, el cable a tierra reduce el riesgo de sufrir una descarga eléctrica
al proporcionar una trayectoria de escape a la corriente eléctrica. Por lo
tanto este aparato está equipado con una clavija de 3 puntas que
contiene una terminal para la conexión a tierra, la cual debe de
conectarse a un contacto que esté propiamente instalado y conectado a
tierra. El uso indebido del enchufe y/o la salida de puesta a tierra puede
causar riesgo de descarga eléctrica. Consulte a un electricista o técnico
calificado si no comprende totalmente las instrucciones de puesta a
tierra.
NOTA: Este tipo de enchufe no encaja en un tomacorriente de tres
clavijas estándar.
Se suministra un cable de suministro eléctrico corto a fin de reducir el riesgo de lesiones personales
por enredarse o tropezar con un cable más largo. Si necesita usar un cable de extensión, utilice
únicamente uno de 3 cables que tenga un enchufe de puesta a tierra de 3 hojas, y un receptáculo de 3
ranuras en el que quepa el enchufe del electrodoméstico. La clasificación marcada en el cable de
extensión debe ser mayor o igual a la clasificación eléctrica del electrodoméstico. No modifique el
enchufe del aparato o de cualquier alargue que utilice con este aparato. El cordón debe colocarse de
manera que no cuelgue del mostrador o mesa donde puedan jalarlo o tropezarse con él
accidentalmente.
SP - 4
5
LAS INSTRUCCIONES IMPORTANTES DE LA SEGURIDAD
Precaución: Peligro de incendio
Cuando utilice su máquina para fabricar hielo comercial , deben tomarse las precauciones de seguridad
básicas, entre las que se incluyen:
1. Lea todas las instrucciones antes de usar el máquina para fabricar hielo comercial.
2. Debido a que esta unidad posee equipamiento sanitario ETL, puede utilizarse en configuraciones
residenciales y comerciales. Este aparato está destinado para uso doméstico y en aplicaciones
similares como:
• Cocinas de personal en tiendas, oficinas y otros entornos de trabajo
• Casas rurales y para uso de clientes en hoteles, moteles y otros entornos de tipo
residencial
• Servicios de comidas y otras aplicaciones no comerciales similares
3.
Este aparato no se ha diseñado para ser utilizado por personas (incluidos niños) con capacidades
físicas, sensoriales o mentales reducidas o con falta de experiencia y conocimiento, a menos que
sean supervisadas o hayan recibido instrucción respecto del uso del aparato por parte de una
persona responsable de su seguridad. Los niños deben ser supervisados para asegurarse de que
no jueguen con el aparato.
4.
NO almacene sustancias explosivas como latas de aerosol con propelente inflamable en este
aparato.
5.
Si el cable de suministro eléctrico está dañado, debe ser reemplazado por el fabricante, su agente
de servicio técnico o persona similar calificada para evitar cualquier peligro. Póngase en contacto
con nuestro departamento de Servicio al cliente al número gratuito 1 888-775-0202 para obtener
más información.
6.
NO desenchufe la máquina para fabricar hielo tirando del cable. NO haga presión sobre el cable
de suministro eléctrico en el punto en que se conecta con el producto.
SP - 5
6
PARTES Y CARACTERÍSTICAS
Revise para asegurarse de tener los accesorios de la lista a continuación. Si le falta alguno de los
artículos a continuación, póngase en contacto con nuestro departamento de Servicio al cliente al
número gratuito 1 888-775-0202.
a.
b.
c.
d.
Manguera de entrada de agua (1)
Manguera de drenaje de agua (1)
Patas de nivelación (4)
Pala para hielo (1)
Unidad
1.
2.
3.
4.
5.
6.
Placa frontal superior
Evaporador
Panel de control
Tablero para bloque de agua
Caja de agua
Puerta de compartimiento de
almacenamiento de hielo
7. Pala para hielo
8. Compartimiento de almacenamiento
de hielo
9. Entrada lateral
10. Válvula de entrada de agua
11. Manguera de entrada de agua
12. Interruptor
13. Enchufe
14. Manguera de drenaje de agua
15. Patas de nivelación ajustables
16. Aspersor
Panel de Control
SP - 6
7
ESPECIFICACIONES
Modelo No.
EWCIM350S
Dimensiones de compartimiento para fabricar hielo
556mm An x 478mm Al x 574mm P
Dimensiones de compartimiento de
almacenamiento de hielo
574mm An x 757mm Al x 795mm P
Peso neto
167.6 Lbs.
Capacidad de fabricación de hielo
330 Lbs./Día
Capacidad de almacenamiento
209 Lb.
Capacidad de voltaje
115V
Capacidad de potencia
980W
Tipo de enchufe
NEMA 6-20P
Estándar de seguridad
Equipamiento sanitario ETL
SP - 7
8
INSTALACIÓN
Conecte solo a un suministro de agua potable. Se recomienda la instalación de un filtro de
agua. La manguera de entrada de agua debería conectarse al filtro y a la válvula de
entrada en la máquina.
1. Durante su transporte, el ángulo de inclinación de la máquina para fabricar hielo no debería
exceder los 45º. Para evitar el daño al compresor en los sistemas de refrigeración, la máquina para
fabricar hielo siempre debería permanecer con el lado derecho hacia arriba.
2. Desempaque la máquina para fabricar hielo y quite todos los documentos y repuestos.
3. Coloque la máquina para fabricar hielo en un área bien ventilada en una superficie nivelada y
estructuralmente sólida lejos de fuentes de calor y de gas corrosivo. Para una ventilación
adecuada, deje al menos 15,25 cm de espacio alrededor de la extensión de la máquina para
fabricar hielo.
4. Ajuste las patas de nivelación después de ubicar la máquina para fabricar hielo. Al hacerlo se
asegurará de que el nivel de agua y la forma del hielo no se vean afectados. La salida del tubo de
drenaje debe estar más bajo que el gabinete para drenar el agua fácilmente. Espere
aproximadamente 12 horas, luego de ubicar la máquina para fabricar hielo antes de su uso.
5. Conecte un extremo de un tubo de plástico corrugado flexible con la manguera de drenaje de agua
en la parte inferior de la máquina para fabricar hielo. El otro extremo del tubo debe colocarse en
un contenedor o alcantarilla para poder recoger el agua excedente. No recomendamos el drenaje
en un balde. Es probable que se requiera que haya un espacio de aire entre la manguera de drenaje
de agua y el receptáculo de drenaje/residuos. Esto debe ser preparado por el usuario.
6. Conecte un extremo de la manguera de entrada de agua (proporcionada con la máquina para
fabricar hielo) con un conector tipo tornillo de 1,90 cm con el suministro de agua potable o filtro.
La presión de agua de la manguera de entrada de agua es de 1~8 kg/cm². El otro extremo de la
manguera de entrada de agua debe estar conectado con un conector de tipo tornillo de la válvula
de entrada de agua en la parte posterior de la máquina para fabricar hielo.
7. Asegúrese de que las juntas estén instaladas en ambos extremos de la manguera de entrada de
agua antes de conectarla.
SP - 8
9
OPERACIÓN
Nota: Si hay algo mal con el sistema de suministro de agua, la máquina para fabricar hielo se reiniciará
automáticamente en 24 horas. De lo contrario, tendrá que apagar la máquina para fabricar hielo y
reiniciarla.
Nota: NO quite el tablero de bloque de agua mientras la máquina para fabricar hielo esté en
funcionamiento.
Nota: Nunca mantenga otra cosa que no sea hielo en el compartimiento de almacenamiento de hielo.
Los objetos como vino o cerveza no debe almacenarse en el compartimiento de hielo debido a que
estas botellas son antihigiénicas y las etiquetas pueden salirse y tapar el drenaje.
1. Enchufe la máquina para fabricar hielo, encienda el interruptor y la luz indicadora de
funcionamiento se iluminará.
2. Cuando se utilice la máquina para fabricar hielo por primera vez o se vuelva a utilizar después de
haber estado inactiva por un periodo largo de tiempo, el primer y segundo ciclo de fabricación de
hielo sirven para limpiar el sistema de tubos; NO use este hielo. Después de que se drene el agua,
puede comenzar los procedimientos normales de fabricación de hielo.
3. Todas las funciones: entrada de agua, fabricación de hielo, caída de hielo y almacenamiento de
hielo; se controlan automáticamente para una fabricación de hielo continua.
4. Si el compartimiento de almacenamiento de hielo está lleno, la luz indicadora completo de hielo se
iluminará y la máquina para fabricar hielo se detendrá automáticamente. Si hay escasez de agua o
algo mal con el sistema de suministro de agua, la luz indicadora agua baja se iluminará y la
máquina para fabricar hielo detendrá su funcionamiento. La máquina para fabricar hielo se
reiniciará automáticamente en 24 horas. De lo contrario, tendrá que apagar la unidad y reiniciarla
nuevamente.
5. Utilice agua potable como una fuente de agua. Si se ilumina la luz indicadora de agua baja y no se
está fabricando hielo, la máquina para fabricar hielo comenzará, puede que haya aire en el tubo de
entrada de agua. Si la presión hidráulica es baja, luego de 5 minutos, la máquina añadirá agua
automáticamente. La luz indicadora de agua baja se apagará cuando se llene de agua y la máquina
para fabricar hielo comenzará a funcionar.
SP - 9
10
LIMPIEZA Y MANTENIMIENTO
Una limpieza periódica y un mantenimiento adecuado garantizarán la eficiencia, un rendimiento
superior y una vida prolongada.
Se deben mantener limpias cuatro áreas:
a.
b.
c.
d.
El exterior
El interior
El aspersor
El sistema de fabricación de hielo
Nota: Si no se usa la máquina para fabricar hielo por un largo periodo de tiempo, debe limpiarse
exhaustivamente antes del próximo uso. Siga con cuidado todas las instrucciones proporcionadas para
la limpieza o uso de una solución desinfectante. NO deje ninguna solución dentro de la máquina para
fabricar hielo después de limpiarla.
Nota: Antes de proceder con las operaciones de limpieza y mantenimiento, asegúrese de que el
suministro eléctrico esté desconectado y que la línea de agua esté desconectada (la excepción a esta
regla es la limpieza del sistema de la máquina para fabricar hielo detallada en la página 12).
Lea las instrucciones detalladas a continuación para limpiar correctamente cada una de las áreas
antes mencionadas.
Limpieza exterior
1. El gabinete y la puerta pueden limpiarse con un detergente suave y una solución acuosa tibia,
como una onza de líquido lavaplatos mezclado con dos galones [7,5 litros] de agua tibia. No use
solventes o limpiadores abrasivos. Utilice una esponja suave y enjuáguela con agua limpia. Límpiela
con una toalla suave y limpia para evitar que queden manchas.
2. El acero inoxidable debe limpiarse ya que puede decolorarse cuando se expone a gas de cloro.
Limpie las superficies de acero inoxidable con una solución de detergente suave, agua tibia y un
paño humedecido. Nunca utilice agentes de limpieza abrasivos.
Nota: El acero inoxidable expuesto al gas de cloro y humedad, tales como en áreas con spas o piscinas,
puede mostrar más decoloración. La decoloración por gas de cloro es normal.
SP - 10
11
LIMPIEZA Y MANTENIMIENTO
Limpieza interior
Nota: El compartimiento de almacenamiento de hielo debe desinfectarse ocasionalmente. Limpie el
compartimiento antes de que se utilice la máquina para fabricar hielo por primera vez y antes de
volver a utilizarla después de un periodo prolongado de tiempo. Típicamente es conveniente
desinfectar el compartimiento después de que se haya limpiado el sistema de fabricación de hielo y
que el compartimiento de almacenamiento esté vacio. La pala de hielo debe lavarse regularmente.
Lávela como cualquier otro contenedor de alimentos.
1. Desconecte el cable de suministro eléctrico.
2. Abra la puerta del compartimiento de almacenamiento de hielo y con un paño limpio, limpie el
interior con una solución desinfectante realizada con una onza de lejía de uso doméstico o cloro y dos
galones [7,5 litros] de agua caliente (95-115°F / 35-46°C).
3. Enjuague bien con agua limpia. El agua residual se drenará a través del tubo de drenaje.
4. Enchufe la máquina para fabricar hielo.
Limpieza del aspersor
Nota: El aspersor solo debe limpiarse cuando encuentra que algunos cubos de hielo se forman
incorrectamente. Debe limpiar el sistema de fabricación de hielo después de limpiar el aspersor.
Nota: NO utilice agentes limpiadores basados en solventes o abrasivos en el interior. Estos limpiadores
pueden transmitir sabor a los cubos de hielo o dañar o aún decolorar el interior.
1. Desconecte el cable de suministro eléctrico.
2. Abra la puerta y quite el tablero de bloque de agua al levantar un extremo hacia arriba y tirar hacia
adelante.
3. Quite el tablero de bloque de agua del evaporador.
4. Encuentre el brazo del aspersor y levántelo. Desconéctelo del tubo de agua que está conectado en la
parte posterior del brazo del aspersor.
5. Puede prepararse una solución de descalcificación en un recipiente de plástico con un limpiador de
máquina para fabricar hielo de Nu Calgon sin níquel. Mezcle cuatro onzas del limpiador para la
máquina para fabricar hielo por cada galón [3,78 litros] de agua caliente.
SP - 11
12
LIMPIEZA Y MANTENIMIENTO
6. Retire el brazo aspersor del interior. Limpiar a fondo el brazo aspersor al sumergirlo en el recipiente
lleno con la solución de descalcificación hasta que esté libre de cualquier depósito. Utilice un
cepillo suave para quitar cualquier residuo espeso o duro para ayudar a la acción de disolución.
Enjuague bajo un chorro de agua del grifo.
7. Limpie el interior del sumidero de agua con la solución de descalcificación y agua tibia. Enjuague
exhaustivamente con agua limpia.
8. Vuelva a armar el brazo del aspersor, el evaporador y el tablero de bloque de agua.
9. Realice los pasos 1, 3-5 del procedimiento de limpieza del sistema de fabricación de hielo detallado
a continuación.
Limpieza del sistema de fabricación de hielo
1. Desenchufe la máquina para fabricar hielo para asegurarse de que la conexión de agua permanezca
intacta.
2. Abra la puerta del gabinete superior y asegurándose de que no haya cubos de hielo en el
evaporador, quite todos los cubos de hielo del compartimiento de almacenamiento de agua.
3. Quite la caja de agua y deseche el agua antes de volver a instalarla. Luego, llene la caja de agua con
el limpiador de la máquina para fabricar hielo. Enchufe la unidad y presione el botón limpiar
(5 segundos). La máquina pasará automáticamente al modo limpieza que dura 30 minutos. Al
mismo tiempo , limpie el compartimiento de almacenamiento de hielo con el limpiador.
4. Luego de que la máquina para fabricar hielo complete el modo de limpieza, quite la caja de agua,
drene el agua, limpie la caja de agua y la cubierta del evaporador según las instrucciones en este
manual (vea el paso 6 a continuación). Por último, vuelva a instalar la caja de agua, presione el
botón limpiar (5 segundos) para comenzar el modo de ciclo de agua y limpie toda la solución de
limpieza residual.
5. Repita el proceso detallado en el paso 4 tres veces para asegurar que la solución de limpieza se
descargue completamente.
6. Luego de completar el paso 5, quite la caja de agua y la cubierta del evaporador. Limpie estas
partes con agua entre 95 y 122°F (35-50°C). Enjuague y limpie la cubierta interior del
compartimiento de almacenamiento de hielo.
7. Una vez que haya completado los procesos anteriores, tire los cubos de hielo.
SP - 12
13
LIMPIEZA Y MANTENIMIENTO
Notas de mantenimiento
a. Si el compresor se detiene por alguna razón como escasez de agua, demasiado hielo, etc. NO
reinicie la unidad enseguida. Para proteger el compresor, espere 5 minutos antes de reiniciarla.
b. Revise regularmente los conectores los tubos de entrada y salida de agua. Drene la poca agua
excedente que pueda haber.
c. Cuando no se utilice por un largo periodo de tiempo, quite todos los artículos del compartimiento
y desconecte el cable de suministro eléctrico del tomacorriente de pared. Limpie el interior del
compartimiento y seque toda el agua. Retire el tubo de entrada de agua de la parte posterior de la
unidad y drene toda el agua. Para prevenir la formación de moho, deje la puerta abierta para que el
compartimiento se seque completamente.
d. Limpie el condensador una vez cada seis meses para mantenerlo bien ventilado. Desconecte la
máquina para fabricar hielo y deje que el condensador se enfríe antes de la limpieza. NO toque las
piezas en forma de ala (con forma de ala) durante la limpieza para evitar heridas. Después de quitar
la placa frontal de entrada lateral, utilice un limpiador o un cepillo para limpiarla.
e. Limpie el evaporador y el aspersor una vez cada tres meses para mantenerlo limpio.
SP - 13
14
GUÍA DE RESOLUCIÓN DE PROBLEMAS
Consulte la tabla a continuación para identificar la causa y la solución de un problema particular.
PROBLEMA
CAUSA POSIBLE
SOLUCIÓN
La máquina
para
fabricar
hielo no
funciona.
El voltaje es inferior a 98V.
Apague la máquina de hielo. Reinicie la unidad
solo cuando el voltaje sea normal.
La temperatura ambiente
es demasiado baja
(<50°F/10°C).
Trate de utilizar la máquina para fabricar hielo
nuevamente cuando la temperatura ambiente
esté por encima de 50°F / 10°C.
El
compresor
está
funcionand
o, sin
embargo
no se hace
hielo.
El refrigerante tiene
pérdidas.
Vuelva a llenar el refrigerante y pruebe para ver si
hay pérdidas.
El sistema de refrigeración
está obstruido.
Vuelva a colocar el filtro para el sistema de
llenado N₂.
La válvula del solenoide se
abre constantemente.
Reemplace la válvula del solenoide.
El ventilador de
condensación no funciona.
Revise para ver si funciona el ventilador de
condensación.
El elemento de sala se
encuentra sobre el aspersor.
Se trata de un sensor que
detecta el espesor del hielo y
el nivel de hielo. Puede no
estar funcionando.
Compruebe que el elemento de sala se encuentre
en su posición correcta (puede encontrar el
elemento de sala en la esquina inferior derecha
del aspersor) y que esté funcionando.
Escasez de agua.
Revise el sistema de suministro de agua (válvula
de entrada de agua y tubo de entrada de agua).
Completo de hielo.
Quite un poco de hielo.
La temperatura de la
carcasa es demasiado alta.
Apague la máquina de hielo. Reinicie la
unidad en aproximadamente 1 hora.
Hay una escasez de agua en
el sistema de suministro de
agua.
Asegúrese de que el sistema de suministro de
agua esté conectado a un suministro de agua
potable y que no haya obstáculos. Luego reinicie
la máquina para fabricar hielo.
La válvula de entrada de agua
está dañada.
Revise la válvula de entrada de agua.
La presión de agua es
demasiado baja.
La presión de agua no debe ser inferir a 1 kg/cm².
La
compresor
no
funciona.
La luz
indicadora
de agua
baja está
iluminada.
SP - 14
15
GARANTÍA LIMITADA
MC Appliance Corporation garantiza que cada Máquina para fabricar hielo comercial nueva no tiene defectos
de materiales ni de mano de obra y acepta reparar cualquier defecto o proporcionar un repuesto nuevo, a
discreción de la compañía, de cualquier parte de la unidad que presente algún defecto durante el período de
garantía. Los gastos de repuestos y mano de obra está cubiertos para esta unidad durante un período de un
año a partir de la fecha de compra.
Además MC Appliance Corporation autoriza el compresor (piezas solamente) para estar libre de defectos en
material y la ejecución por un período de 5 años. El consumidor es responsable de todo el trabajo y los costos
del transporte relacionados con la diagnosis y el reemplazo del compresor después de las uno garantías inicial
del año han expirado. Si en el acontecimiento la unidad requiere el reemplazo o el reembolso bajo términos de
esta garantía el consumidor es responsable de todos los costos del transporte volver la unidad a nuestra
fábrica antes de recibir una unidad o un reembolso del reemplazo.
Es necesario presentar una copia del recibo o factura de compra con fecha para obtener los servicios de la
garantía, el reemplazo o el reembolso.
Esta garantía cubre los electrodomésticos en usen dentro de los Estados Unidos contiguos, Alaska, Hawái y
Puerto Rico. Esta garantía no cubre lo siguiente:
• Daños ocurridos durante el transporte o debidos a una instalación inadecuada.
• Daños debidos a uso indebido o abuso.
• Pérdida de los contenidos debido a falla de la unidad.
• Componentes interiores tales como paneles de la puerta, estantes de la puerta, estantes, bombillas
etc.Punturas al sistema del evaporador debido a la descongelación incorrecta de la unidad.
• Reparaciones efectuadas por agentes de servicio no autorizados.
• Llamados al servicio de reparación que no se deban a fallas de materiales o mano de obra, como
instrucciones sobre el uso adecuado del producto o instalación inadecuada.
• Cambio o reprogramación de fusibles o interruptores de circuitos eléctricos en el hogar.
• Falla del producto si se utiliza para otros fines fuera de los específicos.
• Costos de disposición por toda unidad fallada no devuelta a la fábrica.
• Costos de envío/instalación incurridos como resultado de una unidad que no funciona según lo
especificado.
• Gastos de viaje y trasporte para el servicio del producto si el aparato está ubicado en un lugar
remoto donde el servicio de un técnico autorizado no está disponible.
• El retiro y la instalación nueva del aparato si la instalación está en un lugar inaccesible o no está
instalado según las instrucciones de instalación publicadas.
• Los reintegros por productos que no tienen reparación se limitan al precio pagado por la unidad
según el recibo de compra.
• Esta garantía es intransferible. Esta garantía es válida exclusivamente para el comprador original y
no se extiende a ningún otro propietario o propietarios subsiguientes.
SP - 15
16
GARANTÍA LIMITADA
LIMITACIONES DE RECURSOS Y EXCLUSIONES
La reparación del producto según los términos del presente es su recurso único y exclusivo bajo esta garantía
limitada. Todas y cualquier garantía implícita, incluida la comerciabilidad y aptitud para un fin particular se
limitan por la presente a un año o el período menor autorizado por la ley. MC Appliance Corporation no es
responsable de los daños incidentales o contingentes y ningún representante o persona está autorizada a
asumir en nombre nuestro ninguna responsabilidad en relación con la venta de este producto. Bajo ninguna
circunstancia el consumidor puede devolver esta unidad a la fábrica sin contar con la autorización previa por
escrito de MC Appliance Corporation.
Algunos estados prohíben la exclusión o limitación de los daños incidentales o contingentes o las limitaciones o
garantías implícitas. Esta garantía le da derechos legales específicos y pueden corresponder otros derechos
que varíen de un estado a otro.
Modelo
EWCIM350S
Partes y Mano de obra
Un año
Compresor (Parte Solamente) Tipo de servicio
Cinco Años
En el lugar
Para solicitar servicio o ayuda llame al 888-775-0202, o visítenos en www.mcappliance.com para
solicitar el servicio de la garantía o pedir repuestos.
SP - 16
CNA International, Inc. realiza negocios bajo el nombre de Norpole Inc.
Derechos reservados. Norpole™ es una marca registrada de CNA International, Inc.
www.mcappliance.com
Impreso en China