1
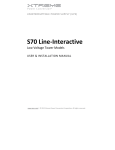
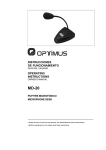
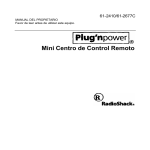
Termo Eléctrico
Storage Electric Water Heater
GTS 10
GTS 15
INSTRUCCIONES DE INSTALACIÓN Y USO
INSTALLATION AND OPERATING INSTRUCTIONS
Lea estas instrucciones atentamente antes de instalar o utilizar el aparato por primera vez.
Please read these instructions before installing or using this appliance for the first time.
1.- INFORMACION IMPORTANTE
•
•
•
•
•
•
•
•
•
•
•
•
•
•
•
•
•
•
•
•
•
•
•
•
Lean con detalle estas instrucciones antes de instalar o utilizar este aparato por primera vez. La
garantía no cubrirá los daños causados por la no observancia de estas instrucciones.
Las instrucciones deben conservarse para futuras referencias. Este manual debe ser conservado
y dado a cualquier nuevo usuario.
Este aparato está diseñado sólo para uso doméstico.
La instalación y puesta en marcha debe realizarse de acuerdo con estas instrucciones y sólo por
profesionales cualificados respetando la legislación vigente.
Es obligatoria la instalación de manguitos dieléctricos en la entrada y en la salida de agua. La
garantía no cubrirá los daños causados por la no instalación de los mismos.
El uso de este termo está prohibido en áreas con presencia de gases explosivos o sustancias
inflamables.
Asegúrese de que el suministro eléctrico a la base a la cual el termo se va a enchufar es
adecuado a lo mostrado en la placa de características del aparato.
Este equipo debe ser puesto a tierra.
Mantenga la manguera de alimentación lejos de las partes calientes del termo.
No deje cable colgando del extremo de mesas o escalones ni deje que entre en contacto con
cualquier superficie caliente.
Un manejo inadecuado puede causar heridas graves.
No tire del cable sino de la clavija para desconectar el termo de una toma de corriente.
No utilice alargadores de cable. Esto puede causar sobrecalentamiento y causar un incendio.
No toque nunca el termo estando descalzo o con las manos mojadas o húmedas.
El termo debe estar desconectado durante la instalación y su limpieza.
No instalar el termo en frente o debajo de una toma de corriente.
El termo debe ser instalado de tal forma que los interruptores u otros controles no puedan ser
tocados por alguien que esté usando el baño o la ducha.
Es importante mantener una distancia de 80 cm entre el termo y cortinas u otros objetos
inflamables.
Evitar el uso del termo donde haya niños o personas incapacitadas sin ser supervisadas por una
persona responsable.
Nunca desmonte los componentes del termo ni los reemplace por otros que no cumplan los
requisitos de seguridad. Si el cable de alimentación está dañado debe ser sustituido por el
fabricante o por su agente oficial para evitar un peligro.
Este termo no está destinado a ser usado por personas (incluidos niños) cuyas capacidades
físicas, sensoriales o mentales estén reducidas o con falta de conocimiento o experiencia, salvo
si son supervisados por una persona responsable de su seguridad.
Los niños deben ser supervisados para evitar que jueguen con el aparato.
La presencia en el aire de humo de tabaco o polución puede, con el tiempo, manchar las paredes
y zona próximas al termo.
No usar en exteriores.
2.- INSTALACIÓN
El termo debe instalarse lo más cerca posible del punto de utilización resguardado de posibles heladas.
Para elegir el emplazamiento se debe tener en cuenta que los conductos de entrada y salida de agua
sean fácilmente accesibles evitando en lo posible el uso de codos, para que pueda ser desmontado sin
problemas o se pueda sustituir cualquier componente del mismo.
La pared donde se instale el termo deberá soportar el peso del aparato una vez lleno de agua.
Utilice el soporte suministrado para fijar el termo a la pared.
La instalación debe cumplir con la legislación vigente si se instala en un cuarto de baño.
Sujete el soporte firmemente a la pared mediante tornillos y tacos adecuados. Sólo entonces cuelgue el
termo del soporte.
Mantenga una distancia de 20 cm entre la parte inferior
del termo y el objeto más próximo para facilitar las
labores de mantenimiento.
Este termo es para instalación vertical, exclusivamente. La entrada y salida de agua siempre deben
quedar en la parte inferior del termo una vez instalado.
Conexión hidráulica.
Todas las conexiones son G1/2”.
Antes de proceder a la conexión hidráulica es indispensable limpiar las tuberías de alimentación con el
objeto de no introducir partículas metálicas o extrañas en el interior del termo. ATENCIÓN : No
conectar nunca las tomas de entrada y salida de agua directamente a la tubería para evitar pares
galvánicos que producirían corrosión. Es obligatorio intercalar manguitos dieléctricos en las tomas. El
par de apriete máximo de los manguitos es de 3.5 kgm. La garantía del termo perderá validez si no se
han instalado los manguitos dieléctricos.
REDUCTOR DE PRESIÓN. Si la presión de suministro supera los 5.5 bares, es obligatorio instalar un
reductor de presión en la acometida de la vivienda. Se recomienda una presión de 3 a 4 bares.
La instalación se realizará con un grupo de seguridad de membrana tarado a 7 bares, conectado a la
entrada de agua del termo, dotado de anti retorno. El termo solo está garantizado si está equipado con
este accesorio y respeta el esquema de instalación.
Salida de agua caliente
Entrada de agua fría
Manguito dieléctrico
Manguito dieléctrico
Válvula de Seguridad Unidireccional
Desagüe Válvula Presión
El desagüe o flujo de agua que resulta de la sobrepresión nunca debe ser obstruido. El conducto de
desagüe debe tener una pendiente continua y suficiente con una sección en ningún caso inferior a la
del orificio de salida del grupo de seguridad. Ningún accesorio hidráulico se debe instalar entre el grupo
de seguridad y la entrada de agua fría del termo. Se recomienda instalar un embudo sifónico conectado
al desagüe con el fin de verificar fácilmente el funcionamiento del grupo de seguridad.
Durante el período de calentamiento el agua se dilata y es posible que una parte se pierda por goteo
por el desagüe (hasta el 3% de la capacidad para cada ciclo de calentamiento). No se preocupe es un
fenómeno normal.
Conexión eléctrica.
No conecte nunca el termo sin estar lleno de agua.
Asegúrese de que el suministro eléctrico de la toma de corriente es adecuado a lo mostrado en la placa
de características del aparato. Conecte el termo a una toma de corriente equipada con una buena toma
de tierra.
Limitador térmico de seguridad. Todos nuestros termos están equipados con un limitador térmico de
seguridad que desconectará el elemento calefactor si la temperatura supera un valor anormal. En caso
de actuación del limitador térmico de seguridad verificar la instalación antes de proceder a su rearme.
Puesta en marcha.
ATENCIÓN. No conecte nunca el termo sin estar lleno de agua. Es necesario purgar la instalación por
completo eliminando el aire del interior. Antes de conectar el termo abra por completo el grifo de agua
caliente y no lo cierre hasta que la salida de agua se produzca de forma regular y sin ruidos en la
tubería.
Compruebe que no existen fugas en la instalación.
3.- FUNCIONAMIENTO
Carcasa Plástico
Indicator de calentamiento
Salida Agua Caliente
Mando
Control
Termostato
Entrada Agua Fría
Enchufar a la red. El indicador de calentamiento permanecerá encendido siempre que la resistencia
esté calentando el agua.
Es posible regular la temperatura del agua caliente mediante el mando de control del termostato hasta
los 75ºC como máximo. El termostato se encargará de mantener la temperatura del agua siempre que
el termo se encuentre conectado a la red.
Si existen riesgo de heladas en caso de no utilización es conveniente vaciar el termo. Este se puede
hacer mediante el grupo de seguridad.
Tornillo
Posición de drenaje
0.8MPa
0.8MPa
Drenaje
Leva de drenaje
Si durante el funcionamiento del termo se aprecia una salida continua de vapor de agua o de agua
hirviendo por la boca del desagüe o al abrir un grifo desconecte el termo de la toma de corriente y
póngase en contacto con el Servicio de Asistencia Técnica.
4.- MANTENIMIENTO
IMPORTANTE: Una vez al mes compruebe que el grupo de seguridad no se encuentra obstruido.
Colóquelo en posición de drenaje para ello. Si se encuentra obstruido debe ser reemplazado por uno
nuevo.
Cada dos años es necesario encargar el trabajo de eliminar las incrustaciones de la resistencia y
revisar el ánodo de magnesio sustituyéndolo si fuera necesario. La garantía no cubrirá los daños
causados por la no realización de esta revisión y en los que se compruebe que el ánodo se ha
consumido por completo.
Limpie el polvo con un trapo suave y seco, sólo cuando la unidad esté desconectada y fría.
No utilice disolventes ni productos abrasivos. No sumerja el termo en agua.
Este termo ha sido fabricado dentro de un sistema de calidad asegurada y conforme a procesos
respetuosos con el medio ambiente. Una vez finalizada la vida útil del aparato, llévelo a un punto limpio
para que sus materiales puedan ser reciclados de forma adecuada
5.- DATOS TÉCNICOS
Modelo
Capacidad
Potencia
Conexión
Corriente
Presión máxima
Máx. Temperatura agua
Grado de protección
Fijación
Consumo de mantenimiento
Peso vacio
GTS10
10 L
1500W
230V~
6.5A
0.8MPa
75ºC
IPX4
Vertical
0.50 kWh/24h
6.3kg
GTS15
15 L
1500W
230V~
6.5ª
0.8MPa
75ºC
IPX4
Vertical
0.57 kWh/24h
7.8kg
6.- ESQUEMA ELÉCTRICO
Limitador
Térmico
Tierra
Azul
Amarillo/
Verde
Resistencia
Neutro
Marrón
Indicador
calentamiento
Fase
Termostato
de control
Cambios al esquema
sin previo aviso.
1.- IMPORTANT INFORMATION
•
•
•
•
•
•
•
•
•
•
•
•
•
•
•
•
•
•
•
•
•
•
•
•
•
Read these instructions carefully before installing or using this heater for the first time. The
guarantee will not cover damage caused by not following these instructions.
The instructions should be retained for future reference. This guide must be kept and given to any
new owner.
This appliance is designed for domestic use only.
The installation must be carried out by trained personnel and in accordance with the current
electrical regulations.
Dielectric hoses must be installed both in water inlet and water outlet. The guarantee will not
cover damage caused if dielectric hoses are not fitted.
The use of this water heater is forbidden in areas where gases, explosive or inflammable
substances are present.
Ensure the power supply to the socket into which the appliance is plugged is in accordance with
the rating label on the heater.
This appliance must be earthed.
Keep the power cable away from the hot body of the electric water heater.
Do not let the cable hang over the edge of a table or counter or let it come into contact with any
hot surfaces.
The improper handling can cause injuries.
Do not pull on the connection cord, but rather on the plug, to separate the appliance from the
mains.
Do not use extension cable. This could overheat and cause fires.
Never touch the appliance with wet or humid hands or barefoot.
The water heater must be disconnected during installation and cleaning.
The water heater should not be located in front of, or under an electrical socket.
The water heater should be positioned so the controls cannot be used when using the shower or
bath.
The location of the water heater should not be close to curtains or other inflammable articles.
It is important to maintain a minimum distance of 80 cm between the water heater and curtains, or
any other combustible materials.
Avoid using the heater where there are children or disabled persons without being adequately
supervised by a responsible person.
Never dismantle the components of the water heater or replace the components with the ones
that do not meet the safety requirements. If the supply cord is damaged, it must be replaced by
the manufacturer or its service agents or a similarly qualified person in order to avoid a hazard.
The appliance is not intended for use by persons (including children) with reduced physical,
sensory or mental capabilities, or lack of experience and knowledge, unless they have been given
supervision or instruction concerning use of the appliance by a person responsible for their safety.
Children should be supervised to ensure that they do not play with the appliance
The presence in the atmosphere of tobacco smoke or atmospheric pollution can with time
discolour the heater surface.
Do not use outdoor.
2.- INSTALLATION
When possible the water heater should be sited to minimize the pipe distance to hot water outlets.
It should be protected from moisture and frost.
Please note that the inlet and outlet are easily accessible. Avoid if possible the use of many fittings, so
that it can be disassembled without problems or any spare part may be easily replaced.
Wall and fixings must be suitable to support the total weight of the water heater when full.
Installation must comply with regulations for electrics if installed in bathrooms.
Use the supplied mounting bracket to fit the water heater to the wall.
Fix the bracket securely to the wall using suitable screws with appropriate plugs or fixings. Only then it
is possible to hang the water heater from the bracket.
Maintain a clearance of 20 cm underneath the water heater to allow maintenance.
This water heater is to be installed exclusively in vertical position. Inlet and outlet must be always in the
lower part of the water heater.
Water connections.
All the fittings are G1/2”.
Before making the water connections it is necessary to clean all the pipes to prevent that any debris is
introduced in the water heater.
ATTENTION. Never connect directly inlet and outlet to the existing pipes. Dielectric hoses (max.
tightening torque 3.5 kgm) must be installed both in water inlet and water outlet to prevent from
corrosion. The guarantee will not cover damage caused if dielectric hoses are not fitted.
PRESSURE REDUCING VALVE. If the incoming water pressure exceeds 5.5 bar it is necessary to
install a Pressure Reducing Valve on the water main into the dwelling. It is recommended a pressure
between 3 and 4 bar.
On the cold water inlet a 7 bar pressure relief valve including a non-return feature must be installed. The
warranty only covers the appliance if this valve is installed and the installation diagram is followed at any
time.
Cold Water Inlet Pipe
Hot Water Outlet Pipe
Dielectric Hose
Dielectric Hose
Mono-directional Security Valve
Pressure leakage hole
The Pressure Relief Valve may discharge water and it should be piped to a safe but visible drain point.
A tundish should be incorporated close to the appliance where any discharge will be visible nut not
hazardous. The pipe work should have a continuous fall to the drain and the diameter should not be
lower than the hole in the Pressure Relief valve.
When the water is being heated the water expands and it is possible that some water will drip (up to 3%
of the total volume each heating cycle). It is normal.
Electrical power supply.
Never connect to the electricity supply an empty water heater.
Ensure the power supply to the socket into which the appliance is plugged is in accordance with the
rating label on the heater.
This appliance must be earthed.
All models are supplied with an electrical interrupt cut-out. This will switch off the heater if, for any
reason, it overheats. Should the cut-out operate, disconnect the water heater from the electricity supply
and remove the cause for the overheating.
Commissioning.
IMPORTANT. Never connect to the electricity supply an empty water heater.
Turn on all the hot water system taps and thoroughly flush allowing water to flow until no air is present.
This will automatically vent the integral hot water store of any air.
Check there is no leakage in the installation.
3.- OPERATING THE WATER HEATER
Plastic Cover
Heating Indicator
Temperature
Controlling
Knob
Hot Water Outlet
Cold Water Inlet
Connect the water heater to the electrical socket. The heating indicator will be lit as long as the heating
element is energized. The light will go out when the desired temperature is reached.
The setting of the water temperature can be modified by turning the Temperature Controlling Knob up to
75ºC max.
The thermostat will maintain the water temperature as long as the water heater is connected to the
electricity supply.
If there is any risk of frost conditions may be opportune to empty the water heater. It could be done by
means of the Preassure Relief Valve.
Fixed Screw Nail
Water-drainage Position
0.8MPa
0.8MPa
Pressure relief
Water- drainage Spanner
Should any continuous water steam or boiling water is delivered at draining hole or at any hot water
system tap disconnect immediately the water heater from the electrical socket and get in contact with
after sales service.
4.- MAINTENANCE
IMPORTANT: Check every month that the Pressure Relief Valve is not blocked. Operate the spanner to
drainage position. If the Pressure Relief valve is obstructed it must be replaced.
Every two years it is necessary to arrange heating element de-scaling works at the same time it is
necessary to check the magnesium anode if required. The warranty will not cover any damage caused
by the inobservance of this point and if the anode is completely gone due to lack of maintenance.
Clean and dust with a dry, soft cloth only when the unit is disconnected and cold.
Do not use solvents or abrasive products for cleaning.
Do not immerse the electric water heater in water.
Do not allow the interior to get wet as this could create a hazard.
In case of malfunction or doubt, do not try to repair the heater yourself; it may result in a fire hazard or
electric shock.
This thermal radiator has been manufactured under an assured quality system using environment
friendly processes.
Please take the heaters to a clean point once their useful life is finished, in order to recycle their
materials in the right way.
5.- SPECIFICATIONS
Model
Rated Volume
Input
Voltage
Current
Rated Pressure
Rated Water Temperature
IP rating
Fixing
Loss
Net Weight
6.- WIRING
Thermal
Limiter
Earth
Brown
Blue
Yellow/
Green
Heating
Indicator
Neutral
GTS15
15 L
1500W
230V~
6.5ª
0.8MPa
75ºC
IPX4
Vertical
0.57 kWh/24h
7.8kg
Temperature
Controller
H eating Tube
Live
GTS10
10 L
1500W
230V~
6.5A
0.8MPa
75ºC
IPX4
Vertical
0.50 kWh/24h
6.3kg
No notice to any
change of the diagram
E
El símbolo en el pro
oducto o en su embala
aje indica que este prroducto no se puede tratar
t
como despe
erdicio normales del hogar. Este producto
o se debe entregar all punto de recolección de
equipos elé
éctricos y electrónicos
s para reciclaje. Al a
asegurarse de que este
e
producto se dese
eche
correctamen
nte usted ayudará a evitar
e
posibles conseccuencias negativas pa
ara el ambiente y la salud
s
pública, lo cual podría ocurrir sii este producto no se
e manipula de forma adecuada. Para obttener
información
n más detallada sob
bre el reciclaje de e
este producto, póngase en contacto co
on la
administrac
ción de su ciudad, con
n su servicio de desecchos del hogar o con la
l tienda donde comp
pró el
producto. Estas disposiciones so
olamente son válidas e
en los países miembro
os de la UE.
GB
The symbol on the product or in its pacckaging indicates thatt this product may no
ot be
treated as household
h
waste. Insttead it shall be hande
ed over to the applicable collection point for the
recycling off electrical and electro
onic equipment. By ensuring this product is disposed of correctly,, you
will help pre
event potential negativ
ve consequences for tthe environment and human
h
health, which could
c
otherwise be
b caused by inappropriate waste handling
g of this product. For more detailed informa
ation
about recyc
cling of this product, please
p
contact your lo
ocal city office, your household
h
waste disp
posal
service or the
t
shop where you purchased
p
the producct. These instructions
s are only valid in the
e EU
member sta
ates.
www.elnur.es
Tf. de atención
n al cliente:
+34 902 19
9 57 14
Como parte de la política de mejora continua
a Elnur s.a. se reserva el derrecho a realizar modificacione
es técnicas sin previo aviso.
As a part of the policy of continuous productt improvement Elnur s.a reserrves the right to alter specifica
ations without notice.
@2
2012
Cod. 90800011 rev.0