1
7.
Wall Anchor
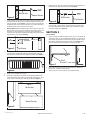
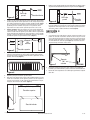
Remove the back splash top section and install the included wall anchors
by drilling into the wall at the marked locations (Figure 6).
Bottom Section
Figure 2
2.
3.
Wall Anchor
Install the bottom section of the back splash by lining up the 6 holes in the
back splash with the wall anchors that where installed earlier and attach
using the included screws (Figure 2). If your back splash is equipped with
the optional shelves please continue with step 3. If your back splash does
not include shelves proceed to step 6 in this section.
Optional Shelves: Before installing the top section of the back splash, the
shelf brackets and shelves must be installed. Install one of the outer shelf
bracket by securing it from the back side of the back splash with the
included screws, through the predrilled holes. Make sure the notched side
of the bracket is facing outward (Figure 3).
8.
Figure 3
4.
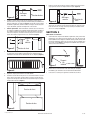
Lift the top section back into place by hooking the flange of the bottom
section into the channel of the top section and line up the 3 holes in the
back splash with the wall anchors that where just installed and attach
using the included screws (Figure 6).
SECTION 3
Use and Care
1.
Screws
Top Section
Figure 6
Shelf Notch
Bracket
If your back splash include the optional shelves, these can be positioned
upward when not in use to create additional working space. To move the
shelf into the upright position, hold the front of the shelf and lift upward,
then slide the shelf down into the channel of the bracket (Figure 7). To
move the shelf into the lowered position, reverse the directions.
Top Section
Insert one side of the shelf into the bracket that was just installed onto the
back splash, then install the opposite bracket to the opposite side of the
shelf and connect it to the back splash with the provided screws (Figure 4).
Figure 7
Figure 4
5.
Repeat steps to install the second shelf.
6.
Lift the top section into place by hooking the flange of the bottom section
into the channel of the top section and center the top section in place. Once
the top section is exactly in place, mark the hole locations (Figure 5).
Shelf
Bracket
2.
Refer to the hood instruction manual to complete the installation, for
maintenance, and before restoring power.
3.
The back splash is covered under the range hood’s warranty.
Holes
Top Section
Bottom Section
Figure 5
111597004 New 3-07
www.airkinglimited.com
2 of 8