1
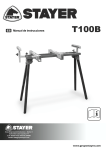
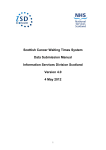
T88
ES Manual de instrucciones
EN Operating instructions
Área Empresarial Andalucía - Sector I
Calle Sierra de Cazorla nº7
C.P: 28320 Pinto (Madrid) SPAIN
Email: [email protected]
www.grupostayer.com
Area Empresarial Andalucía - Sector I
Calle Sierra de Cazorla nº7
C.P: 28320 Pinto (Madrid) SPAIN
Email: [email protected]
3
6.1.
CARACTERÍSTICAS TÉCNICAS
TECHNICAL CHARACTERISTICS
T88
cm
75,5
cm
8
cm
2x(60.5x12x2)
Kg
50
Kg
5.5
kg
kg
3
4
12 cm
8 cm
60,5 cm
12 cm
2 cm
75,5 cm
62 cm
52,5 cm
4
5
MONTAJE/ Mounting
Fig.1
6
8
9
1
9
11
12
2
12
5
3
5
10
4
7
5
6
Fig.2
Fig.3
Fig.4
Fig.5
Fig.6
6
ESPAÑOL
7
Ÿ Coloque la mesa de trabajo sobre una superficie firme,
plana y horizontal. Si la mesa de trabajo patina sobre la
base o tambalea, no es posible guiar uniformemente ni de
forma segura la herramienta eléctrica.
¡Muchas gracias por la adquisición de un producto
STAYER!
Deseamos felicitarle por haber adquirido un producto
STAYER. Ya sea que lo aplique usted a trabajos
profesionales como de bricolaje, los resultados serán de
indudable calidad.
La mesa T88 es una solución compacta y funcional de
utilización universal, diseñada para trabajos básicos de
bricolaje, con sistema rápido de plegado.
Sirve para medir, cortar o fresar, cuenta con unas guías
para cortar recto o en ángulo.
3.2 Montaje
NOTA: para montar la mesa de trabajo T88, necesitará un
martillo, un destornillador de punta plana y las piezas
proporcionadas. Tiempo de ensamblaje es de
aproximadamente 45 minutos a una hora. Siga las
instrucciones que se muestran en las imágenes y siga los
siguientes pasos:
1. Índice
página
2.Instrucciones Especificas de Seguridad....................7
3.Instrucciones de puesta en servicio...........................7
3.1 Colocación......................................................................7
3.2 Montaje..................................................................7
3.3 Descripción ilustrada de piezas.............................7
4.Instrucciones de mantenimiento y servicio...............7
4.1 Servicio de reparación............................................7
4.2 Garantía.................................................................7
4.3 Eliminación y reciclaje...........................................8
5. Marcado Normativo....................................................8
5.1 Características técnicas.........................................8
5.2 Declaración de Conformidad..................................8
1- Vaciar el contenido de la caja e identificar todas las
piezas.Fig. 1).
2- Ubicar las piezas en el paquete de partes e identificar.
3- Ver montaje (Fig. 1).
4. Se recomienda empezar armando la estructura
estabilizadora de la mesa (patas).
3.3 Descripción ilustrada de piezas
1- Tornillo para ajuste estructura base.
2- Tornillo cabeza hexagonal ajuste manivela.
3- Tornillo de cabeza plana ajuste barra estabilizadora.
4- Patas de goma.
5- Tornillo sujeción refuerzo patas.
6- Mordaza.
7- Llave.
8- Estructura base (mordaza).
9- Apoyo estructura base.
10- Patas.
11- Barra estabilizadora.
12- Manivelas.
2. Instrucciones Especificas de seguridad
Lea íntegramente todas las advertencias de
peligro e instrucciones que se adjuntan con la
mesa de trabajo. En caso de no atenerse a las
indicaciones
de seguridad e instrucciones
siguientes, puede ocasionarse una descarga
eléctrica, un incendio y/o lesión grave.
Ÿ Ensamble correctamente la mesa de trabajo y controle
su estado antes de cada uso. Un ensamble correcto es
primordialpara conseguir una buena estabilidad y evitar
accidentes.
50
4. Instrucciones de mantenimiento
y servicio
4.1 Servicio de Reparación
No coloque pesos excesivos
sobre la mesa de trabajo ni la
emplee como escalera o andamio.
Al sobrecargar o subirse a la
mesa de trabajo puede ocurrir que
ésta vuelque.
El servicio técnico le asesorará en las consultas que pueda
Ud. tener sobre la reparación y mantenimiento de su producto, así como sobre piezas de recambio.
Los dibujos de despiece e informaciones sobre las piezas
de recambio las podrá obtener también en internet bajo:
[email protected]
Ÿ Asegúrese que las piezas largas y pesadas no hagan
volcar la mesa de trabajo. En las piezas de trabajo largas y
pesadas deberá soportarse su extremo libre (en voladizo).
Nuestro equipo de asesores técnicos le orientará gustosamente en cuanto a la adquisición, aplicación y ajuste de los
productos y accesorios.
Ÿ No fije herramientas eléctricas a la mesa de trabajo. Las
herramientas eléctricas que han sido fijadas y los afilados
útiles pueden acarrear graves lesiones.
4.2. Garantía
Ÿ Guarde la mesa de trabajo en un lugar seguro. El lugar
de almacenaje, además de ser seco. Esto evita que se
deteriore la mesa de trabajo durante el almacenaje o que
sea utilizada por personas inexpertas.
Tarjeta de Garantía
Entre los documentos que forman parte de la herramienta
eléctrica encontrara la tarjeta de garantía. Deberá rellenar
completamente la tarjeta de garantía aplicando a esta
copia del ticket de compra o factura y entregarla a su revendedor a cambio del correspondiente acuse de recibo.
3. Instrucciones de puesta en servicio
3.1 Colocación
¡NOTA! Si faltara esta tarjeta pídasela de inmediato a su
revendedor.
La mesa de trabajo ha sido diseñada para sujetar piezas
de trabajo con la ayuda de unas mordazas.
7
ESPAÑOL
8
5.2 Declaración de Conformidad CE
La garantía se limita únicamente a los defectos de fabricación o de mecanización y cesa cuando las piezas hayan
sido desmontadas, manipuladas o reparadas fuera de la
fábrica.
El que suscribe:
STAYER IBERICA, S.A.
4.3. Eliminación y reciclaje
Con dirección:
Recomendamos que las herramientas eléctricas, accesorios y embalajes sean sometidos a un proceso de recuperación que respete el medio ambiente.
Calle Sierra de Cazorla, 7
Área Empresarial Andalucía - Sector 1
28320 PINTO (MADRID)
Tel.: 902 91 86 81 / Fax: +34 91 691 86 31
Sólo para los países de la UE:
CERTIFICA
¡No arroje las herramientas eléctricas a la basura!
Que las máquinas:
Conforme a la Directiva Europea 2002/96/CE
sobre aparatos eléctricos y electrónicos inservibles, tras su transposición en ley nacional, deberán acumularse por separado las herramientas
eléctricas para ser sometidas a un reciclaje ecológico.
Tipo:
SOPORTE MESA
Modelo: T88
Declaramos bajo nuestra responsabilidad, que el producto descrito bajo “Datos técnicos” está en conformidad con las normas o
documentos normalizados siguientes: UNE EN 581-3:2007.
Reservado el derecho de modificación.
15 de octubre de 2013
5. Marcado normativo
5.1 Características técnicas
Ramiro de la Fuente
Director Manager
= Altura máxima
= Apertura máxima entre apoyos
= Plano de apoyo
kg
= Peso máximo que soporta
= Peso
kg
LWA
= Nivel de potencia acústica
LPA
= Nivel de presión acústica
8
ENGLISH
9
Thank you for purchasing a product STAYER!
We congratulate you for purchasing a product STAYER.
Whether you apply it to professional and DIY work, the
results will be of unquestionable quality.
3. Instructions for use
3.1 Placement tool
The saw stand is intended for clamping workpieces with
clamping jaws.
The table T88 is a compact and functional universal use,
designed for basic DIY with quick folding system.
Used to measure, cut or milling, has guides for cutting
straight or angled.
Ÿ Place the saw stand on a firm, level and horizontal
surface. If the saw stand can slip off or wobble, the power
tool cannot be uniformly and securely guided.
1. Contens
3.2 Assembly Instructions
página
2.Specific Specific Instructions...................................9
3.Instructions for use...................................................9
3.1 Placement tool................................................................9
3.2 Assembly Instructions............................................9
3.3 Illustrated description.............................................9
4.Maintenance and service instructions......................9
4.1 Repair Service.......................................................9
4.2 Warranty.................................................................10
4.3 Disposal and recycling.........................................10
5.Regulations.........................................................10
5.1 Technical Data......................................................10
5.2 EU Declaration of Conformity................................10
NOTE: For assembly of the T88 you will need a hammer,
flat bladed screwdriver and the provided nut diver part (U).
Assembly time is approximately 45 minutes to one hour.
Follow the sequence shown in the diagrams and described
in the steps below.
1- Emply the contents of the box and identify all
components. (Figure 1).
2- Emply the contents of the parts pack and identity all
components.
3- See Mounting (Figure 1).
4. It is recommended to start putting together the structure
of the table roll (legs).
2. Specific Specific Instructions
3.3 Ilustrated description
Read all warnings and instructions pro- vided
with the saw stand. Failure to follow the warnings
and instructions may result in electric shock, fire
and/or serious injury.
1 - Adjustment screw base structure.
2 - Hex screw adjustment crank.
3 - Flathead screw adjustment stabilizer bar.
4 - Rubber feet.
5 - Screw fastening reinforcing legs.
6 - Gag.
7 - Key.
8 - Structure base (gag).
9 - Support for basic structure.
10 - Feet.
11 - Anti-roll bar.
12 - Cranks.
Ÿ Assemble the saw stand in the proper manner and
check it before each use. Proper assembly is impor- tant to
prevent the risk of a collapse of the saw stand.
50
Do not overload the saw stand
and do not use it as a ladder or
scaffolding. Overloading or
standing on the saw stand can
lead to the upward shifting of the
centre of gravity of the stand and
its tipping over.
4. Maintenance and service instructions
4.1 Repair Service
Ÿ Ensure that long and heavy workpieces do not affect the
equilibrium of the saw stand. Long and heavy workpieces
must be supported at the free end.
Our after-sales service responds to your questions
conceming maintenance and repair ofyour product as well
as spare parts.
Ÿ Do not clamp power tools in the saw stand. Clamped
power tools and sharp-edged application tools may re- sult
in serious injury.
Exploded views and information on spare parts can also be
found under: [email protected]
Ÿ Store the saw stand in a safe manner when not being
used. The storage location must be dry. This prevents the
saw stand from storage damage, and from being used by
untrained persons.
Our customer consultants answer your questions
conceming best buy, application and adjustment of
productsand accessories.
9
ENGLISH
10
4.2. Warranty
5.2 EU Declaration of Conformity
Warranty card
The undersigned:
STAYER IBERICA, S.A.
lncluded in the documentation that accompanies this
equipment, you should find the warranty card. You should
fill out the card completely and retum to vendar with a copy
of purchasing receipt or invoice and you should receive a
receipt.
With address at:
Calle Sierra de Cazorla, 7
Área Empresarial Andalucía - Sector 1
28320 PINTO (MADRID)
Tel.:+34 91 691 85 16 - Fax:+34 91 691 86 31
Note: lf you cannot find the warranty card within the
documentation,youmust ask for it through your
supplier.
CERTIFIES
The warranty is limited only to manufacturing defects and
expire if pieces have been removed or manipulated or
repaired otherthan themanufacturer.
That the machine:
Type:
4.3. Disposal and recycling
Table support
Models: T88
The machine, accessories and packaging should be sorted
for environmental-friendly recycling.
We declare under our sole responsibllity that this product is
in confonnity with the following standards or standardized
documents: UNE EN 581-3:2007.
OnlyforEC countries:
Do not dispose of power tools into household waste!
October 15, 2013
According the European Guideline 2002/96/EC
for Waste Electrical and Electronic Equipment
and its implementation into national right, power
tools that are no longer usable must be collected
separately and disposed of in an
environmentally correct manner.
Ramiro de la Fuente
Managing Director
Subject to change wlthout notlce.
5. Regulations
5.1 Technical Data
= Maximum height
= Maximum opening between supports
= Support plan
kg
= Maximum weight bearing
kg
= Weight
LWA
= Sound power level
LPA
= Sound pressure level
10
Area Empresarial Andalucía - Sector I
Calle Sierra de Cazorla nº7
C.P: 28320 Pinto (Madrid) SPAIN
Email: [email protected]
Área Empresarial Andalucía - Sector I
Calle Sierra de Cazorla nº7
C.P: 28320 Pinto (Madrid) SPAIN
Email: [email protected]
www.grupostayer.com