1
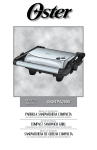
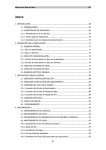
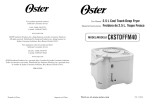
MODEL/MODÈLE
CKSTYY4995
MODELO
Instruction Manual
TURNOVER MAKER
READ ALL INSTRUCTIONS BEFORE USING THIS APPLIANCE
Manual de Instrucciones
APARATO PARA PREPARAR EMPANADAS
LEA TODAS LAS INSTRUCCIONES ANTES DE USAR ESTE APARATO
IMPO RTA N T S A F E GU AR D S
When using electrical appliances, basic safety precautions should always be followed
including the following:
1. READ ALL INSTRUCTIONS BEFORE USING THE TOSTY® EMPANADA OSTER®
TURNOVER MAKER.
2. Before connecting the appliance, make certain the voltage in your outlet is the same
as the voltage indicated on the appliance’s rating label.
3. To protect against risk of electrical shock, DO NOT immerse the appliance in water or
any other liquids.
4. DO NOT touch hot surfaces . Use handles and always use oven mitts when
handling hot materials. Please note that plate surfaces are exposed on the sides of
unit to release steam and thus get hot.
5. Unplug from wall outlet when not in use and before cleaning. Allow to cool before
cleaning or storing this appliance.
6. Never yank the cord to disconnect the appliance from the outlet. To unplug, grasp the
plug and pull straight out from the outlet.
7. DO NOT operate this or any appliance if the cord is damaged. DO NOT use the
appliance if the unit malfunctions or has been damaged in any manner. In order to
avoid the risk of electric shock, NEVER try to repair the unit yourself. Take it to an
authorized service center for examination and repair. An incorrect reassembly could
present a risk of electric shock when the appliance is used.
8. The use of replacement parts or accessories is not recommended by the
manufacturer; they may cause fire, electric shock or personal injury.
9. DO NOT use outdoors or for commercial purposes.
10.DO NOT use this appliance for purposes other than the one for which it was
designed.
11.DO NOT let the electrical cord hang over the edge of a table or countertop or touch
hot surfaces.
12.DO NOT place the appliance on or near a hot gas or electrical burner or in a heated
oven or microwave oven.
13.Use on a heat resistant, flat level surface only.
14.DO NOT operate in the open position.
15.When using this appliance, make sure there are no flammable materials close to it,
such as curtains, paper, plastics, etc.
16.DO NOT store any items on top of the appliance when in operation.
17.DO NOT cover the unit with metal foil. This will cause overheating of the appliance.
DO NOT place any flammable material on or close to the unit, such as paper,
cardboard or plastics or any material that can be set afire or melted.
18.When using this appliance, provide adequate air space above and on all sides for air
circulation.
19.Use with wall receptacle only.
20.DO NOT leave the appliance unattended during use.
21.Let unit cool completely before wrapping cord around it.
22.This appliance is not intended for use by persons (including children) with reduced
physical, sensory or mental capabilities, or lack of experience and knowledge, unless
they have been given supervision or instruction concerning use of the appliance by a
person responsible for their safety. Children should be supervised to ensure that they
do not play with the appliance.
1
23.Close supervision is necessary when any appliance is used by or near children, or
incapacitated individuals.
THIS APPLIANCE IS FOR HOUSEHOLD USE ONLY.
(For 120 & 127V with two flat pins only)
This appliance has a polarized plug (one blade is wider than the other). To reduce the risk
of electric shock, this plug will fit in a polarized outlet only one way. If the plug does not fit
fully in the outlet, reverse the plug. If it still does not fit, contact a qualified electrician. DO
NOT MODIFY THE PLUG IN ANY WAY.
S AV E T H E S E I N S TRU CTI O N S
2
DE SC RIP TION OF TH E APPLIA N C E
1
2
3
4
1. Indicator Lights - There are two Indicator Lights:
Red: indicates the appliance is connected to an electrical power source.
Green: illuminates after the Timer is rotated clockwise and indicates the
warming process has started. When the Timer reaches the zero
position, a bell will ring. Once the green Indicator Light turns off the
cooking surfaces will begin to cool down.
2. Timer - The 14-minute Timer will activate the heating process and also
serve as a timer. When the Timer is in zero position, the cooking surfaces
will not heat.
3. Locking Lid - The Locking Lid ensures the complete closure of the unit.
This will allow the unit to maintain the appropriate temperature and ensure
cooking uniformity.
5. Non-Stick Cooking Surfaces - The Non-Stick Cooking Surfaces can
prepare 4 turnovers at a time and allows for easy release and cleaning.
3
OP E RATIN G IN STRU CTIO N S
BEFORE USING IT FOR THE FIRST TIME
Before using for the first time, remove all stickers, tags and packaging materials. It is also
important to clean and season the cooking surfaces:
• With the appliance unplugged, clean the cooking surfaces with a cloth or sponge
dampened with warm, soapy water. DO NOT IMMERSE UNIT IN WATER. Rinse with a
dampened cloth or sponge and wipe dry.
• To season the cooking surfaces plug the appliance into an electrical outlet. The red
indicator light will illuminate. Wipe a small amount of butter or margarine onto the
cooking surfaces, rub lightly and wipe away any excess.
• Close and lock lid.
• Turn the 14-minute timer half way to set it for 7 minutes. The green indicator light will
illuminate.
• Once timer is off, the unit will make a sound and the green indicator light will turn off.
Unplug unit from electrical outlet and let it cool down completely.
Note: When using your appliance for the first time you may notice a fine smoke haze
being emitted from the unit. This is normal. It is due to the initial heating of
internal components.
PRE-HEATING
1.Season the unit cooking surfaces lightly with butter or
cooking oil.
2.Plug it into the appropriate electrical outlet. The red
indicator light will illuminate.
3.Close and lock lid.
4.Turn timer clockwise half way setting it for 7 minutes to
pre-heat unit. The green indicator light will illuminate.
5.Let unit pre-heat empty unit for 7 minutes.
6.Once timer is off, the unit will make a sound and the green indicator light will turn off.
COOKING
1.Once unit is already pre-heated, open lid.
2.Place up to 4 turnovers on lower cooking surface.
3.Close and lock lid.
4.If you wish to make more than 4 turnovers, turn the timer clockwise all the way setting it
for 14 minutes. When timer reaches half way, i.e. 7 minutes have gone by, open lid and
remove turnovers.
NOTE: If you intend to only prepare up to 4 turnovers at this time, turn the timer only
half way to the 7-minute mark.
4
5.Place a second batch of turnovers (up to 4) that you would like to prepare, close
and lock lid and let the timer continue to count down from 7 to 0. Continue preparing
additional turnover batches as desired.
6.Once you are done cooking, unplug the unit and let it cool completely. If the timer was
not at the starting position it will continue to count down until to zero even after unit has
been unplugged.
CARE AND CLEANING
Read all the Important Safeguards before cleaning this appliance. The unit does not need
internal maintenance and should be taken to an authorized service center for necessary
repairs.
• Always unplug the unit before cleaning and when not in use.
• Clean the cooking surfaces with a soft cloth dampened with warm water.
• If you wish to clean food residue stuck to the cooking plates, use a soft cloth with oil
while the cooking surfaces are still warm.
• The cooking surfaces have a non-stick coating. A steel wool or other abrasive cleaner
may damage the non-stick surface.
• To clean the exterior, simply wipe with a dampened cloth and polish dry with a dry soft
cloth.
• Store in a cool and dry place.
RECIPE AND PREPARING TURNOVERS WITH
THE TOSTY® EMPANADA OSTER® TURNOVER MAKER
Suggested Ingredients:
• Corn meal or Wheat Flour
• Water
• Salt
• Oil
Suggested Materials/Utensils:
• Bowl
• Plastic Cutting Board
• Two sheets of wrapping film/Clean plastic bag
• Mold/Cutter included with the Turnover Maker
• Spatula
• Serving dish
Recommendation: For easier handling of the dough, it is recommended the use of oiled
plastic to extend the dough and prevent sticking.
1. Prepare the dough by pouring 1 2/3 cups (400 ml) of tap water into a bowl. Add
1 teaspoon (5 ml) of salt and slowly add 10 – 12 oz. (280 to 320 g) of corn meal
powder, knead until smooth and firm. Make 4 balls of batter of 1.5 inches (4cms)
each.
5
2. Place one of the balls of batter on a previously oiled plastic.
Cover it with another sheet of plastic and then using the
cutting board; flatten the dough to make a tortilla shape of a
desired thickness.
3. Remove the cutting board and the top plastic sheet before
starting the filling process.
4. Lift the dough by holding the edges of the bottom plastic and
place it over the mold/cutter that comes with the Turnover
Maker.
5. Slightly lift one side of the mold and fill with desired filling
(approximately 2 tablespoons). Avoid placing too much filling
to ensure that your turnover is securely sealed.
6. Close the mold by pressing down firmly to cut the excess
dough and ensure proper sealing of the turnover.
7. Open the mold and remove the excess dough from the edge.
If necessary, manually seal any part of the turnover that was
not properly sealed.
8. Remove carefully from the mold the turnover and set aside.
Repeat steps 2 through 8 to prepare all the turnovers
desired.
9. Open the Oster® Turnover Maker by lifting up on the Locking Lid.
10.Clean the cooking surfaces with a dampened cloth. DO NOT
IMMERSE THE UNIT IN THE WATER OR ANY OTHER
LIQUID. Wipe-dry and lightly season the cooking surfaces
with cooking oil, butter or margarine (do not use cooking
spray oils to avoid damaging the non-stick coating). Rub
lightly and wipe away any excess.
11.Close the unit, lock it and plug into the outlet. The red
Indicator Light will illuminate. To activate, turn the timer dial
to the start position to preheat for 7 minutes prior to placing
The green Indicator Light will
the turnovers on the unit.
illuminate indicating the warming process has started.
12.Once the unit is preheated for 7 minutes, gently place the
number of turnovers you would like to prepare, (max. 4 each
batch) one at a time. Close the lid, lock it and turn the timer
dial to the 7 minute mark.
In 7 minutes your turnovers
will be ready; depending on the desired result you may add
more cooking time to achieve a more golden finish.
CAUTION: DO NOT TOUCH THE COOKING SURFACES
AS THEY ARE VERY HOT.
13.When ready, open the lid and remove the turnovers using
a non-scratching/heat-resistant spatula or utensil. The
turnovers and the cooking surfaces will be HOT, do not touch
them with your hands to avoid burning.
If you desire to prepare a new batch of turnovers, repeat
steps 12 and 13 immediately to avoid cooling down the
plates.
14.After you have completed using the appliance, unplug the
unit from the electrical outlet. DO NOT wrap the cord on the
metal hinges in back of the unit.
6
TURNOVER FILLING RECIPES
Prepare the batter according to the instructions from 1 to 4 above or your own recipes.
CHEESE TURNOVERS
INGREDIENTS:
½ Cup (1/4 lb) of White grated cheese
or any grated/shredded cheese desired
COOKING INSTRUCTIONS:
Fill in the turnovers with approximately 2 tablespoons of cheese and follow the
instructions from 5 to 14.
CHICKEN STEW TURNOVERS
INGREDIENTS:
1 Kg of Chicken (grilled or broiled)
1Cup of Tomatoes, finely diced
½ Cup of Sweet Wine
1 Teaspoon of Salt
1 Teaspoon of Worcester Sauce
3 Tablespoons of Olives, mined
½ Cup of Onion, Red Pepper and
Leek, minced and combined
¼ Cup of Oil
¼ Cup of Water
1 Teaspoon of Sugar
3 Tablespoons of raisins
COOKING INSTRUCTIONS:
Lightly fry onion, red pepper, leek and tomatoes. Add the cubed, de-boned chicken. Add
wine, water, salt, sugar, Worcester sauce and cook over low heat for 10 minutes. Add
raisins and olives and cook for 5 more minutes. Fill in the turnovers with approximately 2
tablespoons of chicken stew and follow the instructions from 5 to 14.
TUNA FISH TURNOVERS
INGREDIENTS:
1 Can of Tuna
½ Cup of Mixed Onion, Red Pepper
1 Teaspoon of Salt
and Tomato, finely minced
½ Teaspoon of Cumin
½ Teaspoon of Worcester Sauce
2 Teaspoons of Oil
COOKING INSTRUCTIONS:
Lightly fry all vegetables, seasoning with salt, Worcester sauce and cumin. Crumble
the tuna and mix with the vegetables. Simmer for 3 minutes. Fill in the turnovers with
approximately 2 tablespoons of tuna fish filling and follow the instructions from 5 to 14.
7
“CARNE MECHADA” (MEAT FILLING) TURNOVERS
INGREDIENTS:
1 Kilo of Flank Meat, cut into medium 1 Whole Onion
sized pieces
2 Cups of Tomatoes, finely minced
1 Whole Red Pepper
2 Cups of Red Pepper, finely minced
1 Cup of Onion, finely minced
3 Cloves Garlic
3 Sweet Peppers, finely minced
1 Teaspoon of Salt
¼ Tablespoon of Oil
½ Teaspoon of Pepper
1 Teaspoon of Worcester Sauce
½ Teaspoon of Cumin
½ Teaspoon of Color
COOKING INSTRUCTIONS:
Cook the meat in salted water with a whole onion and a whole red pepper. Cook until
fork-tender. Allow to cool down and separate one cup of broth. Shred the meat finely. Fry
lightly the tomatoes, onion, red pepper, sweet peppers and garlic in oil and add shredded
meat. Add the remaining condiments. Add one-cup of broth and let it cook for 10 minutes.
“CARNE MOLIDA” (MEAT FILLING) TURNOVERS
INGREDIENTS:
1 Kilo of Ground Beef
3 Tomatoes, finely diced
1 Large Onion, chopped
1 Red Pepper, finely minced
2 Sweet Pepper, finely minced
3 Cloves of Garlic
1 Teaspoon of Salt
1 Teaspoon of Worcester Sauce
½ Teaspoon of Cumin
1 Teaspoon color
COOKING INSTRUCTIONS:
In a blender, blend tomatoes, onion, red pepper, sweet pepper and garlic together with
two spoons of water. Mix with the ground meat. Add salt, Worcester sauce, cumin and
color. Cook and let it dry for a few minutes.
8
PR E C A UC I ON E S I M P O RTAN TE S
Cuando se utilicen artefactos eléctricos deben seguirse siempre las precauciones
básicas de seguridad incluyendo las siguientes:
1. LEA TODAS LAS INSTRUCCIONES ANTES DE UTILIZAR EL APARATO PARA
PREPARAR EMPANADAS TOSTY® EMPANADA OSTER®.
2. Antes de enchufar el artefacto, asegúrese de que el voltaje de su tomacorriente
sea igual al voltaje que aparece en la etiqueta de especificaciones de su
electrodoméstico.
3. Para protegerse contra el riesgo de descargas eléctricas, NO sumerja el artefacto en
agua ni en otros líquidos.
4. NO toque las superficies calientes . Utilice las asas y use siempre guantes de
horno para manipular materiales calientes. Tome en cuenta que, con el fin de dejar
salir el vapor, las superficies de las placas quedan expuestas a los lados de la unidad
y por lo tanto se calientan.
5. Desenchufe la unidad del tomacorriente cuando no esté en uso y antes de limpiarla.
Deje que se enfríe antes de limpiar o guardar este electrodoméstico.
6. Nunca tire del cable para desenchufar el aparato del tomacorriente. Para
desconectarlo, sujete el enchufe y hale hacia usted para sacarlo del tomacorriente.
7. NO haga funcionar este ni ningún electrodoméstico si el cable está dañado. NO use
el electrodoméstico si la unidad presenta fallas o si ha sufrido algún tipo de daño. A
fin de evitar el riesgo de descargas eléctricas, NUNCA intente reparar la unidad usted
mismo. Llévela a un centro de servicio autorizado para su inspección y reparación.
Reensamblar el aparato de forma incorrecta podría producir riesgos de descargas
eléctricas al utilizarlo.
8. El fabricante desaconseja el uso de piezas de reemplazo o accesorios ya que éstos
pueden ocasionar incendios, descargas eléctricas o lesiones personales.
9. NO utilice en exteriores ni para fines comerciales.
10.NO utilice este electrodoméstico para fines distintos de aquellos para los cuales fue
diseñado.
11.NO deje que el cable eléctrico cuelgue del borde de la mesa o del mostrador ni que
entre en contacto con superficies calientes.
12.NO coloque el aparato cerca o sobre un quemador caliente, ya sea de gas o
eléctrico, ni dentro de un horno caliente o de microondas.
13.Utilícelo únicamente sobre una superficie plana resistente al calor.
14.NO haga funcionar la unidad en la posición abierta.
15.Al utilizar este artefacto eléctrico, asegúrese de que no haya materiales inflamables
cerca de él, tales como cortinas, papeles, plásticos, etc.
16.NO coloque ningún artículo sobre el electrodoméstico mientras esté en
funcionamiento.
17.NO forre la unidad con papel de aluminio. Esto ocasionará que el artefacto se
sobrecaliente. NO coloque materiales inflamables sobre la unidad ni cerca de ella,
tales como papeles, cartones o plásticos, ni cualquier material que pueda incendiarse
o derretirse.
18.Al utilizar este electrodoméstico, cerciórese de que haya un espacio libre adecuado
en todos los costados para que el aire pueda circular.
19.Use únicamente con un tomacorriente de pared.
20.NO descuide el electrodoméstico mientras esté en uso.
21.Deje que la unidad se enfríe por completo antes de enrollar el cable alrededor de
ésta.
9
22.Este artefacto eléctrico no está destinado para ser usado por personas (incluyendo
niños) cuyas capacidades físicas, sensoriales o mentales estén disminuidas, o
carezcan de experiencia y conocimiento, a menos que una persona responsable por
su seguridad les haya supervisado o instruido en el uso de este electrodoméstico.
Los niños deberán estar bajo supervisión para cerciorarse de que no jueguen con el
artefacto eléctrico.
23.Se requiere estricta supervisión cuando las personas discapacitadas o los niños
utilicen cualquier electrodoméstico o estén cerca de él.
ESTA UNIDAD ESTÁ DISEÑADA SÓLO PARA USO DOMÉSTICO.
(Únicamente para productos de 120 y 127 voltios con dos clavijas planas)
Este artefacto eléctrico cuenta con un enchufe polarizado (una clavija es más ancha que
la otra). Para disminuir el riesgo de descargas eléctricas, este enchufe entrará sólo de
una manera en un tomacorriente polarizado. Si el enchufe no entra por completo en el
tomacorriente, inviértalo. Si aún no encaja, comuníquese con un electricista calificado.
NO MODIFIQUE EL ENCHUFE DE NINGUNA FORMA.
CONSERVE ESTAS INSTRUCCIONES
10
DE SC RI PCIÓN DEL ARTEFA C TO
1
2
3
4
1. Luces indicadoras - There are two Indicator Lights:
Roja: indica que el electrodoméstico está enchufado en una fuente de
alimentación eléctrica.
Verde: se ilumina al girar el temporizador hacia la derecha e indica que ha
comenzado el proceso de calentamiento. Cuando el temporizador
llegue a la posición cero sonará una campanilla. Una vez que
la luz indicadora verde se apague, las superficies de cocción
comenzarán a enfriarse.
2. Temporizador - El temporizador de 14 minutos de duración activará el
proceso de calentamiento y también funcionará como cronómetro de cuenta
regresiva. Cuando el temporizador llegue a la posición cero las superficies
de cocción ya no calentarán.
3. Seguro de la tapa - El seguro de la tapa garantiza que la unidad quede
bien cerrada. Esto le permitirá mantener la temperatura adecuada y
garantizar una cocción uniforme.
5. Superficies de cocción antiadherentes - Las superficies de cocción
antiadherentes pueden preparar 4 empanadas de cada vez y permiten que
sea fácil sacarlas y además facilitan la limpieza.
11
Instruciones para el funcionamiento
ANTES DE USAR POR PRIMERA VEZ
Antes de usar por primera vez, saque todas las etiquetas, rótulos y materiales de
empaque. También es importante que limpie y cure las superficies de cocción:
• Teniendo desenchufado el electrodoméstico, limpie las superficies de cocción con un
paño o esponja humedecida en agua tibia jabonosa. NO SUMERJA LA UNIDAD EN
AGUA. Enjuague las superficies de cocción utilizando un paño o una esponja húmeda
y frótelas para secarlas.
• Para curar las superficies de cocción, enchufe el electrodoméstico en un
tomacorriente. La luz indicadora roja se encenderá. Aplique una pequeña cantidad de
mantequilla o margarina sobre las superficies de cocción; frótela ligeramente y elimine
cualquier excedente.
• Cierre la tapa con seguro.
• Gire el temporizador de 14 minutos a la mitad para ajustarlo a 7 minutos. La luz
indicadora verde se encenderá.
• Cuando el temporizador se apague la unidad emitirá un sonido y la luz indicadora
verde se apagará. Desenchufe la unidad del tomacorriente eléctrico y deje que se
enfríe por completo.
Nota: al utilizar su electrodoméstico por primera vez quizás observe una fina bruma de
humo proveniente del artefacto. Esto es normal. Se debe al calentamiento inicial
de los componentes internos.
PRECALENTAMIENTO
1.Cure las superficies de cocción utilizando un poco de
mantequilla o aceite de cocinar.
2.Enchúfelo en un tomacorriente adecuado. La luz
indicadora roja se encenderá.
3.Cierre la tapa con seguro.
4.Gire el temporizador hacia la derecha hasta la mitad, en
la posición equivalente a 7 minutos, para precalentar la
unidad. La luz indicadora verde se encenderá.
5.Deje que la unidad se precaliente sin nada adentro durante 7 minutos.
6.Cuando el temporizador se apague la unidad emitirá un sonido y la luz indicadora
verde se apagará.
COCCIÓN
1.Cuando la unidad esté precalentada, abra la tapa.
2.Coloque hasta 4 empanadas en la superficie de cocción inferior.
3.Cierre la tapa con seguro.
4.Si desea preparar más de 4 empanadas, gire el temporizador totalmente hacia la
derecha para ajustarlo a 14 minutos. Cuando el temporizador llegue a la mitad, es
decir, cuando hayan transcurrido 7 minutos, abra la tapa para sacar las empanadas.
NOTA: si sólo desea preparar un máximo de 4 empanadas, gire el temporizador
únicamente hasta la mitad, para ajustarlo a 7 minutos.
12
5.Coloque la segunda tanda de empanadas que desee preparar (hasta 4), cierre la
tapa con seguro y deje que el cronómetro de cuenta regresiva vaya de 7 a 0. Siga
preparando tantas tandas de empanadas adicionales como desee.
6.Cuando haya terminado de cocinar, desenchufe la unidad y deje que se enfríe por
completo. Si el temporizador no se encontraba en la posición inicial, seguirá contando
hasta cero, incluso después de que haya desenchufado la unidad.
MANTENIMIENTO Y LIMPIEZA
Lea todas las Precauciones importantes antes de limpiar este electrodoméstico. La
unidad no requiere mantenimiento interno y deberá llevarlo a un centro de servicio
autorizado si fuera necesario repararlo.
• Desenchufe la unidad antes de limpiarla y cuando no esté en uso.
• Limpie las superficies de cocción con un paño suave humedecido en agua tibia.
• Si desea limpiar residuos de alimentos adheridos a las placas de cocción, utilice un
paño suave con aceite mientras las superficies de cocción todavía estén tibias.
• Las superficies de cocción poseen un revestimiento antiadherente. Los estropajos de
metal u otros limpiadores abrasivos pueden dañar dicha superficie.
• Para limpiar el exterior de la unidad, simplemente frótela con un paño húmedo y
séquela puliéndola con un paño suave y seco.
• Almacene el artefacto en un lugar fresco y seco.
RECETAS Y PREPARACIÓN DE EMPANADAS CON EL APARATO PARA PREPARAR
EMPANADAS TOSTY® EMPANADA OSTER®
Ingredientes sugeridos:
• Harina de maíz o de trigo
• Agua
• Sal
• Aceite
Materiales y utensilios sugeridos:
• Tazón
• Tabla de picar
• Dos láminas de plástico para envolver/bolsa plástica limpia
• Molde que acompaña su aparato para preparar empanadas
• Espátula
• Plato para servir
Consejo: se recomienda aceitar el plástico para extender la masa, a fin de evitar que se
pegue y hacer más fácil su manipulación.
1. Para preparar la masa coloque en el tazón 2/3 de taza (400
ml) de agua del grifo. Añada 1 cucharadita (5 ml) de sal e
incorpore lentamente de 10 a 12 onzas (280 a 320 g) de
harina de maíz; amase hasta que quede homogénea y firme.
Divida la masa en 4 porciones redondas, de 1,5 pulgadas (4
cm) cada una.
2. Coloque una de las porciones de masa sobre el plástico
previamente aceitado. Cúbrala con la otra lámina de plástico
para envolver y luego, utilizando la tabla de picar, aplástela
hasta lograr la forma de una tortilla del espesor deseado.
13
3. Retire la tabla de picar y el plástico superior antes de
empezar a rellenar.
4. Levante la masa sujetando los bordes del plástico inferior
y colóquela sobre el molde que viene con su aparato para
preparar empanadas.
5. Levante ligeramente uno de los lados del molde y rellene
utilizando el relleno de su preferencia (aproximadamente
2 cucharadas). Evite colocar demasiado relleno para
garantizar que su empanada quede bien sellada.
6. Cierre el molde presionándolo bien para cortar el excedente
de masa y asegurarse así de que la empanada quede
sellada.
7. Abra el molde y retire el excedente de masa del borde. Si
fuera necesario, selle manualmente cualquier parte de la
empanada que no haya quedado debidamente sellada.
8. Saque la empanada del molde con cuidado y resérvela.
Repita los pasos del 2 al 8 para preparar todas las
empanadas que desee.
9. Abra el aparato para preparar empanadas Oster®
levantando el seguro de la tapa.
10.Limpie las superficies de cocción con un paño húmedo. NO
SUMERJA LA UNIDAD EN AGUA NI EN NINGÚN OTRO
LIQUIDO. Séquelas y cure las superficies de cocción
utilizando un poco de aceite de cocinar, mantequilla o
margarina (no use aerosoles para cocinar a fin de evitar
dañar el recubrimiento antiadherente). Frótelas ligeramente
y elimine los excesos.
11.Cierre la unidad con seguro y enchúfela en el tomacorriente.
La luz indicadora roja se encenderá. Para encender el
electrodoméstico, gire la perilla del temporizador a la
posición de inicio para precalentarlo por 7 minutos antes
de colocar las empanadas.
La luz indicadora verde se
encenderá para indicar que ha comenzado el proceso de
calentamiento.
12. Cuando la unidad se haya precalentado por 7 minutos,
coloque cuidadosamente la cantidad de empanadas que
desee preparar al mismo tiempo (máximo 4 en cada tanda).
Cierre la tapa con seguro y gire la perilla del temporizador a
la posición de 7 minutos
Sus empanadas estarán listas
en 7 minutos. Dependiendo de los resultados deseados,
quizás deba incrementar el tiempo de cocción para que
queden más doradas.
PRECAUCIÓN: NO TOQUE LAS SUPERFICIES DE COCCIÓN YA QUE ESTARÁN
MUY CALIENTES.
13.Cuando estén listas las empanadas, abra la tapa y sáquelas utilizando un utensilio
o una espátula resistente al calor y de un material que no raye la superficie. Tanto
las empanadas como las superficies de cocción estarán CALIENTES; para prevenir
quemaduras, no las toque.
Si desea preparar una nueva tanda de empanadas, repita los pasos del 12 al 13
inmediatamente para evitar que las placas se enfríen.
14.Después de que haya terminado de usar el artefacto, desenchúfelo del
tomacorriente. NO enrolle el cable en las bisagras metálicas de la parte posterior de
la unidad.
14
RECETAS DE RELLENOS PARA EMPANADAS
Prepare la masa siguiendo las instrucciones descritas anteriormente en los pasos 1 al 4,
o use su propia receta.
EMPANADAS DE QUESO
INGREDIENTES:
½ taza (¼ de libra) de queso blanco rallado
o cualquier otro queso rallado de su preferencia
MODO DE PREPARACIÓN:
Rellene las empanadas con aproximadamente 2 cucharadas de queso y siga las
instrucciones descritas en los pasos 5 al 14.
EMPANADAS CON GUISO DE POLLO
INGREDIENTES:
1 kg de pollo (asado o en brasas)
½ taza de cebolla, pimentón rojo y
1 taza de tomates picados finamente
ajo porro, picados y mezclados
½ taza de vino dulce
¼ de taza de aceite
1 cucharadita de sal
¼ de taza de agua
1 cucharadita de salsa inglesa
1 cucharadita de azúcar
3 cucharadas de aceitunas, picadas
3 cucharadas de pasas
MODO DE PREPARACIÓN:
Sofría ligeramente la cebolla, el pimentón rojo, el ajo porro y los tomates. Añada el pollo
deshuesado y picado en dados. Agregue el vino, el agua, la sal, el azúcar, la salsa
inglesa y cocine todo a fuego lento por 10 minutos. Incorpore las pasas y las aceitunas
y cocine durante 5 minutos más. Rellene las empanadas con aproximadamente 2
cucharadas del guiso de pollo y siga las instrucciones descritas en los pasos 5 al 14.
EMPANADAS DE ATÚN
INGREDIENTES:
1 lata de atún
½ taza de cebolla, pimentón rojo y
1 cucharadita de sal
y tomates, mezclados y picados ½ cucharadita de comino finamente
½ cucharadita de salsa inglesa
2 cucharaditas de aceite
MODO DE PREPARACIÓN:
Sofría ligeramente todos los vegetales, condimentándolos con la sal, la salsa inglesa y el
comino. Desmenuce el atún y mézclelo con los vegetales. Cocine a fuego lento durante
3 minutos. Rellene las empanadas con aproximadamente 2 cucharadas del relleno de
atún y siga las instrucciones descritas en los pasos 5 al 14.
15
EMPANADAS DE CARNE MECHADA
INGREDIENTES:
1 kilo de falda, picada en trozos medianos
1 pimentón rojo entero
1 taza de cebolla, picada finamente
3 dientes de ajo
1 cucharadita de sal
½ cucharadita de pimienta
½ cucharadita de comino
1 cebolla entera
2 tazas de tomates, picados finamente
2 tazas de pimentón rojo, picado
finamente
3 ajíes dulces, picados finamente
¼ de cucharada de aceite
1 cucharadita de salsa inglesa
½ cucharadita de colorante
MODO DE PREPARACIÓN:
Cocine la carne en agua con sal, junto con la cebolla y el pimentón enteros. Cocínela
hasta que pueda desprenderla con un tenedor. Deje que se enfríe y reserve una taza
de caldo. Desmenuce la carne en hebras finas. Sofría ligeramente los tomates, la
cebolla, el pimentón rojo, los ajíes dulces y el ajo en aceite y agregue la carne mechada.
Incorpore los condimentos restantes. Añada una taza de caldo y deje cocinar por 10
minutos.
EMPANADAS DE CARNE MOLIDA
INGREDIENTES:
1 kilo de carne molida
1 cebolla grande, cortada
2 ajíes dulces, picados finamente
1 cucharadita de sal
½ cucharadita de comino
3 tomates picados finamente
1 pimentón rojo picado finamente
3 dientes de ajo
1 cucharadita de salsa inglesa
1 cucharadita de colorante
MODO DE PREPARACIÓN:
En una licuadora mezcle los tomates, la cebolla, el pimentón, los ajíes y el ajo con dos
cucharadas de agua. Revuelva con la carne molida. Añada la sal, la salsa inglesa, el
comino y el colorante. Cocine por unos minutos y deje que se seque.
16
PARA MÉXICO SÓLAMENTE - FOR MEXICO ONLY
TOSTY® EMPANADA OSTER®
MODELO: CKSTYY4995, CKSTYY4995-814
IMPORTADOR: SUNBEAM MEXICANA, S.A. DE C.V.
AV. JUÁREZ No. 40-201,
EX–HACIENDA DE SANTA MÓNICA,
TLALNEPANTLA, ESTADO DE MÉXICO,
C.P. 54050, R.F.C. SME570928G90, TEL. 53660800
PAÍS DE ORIGEN: VENEZUELA
PAÍS DE PROCEDENCIA: VENEZUELA
LEA EL INSTRUCTIVO ANTES DE USAR EL APARATO
CARACTERÍSTICAS ELÉCTRICAS
60 Hz
120 V
1400 W
CONTENIDO: 1 PIEZA
© 2010 Sunbeam Products, Inc. All rights reserved. Distributed by Sunbeam Latin America, LLC,
5200 Blue Lagoon Drive, Suite 470, Miami, FL 33126.
One year limited warranty – please see insert for details.
© 2010 Sunbeam Products, Inc. Todos los derechos reservados. Distribuido por Sunbeam Latin
America, LLC, 5200 Blue Lagoon Drive, Suite 470, Miami, FL 33126.
Garantía limitada de un año – por favor consulte los detalles en el inserto.
www.oster.com
Printed in Venezuela
Impreso en Venezuel
P.N. 138101
CBA -051210