1
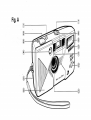
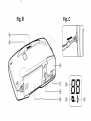
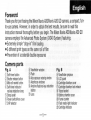
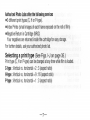
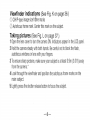
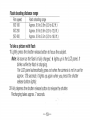
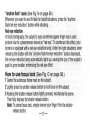
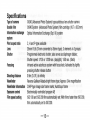
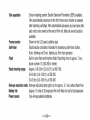
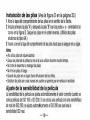
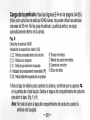
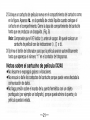
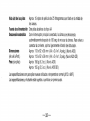
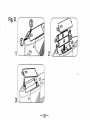
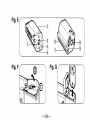
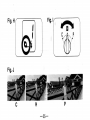
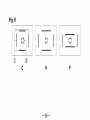
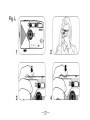
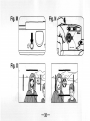
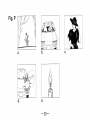
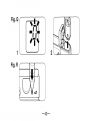
V
?
Nikon Nuvis A20
Instruction Manual
Manual de instrucciones
ACVANCEH)
/
\ P H O T O SYSTEM;
SJH
Fig. A
Fig. B
Fig.C
Contents
English
Espanol
Figs
Nikon Service Warranty
1-15
17-32
33-40
42-46
English
Foreword
Thank you for purchasing the Nikon Nuvis A20/Nuvis A20 QD camera, a compact, funto-use camera. However, in order to obtain the best results, be sure to read this
instruction manual thoroughly before you begin. The Nikon Nuvis A20/Nuvis A20 QD
camera employs the Advanced Photo System (1X240 System) featuring:
• Extremely simple "drop-in" film loading
• 3 different print types on the same roll of film
• Prevention of accidental double exposures
Camera parts
Fig. A
©Self-timer button
© Shutter release button
® Mid-roll rewind button
© Self-timer indicator/
red-eye reduction lamp
© Strap eyelet
© Power switch/lens cover
©CHP selector
©Viewfinder window
© Flash
® Auto exposure metering window
© Autofocus windows
©Anytime flash/red-eye reduction
button
©Lens
Fig. B
® Viewfinder eyepiece
© LCD panel
© Cartridge chamber cover
©Cartridge chamber lock release
©Tripod socket
© Battery chamber cover
@ Frame counter
© Flash ready-light indicator
@ Cartridge indicator
Precautions
• Please make sure you are fully conversant with the operations and features of
your new camera by reading these instructions before using it for special
occasions (holidays, wedding, etc.)
• Do not leave your camera in an excessively hot place; store it in a cool, dry
place. Battery power weakens in extremely low temperatures.
• When not in use, be sure to close the camera's lens cover to turn the power OFF
and keep the camera in a safe place.
• In the event of camera failure, do not attempt to disassemble or repair the
camera yourself. First, replace the batteries. If that dqes not work, take the
camera to your nearest authorized Nikon service center.
Attaching the strap (See Fig. C.)
Thread the wrist strap through the eyelet, then pass the other end through the
loop and pull it tight.
—2—
Installing batteries (See Fig. D on page 33.)
1 To open, pull up the battery chamber cover in the direction of the arrow.
2 Install two AA-size alkaline batteries, with the + and - poles oriented as shown
inside the battery chamber.
3 Push the battery chamber cover back into place until it clicks shut.
Notes
• Do not use NiCd batteries.
• Remove batteries from the camera when not in use for a long time.
• Do not break open or try to recharge batteries.
• Do not throw batteries into the fire.
• Keep batteries out of the reach of children.
• Be sure to replace the batteries with a fresh set if you notice any delays in
recharging flash.
Film speed setting
Correct film speed is automatically set when ISO 100 or ISO 200 film is loaded.
With any film faster than ISO 200, film speed is automatically set to ISO 200
regardless of the actutal ISO rating.
Loading the film (See Figs. E-H on pages 34-35.)
Use only a fresh 1X240 film cartridge. Conventional 35mm film cannot be used.
There is no film leader! Film is automatically thrust and loaded inside the camera.
Fig.E
1X240 film cartridge
Visual Exposure Indication (VEI)
© D: Processed film inside the cartridge
(DO: Unexposed film
© D : Partially exposed film
® Irreversible Processed Indicator (IPI)
©S3: Fully exposed but unprocessed film
©Lightlock Door
©Lightlock Door Drive
©Cartridge Spool
©Data Disk
1 Open the lens cover to turn the camera ON and make sure no Q - appears in the
LCD panel. Slide the cartridge chamber lock release to open the cover. (Figs. F, H)
Note: Do not try to open the cartridge chamber cover while film is loaded.
—4—
2 Insert a fresh film cartridge in the cartridge chamber as shown. Q_ appears in
the LCD panel when the cartridge is inserted in the chamber. Close the cartridge
chamber cover until it clicks shut. (Fig. G)
Note: Check that the VEI shows O before loading. A film cartridge displaying D,
• or Z$ cannot be inserted.
3 Press the shutter release button and the film automatically advances until the
number " 1 " appears in the frame counter.
Notes about 1X240 film cartridge
• Do not disassemble or subject to shock or vibration.
• Be careful not to soil or damage the cartridge contacts, as correct data
communication may be impaired.
• Do not press on the Lightlock Door Drive with a pointed object (e.g. a pen), as
this may open the door and expose the film.
• Do not break the Irreversible Processed Indicator (IPI) on the cartridge, as film
processing and printing may become impossible. Consult your photo lab if IPI
is broken.
—5—
• Do not attempt to rotate the Cartridge Spool with a pointed object (e.g. a
screwdriver). This can expose the film, alter the VEI, or prevent proper use
and/or processing.
• Do not store the film cartridge:
—In direct sunlight, near heating appliances or in a hot place
—Around dirt or dust
—In hot or humid moldy environments
—Near strong magnetic devices
(jirkifiecL
P r o c e s s i n g a n d printing
We recommend bringing your film cartridge to a
photo lab displaying the "Authorized Photo Lab Mark"
sign for processing and printing.
f~Jnoiiofiri£iSni*ia
Authorized Photo Lab Mark
—6—
Authorized Photo Labs offer the following services
• 3 different print types (C, H or P-type).
• Index Prints (small images of each frame exposed on the roll of film)
• Negative Return in Cartridge (NRIC)
Your negatives are returned inside the cartridge for easy storage.
For further details, ask your authorized photo lab.
Selecting a print type (See Figs. l-J on page 35.)
Print type (C, H or P-type) can be changed at any time while film is loaded.
C-type: Vertical vs. horizontal = 2 : 3 (aspect ratio)
H-type: Vertical vs. horizontal = 9 : 1 6 (aspect ratio)
P-type: Vertical vs. horizontal = 1:3 (aspect ratio)
Viewfinder indications (See Fig. K on page 36.)
© C/H/P-type image size fra*me marks
© Autofocus frame mark. Center this mark on the subject.
Taking pictures (See Fig. L on page 37.)
1 Open the lens cover to turn the camera OM. Indicators appear in the LCD panel.
2 Hold the camera steady with both hands. Be careful not to block the flash,
autofocus windows or lens with your fingers.
3 To ensure sharp pictures, make sure your subject is at least 0.9m (3.0 ft) away
from the camera.*
4 Look through the viewfinder and position the autofocus frame marks on the
main subject.
5 Lightly press the shutter release button to focus the subject.
—8—
6 Fully depress the shutter release button to take the picture keeping the
autofocus frame mark on the main subject.
• Pictures can be taken only when the lens cover is open all the way.
*Note: If the camera-to-subject distance is closer than 0.9m (3.0 ft), an
out-of-focus picture may result.
Self-timer operation (See Fig. M on page 38.)
1 Turn the camera ON and press the self-timer button.
2 The self-timer indicator blinks for 8 sec, then lights up for 2 sec. before
the shutter is released.
To cancel self-timer operation, close the lens cover or press the self-timer
button again.
Flash photography
Auto flash mode (default)
The camera determines when flash is needed and fires the flash
automatically. Recommended flash shooting range is as follows:
—9—
Flash shooting distance range
Film speed
ISO 100
ISO 200
ISO 400
Flash shooting range
Approx. 0.9 to 2.8m (3.0 to 9.2 ft.)
Approx. 0.9 to 3.9m (3.0 to 12.8 ft.)
Approx. 0.9 to 5.5m (3.0 to 18.0 ft.)
To take a picture with flash
1 Lightly press the shutter release button to focus the subject.
Note: As soon as the flash is fully charged, H lights up in the LCD panel. It
blinks while the flash is charging.
The LCD panel automatically goes out when the camera is not in use for
approx. 120 seconds; it lights up again when you press the shutter
release button lightly.
2 Fully depress the shutter release button to release the shutter.
Recharging takes approx. 7 seconds.
— 10—
"Anytime flash" mode (See Fig. N on page 38.)
Whenever you want to use fill-flash for backlit situations, press the "anytime
flash/red-eye reduction" button while shooting.
Red-eye reduction
In flash photography, the subject's eyes sometimes appear bright red in color
pictures due to a phenomenon known as "red-eye." To counteract this effect, your
camera is equipped with a red-eye reduction lamp. Under low light situations, when
releasing the shutter with the "anytime flash/red-eye reduction" button depressed,
the red-eye reduction lamp automatically lights up, causing the size of the subject's
pupil to grow smaller, minimizing the red-eye effect.
H o w t o u s e f o c u s lock (See Fig. O on page 38.)
1 Center the autofocus frame mark on the subject.
2 Lightly press the shutter release button to lock focus on the subject.
3 Keeping the shutter release button lightly pressed, recompose the scene.
Then fully depress the shutter release button.
Note: To cancel focus lock, simply remove your finger from the shutter
release button.
Special focusing situations (See Fig. P on page 39.)
The following subjects may be too difficult to focus:
a. Subjects too small to fully cover the autofocus frame mark
b. Subjects behind glass
c. Dark subjects with no reflection
d. Glossy, light-reflecting surfaces, such as shiny cars or water
e. Subjects without solid content (i.e. candle flame, fireworks, etc.)
In the above cases, use focus lock.
Rewinding the film (See Figs. Q-R on page 40.)
1 At the end of the roll, the film starts rewinding automatically.
The frame counter counts backwards until the film is rewound completely.
2 Open the cartridge chamber cover and remove the film after checking that the
number "0" is blinking in the LCD panel.
•You can rewind the film midway through the roll. Press the mid-roll rewind
button. (Fig. R)
— 12—
Specifications
Type of camera
Usable film
Information exchange
system
Print aspect ratio
Lens
Shutter
Focusing
Shooting distance
Viewfinder
Viewfinder information
Exposure control
Film speed setting
1X240 (Advanced Photo System) type autofocus lens-shutter camera
1X240 System (Advanced Photo System) film cartridge (16.7 x 30.2mm)
Optical Information Exchange (Opt. IX) system
C, H and P-type available
25mm f/5.6 (31mm converted to 35mm type); 3 elements in 3 groups
Programmed electronic shutter; also serves as diaphragm blades;
Shutter speed: 1/125 or 1/200 sec. (daylight), 1/50 sec. (flash)
Infrared-active autofocus system with focus lock; Activated by lightly
pressing shutter release button
0.9m (3.0 ft.) to infinity
Reverse Galilean Albada-bright frame type; Approx. 0.4x magnification
C/H/P-type image size frame marks; Autofocus frame
Electronically controlled program AE
ISO 100 and ISO 200 film automatically set; With films faster than ISO 200,
film automatically set to ISO 200.
— 13—
Film operation
Drop-in loading system; Double Exposure Prevention (DEP) available;
Film automatically advances to the first frame when shutter is released
after inserting cartridge; Film automatically advances by one frame after
each shot; Auto rewind at the end of film roll; Mid-roll rewind function
available
Frame counter
Shown in the LCD panel; additive type
Self-timer
Electronically controlled; Activated by depressing self-timer button;
8 sec. blinking and 2 sec. lighting up; One shot operation
Flash
Built-in auto flash and Anytime flash; Recycling time of approx. 7 sec;
Guide number 13 (ISO 200 in meter)
Flash shooting range
Approx. 0.9-2.8m (3.0-9.2 ft.) at ISO 100,
0.9-3.9m (3.0-12.8 ft.) at ISO 200,
0.9-5.5m (3.0-18.0 ft.) at ISO 400
Red-eye reduction mode Red-eye reduction lamp lights up for approx. 0.7 sec. before flash fires
Battery life
Approx. 15 rolls of 25-exposure film with flash for half of all exposures
Power source
Two AA-type alkaline batteries
— 14—
Auto power off
With the power ON, camera power automatically turns OFF after
approx. 120 sec. when the camera is not in use. To turn the power ON
again, lightly press the shutter release button.
Dimensions (WxHxD)
Approx. 113 x 62 x 36mm (4.4 x 2.4 x 1.4 in.) (Nuvis A20)
Approx. 113 x 62 x 39mm (4.4 x 2.4 x 1.5 in.) (Nuvis A20 QD)
Weight (without batteries) Approx. 150g (5.3 oz.) (Nuvis A20) Approx. 155g (5.5 oz.)
(Nuvis A20 QD)
Specifications apply when fresh batteries are used at normal temperature (20 °C or 68 'F).
Specifications and design are subject to change without notice.
— 15—
NOTE: On battery life
Any delays in flash recycling times, indicate the need to replace the batteries. If the flash
ready-light indicator V does not come on, shooting is no longer possible.
As the temperature drops, battery power decreases. In low temperatures, use fresh batteries. If
necessary take the batteries out and keep them warm in a coat pocket or other warm place.
— 16—
Espanol
Prefacio
Muchas gracias por su compra de la camara Nikon Nuvis A20/Nuvis A20 QD, compacta
y divertida de usar. Sin embargo, para que pueda disfrutar al maximo de esta camara
lea todas las instrucciones de este manual antes de empezar a usar la camara.
La camara Nikon Nuvis A20/Nuvis A20 QD utiliza el Sistema fotografico de
adelantada (Sistema 1X240) que tiene las siguientes caracteristicas:
• Carga de pelicula sencilla colocada automaticamente
• 3 diferentes proporciones de imagen en un mismo rollo de pelicula
• Mecanismo para evitar una doble exposicion accidental
Piezas de la camara
Fig. A
© Boton del autodisparador
© Boton del obturador
© Boton de rebobinado en el
medio del rollo
© Indicador del
autodisparador/lampara de
reduction de ojos rojos
© Argolla para la correa
© Interrupter principal/tapa del
objetivo
® Selector de proporciones CHP
Ventanilla del visor
© Flash
Ventanilla del medidor para la
exposicion automata
Ventanillas para el enfoque
automata
Boton de flash en cada fotografia/
reduction de ojos rojos
Objetivo
— 17—
Fig.B
@ Ocular del visor
15 Pantalla de cristal liquido
16 Cubierta de la camara del cartucho
© Liberation del seguro de la camara
del cartucho
® Rosea para tripode
® Cubierta del compartimiento de las pilas
® Contador de fotogramas
© Indicador de flash listo
22 Indicador de cartucho
Precauciones
• Asegurese de que entiende perfectamente el f uncionamiento y las caracteristicas
de su nueva camara leyendo estas instrucciones antes de utilizarla para una
ocasion especial (para sus vacaciones, para un casamiento, etc.)
• No deje su camara en un lugar muy caliente, guardela siempre en un lugar seco
y a la sombra. La corriente de las pitas se debilita a temperaturas muy bajas.
• Cuando no se esta utilizando, cierre la tapa del objetivo de la camara para
desconectar la camara y guarde la camara en un lugar seguro.
• En el caso de que la camara no funcione, no trate de desarmarla o reparar la
camara por su cuenta. Pruebe a cambiar primero las pilas. Si no se soluciona el
problema, lleve la camara al centra de servicio autorizado de Nikon mas
cercano.
Colocacion de la correa (Vea la figura C.)
Pase la munequera por la argolla y pase la otra punta por el bucle, apretando
firmemente el nudo.
— 18—
Instalacion d e las pilas (Vea la figura 0 en la pagina 33.)
1 Abra la tapa del compartimiento de las pilas en el sentido de la flecha.
2 Instale primero la pila "A" y despues la pila "B" con los polos + y - orientados tal
como en la figura D. Saque las pilas en el orden inverso. (Utilice dos pilas
alcalinas de tipo AA.)
3 Vuelva a cerrar la tapa del compartimiento de las pilas hasta que se asegure en su lugar.
Notas
• No utilice pilas de niquel-cadmio.
• Saque las pilas de la camara si no se la va a utilizar durante mucho tiempo.
• No trate de desarmar o recargar las pilas.
• No tire las pilas al fuego.
• Guarde las pilas en un lugar fuera del alcance de los ninos.
• Sustituir las pilas por unas nuevas en cuanto se aprecie que se retrasa el reciclado.
Ajuste de la sensibilidad de la pelicula
La sensibilidad de la pelicula se ajusta automaticamente al valor correcto cuando se
coloca pelicula de IS0100 o ISO 200. Si se coloca una pelicula con una sensibilidad
de mas de ISO 200, se ajusta automaticamente a ISO 200 sea cual sea la
sensibilidad ISO real.
—19—
Carga de la pelicula (Vea las figuras E-H en la pagina 34-35.)
Utilice solo cartuchos de pelicula 1X240 nuevos. No puede utilizar las peli'culas
comunes de 35 mm. No hay gufa de pelicula. La pelicula entra y se carga
automaticamente dentro de la camara.
Fig. E
Cartucho de pelicula 1X240
Indication de exposition visible (VEI)
© D: Pelicula procesada dentro del cartucho
©Puerta hermetica
©Mando de puerta hermetica
© O : Pelicula sin exponer
©Carrete de cartucho
© D : Pelicula parcialmente expuesta
© Indicadorde procesamiento irreversible (IPI) ©Disco de datos
© tZ: Pelicula totalmente expuesta pero sin procesar
1 Abra la tapa del objetivo para conectar la camara y confirme que no aparece tten la pantalla de cristal liquido. Deslice el seguro del compartimiento del cartucho
para abrir la tapa. (Fig. F y H)
Nota: No trate de abrir la tapa del compartimiento del cartucho cuando la
pelicula esta cargada.
—20—
2 Coloque un cartucho de pelicula nuevo en el compartimiento del cartucho como
en la figura. Aparece Q - en la pantalla de cristal liquido cuando coloque el
cartucho en el compartimiento. Cierre la tapa del compartimiento del cartucho
hasta que se produzca un chasquido. (Fig. G)
Nota: Compruebe que el VEI indica o antes de cargar. No puede colocar un
cartucho de pelicula con las indicaciones D, D oti.
3 Oprima el boton del obturador para que la pelicula avance automaticamente
hasta que aparezca el numero " 1 " en el contador de fotogramas.
Notas sobre el cartucho de pelicula 1X240
• No desarme o exponga a golpes o vibraciones.
• No ensucie o dane los contactos del cartucho porque puede verse afectada la
comunicacion de datos.
• No haga presion sobre el mando de la puerta hermetica con un objeto
puntiagudo (por ejemplo un bolfgrafo), porque puede abrirse la puerta y la
pelicula quedara velada.
—21 —
• No rompa el indicador de procesamiento irreversible (IPI) en el cartucho porque
se volvera imposible de procesar e imprimir las fotografias. Consulte con el
laboratorio fotografico mas cercano si el IPI esta roto.
• No trate de girar el carrete del cartucho con un objeto puntiagudo (por ejemplo
un destornillador). Esto puede exponer la pelicula, modificar el VEI o provocar
una utilization o procesamiento incorrectos.
• No guarde el cartucho de pelicula en un lugar:
—Expuesto a los rayos del sol, calefaccion o lugar caliente.
—Sucio o con polvo
Servicio
—Humedo con moho
Fotografico
—Cerca de aparatos que generen
campos magneticos fuertes
Procesamiento e impresion
Recomendamos llevar el cartucho de pelicula
a un laboratorio fotografico con la "Marca de
laboratorio fotografico autorizado" para su
procesamiento e impresion.
—22—
Servicio de
Fotoacabado
Certificado
Certificado
Marca de laboratorio fotografico autorizado
Los laboratories fotograficos autorizados ofrecen los siguientes servicios
• 3 diferentes relaciones vertical a horizontal (tipos C, H o P).
• Fotogratias fndice (fotos pequenas de cada fotograma expuesto en el rollo de
pelicula)
• Devolution del negativo en el cartucho (NRIC)
Sus negativos se devuelven en el cartucho para facilitar su almacenamiento.
Para mas detalles, consulte con su laboratorio de fotogratias autorizado mas
cercano.
Seleccion de tipo de impresion (Vea las figuras l-J en la
pagina 35.)
Se puede cambiar el tipo de impresion (tipo C, H o P) en cualquier momento
siempre que haya una pelicula cargada.
Tipo C: Vertical a horizontal = 2 : 3 (proporcion de imagen)
Tipo H: Vertical a horizontal = 9 : 1 6 (proporcion de imagen)
Tipo P: Vertical a horizontal = 1:3 (proporcion de imagen)
—23—
I n d i c a c i o n e s e n el visor (Vea la figura K en la pagina 36.)
(UMarcas de encuadre del tamafio de la imagen para los tipos C/H/P
® Marca de zona de enfoque automatico. Apunte esta marca sobre su objeto.
Para t o m a r fotografias (Vea la figura L en la pagina 37.)
1 Abra la tapa del objetivo para co'nectar la camara. Aparecen las indicaciones de
la pantalla de cristal liquido.
2 Sujete firmemente la camara con ambas manos. Tenga cuidado de que no esta
tapando el flash, las ventanillas de enfoque automatico o el objetivo con sus
dedos.
3 Para que las fotografias sean mas nitidas, verifique que el objeto esta alejado
por lo menos 0,9 m (3,0 pies) de la camara.*
4 Mire por el visor y apunte hacia el objeto principal para que quede dentro de las
marcas de zona de enfoque automatico.
5 Oprima ligeramente el boton del obturador para enfocar sobre el objeto.
6 Oprima el boton del obturador hasta el fondo para tomar la fotografia,
manteniendo la marca de zona de enfoque automatico sobre su objeto principal.
—24—
• Se pueden tomar fotografias solo cuando la tapa del objetivo esta totalmente abierta.
* Nota: Si la distancia entre la camara y el objeto es de menos de0,9m (3,0
pies), la imagen puede aparecer desenfocada.
Funcionamiento del autodisparador (Vea la figura M en la
pagina 38.)
1 Conecte la camara y oprima el boton del autodisparador.
2 Destella la luz indicadora del autodisparador durante 8 seg. y se enciende
durante 2 seg. antes de levantarse el obturador.
Para cancelar la funcion del autodisparador, cierre la tapa del objetivo o vuelva a
oprimir el boton del autodisparador.
Fotograffa c o n f l a s h
Modo del flash automatico
La camara determina las circunstancias que hacen necesario el disparo del flash y
hace que destelle automaticamente. Las distancias maximas recomendadas para
el uso del flash son las siguientes:
—25—
Distancias maximas para la totografia con flash
Sensibilidad de la pelicula
IS0100
ISO 200
ISO 400
Distancia de la fotografias con flash
Aprox. 0,9 a 2,8 m (3,0 a 9,2 pies)
Aprox. 0,9 a 3,9 m (3,0 a 12,8 pies)
Aprox. 0,9 a 5,5 m (3,0 a 18,0 pies)
Para tomar fotografias con flash
1 Oprima ligeramente el boton del obturador para enfocar Sobre el objeto.
Nota: Cuando termine de cargarse el flash se enciende H en la pantalla de
cristal liquido. Destella mientras se esta cargando el flash.
La pantalla de cristal liquido se apaga automaticamente cuando no se
utiliza la camara durante unos 120 segundos; se vuelve a encender
cuando oprima ligeramente el boton del obturador.
2 Oprima el boton del obturador hasta el fondo para tomar la fotograffa. Demorara
unos 7 segundos en cargarse.
-26-
Modo de destello del flash en cada fotografia (Vea la figura N en la pagina 38.)
Si desea utilizar el flash de relleno en el caso de que el objeto este iluminado por
atras, oprima el boton de "flash en cada fotografia/reduccion de ojos rojos" mientras
hace la fotografia.
Reduccion de ojos rojos
En la fotografia con flash, los ojos de las personas fotografiadas aparecen, a veces,
con un color rojo brillante, en las fotografias en color debido a tin fenomeno
conocido como de "ojos rojos". Para evitar este efecto, su camara tiene una lampara
de reduccion de ojos rojos. Cuando la escena esta mal iluminada, al levantarse el
obturador con el boton de "flash en cada fotografia/reduccion de ojos rojos"
oprimido, se enciende automaticamente la lampara de reduccion de ojos rojos,
haciendo que disminuya el tamano de la pupila del objeto, reduciendo asi el efecto
de ojos rojos.
Forma de utilizar el bloqueo del enfoque (Vea la figura O en la
pagina 38.)
1 Apunte el objeto principal para que quede denjro de las marcas de encuadre del
enfoque automatico.
2 Oprima ligeramente el obturador para que se bloquee el enfoque sobre el objeto.
—27—
3 Mantenga presionado ligeramente el disparador y vuelva a componer la escena. A
continuation, presione el disparador hasta el fondo.
Nota: Para cancelar el bloqueo del enfoque, simplemente levante el dedo del
disparador.
Situaciones de enfoque especiales (Vea la figura P en la
pagina 39.)
Los siguientes objetos pueden no poder enfocarse bien:
a. Objetos demasiado pequenos como para llenar las marcas del encuadre del
enfoque automatico
b. Objetos que estan detras de un vidrio
c. Objetos oscuros que no reflejan la luz
d. Objetos brillantes, que reflejan mucho la luz, porejemplo un coche lustrado o
el agua.
e. Objetos no solidos (por ejemplo la llama de una vela, fuegos artificiales, etc.)
En estos casos, utilice el bloqueo del enfoque.
—28—
Rebobinado de la pelicula (Vea las figuras Q-R en la pagina 40.)
1 Al final del rollo, la pelicula empieza a rebobinar automaticamente. El contador de
fotogramas retrocede hasta que la peliculas se haya rebobinado completamente.
2 Abra la tapa del compartimiento del cartucho y saque la pelicula despues de
confirmar que el numero "0" esta destellando en la pantalla de cristal liquido.
• Se puede rebobinar la pelicula en la mitad del rollo. Oprima el boton de
rebobinado en el medio del rollo. (Fig. R)
NOTA: Vida util de las pilas
Cuando el tiempo de reciclado del flash demora demasiado tiempo, se deben cambiar las
pilas. Si no se enciende el indicador de flash preparado V, ya no es posible seguir utilizando
los destellos del flash.
Cuando la temperatura ambiente baja, disminuye la carga de las pilas. Cuando hace mucho
frio, utilice pilas nuevas. Si fuera necesario, saque las pilas y guardelas en un lugar caliente,
en el bolsillo del saco u otro lugar que permita mantenerlas a una temperatura alta.
—29—
Especificaciones
Tipo de camara
Camara de tipo 1X240 (Sistema fotografico de adelantada) con enfoque
automatico y obturador en el objetivo.
Pelicula que puede
Cartucho de pelicula del sistema 1X240 (Sistema fotografico de adelantada)
utilizar
(16,7x30,2 mm).
Sistema de intercambio Sistema de intercambio de informacion optica (Opt. IX).
de informacion
Relation vertical a horizontal Existen los tipos C, H y P
Objetivo
25 mm f/5,6 (tipo 31 mm convertido a 35 mm); 3 lentes en 3 grupos
Obturador
Obturador electronico programado; tambien actua como hojas de diafragma;
Velocidad de obturation: 1/125 o 1/200 seg. (de dia), 1/50 seg. (flash).
Enfoque
Sistema de enfoque automatico por infrarrojos activo con bloqueo del
enfoque; se activa al oprimir ligeramente el boton del obturador.
Alcance
0,9 m (3,0 pies) a infinito
Tipo Galileo inverso, con pantalla brillante Albada; Aumento de aprox. 0,4x
Visor
Informacion del visor
Marcas de encuadre de tamafio de imagen en los tipos C/H/P; marca de zona
de enfoque automatico.
Control de exposicidn
Programa de exposition automata con control electrfjnico
—30—
Ajuste de sensibilidad
de la pelicula
Se ajusta automaticamente para peli'culas ISO 100 e ISO 200; con
peliculas mas sensibles que ISO 200, la pellcula se ajusta
automaticamente a ISO 200.
Funciones de la pelicula Sistema de carga mediante cofocacion; exlste la prevention de dobles
exposiciones (DEP); la pelicula avanza al primer fotograma al colocar el
cartucho y oprimir el boton del obturador; la pelicula avanza automaticamente
un fotograma despues de cada toma; rebobinado automatico al final del rollo de
pelicula; se puede rebobinar en la mitad del rollo.
Contador de fotogramas Aparece en la pantalla de cristal liquido, tipo cuenta progresiva
Autodisparador
Controlado electronicamente; se activa al oprimir el boton del
autodisparador; destella 8 seg. y se enciende 2 seg.; funciona una vez.
Flash
Flash automatico y flash en cada fotografia incorporado; tiempo de
reciclado en unos 7 seg.; numero guia 13 (para ISO 200 en metros)
Alcance del flash
Aprox. 0,9 - 2,8 m (3,0 - 9,2 pies) a ISO 100,0,9 - 3,9 m (3,0 -12,8
pies) a ISO 200, 0,9 - 5,5 m (3,0 -18,0 pies) a ISO 400.
Modo de reduction
La lampara de reduccion de ojos rojos se enciende durante 0,7 seg. antes
de ojos rojos
del destello del flash
—31 —
Vida util de las pilas
Aprox. 15 rojos de pelicula de 25 fotogramas con flash en la mitad de
los casos.
Fuente de alimentation Dos pilas alcalinas de tipo AA
Desconexion automalica
Con el interruptor principal conectado, la camara se desconecta
automaticamente despues de 120 seg. de no usar la camara. Para volver a
conectar la corriente, oprima ligeramente el boton del obturador.
Dimensiones
Aprox. 113 x 62 x 36 mm (4,4 x 2,4 x 1,4 pulg.) (Nuvis A20)
(An.xAl.xProf.)
Aprox. 113 x 62 x 39 mm (4,4 x 2,4 x 1,5 pulg. (Nuvis A20 QD)
Peso (sin pilac)
Aprox. 150 g (5,3 oz.) (Nuvis A20)
Aprox. 155 g (5,5 oz.) (Nuvis A20 QD)
Las especificaciones son para pilas nuevas utilizadas a temperatura normal (20'C o 68'F).
Las especificaciones y el diseno estan sujetos a cambios sin previo aviso.
—32—
Fig. D
—33—
Fig.E
Fig- F c
-34-
Fig.H
Fig. 1
[w J
Fig. J
*t * M
^HP
H
—35—
Fig. K
-36—
Fig. L
2K /
r
^
_ \
4
-37—
]
o«ZM
.w^lll
Fig. M
Fig. N
Fig.O
JpfF
(J /\]
—38—
/tf^fr*
Fig. P
—39—
-40-
—41 —
[ Nikon S,iris AM
\_Nikon,\uvisAiOQD
Nikon
IMPORTANT NOTICE:
YOU MUST PRESENT THE ATTACHED WARRANTY FORM (PART 1)
TOGETHER WITH PROOF-OF-PURCHASE AND PROOFOFPURCHASE DATE TO OBTAIN WARRANTY SERVICE.
—42—
THIS FORM MUST BE PRESENTED FOR WARRANTY SERVICE
This is your Nikon Inc. One Year Limited
Warranty (valid in the Continental United
States, Alaska, Hawaii, Puerto Rico, U.S. and
U.S. Virgin Islands).
Nikon NuvisAZO
Nikon SurLs AM) QD
YOU MUST PRESENT THIS FORM (PART IJTOGETHER WITH PROOF-OF-PURCHASE AND PROOF-OF-PUR CHASE DATE TO
OBTAIN WARRANTY SERVICE.
This Nikon product is warranted by N i k o n Inc. to be free from defects in materials and workmanship for a period of one (1)
year from the date of purchase. During this period, it this product is found to be defective in materials or workmanship,
Nikon I n c . or its authorized service station will at its option either repair or replace this product without charge
subject to the following limitations and exclusions:
This warranty extends to the original consumer purchaser only and is no! assignable or transferable.
This warranty shall not apply to the following:
1. Any product which has been subject to misuse, abuse, negligence or accident.
2. Any defects or damage directly or indirectly caused by the use of unauthorized replacement parts and/or service performed
by unauthorized personnel.
3. Any batteries.
ALL WARRANTIES IMPLIED BY LAW INCLUDING ANY WARRANTY OF MERCHANTABILITY OR FITNESS FOR A PARTICULAR PURPOSE SHALL BE OF A DURATION OF ONE (1) YEAR FROM DATE OF PURCHASE. THE WARRANTIES HEREIN ARE
EXPRESSLY IN LIEU OF ALL OTHER EXPRESS WARRANTIES 1NCLUDINGTHE PAYMENT OF CONSEQUENTIAL OR
INCIDENTAL DAMAGES FOR THE BREACH OF ANY WARRANTY
Some states do not allow (a) limitations on how long an implied warranty lasts or (b) the exclusion or limitation of
incidental I or consequential damages so the above limitations or exclusions may not apply to you. This warranty gives you
specific legal rights and you may also have other rights which vary from state to state.
In order to obtain performance of the warranty obligatio \, the original
purchaser must return this
warranty and this Nikon product together with proof of
LAST
purchase and proof of purchase date (bill of sale) either
NAME
in person or addressed to the warranty department of
FIRST
N i k o n I n c . , New York headquarters at 1300 Walt Whitman Road.
NAME
Melville, New York 11747-3064, Los Angeles branch at 19601 Hamilton
Avenue, Torrance, California 90502-1309, or any one ol the
authorized service stations at their respective addresses listed
The
rner purcha:
in returning this Nikon product must prepay all postage,
shipping, transportation, insurance and delivery costs
to the repair facility.
I I i M
i I I I I
TJ
I l l l I I I
I I M
I I I M II
•m
I I I I IT
THIS WARRANTY FORM MAY NOT BE REPRODUCED OR COPIED AND
SHALL BE VAUD ONLY WITH PRODUCTS SOLD BY N i k o n i n c .
-43-
Nikon
NikOn
AUTHORIZED SERVICE STATIONS
PnnCjpal-MayLou Grsely
Mmnlain Camera Repair
Principal-Belly Cr.
1Z91BRiveiKM&Me n " C '
HI—
m
Charlotte. NC 28209
Principal-Peler rJicolard
S P -
(7W)l! l 3 L O0i'! H H ' t ""'
rB^TK^r"™"
W U 7 m N b° U ToJ?4KM e '
Sif^y—
Oklahoma City, OK 731
(106) 521-6022
OREGON
AsKCiatM Camera Re,
3101 N.E. Sandy Brvd
(6031 232-5E25
•'"•- M SE
3645 SE 60lh Aue
ssssBriaa
Praicipil-Ted Moszora
(918) 451-1330
Pro Camera Service IfM
PS
i||£f
MASSACHUSETTS
THE AUTHORIZED SERVICE STATIONS LISTED ABOVE ARE SUBJECT TO CHANGE WITHOUT NOTICE.
—44—
Nikon NuvisA20
Nikon NuvisA20QD
Nikon ONE YEAR WORLDWIDE
LIMITED WARRANTY
(Excluding the Continental United States, Alaska, Hawaii,
Puerto Rico, U.S. and U.S. Virgir islands)
Welcome to the worldwide family of Nikon owners.
Your Nikon equipment has been manufactured to the highest quality standards by NIKON CORPORATION, Tokyo, Japan.
This warranty entitles the original consumer to worldwide warranty protection in accordance with the terms and conditions, It affords
the consumer warranty protection outside the continental United States, Alaska. Hawaii, Puerto Rico and the U.S. Virgin Island. Such
warranty coverage is supplemental to and not in lieu of the United States Nikon One Year Limited Warranty which is received by the
customer with the Nikon product.
This Nikon product except for batteries is warranted by NIKON CORPORATION, Tokyo, Japan to be free from defects in
materials or workmanship for a period of one year from the date of purchase. During this period any one of the worldwide repair
facilities listed on the reverse side will repair without charge any parts or assembly of parts found to be defective in materials or
workmanship subject to the following limitations:
1. This warranty extends to the original consumer purchaser only and is nol assignable or transferable.
2. This warranty shall not extend to any product which has been subject to misuse, abuse, negligence, accident or unauthorized repair.
All warranties implied by law including any warranty of merchantability or fitness for a particular purpose shall be of a
duration ot one(1} year from date of purchase. The warranties herein are expressly in lieu of all other express warranties
including the payment of consequential or incidental damages for the breach of any warranty.
No warranties, whether express or implied, including the warranties of merchantability or fitness for a particular purpose
are made by any distributor or dealer of the product herein warranted; nor shall such dealer or distributor be liable for the
payment of any direct incidental or consequential damages.
in order to obtain worldwide service, the consumer should
it product, either in person or addressed tc
Warranty Department of any authorized service repair station listed on the reverse side together with proof of
purchase and this warranty. The original consumer in
returning this product, must prepay all postage, shipping,
transportation, insurance and delivery costs to the repair
facility.
For prompt response of worldwide warranty inquiries,
please direct ah correspondence to:
tt&E I I I I I
II
ESS i i i I ) i i i i ] )
1X3
i
m
M i l
rr I I I 1
i i i i r i i i p<
CD
i I i i r
NIKON CORPORATION
Nikon
—45
PART 2
Nikon SERVICE FACILITIES
Cyprus: K h. Paoasian .
• • I - • • '.»a.Tl* Fk*ay. 945" W a r n e r , Sm Mama CeOei
44 Zelyrou SI.. 175 64 Paled Fakio; Air>ens
TWfenWoKhei Weg 25. 40472 DLBStSBrl
Taikoo S h ^ P t B n t ^ - a a ^ B O M
to. UK. 26-28. H-l 134 Budifiilt
Phone: +36-1 -2.705525
•
Uru(w,t M O D SC.
US.*-: N*0" me
iuimi»tmii*»it«i»i<iwi
F*ior* .91-22-3079284
Pfcone +91-11-6831936
12. J LNei™ Boad. Calcutla-700013
Phone. +91-33-2280091.2285867
380.fficnmondHead. Kinosion Surrey KT2 5PR
Phone. +44-181-541-4440
P 0 Bo. 1686. Tat-Aim 61015
WW* -381-11-4J46652
j ^ ^ , . NIKONCOBPORATNW
£ S m o Sec
Sapporo Saiwce CeiWi
•- if'132Twmn
™ ™ -
M
11-9996804
6-3. NimBhi 1-tlxme. SrwagaM-ku. Tokyo 140-8*01
p n ^ . ^,.3.3773.225!
^
"^
OtUori Bdo,.2F. 1-13, OWonnahi. Chuo-ku. Saepfflo060-0042
Phew+S1-1V23V7B96
pro,,: +81-3-5321-4466
1 Kinrail
Ninontastii Sen™ Canter
,
Nawoaihi FirslBkB. 9F. 2-19. Niwntashi l-cnomB.Cnun*j. Tokyo 10:
IS Puie aoj.. 4F. 2-23-2. Tsuruya-cno. Ksnarjawa-kij. Yokohama 221
Cnugai Tokyo N«o &«_. 6F. 120-17. Maunoucni. Nataku. Nagoya 461
as FologralkHS.
Dr J '^ 7 i J59. i l^rBS.£^^^at,^
KBoazana Service SMbOn
-46-
Karwawa ToVyo Itnjo Bug. 2F. 3-18. Oyaraa-cho. Karaiawa 920HM1
* This Service Warranty is valid for either the Nikon Nuvis A20 or the Nuvis A20 QD, but not for both.
* Esta Garantia de Servicio es valida tanto para la Nikon Nuvis A20 como para la Nuvis A20 QD, pero no
para ambas.
—47—
Note
Nikon
No reproduction in any form of this manual, in whole or in part (except for brief quotation in critical
articles or reviews), may be made without written authorization from NIKON CORPORATION.
Queda prohibida la reproducci6n total o parcial de esta folleto (salvo en lo que se refiere a citas breves
en artfculos o revistas especializadas), sin la autorizacitin escrita de NIKON CORPORATION.
NIKON CORPORATION
FUJI BLDG., 2-3, MARUNOUCHI 3-CHOME,
CHIYODA-KU, TOKYO 100-8331, JAPAN
PHONE: 81-3-3214-5311 TELEX: NIKON J22601
FAX: 81-3-3201-5856


![APSコンパクトカメラの比較テスト結果[PDF形式]](http://vs1.manualzilla.com/store/data/006579504_2-d9432d3d449a5dc4af3b56ecb47906d5-150x150.png)