
1
Nikon
Instruction Manual (Pages 2- 37)
Manual de instrucciones (Paginas 38- 73)
I
I
Foreword
Thank you for purchasing the Nikon Nuvis S 2000 camera.
Your new Nikon camera employs the Advanced Photo System (IX240 system).
The symbol /.!* appears on all Advanced Photo System (APS) format cameras.
Be sure to read this instruction manual thoroughly before use,
and keep it close at hand.
' The Advanced Photo System symbol is a trademark of all IX240 products.
Take some trial shots.
Before taking important pictures, be sure to take a few trial shots first
to fami liarize yourself with the camera and all of its features.
2
Accessories
Check that you have the item shown below before using
yo ur camera.
Attaching the strap
Neck strap AN-L16
Optional accessories
- Camera case CS-L24
(Remote control unit can be stored inside pocket.)
- Remote control unit (1& P 26)
Attach the strap by inserting it through the strap slot and adjust the
length using the lug on the strap as shown.
II
3
Your Nikon camera features:
• Choice of three print types (P, H, C), which can be mixed on the same roll. ~ If. 14-15
P-type (panorama)
Aspect ratio = 1 : 3
•
•
•
•
•
•
4
H-\ype (wide-vis ion)
Aspect ratio = 9 : 16
C-\ype (classic)
Aspect ratio = 2 : 3
The 2x power zoom lens covers the range of focal lengths from 24mm to 48mm. I@':p 15
Title imprinting (ex. "MERRY CHRISTMAS" or "CONGRATULATIONS") on the back of the pictures. '-"""1."""""''''
When the available light is low or the subject is backlit, the camera automatically fires the flash.
Remote-controlled operation (optional) is possible. ~ 26
Photographing subjects as close as DAm (1.3 ft.) is possible. ~ PP. 14 16 27
A slide cover protects the lens, viewfinder window, and LCD panel when the camera is not in use.
Contents
~w~..
................................................................... 2
Accessories ..
........... 3
Your Nikon camera features ............................................................. 4
Camera parts ........ .. . ............................................................ ... 6-7
LCD panel indications ..
. .......... 7
Tips on using the Nuvis S2000 .
...... 8
Getting started
Installing the battery ......................................................................... 9
Checking battery power ................................................. .. ......... 9
Loading the fi lm ...................................... ...................... 10-11
IX240 film cartridge .
. .................. 11
Data recording function ..
. ........... 12
Basic operation
Holding the camera properly................................. . . . ........ 13
Shutter release operation .
. .................. 13
Viewfinder indications .................................................................... 14
Selecting a print type ............................................ .. .............. 14-1 5
Zooming .
.................... . 15
Focusing and shooting.
.... 16-17
Difficult-to-focus subjects ..
......... 17
Battery power saving function ...................................... ...... 17
Removing the film . . . . .................................... 18
Take the exposed fi lm cartridge to a photo lab ............................... 19
................. 19
To rewind the film in mid-roll .
Advanced operation
How to use focus lock............................................ 20
Selecting the flash mode ...................... .................. 21
Auto flash photography.. ................................................... 21
Flash cancel mode ....................... . ......................... 22
Anytime flash mode ..................... . .......................... 22-23
Slow sync flash mode ......................... . ........................ 23
Selecting other modes ..
................................... 24
Red-eye reduction mode .
................................. ......... 25
Remote control photography (optional) ................. .. 26
!~~i~~~~~#i~~;~O~ties .
Setting the date and time .
E
.. . •..• .• .• .• .• .• . •.· •.·•. •.2~~1!
. .................... .................... 30-31
Other information
Troubl eshooting ................................................................. ..... 32-33
Specifications.
. ......
34-35
For safe handling of the camera (WARNING/CAUTION) ......... 36-37
5
Camera parts
.------------------ 6
2
1
2
3
4
5
6
7
8
9
10
11
12
13
14
5 --------------------~
15
16
17
6
Autofocus windows
Flash (I&'P. 21)
Viewfinder window (I&'P 14)
Shutter release button (I&'P. 13)
Zoom buttons (I&'P 15)
Slide cover (power switch) (I&'P.9)
Lens
Remote control reception sensor (I&'P. 26)
Red-eye reduction(I&'P. 25)/ Self-timer
(I&'P. 27)/ AF assist illuminator lamp
Auto exposure metering window
Neck strap slot (I&'P. 3)
Cartridge chamber cover lock release lever (I&'P. 10)
Viewfinder eyepiece (I&'P. 14)
Orange LED (flash/fi lm rewind ing indicator)/
Green LED (in-focus indicator) (I&'P. 14)
~D (m i d-ro ll rewind) button (I&' P. 19)
TITLE (title mode select) button (I&' P. 28)
"'" (language setting) button (I&'P. 28)/
~ (flash mode) button (I&'PP 21-23)/
SEL (date select) button (I&'P 30)
18 PH C selector (I& P. 14)
19 LCD panel
20 DATEbutton (I&PP. 12, 30)
21 , (title select) button (I&P 28)/ MODE
(Red-eye reducti on/Self-timer/Remote control)
button (I&PP 24-27)/ ADJUST (dateadjust)
button (I&P. 30)
22 Cartridge chamber cover (I& P. 10)
23 Tripod socket (I& PP 22, 23, 26, 27)
24 Battery chamber lid (I& P. 9)
13 ----------------~
. -------------- 18
~----~~----- 19
,,'k-----~--- 20
17 --~~----------~~
LCD panel indications
1 Date and time indicator (I& P 12)/
Title recording indicator (I& P. 28)
2 Data recording indicator (I&PP. 12, 28)
3 Low battery power indicator (I&P. 9)
4 Flash mode indicator (I&PP. 21-23)
5 Cartridge indicator (I& P 11 )
6 Frame counter (I&P. 11)
7 Remote control/Self-timer indicator (I&PP 26-27)
8 Red-eye reducti on indicator (I& P. 25)
7
Tips on using the Nuvis S 2000
Camera care tips
- When storing the camera for a long time, remove the battery.
- Close the slide cover to turn the camera off when not in use.
Also once a month, insert a battery and fire the flash several
This prevents accidental release of the shutter and resulting
times to reform its capacitor.
battery drain.
- The Nuvis S 2000 is not a waterproof and therefore should not
Notes on battery
be exposed to rain or saltwater. If water gets on the camera, wipe - Be sure to check battery power when taking important pictures
it off with a dry cloth immediately.
Carry spare batteries when travel ing abroad.
-Do not subject the camera to high temperatures such as those
- Battery power becomes less when the temperature drops below
encountered near a heater or stove or the interior of a car during
DoC (32°F) When taking pictures at low temperatures, keep the
summer.
battery warm. Battery power will recover when the temperature
-Store the camera in a cool , dry, clean place. Do not expose it to
goes back to normal.
chemicals such as camphor or naphthalene. Using a desiccant
Notes on IX240 film cartridge
during storage is recommended.
- Carrying spare IX240 film cartridges is recommended when
-Firing the flash repeatedly makes the battery and camera hot.
traveling abroad where the IX240 film cartridges may not
Allow enough time for them to cool off before taking pictures
be available.
again
- Do not drop the camera or hit it against a hard surface.
-Use a dry, soft cotton cloth or commercially available blower
brush or lens cleaner to remove dirt and smudges.
8 Nikon cannot be held responsible for malfunctions caused by using the Nuvis 52000 in ways not specified in this manual.
Getting started
Installing the battery
Checking battery power
-
..
C
1 click-stops.
Open the slide cover until it
2 Install the battery.
When closing the slide cover, do
not close it too quickly, as thi s
may damage the lens.
eWhen the camera is not used for
approx. 2 minutes, the camera turns off
automatically. (1& P.17)
T Open the battery chamber lid.
T Install one 3V lithium battery
CR2 inside the battery chamber
as shown.
T Close the battery chamber lid
until it clicks shut.
eRemember to reset the date and time
when the battery is rep laced.
(1& PP.30-31)
Check battery power.
T Open the slide cover to turn the
camera on.
eThe lens automatical ly extends out to
the W (wideangle) position and the
flash pops up
elf a low battery power indicator " ClIIII "
does not appear, battery power is full.
elf " ClIIII " bl inks or nothing appears on
the LCD panel, the battery is exhausted
and needs to be replaced.
I
9
Loading the film
'.-,.-,
uu
IlmIill
AUTO
.;
C
~
c..-
1 Open
the slide cover and
check that no cartridge
indicator "IJ" is visible on
the LCD panel.
E -If the number of frames appears on the
LCD panel, a partially exposed cartridge
is already loaded.
-If the letter T ' and the cartridge
indicator "D " appear on the LCD
panel, a cartridge that is fu lly exposed
is loaded and should be removed.
10
(~ P 18)
2 Turn the cartridge chamber
3 Insert a film cartridge in the
Th e cart ri dge cham ber cover locks
automatically after loading . Do not
try to open th e cover until film
rewinding is complete and th e
motor inside th e camera stops.
- Use only IX240 fi lm cartridge. (Regular
35mm fi lm cannot be used.)
- Check that the VEl (Visual Exposure
Indication) shows "0" (unexposed)
before loadi ng. (~ P 11 )
- Close the cartridge chamber cover until
it clicks shut.
cover lock release lever in
the direction of the arrow to
open the cartridge chamber
cover.
cartridge chamber and
close the cover.
IX240 film cartridge
',,"
LILI
,:5
Ii1illill
AUTO
IJ
~
that the available
4 Check
number of frames and" IJ"
appear on the LCD panel.
-I f the number of frames does not appear,
reload the film.
- "E" bli nks if a fully exposed film
cartridge (the VEl shows "83 "), a
partially exposed film cartridge ("D "),
or a processed film cartridge ("0 ") is
inserted.
~
1
Data di sk:---If-~~'"
Lightlock door
Lightlock door drive
Cartridge spool
0 Processed film inside the cartridge'
0 Unexposed film'
~ 0 • ~ >"" ""... """~."" "'m'
4)
2
. •.••. .••.•,
- Available fil m cartridges: 40-exposure,
2S-exposure, and 1S-exposurefil ms.
-I X240 film cartridges do not have a film
leader. The film is automatically pulled
out and set inside the camera.
- The VEl (Visual Exposure Indication)
shows the fou r states of the fi lm.
D Partially exposed film'
0"
Irreversible Processed Indicator
' Visual Exposure Indication (VEl)
Notes on handling IX240 film
cartridges
I
- Do not touch, disassemble or apply
strong physical shock to the Data disk,
Li ghtl ock door or Cartri dge spool.
-Do not break the Irreversible Processed
Indicator. If broken, consult your
nearest photo lab.
-Do not subject the fil mto direct
sunlight, high temperatures near a
heater or stove, dust and humidity,
or a strong magnetic field.
11
Data recording function
o
TITlE
~
(\)
d]
~
MOC~)ATE
SEL
ADJUST
T Press the DATE button.
- The "Year" secti on is displayed and
printed in two digits and the "ti me" is
in 24-hour cycle. The date appearing
in the illustration above shows
"2000, February, 1."
- "- - -" appears when "No recording"
mode is selected.
,
I,
[r a~ ~
~
1
Set your preferred display
mode.
12
ll
! I"TO ~:5:3GD
c'sll
.,.,I"TO ~ I c'sll
rr ~ ~
E
0
(I:""
2 :111
1
uu
:
MOC~)ATE
ADJUST "I
SEL
AUTO
~
- When shooting while "1iilIlil"
appeared on the LCD panel, data on
the LCD panel will be recorded. No
data is recorded when the "- - -"
Year/Month/Day Hour/Minute
No recording
mode is selected.
'n":5
'5
'
''"
uu I:
• -+
~u -+ - - J
- "M" on the LCD panel indicates a
month display, but wi ll not be
imprinted on the back of the pictures.
- Press and hold the DATE button for more
- Ask your photo lab that displays an
than 2 sec. while "- - -" is displayed. The
"Authorized Photo Lab Mark" sign for
display changes in the order indicated:
the location of the recorded data.
Year/Month/Day Month/DaylYear Day/MonthlYear
- When adjusting the date and time,
'nn:;
' _____ :5
, ' nn
5'n"
uu c::
I ~ C
I UU - . . I
I: uu J
refer to "Setting the date and time" on
page 30.
- Press the DATE button to select one of th ree
displays. Each time the button is pressed,
the display changes in the order indicated:
r
r
I
f
•
I
Basic operation
-Keep your elbows against your body
and both hands on the camera as you
press the camera to your face.
- Be careful not to push down the flash
unit when it's in the popped up
position. If the flash is pushed down ,
the orange LED blinks to warn you.
The flash does not fire when the shutter
is released.
Holding the camera
properly
Shutter release
operation
-When holding the camera vertically,
make sure that the flash is on top as
shown.
- To avoid camera shake, hold the
carnera steady.
Lightly press the shutter release button to
achieve focus and exposure and the
green LED will light up While the shutter
release button is depressed lightly, the
focus is locked. (~ P 20)
Press the shutter release button all the
way to release the shutter.
Do not block the lens;-i lash, or
autofocus windows with your
fingers or hair.
II
13
Viewfinder indications
G)Paraliax compensation marks
For close-up shooting at a distance of approx. 04 to 1m (1.3 to 3.3 tt)
@ Autofocus frame mark
Center this mark on the subject.
@ Orange LEO
If lit continuously Flash is ready to fire.
If blinking: Flash is recycling and not to ready to fi re, Fi lm is rewinding, or Flash is
not popped up all the way
@ Green LEO
If lit continuously: Correct focus has been achieved.
If blinking: Correct focus has not been ach ieved or the shooting distance is closer
14 than approx DAm (1.3 ft)
a
Selecting a print type
Usethe PHC selector to select your
desired print type before shooting.
. You can select anyone of three print types
(P, Hor C) by switching thePHC selector
at any time while fi lm is loaded. (~ P 4)
Available picture area differs depending on
the print type selected.
· You can also change the type of print when
ordering extra prints at the photo lab.
CAUTION!
To prevent possible injury to your eye,
hold the camera away from your face
when you operate the PHC selector.
Zooming
Available picture area .
Areas cut aff in the final print differ
depending an the print type (P/H/C)
P-type
(panarama)
Aspect ratio = 1 . 3
H-type
(wide-vision)
Aspect ratio= 9 16
C!:j
l]~l
C-type
(classic)
Aspect ratio = 2
[ ]
Look through the viewfinder
and compose the picture by
pressing the zoom buttons ..
Press the ctJ zoam buttan to. extend the
lens to. 48mm far taking telephata pictures
II
T When the desired image size
has been achieved , remove
your finger from the zoom
button .
- When the camera is nat in use for
approx 2 min , the lens autamatlcal ly
retracts to. the Iilll (wideangle) pasltlOn.
(I@) P 17)
Press the Iilll zaam buttan to. retract the
lens to. 24mm far taking wideangle
pictures.
15
Focusing and shooting
1 Compose the picture.
2 Focus on the subject.
- Center the autofocus frame mark on the
subject.
- To ensure sharp pictures, make sure
your subject is at least approx. DAm
(1.3 ft.) away from the camera.
T Lightly press the shutter release
button.
m
16
- The green LED lights up when focusing
is complete.
If the green LED blinks slowly: the
shutter is locked, because the shooting
distance is less than DAm (1.3 ft.).
If the green LED blinks quickly: the
subject is difficult to focus (ItE P. 17).
In this case, the shutter can be released,
resulting in out-of-focus pictures.
3 Gently depress the shutter
release button all the way to
take a picture.
- If there is not enough light or thesubject is
backlit, theflash fires automatically
(I& PP.21-23)
- After shooting, the number of available frames
is reduced onthe LCD panel one-by-one.
- Pressing the shutter release button with a
jerky motion may cause camera shake.
Close the slide cover to tu rn the camera
power off to save battery power.
Battery power saving
function
Difficult-to-focus subjects:
A~
The following su bjects may be too difficult to focus.
In these cases, use focus lock (~ P . 20) by
focusing on another subject equidistant from the
camera.
B
A Low-contrast subjects such as the blue sky or
highly reflective su rfaces like shiny cars or water.
B Subjects with continuous and repeated
patterns.
e Both near and far subjects present at the same
time within the autofocus frame mark.
o Strongly backlit subjects or those having a
o
bright shiny backg round .
.,
. [J
, ! ~ _ ..~ _ __
.
•
J~'
elm
'.
'.. C,'
~ .
- When the camera is not used for
approx. 2 minutes after opening the
slide cover to turn the power on, the
camera turns off automatical ty to save
battery power. The lens automatically
retracts to the IillI (wideangle) position
and the power tu rns off.
- Press the shutter release button lightly
or any other button to tu rn the camera
back on and the LCD panel will light up
- To avoid accidental battery drain,
remember to close the slide cover to
turn the camera off when not in use.
E
17
Removing the film
'I-'I-'?
LILI
!:
Il1illm
'1-'''''
.,
LILI
C
Il1illm
AUTO ~
1The film starts rewinding
automatically.
eAt the end of the roll of film, film
E
18
rewinds automatically and the frame
counter counts backwards one by one
as the orange LED blinks.
elf you want to remove the fi lm while the
number of available frames still appears
on the LCD panel , rewind the fi lm
midway through the roll. (~ P 19)
Make sure the blinking
3 Open the cartridge chamber
2 "f"
is visible on the LCD
cover and remove the film .
panel.
eWhen the film is completely rewound,
"E"blinks.
elf film rewind stops midway th rough the
roll due to a dead battery, it resumes
automatically as soon as the battery is
replaced.
Do not open the cartridge chamber
cover unti l "E"starts blinking.
eWhen opening the cartri dge chamber
cover, make sure that the camera
bottom faces up, or the cartridge may
fall out.
Take the exposed film
cartridge to a photo lab.
- We recommend bringing your film
cartridge to a photo lab that displays an
"Authorized Photo Lab Mark" sign
above for processing and printing.
- Your negatives are returned inside the
cartridge for easy storage.
-Index prints (small images of each
frame exposed on the roll of film) are
supplied with the negatives.
- For more information, consu lt your
photo lab.
To rewind the film in mid-roll
1 Press the ~IJ button using 2 Remove the film .
the stud on the strap lug or
the point of bali-point pen.
- Once rewinding starts, there is no need
to continue pressing the mid-roll
rewind button.
- When rewinding is complete, "E" starts
blinking. Do not try to open the cover
until "E" starts blinking.
T Open the cartridge chamber
cove r.
T Remove the film .
E
,------Once the film has been removed in
mid-roll , it cannot be used again.
19
Advanced operation
How to use focus lock
When your main subject is not in the center of the frame:
1 Compose the picture.
D
- When the main subject is outside the
autofocus frame mark " [ ] ", the area
behind the subject wil l be in focus.
2 Center
the autofocus frame
3 Recompose the picture
mark on the main subject.
and shoot.
T Lightly press the shutter
release button.
- Make sure that the green LED lights up.
T While depressing the shutter
release button lightly,
recompose the picture.
T Then depress the shutter
release button all the way.
long as the shutter release button ispressed
lightly, focus islocked.
000 not change the camera-to-subject distance
while lightly pressed the shutter release button.
o As
20
Selecting the flash mode
Auto flash photography
The flash automatically fires when the available light is low or the subject is backlit.
~ jg) lbiI
~ ~ MODE DATE
Press the ~ button until the desired
flash mode indicator appears.
- For details, see the reference page of each
flash mode.
A ~TO~ Auto flash
(I&P 21)
l
,
Flash cancel (I&P 22)
~
Anytime flash (I& P 22)
~~j~ ~
Auto flash with slow sync
(I&P.23)
- When the camera power is tu rned off,
the flash mode reverts to auto flash.
'r.r.
UL.I
IlmIill
AUTO
5
L.
~)
1 the
Open the slide cover to turn
camera on .
- When the camera is turned on,
"AUTo fappears on the LCD panel.
Auto flash mode is automatically
activated.
- The camera senses when the available
light is low or the subject is backlit and
automatically fires the flash.
- When " ~ " appears on the LCD panel, the
flash does not fire. In this case, no oragne
LED lights up.
F.-=ll
:"8': ~
'."
2 Checkthat the orange andgreen
LEOs come on then shoot.
- Before shooting with flash, make sure
the subject is within the flash shooting
distance range. Refer to the following
guide (ISO 200)
E
(ill] (24mm) : approx. 0.4 to Sm (1.3 to 16.4 ft.)
C+J (48mm) : approx. 0.4 to 2.8m (1.3 to 9.2 fl.)
- If the orange LED is blinking, the flash is
recycling and the shutter is locked. Lightly
press the shutter release button again after
approx. 6sec. and wait for theorange LED
to light up before shooting.
21
Anytime flash mode
Flash cancel mode
Use this mode to fire the flash intention
11
Press the ~ button until
" ~ " appears on the LCD
panel.
- Since slow shutter speeds are usually
selected in this mode, use a Iripod to
prevent camera shake.
22
2 Compose
the picture and
shoot.
T Lightly press the shutter
release button.
T Make sure the green LED
lights up, then depress the
shutter release button all the
way to take the picture.
1 appears
Press the ~ button until 'T '
on the LCD panel.
Slow sync flash mode
/ly regardless of the available light.
Use this mode to obtain the correct exposure for both the main subject
and background in low-light situations or at night.
~~--------------~
SEL
ADJUST
2 Compose the picture and shoot. 1 Press the ~ button until
2 Compose the picture and shoot. E
T Lightly press the shutter release
button.
T Make sure the orange and green
LEOs light up, then depress the
shutter release button all the
way to take the picture.
T Lightly press the shutter release
button.
T Make sure the orange and green
LEOs light up, then depress the
shutter release button all the
way to take the picture.
- If the orange LED is blinking, lightly
press the shutter release button again
affer approx. 6 sec. and wait for the
orange LED to light up before shooting.
"~~J~ ~"appears
on the LCD
panel.
- Since slow shutter speeds are usually
selected in this mode, use a tripod to
prevent camera shake.
- When the subject is bright, "@"
appears on the LCD panel and flash
does not fire. In this case, no oragne
LED lights up.
-I f the orange LED is blinking, lightly
press the shutter release button again
after approx. 6 sec. and wait for the
orange LED to light up before shooting 23
Selecting other modes
To match your shooting purposes, red-eye reduction, remote control and self-timer modes are selectable.
Cancel (no indication)
~
<D> Red-eye reduction indicator (~ P 25)
1
a
Each time the MODE button is
pressed , the display changes
in the order indicated.
-For detai ls, see the reference page for
each mode.
24
For reducing the "red-eye" effect with flash.
<D>g Remote control indicator (~P
~
For releasing the shutter remotely.
Self-timer indicator (~ P 27)
For includ ing yourself in the picture.
26)
Red-eye reduction mode
In flash photography, the subject's eyes may sometimes appear bright red. To reduce the "red-eye" effect, use this mode.
~
TILE
u
~~ " I
uu
~.~
@
'",0
iiI
.::.
1
lL~rr:::I d J)
~
1
lODE
DATE
SEL ADJUST
I
I
Press the MODE button until
"<0;> " appears on the LCD
panel.
II
2 Compose the picture and
3 Check that the orange and green
- Because the red-eye reduction lamp
lights up for a second before the flash
fires, be careful not to move the camera
or let the subiect move until the flash
fires.
- The red-eye reduction mode is not
recommended when shooting fastmoving subjects.
- If the orange LED is blinking, lightly press
the shutter release button again after
approx. 6 sec. and wait for the orange LED
to light up before shooting.
- To cancel the red-eye reduction mode, press
the MODE button until "0 " disappears
from the LCD panel. This mode cannot
be canceled by turning the power off.
- Red-eye reduction and flash cancel modes
can be set together, but inthis case
25
red-eye reduction cannot be performed.
lightly press the shutter
release button.
LEOs light up before shooting.
Remote control photography (optional)
For releasing the shutter remotely:
r-ro~~~~u-l
the MODE button
1 Place
the camera on a tripod
2 Press
until "<o>li0"appears on
or a secure flat surface.
control extends up to approx.
E - Remote
Sm (164 ft.) while facing the camera. If
the camera-to-subject distance is more
than Sm (164 ft.) away, use the selftimer mode. (~P. 27)
- If the reception sensor on the camera is
exposed to direct sunlight or other
strong light, the remote control wil l not
operate properly.
26
the LCD panel.
- Remote control will be automatically
canceled if not used for more than
approx. 2 minutes or the slide cover is
closed. That means that within 2
minutes after taking the last shots, you
can still continue to shoot remotely.
3 Compose
the picture and
shoot.
.. Aim the remote control unit at
the camera and press the shutter
release button on the unit.
- Thered-eye reduction lamp lights up for
approx. 2 sec. before the shutter is released.
- If the shutter cannot be released with the
remote control, change the battery inside the
remote control unit. (Thelife of the battery is
approx. 10 years.) Visit an authorized Nikon
dealer or service center to change it.
Close-up shooting
Self-timer operation
When you want to include yourself in the picture:
For taking subjects such as close-ups of flowers:
r-------------------~
1
Pres~ the
MODE button until
on the
LCD panel.
" <D>g~ " appears
- Self-timer operation wi ll be automatically
canceled if not used more than approx.
2 minutes or the slide cover is closed.
- Placing the camera on a tripod is
recommended.
2 Compose
the picture and
depress the shutter release
button all the way.
- The red-eye reduction lamp bl inks for
8 sec., then lights up for 2 sec. before
the shutter is released .
- Self-timer operation is canceled alter
shooting.
- To cancel self-timer operation, close
the slide cover.
- When taking subjects within the range of
approx. DA to 1m(1.3 to 3.3 It), compose
the picture with in the parallax compensation
marks. The area IIII as shownabove will
be cut off in the final print.
- When the subject is closer than approx.
DAm (1.3 ft.), the green LED blinks
slowly and the shutter is locked.
-If the subject is very close, the green LED
bl inks qu ickly and the shutter can be
released, resulting in out-of-focus
27
pictures.
E
Title recording function
For imprinting a title on the back of pictures:
~~----~~~--~~
1 "/".
Press the TITLE button until
language and title
E
codes appear on the LCD
panel.
- 3Dtitles are selectable in 12 languages.
28
the language/title
3 Set
codes.
T Press the TITLE button for more
than 2 sec. The title or language
code starts blinking.
T Press the 1-, button to set the
language code. Press the 1
button to set the title code.
Pressing each button continuously
changes the code quickly.
T Press the TITLE button and the
preferred code stops blinking
and appears on the LCD panel.
Then shoot.
- When " I " appears on the LCDpanel,
title recording is possible even when
the date display is activated on the LCD
panel by pressing the DATEbutton.
List of user imprinted
titles
____________
~
I Language provided I I
Code Language
1
2
3
4
5
6
8
9
10
11
12
13
Danish
Finnish
French
German
Italian
Japanese
Norwegian
Portuguese
Spanish
Swedish
British English
American English
~~
________________
~
________
~
__________J
Titles provided for American English
Code Title
01 PARTY
02 BIRTHDAY
03 HAPPY BIRTHDAY
04 FAM ILY
05 FRIEN DS
06 GRADUATION
07 THANK YOU
08 CONGRATULATIONS
09 TRIP
10 VACATION
11 WEDDING
12 HONEYMOON
13 ANN IVERSARY
14 THANKSGIVING
15 SEASON' S GREETINGS
ode Title
16 ROSH HASHANAH
17 HANUKKAH
18 EASTER
19 CHRISTMAS
20 MERRY CHRISTMAS
21 NEW YEAR'S
22 HAPPY NEW YEAR
23 HAPPY HOLI DAY
24 FATHER'S DAY
25 MOTHER' S DAY
26 INDEPENDENCE DAY
27 VALENTIN E'S DAY
28 VICTOR IA DAY
29 CANADA DAY
30 HALLOWEEN
For titles in other language, see the attached "List of Imprinted User Titl e".
• To cancel the title recording function,
press the TITLEbutton and make sure
"I "and language/title codes have
disappeared. The letter "OFF" lights up
for 2 sec. on the LCD panel before
return ing to the date display
I
29
Setting the date and time
o ••
~• . .
~~
.:~~
TI~ ~. ' ·D
~ - t 25
30
Ji?ICl Cl
, T
MODE DATE
ADJUST
J]
I
Entering the setting mode
SEl
2 Setting the "year"
3 Setting the "month"
T Press the SEL (date select)
button for more than
2 seconds,
T Press the ADJUST (date
adjust) button to set the
correct year,
T Press the SEL button. The
- The "year" section starts blinking.
- Each time the ADUST button is pressed.
the number increases by one.
- Pressing the ADJUST button
continuously for more than 2 sec,
changes the number quickly.
1
~
r
"month" section starts blinking.
T Press the ADJUST button to set
the correct month.
T Press the SEL button.
-Repeat procedures 2 and 3 to set the day,
hour and minute,
4 Getting
out of the setting
mode
T Press the SEL button and the
corrected date appears on the
LCD panel.
elf another button is pressed while
setting the date/time, all the previously
set data wi ll be set at thi s time.
e The date appearing in the illustration
above shows "2001 , April , 25."
When the battery is replaced
e Notethat 00
0 00 appears on the LCD
panel when the battery is replaced.
eNo data will be recorded if 00 0 00
appears on the LCD.
e Repeat procedures from 1 to 4 to set the
date and time.
II
31
Troubleshooting
Check the cause of the trouble using the following chart. It may save you a trip to your nearest Nikon service center.
Problem
The shutter cannot be
released.
flash does not fire.
The subject appears out
of focus in the print.
The cartridge chamber
cover does not open.
32
Check this
Ref. page
- If the orange LED blinks when the shutter release button is pressed lightly, the flash is
recycling and the shutter is locked. Remove your finger from the shutter release button and
wait for approx. 6 seconds. Then lightly press the shutter release button again and make sure
the orange LED lights up before reshooting.
-If the green LED blinks slowly, the camera is too close to the subject. Avoid shooting subjects
that are less than approx. D.4m (1.3 ft. ) from the camera.
- If the orange LED blinks when the shutter release button is pressed lightly, the flash is
recycl ing and the shutter is locked. Remove your finger from the shutter release button and
wait for approx. 6 seconds. Then lightly press the shutter release button again and make sure
the orange LED lights up before reshooting.
- Check battery power If the battery is exhausted, replace the battery with a fresh one.
-If the " ~ "mark appears on the LCD panel, the flash will not fire.
- Clean the autofocus windows if dirty.
- To avoid camera shake, gently depress the shutter release button.
- When photographing difficult-to-focus subjects, be sure to center the autofocus frame mark
on the subject, or use focus lock.
-The film is not completely exposed. Take pictures up to the end of the roll, or rewind the fi lm
in mid-roll.
14, 21
14, 16
14,21
9
21-23
6, 13
13
17,20
18, 19
Problem
No indicators appear on
the LCD pan el when the
s ~de cover is opened.
Check this
Ref. page
- The battery was not properly loaded in the battery chamber. Make sure to orient the positive
9
(+) and negative (-) poles correctly.
9
- The battery is exhausted or no battery is installed. Install a new battery.
- If no indicators appear after installing a new battery, the camera is broken. In this case, contact
your nearest Nikon dealer or a camera shop for repair.
The shutter cannot be
released even if the
shutter release button on
th e remote control unit
is pressed .
- You are out of the remote control working range. Move closer to the camera.
- If the remote contro l is exposed to direct sunli ght or other strong light, change the location of
the remote contro l.
- The battery in the remotecontrol is exhausted. Do not attempt to replace the battery you rself,
but go to a Nikon service center.
"
- Press the MODE button once again unti l "<o> g 0" appears on the LCD panel if the remote
controller is not used for more than approx. 2 minutes.
26
26
-
26
A characteristic of electronic camera
In rare cases, when strong static electricity or the like is applied to the camera, the camera may not work properly.
If th is happens, remove the battery. Please note that the date and time must be reset when the battery is replaced,
because settings are erased when the battery is removed. (wP. 30)
33
"7l
Specifications
Type of camera
IX240 (Advanced Photo System) type autofocus AE lens-shutter camera with
Nikon Zoom 24-48mm f/45-8.2 lens
Usable film
IX240 System (Advanced Photo Syslem) film cartridge (16.7 x 30.2mm)
Print aspect ratio
P, Hand C-Iype available
lens
24mm f/45-48mm f/8.2 (30mm-60mm converted 10 35mm type);
5 elements in 5 groups
Shutter
Programmed electronic shutter; also serves as diaphragm blades; Shutter
speeds: 2.510 1/500 sec.
Viewfinder
Real-image zoom viewfinder; frame coverage approx. 85% for H-type printed
image area; approx. 0.32x magnification at 24mm, approx. 0.56x at 48mm;
Viewfinder information
P/H/C-type image size marks with parallax compensalion marks, Aulofocus
frame, Orange LED-Lights up: flash ready; blinks (at 4Hz): flash is recycling;
blinks quickly (at 8 Hz): flash pops up improperly, Green LED-Lights up
complete of focus operation; blinks slowly (at 2 Hz): subject is too close to
a
34
achieve correct focus; blinks quickly (at 8 Hz): subject is difficult to focus,
Orange LED-Blinks (at 4 Hz): film is rewinding.
Focusing
Wide-area passive aulofocus; Activaled by lightly pressing the shutter release
button; Distance range from OAm (1.3 ft) to infinity; Wilh AF assist illuminator
LED (also serves as red-eye reduction lamp)
Focus tock
Focus is locked as long as shutter button is lightly pressed.
Exposure controt
Electronically controlled program AE; Auto exposure range (ISO 200):
EV 6-17 at 24mm, EV 6-18 at 48mm; Flash fires automatically if the available
Iight is low.
Film speed setting
ISO 50, 100,200, 400,800
Film operation
Drop-in loading system; Wrong film loading prevention mechanism; Cartridge
chamber cover lock mechanism
Frame counter
Shown in the LCD panel; Count-down type
Self-timer
Electronically control led; Activated by depressing shutter release button;
10 sec. duration, blinking/ ligting up in 2 steps
Film advance
Film is automatically thrust to the first frame after inserting cartridge; Film
automatically advances by one frame after each shot; Auto rewind at the end of
film roll; Mid-roll rewind function available
Remote control (optional)
Infrared wireless remote control; 2 sec. delay shutter release; Automatically
canceled after 2 min. if not used; Effective range is within approx. 5m (16.4 ft.)
straight in front of the camera; Battery will last for approx. 10 years;
Dimensions (W x Hx D): approx. 60 x 27 x 10 mm (2.4 x 1.1 x 0.4 in.);
Weight (including battery): approx.13g (0.5 oz.)
Built-in flash
Four flash modes avai lable: Auto flash, Flash cancel, Anytime flash, and Slow
sync flash; Flash automatical ly fires when available light is low or subject is
backlit; Flash shooting range: approx. 0.4- 5m (1.3-16.4 ft.) at 24 mm,
approx. 0.4-28 m(1 .3- 9.2 ft.) at 48mm (ISO 200); Shutter release button is
locked during flash charging; Recycling time approx. 6 sec.
Red-eye reduction mode
Red-eye reduction lamp lights up for approx. 1 sec. before flash fires
Battery life
Approx. 10 rolls of 25-exposure film when flash is used for half of exposures.
LCD panel (Power is on)
Frame counter, Flash mode, Red-eye reduction, Self-timer/Remote control
Cartridge, Low battery power, Title/Date/time, Data recording
Power source
One 3V lithium battery CR2
Data recording function
Magnetic recording system; Date/title setting; Date displayed on LCD
panel with five choices: Year/Month/Day, Month/Day/Year,
Day/Month/Year, Hour/Minute, or No recording; 24-hour cycle with no
AM/PM; auto leap year adjustment until 2039; Built-in clock with timing
accuracy within ±90 sec. a month; Power source is same as camera body;
Title recording function: selectable from 30 titles in 12 languages which
can be printed on the back of pictures.
Dimensions (W x H x D)
Approx. 89 x 60.5 x 29 mm (3.5 x 2.4 x 1.1 in.) (with slide cover closed)
Approx. 122.5 x 60.5 x 29 mm (4.8 x 2.4 x 1.1 in) (with slide cover opened)
Weight (without battery)
Approx. 140g (4.9 oz.)
Specifications apply when a fresh battery is used at normal temperature (20°C or 68 OF).
Specifications and design are subject to change without notice.
II
35
For safe handling of the camera
WARNING
- Do not attempt to disassemble, repair, or modify the camera
~
36
yourself, as it houses high-voltage circuitry which can cause an
electric shock. Another reason is that these actions could cause
the camera to malfunction.
- If the camera is dropped and damaged, do not touch any
exposed interior metal parts, as it houses high-voltage circuitry
which can cause an electric shock. Remove the battery and take
the camera to yo ur local Nikon dealer for repair.
-If you detect smoke coming from the camera, stop operati on
immediately and turn the camera off. Let the camera cool off
before removing the battery. Then take the camera to your local
Nikon dealer for repair.
- Do not submerge the camera in water or allow water to splash
on it, as this may cause an electric shock or a fire.
- Do not operate the camera in an environment containing a
combustible gas, as this may cause a fire or explosion.
- Do not look at the sun or a strong light source directly through
the viewfinder, as this may damage your retina, resulting in
permanent eye damage.
- Do not let the strap wind around your neck. In particular, never
put the strap around a child's neck, as this may cause
suffocation.
-Keep batteries out of the reach of ch ildren. If a battery is
accidentally swallowed, cal l a doctor immed iately.
-Never use th inner, benzene, or other active agents for cleaning
the camera, as this may damage the camera, cause it to catch
on fire, or harm your health.
CAUTION
- Do not operate the camera with wet hands, as this may cause an
electric shock.
- Keep the camera out of reach of children. This wil l prevent them
from swallowing batteries or small accessories.
- To prevent possible injury to your eye, hold the camera away
from your face when you operate the PHC selector.
- Do not fi rethe flash close to a person's eyes, as this may cause
temporary blindness.
- When the camera is not in use, close the sl ide cover and avoid
placing it in direct sunlight. Strong sunlight entering the lens
may cause the camera to catch on fire.
- Do not carry the camera while it's mounted on a tripod, as you
might bump into something and injure yourself or others.
- Do not walk around while looking through the viewfinder, as
you might lose your step, fall down, and injure yourself.
- Do not throw used batteries into a fi re. Also do not short-circuit,
disassemble, or heat the battery, as this may cause it to catch
on fire or explode.
- Always fo llow the warning instructions printed on batteries to
prevent them from catching on fire or exploding.
- Never use batteries not specified in this instruction manual , as
this may cause them to generate heat or catch on fire.
- If corrosive liquids seep from the battery and get on your skin or
clothes, wash immediately with runn ing water. If they get in your
eyes, wash immed iately with water and see a doctor.
E
37
Pro/ago
Muchas gracias par su compra de la camara Nuvis S 2000 de Nikon.
Su nueva camara Nikon utiliza el sistema fotografico avanzado
(sistema IX240). EI sfmbolo ~ * aparece en todas las
camaras del formato APS (sistema fotografico avanzado).
Lea fntegramente el manual de instrucciones antes de utilizar par
primera vez, y guardelo en un lugar a mana.
*E/ sfmbolo del sistema fotografico avanzado es una marca registrada para todos los productos IX240.
Haga algunas lolos de prueba.
Antes de hacer fotograffas importantes haga algunas de prueba
para familiarizarse con la camara y todas sus caracteristicas.
38
Accesorios
Compruebe que tiene el item mostrado a continuaci6n
antes de utilizar su camara.
Colocacion de la correa
Correa al cuello AN-L16
Accesorios opcionales
-Estuche para la camara CS-L24
Coloque la correa pasiindola por la argolla y ajuste su longitud con
el ojal en la correa, como en la figura.
(EI mando a distancia puede guardarse en su bolsillo interior.)
- Manda adistancia(1& P 62)
39
Funciones de su camara Nikon:
• Hay tres tipos de impresion (P, H, C) que pueden mezclarse en un mismo rollo.
Tipo P (panoramico)
Relaci6n = 1 : 3
40
•
•
•
•
•
•
Tipo H (vision ancha)
Relacion = 9 : 16
Tipo C (clasico)
Relacion = 2 : 3
EI objetivo zoom electronico de 2x tiene una gama de distancias locales de 24 mm a 48 mm. ~e 51
Impresion de tftulos (ejemplo: "FELIZ NAVIDAD" a"FELICIDADES") en la parte trasera de sus lotograffas. ~P. 64
Cuando hay poca luzael sujeto esta iluminadopar atras, la camara hace destellar automaticamente el flash. ~ P 57
Es posible el luncionamiento por mando a distancia (opcional). ~p, 62
Se pueden lotograffa objetos tan cercanos como aprox. 0,4 m(1 ,3 pies) I&. PP, 50,52 63
Una tapa desl izante protege el objetivo, ventanilla del visor y pantalia de cristal lfquido
cuando no se utilize la camara.
Indice
Prologo .
................. 38
Accesorios .
................. 39
Funciones de su camara Nikon ...................................................... 40
Partes de la camara ..
.................................. 42-43
Indicaciones de pantalla de cristalliqu ido ........... ........................... 43
Consejos sobre el uso de la Nuvis S2000 .. . .......................... 44
Para empezar
Instalacion de la pila ..
. ........................................ 45
Confirmacion de la carga de la pila ..... ...... ..... ... ...... ...................... . 45
Colocacion de la pelfcula .....
................................. 46-47
Cartucho de pelfcula IX240 .
. ...................................... 47
Funci6n de registro de datos ... ......................................... ... .... 48
Funcionamiento btisico
Sujetando correctamente la camara ..
. .. .. .. 49
Funcionamiento del obturador .. .
.. .... .. 49
Indicaciones en el visor ...................... ... ........................................ 50
Seleccion de tipo de impresi6n .
............ 50-51
Zoom .
. ... .. 51
................................................ 52-53
Enfoque y tomas .
Sujetos diffciles de enfocar .
. ........ ............................... .... 53
Funci6n de ahorro de pila .
... .................... .... 53
Para sacar la pelfcu la . . .......................................................... 54
Para lIevar el cartucho de pelicula fotografiada aun laboratorio de fotograffa ... . 55
Para rebobinar la pelfcula a medio ro llo ..................................... 55
Funcionamiento avanzado
Utilizaci6n del bloqueo de enfoque .................................... .. ......... 56
Selecci6n del modo de flash ........................................... .. 57
Fotograffa con flash automatico ............... ... ................................... 57
Modo de cancelacion del flash ................................................... 58
Modo de flash permanente .... ....... .......................... .. ......... ....... 58-59
Modo de flash con sincronizacion lenta . ...................................... 59
Seleccion de otros modos .................................. .__________ .___ ._........ 60
Modo de reduccion de oj os rojos______________
61
Fotograffa con mando a distancia (opcional) ......... ________ .. _........... 62
Funcionam iento con autodisparador .
........ 63
Tomas de acercamiento _________ ..________________
63
Funcion de grabacion de tftu los ................................. .. ... .... ...... 64-65
~~~~~~~:I~~~~r;~~~ del usuario
_.. _. _. .__. _. _. _. _. .... ........
6 68· -_~6~9
Localizacion de averias ..
Especificaciones _
.. 70-70
Paraunuso segura de la camara(ADVERTENCINPRECAUCION) __ ......... 72-73
II
41
Partes de la camara
6
7
8
9
10
11
12
42
1 Ventanillas de enfoque automatico
2 Flash (~P. 57)
3 Ventan illa del visor ( ~P . 50)
4 Boton de disparo del obturador (~P. 49)
5 Botones del,zoom (~ P. 51)
6 Tapa deslizante (interruptor principal) (~P. 45)
7 Objetivo
8 Sensor de recepcion del mando adistancia (~P. 62)
9 Reduccion de oj os rojos(~P . 61) 1
autodisparador (~P. 63) Iluz para asistencia de
enfoque automatico.
10 Ventan illa de medicion de exposicion automatica
11 Argolla de la correa al cue llo (~P. 39)
12 Palanca de apertura del cartucho (~P. 46)
13 Ocular del visor (~P. 50)
14 LED naranja (indicador de flash/rebobinado)1
LED verde (indicador de enfocado) (~P . 50)
15 Baton ~D (rebobinado de media rolla) (~P . 55)
16 Baton T)TLE (seleccion de modode titulo) ( ~P . 64)
17 Boton r-I (ajuste de idioma) (~P. 64)!
boton ~ (modo de flash) (~PP. 57-59)1
boton SEL (seleccion de fecha) (~ P 66)
18 Selector PHC (I& P. 50)
13 - -------------19 Pantal la de cristalliquido
20 Boton de DATE (I&PP. 48, 66)
21 Boton I (seleccion de titulo)(I& P 64) / boton 14 -----------:::::;:;;')l",;k<
MODE (reduccion de ojos rojos/ autod isparador/ 15 _ _ _ _~~~
mando a distancia) (I&PP. 60-63)1 boton
ADJUST (ajuste de fecha) (I& P 66)
22 Tapa del compartimiento del cartucho (I&P. 46)
23 Rosca para tripode (I&PP. 58, 59, 62, 63)
24 Tapa del portapila (I&P. 45)
17 _~~_ _ _ _ _..J_____
. - -- - - - - - - -18
.~~--~--- 19
'it<c---~o__-
20
Indicaciones de pantalla de cristallfquido
1 Indicador de fecha y hora (I&P 48)1
Indicador de grabacion de titu los (I&P. 64)
2 Indicador de registro de datos (I& PP. 48, 64)
3 Indicador de pila baja (I&P. 45)
4 Indicador de modo de flash (I& PP. 57-59)
5 Indicador de cartucho (I& P. 47)
6 Contador de fotogramas (I&P. 47)
7 Indicador de mando a distancia/autodisparador (I& PP. 62-63)
8 Indicador de reduccion de oj os rojos (I& P 61)
'------- - - - - 24
Pantalla de cristal Ifquido
2 ----c~~$
.IL.Irt--- -
5
6
3
1C±=====------7
4 - - --J
'------ - - -8
43
Consejos sobre el uso de la Nuvis S 2000
Consejos para el cuidado de la camara
- Cierre la tapa deslizante para desconectar la camara cuando no
la uti lice. Evita el disparo accidental del obturador y el consumo
innecesario de la pila.
- La Nuvis S 2000 no es a prueba de agua y no debe exponerse a
la Il uvia a agua del mar. Si entra agua en la camara, limpie
inmediatamente can un pano seco.
- No exponga la camara a altas temperaturas; cerca de la
calefaccion a estufa a en el interior de un cache en verano.
- Guarde la camara en un lugar fresco, seco, limpio. No la
exponga a productos qufmicos tales como alcanfor a naftalina.
Se recomienda el usa de gel desecante para el almacenamiento.
- Si utiliza repetidamente el flash la pila y la camara se calentaran.
Deje un intervalo de tiempo suficiente para que se enfrfe antes
de seguir tomando fotografias.
- No deje caer la camara ni la golpee contra una superficie dura.
- Utilice un pane suave y seco de algodon 0 un cepil lo con
soplador a limpiador de cristales para el iminar la suciedad y
manchas.
- Cuando vaya a guardar la camara durante mucho tiempo, saque
la pi la. Una vez al mes coloque la pil,a y haga destellar el flash
varias veces para mantener el condensador en forma.
Notas sobre la pila
- Compruebe la carga de la pila cuando tenga que tomar
fotografias de una ocasion importante. Lleve pilas de repuesto
cuando salga de viaje.
- La carga de la pila se reduce cuando la temperatura ambiente
baja por debajo de 0 °C (32°F) Cuando tome fotografias a bajas
temperaturas, mantenga la pila caliente. La carga de la pila se
recuperara cuando vue Iva a su temperatura normal.
Notas sobre el cartucho de pelfcula IX240
- Se recomienda Ilevar cartuchos de pelicula IX240 de repuesto
cuando salga de viaje a lugares donde puede no ser posible
adquirir cartuchos de pelicula IX240.
44 Nikon no se responsabiliza par averfas provocadas par ulilizar la Nuvis 52000 de forma no especificada en esle manual.
Para empezar
Instalaci6n de la pila
1Abra
la tapa deslizante hasta
2 Instale la pila.
su tope.
Cuando cierre la tapa deslizante, no
la cie rre demasiado rapidamente
porque puede dafiar el objetivo.
· Cuando no uti lice la camara durante
aprox. 2 minutos, la camara se
desactiva automaticamente.
(1& P.53)
T Abra la tapa del portapilas.
T Instale una pila de litio CR2 de
3 V dentro del portapilas,
como en la figura.
T Cierre la tapa del portapilas hasta
que escuche un chasquido.
• Recuerde que tiene que ajustar la fecha y
hora cada vez que cambie la pila.
(1& PP 66-67)
Confirmacion de la carga
de la pila
Compruebe la carga de la pila.
T Abra la tapa deslizante para
activar la camara.
• EI objetivo se alarga automaticamente a
la posicion W (gran angular) y el flash
destel la.
· Si no aparece el indicador de pila baja
" CII ", la pila esta cargada.
· Si " CII " destella 0 no aparece nada
en la pantalla de cristalliquido, la pila
se ha agotado y es necesario cambiarla. 45
S
Colocaci6n de la pelicula
'.-'1-'
uu
IlmIm
:5
L
AUTO ~
.-
C
1 compruebe
Abra la tapa deslizante y
2 Gire la palanca de apertura
que no aparece el
del cartucho en el sentido
"a n
indicador de cartucho
en la pantalla de cristallfquido.
- Si el numero de fotogramas aparece en la
pantalla de cristallfquido, se ha cargado
un cartucho parcial mente expuesto
- Si aparece la letra "E" y el indicador
de cartucho "D " en la pantalla de
cristallfquido, se ha cargado un
cartucho ya expuesto completamente y
46 debe sacarlo. (1& P. 54)
a
de la flecha para abrir la tapa
del compartimiento del
cartucho.
La tapa del compartimiento del
cartucho se cierra automaticamente
despues de cargar. No trate de abrir la
tapa hasta haber rebobinado
completamente la pelfcula y se pare el
motor en el interior de la camara.
3 Coloque
un cartucho de
pelfcula en el compartimiento
y cierre la tapa.
- Utilice s610 cartuchos de pelfcula IX240.
(no se deben utilizar ral los de pelfcula
de 35 mm.)
- Compruebe queel VEl (indicaci6n de
exposici6n visual) muestra "0" (sin
exponer) antes de colocar. (1& P. 47)
- Cierre la tapa del compartimiento del
cartucho hasta que escuche un
chasquido
Cartucho de pelicula IX240
'n.-,
:I
uu c
IlmIill
AUTO
Disco de datos
IJ
~
--=::;:==t--;:-:-F:;;:==DPelicula procesada dentro del cartucho'
0 Pelicula no expuesta'
r-
Puerta a-----"'--."prueba de luz
D Pelicula parcial mente expuesta'
""'. .. "
i:3 Pelicula totalmente expuesta pero sin procesar'
'"---_ou_- Indicador de procesado irreversible
• Indicacion de exposicion visual (VEl)
4 Compruebe
que aparece el
numero de fotogramas
disponibles y que aparece
"D " en la pantalla de cristal
Ifquido.
- Si no aparece el numero de fotogramas,
vuelva a colocar la pelicula.
-La letra "E" destella cuando un cartucho
de pelicula total mente expuesta (VEl
muestra "~ "), un cartucho de pelicula
parcial mente expuesta ("D "), 0 un
cartucho de pelicula procesada ("0 ")
ha sido colocado.
- Cartuchos de pelicula disponibles.
peliculas de 40 exposiciones, 25
exposiciones y 15 exposiciones.
- Los cartuchos de pelicula IX240 no
tienen punta guia. La pelicula sale
automaticamente y se ajusta dentro de
la camara.
- La VEl (indicacion de exposicion
visual) muestra los cuatro estados de
la pelicula
Notas para la manipulacion de
los cartuchos de pelfcula IX240
-No toque, desarme 0 golpee con fuerza
el disco de datos, la puerta a prueba de
luz 0 el car rete del cartucho.
- No rompa el indicador de procesado
irreversible. Si esta roto, consultecon su
laboratorio de fotografia mas cercano.
-No exponga la pelicula ala luz del sol,
altas temperaturas cerca de la
calefaccion 0 estufa, polvo y humedad
o a un campo magnetico fuerte.
47
S
Funci6n de registro de datos
0
:D I
!tol It:c: ~2 csj
'",0
.,
,
0
!tol I
-"i]
., ,
11 C5J ~ ~
~ MOG~)ATE
SEL
I
48
• Aparece la seccion del "Ana" que se
expresa como dos cifras y la "hora" en
un cicio de 24 horas. La fecha que
aparece en la figura anterior muestra
"1 de febrero del 2000".
• Aparece "•••" cuando se selecciona el
modo "Sin registro".
L _,
I IlrnIm J
ll ~~~
ADJUST
Seleccione su modo de
indicaci6n preferido.
T Oprima el bat6n DATE.
-
:s:3aD II
,",o ~
~
MOG~)ATE
SEL
AOJUST
AUTO ~
J
· Oprima el baton DATE para seleccionar
una de las tres indicaciones. Cada vez
que oprima el baton, la indicacion
cambia en el sigu iente orden:
Ano/Mes/Oia HoraiMinutos Sin registro
r '0 02
: -+ :5:30 -+ - -
-]
· Mantenga oprimido el baton DATE
durante mas de 2 seg. mientras aparece
"..•" La indicacion cambia
Ano/Mes/Oia Mes/OiaiAno
r 'OD 2
OiaiMes/Afio
:-+ 2 :'00 -+ : 2'00 ]
· Si toma fotografia cuando aparece " ~"
en la pantalla decristalliquido los datos de
lapantalla quedaranregistrados. Nose
registran datos cuando se selecciona el
modo "...".
• "M" en la pantalla de cristalliquidoes la
indicaci6n det mes, sin embargo no se
imprimira en la parte trasera de las fotografias.
• Acuda aun laboratorio de fotograffa que
tenga el simbolo "Marca delaboratorio de
fotograffa autorizado" ysolicite que imprima
los datos registrados en un lugar especifico
• Cuando se ajuste la fecha y la hora, consulte
el "Ajuste de la fecha y h~ra" en la pagina 66.
c orrectamente
Funcionamiento basico SUjetando
la camara
• Mantenga sus codas contra su cuerpo y
am bas manos sobre la camara mientras
presiona la camara contra su rostro.
• Tenga cuidado de no bajar la unidad de
flash cuando esta emergido. Si se baja
el flash, parpadea el LED naranja para
avisarle. EI flash no destelia allevantar
el obturador.
· Cuando sujete la camara verticalmente,
compruebe que el flash esta hacia
arriba, como en la figura.
·Para evitar que la camara vibre,
sostengala firmemente.
No tape el objetivo, flash 0 ventana
de enfoque auto matico con sus
dedos ni el cabello.
Funcionamiento del
ohturador
Oprima ligeramente el boton de disparo
del obturador para ajustar el enfoque y la
exposicion; se encendera el LED verde.
Con el boton de disparo del obturador
oprimido parcial mente, el enfoque queda
bloqueado (1I@f' P 56)
Oprima el boton de disparo del obturador
hasta el fondo para disparar el obturador.
49
Indicaciones en el visor
Seleccion de tipo de
impresion
~
~4-J
G) Marcas de compensacion de paralaje
Para las tomas de acercamiento can una distancia de aprox.
0,4 m aim (1,3 pies a 3,3 pies).
@ Marco de enfoque automatico
Apunte esta marca sobre el sujeto.
@ LED naranja
Si esta encendido: Flash listo para desteliar.
Si parpadea: Flash esta cargando y no puede destellar, la pelfcula se esta
rebobinando 0 el flash no ha emerg ido completamente.
@ LEDverde
Si esta encendido: EI enfoque es el correcto. Si parpadea: EI enfoque no es el
50 correcto 0 la distancia de la toma es de men os de aprox. 0,4 m (1,3 pies).
S
Utilice el selector PHC para seleccionar el lipo
de impresion deseado anles de hacer la lorna.
• Se puede seleccionar uno de los tres tipos de
impresion (P, HoC) conmutando el selector PHC
siempre, con la pelicula colocada. (Il@f P 40)
La zona de imagen posible es diferente segOn el
tipo de impresion seleccionado .
• Tambien puede cambiar el tipo de impresion
cuando solicite impresiones adicionales en el
laboratorio de fotografia.
iPRECAUCION!
Para no tener problemas en su vista, no apunte
la camara hacia su rostro cuando haga
funcionar el selector PHC.
Zoom
Zona de imagen posible
Las partes cortadas de la impresion
final son diferentes segun el tipo de
impresion (P/H/C).
Tipo P
(panoramico)
Relacion = 1 : 3
Tipo H
(vision ancha)
Relacion = 9 : 16
Tipo C
(clasico)
Relacion = 2 : 3
Mire por el visor y componga la
imagen oprimiendo los botones
del zoom .
Oprima el boton de zoom ctJ par~ alargar
el objetivo a 48 mm para fotograflas con
teleobjetivo.
T Cuando se ha obtenido el
tamafio de imagen deseado,
retire su dedo del bot6n del
zoom.
-Cuando no S8 utiliza la camara durante
mas de aprox 2 minutos, el objetivo se
ret rae automaticamente a la posicion Iilll
(gran angular). (1& P 53)
Oprima el boton de zoom Iilll par~ retraer
el objetivo a 24 mm para fotograflas con
gran angU lar.
51
Enfoque y lomas
1 Componga la imagen .
• Apunte el marco de enfoque auto matico
en el suieto.
• Para que las fotografias sean nitidas,
compruebe que el sujeto esta a aprox.
0,4 m(1,3 pies) de la camara.
52
2 Enfoque sobre el sujeto .
T Oprima ligeramente el boton de
disparo del obturador.
• EI LED verde se enciende cuando se ha
logrado enfocar.
Si el LED verd e parpadea lentamente:
el obturador esta bloqueado, debido a que
la distancia de disparo es menor aOAm
(1,3 pies).
Si el LED verde parpadea rapidamente:
el sujeto no Ruede enfocarse bien
(v:wP. 53). En este caso, el obturador
puede disparar produciendo una imagen
desenfocada.
suavemente el baton de
3 Oprima
dlsparo del obturadar hasta el
fonda para tomar una fatograffa.
· Si no hay suficiente luz 0 si el objeto
tiene iluminaci6n de atras, el flash
destel la automaticamente.
(V:WPP 57-59)
• Despu8s de la toma, el numero de
fotogramas se descuenta en uno en la
~antalla de cristallfquido.
• Si oprime el boton de disparo del obturador
con fuerza puede hacer que vibre la camara.
Cierre la tapa deslizante para desactivar
la camara y ahorrar corriente de la pi la.
Funcion de ahorro de pila
Sujetos diffciles de enfocar:
Los siguientes sujetos pueden ser diffcil es de
enfocar. En este caso utilice el bl oqueo de enfoque
(Il§ P. 56) enfocando otro su jeto a la misma
distancia de la camara.
A Sujetos de bajo contraste tales como el cielo
azul 0 superficie que refl ejan la luz como
coches encerados 0 el agua.
B Sujetos co n patrones continuos y repetidos.
C Hay sujetos cercanos y alejados al mismo
tiempo dentro del marco de enfoque
automatico.
D Sujetos con fuerte ilumi nacion de atras 0 con
fondo bril lante .
- Cuando no se uti liza la camara durante
mas de aprox. 2 minutos, despues de
abrir la tapa deslizante para conectarla,
la camara se apaga automaticamente
para ahorrar la carga de la pila.
EI objetivo se ret rae automaticamente a
la posicion [ill) (gran angu lar) y se
desconecta.
- Oprima el boton de disparo del
obturador ligeramente 0 cualquier otro
boton para co nectar nuevamente la
camara y encender la pantalla de cristal
liquido.
- Para evitar que la pila se descargue
accidental mente, debe cerrar la tapa
desl izante para desconectar la camara
cuando no este en uso.
S
53
Para sacar la pelicula
',-,.-,
.='
L'LI
IlIIDill
AUTO
",..,~.::
LlL'
L
IlIIDill
~
2 Compruebe que el destello 3 Abra la tapa del compartimiento
1 Larebobinarse
pelfcula empieza a
automaticamente.
del cartucho ysaque la pelfcula.
"E "esta visible en la
S
54
-AI final del rol lo de pelicula, la pelicula
se rebobina automaticamente y el
contador de fotogramas va baiando uno
a uno y destella el LED naranja.
-Si desea sacar la pelicula cuando el
numero de fotogramas sigue
apareciendo en la pantalla de cristal
liquido, rebobine la pelicula a medio
rollo. (I@f' P 55)
pantalla de cristallfquido.
-Cuando se ha rebobinado
completamente la pelicula, la letra "E"
parpadea.
- Si el rebobinado se detiene a medio
rollo porque se ha agotado la pila,
continuara automaticamente al cambiar
la pila
No abra la cubierta de la camara del
cartucho hasta que empiece a
destellar "E"
-Cuando abra la tapa del compartimiento
del cartucho, compruebe que la parte
inferior de la camara mira hacia arriba,
o el cartucho puede caerse.
Para lIevar el cartucho de pellcula
folograliada aun laboralorio de folografia
Para rebobinar la pelicula a medio rollo
Servicio
Fotogrilfico
-5
Servicio de
Fotoacabado
Certificado
I'Ri~ D,
Certificado
- Se recomienda Ilevar el cartucho de
pelicula aun laboratorio de fotograffa con
el simbolo "Marca de laboratorio de
fotograffa autorizado" que se indica arriba,
para su procesado e impresion.
- Sus negativos se devuelven en el cartucho
para que pueda guardarlos facilmente.
- Se entrega una impresion indice (con
imagenes pequefias de cada fotograma
expuesto del rollo de pelicula) junto con
los negativos.
- Para mas informacion, consultecon su
laboratorio de fotograffa.
1 Oprima
el boton ttD
2 Saque la pelicula
utilizando el ojal de la correa
o la punta de un bolfgrafo.
- Cuando empieza el rebobinado no es
necesari o seguir oprimiendo el boton
de rebobinado a medio rol lo.
- Cuando se ha completado el
rebobi nado, empieza a parpadear "E".
No trate de abrir la tapa hasta que
empiece a parpadear "E"
T Abra la tapa del compartimiento
del cartucho.
T Saque la pelfcula.
Cuando se ha sacado la pelicula a medio
rolio, no 10 podra volver autilizar.
~~
I
55
Funcionamiento avanzado
Utilizaci6n del bloqueo de enfoque
Cuando el sujeto principal no esta en el centro del marco.
1 Componga la imagen.
• Cuando el sujeto principal esta fuera
del marco de enfoque automatico
"[ J", la zona detras del sujeto
quedara enfocada.
2Apunte el marco de enfoque 3 Vuelva
a componer la
imagen y tome la fotograffa.
automatico al sujeto
principal.
T Oprima ligeramente el boton de
disparo del obturador.
• Compruebe que se enciende el LED
verde.
56
T Mientras mantiene el boton de disparo
del obturador ligeramente oprimido,
vuelvaacomponer la imagen.
T Oprima a fonda el boton de
disparo del obturador.
oMientras mantenga ligeramente oprimido el
boton del disparador del obturador, el enfoque
permanece bloqueado.
oNo cambie ladistancia de la camara al sujeto
mientras mantiene oprimido ligeramente el boton
de disparo del obturador.
Seleccion del modo de flash
Fotografia con flash auto matico
EI flash"ciest~lIa automaticamente cuamio hay poca /uz 0 e/ sujeto
esta a contra/uz
'"....
LILI
IlmIm
AUTO
· Para mas detalles, consulte la pagina de
referencia para cada modo de flash.
A ~TO~ Flash auto matico (~P. 57)
l
r
~
AJro
Cancelaci6n de flash (I&P 58)
Flash permanente (I& P 58)
~ Flash automatico con
sincronizaci6n lenta (I&P. 59)
• Cuando se desconecta lacamara, el modo
de flash vuelve al flash automatico.
SLOW
:;
C
~l
1 Abra
la tapa deslizante para
2 Compruebe
que se han encendido
los LED naranja yverde antes de
activar la camara.
• Cuando la camaraestaactivada, aparece
"AUTO~ " en la pantal la de cristallfquido
Se activa automaticamente el modo de
flash auto matico.
• La camara detecta que hay poca luz 0
que el sujeto estaacontraluz y destella
automati camente el flash. .
· Cuando aparece " ~ " en lapantalla de
cristal liquido, el flash no destella. En este
caso no se enciende el LED naranja
tomar la fotograffa.
• Antes de tomar una fotografiacon flash,
compruebe queel sujeto esta dentro del alcance
del flash. Consultela siguienteguia (ISO 200).
Iilll (24 mm) : aprox 0,4a5m(1 ,3a16,4pies)
ctJ (48 mm) aprox. 0,4a2,8m (1,3a 9,2 pies)
• Si el LED naranja parpadea, el flash se carga yel
obturador se bloquea Oprima ligeramenteel boton
de disparo del obturador nuevamente despues de
aprox. 6seg. yespere hasta queel LED naranjase 57
encienda antes de tomar una fotografia
S
M()do de cancelacion del flash
Modo de flash permanente
Utilice este modo para hacer que destelle
I TITlE
~
«:~ 0
~~
SEL
1 Oprima el boton ~ hasta que 2 tome
Componga la imagen y
la fotograffa.
aparezca "(i) " en la pantalla
de cristallfquido.
• Como este modo selecciona
normal mente velocidades de obturacion
lentas, uti lice un tr[pode para evitar que
la camara vibre.
58
T Oprima ligeramente el boton
de disparo del obturador.
T Compruebe que el LED verde
esta encendido y oprima el
boton de disparo del
obturador hasta el fondo para
tomar la fotograffa.
D
MODE DATE
ADJUST
1 aparezca
Oprima el boton ~ hasta que
en la pantalla
"~"
de cristallfquido.
Modo de flash con sincronizacion lenta
I flash
sin importar la Iuz ambiente.
Utilice este modo para obtener la exposicion correcta tanto del sujeto
principal como del fondo en condiciones de poca luz 0 de noche.
II CJ ~ IQ
~~
SEL
2tome
Componga la imagen y
la fotografia.
T Oprima ligeramente el bot6n de
disparo del obturador.
T Compruebeque se encienden los LED
naranjay verde y oprima el bot6n de
disparo del obturador hasta el fonda
para tamar la fotografia.
- Si el LED naranja parpadea, aprima
ligeramente el batonde disparo del
aoturadar nuevamente despues de aprox
6seg yespere hasta queel LED naranjase
encienda antes de tamar una fatagrafia.
MODE DATE
ADJUST
el boton ~ hasta que
2tome
Componga la imagen y
1 Oprima
la fotografia.
aparezca
en la
"~~J£ ~ "
pantalia de cristalliquido.
- Como este modo selecciona
normal mente velocidades de obturacion
lentas, utilice un tripode para evitar que
la camara vibre.
- Cuando el sujeto esta brillante, aparece
"G)" en la pantalla de cristall iqu ido y
no destel la el flash. En estecaso no se
enciende el LED naranja
T Oprima ligeramente el bot6n de
disparo del obturador.
T Compruebe que se encienden los
LED naranja yverde yoprima el
bot6n de disparo del obturador hasta
el fondo para tomar lafotografia.
- Si el LED naranja parpadea, oprima ligeramente el
bolon de disparo del obturador nuevamente
despu8s de aprax 6seg. yespere hasta que el LED 59
naranja se encienda antes de lamar una folografia.
S
Seleccion de otros modos
~
Para hacer coincidir los objelivos de sus lomas folograficas, se pueden seleccionar la reducci6n
de ojos rojos, mando a dislancia yaulodisparador.
Cancelaci6n (sin indicaci6n)
~
<0> Indicadar de reducci6n de ajas rajas (~ P . 61)
1
Cada vez que se oprime el
boton MODE, la pantalia
cambia en el orden indicado.
· Para mas detalles. consu lte la pag ina
de referencia para cada modo.
60
Para reducir el electo de "oios rajos" con flash.
<O>g Indicadar de manda a distancia (~P . 62)
~
Para disparar el obturador a distancia.
Indicadar de autadisparadar (~ P 63)
Para incluirse a sf mismo en la fotograffa.
Modo de reduccion de ojos rojos
En la /otogra/fa con flash, los ojos del sujeto pueden aparecer rojos. Utilice este modo para reducir el e/ecto de "ojos rojos".
u
!
~
!
~ c:.
:~]
.
-,~
<I>
AUTO
.~
~
[Q J
I l~_rg
~ " 'ODE DATE
SEL ADJUST
I
la imagen y
3 Compruebe
que se han encendido
1 Oprima el baton MODE hasta 2 Campanga
los LED naranja yverdeantes de
aprima ligeramente el baton
que aparezca "0 " en la
pantalla de cristallfquida.
de disparo del abturadar.
- Como se enciende la luz de reducci6n de
ojos rajas durante un segundo antes de
que destelle el flash, tenga cuidado de no
mover la camara a permitir que el objeto
se mueva hasta que destelle el flash.
- No se recomienda el modo de
reducci6n de ojos rajas cuando se
toma una fotografia de sujetos en
rapido movimiento.
tomar la fotograffa.
- Si el LED naranja parpadea, oprima ligeramente el
boton de disparo del obturador nuevamente
despues de aprox. 6 seg. yespere hasta que el LED
naranja se encienda antes de tomar una fotograffa. 1
- Para cancelar el modo de reduccion de ojos rojas,
oprima el boton MODE hasta que se apague "<II>"
en la pantalla de cristalliquido. Este modo no puede
cancelarse desactivando la camara.
- Se pueden ajustar conjuntamente los modos de
reduccion de ojos rojos ycancelacion de flash pero 61
en este caso no se produce la reducci6n de ajos rojos.
Fotografia con mando a distancia (opcional)
Para un disparo remoto del obturador.
'--TO--;r.=;;;;;;;;;;;;=~,,-,
1 1nstale la camara en un
trfpode 0 sobre una
superficie plana firme.
• EI mando a distancia puede funcionar a
una distancia de hasta 5 m(16,4 pies)
desde el frente de la camara. Si la
distancia de la camara al sUI'eto es demas
de 5 m(16,4 pies), utilice e modo del
autodisparador. (~P. 63)
• Si el sensor de recepcion de la camara
recibe los rayos del solo esta expuesta
62 a una luz intensa, el mando a distancia
no funcionara correctamente.
I
2 hasta
Oprima el boton MODE
que aparezca
" Oi~ " en la pantalla de
cristalilquido .
• EI mando adistancia se cancelara
automaticamente si no 10 utiliza durante
mas de unos 2 minutos 0 se cierra la tapa
deslizante. Esto significa que puede
seguir tomando fotograffas desde la
distancia hasta 2 minutos desde la ultima
toma.
3 tome
Componga la imagen y
la fotograffa.
T Apunte el manda adistancia hacia
la camara y aprima el baton de
disparo del abturadar en el manda.
• La luz de reducci6n de oios roios se enciende
duranteunos 2seg. antes de disparar el obturador.
• Si no puede dispararse el oblurador con el mando
adislancia, cambie la pila del mando adisiancia.
(La vida de lapila es de unos 10 arios.) Consulle
con un concesionario autorizado 0 centro de
servicio de Nikon para que Ie cambien la pila
Funcionamiento con autodisparador
Tomas de acercamiento
Cuando desea participar en /a fotograffa.
Para tomar sujetos tales como flores en acercamiento
~~--------------~
1Oprima
el boton MODE
hasta que aparezca
" ~i~" en la pantalla de
cristallfquido.
- EI autodisparador se cancelara
automaticamente si no 10 util iza durante
mas de unos 2 minutos 0 se cierra la
tapa deslizante.
- Se recom ienda instalar la camara sobre
un tripode.
2 Componga
la imagen y
oprima el boton de
disparo del obturador
hasta el fondo .
- La luz de reduccion de ojos rojos
destel la durante 8 seg. y despues se
enciende durante 2 seg. antes de
disparar el obturador.
- EI autodisparador se cancela una vez
tom ada la fotog rafia.
-Para cancelar el autodisparador cierre
la tapa desl izante.
- Cuando se toman fotografias de sujetos
dentro de una gama de 0,4 ma 1 m
(1,3 pies a 3,3 pies), componga la
fotografia dentro de las marcas de
compensacion de paralaje. La zona ////
indicada en la figura quedara co rtada
de la fotografia impresa.
- Cuando el sujeto esta a menos de
0,4 m (1,3 pies), el LED verde parpadea
lentamente y se bloquea el obturador.
- Si el sujeto esta muy cerca, el LED
verde parpadea rap idamente y puede
disparar el obturador y la fotog rafia
63
quedara desenfocada.
Funci6n de grabaci6n de tltulos
Para imprimir un titulo en la parte trasera de las fotografias.
-0
-0
TITLE
~?
~
lQ~-=
(g~~(g=,"" 11
1 Oprima
el boton TITLE
hasta que aparezcan "I",
l!!I ese
iii
los codigos de idioma y
titulo en la pantalla de
cristallfquido.
pueden seleccionar 30 titul os en
12 id iomas.
64
~~rr:::l
• lODE
~ ~
(g
DATE
~
SEL
MODE DATE
ADJUST
2 Seleccion de los codigos de 3 Ajuste
los codigos de
idiomaJtltulo
idiomaJtltulo.
... Oprima el baton TITLE durante
mas de 2 seg. EI codiga de titulo a
idiama camienza a parpadear.
... Oprima el baton
para ajustar el
codiga de idiama. Oprima el baton
I para ajustar el codiga de titula.
Oprimiendo cantinuamente cada
baton para cambiar rapidamente el
codigo.
r-I
... Oprima el boton TITLE y el codiga
preferida deja de parpadear y aparece
en el panel de pantalla de cristal
liquida. Despues tome la fotografia.
e Cuando aparece "I "en el panel de la
pantalla decristall fqu ido, es posible
grabar el titulo aun cuando esta activada
lapantalla de fecha en el panel de
pantal la de cristallfquido medianteuna
presion del boton DATE.
lista de lItuios impresos del usuario
Idioma integ rado
C6digo Idioma
1
Danes
2
Finlandes
3
Frances
4
Aleman
5
Italiano
6
Japones
8
9
10
Portugues
11
12
13
Noruego
Espanol
Sueco
Ingles britanico
Ingles americano
II
Tftulos en Espanol
COOIQO Titulo
01 NAVIDAD
02 CUMPLEANOS
03 VACAC IONES
04 LUNA DE MIEL
05 BODA
06 FAMI LI A
07 FIESTA
08 AN IVERSAR IO
09 AMIGOS
10 VIAJE
11 FELIZ CUMPLEANOS
12 FE LI CIDADES
13 FELIZ NAVIDAD
14 TOUR
15 ANO NUEVO
COOioo Titulo
16 FELIZ ANO NUEVO
17 DiA DEL PADRE
18 DiA DEL LA MADRE
19 RECUERDOS
20 BAUTISMO
21 DiA DE LOS REYES MAGOS
22 SEMANA SANTA
23 DiA DELA PRIMERA COMUNION
24 CARNAVAL
25 VERBENA
26 SANTO
27 SALUDOS DESDE ...
28 fELIZNAVIDAD YPROSPERO AND NUEVO
29 DESPEDIDA DE SOLTERO
30 DESPEDIDA DE SOLTERA
Para los t~ul os en otros idiomas, vea la "Usta detftulos impresos para el usuario" que se adjunta.
• Para cancelar la funcion de grabacion
de tftulo, oprima el boton TITLE y
comp ruebe que" ' " y los codigos de
idioma/tftulo se han borrado. La
palabra "OFF" se enciende durante
2 seg en el panel de pantalla de cristal
liquido antes de volver a la indicacion
de la fecha.
I
65
Ajusle de la lecha y hora
~§o ••~~ 'nn.i'
~~
'"
.~- 2~
o
TITlE
,,,, ~
r'll
,
SEL
ADJUST
::l
J.!. t=J !b:l CJJI
~ ~ MODE DATE
66
1 Entrada del modo de ajuste 2 Selecci6n del "ana"
3 Selecci6n del "mes"
... Oprima el boton SEL
(seleccion de fecha) durante
mas de 2 segundos.
... Oprima el boton ADJUST
(ajuste de fecha) para ajustar
el ano correcto.
- La parte del "ana" empieza a parpadear.
- Cada vez que se oprime el baton
ADJUST, el numero cambia de a una
un idad.
- Oprimacontinuamenteel baton ADJUST
durante mas de 2 seg. paracambiar
rapidamente el numero.
... Oprima el boton SEL. La parte
del "mes" empieza a
parpadear.
... Oprima el boton ADJUST para
seleccionar el mes correcto.
... Oprima el boton SEL.
- Repita los proced imientos 2 y 3 para
seleccionar el dfa, hora y minutos.
~"
o
TITLE
11'u.
" ' 'i- <'5 111
~ I,," ~
iiI
lL c:J
'h
I
P
cosl
~ll
MODE DATE
ADJUST
1
SEL
II
Para salir del modo de
ajuste
T Oprima el baton SEL y la
4
fecha carregida aparece en la
pantalia de cristal Ifquida.
eSi se oprime otro boton mientras se
ajusta la fecha/hora, todos los datos
ajustados anteriormente se ajustaran en
este momento.
eLa fecha que aparece en la figura
anterior muestra "25'de abril del
2001 ".
Cuando se cambia la pila
eAparecera 00 0 00 en la pantalla de
cri stalliquido cuando cambie la pila.
eNo habra datos registrados si aparece
00000 en la pantalla de cristalliquido.
eRepita los proced imientos de 1 a 4 para
seleccionar la fecha y la hora.
I
67
I
Localizacion de averias
Verifique fa causa de fa averfa en ef siguientecuadro. Puede ahorrarfe un viaje asu centro de serviciode Nikon mascercano.
Problema
Inspeccione
pag. ref.
EI obturador no dispara.
- Si el LED naranja parpadea cuando se oprime el bolon de disparo del obturador ligeramente, el
flash se carga y se bloquea el obturador. Suelte su dedo del baton de disparo del obturador y
espere durante aprox. 6 segundos. Despues oprima el bot6n de disparo del obturador
nuevamente y compruebe que se enciende la luz LED antes de tomar una vez mas la fotografia.
- Si el LED verde parpadea lentamente, la camara esta demasiado cerca del sujeto. Evite tamar
fotografias de sujetos que estan a men as de aprox. 0,4 m (1,3 pies) de la camara.
- Si el LED naranja parpadea cuando se oprime el bot6n de disparo del obturador ligeramente, el
flash se carga y se bloquea el obturador. Suelte su dedo del bot6n de disparo del obturador y
espere durante aprox. 6 segundos. Despues oprima el bot6n de disparo del obturador
nuevamente y compruebe que se enciende la luz LED antes de tamar una vez mas la fotografia.
- Verifique la carga de la pila. Si la pila esta sin carga, cambie la pila par otra nueva.
- Si aparece la marca "1$1 "en la pantal la de cristalifquido, el flash no destellara.
- Limpie las ventaniltas de enfoque automatico si estan sucias.
- Para que la camara no vibre, oprima suavemente el bot6n de disparo del obturador.
- Cuando se realizan fotografias de sujetos dificiles de enfocar, apu nte el centro de la marca de
enfoque automatico en el sujeto 0 utilice el bloqueo de enfoque.
- La peifcu la no esta completamente expuesta. Tome fotografias hasta el final del rolla a
rebobine la pelfcula a medio rolla.
50, 57
EI flash no destella.
EI sujeto aparece
desenfocado en la
fotografia.
La tapa del compartimiento
del cartucho no se abre.
68
50, 52
50, 57
45
57-59
42, 49
49
53, 56
54, 55
Problema
Inspeccione
pag. ref.
No aparecen los
indicadores en la pantalla
de cristalliquido al abrir
la tapa deslizante.
eNo se hacargado correctamente la pila en el portapila. Coloque correctamente los polos
positiv~ (+) y negativo (-).
eLa pila esta sin carga 0 no hay pila. Instale una nueva pila.
eSi no aparecen los indicadores despues de instalar una nueva pila, la camara esta averiada.
En este caso, hable con su concesionario de Nikon mas cercano 0 con una tienda de camaras
para reparar la camara.
45
EI obturador no dispara
a pesar de oprimir el
boton de disparo del
obturador en el mando a
distancia.
eEsta fuera del alcance del mando a distancia. Acerquese a la camara.
eSi el mando a distancia esta expuesto a los rayos del sol u otra luz intensa, camb ie la
posicion del mando a distancia.
eLa pila en el mando a distancia esta sin carga No trate de cambiar la pila por si mismo;
solicite al centro de servicio de Nikon que se 10 cambie. ~
eOpri ma el boton MODE una vez hasta que aparezca "<a> g 0" en la pantalla de cristalliquido
si no se utitiza el mando a distancia durante mas de 2 minutos.
62
62
Una caracteristica de las camaras electronicas
En algunos casas especiales, cuando la camara recibe una fuerte carga de electricidad estatica, la camara puede no
funcionar bien. En este caso, saque la pila. Recuerde que debera volver a ajustar la fecha y hora al cambiar la pita
porque los ajustes se borran al sacar la pila. (I&P 66)
45
-
-
62
I
69
l
Especificaciones
70
Tipo de camara
Camara de tipo IX240 (sistema fotografico de avanzada) con obturador en el
objetivo de enfoque yexposici6n automaticos y Nikon Zoom 24-48 mm 1/4,5-8,2
Peliculas ulilizables
Cartucho de pelicula del sistema IX240 (sistema fotografico de avanzada)
(16,7 x 30,2 mm)
Refacion de impresion
Puede seleccionar entre P, HYC
Objelivo
24 mm f/4,5-48 mm f/8,2 (equivalente a 30 mm--£O mm en una camara de
35 mm); 5 elementos en 5 grupos
Oblurador
Obturador electronico programado; sirve como hojas de diafragma;
velocidades de obturaci6n: 2,5 a 1/500 seg . .
Visor
Visor zoom de imagen real; cobertura del marco de aprox. 85% para la
imagen impresa en H; aprox. 0,32x ampliacion a 24 mm, aprox, 0,56x
a48mm
Informacion en el visor
Marcas de tamano de imagen de tipo P/H/C con marcas de compensaci6n
paralaje, marco de enfoque automatico, LED naranja-se enciende: flash listo;
parpadea (a 4 Hz): el flash se esta cargando; parpadea rapidamente
(a 8 Hz): el flash dispara incorrectamente, LED verde--se enciende: Iinaliza la
operaci6n de enfoque; parpadea lentamente (a 2 Hz): sUleto demaslado
cerca como para enfocar bien el objetivo; parpadea rapidamente (a 8 Hz):
sujeto dificil de enfocar , LED naranja - parpadea (a 4 Hz): la pelfcula se
esta rebobinando.
Enfoque
Enfoque automatico con una gran superlicie pasiva; activado al oprimir
ligeramente el bot6n de disparo del obturador; alcance de OAm (1 ,3 pies) a
infinito, con el LED iluminador para asistir el enfoque automatico (tambien
sirve como luz de reducci6n de ojos rojos)
Bloqueo de enfoque
EI enfoque se bloquea mientras se mantenga oprimido ligeramente el
bot6n de disparo del obturador.
Confrol de exposicion
Programa de exposici6n automiitica controlado electronicamente; alcance
de exposicion automatica (ISO 200) EV 6-17 a 24 mm, EV6-18 a 48 mm;
Flash destella automiiticamente con poca lUI.
Ajusle de sensibilidad de la pelicula
Ajuste automatico de peifculas ISO 50, 100,200,400,800
Funcionamienfo de la pelicula
Sistema de carga por instalacion; mecanisme para evitar errores en la
carga de peifcula; mecanisme del seguro de la tapa de la camara del
cartucho
Conlador de fologramas
Aparece en la pantalla de cristal lfquido; tipo cuenta regresiva
Autodisparador
Vida util de la pila
Controlado electronicamente; activado al oprimir el boton de disparo del
Aprax. 10 rallos de 25 exposiciones cuando se utiliza el flash en la mitad
obturador; duraci6n de 10 seg., parpadea en 2 intervalos
de las exposiciones.
Avance de pelicula
Pantalia de cristalliquido (activado)
Contador de fotogramas , modo de flash, reduccion de oj os rojos,
La pelicu la avanza al primer fotog rama al colocar el cartucho; la pelicula
autodlsparador, cartucho de mando a distancia, pila baja, titulo,
avanza automaticamente un fotograma despues de cada loma; rebobinado
fecha/hora,
registro de datos
auto matico al final del rollo de pelicula, tambien puede rebobinar a medio
Alimentacion eilictrica
rollo.
Una pi la de litio CR2 de 3 V
Mando a distancia (o pcional)
Mando adistancia inalambrico par infrarrojos; disparo de obturador con retardo
Funcion de registro de datos
de 2seg.; se cancela automaticamente despues de 2 min. si no se utiliza; gama
Sistema de registra magnetico: Fecha/Tftulo; aparece la fecha en la
efectiva aaprox. 5 m(16.4 pies) delante de la camara; la piladura unos 10 anos;
pantalla de cristalliqu ido en cinco modos ano/mes/dia, hora/minutos,
mes/dia/ano, dia/mes/ano 0 Sin regislro; cicio de 24 horas sin AM/PM;
Dimensiones (An. xAI. x Prof.): aprox 60 x 27 x 10 mm (2,4 x 1,1 x 0,4 pulg.);
aJuste de ano bisiesto hasta 2039; reloj integrado con precision de ±90
Peso (con pila): aprox. 13 g(0,5 onzas).
seg
por mes; la alimentacion electrica es la de la camara; funcion de
Flash integrado
grabacion de titulo: puede seleccionar entre 30 titu los en 12 id iomas a
Tiene cuatro mod os de flash: Flash auto matico, cancelacion de flash, flash
imprimir en la parte trasera de las imagenes
siempreyflash con sincronizacion lenta; el flash destella automaticamente
Dimensiones (An. x AI. x Prof.)
con poca luz 0 cuando el sujeto esta acontraluz; alcance del flash: aprox
Aprax. 89 x 60,5 x 29 mm (3,5 x 2,4 x 1,1 pu lg.) (con tapa deslizante cerrada)/
0,4-5 m(1,3-16,4 pies) a24 mm, aprox. 0,4-2,8 m(1,3-9,2 pies) a48 mm
aprox 122,5 x 60,5 x 29 mm (4,8 x 2,4 x 1,1 pulg.)(con tapa deslizante abierta)
(ISO 200); el boton de disparo del obturador esta bloqueado durante la carga
Peso (sin pila)
del flash; tiempo de reciclado de aprox. 6 seg.
Aprox 140 g (4,9 onzas)
Modo de reduccion de oios roios
La luz de reducci6n de oj os rajos se enciende durante aprox.
Las espedficaciones son para una pila nueva utilizada atemperatura ambiente normal (20 'C /68 "F).
1 seg. antes del destello del flash
Las especificaciones yel disefio eslan sujelos acambios sin previa aviso.
I
71
Para un uso seguro de la camara
ADVERTENCIA
- No trate de desarmar, reparar a modificar la camara par sf
mismo ya que tiene un circuito de alta tension que puede
provocarle una sacudida eillctrica. Ademas esto puede provocar
una averfa de la camara.
- Si la camara se cayo a se dana, no toque ninguna de las piezas
metalicas interiores que quedaron expuestas, ya que existen
circuitos de alta tension que pueden provocarle una sacudida
electrica. Saque la pila y lIeve la camara a su concesionario
local de Nikon para su reparac ion.
.
- Si sale humo de la camara, deje de uti lizar inmediatamente y
desactive la camara. Oeje enfriar la camara antes de sacarle la
pila. Ll eve la camaraa su concesionario local de Nikon para su
reparacion .
- No sumerja la camara en aguani permita que caigaagua ya que
puede provocar una sacudida electrica a un incendio.
•
•
72
- No haga funcionar la camara en un lugar que tiene gas
combustible porque puede provocar un incendio a explosion.
- No mire directamente hacia el solo una fuente de luz intensa a
traves del visor ya que puede danar su reti na, provocando un
dana permanente en su vision.
- No enrolle la correa alrededor del cuello. Especialmente no la
pase par el cuello de un nino ya que puede asfixiarl o.
- Mantenga las pilas lejos del alcance de los ninos. Si traga
accidental mente una pila, lIame inmed iatamente a su medico.
- No utilice diluyente, bencina u otros agentes activos para la
Iimpieza de la camara ya que puede danar la camara, provocar
un incendio a afectar su salud.
PRECAUCION
- No utilice la camara can las manos mojadas ya que puede sufrir
una sacudida electrica.
- Mantenga la camara lejos del alcance de los nifios. Esto evita
que puedan tragar las pilas a accesorios pequefios.
- Para evitar que pueda recibir heridas en su ojo, sostenga la
camara lejos de su rostro cuando mueva el selector PHC.
- No haga destellar el flash cerca de los ojos de una persona ya
que puede provocarle una ceguera temporal.
- Cuando no este utilizando la camara, cierre la tapa deslizante y
evite dejarlo bajo los rayos del sol. Una luz fuerte que entre par
el objetivo puede hacer que la camara se incendie.
- No Ileve la camara instalada en un tripode ya que puede
golpearla contra alga y provocar heridas en usted u otros.
- No camine mientras mira par el visor ya que puede perder pie,
caerse y lastimarse.
- No tire las pilas al fuego. Tampoco las cortocircuite, desarme a
cal iente la pila ya que puede provocar un incendio a explotar.
- Siga las instrucciones de advertencia impresas en las pilas para
evitar que se produzca un incendio a exploten.
- No utilice pilas no especificadas en este manual de
instrucciones ya que puede hacer que generen calor a se
produzca un incendio.
- Si elliquido corrosivo se escapa de la bateria y mancha su piel
o ropa, lave inmediatamente en agua del grifo. Si entra en sus
ojos, lave inmediatamente con agua y consu lte can su medico.
I
73
Nota=s________________________________~______
No reproduction in any form of this manual, in whole or in part (except for brief quotation in critical
articles or reviews), may be made without written authorization from NIKON CORPORATION.
Nikon
Queda prohibida la reproducci6n total 0 parcial de este folleto (salvo en 10 que se reliere a citas breves
en articulos 0 revistas especializadas), sin la autorizaci6n escrita de NIKON CORPORATION.
NIKON CORPORATION
FUJI BLDG., 2-3, MARUNOUCHI 3-CHOME,
CH IYODA-KU , TOKYO 100-8331, JAPAN
Printed in China T9101 (23)


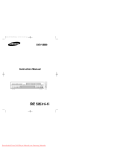
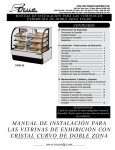


![APSコンパクトカメラの比較テスト結果[PDF形式]](http://vs1.manualzilla.com/store/data/006579504_2-d9432d3d449a5dc4af3b56ecb47906d5-150x150.png)