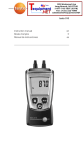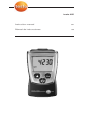
1
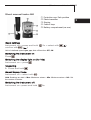
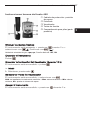
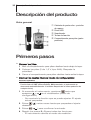
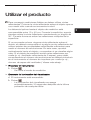
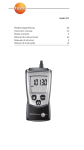
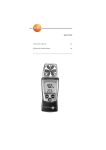
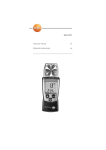
testo 460 Instruction manual en Manual de instrucciones es en pt it es Protection cap: Park position Photo transistor Display Control keys Battery compartment (on rear) fr Short manual testo 460 de Short manual testo 460 11 ( ), Unit of rotational speed: rpm, rps, Auto off function: OFF, ON . Switching the display light on (for 10s) Instrument on > press Measuring i Press and hold . Select display mode Instrument on > select with : Hold: Readings are held > Max: Maximum values > Min: Minimum values > NO.: Set the number of blades. Switching the instrument off: Instrument on >press and hold 2s. ?? ?? Switching the instrument on Press nl 2s > select with sv Basic settings Instrument off > press and hold confirm with ( ): 12 Safety and the enviroment Safety and the environment About this document i Please read this documentation through carefully and familiarise yourself with the product before putting it to use. Keep this document to hand so that you can refer to it when necessary. Hand this documentation on to any subsequent users of the product. i Pay particular attention to information emphasised by the following symbols: With the signal word Warning!: Warns against hazards which could result in serious physical injury if the precautionary measures indicated are not taken. Important. Avoid personal injury/damage to equipment i Only operate the measuring instrument properly, for its intended purpose and within the parameters specified in the technical data. Do not use force. i Never store the product together with solvents, acids or other aggressive substances. i Only carry out the maintenance and repair work that is described in the documentation. Follow the prescribed steps when doing so. Use only OEM spare parts from Testo. Protecting the environment i Take faulty rechargeable batteries as well as spent batteries to the collection points provided for them. i Send the product back to Testo at the end of its useful life. We will ensure that it is disposed of in an environmentally friendly manner. Specification 13 en de Specifications Directives, standards and tests · EC Directive: 89/336/EEC Warranty · Duration: 2 years · Warranty conditions: see guarantee card sv nl · Protection class: IP40 · Ambient conditions: 0...50 °C, 32...122 °F · Storage/transport conditions: -40...70 °C, -40...158 °F · Voltage supply: 2x 1.5 V type AAA · Battery life: 20 h (without display light) · Dimensions: 119x46x25 mm (inc. protection cap) · Weight: 85 g (inc. batteries and protection cap) ?? Further instrument data · Sensor: Optical LED · Parameters: rpm, rps · Measuring ranges: 100...30000 rpm, 1.7...500.0 rps · Resolutions: 0.1 rpm (100.0...999.9 rpm), 0.1 rps (1.7...17.0 rps), 1 rpm (1000...30000 rpm) 1 rps (17.0...500.0 rps) · Accuracies (Nominal temperatue 22 °C, ±1 Digit): ±0.02 % of reading · Measuring rate: 0.5 s ?? Measurement data pt it Technical data es The testo 460 is a rotational speed measuring instrument. It is normally used to measure rotational speed, e.g. of impellers, drums and spindles. fr Functions and use 14 Product description Product description At a glance Protection cap: Park position Photo transistor Display Control keys Battery compartment (on rear) First steps ² Inserting batteries: 1 To open the battery compartment, push the battery cover down. 2 Insert batteries (2x 1.5 V type AAA). Observe the polarity! 3 To close the battery compartment, push the battery cover back on. ² Basic settings (configuration mode): Adjustable functions · Unit of rotational speed: rpm, rps · Auto off function: OFF, ON (instrument switches off automatically if no key is pressed for 10 minutes) 1 When switching the instrument on, press and hold until and appear on the display (configuration mode). - The adjustable function is displayed. The current setting flashes. 2 Press ( ) several times until the desired setting flashes. 3 Press ( ) to confirm the input. 4 Repeat steps 2 and 3 for all functions. - The instrument changes to measuring mode. ² Switching the instrument on: i Press . - Measuring mode is opened. ² Switching the display light on: The instrument is switched on. i Press . - The display light goes out automatically if no key is pressed for 10 seconds. ² Changing the display view/setting the number of blades: As an alternative to entering the impulses per revolution, the setting NO.1 can be selected and the rpm calculated manually from the measurement value (measurement value divided by impulse/number of vanes) Adjustable views/setting the number of blades · · · · Hold: Readings are held. Max: Maximum values since the start of the last measurement. Min: Minimum values since the start of the last measurement. NO.: Set the number of blades. Change the value with . i Press several times until the desired view appears. en fr es it pt sv If no reflective marker can be attached, it must be checked whether the reflective properties of a reflective point on the measurement object are sufficient for rpm measurement. In this case, aim at the measurement object from the vertical, and check whether a value is displayed. If the measurement object displays several reflections per revolution, (e.g. reflective ventilator with 5 vanes), the number of the impulses per revolution (e.g. number of ventilator vanes) must be entered into the instrument (see below) in order to obtain correct rpm measurements. nl The ideal distance to the measurement object is between 10 and 40 cm. During the measurement, always aim at the reflective marker from an angle of approx.30°. This avoids multiple reflections from the surface. ?? For reliable measurements it is necessary to use reflective markers. To apply the reflective marker, wait until the object to be measured has come to a standstill. ?? Using the product de Using the product 15 16 Using the product ² Measuring Warning! Danger of injury from rotating parts! i Keep to the safe distances and comply with the protective measures stipulated by the manufacturer. i Press and hold . - rpm or rps flashes in the display as soon as useful measuring signals are available. The light spot marks the centre of the measuring surface. - When measurement has been completed (release ), the instrument changes to the Hold display view and the reading is held. ² Switching the instrument off: i Press and hold until the display goes out. 3 To close the battery compartment, push the battery cover back on. ± Cleaning the housing: es ?? Tips and assistance ?? nl i Clean the housing with a moist cloth (soap suds) if it is dirty. Do not use aggressive cleaning agents or solvents! it 2 Remove used batteries and insert new batteries (2x 1.5 V type AAA). Observe the polarity! pt 1 To open the battery compartment, push the battery cover down. sv ± Changing batteries: fr en Maintaining the product de Maintaining the product 17 Questions and answers Question Possible causes/solutions Hi or Lo · Readings outside the measuring range (too high, too low): Keep to the permitted measuring range. · Residual capacity <10 min: Change batteries. If we could not answer your question, please contact your dealer or Testo Customer Service. Contact details can be found on the guarantee card or on the Internet at: www.testo.com pt it posterior) en de reposo Fotodiodo Visualizador Teclas de función Compartimento para pilas (parte fr Cubierta de protección : posición es Instrucciones breves del testo 460 de Instrucciones breves del testo 460 27 El instrumento está apagado > presionar seleccionar con ( ) confirmar con ( durante 2 s > ): nl sv Efectuar los ajustes básicos ?? Unidad de velocidad de giro: rpm, rps, Función Auto off: OFF, ON Encender el instrumento . ?? Pulsar Encender la iluminación del visualizador (durante 10 s) El instrumento está encendido > pulsar . ² Medir i Mantener presionado . Seleccionar modo de visualización El instrumento está encendido > seleccionar con : Hold: se mantienen los valores de medición > Max: valores máximos > Min: valores mínimos, NO.: ajustar el número de aspas. Apagar el instrumento El instrumento está encendido > presionar durante 2 s. 28 Seguridad y medio ambiente Seguridad y medio ambiente Indicaciones sobre este documento i Lea atentamente esta documentación y familiarícese con el manejo del producto antes de utilizarlo. Guarde la presente documentación en un lugar accesible de forma que se pueda consultar cuando sea necesario. Entregue la documentación a posteriores usuarios de este producto. i Preste especial atención a la información resaltada mediante los siguientes símbolos: Con la palabra ¡Advertencia!: Esta información advierte de peligros que pueden suponer graves lesiones corporales en caso de que no se respeten las medidas de precaución indicadas. Indicación importante. Evitar daños personales / materiales i Utilizar el producto sólo de acuerdo con el uso previsto y observando los parámetros predeterminados que figuran en los datos técnicos. No forzar el instrumento. i No almacenar nunca el producto junto con disolventes, ácidos u otras substancias agresivas. i Realizar únicamente los trabajos de mantenimiento que vienen descritos en la documentación respetando siempre los pasos indicados. Utilizar solamente piezas de repuesto originales de Testo. Protección del medio ambiente i Llevar las baterías averiadas y las pilas agotadas a los puntos de recogida previstos al efecto. i Enviar el producto a Testo al término de su vida útil. Nosotros nos ocuparemos de eliminarlo ecológicamente. Atención: su producto está marcado con este símbolo. Significa que los productos eléctricos y electrónicos usados no deberían mezclarse con los residuos domésticos generales. Existe un sistema de recogida independiente para estos productos. en fr Descripción de los instrumentos de Descripción de los instrumentos 29 Directivas, normas y controles · Directiva CE: 89/336/CEE Garantía · Duración: 2 años · Condiciones de garantía: véase el libro de garantías nl · Clase de protección: IP40 · Temperatura ambiental: 0 - 50 °C; 32 - 122 °F · Temperatura de almacenaje/transporte: -40 - 70 °C; -40 - 158 °F · Alimentación: 2 pilas de 1,5 V, tipo AAA · Vida útil de las pilas: 20 h (sin iluminación del visualizador) · Medidas: 119x46x25 mm (incl. pilas y cubierta de protección) · Peso: 85 g (incl. pilas y cubierta de protección) ?? Otros datos del instrumento · Sensor: LED óptico · Parámetros de medición: rpm, rps · Rangos de medición: 100 - 30000 rpm; 1,7 - 500,0 rps · Resolución: 0,1 rpm (100,0 - 999.9 rpm) 0,1 rps (1,7 - 17,0 rps) 1 rpm (1000 - 30000 rpm) 1 rps (17,0 - 500,0 rps) · Exactitud (a temperatura nominal de 22 °C, ±1 dígito): ±0,02% del v. m. · Frecuencia de medición: 0,5 s ?? Datos técnicos sv pt Datos técnicos it El testo 460 es un instrumento de medición del número de revoluciones por minuto. Se utiliza generalmente para medir el número de revoluciones de molinetes, cilindros, cintas... es Funciones y aplicación 30 Descripción del producto Descripción del producto Vista general Cubierta de protección : posición de reposo Diodo LED Visualizador Teclas de función Compartimento para pilas (parte posterior) Primeros pasos ² Colocar las pilas: 1 Abrir el compartimento para pilas: deslizar hacia abajo la tapa. 2 Colocar las pilas (2 de 1,5 V, tipo AAA). Respetar la polaridad. 3 Cerrar el compartimento para pilas: deslizar hacia arriba la tapa. ² Efectuar los ajustes básicos (modo de configuración): Funciones ajustables · Unidad de velocidad de giro: rpm, rps · Función Auto off: OFF (desconectado), ON (conectado; el instrumento se desconecta automáticamente 10 minutos después de la última pulsación de cualquier tecla). 1 Al encender el instrumento, presionar hasta que aparezca y en el visualizador (modo de configuración). - Se mostrará la función que se puede ajustar. El ajuste actual parpadea. 2 Pulsar ( ) varias veces hasta que parpadee el ajuste deseado. 3 Pulsar ( ) para confirmar la entrada. 4 Repetir los pasos 2 y 3 para todas las funciones. - El instrumento cambia al modo de medición. ² Encender el instrumento: i Pulsar . - Se inicia el modo de medición. ² Encender la iluminación del visualizador: El instrumento está encendido. i Pulsar . - La iluminación del visualizador se apaga automáticamente 10 segundos después de la última pulsación de cualquier tecla. en fr es it pt sv Si no se puede colocar ninguna cinta reflectante sobre el objeto, se deberá comprobar si en algún punto reflectante del mismo existen las propiedades reflectantes suficientes para medir el número de revoluciones. En este caso, apuntar verticalmente hacia el objeto y comprobar si se visualiza algún valor. Si el objeto de medición emite varias reflexiones por vuelta (p. ej. ventilador reflectante de 5 aspas), para medir correctamente el número de revoluciones se deberá introducir en el instrumento el número de impulsos por vuelta (p. ej., número de aspas del ventilador). Véase más abajo. nl La distancia óptima hasta el objeto de medición está comprendida entre 10 y 40 cm. Durante la medición, apunte siempre sobre la cinta reflectante manteniendo un ángulo de 30°. De esta forma se evitan las reflexiones múltiples de la superficie. ?? Para conseguir mediciones fiables se deben utilizar cintas reflectantes. Colocar la cinta reflectante sobre el objeto que se va a medir sólo cuando se encuentre inmóvil. ?? Utilizar el producto de Utilizar el producto 31 32 Utilizar el producto ² Cambiar el modo de visualización/ajustar el número de aspas: Como alternativa a la introducción de los impulsos por vuelta (p. ej., número de aspas del ventilador), se puede seleccionar el ajuste NO.1 y calcular manualmente el número de revoluciones a partir del valor de medición (valor de medición dividido entre impulsos/número de aspas). Modos de visualización ajustables/ajuste del número de aspas · · · · Hold: se mantienen los valores de medición Max: valores máximos desde el inicio de la última medición. Min: valores mínimos desde el inicio de la última medición. NO.: ajustar el número de aspas. Modificar el valor con . i Pulsar varias veces hasta que aparezca el modo de visualización deseado. ² Medir ¡Advertencia! Peligro de lesiones debido a las piezas en rotación. i Respetar las distancias de seguridad y las medidas de protección indicadas por el fabricante. i Mantener presionado . - rpm o bien rps parpadea en el visualizador en cuanto haya señales de medición aceptables. El punto de luz marca el centro de la superficie de medición. - Tras finalizar la medición (soltar ), el instrumento cambia al modo de visualización Hold; el valor de medición se mantiene. ² Apagar el instrumento: i Presionar hasta que se apague el visualizador. en fr Mantenimiento del producto de Mantenimiento del producto 33 Consejos y ayuda Problemas y soluciones Problema Posibles causas/soluciones Hi o Lo · Valores de medición fuera del rango de medición (demasiado altos o demasiado bajos): respetar el rango de medición permitido. · Capacidad restante <10 min: cambiar las pilas. Si no hemos podido resolver sus dudas, por favor, póngase en contacto con su distribuidor más cercano o con el Servicio Técnico de Testo. Encontrará los datos de contacto en el libro de garantías y en la página de internet: www.testo.com ?? i Limpiar la suciedad de la carcasa con un paño húmedo (agua jabonosa). No utilizar productos de limpieza o disolventes agresivos. ?? ± Limpiar la carcasa: nl sv 3 Cerrar el compartimento para pilas: deslizar hacia arriba la tapa. it 2 Retirar las pilas agotadas e insertar pilas nuevas (2 de 1,5 V, tipo AAA). Respetar la polaridad. pt 1 Abrir el compartimento para pilas: deslizar hacia abajo la tapa. es ± Cambiar las pilas: