Transcript
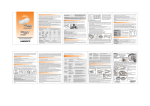
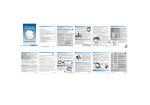
01
1Í- PRESENTACION / PRESENTATION
2 - ATENCION / ATTENTION
Nunca conecte dispositivos o accesórios no indicados en este manual en la salida del
aparato. Use sólamente ducha manual (con manguera original Lorenzetti).
Este producto fue desarrollado para ser usado con agua previamente tratada por la
distribuidora pública.
Do not connect any devices or accessories to this equipment that have not been indicated
in this manual. Use only the hand shower head (with original hose Lorenzetti). This product
has been developed to be used with treated water by a public distributor.
3 - CARACTERÍSTICAS TÉCNICAS / TECHNICAL CHARACTERISTICS
Especificación/ Especification
Modelo/ Model
Tensión / Tension (V~)
Desconec./ Off
Potencia Selector de Tibio/Warm
Temperatura
Power
Temperature Caliente/Hot
(Watts)
Super caliente
Selector
Super Hot
Disyuntor o Fusible/ (Amperios)
Circuit Breaker or fuse ( Ampers)
Grosor de los cables (mm2)***
Size of the cables (AWG)
Presión de funcionamiento Mnima/Minimum
Working Pressure.
Máxima/ Max
Manual de instrucciones
Instructions Manual
Grado de protección/Protecting Degree: IP24
Tradição *
0
1700
**3300
0
**2400
4400
0
**2400
4400
0
**2600
4400
3850
4500
5500
5500
6800
30
35
4
10
6
10
10 kPa (1 mca )
400 kPa (40 mca )
6
8
40
40
6
8
6
8
Para abrir la ducha manual, estire el pino central. Para
cerrar la ducha manual, empuje el pino central (Fig.09).
To open, push the central pin of the hand shower. To close,
pull the central pin of the hand shower. (Picture 09)
09
Abierto
Open
Ducha
Manual
Hand
Shower
Manguera
Hose
Cerrado
Close
6 - Instalación eléctrica / Electric installation
En el caso de construcciones nuevas, providencie la caja de derivación a 13cm de distancia,
arriba de la salida del agua (Fig 14). Desconecte la llave general o disyuntor del circuito que
alimentará su ducha.
Conecte los cables de conexión de la ducha a los cables e la red eléctrica, utilizando los
conectores para garantizar una perfecta conexión. (Fig. 14)
13 cm
Connector Hendiduras/Split 11
1
01
Such installation should take into consideration the voltage (volts), power rating (Watts) and
distance from the shower head to the switchboard, according to the technical characteristics
table. Use two pole circuit breaker for 220V~ two phase supply and a single pole circuit breaker
for 110V~, 127V~ and 220V~. Pict.1
Desconecte el disyuntor o llave fusible del cuadro de distribución de energía eléctrica del
circuito en el cual será instalada la Ducha, antes de iniciar la instalación. (Fig. 02).
50
Conexión Hidráulica/Hydraulic connection
Entrada de agua - Rosca/Water Inlet - Thread 1/2” BSP
Conexión Eléctrica/ Electric Connection
Cables Blancos - Fase/Fase White Wire - Phase/Phase
Fase/Neutro Phase Neutral
Cable verde/amarillo- puesta a tierra
Green/ Yellow wire - Grounding wire
06
Para que se llege a la máxima eficiencia, el sistema de puesta a tierra debe ser
efectuado por profesional capacitado. Un buen sistema de puesta a tierra es
obtenido con la colocación de jabalinas metálicas en el suelo, obteniendose una
impedancia máxima de 10ohms (10W)
Important for your safety /
In order to avoid the risk of electric shocks, make sure to connect the grounding
wire from the product to a grounding system. Do not use the Neutral Wire as the
grounding one.
The grounding system guarantees your safety while home appliances are used.
To a maximum efficiency the grounding system should be done by a qualified
professional.
A good grounding system is obtained with the installation of copper ground rods in
the floor with a maximum impedance of 10 ohms (10W)
Barra de Tierra 02
Land Bar
Barra Neutro
Neutral Bar
Disconnect the circuit breaker or fuse at the main electric
switchboard where the shower is going to be installed,
before starting the installation. (Pict.: 2)
IMPORTANTE: Esta ducha puede ser utilizada en
circuitos con dispositivo diferencial residual ( DR ).
IMPORTANT: This shower can be used by circuits with
residual dispositive ( DR ).
2
3
Conecta/On
5 - Instalación Hidráulica/ Hydraulic Installation
La altura del punto de salida del agua (donde
está instalada la ducha) hasta el piso del box o
de la bañadera debe ser 2 metros,
aproximadamente (Fig. 03).
Verifique si la salida del agua de ½" (pulgada)
está nivelada con el azulejo. En el caso que
esté más de 3mm para adentro, utilice un
prolongador de hierro galvanizado, latón o
plástico. Este prolongador no acompaña la
ducha (Figura 4). En el caso de que la cañería
no coincida con la rosca de ½" BSP, use un
adaptador (Figura 5). Este adaptador no
acompaña la ducha.
03
Caja de agua
Reservoir
Presión
Producto mínima
Product Minimum
Pressure
mca
Lorenducha
Salida
de Agua
Water
Exit
Presión
máxima
Maximum
Pressure
Tecla Conect/Descon
On/Off
No cambie el regulaje de los contactos del
producto, pues el mismo le garantiza el
perfecto funcionamiento del aparato.
6.1 - Puesta a tierra/ Grounding wire
Importante para su seguridad:
Para que no haya riesgos de choques eléctricos, conecte el cable de tierra del producto a un
sistema de puesta a tierra eficaz. No utilice el cable neutro como puesta a tierra.
El sistema de puesta a tierra garantiza su seguridad durante la utilización de aparatos
electrodomésticos.
Turn the circuit breaker from the distribution box which will be used to connect the
shower . Place the ON/Off button in the ON position and the temperature selector
in the position desired. To start the product, open the water tap. Its activation is
automatic
Important: This equipment can heat the water at a temperature above the one
adequate for use. Therefore before and during its use, special care should be
taken so that temperature can be adequately adjusted.
Children and the elderly, sick, physically or mentally ill people must be
supervised if they need to use the equipment. Do not changed the settings of the
electrical contacts, as they guarantee the perfect working of the product.
Retire la tapa trasera del producto, saque
el revestimiento con los cables eléctricos.
Pase el revestimiento por el orificio
superior de la tapa trasera y muévala para
colocarla correctamente en el alojamiento
superior de la capa del producto.(Fig.04).
Remove the back cover of the product,
remove the electric wire cover. Pass de
cover across the upper hole and move it to
place it correctly in the upper part of the
product cover.
Revestimiento
Covering
Teflon
Sealing tape
Tapa
Trasera
Back
cover
05
06
2 metros/Meters
Piso
10 kPa = 1 mca =1 metro linear/ Linear meters
Caliente/Hot
07
5.1 - Instalación de la ducha manual/ Hand Shower Installation.
08
ha
DucJet
4TemperatSet
uras
07
Tibio Super caliente13
Warm Super hot
Tecla Temperaturas
Temperature button
To change the power rating, close the water valve and place the temperature selector in the position
disired.
Control the water temperature by regulating the water flow.
IMPORTANT: For your own safety and to provide a longer life for the components of the unit, only
use the temperatures switch (sliding key) when the shower head is «OFF».
In very hot days use the selector temperature in the position warm (Economic power).
7.2 - Chorro inteligente y chorro multidireccional
Smart water flow and multidirectional flow
Para que no ocurran gotas inconvenientes cuando se utiliza la ducha manual, Lorenzetti creó el
chorro Inteligente.
Este nuevo sistema, que integra el producto, permite la elección del agua solo con chorro
multidireccional o en la ducha manual.
El chorro multidireccional es un sistema que permite mayor comodidad en la
elección de la dirección del chorro de agua durante el baño.
Es normal después del cierre del registro o apertura de la ducha manual, existir
unas gotas por algunos segundos, hasta que toda el agua del interior del chorro
multidireccional se agote
To stop those inconvenient drops when the hand shower is operating, Lorenzetti created
the smart jet. This new system that integrates this product allows you to choose the
water flow in the multidirection jet or in the hand shower.
The multi direction water flow provides comfort to your shower. It directs the water
flow according to your convenience
Water may continue dropping after the water valve is closed or the hand shower is
open due to an excess of water in the mulitidirectional flow.
Reductor
de Presión
Pressure
Reducer
Chorro
Multidireccional
Multidirectional
Water flow
Chorro
Multidireccional
Multidirectional
Water flow
8 - Limpieza y mantenimiento/ Cleaning and maintenance
Chorro
Multidirecional
Multidirectional
water flow
Manguera
Hose
Ducha Manual
Hand Shower
Soporte de
Fijación
Fixing support
1,0 mca 40,0 mca
7.1 - Control de temperatura/ Temperature control
En el caso de preferir mayor o menor calentamiento,
cierre el registro y coloque la tecla de selección de
temperatura en la posición que más le agrade
(Fig.:13).
La temperatura del agua también puede ser regulada
a través del registro.
Para dias más calientes posicione la tecla selectora
de temperatura en la opción tibia (posición
económica).
IMPORTANTE:
Para su seguridad y mayor vida útil de los
componentes del producto accione la tecla selectora
de temperatura sólamente con el registro cerrado.
04
Revestimiento/Covering
Perforacion
superior
de la tapa
Cover upper
hole
mca = metro de columna de agua
Water meters column.
12
3
Attention! Do not use plugs nor socket for the product installation.
1) Uncover the tip of the wires. The length should have the same lenght of the groove of the
connectors .
2) Put the wires into the connector without twisting them.
3) Hold the wires and turn the connectors clockwise until the wires become firm.
Instale la Ducha girándola suavemente sin usar herramientas.(fig.:06). No usar el
chorro multidireccional como palanca para instalar la ducha.(fig.:07).
Install the shower head turning if softly without the tools. (Pic 06). Do not use the
multidirectional shower as a lever to install the product. (Pic 07).
Evite quema de la resistencia dejando salir agua para llenar la cámara de
calentamiento, antes de conectar el producto a la red de energía eléctrica.
To avoid damaging the heating element, let water run through the water chamber
before connecting the unit into the electricity.
Verifique si hay algun escape de agua y cierre el registro de agua.
Este procedimiento debera ser realizado cuando instale el producto, en eventuales
cambios de la resistencia y siempre que el producto es retirado de la pared por algun
motivo.
Check if there is any leakage and than close the water valve. This procedure must be
when the product is to be installed, when changing heating elements and every time
the product is removed from the wall that any reasons..
Capa/Cover
7 - Utilización/ Usage
Para el producto funcionar, conecte el disyuntor en el cuadro de distribución del
cual su ducha hace parte. Coloque el botón de la temperatura en la posición
conecta y el botón de temperaturas en la posicion que más le agrade. Después
precisa sólamente abrir el registro del agua. El accionamiento de la Ducha es
hecho automáticamente.
Importante: Niños, personas de edad,
enfermos o físicamente debilitados, debem
ser supervisionadas durante la utilización del
producto.
The height from the water exit where the shower is to be installed up to the floor or bathtub
should be of approximately 2 meters. (Pict.: 3)
Check if the water exit of ½" is leveled with the tile. If it is more than 3 mm inwards, use a
galvanized iron, brass or plastic prolonger. This prolonger is not supplied. (Pict.: 4). If the pipe
does not match with the thread of ½", use an adaptor (Pict.: 5). This adaptor is not supplied.
Abra el registro y deje correr bastante agua para eliminar todas las suciedades del caño. Use
cinta veda rosca en el niple de entrada del agua del producto
!El reductor de presión del aparato fue previamente colocado en el niple. Para presiones menores
que 8mca 80kPa, retire el reductor. In case the piping system does not match with the 1/2” BSP
thread, use an adaptor. This adaptor is not supplied. Turn on the register and let the water run to
eliminate dirt particles in the piping. Use sealing tape in the nipple of the water inlet. The pressure
reducer has been already set in the nipple. For pressures lower than 8 m.c.a. 80kPa, remove the
reducer.
IMPORTANTE:Instale la Ducha en el caño sin usar herramientas.
IMPORTANT: Install the shower head with no tools.
Ducha
Shower Head
10
Atención! No use ningún tipo de toma o interruptor para la
instalación de este aparato.
1) Pele las puntas de los cables, teniendo como medida la
largura de las hendiduras del conector .
2) Sin torcer los cables, introdúzcalos con fuerza.
3) Sostenga los cables y gire el conector en el sentido horario
hasta que los mismos esten seguros sin moverse.
For new constructions, make sure to provide the
derivative box 13 centimeters of distance above
the water exit. (Picture 14)
Turn off the main switch and the circuit breaker
that feeds your shower head. Connect the
shower cables to the wires of the electric
network, use the connectors as indicated in the
technical characteristics table.
Certifíquese que el voltaje del producto grabado en la
capa, corresponde a la tensión de la red eléctrica
(110V~,127V~ o 220V~) Fig. 1. Verifique o providencie
una línea directa del cuadro de distribución (Fig2)
usando cables y protección (disyuntor) llevando en
consideración los valores de voltaje, potencia y
distancia del producto hasta el cuadro de distribución,
conforme tabla de características técnicas. Use
disyuntor bipolar para 220V~(fase fase) y disyuntor
unipolar para 110V~, 127V~ o 220V~(fase-neutro).
Make sure the voltage of the shower head is adequate
to the Voltage of the line which comes from the main
switchboard (110V~, 127V~ Or 220V~) Pict 1. - The unit
must be installed to a direct line that comes from the
main switchboard (Pict 2) using adequate cables and
protection (circuit Breaker).
220
127
0
1800
**3200
* La Resistividad del agua suministrada para este producto a 22ºC, no debe
ser inferior a 1300 ohms x cm.
** Potencia ecónomica
*** Para distancias superiores a 30 m, use cables de mayor sección.
*The water resistivity for this product at 22º C, Cab not be lower than 1300 ohms xcm.
**Economic power.
***For distances over 30 meters, thicker cables must be used.
05
5.2 - Funcionamiento de la ducha manual/ Hand Shower Working
04
08
Antes de iniciar la limpieza del producto, desconecte el disyuntor o llave fusible del cuadro
de distribución de energía eléctrica del circuito en el cual la ducha está instalada.
Utilice solamente un paño húmedo para la limpieza, pues el uso de productos químicos
pueden perjudicar el aparato.
Para la limpieza del esparcidor, desenrósquelo moviéndolo del cuerpo y utilice un cepillo
para retirar las suciedades. Certifíquese de la limpieza total, observando la desobstrucción
de todos los orificios, lo que le proporcionará un baño mucho más agradable.
Después de la limpieza recoloque el esparcidor enroscándolo nuevamente en el cuerpo de
la ducha.
En el caso de dudas, entre en contacto con personal especializado.
Suciedades que pueden venir en el agua pueden perjudicar el funcionamiento del producto
causando entupimientos en el tejido de contención de residuos (item 8.1) Si el agua
suministrada presenta estas características, providencie la instalación de dispositivos/ filtros
capaces de evitar que las suciedades lleguen al producto. Certifíquese que éstos
dispositivos sean adecuados y no comprometan la presión mínima de funcionamiento.
Before cleaning the product, disconnect the circuit breaker or fuse key in the main switchbox
from the circuit which the shower head is installed.
Use a damp cloth only for cleaning, chemical products may damage the product.
To clean the multi direction water flow chamber (Pic 11) unscrew and remove it. Use a brush
to clean the holes and remove all the dirt. Make sure the orifices are cleaned, it will provide
a more pleasant shower.
After cleaning, replace the spreader by screwing it in the shower head. In case of doubts
contact a qualified person.
Dirt antd particles that may be in the water may damage the product operation blocking the
residues net (Item 8.1). If the water supplied present such characteristics, install devices/
filters that avoid the dirt from entering the product. Make sure devices are adequate and do
not jeopardize the minimum working pressure.
40 cm
ATENCION: Lea las instrucciones de instalación, antes de instalar el aparato. Guarde este
manual para futuras consultas. La instalación de este producto debe ser hecha por
personas capacitadas.
ATTENTION: Read carefully all installation instructions before installing the product. Keep
this manual for further reference in case needed. The installation of this equipment must be
done by a professional.
DUCHA 4 TEMPERATURAS
4 TEMPERATURES SHOWER HEAD
03
02
4 - Preparación para Instalación/ Preparing to Install
Para fijar el soporte (Fig 12), perfore
la pared utilizando una broca de
5mm (1/4") a una altura adecuada al
alcance de las manos. Coloque los
bujes en los tornillos y fije el
soporte con los tornillos. Obs:
Certifíquese de la localización de
los caños del agua empotrados en
la pared para no perforarlos.
Coloque la ducha manual en la otra
extremidad de la manguera y
posiciónela en el soporte
To fix the support (Pic 12), make a
hole using a 5 mm drill (1/4") at
hand’s reach. Put the bushing
into the holes and fix the support
with the screws. Obs.: Before
drilling make sure where the water
pipes are.
Place the hand shower on the
other end of the hose and hang it
on the support.
09
9 - Eventuales problemas y sus soluciones/ Frequent questions and answers
09
Observe el cuadro abajo antes de llamar personal especializado
Read the table below, before request especciallized technical support
Probable causa
Probably reason
Problema
Problem
La ducha no
conecta automáticamente.
The shower
does not turn
ON automatically
No sale agua
por la ducha
The water does
not flow from the
shower head
Disyuntor desconectado
Circuit breaker is turned OFF
Solución / Solution
Accione el disyuntor /Turn the cricuit breaker key ON
O boton de comando
esta en la posicion
desligado
The temperature button
is on OFF position
Posicionar el botón del comando de temperaturas
en la que mas le agradar.
Press the selector button in the temperature that
please you most.
El registro esta
cerrado o existe
aire en la cañeria
The bathroon register
is closed or there is
air in the pipes
Abra el registro principal y/o as canillas que
pertenecen al mismo circuito hidraulico,
hasta retirar todo el aire.
Open the register and/or the taps and let the
water flow to remove the air.
La ducha no
calienta o
caliente poco
aun que el boton este en la
posiciónmaximo.
The shower is
not heating
enough even
when the
button is on the
hottest position
Cableado inadecuado
Inadequate hardwired
Tensión electrica
baja
Low Tension
Consulte un profesional para verificar si el cableado
esta de acuerdo con las espeficicaciones del manual
Contact a professional to check the hardwire is proper
Consulte un profesional para verificar si la tensión
eléctrica está abajo de los valores nominales de
suministro (127V~ o 220V~). En este caso,
comunique a la proveedora de su región.
Contact a qualified technician, to verify your electrical
system. If the nominal voltage of your system is
under the values specified by your electrical supplier
(127V~or 220V~), contact the utility responsible for
your electrical supply.
Importante: Ocurriendo quema de la resistencia, substitúyala por originales Lorenzetti para
este producto. En caso de defectos en los cables de alimentación del aparato, no los
substituya, retire el aparato y llevelo a personal especializado.
Important: Replace the heating element for originals Lorenzetti.
In case there are defects in the feeding wires do not replace them, remove the equipment
and take to qualified technician.
371398 - FEV 2009
Lorenzetti S.A. Indústrias Brasileiras Eletrometalúrgicas
Av. Presidente Wilson, 1230 - CEP 03107-901
Mooca - São Paulo - SP - Made in Brazil
C.N.P.J. 61.413.282/0001-43
www.lorenzetti.com.br
[email protected]