1
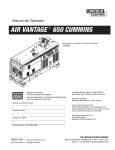
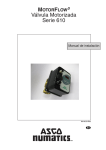
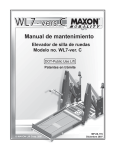
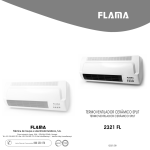
Termoventilador cerámico
Ceramic fan heater
Model TGV200
INSTRUCCIONES DE INSTALACIÓN Y USO
INSTALLATION AND OPERATING INSTRUCTIONS
Lea estas instrucciones atentamente antes de instalar o utilizar el aparato por primera vez.
Please read these instructions before installing or using this appliance for the first time.
1.- INFORMACION IMPORTANTE
Lean con detalle estas instrucciones antes de instalar o utlizar este aparato por primera vez. La garantía no cubrirá los daños causados
por la no observancia de estas instrucciones.
Las instrucciones deben conservarse para futuras referencias. Este manual debe ser conservado y dado a cualquier nuevo usuario.
Este aparato está diseñado sólo para uso doméstico.
El uso de este calefactor está prohibido en areas con presencia de gases explosivos o sustancias inflamables.
NO USE EL RADIADOR PARA SECAR ROPA.
Asegúrese de que el suministro eléctrico a la base a la cual el radiador está enchufado es adecuado a lo mostrado en la placa de
características del aparato.
Mantenga la manguera de alimentación lejos de las partes calientes del calefactor.
No deje cable colgando del extremo de mesas o escalones ni deje que entre en contacto con cualquier superficie caliente.
No utilice el radiador mientras duerma. Nunca deje el radiador desatendido mientras esté en funcionamiento.
Un manejo inadecuado puede causar heridas graves.
Siempre desenchufe el radiador cuando lo mueva de un sitio a otro.
No tire del cable sino de la clavija para desconectar el calefactor de una toma de corriente.
No utilice alargadores de cable. Esto puede causar sobrecalientamiento y causar un incendio.
No toque nunca el radiador estando descalzo o con las manos mojadas o húmedas.
No deje ningún objeto encima del radiador, cubriendo la rejilla u obstruyendo el flujo de aire.
El radiador debe estar desconectado durante la instalación y su limpieza.
No instalar el radiador en frente o debajo de una toma de corrriente.
El radiador debe ser instalado de tal forma que los interruptores u otros controles no puedan ser tocados por alguien que esté usando
el baño o la ducha.
No instalar el radiador cerca de cortina u otros objetos inflamables ni debajo de ropa mojada que pueda gotear.
Es importante mantener una distancia de 80 cm entre el radiador y cortinas u otros objetos inflamables.
Nunca ajuste la inclinación de la rejilla estando en funcionamiento. Para cambiar el ángulo de la rejilla, aconsejamos esperar 15
minutos después de apagar el radiador.
Evitar el uso del radiador donde haya niños o personas incapacitadas sin ser supervisadas por una persona responsable.
Nunca desmonte los componentes del radiador ni los reemplace por otros que no cumplan los requisitos de seguridad. Si el cable de
alimentación está dañado debe ser sustituido por el fabricante o por su agente oficial para evitar un peligro.
Este radiador no está destinado a ser usado por personas (incluidos niños) cuyas capacidades físicas, sensoriales o mentales estén
reducidas o con falta de conocimiento o experiencia, salvo si son supervisados por una persona responsable de su seguridad.
Los niños deben ser supervisados para evitar que jueguen con el radiador.
El radiador debe ser apagado y desconectado de la red para evitar accidentes cuando no esté a la vista o sin usar por mucho tiempo.
Asegúrese de que el voltaje es compatible con el del radiador indicado en la placa de características.
La presencia en el aire de humo de tabaco o polución puede, con el tiempo, manchar las paredes y zona próximas al radiador.
Sitúa el calefactor sobre una mesa o en una superficie plana.
No utilizar en exteriores.
ATENCIÓN: Para evitar sobrecalentamiento no cubrir el calefactor.
2.- INSTALACIÓN
Abra la caja para sacar el radiador y todos los accesorios.
Cuando instale el calefactor tenga en cuenta las distancias indicadas en la siguiente figura.
≥20cm
≥20cm
≥100cm
Elija un lugar adecuado para instalar el termoventilador. El termoventilador debe colgarse de la pared al menos a 100cm del suelo. La
distancia libre a los lados debe ser mayor de 20cm.
Realice dos agujeros en la pared separados 15 cm uno del otro y coloque los tacos. Parte de los tornillos debe ser dejada fuera del
taco para poder colgar el termoventilador.
Agujeros utilizados para
colgar el termoventilador de
la pared.
Nota: Por favor, asegúrese de que los tornillos están sujetos y de que el termoventilador está
colgado de la pared firmemente.
ATENCIÓN: Cuando instale este equipo de forma fija, puede que necesite cortar la clavija y conectar
los tres conductores de la manguera de alimentación a una caja de conexión. Respete el siguiente
código de colores:
Fase:
Marrón
Neutro:
Azul
Tierra:
Amarillo/Verde
Se recomienda consultar con un electricista cualificado para solicitar ayuda y tener la seguridad de
que la instalación cumple la legislación vigente.
3.- FUNCIONAMIENTO
ATENCIÓN : Elija siempre un emplazamiento seguro para el radiador, teniendo en cuenta todas las importantes instrucciones de
seguridad del punto 1.
1
1.
2.
3.
4.
Indicador luminoso de funcionamiento
Mando del termostato
Selector de potencia
Salida de aire
2
3
4
Antes de utilizar el termoventilador asegúrese de que está en una superficie plana y estable. Se pueden ocasionar daños si se coloca en
una superficie inclinada.
Apague todos los controles del termoventilador y, entonces, enchufe la clavija a una toma de corriente AC estándar. Asegúrese de que la
clavija encaja firmemente en la toma.
Gire el mando del termostato (2) a la posición MAX, entonces gire el selector de potencia (3) de 0 (OFF) a
(FAN) para activar el motor
del ventilador y compruebe que funciona correctamente.
Gire el selector de potencia (3) de
(FAN) a (LOW) o
(HIGH) para seleccionar la potencia deseada:
(LOW) para 1000W
(HIGH) para 2000W.
Cuando se alcance la temperatura deseada gire el mando del termostato (2) hasta que el indicador luminoso de funcionamiento (1) se
apague. El termostato mantendrá la temperatura así seleccionada.
4.- MANTENIMIENTO
Este radiador no requiere de ningun mantenieminto especial. Limpie el polvo con un trapo suave y seco, sólo cuando la unidad esté
desconectada y fría. No utilice disolventes ni productos abrasivos.
No sumerja el termoventilador en agua.
Este termoventilador ha sido fabricado dentro de un sistema de calidad asegurada y conforme a procesos respetuosos con el medio
ambiente. Una vez finalizada la vida útil del aparato, llévelo a un punto limpio para que sus materiales puedan ser reciclados de forma
adecuada.
5.- DATOS TÉCNICOS
Modelo:
Tensión:
Potencia:
Clase II
Peso neto:
TGV200
230V~
2000W
IP23
2 kg
1.- IMPORTANT INFORMATION
Read these instructions carefully before installing or using this heater for the first time. The guarantee will not cover damage caused by
not following these instructions.
The instructions should be retained for future reference. This guide must be kept and given to any new owner.
This appliance is designed for domestic use only.
The use of this heater is forbidden in areas where gases, explosive or inflammable substances are present.
DO NOT USE THIS HEATER TO DRY CLOTHES.
Ensure the power supply to the socket into which the heater is plugged is in accordance with the rating label on the heater.
Keep the power cable away from the hot body of the heater.
Do not let the cable hang over the edge of a table or counter or let it come into contact with any hot surfaces.
Do not use the heater while sleeping. Never leave the heater unattended while it is operated.
The improper handling can cause injuries.
Always unplug the heater when moving it from one location to another.
Do not pull on the connection cord, but rather on the plug, to separate the appliance from the mains.
Do not use extension cable. This could overheat and cause fires.
Never touch the heater with wet or humid hands or barefoot.
Do not leave any object above the heater, covering the grill, or restricting the air flow.
The heater must be disconnected during installation and cleaning.
The heater should not be located in front of, or under an electrical socket.
The heater should be positioned so the controls cannot be used when using the shower or bath.
The location of the heater should not be close to curtains or other inflammable articles, and the heater must not be located immediately
below dripping clothes.
It is important to maintain a minimum distance of 80 cm between the heater and curtains, or any other combustible materials.
Never rotate the heating part of the appliance during operation. To change the tilt angle of the heating part, we advise you to wait for 15
minutes after the appliance has been switched off.
Avoid using the heater where there are children or disabled persons without being adequately supervised by a responsible person.
Never dismantle the components of the heater or replace the components with the ones that do not meet the safety requirements. If the
supply cord is damaged, it must be replaced by the manufacturer or its service agents or a similarly qualified person in order to avoid a
hazard.
The appliance is not intended for use by persons (including children) with reduced physical, sensory or mental capabilities, or lack of
experience and knowledge, unless they have been given supervision or instruction concerning use of the appliance by a person
responsible for their safety.
Children should be supervised to ensure that they do not play with the appliance
The heater should be switched off and be disconnected from electric supply to avoid accidents when it is not being watched or not in
use for a long time.
Ensure the voltage is suitable for the heater. Refer to technical label.
The presence in the atmosphere of tobacco smoke or atmospheric pollution can with time discolour the heater surface.
Stand the appliance on a table or flat surface.
Do not use outdoor.
WARNING: In order to avoid overheating, do not cover the heater
2.- INSTALLATION
Open the box to take out the heater and all the accessories.
When you install the heater, please refer to the picture.
≥20cm
≥20cm
≥100cm
Select a suitable place to install the heater, heater should be hung on the wall at least 100cm above the floor, the distance away from
two side wall should be more than 20cm.
Drill two holes on the wall, with the distance between as 15cm and then locate the anchors in the holes. Part of the screws should left
outside the wall in order to hang the heater.
Holes used to hang the
product on the wall
Note: Please make sure the screw fixed in the hole tightly and the heater hanged on the wall firmly.
WARNING: When you install your appliance in fixed position, you may cut the plug and connect the
three conductors of the supply cord to a connection box in respecting the polarities as following:
- Live: Brown
- Neutral: Blue
- Earth: Yellow/Green
If you are not sure, it’s recommended to ask a qualified electrician for any help and to be sure that
your installation is in accordance with the local regulations.
3.- OPERATION
WARNING : Always choose a safe location for the heater, keeping in mind the safety instructions outlined in point 1.
1
1.
2.
3.
4.
Power indicator light
Thermostat knob
Power selector
Air outlet
2
3
4
Before using the heater make sure that it is on a flat and stable surface. Damage may occur if it is placed on an incline or decline.
Turn off all the controls of the heater, and then plug the heater power plug directly into a standard AC outlet. Be sure plug fits tightly into
outlet.
Rotate the thermostat regulator (2) clockwise to the position MAX, then rotate the power selector (3) from 0 (OFF) to
(FAN) to activate
the wind-motor, and check if it acts normally.
Rotate the power selector (3) from
(FAN) to (LOW) or
(HIGH) to choose the desired power:
(LOW) for 1000W
(HIGH) for 2000W.
When the desired temperature is reached, rotate the thermostat regulator (2) counter clockwise until the pilot light (1) goes off. The desired
temperature will be kept constant by the thermostat.
4.- MAINTENANCE
Clean and dust with a dry, soft cloth only when the unit is disconnected and cold.
Do not use solvents or abrasive products for cleaning.
Do not immerse the heater in water.
Do not allow the interior to get wet as this could create a hazard.
In case of malfunction or doubt, do not try to repair the heater yourself; it may result in a fire hazard or electric shock.
This thermal radiator has been manufactured under an assured quality system using environment friendly processes.
Please take the heaters to a clean point once their useful life is finished, in order to recycle their materials in the right way.
5.- SPECIFICATIONS
Model: TGV200
Voltage: 230V~
Input:
2000W
Class II IP23
Net weight: 2kg
E
El símbolo en el producto o en su embalaje indica que este producto no se puede tratar como desperdicio normales del hogar.
Este producto se debe entregar al punto de recolección de equipos eléctricos y electrónicos para reciclaje. Al asegurarse de que este
producto se deseche correctamente usted ayudará a evitar posibles consecuencias negativas para el ambiente y la salud pública, lo cual
podría ocurrir si este producto no se manipula de forma adecuada. Para obtener información más detallada sobre el reciclaje de este
producto, póngase en contacto con la administración de su ciudad, con su servicio de desechos del hogar o con la tienda donde compró el
producto.
Estas disposiciones solamente son válidas en los países miembros de la UE.
EN
The symbol on the product or in its packaging indicates that this product may not be treated as household waste. Instead it
shall be handed over to the applicable collection point for the recycling of electrical and electronic equipment. By ensuring this product is
disposed of correctly, you will help prevent potential negative consequences for the environment and human health, which could otherwise
be caused by inappropriate waste handling of this product. For more detailed information about recycling of this product, please contact your
local city office, your household waste disposal service or the shop where you purchased the product. These instructions are only valid in
the EU member states.
www.elnur.es
Tf. de atención al cliente:
+34 902 19 57 14
Como parte de la política de mejora continua Elnur s.a. se reserva el derecho a realizar modificaciones técnicas sin previo aviso.
As a part of the policy of continuous product improvement Elnur s.a reserves the right to alter specifications without notice.
@2011
Cod. 90210200 rev.1