1
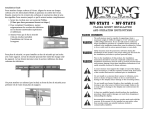
Sopladora a Gasolina
Gas Blower
Manual de Usuario y Garantía.
User’s Manual and Warranty.
SG530
ATENCIÓN: Lea, entienda y siga las instrucciones de seguridad contenidas en este
manual, antes de operar esta herramienta.
WARNING: Read, understand and follow the safety rules in this manual, before operating this tool.
SG530 manual.indd 1
23/06/15 11:48
E S P A Ñ O L
E N G L I S H
CONTENIDO
CONTENT
Introducción
3
Introduction
9
Normas generales de seguridad
3
General safety rules
9
Características
4
Features
10
Desembalaje y ensamble
5
Unpacking & assembly
10
Instrucciones de operación
6
Operation instructions
12
Mantenimiento
7
Maintenance
13
Solucionador de problemas
8
Troubleshooting
13
Especificaciones técnicas
8
Technical data
14
Notas
15
Notas
15
Garantía
16
Warranty policy
16
2
SG530 manual.indd 2
23/06/15 11:48
E S P A Ñ O L • Ma n u a l
INTRODUCCIÓN
Este producto tiene características que harán
su trabajo más rápido y fácil. Seguridad, comodidad y confiabilidad fueron previstos como
prioridad para el diseño del mismo, haciendo
más fácil su mantenimiento y operación.
ADVERTENCIA: Lea atentamente el manual
antes de intentar usar este producto. Asegúrese de prestar atención a todas las advertencias
y las precauciones a lo largo de este manual.
NORMAS GENERALES DE SEGURIDAD
ADVERTENCIA: Lea y entienda todas las
instrucciones. El no seguir las instrucciones
listadas abajo puede resultar en una descarga
eléctrica, fuego y/o lesiones personales serias.
GUARDE ESTAS INSTRUCCIONES PARA
FUTURAS REFERENCIAS
ADVERTENCIA: Al utilizar la unidad, para
reducir el riesgo o lesiones personales graves
y daños a la unidad siempre se debe de seguir
las instrucciones y precauciones básicas de seguridad, incluyendo las que se mencionarán a
continuación.
NOTA: Lea estas instrucciones antes de utilizar
este producto y guardelas para futuras referencias.
+ QUE HACER
1. VISTA CON ROPA ADECUADA que proporcione protección al usuario, tales como pantalones largos, zapatos de seguridad (antideslizantes), guantes de trabajo pesado, casco, un
escudo de seguridad, o gafas de protección
ocular y un buen grado de auriculares u otras
barreras de sonido para protección auditiva.
2. REABASTEZCA DE COMBUSTIBLE EN UN LUGAR SEGURO. Abra lentamente el tapón de
combustible para liberar toda la presión que
pudo haberse formado en el depósito de combustible. Siempre limpie la unidad de cualquier
derrame de aceite o combustible antes de encenderla. Para prevenir un incendio, alejese al
menos 10 pies (3 metros) de la zona donde se
reabastecio antes de comenzar la operación.
3. APAGUE EL EQUIPO antes de dejarlo a un
lado y tambien antes de instalar o remover accesorios.
d e U su a ri o
4. MANTENGA TODOS LOS TORNILLOS Y
AFIANZADORES APRETADOS. Para tener buenas condiciones de funcionamiento nunca opere este equipo si no está bien ajustado o completamente ensamblado con seguridad.
5. MANTENGA EL MANERAL SECO. Limpie y
mantenga libre de aceite y mezclas.
6. ALMACENE EL EQUIPO LO MÁS ALEJADO
POSIBLE DE PROBABLES FUENTES DE INCENDIO.
Calentadores de agua, secadoras de ropa, calentadores portátiles, etc.
7. SIEMPRE MANTENGA el motor libre de residuos.
8. EL FUNCIONAMIENTO DEL EQUIPO debe ser
restringido el uso de personas no capacitadas.
9. A LOS OPERARIOS CON PROBLEMAS RESPIRATORIOS y los que operan el soplador en
lugares con polvo en exceso se deberá utilizar
una mascara de protección.
10. OPERE EL SOPLADOR en horas razonables,
no muy temprano en la mañana ni muy tarde
por la noche debido a que puede incomodar a
las personas que están descansando.
11. Opere la máquina en el nivel mas bajo posible al realizar el trabajo.
12. Use rastrillos y escobas para aflojar los desechos antes del soplado.
13. En condiciones de exceso de polvo, humedezca ligeramente las superficies.
14. Use la extensión completa del soplador de
modo que pueda trabajar más cerca el suelo.
15. Cuide que no haya niños, mascotas y ventanas abiertas y asi pueda tener una operación
más segura.
+ QUE NO HACER
IMPORTANTE: No use otro combustible que
no sea el que se menciona en este manual,
nunca use gasolina pura, asegúrese de que sea
una mezclada con aceite para motor de 2-tiempos, de no hacerlo tendra daños permanentes
en el motor.
1. NO FUME mientras esta operando o reabasteciendo la máquina.
2. NO OPERE SIN EL ESCAPE instalado.
3. NO TOQUE o deje que sus manos o cuerpo
entren en contacto con el escape caliente o la
bujía.
4. DEBIDO AL PELIGRO y humos excesivos, nunca opere en lugares pobremente ventilados.
3
SG530 manual.indd 3
23/06/15 11:48
5. NUNCA DIRIJA el soplador hacia las personas, animales, construcciones, ventanas, autos,
etc.
6. NO OPERE la unidad sin la cubierta instalada
para no entrar en contacto con el propulsor.
7. NO COLOQUE la unidad con el motor caliente en presencia de materiales inflamables.
8. NO OPERE POR PERIODOS PROLONGADOS,
deje de operar periódicamente.
9. NO opere el equipo si se encuentra bajo la
influencia de drogas, alcohol o medicamentos.
10. NO opere la herramienta en atmósferas
explosivas o cercanas a líquidos y gases flamables, ya que puede ser causa de una explosión
o incendio.
11. NO UTILICE ropa suelta, bufandas, cadenas
ni cabello suelto, ya que las partes móviles pueden atrapar dichos artículos y ocasionar lesiones serias al operario.
12. NO reabastezca de combustible cuando la
máquina este caliente.
13. NUNCA permita a menores utilizar este
aparato.
IMPORTANTE: Nunca agregue, remueva, o
altere cualquier componente de este producto.
Hacerlo puede ser la causa de riesgos y heridas
personales.
22
CARACTERÍSTICAS
CONOZCA SU HERRAMIENTA
Antes de intentar usar este producto, familiarícese con todas sus características de operación
y requerimientos de seguridad.
1. GATILLO DE ACELERACIÓN.
2. INTERRUPTOR DE BLOQUEO.
3. INTERRUPTOR DE ENCENDIDO/APAGADO.
4. MANGO SUPERIOR.
5. ARRANCADOR.
6. CUBIERTA DE BUJÍA Y BUJÍA.
7. CUBIERTA DEL FILTRO DE AIRE.
8. AHOGADOR.
9. TANQUE DE COMBUSTIBLE.
10. TAPA DE TANQUE DE COMBUSTIBLE.
11. ARNÉS.
12. CEBADOR.
13. MANGO DE CONTROL.
14. TUBO DE OPERACIÓN.
15. UNIÓN DEL ACELERADOR.
16. TUBO FLEXIBLE.
17. ABRAZADERA DE LA MANGUERA.
18. CUBIERTA DEL MOFLE.
19. PANTALLA ANTI-CHISPA.
20. SOPORTE TIPO MOCHILA.
21. TUBO INTERMEDIO.
22. BOQUILLA DE 56mm.
23. BOQUILLA CONCENTRADORA DE 45mm.
3
2
23
4
5
1
6
21
7
8
9
20
13
10
11
12
14
19
18
17
16
15
4
SG530 manual.indd 4
23/06/15 11:48
E S P A Ñ O L • Ma n u a l
ENSAMBLE Y AJUSTES
Retire con cuidado el soplador y los accesorios
de la caja. Asegúrese de que todos los artículos
de la lista estén dentro del empaque. Inspeccione el soplador y asegurese de que no haya
ninguna rotura o daño durante el envío.
ENSAMBLADO
INSTALANDO EL TUBO FLEXIBLE
Coloque la abrazadera (C) de la manguera en
el tubo flexible antes de conectar el tubo flexible y el tubo de salida del ventilador juntos.
Conecte el tubo flexible (B) al tubo de salida
del ventilador (A) con la abrazadera y apriete
bien.
INSTALANDO LA BOQUILLA DE OPERACIÓN
NOTA: Mantenga la soga del arrancador lo más
recta posible cuando conecte los tubos de la sopladora.
1. Coloque la máquina sobre una superficie
plana durante el ensamble. Asegúrese de que
el mecanismo de tornillo con la abrazadera
esté colocado lejos del operador.
2. Coloque la abrazadera de la manguera (G).
en el tubo flexible y en el tubo de operación.
3. Gire la marca de anillo giratorio (D) para que
se alinee con el mango del acelerador (F). Inserte el tubo de operación (E) en el tubo flexible
(B) y apriete firmemente con una abrazadera
de manguera (G).
4. Coloque los clips que aseguran el cable del acelerador a ambos extremos del
tubo flexible y asegúrelo.
d e U su a ri o
INSTALE EL TUBO INTERMEDIO Y LA BOQUILLA
CONCENTRADORA
Conecte tubo intermedio (H) con la boquilla
de aire (I). Una ambos tubos y enrosquelos en
sentido de las manecillas del reloj hasta que se
aseguren.
AJUSTE LA MOCHILA, EL ARNÉS Y EL MANGO
DE CONTROL
1. Coloquese el soplador pasando los brazos
por las correas por sobre los hombros, como si
estuviera poniendo una chaqueta.
2. Una vez que se han hecho los ajustes a las
correas para la comodidad del usuario, quitese
el soplador de la espalda y coloquelo sobre una
superficie plana en posición vertical.
3. Ajuste el arnés de la mochila y el mango de
control
LLENADO DE COMBUSTIBLE
MEZCLA DE COMBUSTIBLE
Use una mezcla de gasolina sin plomo con aceite para motor de 2 tiempos. Mezcle gasolina y
aceite a una proporción de 40:1.
ADVERTENCIA: Nunca utilice solamente
gasolina en su unidad. Esto puede ocasionar
daños permanentes. Nunca utilice una mezcla
de combustible que haya permanecido almacenada por más de 90 días.
ADVERTENCIA: Se recomienda el uso de
aceite para motor de 2 tiempos grado premium con una proporción de 40:1, no debe de
utilizar ningun aceite para motor de 2-tiempos, que indique como recomendación, una
mezcla con una proporción de 100:1
Si la causa de daños en el motor es debido a
una lubricación insuficiente, la garantía no
procederá.
• Agregue el aceite a un contenedor de gasolina adecuado, permitiendo la distribución de la
mezcla de gasolina con aceite. Agitar el contenedor para asegurar la mezcla adecuada.
• Afloje el tapón del depósito de combustible
y vierta la mezcla.
• Tenga cuidado de no derramar la mezcla, si
un derrame ocurre, límpielo con un trapo limpio.
5
SG530 manual.indd 5
23/06/15 11:48
• Arranque el motor al menos a tres metros de
distancia de la zona donde se ha abastecido el
depósito de combustible con el fin de evitar
cualquier riesgo de incendio.
PELIGRO DE INCENDIO O QUEMADURAS
• Siempre extreme precauciones al manejar
combustible. El combustible es altamente inflamable.
• Nunca intente abastecer de combustible si los
componentes del sistema de combustible están
dañados o con fugas.
• Nunca intente reabastecer de combustible
mientras el motor está en funcionamiento o
que aún se encuentre caliente. Deje que el motor se enfríe antes de reabastecer.
• Nunca fume ni encienda algún tipo de fuego
cerca de la máquina.
• Siempre transporte y guarde el combustible
en el recipiente proporcionado.
• Nunca coloque material inflamable cerca del
escape del motor.
• Nunca opere la sopladora sin un escape que
funcione correctamente y el anti-chispas instalado.
• Nunca opere la soplo-aspiradora si no está
completamente ensamblada y en buenas condiciones.
• No use gasolina que contenga etanol o metanol, ya que puede dañar los conductos de combustible y otras partes del motor.
• Mezcle el combustible lo suficiente de acuerdo a sus necesidades. Si el combustible se debe
almacenar más de 30 días, debe primero ser
tratado con un estabilizador o un producto
similar.
INSTRUCCIONES DE OPERACIÓN
ARRANCAR EL MOTOR FRIO
1. Asegúrese que el interruptor (A) esté en la posición de encendido (I).
2. Bombee el cebador 10
veces presionando el bombín (D).
3. Su equipo ha sido diseñado con 3 posiciones
de ahogador: cerrado,
medio y abierto (encendido). Mueva la palanca del
ahogador a la posición de
cerrado.
4. Con la unidad sobre el suelo, sostenga el
asa auxiliar superior y pise la parte inferior del
marco con el pie.
5. Tire de la cuerda de arranque de 4-6 veces,
si la unidad no arranca, mueva la palanca del
ahogador a la posición media y tire de 4 a 6
veces más. Espere 10 seg. después que la unidad se encienda después mueva la palanca del
ahogador a la posición de abierto.
6. Empuje el botón de bloqueo (C) y presione el
gatillo (B) para arrancar.
NOTA: Si el motor no enciende después de varios intentos, consulte la sección “solucionador
de problemas”.
NOTA: Siempre tire de la cuerda hacia afuera.
Tirando la soga de arranque en algún ángulo
causará que la cuerda haga fricción contra el
ojal, esta fricción causará que la soga se desgaste y se deteriore más rápidamente. Sujete
siempre el mango del arrancador cuando la
cuerda se retraiga. Nunca deje que la cuerda
regrese bruscamente de su posición extendida,
esto podría ocasionar que la soga se rompa o
desgaste y así dañar el mecanismo de arranque.
INFORMACIÓN IMPORTANTE DE MARCHA AL
VACÍO
En algunos casos, debido a las condiciones de
funcionamiento (altitud, temperatura, etc) su
soplador puede necesitar un pequeño ajuste a
la velocidad de marcha al vacío. Después del
calentamiento, si la unidad no está en uso después de reiniciar 2 veces, siga estos pasos para
ajustarlo.
1. Localice el tornillo (G de la siguiente foto)
de ajuste de marcha al vacío en el carburador.
2. Usando un destornillador, gire el tornillo de 1/4
a 1/2 hacia el sentido de
las manecillas del reloj. La
unidad ahora deberá trabajar apropiadamente.
6
SG530 manual.indd 6
23/06/15 11:48
E S P A Ñ O L • Ma n u a l
DETENIENDO EL MOTOR
PROCEDIMIENTO DE PARADA DE EMERGENCIA
Cuando sea necesario detener el motor del soplador inmediatamente, pulse el interruptor
de encendido a la posición “STOP”.
MÉTODO NORMAL DE DETENCIÓN DEL MOTOR
Para apagar el motor normalmente, suelte el
gatillo y deje que el motor regrese a marcha
lenta. A continuación, pulse el interruptor de
encendido a la posición “STOP”.
ARRANCAR CON EL MOTOR CALIENTE
(El motor ha sido detenido por no más de
15-20minutos)
1. Establecer cierre el paso del ahogador (consulte el paso 2 para arrancar un motor frío),
tire de la soga de arranque rápidamente.
2. Si el motor no arranca, o arranca y se detiene
después de tirar de la soga 5 veces, siga el procedimiento “Arrancar el motor en frío”.
OPERACION DEL SOPLADOR
1. Use la sopladora para árboles, arbustos, desechos de flores y áreas difíciles de limpiar.
2. Use la unidad alrededor de edificios y para
otros procedimientos normales de limpieza.
3. Use la sopladora para paredes, cornizas, cercas y mallas.
4. Se recomienda usar una mascarilla cuando
opere el soplador en áreas con mucho polvo.
5. Manténgase alejado de los escombros, a una
distancia que le permita fácilmente controlar
la dirección para soplar los deshechos. Nunca
sople en la dirección de las personas que van
pasando.
6. Para controlar la velocidad de flujo de aire,
el soplador puede funcionar a cualquier velocidad. La experiencia y el uso de la unidad le ayudará a determinar la cantidad de aire necesaria
para cada aplicación.
7. Para reducir los niveles de ruido, limitar el
número de piezas de equipo en cualquier momento.
8. Revise su equipo antes de la operación, especialmente el silenciador, las tomas de aire y
filtros de aire.
9. Use rastrillos y escobas para aflojar escombros antes de soplar. En condiciones de mucho
polvo, moje ligeramente la superficies cuando
haya agua disponible.
d e U su a ri o
10. Ahorre agua utilizando el soplador en lugar de mangueras para muchas aplicaciones de
césped y jardín, incluyendo áreas tales como
canales, mallas, patios, parrillas, cocheras y jardines.
11. Utilice el tubo intermedio con la boquilla
de su elección para que la corriente de aire
pueda trabajar cerca del suelo.
12. Después de utilizar sopladores y otros equipos, LIMPIE! Coloque los restos en recipientes
de basura.
INSTRUCCIONES DE USO
1. Siga las instrucciones de “ARRANCAR EL MOTOR FRIO”.
2. Una vez que la unidad está en funcionamiento, coloquese la unidad en la espalda deslizando los brazos por las correas de los hombros
como si la estuviera poniendo una chaqueta.
3. Cuando se preparare para limpiar una zona
de escombros, siempre colóquese de modo
que usted pueda controlar la dirección de los
escombros que soplará.
4. El mecanismo de control y la flexibilidad del
tubo del soplador le permitirá limpiar las áreas
más difíciles de alcanzar.
5. El mango, el gatillo y el acelerador de encendido/apagado están montados en un mango giratorio que ofrece una amplia gama de
posiciones de funcionamiento y comfort.
MANTENIMIENTO
ADVERTENCIA: Use accesorios de repuesto
originales de fábrica. Caso contrario se pueden
producir lesiones serias y resultados pobres.
SUSTITUCIÓN Y LIMPIEZA DEL FILTRO DE AIRE
Para un funcionamiento correcto y una larga
vida, mantenga el filtro de aire limpio.
1. Afloje el tornillo mientras sostiene el filtro de
aire en su lugar, quitelo y
saque el filtro (C).
2. Limpie el filtro en agua tibia con jabón. Deje
que se seque completamente. Para un mejor
rendimiento, sustituya el filtro de aire anualmente.
3. Instale nuevamente el filtro de aire en la
base del filtro.
4. Coloque la tapa en su lugar.
7
SG530 manual.indd 7
23/06/15 11:48
TAPA DE TANQUE DE COMBUSTIBLE Y FILTRO
DE COMBUSTIBLE
PRECAUCIÓN: Drene el combustible de la
máquina y guardelo en un recipiente adecuado antes de comenzar con el proceso de limpieza. Abra la tapa del tanque de combustible
lentamente, para que se libere la presión que
se pudo haber generado en él.
NOTA: Mantenga la abertura (A) de la tapa limpia y
libre de cualquier residuo.
FILTRO DE COMBUSTIBLE
1. Quite la tapa del tanque de combustible (B)
para poder alcanzar el filtro de combustible que se
encuentra dentro del tanque. Usando un pedazo de
alambre (C) con algún tipo
de gancho, saque le filtro
del tanque.
2. Saque el filtro (D) con
un movimiento de giro.
3. Reemplace o limpie el
filtro de combustible.
NOTA: Nunca opere el soplador sin el filtro de
combustible, ya que podría ocasionar un daño
interno en el motor de la máquina.
REVISIÓN DE LA BUJÍA
1. Revise la bujía cada 10-15 horas de uso.
2. Retire la cubierta de la bujía.
3. Utilice la llave de bujías para retirarla girando en sentido contrario a las agujas del reloj.
4. Limpiar y ajustar la distancia entre electrodos a 0,6 - 0,7 mm.
5. Reemplace una bujía dañada o visiblemente
desgastada con una nueva.
6. Instale la bujía en cabezal del cilindro y luego aprietela firmemente con la llave.
• La mezcla no llega al carburador. Limpie el
filtro de combustible en el depósito de combustible.
• Hay agua en la mezcla. Drene y enjuague el
sistema del combustible.
• El filtro de aire está sucio. Limpie el filtro de
aire.
• Hay depósitos de carbón en el tubo de escape
del cilindro o el escape. Limpielas o cambie el
mofle.
ARRANCANDO UN MOTOR AHOGADO
• Desconecte el cable de la bujía y utilice la llave para quitarla, gire en el sentido de las agujas del reloj.
• Si la bujía está dañada o empapada de combustible, limpie o reemplace la bujía según sea
necesario.
• Drene el exceso de combustible de la cámara
de combustión jalando la soga de encendido del
motor varias veces mientras no tenga la bujía.
• Instale la bujía y apriétela firmemente con la
llave.
• Repita el procedimiento de arranque, como
si el soplador estuviese previamente en funcionamiento.
SI EL MOTOR NO SE DETIENE
• Si el motor continúa funcionando después
de posicionar el interruptor en la posición OFF
de apagado, detenga el motor empujando la
palanca del estrangulador a la posición completamente cerrada. Si esta condición persiste,
lleve su sopladora a un centro de servicio para
mantenimiento antes de usarla nuevamente.
ESPECIFICACIONES TÉCNICAS
CILINDRADA
30 cc
CAPACIDAD DEL TANQUE
DE COMBUSTIBLE
500 ml
VELOCIDAD EN VACÍO
7 500 r/min
VELOCIDAD DEL AIRE
450 Km/h
VOLÚMEN DEL AIRE
459 CFM (13 m³/min)
PESO
7 kg (15,4 lb)
SOLUCIONADOR DE PROBLEMAS
PÉRDIDA DE POTENCIA O PARO REPENTINO
DEL MOTOR
• Compruebe que el depósito de combustible
esté vacío.
8
SG530 manual.indd 8
23/06/15 11:48
E N G L I S H • U se r' s
INTRODUCTION
Your unit has many features that will make
your job faster and easier. Safety, performance
and reliability have been given top priority in
the design of this tool, qualities to make easy
to maintain and to operate.
WARNING: Carefully read the entire manual before attempting to use this tool. Make
sure to pay special attention to the safety rules
and indications, plus all the warnings and cautions of this manual.
GENERAL SAFETY RULES
WARNING: Read and understand all instructions. Failure to follow all indications listed below, may result in electric shock, fire and/
or serious personal injury.
SAVE THESE INSTRUCTIONS.
WARNING: When using the unit, basic safety precaution, including the following, should
always be followed to reduce the risk or serious personal injury and damage to the unit.
NOTE: Read all these instruction before operating this production and save this instruction.
Do not allow children or untrained individuals
to use the unit.
+ WHAT TO DO
READ YOUR USER MANUAL AND ALL SUPPLEMENTS (IF ANY ENCLOSED) THOROUGHLY BEFORE OPERATING YOUR UNIT.
1. WEAR CLOSE FITTING, TOUGH WORK
CLOTHING that will provide protection, such
as long slacks or trousers, safety work shoes,
heavy duty work gloves, hard hat, a safety face
shield, or safety glasses for eye protection and
a good grade of ear plugs or other sound barriers for hearing protection.
2. REFUEL IN A SAFE PLACE. Open fuel cap
slowly to release any pressure which may have
formed in fuel tank. Always wipe unit of fuel
or oil spills before starting. To prevent a fire
hazard, move at least 10 feet (3 meters) from
fuelling area before starting.
3. TURN UNIT OFF before setting it down,
and also before installing or removing attachments.
ma n u a l
4. KEEP ALL SCREWS AND FASTENERS TIGHT
and the unit in good operating condition.
Never operate this equipment if it is improperly adjusted or not completely and securely
assembled.
5. KEEP HANDLES DRY, clean and free of fuel
mixture.
6. STORE EQUIPMENT AWAY FROM POSSIBLE
IGNITION SOURCES, such as gas-powered water heaters, clothes dryers, or oil-fired furnaces,
portable heaters, etc.
7. ALWAYS KEEP the engine free of debris
build-up.
8. OPERATION OF EQUIPMENT should always
be restricted to mature and properly instructed
individuals.
9. ALL PERSONS WITH RESPIRATORY PROBLEMS and persons operating blower in very
dusty environments, should wear a dust particle mask at all times. Paper dust masks are
available at most paint and hardware stores.
10. Operate the machine only at reasonable
hours- not early in the morning or late at night
when people might be disturbed. Comply with
times listed in local ordinances.
11. Operate the machine at the lowest possible
engine speed to do the job.
12. Use rakes and brooms to loosen debris before blowing.
13. In dusty conditions, slightly dampen surfaces.
14. Use the full blower nozzle extension so the
air stream can work close to the ground.
15. Watch out for children, pets, open windows etc. and blow debris safely away.
+ WHAT NOT TO DO
1. DO NOT SMOKE while refuelling or operating equipment.
2. DO NOT OPERATE UNIT WITHOUT A MUFFLER and properly installed muffler shield.
3. DO NOT TOUCH or let your hands or body
come in contact with a hot muffler or spark
plug wire.
4. DUE TO THE DANGER of exhaust fumes,
never operate blower in a confined or poorly
ventilated area.
5. NEVER POINT BLOWER in the direction of
people, animals, buildings, automobiles, or
windows, etc.
6. DO NOT operate unit without inlet cover installed to prevent contact with impeller.
9
SG530 manual.indd 9
23/06/15 11:48
7. DO NOT set a hot engine down where fla
mmable material is present.
8. DO NOT OPERATE UNIT FOR PROLONGED
PERIODS. Rest periodically.
9. DO NOT OPERATE UNIT WHILE UNDER THE
INFLUENCE OF ALCOHOL OR DRUGS.
10. DO NOT operate your unit near or around
fla mmable liquids or gases whether in or out
of doors. An explosion and/or fire may result.
11. DO NOT WEAR loose clothing, scarfs, neck
chains, unconfined long hair, and the like. Doing so could cause injury associated with objects being drawn into the rotating parts.
12. DO NOT refuel a running engine or an engine that is hot.
13. Never allow children to operate the appliance.
WARNING: Do not add,remove or alter any
components of this product. Doing so could
cause personal injury and/or damage the unit
voiding the manufacturer’s warranty.
3. ON/OFF IGNITION SWITCH.
4. TOP ASSIST HANDLE.
5. STARTER HANDLE.
6. SPARK PLUG WIRE/SPARK PLUG.
7. AIR CLEANER COVER.
8. CHOKE LEVER.
9. FUEL TANK.
10. FUEL CAP.
11. HARNESS.
12. PRIMER BULB.
13. CONTROL HANDLE.
14. OPERATING TUBE.
15. THROTTLE LINKAGE.
16. FLEX TUBE.
17. HOSE CLAMP.
18. MUFFLER COVER.
19. SPARK ARRESTER SCREEN.
20. VENTED BACK PAD.
21. INTERMEDIATE TUBE.
22. 56mm NOZZLE.
23. 45mm CONCENTRATOR NOZZIE.
ASSEMBLY & ADJUSTMENTS
Carefully remove the blower and accessories
from the box. Make sure that all items listed in
the packing list are included.
Inspect the blower carefully to make sure no
breakage or damage occurred during shipping.
FEATURES
KNOW YOUR TOOL
Before attempting to use this product, become
familiar with all of its operating features and
safety requirements.
1. THROTTLE TRIGGER.
2. LOCK-OUT.
22
2
23
3
4
5
1
6
21
7
8
9
20
13
10
11
12
14
19
18
17
16
15
10
SG530 manual.indd 10
23/06/15 11:48
E N G L I S H • U se r' s
WARNING: If any parts are missing do not
operate the unit until the missing parts are replaced. Failure to do so could result in possible
serious personal injury.
ASSEMBLY
ATTACH FLEX TUBE
Put the hose clamp (C) on the flex tube before
connecting the flex tube and the fan’s outlet
tube together. Connect the flex tube (B) to the
fan’s outlet tube(A)with a hose clamps and
tighten securely.
ATTACH OPERATING TUBE
NOTE: Keep the throttle cable as straight as
possible when connecting the blower tubes.
1. Place the unit on flat surface during assembly. Insure screw mechanism of clamp is positioned away from operator.
2. Put the hose clamp (G) on the flex tube and
the operating tube together.
3. Turn the rotary ring mark (D) so it aligns with
the throttle handle (F).Insert the operating
tube (E) into the flex tube (B) and then tighten
securely with a hose clamp (G).
4. Attached throttle linkage clips to both ends of
the flex tube to secure the
throttle cable.
ATTACH INTERMEDIATE TUBE AND CONCENTRATOR NOZZLE
Connect the intermediate tube (H) and air
nozzle (I). Push the tubes together and turn
them clockwise so that they Lock together.
ma n u a l
ADJUST BACK PACK AND HARNESS AND CONTROL HANDLE
1. Place blower on your back by slipping arms
through the shoulder straps as if you were putting on a jacket.
2. Once adjustments have been made, to the
straps for user comfort, remove the blower
from yur back and place on level ground in an
upright position.
3. Adjust backpack harness and control handle.
FUELING
MOTOR FUEL
Use regular grade unleaded gasoline mixed
with 2-cycle engine oil. Use 40:1 mixing ratio.
WARNING: Never use straight gasoline in
your unit. This will cause permanent engine
damage and void the warranty for the product. Never use a fuel mixture that has been
stored for over 90 days.
WARNING: Use a premium grade oil for
2-cycle air cooled engines mixed at a 40:1 ratio.
Do not use any 2-cycle oil product with a recomended mixing ratio of 100:1.
If insuficient lubrication es the cause of engine
damage, it cause a void in the warranty.
• Add the oil to an approved fuel container
followed by the gasoline to allow incoming
gasoline to mix with oil. Shake the container
to ensure thorough mix.
• Unscrew the fuel tank cap and pour the mixture into the tank with the aid of a funnel.
• Be careful not to spill any mixture. If this happens, wipe the spill with a clean rag.
• Start the engine at least three meters away
from the area where the fuel tank has been
filled up in order to avoid any risk of fire.
DANGER OF FIRE AND BURN INJURIES
• Always use extreme care when handling fuel.
Fuel is highly flammable.
• Never attempt to fuel the blower-vacuum if
the fuel system components are damaged or
are leaking.
• Never attempt the refuel the engine while it
is running or still warm, allow it to cool before
fueling.
• Never smoke or light any fires near the
blower or fuels.
• Always transport and store fuels in an approved container.
11
SG530 manual.indd 11
23/06/15 11:48
• Never place flammable material close the the
engine muffler.
• Never operate the blower-vac without a
properly functioning muffler and spark arrestor installed.
• Never operate the blower-vac unless it is
properly assembled and in good working condition.
• Do not use petrol which contains ethanol or
methanol as it may damage the fuel lines and
other engine parts.
• Mix only enough fuel for your immediate
needs. If fuel must be stored longer than 30
days, it should first be treated with a stabilizer
or similar product.
OPERATION INSTRUCTIONS
STARTING A COLD ENGINE
1.
Make sure ignition
switch (A) is in the ON (I)
position.
2. Pump primer bulb 10
times by pressing up on
the bulb (D).
3. Your unit is designed
with a 3 position choke:
full choke, partial choke,
and run. Move choke lever
to full choke position.
4. With the unit on the
ground, hold the top assist
handle and step on the bottom of the frame
with foot.
5. Pull starter rope 4-6 times, if unit does not
start move choke lever to position 2 and pull
4-6 more times.Wait 10 sec. after unit starts
then move choke lever to position 3.
6. Push the Lock-out (C) button and press throttle trigger (B) to run.
NOTE: If engine fails to start after repeated attempts, refer to Troubleshooting section.
NOTE: Always pull starter rope straight out.
Pulling starter at an angle will cause rope to
rub against the eyelet. This friction will cause
the rope to fray and wear more quickly. Always
hold starter handle when rope retracts. Never
let a rope snap back from extended position.
This could cause rope to snag or fray and also
damage the starter assembly.
IMPORTANT IDLING INFORMATION
In some cases due to operating conditions (altitude, temperature etc.) your blower may need
a slight adjustment to the idle speed. After
warm up, if unit does not Idle after restarting
2 times, follow these steps to adjust idle.
1. Locate the idle adjustment screw (G) on the
carburetor.
2. Using a Phillips or slotted
screwdriver,
turn
screw 1/4 to 1/2 turn clockwise (to the right).Unit
should then idle properly.
STOPPING THE ENGINE
EMERGENCY STOPPING PROCEDURE
When it is necessary to stop blower engine immediately, PRESS the OFF ”STOP” switch (A).
NORMAL STOPPING METHOD
For normal stopping, release trigger and allow
engine to return to idle speed, then PRESS the
OFF “STOP” switch.
STARTING A WARM ENGINE (Engine has
been stopped for no more than 15-20 minutes)
1. Set throttle latch (see step 2 for starting a
cold engine),pull starter rope briskly.
2. If engine does not start, or starts and then
stops after 5 rope pulls, follow procedure
“STARTING A COLD ENGINE”.
BLOWER OPERATIONS
1. Use the blower for trees, shrubs, flower
beds, and hard-to-clean areas.
2. Use the unit around buildings and for other
normal cleaning procedures.
3. Use the blower around walls, overhangs,
fences, and screens.
4. We recommend that a face mask be worn
when operating blower in dusty areas.
5. Stand away from the debris, at a distance
that will easily allow you to control the direction of blown debris. Never blow debris in direction of bystanders.
6. To control velocity of air stream, blower can
be operated at any speed between idle and full
throttle.
Experience with the unit will help you determine the amount of airflow necessary for each
application.
12
SG530 manual.indd 12
23/06/15 11:48
E N G L I S H • U se r' s
7. To reduce sound levels, limit the number of
pieces of equipment used at any one time .
8. Check your equipment before operation, especially the muffler, air intakes and air filters.
9. Use rakes and brooms to loosen debris before blowing. In dusty conditions, slightly
dampen surfaces when water is available.
10. Conserve water by using power blowers
instead of hoses for many lawn and garden
applications, including areas such as gutters,
screens, patios, grills, porches and gardens.
11. Use intermediate tube plus nozzle of your
choice so the air stream can work close to the
ground.
12. After using blowers and other equipment,
CLEAN UP! Dispose of debris in trash receptacles.
OPERATION INSTRUCTIONS
1. Follow the instructions “STARTING A COLD
ENGINE”.
2. Once unit is running, place unit on your back
by slipping arms through the shoulder straps as
if your were putting on a jacket.
3. When preparing to clear an area of debris,
always position yourself so that you can control the direction debris will be blown.
4. The control handle and the flexibility of the
blower tube assembly will allow you to clear
the most hard–to-reach areas.
5. The hand grip ,throttle trigger, throttle lock
and ignition on/off switch are all mounted on
a swivel handle that offers a wide range of operating positions and comfort.
MAINTENANCE
WARNING: Use only original manufacture’s
replacement parts, accessories and attachment. Failure to do so can cause possible injury,
poor performance.
REPLACING AND CLEANING THE AIR FILTER
For proper performance and long life, keep air
filter clean.
1. Loosen knob (A) holding air filter cover in place, remove, cover and lift
filter from air box.
2. Wash filter in soap and water. DO NOT USE
GASOLINE!
ma n u a l
3. Air dry filter.
4. Reinstall air filter and air filter cover.
FUEL CAP / FUEL FILTER
CAUTION: Remove fuel from unit and store in approved container before starting this
procedure. Open fuel cap slowly to release any
pressure which may have formed in fuel tank.
NOTE: Keep vent (A) on
fuel cap clean of debris.
FUEL FILTER
1. Completely remove fuel
cap from fuel tank(B) to
be able to remove fuel filter from tank. Use a piece
of wire (C) with a hook
formed at the end to pull
filter out of tank.
2. Pull off fuel filter (C)
with a twisting motion.
3. Replace fuel filter.
NOTE: Never operate the
blower without the fuel
filter. Internal engine damage could result!
CHECKING THE SPARK PLUG
1. Check the spark plug every 10-15 hours of
use.
2. Remove the spark plug cover.
3. Use the spark plug wrench to remove the
spark plug, by turning it counter-clockwise.
4. Clean and adjust the spark plug gap to 0.6
- 0.7mm.
5. Replace any damaged or visibly worn plug
with a TORCH L8RTC or equivalent spark plug.
6. Install the spark plug finger tight in the cylinder head, and then tighten it firmly with the
spark plug wrench.
TROUBLESHOOTING
POWER LOSS OR SUDDEN STOPPING OF THE
ENGINE
• Check whether the fuel tank is empty.
• The mixture does not reach the carburetor.
Clean the fuel filter in the fuel tank.
13
SG530 manual.indd 13
23/06/15 11:48
• There is water in the mixture. Drain and rinse
all the fuel system.
• The air filter is dirty. Clean the air filter.
• There are carbon deposits in the cylinder
exhaust pipe or the muffler. Clean those or
change the muffler.
STARTING A FLOODED ENGINE
• Disconnect the spark plug lead, and use the
plug wrench to remove the spark plug in a
counter clockwise direction.
• If the spark plug is fouled or is soaked with
fuel, clean or replace the plug as required.
• Clean excess fuel from the combustion chamber by cranking the engine several times while
the spark plug is removed.
• Install the spark plug and firmly tighten it
with the spark plug wrench.
• Repeat the starting procedure as if the blower was already warm.
TECHNICAL DATA
DISPLACEMENT
30 cc
GAS TANK CAPACITY
NO LOAD SPEED
500 ml
AIR SPEED
7 500 r/min
AIR VOLUME
450 Km/h
WEIGHT
459 CFM (13 m³/min)
COLLECTOR CAPACITY
7 kg (15,4 lb)
IF THE ENGINE WON’T STOP
• If the engine continues to run after switching the on/off switch to off, stop the engine
by pushing the choke lever to the fully closed
position. If this condition continues, have the
blower serviced before using it again.
14
SG530 manual.indd 14
23/06/15 11:48
M a n u a l d e u s u a r i o / U s e r ’s m a n u a l
Notas / Notes
15
SG530 manual.indd 15
23/06/15 11:48
E S P A Ñ O L
E N G L I S H
POLIZA DE GARANTÍA
WARRANT POLICY
Urrea Herramientas Profesionales S.A. de C.V.
garantiza este producto por el termino de 1 año
en sus piezas, componentes y mano de obra contra cualquier defecto de fabricación a partir de la
fecha de entrega.
Urrea Herramientas Profesionales S.A. de C.V.
Warranties this product for a period of 1 year in
its parts, components and manual labour against
any manufacture defect from the purchasing date.
Fecha de venta: ____/____/____
Producto: ___________________
Marca: ______________________
Modelo: ____________________
Purchase date: ____/____/____
Product:____________________
Brand:______________________
Model:______________________
______________________________
Sello y firma de distribuidor
______________________________
Distributor seal and signature
Comercializado e Importado por:
Urrea Herramientas Profesionales S.A. de C.V.
km 11,5 Carretera A El Castillo, El Salto, Jalisco, México. C. P. 45680, Tel. (33) 3208 7900,
RFC UHP900402Q29
Sold and Imported by:
Urrea Herramientas Profesionales S.A. de C.V.
km 11,5 Carretera A El Castillo, El Salto, Jalisco, México. C. P. 45680, Tel. (33) 3208 7900,
RFC UHP900402Q29
Condiciones:
Para hacer efectiva la garantía deberá presentar
el producto junto con la poliza de garantia debidamente firmada y sellada por el establecimiento
donde la adquirio, en cualquiera de los centros de
servicio autorizados.
Los gastos de transportación que se deriven del
cumplimiento de la garantía seran cubiertos por:
Urrea Herramientas Profesionales S.A. de C.V.
Terms:
In order to make warranty effective you must present the product along with the warranty properly
fillled and signed to an authorized distributor or
service center.
Esta garantía no será valida en los siguientes
casos:
· Cuando el producto haya sido utilizado en condiciones distintas a las normales o al desgaste natural de sus partes.
· Cuando el producto no haya sido operado de
acuerdo al instructivo de uso que lo acompaña.
· Cuando el producto haya sido alterado o reparado por personas no autorizadas.
This warranty is not applicable in the following cases:
· When the product has not been used according
to normal conditions or natural wear of its parts.
· When the product has not been used according
with this user’s manual instructions.
· When the product has been fixed or modified by
unauthorized or unqualified person.
SG530
Urrea Herramientas Profesionales S.A. de C.V.
will cover the transportation cost related to the
warranty.
16
SG530 manual.indd 16
23/06/15 11:48