1
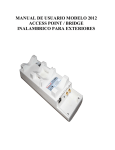
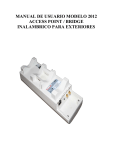
www.ansel.com.mx
INDICE
Capitulo 1. Introducción. .............................................................................. 4
1.1
1.2
Contenido: ........................................................................................................................................................4
Características: .................................................................................................................................................4
Capitulo 2. Instalación .................................................................................. 4
2.1
Driver de Instalación..........................................................................................................................................4
2.2 Instalación de Tarjeta Inalámbrica ..........................................................................................................................7
2.2.1 Tarjeta PCMCIA Cardbus ...............................................................................................................................7
2.2.2 Tarjeta PCI.....................................................................................................................................................10
2.3 Servicio de Configuración ...................................................................................................................................11
Capitulo 3. Configuración ......................................................................... 13
3.1 Perfil .....................................................................................................................................................................13
3.2 Estatus de Conexión.............................................................................................................................................14
3.3 Inspección del Lugar............................................................................................................................................14
ADD/EDIT Profile (Agregar / Editar Perfil) .........................................................................................................16
3.4 Estadística ............................................................................................................................................................17
3.5 Avanzado ..............................................................................................................................................................18
3.6 About ....................................................................................................................................................................20
Capitulo 4. Especificaciones..................................................................... 20
CONTACTO : ............................................................................................... 21
Capitulo 5. Glosario ................................................................................... 21
Chapter 1. Introduction.............................................................................. 23
1.1
Package Content.............................................................................................................................................23
1.2 Features ................................................................................................................................................................23
Chapter 2. Installation................................................................................ 23
2.1 Driver Installation ................................................................................................................................................23
2.2 Install Wireless Adapter .......................................................................................................................................26
2.2.1 Cardbus card .................................................................................................................................................26
2.2.2 PCI Adapter...................................................................................................................................................29
2.3 Zero Configuration Service .................................................................................................................................30
Chapter 3. Configuration ........................................................................... 31
3.1
Profile .............................................................................................................................................................31
3.2 Link Status ............................................................................................................................................................32
Página 2 de 41
3.3 Site Survey ...........................................................................................................................................................32
ADD/EDIT Profile .................................................................................................................................................34
3.4 Statistics ...............................................................................................................................................................35
3.5 Advance................................................................................................................................................................36
3.6 About ....................................................................................................................................................................38
Chapter 4. Specification ............................................................................ 39
Chapter 5. Glossary ................................................................................... 40
Página 3 de 41
Capitulo 1. Introducción.
Gracias por comprar el adaptador ANSEL 802.11g MIMO Inalámbrico PCI modelo 2614 / PCMCIA Modelo 2613.
En este manual de usuario le asistirá en el proceso de Instalación de su tarjeta. El sistema con Múltiples
Salidas Múltiples Entradas (MIMO) representa un modo económico de incrementar la capacidad del usuario en
una variedad de ambientes distintos. El uso de antenas de transmisión y recepción permite:
¾
¾
¾
¾
¾
1.1
Contenido:
¾
¾
¾
¾
¾
1.2
Incremento multiplicativo en capacidad y eficiencia del espectro.
Reducción dramática de ruido gracias a la diversidad.
Incremento en capacidad (Número de usuarios).
Menos probabilidad de detección.
Resistencia probada a interferencia.
Tarjeta MIMO Inalámbrica PCI Mod.2614 / PCMCIA Mod.2613
CD con driver
Manual
3 antenas externas (en tarjeta PCI)
Si alguno de los productos esta dañado o hace falta, favor de contactar a su distribuidor inmediatamente,
guarde su material de empaque completo por si en un futuro requiere enviar su producto.
Características:
¾ Cumple con los estándares inalámbricos IEEE802.11b/g MIMO IEEE802.11g e IEEE802.11b.
¾ Soporta modulación con tecnología Directa Sequence Spread Spectrum (DSSS) y tecnología
Orthogonal Frequency Division Multiplexing (OFDM) para IEEE802.11b/g PCI 2.1/2.0 32 bit interfase
CardBus.
¾ Opera en banda de frecuencia 2.4GHz
¾ Tecnología Packet-OVERDRIVETM (TX/RX throughput hasta 35Mbps); Range-OVERDRIVETM
Technology (Distancia de Transmisión hasta 100Mts.)
¾ Suporta auto-data selección a 54/48/36/24/12/11/9/6/5.5/2/1 Mbps
¾ Provee WEP 64/128 bit y 802.11i seguridad de encriptación.
¾ Calidad de Servicio (QoS)-802.11e, WMM
¾ Suporta Windows 98SE/ME/2000/XP/CE, Linux, MAC OSX
Capitulo 2. Instalación
2.1
Driver de Instalación
1. Antes de insertar la tarjeta PCI / CardBus a la ranura de la computadora, favor de instalar primero el driver.
Favor de asegurarse que la tarjeta 802.11g MIMO PCI Modelo 2614/ CardBus Modelo 2613 no este
insertada en la ranura antes de comenzar la instalación del Driver.
NOTA: Todas las imagenes de este manual están basadas en Windows XP. Para otros sistemas operativos
de Windows el procedimiento es exactamente el mismo.
2. Prenda su computadora, inserte el CD en el CD-Rom, Busque con su Browser “MIMO Wireless LAN Drive” y
haga clic en “setup .exe”. El sistema se instalara automáticamente.
Página 4 de 41
Figura 2-1
3. Haga Clic en “yes” para aceptar el acuerdo, Haga clic en “No” para cancelar la instalación.
Figura 2-2
4.
Si esta instalando el driver para un sistema Windows XP, tendrá que seleccionar “Configuration Tool”. De
acuerdo con las necesidades podrá seleccionar “MIMO Configuración Tool” o “Microsoft Zero Configuration
Tool, una vez seleccionado haga clic en next, si selecciono “MIMO Configuration Tool”, favor de
referirse al capitulo ‘3. Configuración’. Si selecciono “Microsoft Zero Configuration Tool”, Favor de
referirse a la sección ‘2.3 Zero Configuration service’.
Página 5 de 41
Figura 2-3
5. Seleccione Optimize for WiFi mode o Optimize for performance mode haga click en next.
Figura 2-4
6. Haga clic en “Continue Anyway.
Página 6 de 41
Figura 2-5
7. Cuando termina aparecerá como esta en la figura 2-6 seleccione “Setup has finished installing”,
seleccione “Yes, I want to restart my computer now” haga clic en “Finish”.
Figure 2-6
2.2 Instalación de Tarjeta Inalámbrica
2.2.1 Tarjeta PCMCIA Cardbus
1. Prenda su computadora portátil, permita que el sistema operativo termine de instalarse completamente.
Página 7 de 41
2. Sostenga el adaptador con el logotipo mirando para arriba e inserte la tarjeta PCMCIA Modelo 2613 en
la ranura Cardbus de su portátil.
Figure 2-7
3. Si el Wizard despliega un anuncio de que encontró Nuevo hardware, escoja “Install the software
automatically” (Recomendado), haga clic en el botón de “Next”.
automáticamente.
Figura 2-8
Página 8 de 41
El driver se instalara
Figura 2-9
4. Haga Clic en “Continue Anyway”.
Figura 2-10
Página 9 de 41
Figura 2-11
5. Haga Clic en “finish”. Ha terminado de instalar el driver y la utilería.
Figura 2-12
2.2.2 Tarjeta PCI.
Página 10 de 41
1. Abra su PC y localice una ranura PCI disponible en su tarjeta madre.
2. Deslice la Tarjeta PCI dentro de la ranura PCI. Este seguro de que lodos los pines de la tarjeta están
tocando los contactos de la ranura. Probablemente tendrá que aplicar un poco de presión para poder
deslizar la tarjeta completamente dentro de la ranura. Después de que la tarjeta este firmemente en su
lugar, asegure con tornillo la tarjeta al chasis de su PC con el tornillo de montaje, ahora cierre su PC.
3. Coloque la antena externa que viene en su kit de instalación a la tarjeta.
4. Encienda su PC.
Figura 2-13
5. Si el Wizard despliega un mensaje de Nuevo hardware encontrado, escoja “Install the software
automatically” (Recomendado), y haga clic en el botón de “Next”.
El driver se instalara
automáticamente.
6. Si quisiera utilizar el Servicio de la utilería del adaptador, favor de referirse al Capitulo 3. Configuración.
Si selecciona “Microsoft Configuration Tool”.
2.3 Servicio de Configuración
Windows XP incluye El servicio de Configuracion Zero, un servicio ínter construido para configurar clientes
inalámbricos desde Windows. Sáltese a la sección 3 si prefiere usar el Driver MIMO para configurar su cliente
inalámbrico.
Si el servicio de configuración Zero esta activado, Windows buscara los Access Points disponibles una vez que
este debidamente instalada su tarjeta PCI / PCMCIA. Si Windows detecta uno o mas Access Points, el icono de
red
aparece entre los programas disponibles en la barra de herramientas. ”Una o mas redes
Inalámbricas pueden estar disponibles” .
Página 11 de 41
Para empezar manualmente la configuración Inalámbrica Zero, Haga Clic en “start” >> Control Panel >>
Herramienta Administrativa >> Servicios. Selección automática en campo de campo de escritura teclear
“servicio de Configuración inalámbrica Zero”.
Haga Clic derecho en el Mouse sobre el icono de la barra de herramientas seleccionar “ver redes inalámbricas
disponibles” seleccionar SSID y haga un Clic en Conectar. Tal vez requiera se presione el botón que indica
que se esta conectando a una red insegura. Vea la sección 3 si requiere entrar a SSID nombre de red o
WEP/WPA llave de encriptación.
Figure 2-13
Página 12 de 41
Capitulo 3. Configuración
3.1 Perfil
El perfil le permite seleccionar su red inalámbrica favorita entre su casa, oficina y otro hot spot público, usted
podrá guardar múltiples perfiles, y activar el correcto a su preferencia.
1. Definición de cada campo.
¾
¾
¾
¾
¾
¾
Profile: Nombre del perfil, preconfigurado PROF* (* indica 1, 2, 3,).
SSID: AP o nombre Ad-hoc.
Channel: Canal en uso para modo Ad-Hoc.
Authentication: Modo Autentificación.
Encryption: Algoritmo de Seguridad en uso.
Network Type: Tipo de Red, incluye infraestructura y Ad-Hoc.
2. Estatus de Conexión
Indica si la conexión esta vigente en el determinado perfil activado.
Indica falla de conexión en el determinado perfil activado.
Nota: Cuado use site survey para hacer la conexión. Ninguno de los perfiles tendrá el icono de estatus de
conexión.
3. Incluir un Nuevo perfil.
4. Borrar un perfil existente.
Página 13 de 41
5. Editar Perfil.
6. Activar el perfil seleccionado.
3.2 Estatus de Conexión
El estatus de conexión de la siguiente pagina; muestra los detalles de la información de la conexión actual.
¾ Status: Status de la conexión actual, si no hay conexión mostrara desconectado “Disconnected”. De
otra forma, el SSID y BSSID se mostraran aquí.
¾ Extra Info: Mostrara el estatus de conexión y el canal que se esta utilizando.
¾ Link Speed: Mostrara la velocidad de transmisión y recepción actuales.
¾ Throughout: Mostrara la velocidad de transmisión en unidades de Kbits/sec.
¾ Link Quality: Mostrara la calidad de conexión basada en la fuerza de la señal y cantidad de errores en
los paquetes TX/RX.
¾ Signal Strength: Fuerza de señal de recepción, el usuario puede elegir para mostrar como un
porcentaje o formato de dBm.
¾ Noise Level: Muestra la fuerza de la señal del ruido.
3.3 Inspección del Lugar
En la pagina de inspección el lugar, el sistema desplegara la información de los AP’s disponibles del ultimo
Página 14 de 41
escaneo. La lista con información incluye SSID, BSSID, Señal, Canal, Algoritmo de Encriptación, y Tipo de Red
como se muestra a continuación.
1. Definición de cada campo:
¾
¾
¾
¾
¾
SSID:
Nombre del BSS y IBSS de la Red.
BSSID:
Dirección MAC del AP o IBSS aleatorio generado.
Signal:
Fuerza de la señal de recepción de una red especifica.
Channel:
Canal en uso.
Encryption:
Algoritmo de Encriptación utilizado con BSS o IBSS. Valores validos incluye WEP,
TKIP, AES, y No Usado.
¾ Authentication:
Modo de Autenticación usado entre las redes, incluye desconocido, WPA-PSK,
WPA2-PSK, WPA y WPA2.
¾ Network Type:
Tipo de red en uso, Infraestructura para BSS, Ad-Hoc para red IBSS.
2. Red conectada:
a. Cuando RaConfig corre por primera vez, seleccionara el mejor AP para conectarse automáticamente.
b. Si el usuario quiere conectarse a otro AP. Podrá darle doble Clic al mouse sobre el AP deseado para
hacer la conexión.
c. Si la red seleccionada tiene encriptación otra que No Use? RaConfig traerá la página de seguridad y
permitira proporcionar la información apropiada para hacer la conexión. Favor de referirse a la sección 4
en como completar la información de seguridad.
Este es el icono que indica que el cambio se hizo satisfactoriamente.
3. Indica el estatus de conexión, las redes conectadas SSID se mostraran aquí.
4. El comando de re-escaneo a la tarjeta inalámbrica para actualizar la información de las redes inalámbricas
cercanas.
Página 15 de 41
5. Comando para conectarse a la red seleccionada.
6. Agregar el AP seleccionado a la selección de Perfiles. Tendrá la página de perfiles para guardar los nuevos
perfiles.
ADD/EDIT Profile (Agregar / Editar Perfil)
1.
Configuración de Sistema:
¾ Pro file Name: Elija un nombre para el perfil.
¾ SSID: El usuario puede teclear el nombre SSID o usar alguno del menú para seleccionar de los AP’s
disponibles.
¾ PSM: Puedes escoger Constantly Awake Mode o Power Saving Mode. Hay una casilla para anotar
cuando es corriente alterna CAM o cuando es corriente en modo seguro. Cuando esta revisando la
señal, la tarjeta estará a su máxima capacidad cuando el cable este correctamente conectado.
¾ Network Type: Hay dos tipos de energía, modo infraestructura y 802.11 ad-hoc. bajo el modo Ad-hoc,
el usuario también puede elegir tipo “preamble”; los tipo disponibles de preamble incluye corto y largo.
En adición a esto, el canal y modo inalámbrico Ad-hoc el campo estará disponible para ponerlo en modo
Ad-hoc.
¾ TX Power: Transmisión de potencia, la cantidad de potencia utilizada por el radio transceiver para
enviar la señal. El usuario puede elegir el valor de la potencia utilizada deslizando la barra.
¾ Preamble: Soporta tres tipos, Auto, Long y Short.
Página 16 de 41
¾ RTS Threshold: El usuario puede ajustar el numero RTS threshold deslizando la barra o tomando el
valor directamente. El valor por default es 2347.
Fragment Threshold: Se puede ajustar el numero FRG threshold deslizando la barra o tomando el
valor directamente. El valor por default es 2346.
2.
Authentication & Security
Autentificación y Seguridad configuración mostrada.
3.4 Estadística
La pagina de estadísticas muestra el detalle de información de conteo basada en 802.11 MB. Esta página
traslada los MB a formatos sencillos para que el usuario los pueda comprender. La siguiente figura muestra el
detalle del despliegue de la página.
Página 17 de 41
1.
Transmisión de Estadísticas:
a. Frames Transmitted Successfully: Marcos satisfactoriamente enviados.
b. Frames Transmitted Successfully Without Retry: Marcos satisfactoriamente enviados sin ningún
reintento.
c. Frames Transmitted Successfully After Retry: Marcos satisfactoriamente enviados con uno o más
reintentos.
d. Frames Fail To Receive ACK After All Retries: Los marcos fallaron al transmitirse después de
llegar al límite de reintentos.
e. RTS Frames Successfully Receive CTS: Enviados satisfactoriamente CTS después de enviar
marco RTS.
f. RTS Frames Fail To Receive CTS: Fallo de recibir CTS después de enviar RTS.
2.
Estadísticas de recepción:
a.
b.
c.
d.
3.
Frames Received Successfully: Marcos satisfactoriamente recibidos.
Frames Received With CRC Error: Marcos recibidos con error CRC.
Frames Dropped Due To Out-of-Resource: Marcos caídos debido a un asunto de recursos.
Duplicate Frames Received: Marcos recibidos duplicados.
Resetear contadores a cero.
3.5 Avanzado
La siguiente Figura muestra la pagina de configuración avanzada de RaConfig
Página 18 de 41
1. Wireless mode: Seleccione el modo inalámbrico. Solo estos modos son soportados 802.11b, 802.11 B/G
mezclado, 802.11A solo, 802.11 A/B/G mezclado y 802.11G.
2. 11B/G Protección: modo protección ERP de definición 802.11G. Se puede elegir de Auto, On, y Off.
3.
a. Auto: STA cambiara dinámicamente el anuncio de AP.
b. On: Siempre enviara marcos con protección.
c. Off: Siempre enviara marcos sin protección.
TX Rate: Manualmente fuerza a Transmitir usando la velocidad seleccionada. Default es auto.
4.
TX Burst: Marco propietario Ralink’s modo burst.
5.
Enable TCP Window Size: Habilita la vventana de TCP.
6.
Fast Roaming at: Rápida transmisión para completar la comunicación inalámbrica..
7.
Select Your Country Region Code: Selecciona el código del país al cual perteneces.
8.
CCX2.0: Soporta extensiones compatibles con funciones de Cisco:
a.
b.
9.
LEAP prender CCKM
Enable Radio Measurement: puede medir por canal 0~2000 milisegundos.
Encendido de radio ON/OFF para requerimientos FAA.
Radio On: Indica que el radio esta encendido.
Radio Off: Indica que el radio esta apagado.
10. Aplica para ambos cambios.
Página 19 de 41
3.6 About
Muestra acerca de la tarjeta inalámbrica e información de versión de drivers, la información se despliega como
sigue:
1.
Muestra utilerías de configuración, Driver, e información de versión de EEPROM.
2.
Muestra la dirección MAC address de la tarjeta inalámbrica.
Capitulo 4. Especificaciones
Estándar / protocolo
Interface
Rango de Frecuencia
Velocidad de transmisión
Espectro de expansión
Distancia de Transmisión
Potencia del Transmisor
Datos de Seguridad
LED
Dimensionnes
IEEE 802.11b/g MIMO; IEEE 802.11g; IEEE 802.11b;
PCI Card / Card bus
2.4~2.4835GHz
54/48/36/24/12/9/6/11/5.5/2/1 Mbps (Auto Rate Sensing)
DSSS
Exteriores: 100mts (limitado al medio ambiente)
18dBm(Típico)
WPA; 64/128-bit WEP; TKIP/AES, WPA2, 802.11i
LINK/ACT
128mm*120.5mm*18.5mm/128mm*120.5mm*18
0~55℃Temperatura de Operación: 0℃~40℃ (32℉~104℉);
Medio ambiente
Temperatura de almacenaje: -40~70℃ (-40℉~158℉);
Humedad de Operación: 10%~90% sin-condensación;
Humedad de Almacenaje: 5%~95% sin-condensación;
Página 20 de 41
Sistemas Operativos
Certificaciones
Windows 98SE/ME/2000/XP/CE, Lin, MAC
CE, NOM
CONTACTO :
Si tiene alguna duda o requiere alguna asesoria respecto a su equipo puede mandar un correo a:
[email protected] o a www.ansel.com.mx; tel: 52714421 para hacer valida su garantía requerimos de
copia de factura o remisión donde aparezca el No. de serie del equipo en cuestión.
Capitulo 5. Glosario
IEEE 802.11 Estándar
El subcomité de estándares inalámbricos IEEE 802.11, el cual formula estándares para la industria.
Access Point (AP)
Un dispositivo hub inalámbrico que conecta tanto redes alambicas como inalámbricas.
Ad-Hoc
Una red inalámbrica Ad-hoc es un grupo de computadoras, cada una con un adaptador WLAN, conectada como
una red LAN inalámbrica independiente. Una Red LAN Ad-hoc es aplicable para un departamento especifico de
una sucursal o para una operación SOHO.
BSSID
Una red específica LAN Ad-hoc es llamada Basic Service Set (BSS). Las computadoras en una BSS y tiene que
estar configurado con el mismo BSSID.
DHCP
Dynamic Host Configuration Protocol – Es un método por el cual las direcciones IP son asignadas por un
servidor dinámico a los clientes en la red. DHCP es usado para direcciones IP dinámicas y requiere en la red un
servidor dedicado DHCP.
ESSID
Una estructura de configuración podría tener capacidad de roaming para trabajadores móviles. Más de un BSS
se puede configurar como un conjunto de servicio extendido (ESS). Usuarios dentro de un ESS pueden
libremente conectarse entre BSS mientras disfrutan una conexión continua en la red entre las estaciones
inalámbricas y Access Points dentro de una ESS tiene que estar configurado dentro de la misma ESSID y el
mismo canal de radio.
Ethernet
Ethernet una red cableada que trabaja a 10/100Mbps dedicada a casa u oficina. Los Usuarios para tener acceso
a la red tienen que estar conectados todo el tiempo.
Gateway
Un gateway es un equipo con hardware y software que conecta dos sistemas similares, tales como una red LAN
y una mainframe. En la terminología de Internet un gateway es otro nombre para router. Generalmente un
gateway es usado como túnel para todo el tráfico a Internet.
IEEE
Institute of Electrical y Electronics Engineers
Infrastructure
Una estructura de configuración integra una red alámbrica e inalámbrica. La infraestructura es aplicable a
empresas con conexión inalámbrica a bases de datos, o aplicaciones cableadas para trabajadores móviles.
Página 21 de 41
Local Área Network (LAN)
Una LAN es un grupo de computadoras, cada una equipada apropiadamente con un adaptador de red
conectada a un cable /aire que comparten aplicaciones, datos y periféricos. Todas las conexiones son por
medio de cable o inalámbricas, una LAN no usa servicios telefónicos. Típicamente se aloja en un solo edificio o
campus.
Network
Una red es un sistema de computadoras que están conectadas. Datos, archivos y mensajes pueden ser
transmitidos sobre la red talvez local LAN o por el Internet WAN.
PCMCIA
Personal Computer Memory Card International Association. También se refiere una tarjeta PCMCIA a un
adaptador CardBus.
SSID
Es una identificación única dentro de la red. Solo clientes y Access Points que comparten el mismo SSID son
capaces de comunicarse entre ellos. La cadena es sensible a mayúsculas y minúsculas con un máximo de 32
caracteres.
Simple Network Management Protocol (SNMP)
Simple Network Management Protocol es el protocolo de administración de la red TCP/IP, en SNMP, agente
que pueden ser hardware al igual que software-monitorea la actividad varios dispositivos en la red y reporta a la
consola de la red. El control de la información acerca de cada uno de los dispositivos es mantenido en una
infraestructura conocida como: management information block.
Static IP Addressing
Un método de asignación de direcciones IP a los clientes de la red. En redes con direcciones IP fijas, el
administrador de la red manualmente asigna la dirección IP a cada computadora. Una vez que la dirección IP es
asignada, cada computadora usa su misma dirección IP cada vez que rebutea o se firma a la red, a menos que
se cambia manualmente.
Transmission Control Protocol / Internet Protocol (TCP/IP)
TCP/IP es un protocolo desarrollado por The Advanced Research Projects Agency (ARPA). Es ampliamente
usado para trabajo en Internet, por su diseño superior para WANs. TCP gobierna como los paquetes son
secuenciados para la transmisión en la red. El termino “TCP/IP” es muy común que se use para referirse a toda
la suite de protocolos relacionados a este.
Transmit / Receive
La velocidad inalámbrica se mide en Bytes por segundo promedio sobre dos segundos.
Wide Área Network (WAN)
Una WAN consiste en múltiples LANs Que están unidas entre si por medio de servicio telefónico y / o cableado
de fibra óptica. WANs pueden extenderse a ciudades, estados, países, o a todo el mundo. Si tienen el mismo
SSID son capaces de comunicarse entre ellas. Simple Network
MIMO Multiple-Input Multiple-Output (MIMO) Este sistema inalámbrico representa una manera económica de
incrementar la capacidad del usuario en una variedad de ambientes. El uso de antenas en ambos trasmisor y
receptor permite tener la posibilidad de escoger el mejor punto para una mejor comunicación.
Página 22 de 41
Chapter 1. Introduction
Thank you for purchasing 802.11g MIMO Wireless PCI Model 2614 / CardBus Adapter Model 2613.
This user manual will assist you with the installation procedure. Multiple-Input Multiple-Output
(MIMO) wireless systems represent an economical way to increase user capacity in a variety of
environments. The use of antennas at both transmitter and receiver allows
z
z
z
z
z
Multiplicative increase in capacity and spectral efficiency
Dramatic reductions of fading thanks to diversity
Increased system capacity (number of users)
Lower probability of detection
Improved resistance to interference
1.1 Package Content
z
z
z
z
MIMO Wireless PCI Adapter /CardBus Card
Driver CD
Manual
Three pieces external Antennas (PCI Only)
If any item contained is damaged or missing, please contact your local dealer immediately. Also,
keep the box and packaging materials in case you need to ship the unit in the future.
1.2 Features
Compliant with IEEE802.11b/g MIMO IEEE802.11g and IEEE802.11b wireless standards
Support modulation with Direct Sequence Spread Spectrum (DSSS) technology and
Orthogonal Frequency Division Multiplexing (OFDM) technology for IEEE802.11b/g PCI 2.1/2.0
32 bit CardBus interface
z
Operate in 2.4GHz frequency band
z
Packet-OVERDRIVETM Technology (TX/RX throughput up to 35Mbps); Range-OVERDRIVETM
Technology (Transmission distance up to 300M)
z
Support auto-data rate selection at 54/48/36/24/12/11/9/6/5.5/2/1 Mbps
z
Provides 64/128 bit WEP and 802.11i encryption security
z
Quality of Service (QoS)-802.11e, WMM
z
Support Windows 98SE/ME/2000/XP/CE, Linux, MAC OSX
z
z
Chapter 2. Installation
2.1 Driver Installation
1. Before insert the Adapter into the PCI/CardBus slot of your computer, please install the Driver
first. Please make sure the 802.11g MIMO Wireless PCI/CardBus Adapter is NOT inserted into the
slot before you install the driver.
NOTE: all the snapped images of installation mentioned in this manual are based on Windows XP. For other
windows operating system, all the procedures are the same but the screens are not the exactly same.
2. Power on the computer. Insert the CD to the CD-ROM Drive. Please browse ” MIMO Wireless LAN
Driver” and then click “setup.exe”. System will install automatically.
Página 23 de 41
Figure 2-1
3.
Click Yes to accept the Agreement. Click No to cancel the setup
Figure 2-2
4. If you are installing the driver under WinXP system, you need to select configuration tool.
According to your needs, you can select MIMO Configuration Tool or Microsoft Zero
Configuration Tool, and then click next. If you select MIMO Configuration Tool, please refer
to Chapter 3. Configuration. If you select Microsoft Zero Configuration Tool, please refer to
2.3 Zero Configuration Service.
Página 24 de 41
Figure 2-3
5. Select Optimize for WiFi mode or Optimize for performance mode then click next
Figure 2-4
6. Click Continue Anyway.
Página 25 de 41
Figure 2-5
7. After shows Setup has finished installing as Figure 2-6, select Yes, I want to restart my
computer now and click Finish.
Figure 2-6
2.2 Install Wireless Adapter
2.2.1 Cardbus card
1. Power on your notebook, let the operating system boot up completely, and log in as needed.
Página 26 de 41
2. Hold the adapter with the LOGO facing up and insert it into a Cardbus slot.
Figure 2-7
3. If the Found New Hardware Wizard displays, choose install the software automatically
(Recommended), and click Next button. The driver will be installed automatically.
Figure 2-8
Figure 2-9
Página 27 de 41
4. Click Continue Anyway.
Figure 2-10
Figure 2-11
5. Click finish. You have finished install the driver and Utility.
Página 28 de 41
Figure 2-12
2.2.2 PCI Adapter
1. Open your PC case and locate an available PCI on the motherboard.
2. Slide the PCI Adapter into the PCI slot. Make sure that all of its pins are touching the slot’s contacts.
You may have to apply a bit of pressure to slide the adapter all the way in. after the adapter is firmly
in place, secure its fastening tab to your PC’s chassis with a mounting screw. Then close your PC.
3. Attach the external antenna to the adapter’s antenna port.
4. Power on the PC.
Figure 2-13
Página 29 de 41
5.If the Found New Hardware Wizard displays, choose install the software automatically
(Recommended), and click Next button. The driver will be installed automatically. You can refer to
Cardbus.
6. if you’d like to use utility with adapter, please refer to Chapter 3. Configuration. if you select
Microsoft configuration tool.
2.3 Zero Configuration Service
Windows XP includes the Zero Configuration Service, a built in service to configure your wireless
clients from within Windows. Skip to Section three configuration if you would rather use MIMO
Driver to configure your wireless client.
If the Wireless Zero Configuration Service is activated, Windows will scan for available wireless
access points once the Wireless PCI/CardBus Adapter is properly installed. If Windows detects one
or more access points, a networking icon
networks are available”.
appears within the system tray. “One or more wireless
To start Wireless Zero Configuration manually, click Start >> Control Panel >> Administrative Tools
>> Services. Select Automatic in the Startup Type field of Wireless Zero Configuration Service.
Right click the networking icon in the taskbar and select View Available Wireless Networks. Select an
SSID and click Connect. You may need to check the box indicating you are connecting to an
unsecured network. See section 3 if you need to enter an SSID network name or WEP/WPA
encryption key.
Figure 2-13
Página 30 de 41
Chapter 3. Configuration
3.1 Profile
Profile can book keeping your favorite wireless setting among your home, office, and other public
hotspot. You may save multiple profiles, and activate the correct one at your preference.
1 Definition of each field:
a.
b.
c.
d.
e.
f.
2
Profile: Name of profile, preset to PROF* (* indicate 1, 2, 3,).
SSID: AP or Ad-hoc name.
Cannel: Channel in use for Ad-Hoc mode.
Authentication: Authentication mode.
Encryption: Security algorithm in use.
Network Type: Network’s type, including infrastructure and Ad-Hoc.
Connection status
Indicate connection is successful on currently activated profile.
Indicate connection is failed on currently activated profile.
Note: When use site survey to make the connection. None of the profile will have the connection
status icon.
3 Add a new profile.
4 Delete an existing profile.
5 Edit Profile.
Página 31 de 41
6 Activate selected profile.
3.2 Link Status
The link status page as below; it displays the detail information current connection.
Status: Current connection status. If no connection, if will show Disconnected. Otherwise, the SSID
and BSSID will show here.
Extra Info: Display link status and current channel in use.
Link Speed: Show current transmit rate and receive rate.
Throughout: Display transmits and receive throughput in unit of K bits/sec.
Link Quality: Display connection quality based on signal strength and TX/RX packet error rate.
Signal Strength: Receive signal strength, user can choose to display as percentage or dBm format.
Noise Level: Display noise signal strength.
3.3 Site Survey
Under the site survey page, system will display the information of surrounding APs from last scan
result. List information’s include SSID, BSSID, Signal, Channel, Encryption algorithm, and Network
type as below.
Página 32 de 41
1 Definition of each field
a. SSID: Name of BSS of IBSS network.
b. BSSID: MAC address of AP or randomly generated of IBSS.
c. Signal: Receive signal strength of specified network.
d. Channel: Channel in use.
e. Encryption: Encryption algorithm used within than BSS or IBSS. Valid value includes WEP,
TKIP, AES, and Not Use.
f. Authentication: Authentication mode used within the network, including Unknown,
WPA-PSK, WPA2-PSK, WPA and WPA2.
g. Network Type: Network type in use, Infrastructure for BSS, Ad-Hoc for IBSS network.
2 Connected network:
a. When RaConfig first ran, it will select the best AP to connect automatically.
b. If user wants to connect to other AP. He can double click mouse on the intended AP to make
connection.
c. If the intended network has encryption other than ?Not Use ? RaConfig will bring up the
security page and let use input the appropriate information to make the connection. Please refer to
section 4 on how to fill the security information.
This icon indicates the change is successful.
3 Indicate connection status, the connected network’s SSID will show up here.
4 Issue an rescan command to wireless NIC to update information on surrounding wireless network.
5 Command to connect to the selected network.
6 Add the selected AP to Profile settin. It will bring up profile page and save user’ setting to a new
profile.
Página 33 de 41
ADD/EDIT Profile
1.
System Configuration:
1 Profile Name: User chose name for this profile.
2 SSID: User can key in the intended SSID name or use pull down menu to select from available
APs.
3 Power Save Mode: Choose from CAM (Constantly Awake Mode) or Power Saving Mode. There is
a check box for CAM when AC power? When this is checked, the wireless NIC will stay full power
when AC power cord is plug into power outlet.
4 Network Type: There are two types, infrastructure and 802.11 ad-hoc modes. Under ad-hoc
mode, user can also choose the preamble type; the available preamble type includes short and long.
In addition to that, the channel and Ad hoc wireless mod field will be available for setup in ad-hoc
mode.
5 TX Power: Transmit power, the amount of power used by a radio transceiver to send the signal
out. User can choose power value by sliding the bar.
6 Preamble: There are three types, Auto, Long and Short are supported.
7 RTS Threshold: User can adjust the RTS threshold number by sliding the bar or key in the value
directly. The default value is 2347.
Fragment Threshold: User can adjust the FRG threshold number by sliding the bar or key in the
value directly. The default value is 2346.
Página 34 de 41
4.
Authentication & Security
Authentication & Security setting shown
3.4 Statistics
Statistics page displays the detail counter information based on 802.11 MIB counters. This page
translates that MIB counters into a format easier for user to understand. The next figure shows the
detail page layout.
Página 35 de 41
1 Transmit Statistics:
a. Frames Transmitted Successfully: Frames successfully sent.
b. Frames Transmitted Successfully Without Retry: Frames successfully sent without any retry.
c. Frames Transmitted Successfully After Retry: Frames successfully sent with one or more
reties.
d. Frames Fail To Receive ACK After All Retries: Frames failed transmit after hitting retry limit.
e. RTS Frames Successfully Receive CTS: Successfully receive CTS after sending RTS frame.
f. RTS Frames Fail To Receive CTS: Failed to receive CTS after sending RTS.
2 Receive Statistics:
a.
b.
c.
d.
Frames Received Successfully: Frames received successfully.
Frames Received With CRC Error: Frames received with CRC error.
Frames Dropped Due To Out-of-Resource: Frames dropped due to resource issue.
Duplicate Frames Received: Duplicate received frames.
3 Reset counters to zero.
3.5 Advance
The next Figure shows advance setting page of RaConfig
Página 36 de 41
1 Wireless mode: Select wireless mode. 802.11B only, 802.11 B/G mixed 802.11A only, 802.11
A/B/G mixed and 802.11G only modes are supported.
2 11B/G Protection: ERP protection mode of 802.11G definition. User can choose from Auto, On, and
Off.
a. Auto: STA will dynamically change as AP announcement.
b. On: Always send frame with protection.
c. Off: Always send frame without protection.
3 TX Rate: Manually force the Transmit using selected rate. Default is auto.
4 TX Burst: Ralink’s proprietary frame burst mode.
5 Enable TCP Window Size:
6 Fast Roaming at: fast to roaming, setup by transmit power.
7 Select Your Country Region Code: eight countries to choose. Country channel list: Country
channel list
8 CCX2.0: support Cisco Compatible Extensions function:
a. LEAP turn on CCKM
b. Enable Radio Measurement: can channel measurement every 0~2000 milliseconds.
9 Turn radio ON/OFF for FAA requirement.
Radio On: Indicate to turn on radio.
Radio Off: Indicate to turn off radio.
10 Apply the above changes.
Página 37 de 41
3.6 About
About page display the wireless card and driver version information as below.
1 Display Configuration Utility, Driver, and EEPROM version information.
2 Display Wireless NIC MAC address.
Página 38 de 41
Chapter 4. Specification
Standard / protocol
Interface
Frequency Range
Data Rate
Spread Spectrum
Transmission Distance
Transmitter Output Power
Data Security
LED Indicator
Dimensions
Environment
Operating System
Conformance
IEEE 802.11b/g MIMO ; IEEE 802.11g; IEEE 802.11b;
PCI Card/Cardbus
2.4~2.4835GHz
54/48/36/24/12/9/6/11/5.5/2/1 Mbps (Auto Rate Sensing)
DSSS
Outdoor:900m/700m(limited to environment)
18dBm(Typical)
WPA; 64/128-bit WEP; TKIP/AES, WPA2, 802.11i
LINK/ACT
128mm*120.5mm*18.5mm/128mm*120.5mm*18
0 ~ 55℃Operating Temperature: 0℃~40℃ (32℉~104℉) ;
Storage Temperature: -40~70℃ (-40℉~158℉) ;
Operating Humidity: 10%~90% non-condensing ;
Storage Humidity: 5%~95% non-condensing
Windows 98SE/ME/2000/XP/CE, Linux, MAC
CE
Página 39 de 41
Chapter 5. Glossary
IEEE 802.11 Standard
The IEEE 802.11 Wireless LAN standards subcommittee, which is formulating a standard for the
industry.
Access Point
An internetworking device that seamlessly connects wired and wireless networks together.
Ad Hoc
An Ad Hoc wireless LAN is a group of computers, each with a WLAN adapter, connected as an
independent wireless LAN. Ad Hoc wireless LAN is applicable at a departmental scale for a branch or
SOHO operation.
BSSID
A specific Ad Hoc LAN is called a Basic Service Set (BSS). Computers in a BSS must be configured
with the same BSSID.
DHCP
Dynamic Host Configuration Protocol - a method in which IP addresses are assigned by server
dynamically to clients on the network. DHCP is used for Dynamic IP Addressing and requires a
dedicated DHCP server on the network.
ESSID
An Infrastructure configuration could also support roaming capability for mobile workers. More than
one BSS can be configured as an Extended Service Set (ESS).Users within an ESS could roam freely
between BSS while served as a continuous connection to the network wireless stations and Access
Points within an ESS must be configured with the same ESSID and the same radio channel.
Ethernet
Ethernet is a 10/100Mbps network that runs over dedicated home/office wiring. Users must be wired
to the network at all times to gain access.
Gateway
A gateway is a hardware and software device that connects two dissimilar systems, such as a LAN
and a mainframe. In Internet terminology, a gateway is another name for a router. Generally a
gateway is used as a funnel for all traffic to the Internet.
IEEE
Institute of Electrical and Electronics Engineers
Infrastructure
An integrated wireless and wired LAN is called an Infrastructure configuration. Infrastructure is
applicable to enterprise scale for wireless access to central database, or wireless application for
mobile workers.
Local Area Network (LAN)
A LAN is a group of computers, each equipped with the appropriate network adapter card connected
by cable/air, that share applications, data, and peripherals. All connections are made via cable or
wireless media, but a LAN does not use telephone services. It typically spans a single building or
campus.
Network
A network is a system of computers that is connected. Data, files, and messages can be transmitted
over this network. Networks may be local or wide area networks.
PCMCIA
Personal Computer Memory Card International Association. Also a PCMCIA card is also referred to
CardBus Adapter.
SSID
A Network ID unique to a network. Only clients and Access Points that share the same SSID are able
to communicate with each other. This string is case-sensitive.
Simple Network Management Protocol (SNMP)
Simple Network Management Protocol is the network management protocol of TCP/IP. In SNMP,
agents-which can be hardware as well as software-monitor the activity in the various devices on the
network and report to the network console workstation. Control information about each device is
maintained in a structure known as a management information block.
Página 40 de 41
Static IP Addressing
A method of assigning IP addresses to clients on the network. In networks with Static IP address,
the network administrator manually assigns an IP address to each computer. Once a Static IP
address is assigned, a computer uses the same IP address every time it reboots and logs on to the
network, unless it is manually changed.
Transmission Control Protocol / Internet Protocol (TCP/IP)
TCP/IP is the protocol suite developed by the Advanced Research Projects Agency (ARPA). It is
widely used in corporate Internet works, because of its superior design for WANs. TCP governs how
packet is sequenced for transmission the network. The term “TCP/IP” is often used generically to
refer to the entire suite of related protocols.
Transmit / Receive
The wireless throughput in Bytes per second averaged over two seconds.
Wide Area Network (WAN)
A WAN consists of multiple LANs that are tied together via telephone services and / or fiber optic
cabling. WANs may span a city, a state, a country, or even the world.
are the same SSID are able to communicate with each other. This string is case-sensitive.
MIMO Multiple-Input Multiple-Output (MIMO) wireless systems represent an economical way to
increase user capacity in a variety of environments. The use of antennas at both transmitter and
receiver allows to have several points to use the best connection.
Página 41 de 41