1
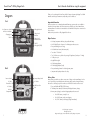
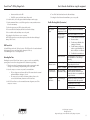
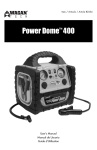
Item no.2355
Artículo No 2355
Power Dome™ 200
User’s Manual
Manual de Usuario
Power DomeTM 200 by Wagan Tech
User’s Manual—Read before using this equipment
Diagram
Thank you for purchasing the Power Dome 200W Compact Generator by Wagan Tech. With
minimal care and proper treatment it, will provide years of reliable use.
Front:
Important Information
Air Compressor Switch
Utility Light Switch
Air Pressure Indicator
Charging Jack
12V DC
Before power dome use, read and understand all warnings, cautions, and notes included in
this manual. It is important to also follow instructions provided by your vehicle manufacturer
and manufacturer of other devices intended to be used with this unit. Keep these instructions for
future reference.
Charge Level
Indicator
Make sure the power dome is fully charged before first use.
Charge Level
Indicator button
Major Features:
12V DC
Utility Light (5 LED)
• 600 Amp Jumpstarter with heavy duty cable and clamps
• 260 PSI High Flow Air Compressor for inflating tires and accessories
• Easy-read analog Pressure Gauge
• 200 Watt Power Inverter (400 watts peak)
• Two outlets 115 Volts AC
• Two 12 Volt Accessory Outlets for powering DC appliances (loads up to 11 Amps)
• 1 USB power port
• Bright LED Area light
• AC Recharging Adapter
• DC Recharging Adapter (fused)
Back:
• Easy-read analog voltmeter for checking battery status
• Jumpstart cable polarity indicator for safety
Inverter Switch
Jumper Safety Switch
25 Amp
External Fuse
AC Outlet
USB Power Port
AC Outlet
Fan
Air Hose
Compartment
Battery Status
Battery Status provides the user with a current state of charge on the internal battery. It is the
user’s responsibility to periodically monitor the battery charge and to recharge the battery
after each use. Recharge every three months even if the Power Dome has not been used.
1. Press and hold the BATTERY STATUS button
2. The Battery Status Meter (DC Voltmeter) will display the battery voltage
3. Battery status (voltage) is read with charging adapters disconnected
• ≥12.6V DC: battery is ready for use
• ≤12.0V DC: battery needs some charging
• <10.5V DC: battery is discharged, charge immediately
1
www.wagan.com
© 2010 Wagan Corporation.
All Rights Reserved.
Wagan and wagan.com are trademarks used by Wagan Corporation.
2
Power DomeTM 200 by Wagan Tech
Charging The Power Dome
User’s Manual—Read before using this equipment
2. Insert the 12V DC accessory plug into the Power Port
3. Operate the appliance as you normally would
AC Charging
Make sure the supplied AC Charging Adapter is to be powered by the correct voltage.
(i.e. 110V AC or 220V AC). Only use the AC charging adapter supplied with this unit.
1. Make sure all Power Dome switches are set to OFF
4. After use, disconnect the accessory plug from the Power Port
5. Replace the Power Port’s dust cover
6. Recharge the Power Dome as soon as convenient
2. Open the dust cover on the Charging Jack
3. Connect the AC Charging Adapter to the AC outlet
Using The Air Compressor
4. Plug the Charging Adapter’s cord into the Power Dome’s Charging Jack
5. The Charging Indicator will light during the charging process
The Air Compressor Gauge and ON/OFF Switch are located on the front of the Power Dome.
The Compressor Air Hose Compartment is located on the rear of the Power Dome.
6. Initial AC charge can take up to 34 hours
CAUTION:
7. Do not charge for more than 48 hours
• Never connect or disconnect the nozzle with the compressor operating.
8. After charging the battery, disconnect the adapter from the AC outlet first, then from
the charging jack
• Before any tire inflation, look for the recommended inflation pressure information on
the sidewall of the tire.
9. Replace the dust cover on the charging jack
NOTE: The Charging Indicator light indicates charging. Press the Charge Status Button for
the Voltmeter to show battery voltage and charge status.
DC Charging in Your Vehicle or Boat
Only use the DC charging adapter supplied with this unit.
NOTE: The engine must be running while charging the Power Dome.
1. Make sure all Power Dome switches are set to OFF
2. Open the dust cover on the Charging Jack
3. Plug the Charging Adapter’s cord into the Power Dome’s Charging Jack
4. Plug the DC Charging Adapter into an accessory outlet (cigarette lighter)
5. The Charging Indicator will light during the charging process
6. Do not charge more than 14 hours using the DC method
7. After charging the battery, disconnect the adapter from the accessory socket first, then
from the charging jack.
8. Replace the dust cover on the charging jack
Inflation Procedure
1. Open the Air Hose Compartment door at the rear of the Power Dome and extend the
air hose.
2. Position the Power Dome so that you see the front panel
3. Make sure nozzle lever is positioned UP (away from the nozzle opening)
4. Remove the valve cap from the valve stem
5. Attach the nozzle to the tire’s valve stem
6. Move the nozzle lever down to secure the nozzle to the valve stem
7. Turn compressor switch on to ON position
8. Monitor the pressure gauge while inflating the tire
9. When recommended tire pressure has been reached, turn the Compressor OFF
10.Disconnect hose and replace valve cap
11.Store the hose in the Air Hose Compartment
12.Recharge the Power Dome as soon as convenient
DC Power Port
DC To AC Power Inverter
DC Power Ports (accessory sockets) are located under the Pressure Gauge and the Battery
Status Meter (voltmeter). The ports can power a DC load of up to 11 Amps. Overloading the
port will result in “tripping” a self-resetting circuit breaker. Removing the overload automatically
restores power to the DC Power Ports.
The Power Dome’s inverter can operate most AC appliances or a combination of appliances up
to 200 watts. Operating time is dependant on the AC load (watts) and the current charge of
the Power Dome’s internal battery. Reduced AC loads and a fully charged battery will result in
longer operating time. Be sure to turn off or disconnect any AC appliance not in use.
1. Uncover the dust cover from the Power Port
3
www.wagan.com
There is a user-replaceable 25 amp automotive type fuse to the left of the inverter ON/
© 2010 Wagan Corporation.
All Rights Reserved.
Wagan and wagan.com are trademarks used by Wagan Corporation.
4
Power DomeTM 200 by Wagan Tech
OFF switch. This fuse protects the inverter from an unlikely excessive input current. Ordinary
overloads will cause the inverter to automatically shut down. When this happens, reduce the
load and restart the inverter.
Using The Power Inverter
1. Open the AC outlet dust cover
2. Connect the AC appliance or appliances to either AC outlet
3. Turn on the Inverter using the Inverter’s ON/OFF switch
generated when vinyl clothing is rubbed.
• Remove any metallic jewelry, such as rings, bracelets, necklaces, and watches while
working with a lead acid battery. It can produce a short-circuit that may cause severe
burns.
• Wear complete eye protection. Do not touch eyes while working near or with battery.
Battery acid can cause blindness and/or severe burns.
• Do not smoke while jump starting
• Never charge or jump-start a frozen battery.
• “I” = USB and DC sockets ON
• To prevent short-circuits and arcing, never allow the metal ends/tips of clamps
(positive & negative terminals) to touch each other or connect to the same piece of
metal.
• “II” = Everything On (AC outlets, USB Port, and DC sockets)
• Power Dome is for use with 12 volt systems
• “O” = OFF
4. If the Inverter Power Indicator LED light is green, the inverter is operating
• Jump start a vehicle or boat in a well ventilated area
5. Turn on one AC appliance and observe the Power Indicator
• After using the jump starter, turn OFF Power Safety switch
6. If the LED remains green, then turn on the second appliance
• Excessive engine cranking can damage the vehicle‘s starter motor. If the engine fails
to start after the recommended number of attempts, discontinue jumpstart procedure
and look for other problems that may need to be corrected.
7. If the Power Indicator remains green, then both appliances are operating properly
8. After use, remove the appliance plug and close the dust cover
9. Recharge Power Dome as soon as convenient
NOTES: If the Power indicator LED is not lit, then reduce the AC load. If the inverter is still
not operating, refer to the troubleshooting table at the end of this User’s Manual.
CAUTION:
Some rechargeable devices are equipped with a separate AC charger. These devices
will most likely operate properly with this inverter. Rechargeable devices that have built-in
chargers (see device owner’s manual) may not operate properly with this type
of inverter.
The motors of some motorized devices may operate at excessive motor temperature.
Abnormally elevated temperature of the motor is an indication that they should not be used
with this inverter.
Some televisions and other electronics with sensitive components should be checked to see
if they are compatible with modified sine wave (non-sinusoidal) inverters. Check with the
appliance manufacturer.
• If vehicle to be started has a Positive Grounded System (positive battery terminal is
connected to chassis):
i. Connect negative (-) black clamp to vehicle battery‘s negative terminal.
ii. Connect positive (+) red clamp to vehicle chassis or a solid, non-moving, metal
vehicle component or body part. DO NOT clamp directly to positive battery
terminal or moving part.
Jumpstarting
1. Review the Jumpstart Warnings
2. Make sure all vehicle appliances, lights, radio, etc. are turned OFF
3. Make sure the vehicle’s brake is set and the transmission is in “Park”
4. Make sure all Power Dome switches are OFF
5. Securely connect the Red (+) cable Clamp to the vehicle’s Positive (+) battery terminal
6. Connect the Black (-) cable Clamp to a non-moving part on the vehicle
JUMPSTART WARNINGS
Lead-acid batteries can release explosive gasses. Failure to follow instructions may cause
property damage, explosion hazard, and/or personal injury.
5
User’s Manual—Read before using this equipment
7. Observe the color of the REVERSE POLARITY LED that is located between the Battery
Status and Work Light Switches
8. If the LED is RED—DO NOT TURN ON THE CABLE JUMPER SWITCH
• This product is not a toy, keep out of the reach of children.
• Cable clamps need to be reversed
• Do not operate this device while wearing vinyl clothing. Static electricity may be
• Disconnect the black clamp first and then the RED cable clamp
www.wagan.com
© 2010 Wagan Corporation.
All Rights Reserved.
Wagan and wagan.com are trademarks used by Wagan Corporation.
6
Power DomeTM 200 by Wagan Tech
User’s Manual—Read before using this equipment
• Reconnect and observe the LED
4. Turn off the Cable Switch and store the cables and clamps
• If the LED is green, turn ON the Jumper Safety switch
5. Recharge the Power Dome and external battery as soon as possible
9. Inside the vehicle, turn on the ignition switch and attempt to start the engine.
10.Crank a maximum of three seconds. If the engine does not start, wait three minutes
before the next attempt
Trouble Shooting Guide (for inverter)
11.After the engine starts, turn OFF the Jumper Safety switch.
Trouble
Cause
Remedy
12.Disconnect the black clamp first, and then disconnect the red clamp.
Lack of power
output
Power Dome battery
voltage below 10 volts
Recharge the Power Dome immediately
Excessive current
drawn by appliance
being operated
Reduce load to maximum of 200 watts
13.Be sure that the cables and clamps are securely stored.
14.Recharge the Power Dome as soon as convenient.
NOTE: If the engine does not start, there may be a problem other than a discharged
battery. Call for service.
1. Turn OFF the device and inverter
2. Disconnect device
3. Turn the inverter ON and run for
a minimum of 2 minutes
USB Power Port
4. Turn OFF inverter, quickly plug
in device to inverter making sure
device is OFF prior to connection
Set On/Off safety switch to the “USB port” position. The USB Power Port is located underneath
the charging jack. It can power/charge devices that require 5 Volts up
to 500mA through the use of a user-supplied cord.
5. Turn ON the inverter and device
Extending Run Time
Extending the run time of Power Dome’s inverter or compressor can be accomplished by
powering these functions from a charged external 12 volt automotive-type battery.
1. Follow the procedure for jumpstarting an engine as far as connecting the cables
checking for correct battery polarity and turning on the Cable Switch.
2. Now the compressor or inverter can operate for an extended time
• The low voltage protection feature will shut off the inverter when the external
and internal batteries discharge to 10 volts.
• The compressor does not have a low battery shut-down feature so the
user must check the Battery Status meter on the Power Dome.
3. After The Power Dome is used in an extended run time configuration, turn off the
compressor or inverter.
Inverter Power
Indicator is not lit.
Inverter fuse blown
Check and replace if necessary. Be sure
any replacement fuse is the same type
and rating.
Excessive voltage drop
Check Power Dome and recharge if
voltage drops below 10 volts.
Inverter is overloaded
Reduce load to maximum of 200 watts.
Television/Power
Tool will not start
High surge wattage
requirement to start-up
Toggle the On/Off switch in quick
succession five times. If the device does
not start, the device is not compatible with
this type of inverter.
Television
Interference
Picture breaking up
(snow).
Place the Power Dome as far from the TV,
antenna, and coaxial cable as possible.
TV station may be out or range.
Do not use inverter with low quality audio
AC filtering system.
7
www.wagan.com
© 2010 Wagan Corporation.
All Rights Reserved.
Wagan and wagan.com are trademarks used by Wagan Corporation.
8
Power DomeTM 200 by Wagan Tech
Static/noise
interference in
audio system
Sound system has
weak alternating
current shielding
Replace audio system with high quality
noise filtering
Specifications
Sealed Lead Acid - Rechargeable Battery
12 Volt, 18 Amp Hour
Work Light with On/Off Switch
5 x LED’s
Compressor
260 PSI
Inverter Output - Two AC outlets
115 Volts AC 60 Hz
Maximum Inverter Output Power Peak Power
200 Watts – 400 Watts peak
(max of 0.3 sec.)
12 Volt Accessory Outlet
12 Volt 11 Amps max
USB Power Port
5 Volt up to 500 mA.
Max AC Charging Time from discharge
34 hours
Max DC Charging Time (engine operating)
12 hours
Jump Start Cables and Clamps
6 Gauge, heavy duty clamps 24 in length
WAGAN Corp. Limited Warranty
All WAGAN Corporation products are warranted to the original purchaser of
this product.
Warranty Duration: This product is warranted to the original purchaser for a
period of one (1) Year from the original purchase date, to be free of defects
in material and workmanship. WAGAN Corporation disclaims any liability for
consequential damages. In no event will WAGAN Corporation be responsible
for any amount of damages beyond the amount paid for the product at retail. In
the event of a defective item, please contact WAGAN Corporation at (800) 2315806 to obtain a Returned Merchandise Authorization number (RMA#), and
return instructions. Each item returned will require a separate RMA#. After you
have received the RMA# and the return instructions from WAGAN Corporation,
please follow the instructions and send the item with PREPAID SHIPPING, along
with all of the required documentation, a complete explanation of the problem,
your name, address and daytime phone number. WAGAN Corporation will, at
its option, replace or repair the defective part.
A Returned Merchandise Authorization number (RMA#) is REQUIRED when
sending in any defective item. WAGAN Corporation is not responsible for any
item(s) returned without an official Returned Merchandise Authorization number.
The item(s) must be returned with prepaid shipping. WAGAN Corporation is not
responsible for any shipping charges incurred in returning the item(s) back to the
company for repair or replacement. This warranty is void if the product has been
damaged by accident, in shipment, unreasonable use, misuse, neglect, improper
service, commercial use, repairs by unauthorized personnel or other causes not
arising out of defects in materials or workmanship. This warranty is effective only
if the product is purchased and operated in the USA and does not extend to any
units which have been used in violation of written instructions furnished.
Warranty Disclaimers: This warranty is in lieu of all warranties expressed or
implied and no representative or person is authorized to assume any other
liability in connection with the sale of our products. There shall be no claims
for defects or failure of performance or product failure under any theory of
tort, contract or commercial law including, but not limited to negligence, gross
negligence, strict liability, breach of warranty and breach of contract.
Warranty Performance: During the above one (1) Year warranty period, a
product with a defect will be replaced with a comparable model when the
product is returned to WAGAN Corporation with an original store receipt. The
replacement product will be in warranty for the balance of the one (1) Year
warranty period.
Updated August 2008
9
www.wagan.com
Power DomeTM 200 de Wagan Tech
Manual de usuario—Leer antes de utilizar este equipo
Diagrama
¡Gracias por adquirir el generador compacto Power Dome™ 200 de Wagan Tech! Con
cuidado mínimo y el tratamiento apropiado proporcionará años de uso confiable
Parte Delantera:
Información Importante
Botón de Encendido
Apagado del Compresor
Bóton de Encendido
apagado de la Luz
Calibrador del Compresor
Medidor de Estado de
la Batería
Zócalo para Carga CA
Botón de Monitoreo de
la Batería
Zócalo de Corriente CC
Zócalo de Corriente CC
Luz de trabajo
Antes de utilizar el Power Dome, lea y comprenda todas las advertencias, precauciones
y notas que incluye este manual. Resulta también importante seguir las instrucciones
proporcionadas por el fabricante de su vehículo y del fabricante de otros productos que desee
utilizar con esta unidad.
GUARDE ESTAS INSTRUCCIONES PARA FUTURA REFERENCIA.
Asegúrese de que el Power Dome esté totalmente cargado antes de utilizarlo.
Características Principales:
• Jumper de 600 amperios con cables y abrazaderas para trabajos pesados
• Compresor con un caudal de aire de hasta 260 PSI para el inflado de neumáticos y
accesorios
• Calibrador analog de fácil lectura
• Inversor de 200 vatios de alimentación (potencia pico de 400 vatios)
• Dos puertos des corriente CC de 115 voltios
• Dos salidas auxiliares de 12 voltios para alimentar dispositivos de CC (carga hasta
11 amperios)
• 1 puerto de alimentación USB
• Luz de trabajo LED
Parte Posterior:
• Adaptador de recarga de CA
• Adaptador de recarga de CC (con fusibles)
• Medidor de fácil lectura para comprobar el estado de la batería
Botón de Encendido
Apagado del Inversor
Bóton de Seguridad
del Jumper
Fusibles Externos
de 25 Amps
Zócalo de Corriente CA
Puerto USB
Zócalo de Corriente CA
Ventilador
Compartimiento de
Manguera de aire
• Indicador de polaridad del jumper para seguridad
Estado de la Batería
El estado de la batería informa al usuario del estado de carga actual de la batería interna.
Es responsabilidad del usuario supervisar de forma periódica la carga de la batería y de
recargar la batería después de cada uso. Recargue la batería cada tres meses, incluso si no
ha utilizado el Power Dome.
1. Mantenga pulsado el botón BATTERY STATUS (MONITOREO DE LA BATERÍA)
2. El medidor de estado de la batería (Voltímetro de CC) mostrará el voltaje de la
batería
11
www.wagan.com
© Corporación Wagan 2010
Todos los derechos reservados
WAGAN y Wagan.com son marcas registradas de la Corporación Wagan
12
Power DomeTM 200 de Wagan Tech
3. El estado de la batería (voltaje) se lee con los adaptadores de carga desconectados
• ≥12,.V CC: la batería está lista para utilizar
• ≤12.0 V CC: la batería necesita algo de carga
• <10.5 V CC: la batería está descargada, cárguela inmediatamente
Recargando el Power Dome
Carga CA
Asegúrese de que el adaptador de carga de CA esté recibiendo alimentación con el voltaje
correcto (es decir, 110 V CA o 220 V CA). Utilice únicamente el adaptador de carga de CA
incluido con esta unidad.
Manual de usuario—Leer antes de utilizar este equipo
7. Tras cargar la batería, desconecte primero el adaptador de la toma de corriente
auxiliar, a continuación, del conector de carga.
8. Vuelva a colocar la cubierta antipolvo del conector de carga
Puertos de Corriente CC
Los puertos de alimentación de CC (tomas auxiliares) están situadas debajo del calibrador del
compresor y del medidor de estado de la batería (voltímetro). Los puertos pueden alimentar
una carga de CC de hasta 11 amperios. Sobrecargar el puerto provocará que se “dispare”
un disyuntor de circuito de autorrestauración. Al eliminar la sobrecarga se restaurará
automáticamente la alimentación hacia los puertos de alimentación de CC.
1. Descubra la cubierta antipolvo del puerto de alimentación
1. Asegúrese de que todos los interruptores del Power Dome estén en la posición OFF
(APAGADO)
2. Inserte la clavija auxiliar de 12 V CC en el puerto de alimentación
2. Abra la cubierta antipolvo del conector de carga
4. Después de utilizarlo, desconecte la clavija auxiliar del puerto de alimentación
3. Conecte el adaptador de carga de CA a la toma de corriente de CA
5. Vuelva a colocar la cubierta antipolvo del puerto de alimentación
4. Conecte el cable del adaptador de carga al conector de carga del Power Dome
6. Recargue el Power Dome siempre que sea necesario
3. Utilice el dispositivo de forma normal
5. El indicador de carga se iluminará durante el proceso de carga
6. La carga de CA inicial puede demorar hasta 34 horas
7. No cargar durante más de 48 horas
Usando el Compresor de Aire
8. Tras cargar la batería, desconecte primero el adaptador de la toma de corriente de
CA, a continuación, del conector de carga
El manómetro del compresor de aire y el interruptor ON/OFF (encendido/apagado) se
encuentran en la parte delantera del Power Dome. El compartimiento de la manguera de aire
del compresor se encuentra en la parte trasera del Power Dome.
9. Vuelva a colocar la cubierta antipolvo del conector de carga
PRECAUCIÓN:
NOTA: La luz del indicador de carga indica que el proceso de carga está en curso. Pulse
el botón Charge Status (Estado de carga) para que el voltímetro muestre el voltaje de la
batería y el estado de carga.
• No conecte ni desconecte nunca la boquilla con el compresor en funcionamiento.
• Antes de inflar los neumáticos, consulte la información de presión de inflado en la
parte lateral del neumático.
Carga CC en Su Vehículo o Barco
Utilice únicamente el adaptador de carga de CC incluido con esta unidad.
NOTA: El motor del vehículo or barco debe estar encendido mientras carga el Power Dome.
1. Asegúrese de que todos los interruptores del Power Dome estén en la posición OFF
(APAGADO)
2. Abra la cubierta antipolvo del conector de carga
3. Conecte el cable del adaptador de carga al conector de carga del Power Dome
1. Abra la compuerta del compartimiento de la manguera de aire, que se encuentra
situado en la parte trasera del Power Dome, y despliegue la manguera de aire.
2. Coloque el Power Dome de forma que pueda ver el panel delantero
3. Asegúrese de que la palanca de la boquilla esté en posición UP (ARRIBA, lejos de la
apertura de la boquilla)
4. Conecte el adaptador de carga de CC a una toma de corriente auxiliar (encendedor
de cigarrillos)
4. Retire la tapa de la válvula del vástago de válvula
5. El indicador de carga se iluminará durante el proceso de carga
6. Desplace la palanca de la boquilla hacia abajo para fijar la boquilla en el vástago
de válvula
6. No cargue durante más de 14 horas utilizando el método de CC
13
Procedimiento de Inflado
www.wagan.com
5. Coloque la boquilla en el vástago de válvula del neumático
© Corporación Wagan 2010
Todos los derechos reservados
WAGAN y Wagan.com son marcas registradas de la Corporación Wagan
14
Power DomeTM 200 de Wagan Tech
7. Coloque el interruptor del compresor en la posición ON (ENCENDIDO)
9. Recargue el Power Dome siempre que sea necesario
8. Supervise el manómetro mientras infla el neumático
NOTAS: Si la luz LED del indicador de alimentación no está encendida, reduzca la carga
CA. Si el inversor sigue sin funcionar, consulte la tabla de solución de problemas que se
encuentra al final de este Manual de usuario.
9. Cuando se alcance la presión recomendada del neumático, APAGUE el compresor
10.Desconecte la manguera y coloque la tapa de la válvula
11.Guarde la manguera en el compartimiento de la manguera de aire
12.Recargue el Power Dome siempre que sea necesario
Inversor de Corriente de CC a CA
El inversor del Power Dome puede poner en funcionamiento la mayoría de dispositivos CA o
una combinación de dispositivos hasta un máximo de 200 vatios. El tiempo de funcionamiento
depende de la carga de CA (vatios) y de la carga actual de la batería interna del Power
Dome. La reducción de cargas de CA y una batería totalmente cargada derivarán en mayores
tiempos de funcionamiento. Asegúrese de desactivar o desconectar todos aquellos dispositivos
de CA que no se estén utilizando.
En la parte izquierda del interruptor ON/OFF (ENCENDIDO/APAGADO) del inversor se
encuentra un fusible de tipo automotriz de 25 amperios que el usuario puede sustituir. Este
fusible protege el inversor de una, aunque improbable, corriente de entrada excesiva.
Normalmente, las sobrecargas provocarán que el inversor se apague automáticamente. Si esto
sucede, reduzca la carga y reinicie el inversor.
Utilización del Inversor de Corriente
1. Abra la cubierta antipolvo de la toma de corriente de CA
2. Conecte el dispositivo o dispositivos de CA a una de las tomas de corriente de CA
3. Encienda el inversor utilizando el interruptor ON/OFF (ENCENDIDO/APAGADO) del
inversor
PRECAUCIÓN:
Algunos dispositivos recargables incluyen un cargador de CA independiente. En
condiciones normales, estos dispositivos funcionarán correctamente con este inversor.
Los dispositivos recargables que incluyen cargadores integrados (consulte el manual del
propietario del dispositivo) podrían no funcionar correctamente con este tipo de inversor.
Los motores de determinados dispositivos motorizados podrían funcionar con una excesiva
temperatura del motor. Una temperatura de motor anormalmente elevada es un indicativo
de que no debe utilizarse con este inversor.
Es necesario comprobar la compatibilidad de determinados televisores y otros productos
electrónicos con los inversores de onda senoidal (no sinusoidal) modificados. Consulte al
fabricante del dispositivo.
ADVERTENCIAS AL UTILIZAR EL JUMPER
Las baterías de plomo pueden liberar gases explosivos. No seguir las instrucciones puede
provocar daños materiales, provocar riesgos de explosión y/o lesiones personales.
• Este producto no es un juguete, manténgalo fuera del alcance de los niños.
• No utilice este producto llevando ropa con vinilo. Es posible que se genere
electricidad eléctrica al frotar la ropa con vinilo.
• Quítese toda la joyería metálica, como por ejemplo anillos, brazaletes, collares y
relojes mientras trabaje con una batería de plomo. Podría provocar un cortocircuito y
resultar en quemaduras graves.
• I: Enciende el puerto USB y los zócalos de corriente CC
• Utilice protección ocular completa. No se toque los ojos mientras trabaje cerca de
o con la batería. El ácido de la batería puede provocar ceguera y/o quemaduras
graves.
• 0: Apagado
• No fume mientras realiza el arranque asistido
• II: Enciende el inversor CA, puerto USB, y zócalos de corriente CC
• No cargue ni realice el arranque asistido de una batería congelada
4. Si la luz LED indicadora de alimentación del inversor está en color verde, el inversor
estará en funcionamiento
5. Encienda un dispositivo de CA y observe el indicador de alimentación
6. Si el LED permanece en color verde, encienda el segundo dispositivo
7. Si el indicador de alimentación permanece encendido en color verde, ambos estarán
funcionando correctamente
8. Después de utilizarlo, retire la clavija del dispositivo y cierre la cubierta antipolvo
15
Manual de usuario—Leer antes de utilizar este equipo
www.wagan.com
• Para evitar cortocircuitos y formación del arco eléctrico, no deje que los extremos ni
las puntas de las abrazaderas (terminales positivo y negativo) entren en contacto ni
toquen la misma pieza metálica.
• El Power Dome está diseñado para ser utilizado con sistemas de 12 voltios
• Realice el arranque asistido de un vehículo o un barco en una zona ventilada
• Tras utilizar el jumper, coloque en posición OFF (APAGADO) el interruptor de
seguridad.
© Corporación Wagan 2010
Todos los derechos reservados
WAGAN y Wagan.com son marcas registradas de la Corporación Wagan
16
Power DomeTM 200 de Wagan Tech
• El arranque excesivo del motor por medio del jumper puede provocar daños en
el motor de arranque del vehículo. Si el motor no arranca después del número de
intentos recomendado, desista de intentar realizar el procedimiento de arranque
asistido y busque otros problemas que pudieran tener que resolverse.
• Si el vehículo que va a arrancarse cuenta con un sistema de conexión a tierra positivo
(el terminal positivo de la batería está conectado al chasis):
i. Conecte la abrazadera negra negativa (-) de la batería al terminal negativo de
la batería del vehículo.
ii. Conecte la abrazadera roja positiva (+) al chasis del vehículo o a un componente
sólido, metálico, fijo del vehículo. NO coloque la abrazadera directamente en el
terminal positivo de la batería ni a una pieza móvil.
Arranque Asistido
Manual de usuario—Leer antes de utilizar este equipo
seguridad de arranque.
12.Desconecte primero la abrazadera negra y, a continuación, la abrazadera roja
13.Asegúrese de guardar correctamente los cables y las abrazaderas.
14.Recargue el Power Dome siempre que sea necesario.
NOTA: Si el motor no arranca, es posible que haya un problema que no sea que la
batería está descargada. Solicite asistencia.
Puerto de Alimentación USB
Coloque el interruptor de seguridad On/Off (Encendido/Apagado) en la posición “USB
port” (Puerto USB). El puerto de alimentación USB se encuentra bajo el conector de carga.
Puede transferir alimentación o cargar dispositivos que requieren 5 voltios hasta 500 mA
mediante el uso de un cable del que disponga el usuario.
1. Revise las advertencias sobre arranque asistido
2. Asegúrese de que todos los dispositivos, luces, radio del vehículo se encuentren
APAGADOS
3. Asegúrese de que el freno del vehículo esté aplicado y que la transmisión se
encuentre en “Estacionamiento”
4. Asegúrese de que todos los interruptores del Power Dome estén en la posición OFF
(APAGADO)
5. Conecte firmemente la abrazadera del cable rojo (+) al terminal positivo (+) de la
batería
6. Conecte la abrazadera del cable negro (-) a una pieza fija del vehículo
Extendiendo el Tiempo de Funcionamiento
La ampliación del tiempo de funcionamiento del inversor o el compresor del Power Dome
puede realizarse alimentando estas funciones desde una batería externa cargada de tipo
automotriz de 12 voltios.
1. Siga el procedimiento para realizar el arranque asistido conectando los cables
comprobando la polaridad correcta de la batería y activando el interruptor del
cable.
2. De este modo, el compresor o el inversor podrá funcionar durante un periodo de
tiempo prolongado
7. Respete el color del LED DE POLARIDAD INVERSA que se encuentra situado entre los
interruptores de estado de la batería y de la luz de trabajo
• La función de protección de bajo voltaje apagará el inversor cuando las
baterías externa e interna se descarguen hasta llegar a los 10 voltios.
8. Si el LED está encendido en ROJO, NO ENCIENDA EL INTERRUPTOR DE ARRANQUE
DEL CABLE
• El compresor no cuenta con una función de apagado con bajo nivel de
batería, por lo que el usuario deberá comprobar el medidor de estado de
la batería del Power Dome.
• Es necesario invertir las abrazaderas de cable
• Desconecte primero la abrazadera negra y, a continuación, la abrazadera
de cable ROJA
3. Después de utilizar el Power Dome con la configuración de amplio tiempo de
• Vuelva a conectar y observe el LED
• Si el LED está encendido en color verde, ENCIENDA el interruptor seguridad
de arranque
9. Dentro del vehículo, encienda el interruptor de ignición e intente arrancar el motor.
10.Intente arrancar durante un máximo de tres segundos. Si el motor no arranca, espere
tres minutos antes del siguiente intento
11.Cuando el motor se arranque, coloque en posición OFF (APAGADO) el interruptor de
17
www.wagan.com
© Corporación Wagan 2010
Todos los derechos reservados
WAGAN y Wagan.com son marcas registradas de la Corporación Wagan
18
Power DomeTM 200 de Wagan Tech
funcionamiento, apague el compresor o el inversor.
4. Apague el interruptor del cable y guarde los cables y las abrazaderas
Manual de usuario—Leer antes de utilizar este equipo
Interferencias en el
televisor
Interferencias (nieve) en
la imagen.
5. Recargue el Power Dome y la batería externa a la mayor brevedad posible
La emisora de televisión podría estar fuera
de alcance.
Guía de Solución de Problemas (para el Inversor)
Problema
Causa
Solución
Falta de salida de
potencia
El voltaje de la batería
del Power Dome está
por debajo de los 10
voltios
Recargue el Power Dome inmediatamente
El dispositivo que se
está utilizando utiliza
excesiva corriente
Reduzca la carga a un máximo de 200
vatios
1. APAGUE el dispositivo y el inversor
2. Desconecte el dispositivo
3. ENCIENDA el inversor y hágalo
funcionar durante un mínimo de 2
minutos
4. APAGUE el inversor, conecte
rápidamente el dispositivo al inversor
asegurándose de que el dispositivo
está APAGADO antes de realizar la
conexión
5. ENCIENDA el inversor y el dispositivo
19
El fusible del inversor
está fundido
Revise y sustituya si es necesario. Asegúrese
de que el fusible de sustitución sea del
mismo tipo y potencia nominal.
El indicador de
alimentación del
inversor no está
encendido.
Caída de voltaje
excesiva
Revise el Power Dome si el voltaje cae por
debajo de los 10 voltios.
El inversor está
sobrecargado
Reduzca la carga a un máximo de 200
vatios.
La televisión o
la herramienta
mecánica no se
encienden
Necesita una cantidad
elevada de vatios para
encenderse
Alterne el interruptor On/Off (Encendido/
Apagado) en una sucesión rápida cinco
veces. Si el dispositivo no se enciende, el
dispositivo no es compatible con este tipo de
inversor.
www.wagan.com
Coloque el Power Dome lo más alejado
posible del televisor, la antena y el cable
coaxial.
No utilice el inversor con un sistema de
filtrado de CA de audio de baja calidad.
Interferencias
estáticas/ruido en el
sistema de audio
El sistema de sonido
tiene un blindaje de
corriente alterna débil
Sustituya el sistema de audio por un filtrado
de ruido de alta calidad
Especificaciones
Bateriá de plomo sellada, recargable
12 voltios, 18 amperios/hora
Luz de trabajo con interruptor de encendido y
apagado
5 LED
Compresor
260 PSI
Salida del inversor: dos tomas de CA
115 voltios CA 60 Hz
Potencia de salida máxima del inversor,
potencia pico
200 vatios - 400 vatios pico (máx. de 0,3 seg)
Salida auxiliar de 12 voltios
12 voltios 11 amperios máx.
Puerto de alimentación USB
5 voltios hasta 500 mA.
Tiempo de carga de CA máx. desde descarga
34 horas
Tiempo de carga de CC máx. (motor en
funcionamiento)
12 horas
Cables y abrazaderas de jumper
6 medidores, abrazaderas para trabajos
pesados de 0,6 m (24 pulgadas) de longitud
© Corporación Wagan 2010
Todos los derechos reservados
WAGAN y Wagan.com son marcas registradas de la Corporación Wagan
20
Garantía Limitada de la Corporación Wagan
Todos los productos de la corporación WAGAN son garantizados al comprador
original de este producto.
Duración de la garantía: Este producto es garantizado al comprador original por
un período de un (1) año a partir de la fecha original de la compra. El producto
esta garantizado de estar libre de defectos en los materiales o en la fabricación
del mismo. La corporación Wagan no se hace responsable por ningún tipo de
daños consecuentes. La corporación WAGAN no se hace responsable en ningún
momento de cualquier daño más allá de la cantidad pagada por el producto a un
precio al detal. En el caso de recibir un artículo defectuoso, por favor contacte a
la corporación WAGAN al 1-800-231-5806 y obtenga un número de autorización
de devolución de mercancía (RMA) al igual que instrucciones de devolución.
Cada artículo devuelto necesitara un número RMA diferente. Después de recibir
el número RMA y las instrucciones de devolución de la Corporación WAGAN,
por favor siga las instrucciones y envíe el artículo (pagando por el envío) junto
con la documentación requerida, una explicación completa del problema, nombre,
dirección, y número de teléfono. La corporación Wagan decidirá a su discreción
reparar o reemplazar el producto defectuoso.
Números de autorización de devolución de mercancía (RMA) son REQUERIDOS en
caso de enviar un artículo defectuoso. La corporación WAGAN no es responsable
por ningún articulo devuelto sin el debido numero RMA. La corporación WAGAN
no es responsable de gastos incurridos en la devolución de productos que necesiten
reparación o reemplazo. Esta garantía será cancelada en caso de que el producto
haya sido dañado por accidente en el envío, por uso irrazonable, mal uso,
negligencia, servicio inapropiado, uso comercial, reparaciones por personal no
autorizado, u otras causas que se no se presenten debido defectos en materiales
o la fabricación. Esta garantía excluye unidades que hayan sido utilizadas en
violación de las instrucciones escritas en este manual de usuarios.
Excepción de la garantía: Esta garantía toma efecto en lugar de cualquier otra
garantía expresada o implicada, que no represente a ninguna persona autorizada
de asumir ninguna otra responsabilidad conectada con la venta de productos de
la Corporación Wagan. Demandas debido a defectos o fallas de productos no
deberán ocurrir bajo ninguna teoría de disputas, contratos, o leyes comerciales,
incluyendo pero no limitando negligencia, responsabilidad estricta, infracción de
la garantía, o infracción de contrato.
Condiciones de la garantía: Durante el antedicho periodo de un (1) año, productos
defectuosos serán reemplazados por un modelo comparable, cuando el producto
sea devuelto a la corporación WAGAN con un recibo de compra original. El
producto de reemplazo estará bajo garantía por el resto del periodo de un (1) año.
©2008 WAGAN Corp. Revisado en Agosto del 2008
www.wagan.com
[email protected]
USA & CAN Toll Free: 1.800.231.5806
Tel: 1.510.471.9221
31088 San Clemente Street
Hayward, CA 94544
U.S.A.
All Rights Reserved
©2010 Wagan Corporation
Wagan and wagan.com are trademarks used by Wagan Corporation
Revised April 2010
Todos los derechos reservados
© Corporación Wagan 2010
WAGAN y Wagan.com son marcas registradas de la Corporación Wagan
Revisado Abril 2010