1
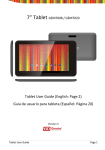
Tablet PC ARGOS BLUETOOTH® EUTB-703+BT Thanks for acquiring our Tablet PC EUTB-703+BT ARGOS BLUETOOTH® EUROCASE. Read thoroughly these operating instructions to properly use the product. TECHNICAL SPECIFICATIONS * Allwinner A13 Cortex A8 at 1Ghz * Android 4.0 ICS * RAM 512 MB DDR3 * Built-in 8 GB Flash Memory * 7’ Capacitive Touch Screen (G+P) * 800x480 pixels / Aspect Ratio: 16:9 * VGA 0.3 MP front camera * 720P 2 MP back camera * Built-in Wi-Fi IEEE 802.11b/g/n * Built-in Bluetooth® * TF card reader up to 32 GB * Built-in speaker & microphone * Accelerometer, gyroscope, multi-touch * Multilingual * Inputs: Micro USB, Earphone 3.5mm, TF Card * Power Battery: 2800mAh/3.7V * Power adapter: DC Output 5V/2A TM GETTING STARTED Buttons and Connections Front Camera Microphone Earphones Speaker TF Card PHONE EUTB-703G Charge DC 5V / 2,5A max Microphone Back Camera Volume - On/Off Volume + Charging the Battery You can charge your tablet either by using the provided AC adapter or via USB. We recommend charging for at least 8 hours before first use. Unlocking and Powering On and Off To Power On press and hold the power button until the screen lights up. To power off hold down the power button until a menu appears asking what you would like to do. To wake the tablet from sleep or put it back to sleep click the power button once. Unlocking the Screen: You will need to unlock the screen before using your Tablet. To do this, place your finger on the padlock icon and drag towards the other side of the screen. Locking the Screen: By default the tablet locks itself automatically after 1 minute if unused. To manually lock the screen, press the power button. The screen will go blank and your device will be locked. Using the Touch Screen The capacitive touch screen gives a fluid and responsive touch experience without the need to apply pressure to the screen. • Touch and slide your finger up and down the screen to scroll web pages. • Tap an icon to start apps or visit web page links. • Multi-Touch technology allows you to use more than one finger at a time, for example in the web browser you can pinch to zoom in. Connecting to the Internet (Wi-Fi) Your tablet can connect to any router that supports the 802.11b/g standard. To connect to your wireless network: 1. Touch Settings, Wireless & Networks then Wi-Fi. 2. Touch the Wi-Fi Off/On toggle. 3. Touch your network name from the list. 4. Input your password. Bluetooth® connection 1. Touch Settings, Wireless & Networks. 2. Touch the Bluetooth® Off/On toggle. 3. Toque “Search for devices”. 4. Select the device from the list. USING ANDROID The Home Screen The home screen is the first screen you see after unlocking your device. You can use up to 5 screens to store shortcuts to your favorite apps or widgets. At the bottom left corner of the screen you will find 3 navigation buttons. ICON NAME Back Home Recent Apps DESCRIPTION Opens the previous screen you were working in, even if it was in a different app. Once you back up to the Home screen, you can't go back any further in your history. Opens Home. If you’re viewing a left or right Home screen, opens the central Home screen. Opens a list of thumbnail images of apps you’ve worked with recently. To open an app, touch it. To remove a thumbnail from the list, swipe it left or right. After a short time without being used, these buttons may shrink to dots or fade away. To bring them back, touch their location. At the top right corner of the screen, notice the All Apps icon. Touch it to see all your apps and widgets. The middle of your Home screen can hold app and widget icons, plus folders. • To open an app, folder or widget touch its icon. • To see additional Home screens, swipe your finger quickly left or right. At the bottom right corner of the screen, you'll see something like this: Status icons to the left of the clock tell you which apps have sent you notifications—for example, that a message has arrived, or it's time for a meeting. • To see your notifications, touch the clock or the icons on either side of it. System icons to the right of the clock display the current wireless and network connection strength, battery level, and sometimes more. At the top left corner of the screen you'll find Google Search, which lets you search your tablet or the Internet. Touch Google to type your search terms, or to speak them. Changing the Wallpaper Wallpapers are images from Gallery (pictures you shot with Camera, synced from Picasa, and so on), still images included with the system, and live images (such as an animation or a map that centers on your location). They take the place of the default background for your Home screens. 1. Touch & hold anywhere on a Home screen that's not occupied. A list of options appears. 2. Touch a wallpaper source: Gallery: Choose from pictures that you've taken with Camera or downloaded to your device. Live Wallpapers: Choose from a scrolling list of animated wallpapers. Wallpapers: Choose from thumbnails of default images, or touch a thumbnail for a larger version. You can download additional wallpapers on Google Play. 3. To set a wallpaper image, touch Set wallpaper or, for Gallery images, determine the cropping and touch Crop. Camera The Camera app is a combination camera and camcorder. You can view photos and videos you take with Camera in the Gallery App. To take pictures and videos, first touch the Camera icon on a Home or All Apps screen. When Camera opens, you can • Take a picture: Touch the blue button. • View the most recently taken picture: Touch the thumbnail near the blue button. You can now share the picture by touching the Gmail or other icons displayed along one side of the image. To view this picture and others in the Gallery App, touch the picture. While Camera is open, you can also touch these icons to adjust its settings: ICON NAME Mode DESCRIPTION Switch among camera & video modes. Switch Camera Toggles between cameras on the front and back of your tablet. Zoom Touch & hold, then slide to zoom in or out. Settings Reveals additional icons that you can use to set exposure, flash, focus, scene mode, white balance, and other settings. Using the Keyboard You can enter text using the onscreen keyboard. Some apps open it automatically. In others, you open it by touching where you want to type. As you type, the keyboard displays suggestions above the top row of keys. To accept a suggestion, touch it. Basic Editing • Move the insertion point: Touch where you want to type. The cursor blinks in the new position, and a green tab appears below it. Drag the tab to move the cursor. • Select text: Touch & hold or double-tap within the text. The nearest word highlights, with a tab at each end of the selection. Drag the tabs to change the selection. The tab disappears after a few moments, to get out of your way. To make it reappear, touch the text again. • Delete text: Touch before the cursor. to delete selected text or the characters • Cut, copy, paste: Select the text you want to manipulate. Then touch the Paste , Cut , or Copy button: To make the keyboard go away, touch Done. Tips and Shortcuts • Type capital letters: Touch the Shift key capital letters for one letter. once to switch to Or touch & hold the Shift key while you type. When you release the key, the lowercase letters reappear. • Turn caps lock on: Double-tap or touch & hold the Shift key , so it changes to . Touch the Shift key again to return to lowercase. • Show numbers or symbols: Touch the “?123” key. To see more choices, touch the = \ < key. • Quickly access common punctuation and symbols: Touch & hold the key to the right of the space bar (period key). • Type special characters: Touch & hold the Shift key while you touch a key with a small grey character in its corner to enter the grey character. Touch & hold any key to see alternative letters, symbols, or numbers, which you can then touch to type. • Change input language or keyboard: Touch & hold the key to the left of the space bar (with ... in the lower-right corner), and then release it. The Input options menu appears. Choose the option you want to adjust. Settings The settings screen can be accessed by touching the settings icon under applications or on the status bar at the bottom right of the home screen. These options allow you to configure your device to your requirements. The following options are available: Please note that you can get to application specific settings by touching the settings icon in the status bar whilst you are in an application. Storage Built in Storage The Android operating system divides this space up into 2 sections, internal storage and internal flash storage. The Internal storage is reserved for use by applications and the operating system. You may not see all of the space available for use as the rest is used by Android. You cannot access this area from your computer. The Internal flash storage shows the rest of the free space. This is the storage that you see when you plug your tablet into your computer and should be used to hold your movies and music etc. Using a Micro TF Card: Available storage can be expanded using a Micro TF card of up to 32GB in capacity. To use a Micro TF Card: 1. Insert the Micro TF card into the slot shown in the front of this guide. You may need to use a pen or similar implement to push the card fully into place. 2. The tablet will automatically prepare the card for use. To eject the card: 1. Push the end of the card inwards again until it clicks then release. The card will pop out from the slot. Connecting to a PC 1. Connect the device to the computer using the supplied USB cable. You will see a notification in the status bar that USB is connected. 2. Touch the USB icon. 3. Touch the “USB Connected” option. 4. Touch “Turn on USB storage” 5. You should see a pop up on your computer asking you if you want to browse the device. You can also see the device under “My Computer”. 6. To copy files you can now drag and drop files to and from your device. 7. To disconnect from your computer repeat step 2 above then touch “Turn off USB storage”. MANAGING APPLICATIONS Arrange & work with Apps To see all your apps, touch the All Apps icon on any Home screen. The main All Apps screen opens. This is where you can see all your apps, including those downloaded on Google Play. You can move app icons to any of your Home screens. From All Apps, you can • Move between screens: Swipe left or right. • Launch an app: Touch its icon. • Place an app icon on a Home screen: Touch & hold the app icon, slide your finger, and lift your finger to drop the icon in place. • Explore your widgets: Touch the Widgets tab at the top of any All Apps screen. • Get more apps: Touch the Google Play icon in the list of app icons, or the Shop icon at the upper right. Adding & Removing Applications Adding Applications To download apps you need a Google account. You can login or setup a new account after you have started the Google Play application. A simple wizard guides you through this process. Uninstalling Applications To remove an app icon from the Home screen, touch and hold it, slide your finger toward the top of the screen, and drop the app over the Remove icon. Using Folders You can combine several app icons in a folder. Drop one app icon over another on a Home screen, and the two icons will be combined. From any Home screen, you can: • Open a folder: Touch it. The folder opens: • Rename a folder: Touch its name. • Move icons around your Home screens: Touch, hold, and slide. INCLUDED APPLICATIONS There are many applications included with your tablet. Below you will find information on how to use the main applications. Browser From a Home or All Apps screen, touch the Browser icon. Browser opens to the last webpage you were viewing. If you haven't used it recently, it opens to your homepage. Browser also opens when you touch a web link—for example, in an email or chat. The web address (URL) of the current page is displayed at the top of the screen, unless the address box (also called omnibox) scrolls off the top. If this happens, swipe down to show it again. Open a webpage or search the web 1. Touch the omnibox at the top of the page. 2. Type the address of a webpage or terms to search for. As you type, a list of matching suggestions appears. Icons in the list help identify the type of match: The Favorites icon identifies items from your bookmarks. The Search icon identifies related searches. The History icon identifies items from your search history. To add a suggestion to the omnibox, touch the arrow to its right. You can then keep on typing or choose further suggestions. 3. To search for the contents of the omnibox or open a specific web address it contains, touch the Go key in the lower right corner of the keyboard. OR To search for a suggestion or go to a suggested web page, touch it. The Browser opens either the specified webpage or a list of search results. To set which search engine you want to use for searches from the Omnibox, go to Menu > Settings > Advanced > Set search engine. Navigate within a webpage Webpages that aren’t optimized for mobile devices typically open with the page zoomed out, to give you the big picture. To change this behavior, go to Menu > Settings > Advanced > Open pages in overview. Uncheck the option to zoom in on new webpages automatically. While viewing most webpages, you can: • Scroll: Swipe the screen in any direction. • Zoom: To zoom out, touch the screen with two fingers and pinch them together. To zoom in, spread them apart. OR Double-tap the place where you want to zoom in. To return to the original zoom level, double-tap again. You can control the way double-tap works with the Auto-fit setting, described below. • Find text. Touch Menu > Find on page and type. As you type, the first word on the page with matching characters highlights, and subsequent matches are boxed. To move between matches, touch the up and down arrows at the top right. Auto-fit behavior for double-tap is controlled by the option Menu > Settings > Advanced > Auto-fit pages: • With Auto-fit checked, double-tapping a column of text causes Browser to fit the text to the screen; and double-tapping again returns to the original view. • With Auto-fit unchecked, double-tapping just zooms in and out without regard for the text layout. When a page doesn't zoom: Websites that are optimized for mobile devices typically open to a size appropriate for the device, and may not permit zooming and scrolling. In some cases you may prefer to view the desktop (non-mobile) version of a site. Most mobile-optimized sites provide a link that allows you to switch to the desktop version. Bookmark a webpage 4. Open the webpage. 5. Touch 6. Edit the bookmark label and address if necessary, or choose a different account. 7. To specify a different place to store the bookmark, touch the name displayed beside Add to, and choose a Bookmarks folder, the top-level list of bookmarks, or the Home screen. 8. When you're done, touch OK. The bookmark is added to your list of bookmarks Open a bookmark 1. Touch the Bookmarks icon. A set of three tabs appears, with Bookmarks on the left. To show or hide an account's bookmarks, touch the email address for the account. 2. To open a bookmark in the current tab, touch it. OR To open a bookmark in a new tab, touch & hold it, then choose Open in new tab. The bookmarked page opens. Email You can enter one or several email accounts to your tablet. Adding an email account 1. Touch the email icon. 2. In the account interface touch Next. 3. In the e-mail address box enter your email address. 4. Enter your password in the password box. 5. Touch OK. 6. Manual settings (optional) – The device should detect your other settings automatically, however should you need to enter them manually click Manual settings to make any required changes. 7. Touch Next. 8. Enter an account name. If you have problems connecting to the account please check all of your settings with your email service provider. Video Player You can view photos and videos with the Gallery app. The Gallery app finds all of your media and arranges it in a thumbnail view. It shows folders on the first screen. Touch the folder you would like to open to go into it and the app will show all of the files in that folder. Touch the file you would like to play. Clock Touch the Clock icon to view the current date and time. Setting an Alarm You can set several alarms at the same time. 1. From the clock app press menu – Add alarm clock. 2. Set the time you would like the Alarm to start. 3. Touch enable alarm clock. 4. Touch OK. Music 1. Touch the Music icon. 2. Select your desired music to play from the music/album/artist/ playing list. 3. Use the Previous – Pause – Next icons to control the playback. 4. To return to the previous screen press the back icon in the navigation area or to return to the home screen press the home icon. TROUBLESHOOTING Resetting your device to Factory Defaults. If you need to reset your device to the factory default settings for any reason please follow the process below: WARNING!!! Please be aware any information currently on the device will be permanently erased by following this procedure. 1. Go to applications screen and touch the settings button. 2. Touch the Backup & reset option. 3. Select Factory data reset. 4. Leave the erase SD card option unticked & touch “Reset tablet”. 5. Touch “erase everything”. 6. The unit will now reset itself back to factory reset and any previous information/data will have been permanently erased. Tableta ARGOS BLUETOOTH® EUTB-703+BT MANUAL DE USUARIO Gracias por adquirir nuestra Tableta EUROCASE EUTB-703+BT ARGOS BLUETOOTH® . Lea detenidamente estas instrucciones antes de poner en funcionamiento el equipo para utilizarlo de manera correcta. ESPECIFICACIONES TÉCNICAS * Allwinner A13 Cortex A8 a 1 GHz * Android 4.0 ICS * RAM 512 MB DDR3 * Memoria Flash de 8 GB * Pantalla táctil capacitiva de 7” (G+P) * Resolución 800x480 pixeles / relación de aspecto 16:9 * Cámara frontal VGA de 0.3MP * Cámara trasera 720P de 2MP * Wi-Fi IEEE 802.11b/g/n integrado * Bluetooth® integrado * Lector de tarjetas TF hasta 32GB * Parlantes y micrófono incorporados * Acelerómetro, giroscopio, multi-táctil * Multilenguaje * Entradas: Micro USB, Auriculares 3.5 mm, Tarjeta TF * Batería: 2800mAh/3.7V *Adaptador de corriente: Salida CC 5V/2A TM INTRODUCCIÓN Botones y entradas Cámara frontal Micrófono Auriculares 3.5mm Parlante Tarjeta TF PHONE EUTB-703G Charge DC 5V / 2,5A max Micrófono Cámara Trasera Volumen - Encendido / Apagado Volumen + Carga de la batería Puede cargar la tableta ya sea usando el adaptador de CA suministrado o mediante el puerto USB. Se recomienda cargar durante al menos 8 horas antes del primer uso. Desbloqueo y encendido/apagado Para encender presione y mantenga presionado el botón de encendido hasta que la pantalla se ilumine. Para apagar mantenga presionado el botón de encendido hasta que aparezca un menú preguntando qué desea hacer. Para activar la tableta del modo suspendido o ponerla en suspensión, haga clic en el botón de encendido una vez. Desbloquear la pantalla: Usted tendrá que desbloquear la pantalla antes de utilizar su Tableta. Para ello, coloque el dedo en el icono del candado y arrástrelo hacia el otro lado de la pantalla. Bloquear la pantalla: Por defecto, la tableta se bloquea automáticamente si no es utilizada por 1 minuto. Para bloquear manualmente la pantalla, pulse el botón de encendido. La pantalla se pondrá en blanco y el dispositivo se bloqueará. Uso de la pantalla táctil La pantalla táctil capacitiva ofrece una experiencia táctil sensible y fluida, sin la necesidad de aplicar presión a la pantalla. • Toque y deslice el dedo hacia arriba y hacia abajo para desplazarse por las páginas web. • Toque un icono para iniciar aplicaciones o visitar enlaces a páginas web. • La tecnología multitáctil le permite utilizar más de un dedo a la vez, por ejemplo en el navegador web puede usar dos dedos para acercar la imagen. Conexión a Internet (Wi-Fi) Su tableta puede conectarse a cualquier router compatible con el estándar 802.11b/g. Para conectarse a su red inalámbrica: 1. Toque Ajustes, luego Conexiones inalámbricas y redes. 2. Deslice el interruptor Wi-Fi No/Si. 3. Seleccione el nombre de su red de la. 4. Ingrese la contraseña. Conexión Bluetooth® 1. Toque Ajustes, luego Conexiones inalámbricas y redes. 2. Deslice el interruptor Bluetooth® No/Si. 3. Toque “buscar dispositivos”. 4. Seleccione el dispositivo de la lista. USO DE ANDROID Pantalla de inicio La pantalla de inicio es la primera pantalla que aparece después de desbloquear su dispositivo. Puede utilizar hasta 5 pantallas para almacenar accesos directos a sus aplicaciones favoritas o widgets. En la esquina inferior izquierda de la pantalla se encuentran 3 botones de navegación. ÍCONO NOMBRE Volver Inicio Aplicaciones recientes DETALLE Abre la pantalla anterior, aunque fuera en una aplicación diferente. Una vez que vuelva a la pantalla de inicio, no se puede volver más lejos en su historial. Abre Inicio. Si está viendo una pantalla de inicio a la izquierda o a la derecha, se abre la pantalla principal central. Abre una lista de imágenes en miniatura de las aplicaciones que ha usado recientemente. Para abrir una aplicación, tóquela. Para eliminar una miniatura de la lista, deslice el dedo hacia la izquierda o la derecha. Después de un breve periodo de tiempo sin ser utilizado, estos botones pueden reducirse en tamaño a puntos o se desvanecerse. Para traerlos de vuelta, toque su ubicación. En la esquina superior derecha de la pantalla, observe el icono de aplicaciones. Tóquelo para ver todas sus aplicaciones y widgets. El centro de la pantalla de inicio puede tener iconos de aplicaciones y widgets, además de carpetas. • Para abrir una aplicación, carpeta o widget un toque su icono. • Para ver las pantallas de inicio adicionales, deslice el dedo rápidamente a la izquierda o a la derecha. En la esquina inferior derecha de la pantalla, verá algo similar esto: Los iconos de estado a la izquierda del reloj le dirán que aplicaciones le han enviado notificaciones, por ejemplo, que un mensaje ha llegado, o que es tiempo para una reunión. • Para ver las notificaciones, toque el reloj o los iconos de cada lado del mismo. Iconos de sistema a la derecha del reloj aparecen la conexión inalámbrica actual y la fuerza de conexión de red, nivel de batería, ya veces otros. En la esquina superior izquierda de la pantalla encontrará búsqueda de Google, que le permite buscar en su tableta o en Internet. Toque Google para introducir los términos de búsqueda o para decirlos. Cambio del fondo de pantalla Los fondos de pantalla son imágenes de la Galería (imágenes que tomó con la cámara, sincronizado desde Picasa u otras), las imágenes fijas se incluye con el sistema, y las imágenes en movimiento (por ejemplo, una animación o un mapa que se centra en su ubicación). Ellos remplazan al fondo predeterminado de las pantallas de inicio. 1. Toque y mantenga oprimido cualquier parte de la pantalla de inicio que no esté ocupada.Una lista de opciones aparecerá. 2. Toque una fuente de fondos de pantalla: Galería: Elija entre las fotografías que ha tomado con la cámara o descargado en el dispositivo. Fondos de pantalla animados: Elija entre una lista de fondos de pantalla animados. Fondos de pantalla: Elija entre las miniaturas de imágenes predeterminadas, o toque una miniatura para una versión más grande. Puede descargar fondos adicionales en Google Play. 3. Para establecer una imagen de fondo de pantalla, toque Establecer como fondo o, en Galería de imágenes, determine el tam;o de la misma Cámara La aplicación de la cámara es una combinación de cámara y videocámara. Puede ver las fotos y videos que tomas con la cámara en la aplicación Galería Para hacer fotos y videos, toque primero el icono de la cámara en una pantalla de inicio o en la pantalla de aplicaciones. Cuando la cámara se abre, puede • Tomar una foto: Pulse el botón azul. • Ver la imagen más recientemente: Toque la miniatura cerca del botón azul. Ahora puede compartir la imagen tocando los iconos de Gmail u otros que aparecen junto a la imagen. Para ver esta imagen y otras en la Galería de aplicaciones, toque la imagen. Para hacer fotos y videos, toque primero el icono de la cámara en una pantalla de inicio o en la pantalla de aplicaciones. Cuando la cámara se abre, puede • Tomar una foto: Pulse el botón azul. • Ver la imagen más recientemente: Toque la miniatura cerca del botón azul. Ahora puede compartir la imagen tocando los iconos de Gmail u otros que aparecen junto a la imagen. Para ver esta imagen y otras en la Galería de aplicaciones, toque la imagen. Mientras la cámara está abierta, también puede tocar estos iconos para ajustar su configuración: ÍCONO NOMBRE DETALLE Modo Cambia entre los modos de cámara y video Cambiar cámara Cambia entre las cámara frontal y posterior de la tableta. Zoom Toque y mantenga oprimido, luego deslice para acercar o alejar. Ajustes Revela íconos adicionales que pueden utilizar para ajustar la exposición, flash, enfoque, modo de escena, balance de blancos, entre otros. Uso del teclado Puede introducir texto mediante el teclado en pantalla. Algunas aplicaciones que se abren automáticamente. Otras se abren manualmente tocando donde desea escribir. A medida que escribe, el teclado muestra sugerencias por encima de la fila superior de teclas. Para aceptar una sugerencia, tóquelo. Edición básica • Mover el punto de inserción: Toque donde desee escribir. El cursor parpadea en la nueva posición, y una etiqueta verde aparece debajo de ella. Arrastre el cursor para mover el cursor. •Seleccionar texto: Toque y mantenga oprimido o toque dos veces en el texto. Se resaltará la palabra más cercana, con una pestaña en cada extremo de la selección. Arrastre las pestañas para cambiar la selección. La pestaña desaparece después de unos momentos, para salir de su camino. Para que vuelva a aparecer, pulse de nuevo el texto. • Borrar texto: Toque para borrar el texto seleccionado o los caracteres antes del cursor. • Cortar, copiar, pegar: Seleccione el texto que desea modificar. Luego toque el botón pegar , cortar , o copiar Para hacer que el teclado desaparezca, toque Hecho. Consejos y accesos directos • Escriba en letras mayúsculas: Pulse la tecla Shift para cambiar a mayúsculas una letra. una vez También puede tocar y mantener la tecla Shift mientras escribe. Al soltar la tecla, las letras minúsculas reaparecerán. • Bloqueo de mayúsculas: Pulse dos veces o toque y mantenga pulsada la tecla Shift , cambiará a . toque la tecla Shift para volver a las minúsculas. • Mostrar números o símbolos: toque la tecla “123?”. Para ver más caracteres, tóquela tecla “= \<”. • Acceso rápido a puntuación común y símbolos: toque y mantenga pulsada la tecla a la derecha de la barra espaciadora (tecla punto). • Tipeo de caracteres especiales: Toque y mantenga pulsada la tecla Shift mientras se toca una tecla con un personaje gris pequeño en su esquina para entrar el personaje gris. Toque y mantenga presionada una tecla para ver letras alternativas, símbolos o números, que luego puede ingresar. • Cambiar el idioma de entrada o teclado: Toque y mantenga pulsada la tecla a la izquierda de la barra espaciadora (con”...” en la esquina inferior derecha), y luego soltarlo. El menú opciones de teclado. Elija la opción que desea ajustar. Ajustes La pantalla de ajustes se puede acceder pulsando el icono de configuración en las aplicaciones o en la barra de estado en la parte inferior derecha de la pantalla de inicio. Estas opciones le permiten configurar el dispositivo para sus necesidades. Las opciones disponibles son las siguientes: Por favor, tenga en cuenta que puede llegar a ajustes específicos de una aplicación tocando el icono de configuración en la barra de estado mientras está en una aplicación. Almacenamiento Almacenamiento interno El sistema operativo Android™ divide el espacio en 2 partes, almacenamiento interno y almacenamiento interno flash. El almacenamiento interno está reservado para el uso de aplicaciones y el sistema operativo. Usted no puede ver todo el espacio disponible ya que una parte es utilizada por Android. No se puede acceder a esta zona desde el ordenador. La memoria flash interna muestra el resto del espacio libre. Este es el almacenamiento que se ve cuando se conecta la tableta al ordenador y se puede utilizar para guardar sus películas y música, etc. Uso de una tarjeta Micro TF: El almacenamiento disponible se puede ampliar con una tarjeta Micro TF de hasta 32 GB de capacidad. Para utilizar una tarjeta Micro TF: 1. Inserte la tarjeta Micro TF en la ranura que se muestra la principio de esta guía. Es posible que necesite usar una pluma o un instrumento similar para empujar la tarjeta completamente en su lugar. 2. La tableta preparará automáticamente la tarjeta para su uso. Para expulsar la tarjeta: 1. Empuje el extremo de la tarjeta hacia dentro de nuevo hasta que haga clic y luego suéltela. La tarjeta saltará fuera de la ranura. Conexión a una PC 1. Conecte el dispositivo al ordenador mediante el cable USB suministrado. Usted verá una notificación en la barra de estado que el USB está conectado. 2. Toque el icono USB. 3. Toque el "USB conectado" opción. 4. Toque "Activar almacenamiento USB" 5. Usted debe ver una ventana emergente en su ordenador que le pregunta si desea navegar por el dispositivo. También puede ver la unidad en "Mi PC". 6. Para copiar archivos ahora se puede arrastrar y soltar archivos desde y hacia su dispositivo. 7. Para desconectarse de su ordenador, repita el paso 2 anterior y pulse "Desactivar almacenamiento USB". MANEJO DE APLICACIONES Organizar y trabajar con aplicaciones Para ver todas las aplicaciones, toque el icono de aplicaciones en la pantalla de inicio. El menú principal de aplicaciones se abre. Aquí es donde usted puede ver todas las aplicaciones, incluidos los descargados en Google Play. Puede mover los iconos de aplicación a cualquiera de sus pantallas de Inicio. Desde el menú de aplicaciones puede • Desplazarse por las pantallas: Deslice a la izquierda o a la derecha. • Comenzar una aplicación: Toque su icono. • Colocar un icono de aplicación en la pantalla de Inicio: Toque y mantenga presionado el icono de la aplicación, deslice el dedo y levante el dedo para soltar el icono en su lugar. • Explorar widgets: Toque la pestaña widgets en la parte superior de cualquier pantalla de aplicaciones • Obtener más aplicaciones: Toque el icono de Google Play en la lista de iconos de aplicaciones, o el icono de Tienda en la parte superior derecha. Añadir y remover aplicaciones Añadir aplicaciones Para descargar las aplicaciones usted necesita una cuenta de Google. Puede iniciar sesión o configurar una nueva cuenta después de haber iniciado la aplicación Google Play. Un sencillo asistente le guiará a través de este proceso. Desinstalar aplicaciones Para eliminar un icono de aplicación desde la pantalla de inicio, toque y mantenga pulsado, deslice el dedo hacia la parte superior de la pantalla, y suelte la aplicación en el icono Eliminar. Uso de carpetas Se pueden combinar varios iconos de aplicaciones en una carpeta. Suelte un icono de aplicación sobre otro en una pantalla de inicio, y los dos iconos se combinarán. Desde cualquier pantalla de inicio, es posible •Abrir una carpeta: Tóquela. La carpeta se abrirá: • Renombrar una carpeta: Toque su nombre. • Mover iconos alrededor de sus pantallas de Inicio: Toque, mantenga y deslice. APLICACIONES INCLUÍDAS Son muchas las aplicaciones incluidas con la tableta. A continuación encontrará información sobre cómo utilizar las principales aplicaciones. Navegador Desde inicio o el menú de aplicaciones, toque el icono del navegador El navegador se abre en la última página web que estaba viendo. Si usted no lo ha usado recientemente, se abre a su página de inicio. El navegador también se abre cuando se toca un enlace web, por ejemplo, en un correo electrónico o chat. La dirección web (URL) de la página actual se muestra en la parte superior de la pantalla, a menos que el cuadro de dirección (también llamada barra de direcciones) se desplace hacia la parte superior. Si esto ocurre, deslice hacia abajo para mostrar de nuevo. Abrir una página web o buscar en la web 1. Toque la barra de direcciones en la parte superior de la página. 2. Escriba la dirección de una página web o términos a buscar. A medida que escriba, se mostrará una lista de sugerencias coincidentes. Los iconos de la lista ayudan a identificar el tipo de coincidencia: El icono favoritos El icono de búsqueda identifica elementos de su marcador. identifica búsquedas relacionadas. El icono historial identifica los elementos de su historial de búsquedas. Para agregar una sugerencia a la barra de direcciones, pulse la flecha de la derecha. A continuación, puede seguir escribiendo o elegir otras sugerencias. 3. Para buscar el contenido de la barra de direcciones o abrir una dirección Web específica, toque la tecla Ir en la esquina inferior derecha del teclado. O Para buscar una sugerencia o ir a una página web sugiere, tóquelo. El navegador abre bien la página web especificada o una lista de resultados de búsqueda. Para establecer cuál es el motor de búsqueda que desea utilizar para búsquedas desde la barra de direcciones, vaya a Menú> Ajustes> Avanzados> Establecer motor de búsqueda. Navegar dentro de una página Las páginas web que no están optimizadas para dispositivos móviles suelen abrir con la página reducida, para darle todo el panorama. Para cambiar este comportamiento, vaya a Menú> Ajustes> Avanzados> Abrir páginas en tamaño reducido. Desactive la opción para acercar nuevas páginas web de forma automática. Mientras ve la mayoría de las páginas web, es posible: • Desplazarse: Deslice la pantalla en cualquier dirección. • Hacer zoom: Para alejar la imagen, toque la pantalla con dos dedos y júntelos. Para acercar, sepárelos. O Pulse dos veces el lugar en el que desea para acercar la imagen. Para volver al nivel de zoom original, pulse dos veces de nuevo. Usted puede controlar la forma en que el doble toque funciona con el ajuste de páginas automático, que se describe a continuación. • Buscar texto. Toque Menú> Buscar en la página e ingrese el texto. A medida que escribe, la primera palabra con los caracteres coincidentes se resaltará, y las coincidencias posteriores se encuadrarán. Para moverse éntrelas coincidencias, toque la flechas arriba y abajo en la parte superior derecha. El comportamiento ajuste de páginas automático para el doble toque es controlado por la opción de Menú> Ajustes> Avanzados> Ajuste de páginas automático: • Con el ajuste de páginas automático habilitado, tocando dos veces una columna de texto hace que el navegador ajuste el texto a la pantalla y pulsando dos veces otra vez vuelve a la vista original. • Con el ajuste de páginas automático deshabilitado, tocando dos veces sólo acerca y se aleja sin tener en cuenta la disposición del texto. Cuando una página no hace zoom: Los sitios web que están optimizados para dispositivos móviles normalmente se abren a un tamaño adecuado para el dispositivo y no permiten hacer zoom y desplazarse. En algunos casos, es posible que prefiera ver la versión de escritorio (no móvil), de un sitio. La mayoría de los sitios móviles optimizados proporcio- nan un enlace que le permitirá cambiar a la versión de escritorio. Marcar una página web 4. Abra la página web. 5. Toque 6. Edite la etiqueta del marcador y la dirección si es necesario, o elija una cuenta diferente. 7. Para especificar un lugar diferente para almacenar el marcador, toque el nombre que aparece al lado de Agregar y seleccione una carpeta de favoritos, el primer nivel de marcadores, o la pantalla de inicio. 8. Cuando haya terminado, pulse Aceptar. El marcador se añade a su lista de favoritos Abrir un favorito 1. Toque el icono de Favoritos. Un conjunto de tres pestañas aparece, con marcadores de la izquierda. Para mostrar u ocultar los marcadores de una cuenta, toque la dirección de correo electrónico para la cuenta. 2. Para abrir un marcador en la pestaña actual, tóquela. O Para abrir un marcador en una pestaña nueva, toque y mantenga, a continuación, seleccione Abrir en una nueva pestaña. La página marcada se abrirá. Correo electrónico Puede introducir una o varias cuentas en su tableta. Agregar una cuenta de correo 1. Toque el icono de correo. 2. En la interfaz de la cuenta toque Siguiente. 3. En el cuadro de dirección de correo electrónico introduzca su dirección de correo electrónico. 4. Introduzca la contraseña en el cuadro contraseña. 5. Toque Aceptar. 6. Configuración manual (opcional) - El dispositivo debería detectar la configuración automáticamente, otros sin embargo en caso de que tenga que introducirla manualmente, haga clic en Configuración manual para hacer los cambios necesarios. 7. Toque Siguiente. 8. Introduzca un nombre de cuenta. Si tiene problemas para conectarse a la cuenta, por favor verifique todos los ajustes de su proveedor de servicios de correo electrónico. Galería Puede ver fotos y vídeos con la aplicación Galería. La aplicación Galería se encuentra todos los archivos multimedia y los organiza en una vista en miniatura. Muestra las carpetas en la primera pantalla. Toque la carpeta que desea abrir para entrar en ella y la aplicación mostrará todos los archivos de esa carpeta. Toque el archivo que desea reproducir. Reloj Toque en el icono Reloj para ver la fecha y hora actuales. Establecer alarma Puede configurar varias alarmas al mismo tiempo. 1. Desde la aplicación de reloj presione menú-Establecer alarma. 2. Establezca la hora que desea que la alarma se accione. 3. Toque activar alarma. 4. Toque en Aceptar. Música 1. Toque el icono Música. 2. Seleccione la música que desea reproducir desde música / álbum / artista / lista de reproducción. 3. Utilice los iconos Anterior - Pausa - Siguiente para controlar la reproducción. 4. Para volver a la pantalla anterior, presione el icono volver en el área de navegación o para volver a la pantalla inicial presione el icono de inicio. RESOLUCIÓN DE PROBLEMAS Restablecimiento de los ajustes predeterminados de fábrica Si tiene que restablecer el dispositivo a la configuración predeterminada de fábrica por cualquier razón, por favor siga el siguiente proceso: ¡ADVERTENCIA! Por favor, tenga en cuenta que cualquier información actualmente en el dispositivo se borrará permanentemente siguiendo este procedimiento. 1. Vaya a la pantalla de aplicaciones y toque el botón de configuración. 2. Toque la opción Copia de seguridad. 3. Seleccione Restablecer datos de fábrica. 4. Deje la opción de borrado de tarjeta SD sin marcar y toque "restablecer tablet". 5.Toque "borrar todo". 6. Ahora, la unidad se reiniciará de nuevo con los ajustes de fábrica y cualquier información / datos han sido borrados de forma permanente. -28-