1
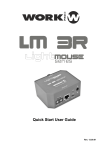
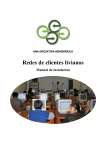
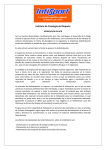
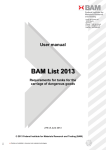
LM-3R
Ethernet to DMX converter
User Manual / Manual de Usuario
LM-3R
Ethernet to DMX converter
EN
0. SAFETY INFORMATION & MAINTENANCE
ENGLISH
Read this manual before powering or installing the device, follow the safety precautions listed below and
observe all warnings in this manual.
•
Be sure that the local power outlet matches that of the required voltage of the power supply included
with this device.
•
To reduce the risk of fire or electrical shock, do not expose the unit to rain or high levels of moisture.
•
Do not spill water or other liquids into or on your unit.
•
Do not open the unit as there are no user serviceable parts inside.
•
Do not dismantle or modify the unit, as this voids all warranties.
•
Do not attempt repairs. Repairs by unqualified people could cause damage or faulty operation.
Contact your local authorized service center.
•
Unplug this unit when not used for long periods of time.
•
Clean only with dry cloth.
•
Handle this unit carefully. Any strong shock or vibration may result in malfunction.
SPANISH
Lea este manual antes de encender o instalar el dispositivo, siga las instrucciones de seguridad listadas a
continuación y observe las precauciones citadas en este manual.
•
Asegúrese de que la toma de corriente local coincide con la tensión necesaria de la fuente de
alimentación incluida con el dispositivo.
•
Para reducir el riesgo de incendios o descargas eléctricas, no exponga la unidad a la lluvia o niveles
altos de humedad.
•
No derrame agua u otros líquidos al interior o dentro de la unidad.
•
No abra la unidad ya que no hay piezas que el usuario pueda reparar.
•
No desmonte ni modifique la unidad, ya que anula todas las garantías.
•
No intente reparaciones. Las reparaciones efectuadas por personal no cualificado pueden causar
daños o un funcionamiento defectuoso. Póngase en contacto con su centro de servicio autorizado.
•
Desenchufe la unidad cuando no se utilice por periodos prolongados de tiempo.
•
Limpie sólo con un paño seco.
•
Transporte esta unidad con cuidado. Cualquier golpe o vibración pueden provocar un mal
funcionamiento.
LM-3R User Manual
2
LM-3R
Ethernet to DMX converter
EN
1. DESCRIPTION
LM-3R is an Ethernet to DMX converter. It has been designed to transport DMX through an Ethernet
network, and it has two operation modes: WORKNET (own protocol) and Art-Net.
LM-3R is a plug and play device, it does not need any network configuration. LM-3R is automatically
configured, which means that it obtains automatically an IP address 2.x.x.x and a Subnet Mask 255.0.0.0,
just as Art-Net protocol specifies. However, for advanced users, network configuration can be modified using
the web browser interface, as seen below in this document.
1.1 WORKNET MODE
In WORKNET mode LM-3R operates as the receiver of the DMX information sent by LM-3E (the transmitter).
So, in this mode, LM-3R always must be used in combination with one LM-3E, and both LM-3E and LM-3R
must be configured in the same group (or DMX universe). In this way, and generalizing to more than one
receiver, the DMX information sent by one LM-3E will be received for all the LM-3R configured in the same
group as the LM-3E transmitter.
Note: just one LM-3E can be associated to one or more LM-3R.
WORKNET is an own protocol that works in any standard TCP/IP network. The protocol is UNICAST, in
order to don't decrease network efficiency.
As seen before in this document and in LM-3E user manual, both LM-3E and LM-3R are automatically
configured, and they don´t need any network configuration. They automaticallly obtain an IP address and a
SubNet Mask, so that they belong to the same subnet in order to can communicate each other.
1.2 ART-NET MODE
In Art-Net mode LM-3R operates as an Art-Net node, receiving all the information sent by an ArtNet
compatible transmitter device. In this case the group concept is replaced by universe, uncluding Subnet
concept, just as Art-Net protocol specifies.
As seen before, LM-3R is automatically configured, and it obtains an IP address and Subnet Mask just as
Art-Net protocol specifies.
1.3 WEB SERVER
LM-3R is a plug and play device. By default, it is automatically configured like an ArtNet device, with an IP
address 2.x.x.x and SubnetMask 255.0.0. Each LM-3R has a sticker at the bottom with its default settings.
Although LM-3R is plug and play, it offers a user-friendly web-based management interface for the
configuration of the network features. To connect to the web interface, you must set your PC IP address to be
on the same subnet as the LM-3R (that is, the PC and LM-3R addresses must both start 2.x.x.x, with subnet
mask 255.0.0.0). Then, to access the configuration menu use your web browser to connect to the
management interface using the default IP addres, shown in the sticker at the bottom of the device.
(http://2.x.x.x)
LM-3R User Manual
3
LM-3R
Ethernet to DMX converter
EN
The web interface allows to change the IP Address, the Subnet Mask and the description of the device.
If the IP Address is modified, it is very important to remember the new one, in order to can connect the next
time you access the web interface. Anyway, the EQDiscover utility can be used in order to obtain the
network settings of the device. All you have to do is connect the LM-3E to the LAN or to your computer, and
execute the application. It will show, in a window, all the information about the network settings of the device.
EQDiscover utility can be downloaded from http://www.equipson.es/prodDetail.asp?idproducto=737
Fig.1 The integrated WEB SERVER allows the
configuration of the unit
2. FRONT PANEL
1. POWER LED
This LED, in red color, will iluminate when there is power currently being supplied to the unit.
2. Main Supply (PLUG IN)
With an external 5V DC, 500 mA power supply, it is possible to supply the unit. (If you use PLUG IN
connector to supply the unit, don't use Terminal Block connector)
3. ACT LED
This green LED blinks when the Ethernet port is connected and is transmitting or receiving data.
LM-3R User Manual
4
LM-3R
Ethernet to DMX converter
EN
4. LINK LED
This green LED is on when the Ethernet LAN port is connected to the network.
5. Main Supply (Terminal Block)
With an external 5V DC, 500 mA power supply, it is possible to supply the unit. (If you use Terminal
Block connector to supply the unit, don't use PLUG IN connector)
6. Group/Universe selector
Under WORKNET protocol
This selector allows to select one of the 16 reception groups. (0-F). Each group will have its own LM3E transmitter, configured in the same group.
Under Art-Net protocol
This selector allows to select one of the 16 DMX universes in the configured Subnet.
7. DMX OUT
This XLR connector sends the converted DMX signal to a control line with compatible DMX devices
like moving heads, scanners, RGB drivers, etc.
8. LAN
RJ 45 connector which allows the connection of LM-3R to Ethernet network.
3. REAR PANEL
9. Operate mode / Subnet switch
This dip-switch has two functions:
◦
It allows to select, with dip number 1, the operation mode (WORKNET (OFF position) or
Art-Net (ON position))
◦
Only in Art-Net operation mode, dips number 2,3,4,5 allow to select the Subnet, with
values from 0 to 15 (16 positions). The numbers in black color (1,2,4,8) indicate the
value of the dip when is in ON position, in OFF position the value is 0. So, the resulting
LM-3R User Manual
5
LM-3R
EN
Ethernet to DMX converter
SUBNET value is the sum of the four dips. The table below shows the position of the
dips for each Subnet value:
SUBNET VALUE
Pin 2
(value 1)
Pin 3
(value 2)
Pin 4
(value 4)
Pin 5
(value 8)
0
OFF
OFF
OFF
OFF
1
ON
OFF
OFF
OFF
2
OFF
ON
OFF
OFF
3
ON
ON
OFF
OFF
4
OFF
OFF
ON
OFF
5
ON
OFF
ON
OFF
6
OFF
ON
ON
OFF
7
ON
ON
ON
OFF
8
OFF
OFF
OFF
ON
9
ON
OFF
OFF
ON
10
OFF
ON
OFF
ON
11
ON
ON
OFF
ON
12
OFF
OFF
ON
ON
13
ON
OFF
ON
ON
14
OFF
ON
ON
ON
15
ON
ON
ON
ON
4. CONFIGURATION IN WORKNET MODE
1. Select WORKNET protocol using the dip number 1 (OFF position) in the dip-switch block at the rear
panel.
2. In the group selector (UNIV) at the front panel, select one of the 16 positions. It is necessary, at
least, one LM-3E transmitter configured in the same group, and connected to the LAN.
3. Connect a standard RJ 45 cable between LAN connector and Ethernet network.
4. Connect a DMX cable in the DMX OUT connector to feed with DMX signal a devices line.
5. Supply the unit with 5 V DC, 500 mA through Plug-in or Terminal Block.
6. Now is possible to receive DMX information from the control console. ACT LED will blink when LM3R is transmitting or receiving data from the network.
5. CONFIGURATION IN ART-NET MODE
1. Select Art-Net protocol using the dip number 1 (ON position) in the dip-switch block at the rear panel.
2. Select the Subnet using the dips 2,3,4,5 in the dip-switch block at the rear panel (up to 16 different
positions). This value must be the same as the Subnet value configured in the DMX console.
3. In the group(Universe) selector at the front panel, select one of the 16 positions (0-F) corresponding
to the DMX universe.
4. Connect a standard RJ 45 cable between LAN connector and Ethernet network.
5. Connect a DMX cable in the DMX OUT connector to feed with DMX signal a devices line.
6. Supply the unit with 5 V DC, 500 mA through Plug-in or Terminal Block.
LM-3R User Manual
6
LM-3R
Ethernet to DMX converter
EN
7. In this moment it is possible to receive DMX information from the control console. ACT LED will blink
when LM-3R is transmitting or receiving data from the network.
6. CONNECTION EXAMPLES
WORKNET MODE: Connection of a LM-3 system composed by a transmitter (LM-3E) and two receivers (LM-3R),
all must be configured in the same group.
WORKNET MODE: Connection of a LM-3 system using a multiuniverse DMX console. It is possible to send two
different universes through the network with two transmitters (LM-3E) and two receivers (LM-3R), configured in
the same groups, as seen in figure.
LM-3R User Manual
7
LM-3R
Ethernet to DMX converter
EN
ART-NET MODE: Using an Art-Net DMX console, transmitting Subnet 10 with its 16 universes; with two receivers
LM-3R, configured in Subnet 10 and the universes they want to receive.
7. SPECIFICATIONS
•
Main Supply: 5 V DC, 500 mA
•
Network protocols: Art-Net / WORKNET (own protocol)
•
Dimensions: 80 x 45 x 80 mm
•
Weight: 370 g
This symbol on the product or in its packaging indicates that this product shall not be
trated as household waste. Instead it shall be handed over the applicable collection
point for the recycling of electrical and electronic equipment. By ensuring this product
is disposed of correctly, you will help prevent potential negative consequences for
the enviroment and human health, which could otherwise be caused by inappropiate
waste handling of this product. The recycling of materials will help to conserve
natural resources. For more detailed information about recycling this product, please
contact your local city office, your household waste disposal service or the shop
where you purchased the product.
LM-3R User Manual
8
LM-3R
Ethernet to DMX converter
ES
1. DESCRIPCIÓN
LM-3R es un convertidor Ethernet a DMX. Ha sido diseñado para poder transportar DMX a través de una
red Ethernet, y tiene dos modos de funcionamiento: WORKNET (protocolo propietario) y Art-Net.
LM-3R es un dispositivo plug and play, y no necesita ninguna configuración de red. LM-3R se configura
automáticamente, lo que significa que obtiene automáticamente una dirección IP 2.x.x.x y una Máscara de
Subred 255.0.0.0, tal y como especifica el protocolo Art-Net. Sin embargo, para usuarios avanzados, la
configuración de red del dispositivo puede modificarse a través de un interfaz web, como se explicará más
adelante.
1.1 MODO WORKNET
En modo WORKNET el LM-3R funciona como receptor de la información DMX enviada por el dispositivo
LM-3E (emisor). Por lo tanto, en este modo de funcionamiento, el LM-3R siempre debe utilizarse en
combinación con un LM-3E, y ambos dispositivos deben configurarse en el mismo grupo (o Universo DMX).
De esta manera, y generalizando para más de un dispositivo receptor, la información enviada por un LM-3E
será recibida por todos aquellos LM-3R configurados en el mismo grupo que el LM-3E emisor.
Nota: sólo un dispositivo LM-3E puede ser asociado a uno o más dispositivos LM-3R.
WORKNET es un protocolo propietario que funciona sobre cualquier red estándar TCP/IP. El protocolo es
unicast, con el objetivo de no disminuir la eficiencia de red.
Como se ha visto anteriormente en este documento y también en el manual de usuario del LM-3E, ambos
dispositivos (LM-3E y LM-3R) se configuran automáticamente, y no necesitan ninguna configuración de red.
La dirección IP y la máscara de subred es obtenida automáticamente, de manera que ambos dispositivos
pertenezcan a la misma subred y puedan así comunicarse entre ellos.
1.2 MODO ART-NET
En modo Art-Net el LM-3R funciona como un nodo Art-Net propiamente dicho, recibiendo toda la información
enviada por un dispositivo emisor Art-Net. En este caso el concepto de grupo es sustituido por el de
Universo, incluyendo además el concepto de Subnet, tal y como se especifica en el protocolo Art-Net.
Como se ha dicho anteriormente, LM-3R se configura automáticamente, obteniendo una dirección IP y una
máscara de subred tal y como especifica el protocolo Art-Net.
1.3 WEB SERVER
LM-3R es un dispositivo plug and play. Por defecto se configura automáticamente como un dispositivo ArtNet, obteniendo una dirección IP 2.x.x.x y Máscara de Subred 255.0.0. Cada LM-3R lleva una pegatina en
su base con los valores de configuración por defecto.
Aunque LM-3R es plug and play, el dispositivo dispone de un interfaz de administración web para la
configuración de las propiedades de red. Para conectar con dicho interfaz web, debe configurar la dirección
IP de su PC de manera que pertenezca a la misma subred que el LM-3R (esto es, las direcciones IP de su
PC y del LM-3R ambas deben comenzar por 2.x.x.x, con máscara de subred 255.0.0.0). Una vez hecho
LM-3R User Manual
9
LM-3R
Ethernet to DMX converter
ES
esto, para acceder a la página web de configuración utilice un navegador web y conecte con la dirección IP
por defecto del dispositivo, la cual aparece en una pegatina en la base del mismo. (http://2.x.x.x)
El interfaz web permite cambiar la dirección IP, la Máscara de Subred y la descripción del dispositivo.
Si la dirección IP es modificada, es muy importante recordar la nueva IP asignada, de manera que pueda
conectar con el dispositivo la siguiente vez que quiera acceder al interfaz web. De cualquier modo, la utilidad
EQDiscover puede ser utilizada para obtener las propiedades de red del dispositivo. Lo que tiene que hacer
es conectar el LM-3R a la red LAN o a su PC, y ejecutar la aplicación. La aplicación mostrará, en una
ventana, toda la información sobre las propiedades de red del dispositivo. La utilidad EQDiscover puede
descargarse de http://www.equipson.es/prodDetail.asp?idproducto=737
Fig.1 El WEB SERVER integrado permite la
configuración de la unidad.
2. PANEL FRONTAL
LM-3R User Manual
10
LM-3R
Ethernet to DMX converter
ES
1. LED POWER
Este LED, de color rojo, se ilumina cuando la unidad dispone de alimentación.
2. Alimentación (Toma PLUG IN)
Mediante un alimentador de 5V DC, 500 mA, es posible alimentar la unidad. (Si se utiliza la toma
PLUG IN para alimentar la unidad, la toma Terminal Block no debe utilizarse)
3. LED ACT
Este LED verde parpadea cuando el puerto Ethernet está conectado y transmitiendo o recibiendo
datos.
4. LED LINK
Este LED verde se enciende cuando el puerto Ethernet LAN está conectado a la red.
5. Alimentación (Toma Terminal Block)
Mediante un alimentador de 5V DC, 500 mA, es posible alimentar la unidad. (Si se utiliza la toma
Terminal Block para alimentar la unidad, la toma PLUG IN no debe utilizarse)
6. Selector de Grupo/Universo
Bajo protocolo WORKNET
Este selector permite seleccionar hasta 16 grupos de recepción. (0-F). Cada grupo tendrá su propio
transmisor LM-3E, configurado en el mismo grupo que sus receptores.
Bajo protocolo Art-Net
Este selector permite seleccionar uno de los 16 Universos DMX, dentro de la Subnet configurada.
7. DMX OUT
Este conector XLR envía la señal DMX a una línea de control con dispositivos compatibles con
DMX, como cabezas móviles, scanners, drivers RGB, etc.
8. LAN
Conector RJ 45 que permite la conexión del LM-3R a una red Ethernet.
3. PANEL TRASERO
9. Selector de modo de funcionamiento / selector de Subnet
Este dip-switch tiene dos funciones:
◦
LM-3R User Manual
Permite seleccionar, con el dip número 1, el modo de funcionamiento (WORKNET
(posición OFF) o Art-Net (posiciónON))
11
LM-3R
ES
Ethernet to DMX converter
◦
Únicamente en el modo de funcionamiento Art-Net, los dips número 2,3,4,5 permiten
seleccionar la Subnet, con valores de 0 a 15 (16 posiciones). Los números de color
negro (1,2,4,8) indican el valor que toma el dip cuando está en posición ON, en posición
OFF el valor es 0. El valor de la Subnet resultante es la suma de los cuatro dips. La
siguiente tabla muestra la posición en la que deben posicionarse los dips para cada
valor de Subnet:
SUBNET VALUE
Pin 2
(valor 1)
Pin 3
(valor 2)
Pin 4
(valor 4)
Pin 5
(valor 8)
0
OFF
OFF
OFF
OFF
1
ON
OFF
OFF
OFF
2
OFF
ON
OFF
OFF
3
ON
ON
OFF
OFF
4
OFF
OFF
ON
OFF
5
ON
OFF
ON
OFF
6
OFF
ON
ON
OFF
7
ON
ON
ON
OFF
8
OFF
OFF
OFF
ON
9
ON
OFF
OFF
ON
10
OFF
ON
OFF
ON
11
ON
ON
OFF
ON
12
OFF
OFF
ON
ON
13
ON
OFF
ON
ON
14
OFF
ON
ON
ON
15
ON
ON
ON
ON
4. CONFIGURACIÓN EN MODO WORKNET
1. Seleccione el protocolo WORKNET utilizando el dip número 1 (posición OFF) del bloque dip-switch
del panel trasero.
2. En el selector de grupo (UNIV) del panel delantero, seleccione una de las 16 posiciones. Es
necesario, al menos un transmisor LM-3E configurado en el mismo grupo, y conectado a la LAN.
3. Conecte un cable estándar RJ 45 entre el conector LAN y la red Ethernet.
4. Conecte un cable DMX en el conector DMX OUT para alimentar con señal DMX los dispositivos de
la línea.
5. Alimente la unidad con 5 V DC, 500 mA por cualquiera de las dos tomas destinadas a tal efecto
(Plug-in o Terminal Block).
6. En este momento es posible recibir la información DMX enviada por la consola de control. El LED
ACT parpadeará cuando la unidad transmita o reciba datos de la red Ethernet.
5. CONFIGURACIÓN EN MODO ART-NET
1. Seleccione el protocolo Art-Net utilizando el dip número 1 (posición ON) del bloque dip-switch del
panel trasero.
2. Seleccione la Subnet utilizando los dips 2,3,4,5 del bloque dip-switch del panel trasero (hasta 16
posiciones diferentes). Este valor debe ser el mismo que el valor de Subnet configurado en la
consola DMX.
3. En el selector de grupo(Universe) en el panel delantero, seleccione una de las 16 posiciones (0-F)
LM-3R User Manual
12
LM-3R
Ethernet to DMX converter
ES
correspondiente al universo DMX.
4. Conecte un cable estándar RJ 45 entre el conector LAN y la red Ethernet.
5. Conecte un cable DMX en el conector DMX OUT para alimentar con señal DMX los dispositivos de
la línea.
6. Alimente la unidad con 5 V DC, 500 mA por cualquiera de las dos tomas destinadas a tal efecto
(Plug-in o Terminal Block).
7. En este momento es posible recibir la información DMX enviada por la consola de control. El LED
ACT parpadeará cuando la unidad transmita o reciba datos de la red Ethernet.
6. EJEMPLOS DE CONEXIONADO
MODO WORKNET: Conexión de un sistema LM-3 compuesto por un emisor (LM-3E) y dos receptores (LM-3R),
todos ellos deben configurarse en el mismo grupo.
MODO WORKNET: Conexión de un sistema LM-3 utilizando una consola DMX multiuniverso. Es posible enviar
dos universos diferentes a través de la red Ethernet, utilizando dos emisores (LM-3E) y dos receptores (LM-3R),
configurados en los mismos grupos, tal y como se muestra en la figura.
LM-3R User Manual
13
LM-3R
Ethernet to DMX converter
ES
MODO ART-NET: Usando una consola DMX Art-Net, transmitiendo la Subnet 10 con sus 16 universos; con dos
receptores LM-3R, configurados en la Subnet 10 y en los universos que quieren recibir.
7. ESPECIFICACIONES
•
Alimentación: 5 V DC, 500 mA
•
Protocolos de red: Art-Net / WORKNET (protocolo propietario)
•
Dimensiones: 80 x 45 x 80 mm
•
Peso: 370 g
Este símbolo en su equipo o embalaje indica que el presente producto no puede ser
tratado como residuos domésticos normales, sino que deben entregarse en el
correspondiente punto de recogida de equipos electrónicos y eléctricos.
Asegurándose de que este producto es desechado correctamente, Ud. está
ayudando a prevenir las consecuencias negativas para el medio ambiente y la salud
humana, que podrían derivarse de la incorrecta manipulación de este producto. El
reciclaje de materiales ayuda a conservar las reservas naturales. Para recibir más
información sobre el reciclaje de este producto, conecte con su ayuntamiento, su
punto de recogida más cercano o el distribuidor donde adquirió el producto.
LM-3R User Manual
14
LM-3R
Ethernet to DMX converter
ES
TECHNICAL SUPPORT
Tel. +34 961 216 301
E-mail address: [email protected]
ENGLISH
Technical Support information available at www.equipson.es
SPANISH
En www.equipson.es ud. podrá encontrar información
relativa a servicios de soporte técnico
INTERNET
E-mail address: [email protected]
World Wide Web
http://www.equipson.es
LM-3R
LM-3R User Manual
Ethernet to DMX converter
15