1
To activate / deactivate massager
CHANGING MASSAGER HEADS
Mini Massager Models: WS901
USER MANUAL
EN
OVERVIEW
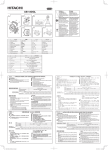
FRONT VIEW & LCD DISPALY
1. Hold the massager head, twist
it clockwise and take it out.
2. Insert another massager head
and align protrusions on the
inside of the massager head.
Twist it counter-clockwise to
secure in place.
1
8
9
2
3
10
6
11
12
4
5
SPECIFICATIONS
TYPE
DESCRIPTION
DESCRIPTION
LxWxH
76mm x 76mm x 113mm
(2.99 x 2.99 x4.45 in)
70 x 91 x 91 mm
(2.76 x 3.58 x 3.58 in)
Weight
220 g (7.76 oz) without battery
100 g (3.53 oz) without battery
Power
3 x UM-4 (AAA) 1.5V batteries
(not included)
1 x CR2032 (included)
7
1.
2.
3.
4.
5.
6.
Massager hand grip
Clock
AM/PM
Low batteries indication (CR2032)
Base
Massager battery compartment (3 x AAA)
7.
8.
9.
10.
11.
12.
Massager head
: Enter clock settings
“-” : Decrease setting values
“+” : Increase setting values
Base battery compartment (CR2032)
“RESET”: Reset unit to default settings
GETTING STARTED
INSERT BATTERIES (AAA BATTERIES) - MASSAGER
1. Remove the massager from the base.
2. Graspe the grey color plastic rim and
hold it firm.
3. Use the other hand to hold the massager
hand grip. Twist it counterclockwise and
pull it out..
4. Insert the batteries (3 X AAA, not
included), matching the polarities.
5. Align protrusions on the inside of the
grip cover with indentations and push down
to secure in place.
SET INSERTING BATTERIES (CR2032 BATTERY) - BASE
1. Turn the battery compartment cover
counterclockwise to remove.
2. Insert the battery (CR2032, included),
matching the polarities (positive side facing up).
3. Replace the battery compartment cover and
turn clockwise to secure.
SET CLOCK
1. Press
to enter setting mode.
2. Press “+” or “-” to select the hour format (12 / 24). Press
to confirm.
3. Press “+” or “-” to change the display time. (Press and hold “+” / “-” to rapidly change the
values).
4. Press
to confirm.
MASSAGER
IMPORTANT The Mini Massager is not a medical / precision device, and is not intended to
replace professional medical care. If you suffer from musculoskeletal disorder, consult a
qualified physician / physiotherapist.
BASE
MASSAGER
PRECAUTIONS
Do not subject the unit to excessive force, shock, dust, temperature or humidity.
Do not cover the ventilation holes with any items such as newspapers, curtains etc.
Do not immerse the unit in water. If you spill liquid over it, dry it immediately with a soft,
lint-free cloth.
Do not clean the unit with abrasive or corrosive materials.
Do not tamper with the unit’s internal components. This invalidates the warranty.
Only use fresh batteries. Do not mix new and old batteries.
Images shown in this manual may differ from the actual display.
When disposing of this product, ensure it is collected separately for special treatment and
not as normal household waste.
Placement of this product on certain types of wood may result in damage to its finish for
which Oregon Scientific will not be responsible. Consult the furniture manufacturer's care
instructions for information.
The contents of this manual may not be reproduced without the permission of the manufacturer.
Do not dispose old batteries as unsorted municipal waste. Collection of such waste
separately for special treatment is necessary.
Please note that some units are equipped with a battery safety strip. Remove the strip from
the battery compartment before first use.
NOTE The technical for this product and the contents of the
user manual are subject to change without notice.
NOTE Features and accessories will not be available in all countries. For more
information, please contact your local retailer.
ABOUT OREGON SCIENTIFIC
Visit our website (www.oregonscientific.com) to learn more about Oregon Scientific products.
If you're in the US and would like to contact our Customer Care department directly, please
visit: www2.oregonscientific.com/service/support.asp
For international inquiries, please visit: www2.oregonscientific.com/about/international.asp
EU-DECLARATION OF CONFORMITY
Hereby, Oregon Scientific, declares that this [WS901] is in compliance with EMC directive
2004/108/EC. A copy of the signed and dated Declaration of Conformity is available on request via
our Oregon Scientific Customer Service.
Per attivare / disattivare il massaggiatore
CAMBIO DELLE TESTE DEL MASSAGGIATORE
Minimassaggiatore Modello : WS901
MANUALE UTENTE
IT
PANORAMICA
VISTA ANTERIORE
INTERNO
VISTA INFERIORE
1. Mantenere la testa del
massaggiatore e ruotarla in
senso orario per estrarla.
2. Inserire un’altra testa e
allineare le tacche nella parte
interna della testa del massaggiatore. Ruotarlo in senso antiorario
per posizionarlo correttamente.
1
8
9
2
3
10
6
11
12
4
5
7
1. Maniglia massaggiatore
2. Orologio
3. AM/PM
4.
indica che l’alimentazione della batteria
(CR2032) è bassa
5. Base
6. Vano batterie massaggiatore (3 x AAA)
7. Testa del massager
8.
: Inserire le impostazioni dell’orologio
9. “-” : Riduce i valori delle impostazioni
10. “+” : Aumentare i valori delle impostazioni
11. Vano della batteria di base (CR2032)
12. “RESET”: ripristinare le impostazioni
predefinite dell'unità
OPERAZIONI PRELIMINARI
INSERIRE LE BATTERIE (BATTERIE AAA) - MASSAGGIATORE
1. Rimuovere il massaggiatore dalla base.
2. Afferrare il bordo in plastica di colore
grigio e mantenerlo fermamente.
3. Con l’altra mano mantenere il bordo del
manico del massaggiatore. Ruotarlo in
senso antiorario ed estrarlo.
4. Inserire le batterie (3 X AAA, not
incluse), facendo corrispondere le polarità.
5. Allineare le sporgenze nella parte
interna della copertura della presa con le
tacche e spingere per fissare in posizione.
INSERIMENTO DELLE BATTERIE (BATTERIA CR2032) - BASE
1. Ruotare il coperchio del vano batteria in
senso antiorario per rimuoverlo.
2. Inserire la batteria (CR2032, inclusa), facendo
corrispondere le polarità (il lato positive rivolto
verso l’alto).
3. Riposizionare il coperchio del vano batteria e
ruotare in senso orario per fissarlo.
OROLOGIO
IMPOSTAZIONE DELL’OROLOGIO
1. Premere per accedere alla modalità di impostazione.
2. Premere “+” o “–” per selezionare il formato dell’ora (12 / 24). Premere per confermare.
3. Premere “+” o “–” per modificare l’ora del display. Tenere premuto “+” / “-” per modificare
rapidamente i valori.
4. Premere per confermare.
MASSAGGIATORE
IMPORTANTE
Il minimassaggiatore non è un dispositivo medico / di precisione e non
sostituisce alcun trattamento medico. In caso di disordini muscolo scheletrici, consultare un
medico / fisioterapista qualificato.
CARATTERISTICHE TECNICHE
MASSAGGIATORE
BASE
TIPO
DESCRIZIONE
DESCRIZIONE
HxPxL
76 x 76 x 113 mm
(2,99 x 2,99 x 4,45 pollici)
70 x 91 x 91 mm
(2,76 x 3,58 x 3,58pollici)
Peso
220 gr (7,77oz) senza batterie
100 gr (3,53 oz) senza batterie
3 batterie UM-4 (AAA) da
Alimentazione 1,5 V (non incluse)
1 CR2032 (inclusa)
PRECAUZIONI
Non sottoporre il prodotto a forza eccessiva, urti, polvere, sbalzi eccessivi di temperatura o
umidità.
Non otturare i fori di aerazione con oggetti come giornali, tende, etc.
Non immergere l’unità in acqua. Se si versa del liquido sul prodotto, asciugarlo immediatamente con un panno morbido e liscio.
Non pulire l’unità con materiali abrasivi o corrosivi.
Non manomettere i componenti interni. In questo modo si invalida la garanzia.
Oregon Scientific declina ogni responsabilità per eventuali danni alle finiture causati dal
posizionamento del prodotto su determinati tipi di legno. Consultare le istruzioni fornite dal
fabbricante del mobile per ulteriori informazioni.
Le immagini del manuale possono differire dalla realtà.
Il contenuto di questo manuale non può essere ristampato senza l’autorizzazione del
fabbricante.
Utilizzare solo batterie nuove. Non mescolare batterie nuove con batterie vecchie.
Al momento dello smaltimento del prodotto, attenersi alla nota relativa in allegato.
Non smaltire le batterie vecchie come rifiuto indifferenziato. È necessario che questo rifiuto
venga smaltito mediante raccolta differenziata per essere trattato in modo idoneo.
Alcune unità sono dotate di una striscia di sicurezza per le batterie. Rimuovere la striscia dal
vano batterie prima del primo utilizzo.
NOTA Le specifiche tecniche del prodotto e il contenuto del manuale per
l’utente possono essere modificati senza preavviso.
NOTA Caratteristiche e accessori non disponibili in tutti i paesi. Per ulteriori
informazioni, rivolgersi al proprio rivenditore.
INFORMAZIONI SU OREGON SCIENTIFIC
Per avere maggiori informazioni sui nuovi prodotti
Oregon Scientific visita il nostro sito internet www.oregonscientific.it, dove potrai trovare tutte
le informazioni di cui hai bisogno, o collegati a www.oregonscientificstore.it.
Per ricerche di tipo internazionale puoi visitare invece il sito
www2.oregonscientific.com/about/international.asp.
DICHIARAZIONE DI CONFORMITA’ UE
Oregon Scientific dichiara che questo prodotto WS901 è conforme alla direttiva EMC 2004/108/EC.
Una copia firmata e datata della Dichiarazione di Conformità è disponibile, su richiesta, tramite il
servizio clienti della Oregon Scientific.
Activer / désactiver le masseur
!"#
$"%
CHANGER LES TETES DU MASSEUR
Mini masseur
FR
Modèle : WS901
MANUEL DE L’UTILISATEUR
VUE D’ENSEMBLE
VUE AVANT
INTERIEUR
VUE DU BAS
1
8
9
2
3
10
6
11
12
4
5
7
1. Poignée du mini masseur
2. Horloge
3. AM/PM
4.
Indique que la pile (CR2032) est faible.
5. Base
6. Compartiment des piles du masseur (3 piles de
taille AAA, 1,5 V)
7. Tête de massager
8.
: Entrer les paramètres de l’horloge
9. “-” : Diminue les valeurs du réglage
10. “+” : Augmente les valeurs du réglage
11. Compartiment de base de la pile (CR2032)
12. RESET (REINITIALISER) : Réinitialise
l’appareil aux réglages par défaut
AU COMMENCEMENT
INSERTION DES PILES (PILES AAA) - MASSEUR
1. Retirez le masseur de la base.
2. Saisissez le bord de plastique gris et
maintenez-le fermement.
3. De l’autre main, maintenez la poignée
du masseur. Tournez-la dans le sens
inverse aux aiguilles d’une montre et tirez.
4. Insérez les piles (3 piles de taille AAA
non incluses) en respectant les polarités.
5. Alignez les encoches intérieures du
couvercle avec les indications et remettez
la poignée en place.
INSERTION DES PILES (PILE CR2032) - BASE
1. Tournez le couvercle du compartiment dans
le sens inverse aux aiguilles d’une montre pour
le retirer.
2. Insérez la pile (pile CR2032 incluse) en
respectant les polarités (le positif devant vous).
3. Remettez le couvercle du compartiment des
piles en le tournant dans le sens des aiguilles
d’une montre.
HORLOGE
REGLER L’HORLOGE
1. Appuyez sur pour entrer dans le mode de réglage.
2. Appuyez sur + ou - pour sélectionner le format de l’heure (12 / 24 h). Appuyez sur
pour confirmer.
3. Appuyez sur + ou – pour changer l’heure d’affichage. (Maintenez + / – pour changer
rapidement les valeurs).
4. Appuyez sur
pour confirmer.
MASSEUR
IMPORTANT
Le Mini Masseur n’est pas un appareil médical / de précision et n’a pas pour
objectif de remplacer des soins médicaux professionnels. Si vous souffrez de désordre
musculosquelettale, veuillez consulter un médecin ou un physiothérapeute qualifié.
1. Maintenez la tête du masseur,
tournez-la dans le sens des
aiguilles
d’une
montre
et
retirez-la.
2. Insérez la tête de rechange et
alignez les encoches à l’intérieur
de la tête du masseur. Tournez-la
dans le sens inverse aux aiguilles
d’une montre pour la fixer.
CARACTERISTIQUES
BASE
MASSEUR
TYPE
DESCRIPTION
DESCRIPTION
HxExP
76 x 76 x 113 mm
(2,99 x 2,99 x 4,45 pouces)
70 x 91 x 91 mm
(2,76 x 3,58 x 3,58 pouces)
Poids
220 g (7,77 onces) sans piles
100 g (3,53 onces) sans piles
Alimentation
3 piles UM-4 (AAA)
1,5 V (non incluses)
Alimentation : 1 pile CR2032 (incluse)
PRECAUTIONS
Ne pas soumettre le produit à une force excessive, au choc, à la poussière, aux
changements de température ou à l'humidité.
Ne pas couvrir les trous de ventilation avec des journaux, rideaux etc.
Ne pas immerger le produit dans l’eau. Si vous renversez du liquide sur l’appareil,
séchez-le immédiatement avec un tissu doux.
Ne pas nettoyer l’appareil avec des matériaux corrosifs ou abrasifs.
Ne pas trafiquer les composants internes. Cela invalidera votre garantie.
N’utilisez que des piles neuves. Ne pas mélanger des piles neuves et usagées.
Les images de ce manuel peuvent différer de l’aspect réel du produit.
Lorsque vous désirez vous débarrasser de ce produit, assurez-vous qu'il soit collecté
séparément pour un traitement adapté.
Le poser sur certaines surfaces en bois peut endommager la finition du meuble, et Oregon
Scientific ne peut en être tenu responsable. Consultez les mises en garde du fabricant du
meuble pour de plus amples informations.
Le contenu du présent manuel ne peut être reproduit sans la permission du fabriquant.
Ne pas jeter les piles usagées dans les containers municipaux non adaptés. Veuillez
effectuer le tri de ces ordures pour un traitement adapté si nécessaire.
Veuillez remarquer que certains appareils sont équipés d’une bande de sécurité. Retirez
la bande du compartiment des piles avant la première utilisation.
REMARQUE Les caractéristiques techniques de ce produit et le contenu de ce
manuel peuvent être soumis à modifications sans préavis.
REMARQUE Caractéristiques et accessoires ne seront pas valables pour tous les pays.
Pour plus d’information, contacter le détaillant le plus proche.
A PROPOS D’OREGON SCIENTIFIC
Pour plus d‘informations sur les produits Oregon Scientific France, rendez-vous sur notre site
www.oregonscientific.fr
Si vous êtes aux Etats-Unis, vous pouvez contacter notre support consommateur directement :
sur le site www2.oregonscientific.com/service/support.asp
Pour des renseignements internationaux, rendez vous sur le site:
www2.oregonscientific.com/about/international.asp.
EU-DECLARATION OF CONFORMITY
Par la présente, Oregon Scientific déclare que [WS901] est conforme à la directive européenne
2004/108/EC. Une copie signée et datée de la déclaration de conformité est disponible sur demande
auprès de notre Service Client.
So aktivieren / deaktivieren Sie das Massagegerät
&*<=>?@"<
J=
"<
DIE MASSAGEKÖPFE AUSWECHSELN
Mini-Massagegerät Modell: WS901
DE
BEDIENUNGSANLEITUNG
ÜBERSICHT
VORDERANSICHT
INNEN
UNTERE ANSICHT
1
8
9
2
3
6
10
11
12
4
5
7
1. Handgriff für Massagegerät
2. Uhr
3. AM/PM
4.
gibt an, dass die Ladung der Batterie
(CR2032) niedrig ist
5. Sockel
6. Batteriefach für Massagegerät (3 x AAA)
7. Massagerkopf
8.
: Uhreinstellungen aufrufen
9. “-” : Einstellungswerte verringern
10. “+” : Einstellungswerte erhöhen
11. Batteriefach im Sockel (CR2032)
12. “RESET”: Gerät auf
Standardeinstellungen zurücksetzen
ERSTE SCHRITTE
BATTERIEN EINLEGEN (BATTERIEN DES TYPS “AAA”) - MASSAGEGERÄT
1. Entfernen Sie das Massagegerät vom Sockel.
2. Umfassen Sie die graufarbige Kunststofffassung und halten Sie sie fest.
3. Halten Sie mit der anderen Hand den
Handgriff des Massagegeräts. Drehen Sie ihn
gegen den Uhrzeigersinn und ziehen Sie ihn
heraus.
4. Legen Sie die Batterien ein (3 X AAA, nicht im
Lieferumfang), und achten Sie auf die
Übereinstimmung der Polaritäten.
5. Richten Sie die vorstehenden Teile an der
Innenseite des Gehäusedeckels an den
Vertiefungen aus und drücken Sie diesen nach
unten, um ihn zu befestigen.
BATTERIEN EINLEGEN (BATTERIE DES TYPS CR2032) - SOCKEL
1. Entfernen Sie den Batteriefachdeckel durch
Drehen gegen den Uhrzeigersinn.
2. Legen Sie die Batterie (CR2032, im Lieferumfang)
ein und achten Sie auf die Übereinstimmung der
Polaritäten (die positive Seite nach oben).
3. Bringen Sie den Batteriefachdeckel wieder an und
befestigen Sie ihn durch Drehen im Uhrzeigersinn.
1. Halten Sie den Massagekopf
fest, drehen Sie ihn im
Uhrzeigersinn und ziehen Sie ihn
heraus.
2. Stecken Sie einen anderen
Massagekopf auf das Gerät und
richten Sie die vorstehenden Teile
an
der
Innenseite
des
Massagekopfes aus. Befestigen
Sie ihn durch Drehen gegen den
Uhrzeigersinn.
TECHNISCHE DATEN
MASSAGEGERÄT
SOCKEL
TYP
DESCRIPTION
DESCRIPTION
HxBxT
76 x 76 x 113 mm
70 x 91 x 91 mm
Gewicht
220 g (ohne Batterie)
100 g (ohne Batterie)
3 x Batterien UM-4 (AAA)
Stromversorgung 1,5V (nicht im Lieferumfang)
1 x CR2032 (im Lieferumfang)
VORSICHTSMAßNAHMEN
Setzen Sie das Gerät keiner extremen Gewalteinwirkung und keinen Stößen aus, und halten
Sie es von übermäßigem Staub, Hitze oder Feuchtigkeit fern.
Sie dürfen die Belüftungsöffnungen nicht mit Gegenständen abdecken, wie z.B. Zeitungen,
Vorhänge, usw.
Tauchen Sie das Gerät niemals in Wasser. Falls Sie eine Flüssigkeit über das Gerät
verschütten, trocknen Sie es sofort mit einem weichen, faserfreien Tuch.
Reinigen Sie das Gerät keinesfalls mit scheuernden oder ätzenden Mitteln.
Machen Sie sich nicht an den internen Komponenten des Geräts zu schaffen, da dies zu einem
Verlust der Garantie führen kann.
Verwenden Sie nur neue Batterien. Verwenden Sie keinesfalls neue und alte Batterien
gemeinsam.
Die in dieser Anleitung dargestellten Abbildungen können sich vom Original unterscheiden.
Entsorgen Sie das Produkt nicht im allgemeinen Hausmüll, sondern ausschließlich in den dafür
vorgesehenen, kommunalen Sammelstellen, die Sie bei Ihrer Gemeinde erfragen können.
Wenn dieses Produkt auf bestimmte Holzflächen gestellt wird, kann die Oberfläche beschädigt
werden. Oregon Scientific ist nicht haftbar für solche Beschädigungen. Entsprechende
Hinweise entnehmen Sie bitte der Pflegeanleitung Ihres Möbelherstellers.
Der Inhalt dieser Anleitung darf ohne Genehmigung des Herstellers nicht vervielfältigt werden.
Verbrauchte Batterien gehören nicht in den Hausmüll. Bitte geben Sie sie bei einer
Sammelstelle für Altbatterien bzw. Sondermüll ab.
Bitte beachten Sie, dass manche Geräte mit einem Batterieunterbrechungsstreifen bestückt
sind. Vor dem ersten Gebrauch müssen Sie den Streifen aus dem Batteriefach ziehen.
HINWEIS Die technischen Daten für dieses Produkt und der Inhalt der Bedienungsanleitung können ohne Benachrichtigung geändert werden.
HINWEIS Eigenschaften und Zubehör nicht in allen Ländern verfügbar. Weitere Informationen erhalten Sie von Ihrem Fachhändler vor Ort.
ÜBER OREGON SCIENTIFIC
DIE UHR EINSTELLEN
1. Drücken Sie auf , um den Einstellungsmodus aufzurufen.
2. Drücken Sie auf + oder -, um das Stundenformat auszuwählen (12 / 24). Drücken Sie
zur Bestätigung auf
.
3. Drücken Sie auf + oder -, um die Anzeigezeit zu ändern. (Halten Sie + / – gedrückt, um
die Werte rasch zu ändern).
4. Drücken Sie zur Bestätigung auf
.
MASSAGEGERÄT
WICHTIG
Das Mini-Massagegerät ist kein medizinisches oder Präzisionsgerät; es ist nicht
dafür vorgesehen, eine fachmännische, ärztliche Behandlung zu ersetzen. Wenn Sie an
Muskel-Skelett-Erkrankungen leiden, suchen Sie einen qualifizierten Mediziner / Physiotherapeuten auf.
Q=Y
>=*\
=^<>Y=_>
=Q>>
Kundendienst erreichen und Daten herunterladen können.
Für internationale Anfragen besuchen Sie bitte unsere Website:
www2.oregonscientific.com/about/international.asp.
EU-KONFORMITÄTSERKLÄRUNG
Hiermit erklärt Oregon Scientific, dass [WS901] mit der EMC Richtlinie 2004/108/EC übereinstimmt.
Eine Kopie der unterschriebenen und mit Datum versehenen Konformitätserklärung erhalten Sie auf
Anfrage über unseren Oregon Scientific Kundendienst.
Para activar o desactivar el masajeador
``
&`{
CÓMO CAMBIAR LOS CABEZALES DEL MASAJEADOR
Mini masajeador
ES
Modelo: WS901
MANUAL DE USUARIO
RESUMEN
VISTA FRONTAL
VISTA INFERIOR
INTERIOR
1
8
9
2
3
10
6
11
12
4
5
1.
2.
3.
4.
5.
6.
7
Mango del masajeador
Reloj
AM/PM
Indica que la pila (CR2032) se está acabando.
Base
Compartimiento para pilas del masajeador (3 x AAA)
7. Cabeza del massager
8.
: Introducir ajustes del reloj
9. “-” : Reducir valores de ajuste
10. “+” : Incrementar valores de ajuste
11. Compartimiento para pilas de la base (CR2032)
12. “RESET”: La unidad vuelve a los ajustes
predeterminados
CÓMO EMPEZAR
CÓMO INTRODUCIR LAS PILAS (PILAS AAA ) - MASAJEADOR
1. Retire el masajeador de la base.
2. Coja la pestaña de plástico de color
gris y agárrela firmemente.
3. Con la otra mano agarre el mango del
masajeador. Gírelo en la dirección
contraria a las agujas del reloj y tire para
sacarlo.
4. Introduzca las pilas (3 x AAA, no
incluidas) haciendo coincidir la polaridad.
5. Alinee el relieve del interior de la
pestaña con las ranuras y apriete para
que fijarla en su sitio.
CÓMO INTRODUCIR LAS PILAS (CR2032) - BASE
1. Haga girar la cubierta del compartimiento
para pilas en la dirección contraria a las agujas
del reloj para sacarla.
2. Introduzca la pila (CR2032, incluida) de
manera que coincida la polaridad (el polo
positivo hacia arriba).
3. Vuelva a colocar la tapa y hágala girar en la
dirección de las agujas del reloj para fijarla.
CONFIGURAR RELOJ
1. Pulse
para acceder al modo de configuración.
2. Pulse + o - para seleccionar el formato de la hora (12 / 24). Pulse
para confirmar.
3. Pulse + o - para cambiar la hora de la pantalla. (Pulse + / – y manténgalos pulsados
para cambiar rápidamente los valores).
4. Pulse
para confirmar.
MASAJEADOR
IMPORTANTE El mini masajeador no es un dispositivo médico ni de precisión, y no está
pensado para sustituir la asistencia médica profesional. Si sufre algún transtorno muscular u
óseo, consulte a un médico o fisioterapeuta cualificado.
1. Agarre el cabezal del
masajeador, hágalo girar en la
dirección de las agujas del reloj y
extráigalo.
2. Introduzca otro cabezal
alineando el relieve del interior
del cabezal. Hágalo girar en la
dirección contraria a las agujas
del reloj para que quede fijo en su
sitio.
FICHA TÉCNICA
BASE
MASAJEADOR
TIPO
DESCRIPCIÓN
DESCRIPCIÓN
AxAxP
76 x 76 x 113 mm
(2,99 x 2,99 x 4,45pulgadas)
70 x 91 x 91 mm
(2,76 x 3,58 x 3,58 pulgadas)
Peso
220 g (7,77 oz) sin pilas
100 g (3,53 oz) sin pilas
Potencia
3 pilas UM-4 (AAA) de
1,5V (no incluidas)
1 pila CR2032 (incluida)
PRECAUCIÓN
No exponga el producto a fuerza extrema, descargas, polvo, fluctuaciones de temperatura
o humedad.
No cubra los orificios de ventilación con objetos como periódicos, cortinas, etc.
No sumerja el dispositivo en agua. Si se vertiera líquido en la unidad, límpiela con un paño
suave y sin electricidad estática.
No limpie la unidad con materiales abrasivos o corrosivos.
No manipule los componentes internos. De hacerlo se invalidaría la garantía.
Use siempre pilas nuevas. No mezcle pilas viejas con pilas nuevas.
Las imágenes de esta guía para el usuario pueden ser distintas al producto en sí.
Cuando elimine este producto, asegúrese de que no vaya a parar a la basura general, sino
separadamente para recibir un tratamiento especial.
La colocación de este producto encima de ciertos tipos de madera puede provocar daños a
sus acabados. Oregon Scientific no se responsabilizará de dichos daños. Consulte las
instrucciones de cuidado del fabricante para obtener más información.
Los contenidos de este manual no pueden reproducirse sin permiso del fabricante.
No elimine las pilas gastadas con la basura normal. Es necesario desecharlas separadamente para poder tratarlas.
Tenga en cuenta que algunas unidades disponen de una cinta de seguridad para las pilas.
Retire la cinta de compartimento para pilas antes de usarlo por primera vez.
NOTA La ficha técnica de este producto y los contenidos de este manual de
usuario pueden experimentar cambios sin previo aviso.
NOTA No todas las funciones y accesorios estarán disponibles en todos los países.
Sírvase ponerse en contacto con su distribuidor local si desea más información.
SOBRE OREGON SCIENTIFIC
Visite nuestra página web (www.oregonscientific.com) para conocer más sobre los productos
de Oregon Scientific.
Si está en EE.UU y quiere contactar directamente con nuestro Departamento de Atención al
Cliente, por favor visite www2.oregonscientific.com/service/support.asp
EU - DECLARACIÓN DE CONFORMIDAD
Por medio de la presente, Oregon Scientific declara que el [WS901] cumple con la Directiva
2004/108/EC del EMC. Tiene a su disposición una copia firmada y sellada de la Declaración de
Conformidad, solicítela al Departamento de Atención al Cliente de Oregon Scientific.
Para activar / desactivar o massageador
|}!
J
MUDAR AS CABEÇAS DO MASSAGEADOR
Mini Massager Models: WS901
USER MANUAL
POR
VISTA GERAL
VISTA FRONTAL
VISTA INFERIOR
INTERIOR
1
8
9
2
3
10
6
11
12
4
5
7
1. Punho do massageador
2. Relógio
3. AM/PM
4.
indica que a carga da bateria (CR2032)
está fraca
5. Base
6. Compartimento das pilhas do massageador (3
x AAA)
7. Cabeça do massager
8.
: Introduzir as definições do relógio
9.
10. “+” : Aumentar os valores da configuração
11. Compartimento da bateria da base
(CR2032)
12. “RESET”: Repõe a unidade para a
configuração predefinida
INICIAR
INSERIR AS PILHAS (PILHAS AAA) - MASSAGEADOR
1. Remova o massageador da base.
2. Agarre a faixa de plástico cinzenta e
segure-a bem.
3. Com a outra mão segure o punho do
massageador. Rode no sentido contrário
aos ponteiros do relógio e retire-o
4. Insira as pilhas (3 X AAA, não
incluídas) tendo atenção às polaridades.
5. Alinhe as saliências na parte interior da
tampa do punho com os entalhes e
pressione para baixo para fixar.
INSERIR A BATERIA (BATERIA CR2032) - BASE
1. Rode a tampa do compartimento da bateria
no sentido contrário aos ponteiros do relógio
para a remover.
2. Insira a bateria (CR2032, incluída) tendo
atenção às polaridades (lado positivo para cima).
3. Volte a colocar a tampa do compartimento da
bateria e rode no sentido dos ponteiros do
relógio para fixar.
ACERTAR O RELÓGIO
1. Prima
para introduzir o modo de configuração.
2. Prima + ou – para seleccionar o formato das horas (12 / 24). Prima
para confirmar.
3. Prima + ou – para alterar a hora visualizada. (Prima e mantenha premido + / – para
mudar rapidamente os valores).
4. Prima
para confirmar.
MASSAGEADOR
O Mini-massageador não é um dispositivo médico/de precisão, e não se
IMPORTANTE
destina a substituir os cuidados médicos profissionais. Se sofrer de problemas
músculo-esqueléticos, consulte um médico/fisioterapeuta qualificado.
1. Segure a cabeça do massageador, rode-a no sentido dos
ponteiros do relógio e retire-a.
2. Insira outra cabeça de
massageador e alinhe as
saliências na parte interior da
cabeça do massageador. Rode
no
sentido
contrário
aos
ponteiros do relógio para fixar no
lugar.
ESPECIFICAÇÕES
MASSAGEADOR
BASE
TIPO
DESCRIÇÃO
DESCRIÇÃO
JxWxH
76 x 76 x 113 mm
(2,99 x 2,99 x 4,45 pol.)
70 x 91 x 91 mm
(2,76 x 3,58 x 3,58 pol.)
Peso
220 g (7,77 oz) sem pilhas
100 g (3,53 oz) sem bateria
Alimentação
3 x UM-4 (AAA)
1,5V pilhas (não incluídas)
1 x CR2032 (incluída)
PRECAUÇÕES
Não submeta a unidade a forças excessivas, impactos, poeiras, oscilações de temperatura ou
umidade.
Não obstrua as aberturas de ventilação com itens como jornais, cortinas, etc.
Não mergulhe a unidade na água. Se respingar líquido nela, seque-a imediatamente com um
pano macio e que não solte fiapos.
Não limpe a unidade com material abrasivo ou corrosivo.
Não altere os componentes internos da unidade. Isso invalidará sua garantia.
Utilize apenas pilhas novas. Não misture pilhas novas e usadas. Retire as pilhas caso pretenda
guardar o produto.
As imagens mostradas neste manual podem diferir da imagem real.
Os materiais utilizados nos produtos Oregon podem ser reutilizados e reciclados após o fim de
sua vida útil. Encaminhe os produtos a serem descartados aos locais de coleta apropriados,
atentando para as legislações locais.
A colocação deste produto sobre certos tipos de madeira pode resultar em danos ao seu
acabamento, pelos quais a Oregon Scientific não se responsabilizará. Consulte as instruções de
cuidados do fabricante do móvel para obter informações.
O conteúdo deste manual não pode ser reproduzido sem a permissão do fabricante.
Não descarte baterias usadas em locais não apropriados. É necessária a coleta do lixo em
questão de maneira separada para tratamento especial.
Observe que algumas unidades estão equipadas com uma tira de segurança da bateria. Remova
a tira do compartimento de bateria antes do primeiro uso.
OBSERVAÇÃO As especificações técnicas deste produto e o conteúdo do manual do usuário
estão sujeitos a alterações sem aviso prévio.
NOTA
Recursos e acessórios não estão disponíveis para todos os países. Para obter mais
informações, entre em contato com o seu distribuidor local.
SOBRE A OREGON SCIENTIFIC
Visite nosso site (www.oregonscientific.com.br) para saber mais sobre os produtos Oregon
Scientific.
Caso você necessite de mais informações ou tenha dúvidas, entre em contato com o nosso
Serviço de Atendimento ao Consumidor através do telefone (11) 3523-1934 ou e-mail
[email protected].
CE – DECLARAÇÃO DE CONFORMIDADE
A Oregon Scientific declara que este WS901 está de acordo com a EMC diretiva 2004/108/EC. Uma
cópia assinada e datada da Declaração de Conformidade está disponível para requisições através
do nosso SAC.
Om de masseur te activeren / deactiveren
&<
J
MASSAGEKOPPEN VERVANGEN
Mini Masseur
Model: WS901
HANDLEIDING
NL
OVERZICHT
VOORKANT
BINNENKANT
ONDERKANT
1. Houd de massagekop vast,
draai met de klok mee en
verwijder hem.
2.
Plaats
een
andere
massagekop
en
houd
de
inkepingen binnenin de kop
boven de uitstulpingen. Draai
tegen de klok in vast.
1
8
9
2
3
10
6
11
12
4
5
7
1. Handvat masseur
2. Klok
3. AM/PM
4.
geeft aan dat de batterij (CR2032) leeg
raakt
5. Basis
6. Batterijvak masseur (3 x AAA)
7. Massager hoofd
8.
: Klok instellen
9. “-” : Instellingswaarde verlagen
10. “+” : Instellingswaarde verhogen
11. Batterijvak basis (CR2032)
12. “RESET”: Het apparaat terugzetten
op standaardinstellingen
STARTEN
PLAATS BATTERIJEN (AAA BATTERIJEN) - MASSEUR
1. Verwijder de masseur uit de basis.
2. Houd het grijskleurige plastic gedeelte
stevig vast.
3. Houd met de andere hand het handvat
van de masseur vast. Draai tegen de klok
in en trek het geheel uit elkaar.
4. Plaats batterijen (3x AAA, niet
inbegrepen) volgens de polariteit.
5. Houd de inkepingen in het handvat bij
de uitstulpingen en druk naar beneden om
het veilig op zijn plaats te draaien.
BATTERIJEN PLAATSEN (CR2032 BATTERIJ) - BASIS
1. Draai het klepje van het batterijvak tegen de
klok in open.
2. Plaats de batterij (CR2032, inbegrepen)
volgens de polariteit (positieve kant omhoog).
3. Draai het klepje van het batterijvak met de
klok mee op zijn plaats.
Klok instellen
1.
2.
3.
4.
Druk op om de instellingsmodus te openen.
Druk op + of - om het uurformaat te kiezen (12 / 24). Druk op om te bevestigen.
Druk + of - om de tijd in te stellen. (Houd + / - ingedrukt om waarden sneller te wijzigen).
Druk op om te bevestigen.
MASSEUR
BELANGRIJK De Mini Masseur is geen medisch nauwkeurig apparaat, en is niet bedoeld om
professionele medische zorg te vervangen. Als u last hebt van RSI, neem dan contact op met
een arts/fysiotherapeut.
SPECIFICATIES
BASIS
MASSEUR
TYPE
BESCHRIJVING
BESCHRIJVING
HxBxD
76 x 76 x113 mm
(2,99 x 2,99 x 4,45 in)
70 x 91 x 91 mm
(2,76 x 3,58 x 3,58 in)
Gewicht
220 g (7,77 oz) zonder batterij
100 g (3,53 oz) zonder batterij
Voeding
3 x UM-4 (AAA) 1,5V
batterijen (niet inbegrepen)
1 x CR2032 (inbegrepen)
KENMERKEN
Stel het apparaat niet bloot aan extreme klappen, schokken, stof, temperatuur of vochtigheid.
Dek de ventilatiegaten niet af met kranten, gordijnen etc.
Dompel het product nooit onder in water. Als u water over het apparaat morst, droog het dan
onmiddellijk af met een zachte stofvrije doek.
Reinig het apparaat niet met krassende of bijtende materialen.
J<
Gebruik alleen nieuwe batterijen. Gebruik nooit oude en nieuwe batterijen door elkaar.
De in deze handleiding weergegeven plaatjes kunnen afwijken van de werkelijkheid.
Wanneer u dit product weg gooit, zorg dan dat het opgehaald wordt door de daarvoor
bestemde afvaldienst.
Dit product kan eventueel schade veroorzaken aan de laklaag van bepaalde houtsoorten.
\=><`<J><
meubel voor meer informatie.
De inhoud van deze handleiding mag niet worden vermenigvuldigd zonder toestemming van
de fabrikant.
Gooi lege batterijen niet bij het huisvuil. Dergelijk afval moet gescheiden verwerkt worden.
J"`"`
`"
batterijvak alvorens het apparaat te gebruiken.
NB
De technische specificaties van dit product en de inhoud van de handleiding zijn
zonder voorafgaande waarschuwing aan veranderingen onderhevig.
NB Functies en accessoires ze zijn niet in alle landen beschikbaar. Neem contact op
met uw plaatselijke verkooppunt voor meer informatie.
OVER OREGON SCIENTIFIC
Bezoek onze website (www.oregonscientific.com) om meer te weten over uw nieuwe product en
andere Oregon Scientific producten zoals digitale fototoestellen, gezondheids- en
fitnessuitrusting en weerstations. Op deze website vindt u tevens de informatie over onze
klantendienst, voor het geval u ons wenst te contacteren.
EU CONFORMITEITS VERKLARING
Hierbij verklaart Oregon Scientific dat WS901 in overeenstemming is met EMC richtlijn 2004/108/EC.
Een kopie van de getekende en gedateerde Conformiteits verklaring is op verzoek beschikbaar via
onze Oregon Scientific klanten service.
BYT MASSAGEHUVUD
Minimassage
SWL
1. Håll massagehuvudet, vrid det
medsols och ta ut det.
2. Sätt i ett annat massagehuvud
och skjut in det inuti massagehuvudet. Vrid motsols för att sätta
fast det.
Modell: WS901
ANVÄNDARMANUAL
ÖVERSIKT
FRAMSIDA
INSIDA
UNDERSIDA
1
SPECIFIKATIONER
8
9
2
3
6
1.
2.
3.
4.
5.
6.
7
Handgrepp
Klocka
FM/EM
indikerar låg batteristyrka (CR2032)
Base
Batterifack (3 x AAA)
7.
BASENHET
10
TYP
BESKRIVNING
BESKRIVNING
11
HxWxD
76 x 76 x 113mm
(2.99 x 2.99 x4.45 in)
70 x 91 x 91 mm
(2.76 x 3.58 x 3.58 in)
Vikt
220 g (7.77 oz) utan batteri
100 g (3.53 oz) utan batteri
Drift
3 x UM-4 (AAA) 1.5V
batterier (medföljer ej)
1 x CR2032 (medföljer)
12
4
5
MASSAGEENHET
Massagehuvud
8.
: Öppna klockinställningar
9. “+” : Öka inställningsvärden
10. “-” : Minska inställningsvärden
11. Batterifack (CR2032)
12. RESET Återställer enheten till
standardinställningar
KOM IGÅNG
SÄTT I BATTERIER (AAA BATTERIES) - MASSAGEENHETEN
1. Avlägsna massageenheten från basen.
2. Grip tag i den gråfärgade plastfliken
och håll den stadigt.
3. Använd andra handen för att hålla i
massageenhetens handgrepp. Vrid det
motsols och dra ut det.
4. Sätt i batterierna (3 X AAA, medföljer
ej), se till att polariteterna matchar. (
5. Skjut in det på insidan av greppskyddet
och tryck ner för att sätta fast det.
SÄTT I BATTERI (CR2032-BATTERI) - BASENHETEN
1. Vrid batterifackets skydd motsols för att lossa.
2. Sätt i batteriet (CR2032, medföljer), se till att
polariteterna matchar (positiv sida upp).
3. Sätt tillbaks batterifackets skydd och vrid
medsols för att stänga.
STÄLL IN KLOCKAN
<>@@
<>@`><><@>
<>@<>@@
<><@>
MASSAGEENHET
VIKTIGT Minimassagern är ingen medicinsk / precisionsenhet, och ska inte ersätta professionell medicinsk utrustning. Om du lider av muskulära skador, kontakta en kvalificerad läkare /
fysioterapeut.
Aktivera / inaktivera massageenheten
<><
=@><
FÖRSIKTIGHETSÅTGÄRDER
Utsätt inte apparaten för kraftigt våld, stötar, damm, extrema temepraturer eller fukt.
@<>@<@>
dukar, gardiner m.m. inte täcker för ventilationshålen.
Utsätt inte produkten för vatten. Om du spiller vätska över den, torka omedelbart med en
mjuk, luddfri trasa.
Rengör inte apparaten med frätande eller slipande material.
Mixtra inte med enhetens interna komponenter då detta kan påverka garantin.
Använd enbart nya batterier. Blanda inte nya och gamla batterier.
Av trycktekniska skäl, kan displaybilderna i denna manual skilja sig från dem i verkligheten.
Förbrukad produkt måste sorteras som specialavfall på avsedd miljöstation och får inte
slängas som vanligt restavfall.
Om denna produkt placeras på ytor med speciell finish såsom lackat trä etc. kan dessa ytor
<<<<>>>
att placera föremål på ytan. Oregon Scientific kan inte hållas ansvariga för skador på träytor
som uppkommit på grund av kontakt med denna produkt.
Innehållet I denna manual får ej kopieras utan tillverkarens medgivande.
Kassera inte gamla batterier som osorterade sopor. Insamling av kasserade batterier måste
ske separat.
@@<>
batteriutrymmet innan produkten används första gången.
NOTERING De tekniska specifikationerna för denna produkt och innehållet I
användarmanualen kan komma att ändras utan vidare upplysning.
NOTERING Egenskaper och tillbehör kan skilja mellan olika länder. För mer information,
kontakta ditt lokala inköpsställe.
OM OREGON SCIENTIFIC
Besök vår hemsida (www.oregonscientific.se) för att se mer av våra produkter såsom
<?`<<<@<@&^>
och konferenstelefoner. Hemsidan innehåller också information för våra kunder i de fall ni behöver
ta kontakt med oss eller behöver ladda ner information.
Vi hoppas du hittar all information du behöver på vår hemsida och om du vill komma i kontakt
med Oregon Scientific kundkontakt besöker du vår lokala hemsida www.oregonscientific.se eller
www.oregonscientific.com för att finna telefonnummer till respektive supportavdelning.
EU-FÖRSÄKRAN OM ÖVERENSSTÄMMELSE
Oregon Scientific intygar härmed att denna WS901 överensstämmer med EMC direktivet
< &J_\ \ \\?_ < @@\\=___
啟動/停止按摩器:
向下按壓按摩器即可啟動。
鬆開即可停止。
更換按摩頭
迷你按摩器
型號: WS901
使用說明書
繁體
概要
正視圖
內部
1. 握住按摩頭,以順時針方向旋
轉將其取下。
2. 插入另一按摩頭,將按摩頭內
部凸起的部分對準凹口。以逆時
針方向旋轉,將其固定到位。
底視圖
1
8
9
2
3
10
6
11
12
4
5
規格
項目
說明
說明
高x寬x厚
76 x 76 x 113毫米
70 x 91 x 91毫米
重量
220 克 (不含電池)
100 克 ( 不含電池)
電源
3 枚 UM-4 (AAA)
1.5V 電池(不隨附)
1 枚 CR2032 (隨附)
7
1.
2.
3.
4.
5.
6.
按摩器手把
時鐘
AM/PM
電池(CR2032)電量低顯示
底座
按摩器電池格 (3 枚 AAA)
7. 按摩頭
8.
: 進入時鐘設定
9. “-” : 減少設定值
10. “+” : 增加設定值
11. 底座電池格 (CR2032)
=重置
開始使用
裝入電池(AAA電池) - 按摩器
1. 將按摩器從底座取下。
2. 握緊住灰色塑膠邊。
3. 用另一隻手握住按摩器手把。以逆時針方向旋
轉,將其拔出。
4. 按極性方向裝入電池(3 枚 AAA,不隨附)
5. 將凹口對準手把蓋內部凸起的部分、向下推壓
,將其固定到位。
底座
按摩器
ࣹრࠃႈ
ᓮ֎ኙขෳԺਜᚘΕᐳᚰΕࢨ࣋ڇ㻭Օࢨመ࣍ᛘ৫ऱֱچΖ
լڇขՂ࣋ᆜࢨ֭ᐶૹढΖ
ᓮ֎ലข௦ֽΖૉլშऀֽΔشࠌܛمਫຌΕլܶऱؒലհᚴ
Ζ
լեឫขऱփຝሿٙΖڼᜰലࠌঅᢞ؈யΖૉᏁፂଥ/অ塄ࣚ
೭Δᓮᜤ൞ࢬچڇऱᄐ೭ז।Ζ
ءਐতࢬقቹቝՈፖኔढլٵΖ
ඵᆜءขழΔᒔᎁբଡܑലհگڃΔۖࠀॺီհԫ୮அᐒඵ
ढΖ
آᆖ፹ທऱױΔլױᓤ፹֫םխऱٚ۶փ୲Ζ
ု ݺଚءޏޓᦞڶขऱݾࡉشࠌءਐতհփ୲ΔۖྤᏁ۩
ຏवΖ
!!!!!
অ塄
裝入電池 (CR2032 電池) - 底座
1. 以逆時針方向旋轉電池格蓋,將其取下。
2.. 按極性方向(正極朝上)裝入電池(CR2032
,隨附)。
3. 裝回電池格蓋,並以順時針方向旋轉,將其
固定到位。
ࠌشਫຌऱؒᚴᇘᆜΔڂመ৫ऱᛘױ౨ᖄીขჾᡏΖլ
ࠌشᗣჾࢨፍ፱ࢤऱढᔆΖ
լലขऴ൷ᡜڇၺ٠ࢨᣊۿཋᑷᕴ࿇ᑷขՀΖ
ᣂ࣍ \\=___
設定時鐘
1.
2.
3.
4.
按
進入設定模式。
按 “+” 或 “ -” ,選擇時間格式 (12 / 24)。 按
確認。
按 “+” 或 “ -”,改變時間顯示。 (按住以快速改變時間)。
按
確認。
按摩器
重要 迷你按摩器並非醫療 / 精密設備,不能代替專業醫療護理。 如果您感到肌肉骨骼不適,請
諮詢專業的醫師 / 理療師。
ោᥦݺଚऱጻీ (www.oregonscientific.com) ΔԱᇞ ڍޓOregon
Scientific ऱขᇡൣΖ
ૉ൞۰ڇભഏࠀݦඨऴ൷ᜤݺଚऱড়֪ࣚ೭ຝΔᓮោᥦጻీΝ
www2.oregonscientific.com/service/support.asp
ഏᎾᇬᓮោᥦΝ
www2.oregonscientific.com/about/international.asp
㤻˂شೖشਊᐰᕴΚ
Θʳʳʳʳ㢑ਊᐰᕴਜٻףՀऱ㣉Ժױܛ㤻شΖ
Θʳʳʳʳ࣋࣪ܛೖشΖ
ޓ䮨ਊᐰ㢎
ಮ܃ਊᐰᕴ
ী㢆Κʳ˪˦ˌ˃˄
ࠌش円ࣔ䢰
亞
ᄗ
˄ˁʳ ༽۰ਊᐰ㢎Δ咋㦍匎ඝ剖㰒ࠡ
࠷ՀΖ
˅ˁʳ ༺Եԫਊᐰ㢎Δ㰒ਊᐰ㢎㡕
ຝऱסದ㢑ןՑΖಭ㦍匎ඝ剖
Δ㰒ࠡࡐࡳࠩۯΖʳ
ʳʳʳʳʳʳإ儆䨞ʳʳʳʳʳʳʳʳʳʳʳʳʳʳʳʳʳʳʳʳʳʳʳʳʳʳʳʳʳʳʳʳʳʳʳʳʳʳʳʳʳʳʳʳʳʳʳʳʳʳʳʳ㡕ຝʳʳʳʳʳʳʳʳʳʳʳʳʳʳʳʳʳʳʳʳʳʳʳʳʳʳʳʳʳʳʳʳʳʳʳʳʳʳʳʳࢍ儆䨞ʳʳʳʳʳʳʳʳʳʳʳʳʳʳ
˄
ˋ
ˌ
˅
ˆ
˄˃
ˉ
˄˄
˄˅
ˇ
ˈ
˄ˁʳʳʳਊᐰᕴ֫ނ
˅ˁʳʳʳ㦍匥
ˆˁʳʳʳ˔ˠ˂ˣˠ
ˇˁʳʳʳʳʳʳʳ।ق䶣ۃʻ˖˥˅˃ˆ˅ʼ䶣ၦ܅
ˈˁʳʳʳࢍஆ
ˉˁʳʳʳਊᐰᕴ䶣ۃ䣔ʳʻˆʳ倓ʳ˔˔˔ʼ
ˊ
ˊˁʳʳʳʳਊᐰ㢎ʳʳʳʳʳ
ˋˁʳʳʳʳʳʳʳʳʳʳˍʳʳ劓Ե㦍匥児ࡳ
ˌˁʳʳʳʳϘˀϙʳˍʳ㴈֟児ࡳଖ
˄˃ˁʳʳϘʾϙʳˍʳᏺף児ࡳଖϘ
˄˄ˁʳʳࢍஆ䶣ۃ䣔ʳʻ˖˥˅˃ˆ˅ʼʳ
˄˅ˁʳʳϘ˥˘˦˘˧ϙˍʳૹᆜΚʳ㰒䣈ᵵ䢠נᩈ児ࡳ
億
咊ؾ
円ࣔ
ʳ̋ʳ䪩ʳ̋ʳদ
ˊˉʳ̋ʳˊˉʳ̋ʳ˄˄ˆʳශۏ
ʻ˅ˁˌˌʳ̋ʳ˅ˁˌˌʳ̋ʳˇˁˇˈʳ՚ʼ
円ࣔ
ʳ
ˊ˃ʳ̋ʳˌ˄ʳ̋ʳˌ˄ශۏ
ʻ˅ˁˊˉʳ̋ʳˆˁˈˋʳ̋ʳˆˁˈˋʳ՚ʼ
ૹၦ
˅˅˃܌ʳʳʻˊʿˊˊʳఝʼʳլܶ䶣ۃ
˄˃˃ʳ܌ʳʻˆˁˈˆʳఝʼʳլܶ䶣ۃ
䶣ᄭ
ˆʳ倓ʳ˨ˠˀˇʳʻ˔˔˔ʼʳ
˄ˁˈ˩ʳ䶣ۃΰլ䃘ॵα
˄ʳ咨ʳ˖˥˅˃ˆ˅ʳʻ䃘ॵʼ
ʳʳ
ࣹრࠃ咊
Θʳ冉֎㢑䣈㧄։شԺΕ㢿䥄Εࢨ࣋ڍڇ㣟ࢨ㻭৫Ε䳶৫㧄ऱ䨩ࢬΖ
Θʳլڇ䣈Ղ࣋ᆜૹढΖʳ
Θʳᓮ֎ലข௦ԵֽխΖૉլშऀֽΔᚨشܛمլದֻऱຌؒᚴΖʳ
Θʳլޏ㣅䣈ऱ㡕ຝሿٙΖܡ䥉㢸䪰ીঅଥ؈யΖڕᏁ位ଥʳ˂ʳࣚ䥜Δ冉
ᩓ൞㣞چऱ历ഇז।侶ߓΖ
Θʳء円ࣔ䢰ࢬق䨞ቝױ౨ᩓ㨕ढլٵΖΖʳ
Θʳ㥯ᆜء䣈㦍Δ䬗┛অࠡ㧧㭦܂אگڃ㤤㢊Δۖ܂ॺڢ䢠ཏຏऱ୮
அ䬙㥯ढΖ
Θʳآ伨ࠫທ兊ױΔլᵵࠫء円ࣔ䢰խऱٚ۶㡕୲Ζ
䬞ࡨࠌش
僞Ե䶣ۃΰ˔˔˔䶣ۃαʳˀʳਊᐰᕴ
˄ˁʳʳʳ㰒ਊᐰᕴ㡘ࢍஆ࠷ՀΖ
˅ˁʳʳʳތ۰ۥۊႿற㤈佱Δ㰒ࠡ༽仟Ζʳ
ˆˁʳʳʳشԫ༽֫۰ਊᐰᕴ֫ނΖʳಭ㦍匎ඝ
剖Δ㰒ࠡࢸנΖ
ˇˁʳʳʳਊᲞࢤֱٻ僞Ե䶣ۃʻˆʳ倓ʳ˔˔˔Δլ䃘ॵʼʳ
ˈˁʳʳʳ㰒ןՑ㢑֫ނ㶿㡕ຝऱסದΕٻՀං㣉
Δ㰒ࠡࡐࡳࠩۯΖʳ
ࢍஆ
ਊᐰᕴ
ʳ
ʳုʳʳʳء䣈ऱݾ㢜億شࠌء֗א円ࣔ䢰ऱ㡕୲ڶڕ䦣ޓΔஏլ۩ຏवΖ
ʳʳʳʳʳ
অ䤧
僞Ե䶣ۃʳʻ˖˥˅˃ˆ˅ʳ䶣ۃʼʳˀʳࢍஆ
˄ˁʳʳಭ㦍匎ඝ剖䶣ۃ䣔㶿Δ㰒ࠡ࠷ՀΖ
˅ˁʳʳਊᲞࢤֱٻΰإᲞ䣱ཛՂα僞Ե䶣ۃʻ˖˥˅˃ˆ˅Δ
䃘ॵʼΖ
ˆˁʳʳ僞ڃ䶣ۃ䣔㶿ڢ咋㦍匎ඝ剖Δ㰒ࠡࡐࡳΖ
ࠌشਫ剙ऱեؒᚴ僞ᆜΔڂ䢠㧄৫ऱ䳶ᩥױ౨䪰ી䣈䮦݅Ζլ
ࠌشᗣ䮦ࢨፍ傚ࢤऱढ凝Ζ
լ㰒䣈ऴ൷ᡜڇ㧌٠ࢨ㮕ۿཋ䴴ᕴ䦡䴴䣈ՀΖ
䤤Պ OREGON SCIENTIFIC
児ࡳ㦍匥
˄ˁʳʳʳʳਊʳʳʳʳʳʳ劓Ե児ࡳᑓڤΖ
˅ˁʳʳʳʳਊʳʾʳࢨʳˀʳΔ㳪䮕㦍吗ڤʳʻ˄˅ʳ˂ʳ˅ˇʼΖʳʳਊʳʳʳʳʳ┛儶Ζ
ˆˁʳʳʳʳਊʳʾʳࢨʳˀʳΔޏ䦣䯲ق㦍吗Ζʳʻਊ۰ʳʾʳ˂ʳΩʳΔݶຒޏ䦣㦍吗ʼΖ
ˇˁʳʳʳʳਊʳʳʳʳʳʳʳ┛儶Ζ
ਊᐰᕴ
ૹʳʳ
ʳʳʳʳʳʳʳʳʳʳʳʳʳಮ܃ਊᐰᕴॺڢ㤩䶸ʳ˂ʳ壄യ児䩥Δլ౨זཙ䢑䢓㤩䶸䮍Ζʳ࣠ڕ൞ტࠩۜۚᙽլ⃰
Δ冉প兴䢑䢓ऱ㤩㣣ʳ˂ʳ䶸㣣Ζ
冉兑向ݺ䣙ऱీ(www.oregonscientific.com) ΔԱᇞڶڍޓ䤤
Oregon Scientific 䣈ऱ典ൣΖ
൞۰ڇભ㧺ݦڢඨऴ൷ᩓݺ䣙ऱড়㡬ࣚ䥜ຝ侶ߓΔ冉兑向Ν
www2.oregonscientific.com/service/support.asp
㧺呄兴冉兑向Ν
www2.oregonscientific.com/about/international.asp