1
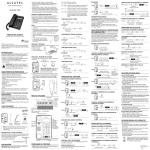
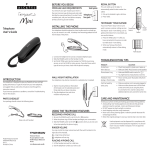
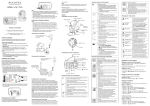
INSTALLING AND REPLACING THE BATTERIES
Your Caller ID phone uses 3 AA-size alkaline batteries for
receiving and storing Caller ID records and for storing the
numbers you use for memory dialing, pulse dialing, and redial.
IMPORTANT: You will have approximately 60 seconds to
replace the batteries before the memories stored are lost.
Please read the instructions before replacing the batteries
and have the batteries ready to be inserted beforehand.
IMPORTANT: If you are not going to use the telephone for
more than 30 days, remove the batteries because they
may leak and damage the unit.
1. If the telephone line cord is connected, disconnect it from the
base unit.
2. Use a ballpoint pen or other tool to open the battery
compartment door.
3. Insert 3 AA-size alkaline batteries (not included) as shown on
the diagram inside the compartment.
4. Replace the battery compartment door.
5. Re-attach the line cords to the unit and check your memory
locations. If installation takes longer than 60 seconds, you
should re-set your memory locations.
INSTALLING THE PHONE
Your phone should be placed on a level surface, such as a desk
or table top.
CONNECTING THE HANDSET
1. Connect one end of the coiled handset cord to the jack on the
handset.
2. Plug the other end of the coiled handset cord to the jack on
the base.
3. Place the handset in the cradle.
Telephone
User’s Guide
CONNECTING THE TELEPHONE LINE
INTRODUCTION
This product, Retro phone with Dual Mode Caller ID, can
provide a features to store and display the FSK /DTMF type
Caller ID information that provided by your local telephone
company.
Your Caller ID phone enables you to:
• Identify callers before you answer the phone.
• View the time and date of each incoming call.
• Record up to 80 Caller ID messages sequentially.
In order to use the Caller ID function on this unit, you
must subscribe the Caller ID services from your telephone
company.
To get the most from your new phone, you are suggested to
take a few minutes right now to read through this user guide.
1. Connect one end of the straight telephone line cord to the
jack on the back of the base.
2. Connect the other end to a wall phone
jack.
NOTE: The unit is properly installed
if you pick up the handset and hear
the dial tone. Otherwise, recheck all
installation steps.
BEFORE YOU BEGIN
Wall plate
To use this phone, you need an RJ11C
type modular telephone jack, which
might look like the one pictured here,
Modular
installed in your home. If you don’t have telephone
a modular jack, call your local phone
line jack
company to find out how to get one
installed.
IMPORTANT INSTALLATION
INFORMATION
CAUTION: Disconnect the phone cord from the wall
outlet before installing or replacing the batteries.
• Never install telephone wiring during a lightning storm.
• Never touch uninsulated telephone wires or terminals,
unless the telephone line has been disconnected at the
network interface.
• Use caution when installing or modifying telephone lines.
• Never install telephone jacks in wet locations unless the
jack is specifically designed for wet locations.
• Temporarily disconnect any equipment connected to the
phone, such as faxes, other phones, or modems.
Summary Screen
FLASH button
REDIAL button
ATLINKS
22 quai Gallieni
92150 Suresnes
France
www.atlinks.com
Alcatel logo and Alcatel name are trademarks of Alcatel and used under license
by Atlinks.
SETTING THE LCD CONTRAST
This adjustment allows you to adjust the contrast and viewing
angle of the display.
1. To enter the setup menu, press the MENU button. SET 1 DATE
appears.
2. Press the
or
arrow button until SET 3 LCD appears.
3. Press the MENU button to show the current contrast setting.
There are 5 levels of contrast, with the default set to 2.
4. To decrease the contrast, press the
arrow button. To
increase, press the
arrow button.
5. Press MENU again to store the contrast setting.
ACTIVATE OR DEACTIVATE CALL LOCK '0'
1. To enter the setup menu, press the MENU button. SET 1 DATE
appears.
2. Press the
or
arrow button until SET 4 Loc appears.
3. Press MENU button to activate or deactivate the call lock
‘0’ function. If the call lock ‘0’ function is deactivate, it will
activate the call lock ‘0’ function. If the call lock ‘0’ function
is activated, it will prompt the user to enter the password to
deactivate call lock. If the password has not been entered
before, it dafaults 0000.
You can abort the current operating and exit by going off-hook,
or by pressing 'FLASH' button.
OPERATION
Caller ID FEATURES
STORE button
DELETE button
REVIEW button
Bottery-low
Message Waiting
Day
Month
In-use lcon
Hour Minute
Lock 0 icon
Incoming call
Outgoing call
Call-log Number
New incoming call
7-seg digits
When applying power for the first time, the summary screen
appears.
NOTE: Proceed immediately to change any of the following
factory preset settings as required.
1. To enter the setup menu, press the MENU button. SET 1 DATE
appears.
2. At this point you can press either arrow button to scroll
through 5 menu screens:
SET 1 DATE
SET 2 CODE (default is ----)
SET 3 LCD (default is 2)
SET 4 LOC
SET 5 PIN
• You have 20 seconds following any key press before the unit
will automatically return to the summary screen.
NOTE: You can exit the setup menu by pressing the FLASH
button.
SETTING DATE/TIME
Model Temporis Retro - EX
00030524 (Rev.1 E/S)
10-20
Made in China
The Caller ID unit uses the programmed area code to determine
the number format to display when a valid Caller ID signal is
received.
1. To enter the setup menu, press the MENU button. SET 1 DATE
appears.
2. Press the
or
arrow button until SET 2 CODE appears.
3. Press the MENU button to show the current local area code.
The default is----. The first digit flashes, indicating it is ready to
accept the area code entry.
4. Press the numeric button to enter the code, up to 4 digits max.
5. If necessary, press the DELETE button to erase the all digits.
6. Press the MENU button to store the new Area Code.
EXITING THE SETUP MENU
Make sure your package includes the following items:
• a base and handset.
• a telephone cord.
• a spiral cord.
TELEPHONE JACK REQUIREMENTS
SETTING THE LOCAL AREA CODE
1. To enter the setup menu, press the MENU button. SET 1 DATE
appears.
2. Press the
or
arrow button until SET 5 PIN appears.
3. Press MENU button to change the password of call lock '0'.
4. It prompt the user to enter the old password in first.
5. Afterwards, it will prompt the user to enter the new one and
then re-enter again for confirmation.
SETUP MENU
MENU button
PAUSE button
DIAL button
PARTS CHECKLIST
NOTE: If the FSK Caller ID is received, the Date / Time will
be automatically updated.
CHANGE PASSWORD FOR CALL LOCK '0'
FUNCTION
SHORT GLOSSARY OF TERMINOLOGY USED
IN THIS MANUAL
Hook switch. The part of the phone that pops up to activate
the phone line when the handset is lifted from the base.
Off-hook. A term used to describe the phone in its active
mode when the handset is off of the base cradle.
On-hook. A term used to describe the phone in an inactive
mode.
6. Press MENU button again to store the value.
This adjustment the Caller ID date/time.
1. To enter the setup menu, press the MENU button. SET 1 DATE
appears.
2. Press the MENU button to show the current year.
3. Press the
or
arrow button to change the current year
value.
4. When the desired number is flashing, press the MENU button
to the month setting.
5. Repeat steps 3 and 4 to set day, hour and minute.
Caller ID (CID) is a service available from your local telephone
company. For Caller ID to work on the system, you must
subscribe to Caller ID service. This unit can receive the FSK and
DTMF caller ID without any setting.
This information may include the phone number, date and time;
The unit stores up to 80 calls for later review.
RECEIVING AND STORiNG CALLS
When you receive a call, the information is transmitted by the
phone company to your caller ID telephone.
When the memory is full, a new call automatically replaces
the oldest call in memory. NEW appears in the display for calls
received the have not been reviewed.
If a FSK Caller ID is received, it will automatically update the date
/time on this unit . If the DTMF Caller ID is received, the record
date/time will copy from the unit Date/Time. However, it must be
set before.
Area Code Management
The received CID will be compared with the area code set. If both
are matched, those digits will be deleted then store into the CID
log.
VERY IMPORTANT: The Caller ID feature of this product
requires a subscription to Caller ID service from your
telephone company.
REVIEWING CALL RECORDS
• When the NEW indicator is ON, you have received new
incoming calls. Press the
or
arrow button to review
the stored calls. After the new call records are reviewed, the
indicator turns Off.
• When you reach the end of the call records, the display shows
---END--• You can exit the caller ID review by pressing the 'FLASH'
button.
TRANSFERRING CID RECORD TO MEMORY
You may transfer a Caller ID record to your phone’s memory.
1. Press the STORE button, the LCD displays the “STOrE IN”
2. You can press the
or
arrow button to select the CID
record.
3. Press the STORE button again, the LCD displays the “ STOrE
IN”.
4. At this moment, press the numeric button [0 ... 9] to select the
memory location.
5. If the memory has content, it will be replaced by the new
entry.
DELETING CALL RECORDS
TO DELETE AN INDIVIDUAL CALL
When reviewing calls, you may delete an individual call by
pressing the DELETE button twice. The contents of the display will
be erased and the remaining Caller ID records are renumbered.
TO DELETE ALL CALLS
1. When reviewing calls, you may delete all calls by pressing and
holding the DELETE button for more than 3 seconds. DEL ALL?
appears in the display.
2. Press DELETE button again to confirm.
DIALING A CALLER ID NUMBER
Dialing from On-hook:
1. Press the
or
arrow button to select the CID record.
2. Pick up the handset, the number will be automatically dialed
out.
Dialing in Off-hook:
1. Pick up the handset to make the phone in off-hook first.
2. Use the
or
arrow button to select he CID record.
3. Press the DIAL button to dial out the displayed number.
CALLER ID MESSAGE
The following indicators show the status of a message.
--P-- The person is calling from a number that has been blocked
from transmission.
--O-- The person is calling from a number that is out of area
from transmission.
--E-- Caller information has been interrupted during
transmission or the phone line is excessively noisy.
TELEPHONE BASICS
RECEIVING A PHONE CALL
1. Lift the handset to answer the call.
2. Replace the handset in the cradle to hang up.
MAKING A PHONE CALL
1. Lift the handset. Wait for a dial tone.
2. Dial the telephone number you want to call.
3. Replace the handset in the cradle to hang up.
VOLUME
You may adjust the receiver volume from a switch that located at
the rear side of the unit.
REDIAL (OUT GOING CALLLOG)
2. Press [ 1 ]....[ 0 ] to select memory location.
3. Go-Off-hook to dial out the numbers.
In Off-hook mode:
1. Press DIAL button.
2. Press [ 1 ]....[ 0 ] to select memory location and directly dial
out the numbers.
CHAIN DIALING FROM MEMORY
Use this feature to make calls which require a sequence of
numbers such as using a calling card for frequently called
long distance number. Basically, you dial each part of the
sequence from memory. The following example shows how
you can use chain dialing to make a call through a long
distance service:
The Number For
Memory Location
Long distance access number
Authorization code
Frequently called long distance number
1. Make sure the phone is ON.
2. Press DLAL and then press 7.
3. When you hear the access tone, press DIAL and then
press 8.
4. At the next access tone, press DIAL and then 9.
TIP: Wait for the access tones before pressing the next
memory button, or your call might not go through.
INSERTING A PAUSE IN THE DIALING
SEQUENCE
Press the PAUSE button to insert a delay in the dialing
sequence of a stored telephone number when a pause is
needed to wait for a dial tone (for example after you dial 9
for an outside line, or to wait for a computer access tone).
PAUSE shows in the display as a “p”, and counts as 1 digit in
the dialing sequence. If you need a longar Pause, press the
PAUSE button twice.
VISUAL MESSAGE WAITING INDICATOR
The VMWI will blank if there have a message in the
centralized voice mail system. You need to contact your
services provider for more details.
TROUBLESHOOTING TIPS
No Dial Tone
• Check all cabling to make sure that all connections are
secure and not damaged.
• Check hook switch: Does it fully extend when handset is
lifted from cradle?
In On-hook mode:
You can press "REDIAL" key and then the
or
button to
review the outgoing call up to last 5 times redial number.
Lift the handset to dial out the outgoing call.
In Off-hook mode:
You can press the REDIAL button to redial out the last number.
If you press the REDIAL button after digits have been dialed out,
it will break the line for a second then redial out the last number
dialed.
No Display
• Replace the batteries.
• Check for proper battery installation.
DELETE REDIAL RECORD
Phone Dials in Pulse with Tone Service
• Make sure T/P DIAL MODE is set to TONE DIAL.
During the redial record review in On-hook, press the DELETE
button to delete the displayed record. If press and hold the
DELETE button for 3 sec, all the redial record will be deleted.
Phone Won't Dial Out with Pulse Service
• Make sure T/P DIAL MODE is set to PULSE DIAL.
TEMPORARY TONE DIALING
If you have pulse (rotary) service and want to access customer
calling services (such as telebanking and long distance services)
that require tone dialing, you can use this feature to temporarily
change from pulse to tone service.
After dialing the telephone number and connecting to the
customer calling service,
1. Press and release the TONE (*) button.
2. When you hang up, the telephone automatically returns to
pulse dialing mode.
PRE-DIALING
1. With the handset on the cradle, enter the telephone number
wish to call (max 32 digit). The telephone number shows in the
display.
2. Lift the handset, the number will be automatically dialed out.
NOTE: Use the DELETE button to delete an incorrectly
entered number.
MEMORY
Store up to ten 16-digit numbers in memory for quick dialing.
STORING A NUMBER IN MEMORY
1. Press the STORE button, the LCD displays the “STOrE IN”.
2. You can enter the telephone number up to 16 digits,
3. If wrong entry, press the DELETE button to erase the last
entered digit.
4. Press the STORE button again, the LCD display the “STOrE IN”.
5. Now, press the numeric button [0 ... 9] to select the memory
location.
6. If the memory has a content, it will be replacea by the mew
entry.
MEMORY DIALING
In On-hook mode:
1. Press DIAL button.
7
8
9
No Information is Shown After the Phone Rings
• Are you subscribed to Caller ID service from your local
telephone company?
• Be sure to wait until the second ring before answering.
Phone Does Not Ring
• You may have too many extension phones on your line.
Try unplugging some extension phones.
• Check for dial tone. See Troubleshooting Tips for No Dial
Tone.
Incoming and Outgoing Voice Volume Low
• Are other phones off hook at same time? If so, this is
normal condition as volume drops when additional
phones are used at once.
• Check the handset receiver volume.
GENERAL PRODUCT CARE
To keep your phone working and looking good, follow these
guidelines:
• Avoid putting it near heating appliances and devices
that generate electrical noise (for example, motors or
fluorescent lamps).
• DO NOT expose to direct sunlight or moisture.
• Avoid dropping and other rough treatment to the unit.
• Clean with a soft cloth.
• Never use a strong cleaning agent or abrasive powder
because this will damage the finish.
• Retain the original packaging in case you need to ship it at
a later date.
Used equipment must be disposed of in
compliance with current environmental protection
regulations. You should return it to your reseller or
dispose of it in an approved recycling centre.
INSTALAR Y REEMPLAZAR LAS PILAS
CONFIGURAR EL CÓDIGO DE ÁERA LOCAL
Su teléfono con Identificador de llamadas utiliza 3 pilas
alcalinas AA para recibir y almacenar registros del Identificador
de llamadas y para almacenar los números que utiliza en
el marcado desde la memoria, el marcado por pulsos y la
rellamada.
La unidad del Identificador de llamadas utiliza el código de área
local programado para determinar el formato de número que se
mostrará cuando se reciba una señal válida del Identificador de
llamadas.
1. Pulse el botón MENU para ingresar en el menú Se mostrará
“CONFIG 1 FECHA” en el visor.
2. Pulse el botón
o
hasta que se muestre “CONFIG 2 CÓD”.
3. Pulse el botón MENU para mostrar el código de área local
actual. El código predeterminado es ----. El primer dígito
parpadeará indicando que puede ingresar el código de área.
4. Pulse los botones numéricos para ingresar el código de 4
dígitos como máximo.
5. Si fuera necesario, pulse el botón DELETE para borrar todos
los dígitos.
6. Pulse el botón MENU nuevamente para guardar el nuevo
código de área.
IMPORTANTE: Tendrá aproximadamente 60 segundos
para reemplazar las pilas antes de que se pierdan todas
las memorias almacenadas. Por favor, lea las instrucciones
antes de reemplazar las pilas y tenga las pilas que va a
colocar listas con anterioridad.
IMPORTANTE: Si no utilizará el teléfono por más de 30 días,
retire las pilas ya que podrían tener pérdidas y dañar la
unidad.
1. Si el cable de línea telefónica está conectado, desconéctelo
de la unidad base.
2. Utilice un bolígrafo de punta redonda u otro instrumento
similar para abrir la tapa del compartimiento de las pilas.
3. Inserte 3 pilas alcalinas AA (no incluidas) según se muestra en
el diagrama dentro del compartimiento.
4. Vuelva a colocar la tapa de las pilas.
5. Vuelva a conectar los cables de línea en la unidad y verifique
sus registros de la memoria. Si la instalación le tomó más de
60 segundos, deberá reconfigurar los registros de la memoria.
INSTALAR EL TELÉFONO
Deberá colocar el teléfono sobre una superficie nivelada, como
un escritorio o una mesada.
CONECTAR EL MICROTELÉFONO
1. Conecte un extremo del cable enroscado en el toma del
microteléfono.
2. Enchufe el otro extremo del cable enroscado en el toma de la
base.
3. Coloque el microteléfono en la base.
Teléfono
Guía de usuario
CONECTAR LA LINEA TELEFÓNICA
INTRODUCCIÓN
Este producto, el teléfono retro con Identificador de llamadas
modo dual, puede proveerle funciones para almacenar y
mostrar la información del Identificador de llamadas tipo
FSK/DTMF provista por su empresa de teléfonos local.
Su teléfono con Identificador de llamadas le permite:
• Identificar a la persona que llama antes de contestar el
teléfono.
• Ver la hora y la fecha de cada llamada entrante.
• Grabar hasta 80 mensajes del Identificador de llamadas
en forma secuencial.
Para utilizar las funciones de Identificador de llamadas,
deberá suscribirse a los servicios de Identificación de
llamadas provistos por su empresa de teléfonos loca.
Para obtener lo máximo de su teléfono, le sugerimos que se
tome unos minutes para leer esta guía de usuario.
BREVE GLOSARIO DE LA TERMINOLOGIA
UTILIZADA EN ESTE MANUAL
Interruptor para colgar. La parte del teléfono que se levanta
para activar la línea telefónica cuando toma el microteléfono
de la base.
Descolgado. Un término utilizado para describir al teléfono
en su modo activo cuando el microteléfono se encuentra
fuera de la base.
Colgado. Un término utilizado para describir al teléfono en su
modo inactivo
ANTES DE COMENZAR
LISTA DE PARTES
Asegúrese que su embalaje contenga las siguientes partes:
1. Base y microteléfono
2. Cable de teléfonos
3. Cable espiralado
REQUISITOS DE TOMA DE TELÉFONOS
Para utilizar este teléfono, necesitará
tener instalado en su hogar un toma
de teléfonos modular tipo RJ11C, que
puede verse similar al de la figura. Si no
posee un toma de teléfonos modular,
comuníquese con su empresa de
teléfonos local para averiguar cómo
instalar uno.
NOTA: El teléfono está correctamente
conectado si toma el microteléfono y
oye el tono de marcado. Si no es así,
verifique los pasos de instalación.
Botón
FLASH
Toma
de línea
telfónica
modular
PRECAUCIÓN: Desconecte el cable del teléfono de la
salida de la pared antes de instalar o reemplazar las
pilas.
• No instale el cableado telefónico durante una tormenta
eléctrica.
• No toque los cables y terminales no aislados a menos que
la línea telefónica esté desconectada de la interfaz de red.
• Tenga cuidado al instalar o modificar las líneas
telefónicas.
• No instale los tomas de teléfono en lugares húmedos a
menos que el toma esté diseñado para lugares húmedos.
• Desconecte temporariamente cualquier equipo
conectado con el teléfono, tal como un fax, otros
teléfonos o un módem.
ATLINKS
22 quai Gallieni
92150 Suresnes
France
www.atlinks.com
El logotipo y el nombre de Alcatel son marcas registradas de Alcatel utilizadas bajo
licencia por Atlinks.
ACTIVAR O DESACTIVAR EL BLOQUEO DE LLAMADAS ‘0’
1. Pulse el botón MENU para ingresar en el menú Se mostrará
“CONFIG 1 FECHA” en el visor.
2. Pulse el botón
o
hasta que se muestre “CONFIG 4
BLOQ”.
3. Pulse el botón MENU para activar o desactivar la función de
bloqueo de llamadas “0”. Si esta función está desactivada,
la activará. Si esta función está activada, el usuario deberá
ingresar la contraseña para desactivar el bloqueo de
llamadas. Si no ha ingresado la contraseña con anterioridad,
la contraseña predeterminada es 0000.
1. Pulse el botón MENU para ingresar en el menú Se mostrará
“CONFIG 1 FECHA” en el visor.
2. Pulse el botón
o
hasta que se muestre “CONFIG 5 PIN”.
3. Pulse el botón MENU para cambiar la contraseña del bloqueo
de llamadas “0”.
4. El usuario deberá ingresar primero la contraseña anterior.
5. Luego, deberá ingresar la contraseña nueva y deberá
reingresarla para confirmar.
Pantalla de
resumen
Botón
REDIAL
Botón
MENU
Este ajuste le permite configura el contraste y el ángulo de visión
del visor.
1. Pulse el botón MENU para ingresar en el menú Se mostrará
“CONFIG 1 FECHA” en el visor.
2. Pulse el botón
o
hasta que se muestre “CONFIG 3 LCD”.
3. Pulse el botón MENU para mostrar la configuración
actual de contraste. Hay 5 niveles de contraste y el nivel
predeterminado es 2.
4. para disminuir el contraste, pulse el botón
. Para
incrementar el contraste, pulse el botón
.
5. Pulse el botón MENU nuevamente para guardar la
configuración de contraste.
CAMBIAR LA CONTRASEÑA PARA LA FUNCIÓN DE
BLOQUEO DE LLAMADAS “0”
MENÚ DE CONFIGURACIÓN
SALIR DEL MENÚ DE CONFIGURACIÓN
Puede salir de la función actual descolgando el teléfono o
pulsando el botón FLASH.
OPERACIÓN
CARACTERISTICAS DEL IDENTIFICADOR DE LLAMADAS
Botón STORE
Botón DELETE
Botón PAUSE
Botón DIAL Botones REVIEW
Batería baja
Icono bloqueo 0
Mensaje en espera
Llamada entrante
Icono de En Uso
Día
Llamada saliente
Hora Minuto
Mes
Número de registros
de llamadas
Nueva llamada
entrante
7 dígitos
Placa para pared
IMPORTANTE INFORMACIÓN ACERCA DE
LA INSTALACIÓN
Modelo Temporis Retro - EX
00030524 (Rev.1 E/S)
10-20
Impreso en China
1. Conecte un extremo del cable recto de línea telefónica en el
toma que se encuentra en la parte
posterior de la base.
2. Enchufe el otro extremo del cable en
el toma de teléfonos de la pared.
CONFIGURAR EL CONTRASTE DEL VISOR
Cuando enchufa la unidad por primera vez, se mostrará la
pantalla de resumen.
NOTA: Proceda inmediatamente a cambiar cualquiera de
las siguientes configuraciones preestablecidas de fábrica
según sea necesario.
1. Para ingresar al menú de configuración, pulse el botón MENU
y se mostrará. SET 1 DATE en el visor.
2. En este momento, puede pulsar cualquier botón de flecha
para desplazarse a través de las 5 pantallas de menú.
CONFIG 1 FECHA CONFIG 4 BLOQ
CONFIG 2 CÓD (predeterminado: ----)
CONFIG 5 PIN
CONFIG 3 LCD (predeterminado: 2)
• Tiene 20 segundos después de pulsar cualquier botón antes
de que la unidad regrese automáticamente a la pantalla de
resumen.
NOTA: Puede salir del menú de configuración pulsando el
botón FLASH.
CONFIGURAR FECHA / HORA
Esta opción ajusta la fecha / hora del Identificador de llamadas.
1. Pulse el botón MENU para ingresar en el menú Se mostrará
“CONFIG 1 FECHA” en el visor.
2. Pulse el botón MENU para mostrar el año actual. .
3. Pulse el botón
o
para cambiar el año actual. .
4. Cuando parpadee el número deseado, pulse el botón MENU
para configurar el mes.
5. Repita los pasos 3 y 4 para configurar el día, la hora y los
minutos.
6. Pulse el botón MENU nuevamente para confirmar la
configuración actual.
NOTA: Si recibe información del Identificador de llamadas
FSK, la fecha y la hora se actualizarán automáticamente.
EL identificador de llamadas es un servicio provisto por su
empresa de teléfonos loca. Para que el Identificador de
llamadas funcione en su sistema, deberá suscribirse al Servicio
de Identificación de llamadas. Esta unidad puede recibir
información del identificador de llamadas FSK y DTMF sin
ninguna configuración. Esta información puede incluir el número
de teléfono, la fecha y la hora. La unidad almacena hasta 80
llamadas para una revisión posterior.
RECIBIR Y ALMACENAR LLAMADAS
Cuando recibe una llamada, la información es transmitida por
su empresa de teléfonos a su teléfono con Identificador de
llamadas.
Cuando la memoria está llena, una nueva llamada reemplaza
automáticamente a la llamada más antigua en la memoria. Se
mostrará NUEVO en el visor para las llamadas que no hayan
sido revisadas.
Si recibe información del Identificador de llamadas FSK,
actualizará automáticamente la fecha y la hora de la unidad. Si
recibe información del Identificador de llamadas DTMF, le fecha
y hora del registro se copiará desde la fecha y hora de la unidad.
Sin embargo, deberá configurar la fecha y hora con anterioridad.
UTILIZAR EL CÓDIGO DE ÁREA
La información del Identificador de llamadas recibida se
comparará con el código de área configurado. Si ambos
coinciden, estos dígitos se eliminarán y luego se guardarán en el
registro del identificador de llamadas.
MUY IMPORTANTE: La función del Identificador de
llamadas de este producto requiere suscripción al servicio
de identificación de llamadas provisto por su empresa de
teléfonos local.
REVISAR LOS ERGISTROS DE LLAMADAS
• Cuando se ilumine el indicador NUEVO, significa que ha
recibido una nueva llamada entrante. Pulse el botón
o
para revisar las llamadas almacenadas. Después de revisar
los nuevos registros de llamadas, el indicador se apagará.
• Cuando haya llegado al final de los registros de llamadas, el
visor mostrará ---FIN---.
• Puede salir de la revisión de los registros del identificador de
llamadas pulsando el botón FLASH.
TRANSFERIR REGISTROS DEL IDENTIFICADOR DE
LLAMADAS A LA MEMORIA
Puede transferir un registro del Identificador de llamadas a la
memoria de su teléfono.
1. Pulse el botón STORE y el visor mostrará “GUARDAR EN”.
2. Puede pulsar los botones
o
para seleccionar el registro
del identificador de llamadas.
3. Pulse el botón STORE nuevamente y el visor mostrará
“GUARDAR EN”.
4. Pulse los botones numéricos [0 ... 9] para seleccionar la
ubicación en la memoria.
5. Si la memoria ya tiene contenido, será reemplazado por el
nuevo registro.
BORRAR REGISTROS DE LLAMADAS PARA BORRAR UNA
SOLA LLAMADA
Durante la revisión de las llamadas, puede borrar una sola
llamada pulsando el botón DELETE dos veces. Se borrarán los
contenidos del visor y se reordenarán los números de los demás
registros del identificador de llamadas.
PARA BORRAR TODAS LAS LLAMADAS
1. Durante la revisión de las llamadas, puede borrar todas las
llamadas manteniendo pulsado el botón DELETE por más de 3
segundos. Se mostrará ¿BORRAR TODO? en el visor.
2. Pulse el botón DELETE nuevamente para confirmar.
MARCAR UN NÚMERO DEL IDENTIFICADOR DE
LLAMADAS
Marcar un número con el teléfono colgado
1. Pulse el botón
o
para seleccionar el registro del
Identificador de llamadas.
2. Tome el microteléfono y el número se marcará
automáticamente.
Marcar un número con el teléfono descolgado
1. Tome el microteléfono.
2. Utilice los botones
o
para seleccionar el registro del
Identificador de llamadas.
3. Pulse el botón DIAL para marcar el número que se muestra en
el visor.
MENSAJES DEL IDENTIFICADOR DE LLAMADAS
Los siguientes indicadores muestran el estado de un mensaje.
--P—La persona está llamando desde un número cuya
transmisión ha sido bloqueada.
--O—La persona está llamando desde un número que se
encuentra fuera del área de transmisión.
--E—La trasmisión de la información de la persona que está
llamando fue interrumpida o la línea telefónica es excesivamente
ruidosa.
FUNCIONES BÁSICAS DEL TELÉFONO
RECIBIR UNA LLAMADA TELEFÓNICA
1. Tome el microteléfono y conteste la llamada.
2. Vuelva a colocar el microteléfono en la base para colgar.
REALIZAR UNA LLAMADA TELEFÓNICA
1. Tome el microteléfono. Espere el tono de marcado.
2. Marque el número de teléfono al que desea llamar.
3. Vuelva a colocar el microteléfono en la base para colgar.
VOLUMEN
Puede ajustar el volumen del receptor utilizando el interruptor
ubicado en la parte posterior de la unidad.
RELLAMADA (REGISTRO DE LLAMADAS SALIENTES)
Con el teléfono colgado
Puede pulsar el botón REDIAL y luego el botón
o
las
llamadas salientes hasta los últimos 5 números de rellamada.
Tome el microteléfono y marque el número.
Con el teléfono descolgado
Puede pulsar el botón REDIAL para marcar el último número.
Si pulsa el botón REDIAL después de haber marcado un número,
habrá una interrupción en la línea por un segundo y se marcará
el último número al que llamó.
BORRAR UN REGISTRO DE RELLAMADA
Durante la revisión del registro de rellamada con el teléfono
colgado, pulse el botón DELETE para borrar el registro que se
muestra. Si pulsa y mantiene pulsado el botón DELETE por 3
segundos, se borrarán todos los registros de rellamada.
MARCADO TEMPORARIO POR TONOS
Si usted posee servicio por pulsos (rotativo) y desea acceder
a los servicios de llamada del cliente (tal como banca
telefónica y servicios de larga distancia) que requieren de
marcado por tonos, puede utilizar esta función para cambiar
temporariamente del servicio por pulsos al servicio por tonos.
Después de haber marcado el número de teléfono y haberse
comunicado con el servicio de llamada del cliente,
1. Pulse el botón TONE (*).
2. Cuando cuelgue, el teléfono regresará automáticamente al
modo de marcado por pulsos.
MARCADO PREVIO
1. Con el microteléfono colgado, ingrese el número de teléfono
al que desea llamar (máximo de 32 dígitos). Se mostrará el
número de teléfono en el visor.
2. Tome el microteléfono y el número se marcará
automáticamente.
NOTA: utilice el botón DELETE para borrar un número que
haya ingresado incorrectamente.
MEMORIA
Puede almacenar hasta diez números de 16 dígitos en la
memoria para el marcado rápido.
ALMACENAR UN NÚMERO EN LA MEMORIA
1. Pulse el botón STORE y el visor mostrará “GUARDAR EN”.
2. Puede ingresar un número de teléfono de hasta 16 dígitos.
3. Si ingresa un número incorrecto, pulse el botón DELETE para
borrar el último dígito ingresado.
4. Pulse el botón STORE nuevamente y el visor mostrará “STORE
IN”.
5. Pulse un botón numérico [0 ... 9] para seleccionar la
ubicación en la memoria.
6. Si la memoria ya tiene contenido, este será reemplazado por
el nuevo registro.
MARCAR DESDE LA MEMORIA
Con el teléfono colgado:
1. Pulse el botón DIAL.
2. Pulse un botón [ 1 ]....[ 0 ] para seleccionar la ubicación en
la memoria.
3. Tome el microteléfono para marcar el número.
Con el teléfono descolgado:
1. Pulse el botón DIAL.
2. Pulse un botón [ 1 ]....[ 0 ] para seleccionar la ubicación en
la memoria y marcar directamente el número.
MARCAR EN CADENA DESDE LA MEMORIA
Utilice esta función para realizar llamadas que requieren de
una secuencia de números tales como utilizar una tarjeta
de llamadas para números de larga distancia a los que
llama con frecuencia. Básicamente, marca cada parte de la
secuencia desde la memoria. El siguiente ejemplo muestra
cómo puede utilizar el marcado en cadena para realizar una
llamada a través del servicio de larga distancia.
Número para Ubicación en la memoria
Número de acceso a larga distancia Código de autorización Número de larga distancia al que
llama con frecuencia
7
8
9
1. Asegúrese que el teléfono está encendido.
2. Pulse el botón DIAL y luego pulse 7.
3. Cuando oiga el tono de marcado, pulse el botón DIAL y
luego pulse 8.
4. Después de oír el siguiente tono, pulse el botón DIAL y
luego pulse 9.
ATENCIÓN: Espere el tono de acceso antes de pulsar el
siguiente botón de la memoria o es posible que falle la
llamada.
INSERTAR UNA PAUSA EN LA SECUENCIA DE MARCADO
Pulse el botón PAUSE para insertar una pausa en la
secuencia de marcado de un número de teléfono
almacenado cuando ésta sea necesaria para esperar el
tono de marcado (por ejemplo, después de marcar 9 para
obtener línea externa o esperar para el tono de acceso de
la computadora). Se mostrará la pausa en el visor como
una “P” y se considerará como un dígito en la secuencia de
marcado. Si necesita una pausa mayor, pulse el botón PAUSE
dos veces.
INDICADOR VISUAL DE MENSAJE EN ESPERA
El indicador visual de mensaje en espera parpadeará si
tiene un mensaje de voz en el sistema de correo de voz
centralizado. Deberá contactarse con el proveedor del
servicio para obtener más detalles.
SOLUCIÓN DE PROBLEMAS
No Hay Tono De Marcado
• Asegúrese de que todas las conexiones se encuentren
bien y que no estén dañadas.
• Verifique que el interruptor para colgar se extienda por
completo cuando toma el microteléfono de la base.
No Se Muestra Nada En El Visor
• Reemplace las pilas.
• Verifique que las pilas estén bien instaladas.
No Se Muestra Información Alguna Después De Que Suena El
Teléfono
• ¿Está suscripto al servicio de Identificación de llamadas
provisto por su empresa de teléfonos local?
• Asegúrese de esperar hasta el segundo timbre antes de
contestar la llamada.
El Teléfono Marca Por Pulsos Con Un Servicio Por Tonos
• Asegúrese de que el modo de marcado T/P esté
configurado en marcado por tonos.
El Teléfono No Marca Con Servicio Por Pulsos
• Asegúrese de que el modo de marcado T/P esté
configurado en marcado por pulsos.
El Teléfono No Suena
• Es posible que tenga muchas extensiones en una misma
línea. Pruebe desenchufar algunas de las extensiones.
• Verifique el tono de marcado. Consulte la solución para
No hay tono de marcado.
Bajo Volumen De Voz Entrante Y Saliente
• ¿Hay otros teléfonos descolgados al mismo tiempo? Si
es así, es normal que el volumen disminuya cuando se
utilizan teléfonos adicionales al mismo tiempo.
• Verifique l volumen del receptor del microteléfono.
CUIDADO GENERAL DEL PRODUCTO
Para mantener su teléfono en funcionamiento y en buen
estado, preste atención a las siguientes pautas:
1. Evite colocar el teléfono cerca de dispositivos de calor y
equipos que generen ruido eléctrico (por ejemplo, motores
y lámparas fluorescentes).
2. NO exponga la unidad a luz solar directa ni a humedad.
3. Evite arrojar la unidad o cualquier otro tratamiento
brusco.
4. Limpie con un paño suave.
5. NO utilice fuertes agentes de limpieza ni polvos abrasivos
para limpiar la unidad ya que esto podría dañar el
acabado.
6. Guarde el embalaje original en caso de que necesite
transportar la unidad en el futuro.
El equipo usado deberá eliminarse en
cumplimiento de las reglamentaciones de
protección del medio ambiente actuales. Deberá
enviarlos a su revendedor o eliminarlos en un
centro de reciclado aprobado.