1
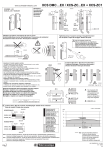
Tacktick Limited
22 North Street, Emsworth,
Hampshire, PO10 7DG, UK
Tel. +44 (0)1243 379331
Fax. +44 (0)1243 379199
www.tacktick.com
Mast Rotation Transmitter
Émetteur de mât pivotant
Minimum system requirements
1. A Tacktick Micronet display with Compass Setup capability (e.g. the
Configuration minimale requise
1. Un écran Micronet avec réglage du compas, comme les écrans
Numérique, Numérique Double ou Répétiteur, mais pas l'Analogique.
2. Un Capteur Girouette Anémomètre Tacktick et un Emetteur de
Coque avec Capteur Compas (ou une Interface Sans Fil et une
source NMEA équivalente).
Digital, Dual Digital, or Remote Displays; but not the Analogue Display)
2. A Tacktick Wind Transmitter and Hull Transmitter with Compass
Transducer (or a Wireless Interface and equivalent NMEA data
source).
Location advice
The location must be free of magnetic disturbance (stainless steel,
aluminum, carbon, and brass present no magnetic disturbance).
The location must give the solar panels a clear view of the sky.
The bracket should be within 15 degrees of the vertical (variable mast
rake causes no problems, so long as it is less than 20 degrees)
A location less than 1.5m above the deck is advised.
For masts longer than 20m, the bracket should be fitted to the front
of the mast to provide a clear radio signal path to the masthead wind
unit; otherwise, any position on the mast is acceptable.
Choix de l'emplacement
L'emplacement doit être éloigné de toute perturbation magnétique
(l'inox, l'aluminium, le carbone et le cuivre n'en induisent pas).
Les panneaux solaires de l'appareil ne doivent pas recevoir d'ombre.
Le support ne doit pas être incliné de plus de 15° par rapport à la
verticale (la quête du mât peut varier dans la limite de 20°).
Nous recommandons de ne pas dépasser 1,5 m au-dessus du pont.
Pour les mâts de plus de 20 m, le support doit être posé à l'avant du
mât pour ne pas perturber le trajet de signal radio de la girouetteanémomètre ; sinon, il peut être placé n'importe où sur le mât.
Installation
1. Fix the bracket to the mast using non-magnetic rivets or self
tapping screws. Ensure that the securing screw is at the bottom.
Or attach the bracket using the supplied Velcro strap as follows:
Stick the adhesive Velcro patch horizontally to the opposite side of
the mast at the intended height for the bracket.
Fit the foam pads to the bracket, to protect the mast .
Attach one end of the Velcro strap to the adhesive patch on the mast.
Offer the bracket up to the mast, and thread the Velcro strap
through the slots
in the side of the bracket. Wrap the strap
around the mast, pull tight applying plenty of tension, and fasten.
Cut off excess Velcro, but leave AT LEAST 80mm (3") overlap.
Warning: Check your installation before you sail. Tacktick does not
accept responsibility for units lost at sea due to insecure fixing.
2. Autonetwork the mast rotation transmitter into the existing network,
by following the yellow instruction guide provided
3. Fit the transmitter in the bracket, with the fixing screw provided .
4. Check that the Micronet display(s) are showing Apparent Wind
Speed, Apparent Wind Angle, and Compass Heading.
Installation
1. Fixez le support au mât à l'aide de rivets amagnétiques ou de vis
autotaraudeuses. Vérifiez que la vis d'arrêt est en bas.
Ou attachez le support à l'aide de la bande velcro :
Collez la pièce velcro adhésive horizontalement à hauteur de
l'emplacement choisi pour le support mais sur le côté opposé du mât.
Placez les coussinets en mousse sur le support pour protéger le
mât .
Attachez une extrémité de la bande velcro à la pièce adhésive.
Positionnez le support sur le mât et passez la bande velcro par ses
fentes latérales . Enroulez la bande autour du mât, tirez fort et
attachez l'autre bout à la pièce adhésive.
Coupez le velcro en trop, mais laissez dépasser AU MOINS 8 mm.
Attention : vérifiez votre installation avant toute navigation. Tacktick
ne peut être tenu responsable de la perte d'appareils pour cause de
mauvaise fixation.
2. Utilisez la procédure « autonetwork » en suivant le guide d'utilisation
jaune fourni.
3. Fixez l’émetteur dans le support à l'aide de la vis d'assemblage .
4. Vérifiez que les écrans Micronet indiquent la vitesse du vent
apparent, l'angle du vent apparent et le cap compas.
Calibration
To ensure accuracy, the transmitter must be calibrated:
1. Fix the mast on the fore and aft axis of the boat.
2. When in clear open water, select the compass setup page on a
Micronet display (refer to the setup section of the user guide for
your display). Make a note of the deviation displayed.
3. Carry out a deviation correction turn as described in the user guide.
4. Check the deviation displayed. If it has changed by more than 1º
from the value noted, note the new deviation and repeat the turns.
5. If the deviation displayed has remained stable, your system is
correctly calibrated. Exit setup on the Micronet display, and unlock
the mast from the fore and aft position.
Troubleshooting
To view the Mast Rotation Transmitter battery level and solar charge
rate from a Micronet display, access the MASTº page in the Health
chapter (refer to the display user guide).
If the Mast Rotation Transmitter battery level becomes low, the "Wind
Low Batt" alarm will be displayed.
UU076 - rev03 Mast Rotation Transmitter user guide
Étalonnage
Pour être précis, le capteur doit être étalonné :
1. Fixez le mât dans l'axe longitudinal du bateau.
2. En pleine mer, sélectionnez la page de réglage du compas sur un
écran Micronet (reportez-vous au guide d'utilisation de votre
écran). Notez la déviation affichée.
3. Effectuez un tour de correction de la déviation comme l'explique le
mode d'emploi.
4. Regardez ensuite la déviation affichée. Si elle a changé de plus
d'1°, notez la nouvelle déviation et refaites un tour de correction.
5. Si la déviation affichée est restée stable, votre système est
correctement étalonné. Sortez du mode réglage sur l'écran
Micronet et déverrouillez le mât.
Dépannage
Pour voir le niveau de la batterie et le taux de charge de l’Émetteur de
mât pivotant à partir d'un écran Micronet, allez à la page MASTº du
chapitre Health (voir le guide de l'écran).
Si le niveau de la batterie de l’émeteur est faible, c'est l'alerte « Wind
Low Batt » (batterie de girouette-anémomètre faible) qui s'affiche.
Mast-Rotation-Geber
Trasmettitore Dati Rotazione Albero
Transmisor de Rotación del Mástil
Mindestvoraussetzung
1. Eine Tacktick Micronet Anzeige, mit der der Kompass kalibriert
werden kann, z.B. Digital-, Dual-Digital-Anzeige oder die Handfernbedienung, aber nicht die Analog-Anzeige.
2. Ein Tacktick Windmessgeber und ein Rumpf-Transmitter mit
Kompass-Sensor (oder ein Tacktick Kabelloses NMEA-Interface
mit entsprechender Datenquelle).
Wo der Geber angebracht werden sollte
Der Ort für den Geber muss frei von magnetischen Einflüssen
(rostfreier Stahl, Aluminium, CFK und Bronze sind nicht magnetisch)
und der Sonne ausgesetzt sein.
Der Halter sollte nicht mehr als 15° vom Lot abweichen (ein
einstellbarer Mastwinkel bis zu 20° ist akzeptabel).
Der Geber sollte nicht höher als 1,5m angebracht werden
Bei Masten mit einer Länge über 20m, sollte der Geber an der
Vorderseite des Mastes angebracht werden, um eine direkte
Radioverbindung mit dem Windmessgeber zu ermöglichen.
Installation
1. Befestigen Sie den Halter mit nichtmagnetischen Nieten oder
Blechschrauben am Mast. Das Loch für die vordere
Befestigungsschraube muss unten sein .
Oder befestigen Sie den Halter folgendermaßen mit dem
beigefügten Klettband:
Befestigen Sie das selbstklebende Klettbandstück horizontal in
geplanter Höhe auf der anderen Seite des Mastes.
Kleben Sie die Schaumstoffunterlagen zum Schutz des Mastes
and den Halter .
Machen Sie ein Ende des Klettbandes an dem angeklebten Stück fest.
Halten Sie den Halter an den Mast und fädeln Sie das Klettband
durch die Schlitze
an der Seite des Halters. Wickeln Sie das
Band um den Mast, ziehen Sie hart an und befestigen Sie es.
Stellen Sie sicher dass eine Überdeckung von mindestens 80mm
besteht und schneiden Sie dann das überschüssige Band ab.
Achtung: Vorm Segeln die Installation prüfen! Tacktick ist nicht verantwortlich für Geräte, die durch nachlässige Montage verloren gehen.
2. Folgen Sie der gelben Anleitung zur Autovernetzung mit dem System.
3. Befestigen Sie den Geber im Halter mit der beigefügten Schraube .
4. Prüfen Sie, dass die Micronet Displays scheinbare Windgeschwindigkeit, scheinbare Windrichtung und Kompasskurs anzeigen.
Kalibrierung
Um die Genauigkeit zu gewähren, muss der Sender kalibriert werden.
1. Verriegeln Sie den Mast in der „recht voraus“ Stellung.
2. Wenn Sie auf hoher See sind, gehen Sie zum Setup auf dem
Anzeigen (siehe Setup Kapitel in der Anleitung für das Display).
Notieren Sie die angezeigte Deviation.
3. Fahren Sie eine Deviations Korrekturrunde, wie in der Anleitung
beschrieben.
4. Prüfen Sie die angezeigte Deviation. Wenn Sie mehr als 1° vom
vorher notierten Wert abweicht, notieren Sie die neue Deviation und
fahren Sie die Runden noch einmal.
5. Wenn sich der Deviationswert stabilisiert hat, ist das System korrekt
kalibriert. Verlassen Sie den Setup und entriegeln Sie den Mast.
Troubleshooting
Der Ladungzustand und -strom der Batterie kann auf der Mast Seite
im HEALTH Kapitel eines jeder Anzeige abgefragt werden (siehe
Anleitung für das Anzeige).
Wenn der Ladungszustand niedrig ist, wird der „WIND LOW BATT“
Alarm angezeigt.
Sistemi minimi richiesti
1. Uno schermo Tacktick Micronet con funzione Compass Setup,
configurazione con la bussola (quindi il Display Palmare Remoto, il
Digitale o il Digitale Doppia Lettura, ma non il Display Analogico)
2. Un Trasmettitore Dati Wind e Centralina Da Interno Tacktick con la
Bussola Digitale (o un'Interfaccia Wireless con equivalenti dati NMEA)
Consigli per il posizionamento
La posizione deve essere libera da influenze magnetiche (acciaio
inossidabile, alluminio, carbonio e ottone non creano disturbi magnetici).
Il posizionamento deve assicurare ai pannelli solari ua chiara
esposizione al cielo.
Il supporto non dovrebbe essere inclinato verticalmente più di 15
gradi (alberi a inclinazione variabile non creano problemi, fino a che
l'inclinazione è minore di 20 gradi.
É consigliato un posizionamento a meno di 1.5 m dal ponte
Per alberi più alti di 20 m, il supporto dovrebbe essere installato sulla
parte frontale dell'albero per evitare ostacoli al segnale radio diretto in
testa d'albero, altrimenti, qualsiasi posizione sull'albero è accettabile.
Installazione
1. Fissare il supporto all'albero usando rivetti o viti auto filettanti non
magnetiche. Assicurarsi che la vite di sicurezza sia in basso.
O attaccare il supporto usando lo strap di Velcro fornito, come segue:
Incollare il nastro di Velcro adesivo orizzontalmente sul lato
opposto dell'albero, all'altezza desiderata per il supporto.
Applicare il tappetino di gomma al supporto, per proteggere l'albero .
Attaccare uno dei capi dello strap di Velcro sulla parte adesiva sull'albero.
Applicare il supporto all'albero, far passare lo strap di Velcro
attraverso le fessure
al lato del supporto. Avvolgere lo strap
attorno all'albero, tirare applicando molta tensione, e fissarlo.
Spuntare il Velcaro in eccesso lasciando sormontare ALMENO 80 mm.
Avvertenza: Controllare il fissaggio prima di navigare. Tacktick non accetta
responsabilità per unità perse in mare a causa di un erroneo montaggio.
2. Eseguire la configurazione automatica del trasmettitore con la rete
esistente, seguendo il manuale giallo di istruzioni fornito.
3. Applicare il trasmettitore nel supporto, con le viti di fissaggio fornite
4. Controllare che Gli schermi Micronet stiano mostrando la velocità
del vento apparente, l'angolo del vento apparente e la rotta.
Calibrazione
Per assicurare l'accuratezza, il trasmettitore deve essere calibrato:
1. Posizionare l'albero sull'asse prodiero e qello poppiero della barca
2. Quando in mare aperto, selezionare la pagina per l'impostazione
della bussola sullo schermo Micronet (riferirsi alla sezione sulle
impostazioni del manuale dello schermo). Prendere nota del valore
della deviazione mostrata.
3. Eseguire l'operazione dei giri di bussola come descritto nel
manuale di istruzioni.
4. Controllare la deviazione mostrata. Se è cambiata più di 1° dal
valore segnato, appuntare il nuovo valore e ripetere i giri.
5. Se la deviazione mostrata è rimasta la stessa allora il sistema è
calibrato correttamente. Uscire dalle impostazioni dello schermo
Micronet, e sbloccare l'albero dalla posizione a prodiera e poppiera.
Risoluzione dei problemi
Per vedere il livello della batteria o il tasso di ricarica del pannello
solare, accedere dallo schermo Micronet alla pagina MAST° sotto il
capitolo "HEALTH" (riferirsi al manuale dello schermo).
Se il livello della batteria del Trasmettitore Dati Rotazione Albero si
abbassa, verrà mostrato l'allarme "Wind low Batt".
Requerimientos mínimos del sistema
1. Una pantalla Micronet de Tacktick con capacidad para configurar
el compás; por ejemplo, un Instrumento Digital, Digital Bidata o
Portátil Remoto (pero no el Instrumento Analógico).
2. Un Brazo de Viento y Transmisor del Casco con Transductor de
Compás(o Interface inalámbrica y su equivalente fuente de datos NMEA).
Consejos de Posicionamiento
Debe colocarlo en un lugar libre de interferencias magnéticas (el acero
inoxidable, aluminio y carbono no provocan ningún tipo de interferencia).
El lugar decidido para su instalación debe permitir que los paneles
solares queden expuestos al sol.
El soporte debería ser montado a menos de 15 grados de la vertical
(el instrumento no causa ningún problema, mientras la inclinación del
mismo sea inferior a 20º).
Se recomienda colocarlo a menos de 1.5m sobre la cubierta.
En caso de mástiles de más de 20 metros, el soporte debería ser
montado en la parte frontal del mástil para permitir una clara señal de
radio hacia el sensor de viento. En caso contrario, cualquier
localización en el mástil será correcta.
Instalación
1. Fije el soporte al mástil utilizando remaches no magnéticos o
tirafondos. Asegúrese que el tornillo de seguridad
esta en la
parte de abajo.
O fije el soporte, utilizando la cinta de Velcro suministrada, de la
siguiente forma:
Pegue la cinta de Velcro adhesivo a la parte opuesta del mástil,
horizontalmente, a la altura deseada para el soporte.
Coloque al soporte las almohadillas de espuma, para proteger el mástil.
Fije un extremo de la cinta de Velcro al parche adhesivo del mástil.
Presente el soporte junto al mástil, e introduzca la cinta de Velcro a
través de las ranuras en el lado del soporte. Abrace con fuerza
la cinta alrededor del palo, manteniéndola con mucha tensión.
Corte el exceso de Velcro, pero deje ALMENOS 80mm de solape
Atención: Compruebe la instalación antes de navegar. Tacktick no se
hace responsable de unidades perdidas por una fijación incorrecta.
2. Ponga en red el Transmisor de Rotación de Mástil (Autonetwork)
con los equipos existentes siguiendo la guía amarilla suministrada.
3. Coloque el trasmisor en el soporte con el tornillo de fijación .
4. Compruebe que las pantallas Micronet muestran la Velocidad y el
Ángulo Aparente del Viento y el rumbo del compás.
Calibración
Para asegurar exactitud, el trasmisor debe calibrarse:
1. Fije el mástil en línea con el plano de crujía de la embarcación.
2. Cuando esté en mar abierto seleccione la página de configuración
del compás desde una pantalla Micronet (consulte la sección de
configuración de su manual de usuario). Tome note de la
desviación mostrada.
3. Lleve a cabo un giro de corrección como el descrito en el manual
de la pantalla.
4. Compruebe la desviación mostrada. Si ha cambiado en mas de 1º
del valor anotado, anote la nueva desviación y repita el giro.
5. Si la desviación permanece estable, su sistema está correctamente
calibrado. Salga del modo Configuración de su pantalla Micronet, y
desbloquee el mástil de su alineación con crujía.
Solución de problemas
Para comprobar el nivel de batería y el ratio de carga del Transmisor
desde una pantalla Micronet, diríjase hasta la página MASTº en el
capítulo HEALTH (Comprobación del Estado del Instrumento).
Si el nivel de batería del Transmisor es bajo, la alarma de Batería Baja
sonará y "Wind Low Batt" aparecerá en pantalla.