1
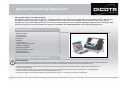
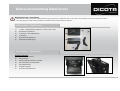
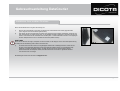
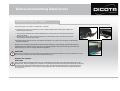
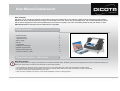
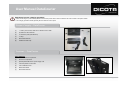
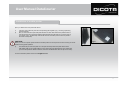
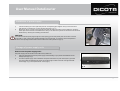
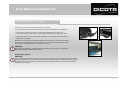
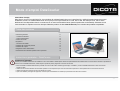
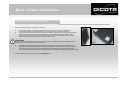
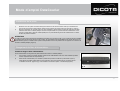
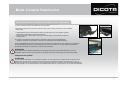
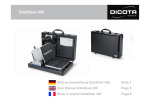
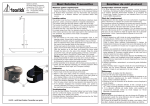
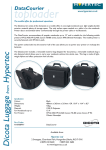
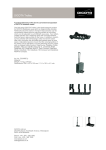
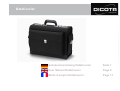
DataCourier
Gebrauchsanleitung DataCourier
Seite 1
User Manual DataCourier
Page 6
Mode d´emploi DataCourier
Page 11
Gebrauchsanleitung DataCourier
Sehr geehrte Kundin, sehr geehrter Kunde,
wir danken Ihnen, dass Sie sich für ein DICOTA - Produkt entschieden haben. Bevor Sie Ihre DataCourier zum ersten Mal benutzen, lesen Sie bitte
die folgende Gebrauchsanleitung sorgfältig durch. Die DataCourier ist für die momentan handelsüblichen Drucker HP DJ 450, HP DJ 460, HP
Officejet H470, Canon Serie i80/iP90 und iP100 mit oder ohne Unterstützung des Canon Portable Kits geeignet (andere Drucker auf Anfrage!). Bitte
informieren Sie sich bei Ihrem Fachhändler oder mit dem Produktdetektiv unter www.dicota.com, welche Notebooks geeignet sind.
Inhaltsverzeichnis
Inhaltsverzeichnis
Allgemeine Hinweise
1
- Arbeitsumgebung
1
- Betriebsspannung
2
Lieferumfang
2
Ausstattung
2
- Kofferausstattung
2
Installation Ihres mobilen Druckers
3
Installation der Steckdose
4
Verstauung der Netzteile
4
Verbindung: Notebook – Drucker
5
User Manual (English)
6
Manuel d’emploi (Français)
11
Allgemeine
Allgemeine Hinweise
Hinweise –– DataCourier
DataCourier
Arbeitsumgebung
Bitte achten Sie grundsätzlich darauf, dass Ihre DataCourier auf einer stabilen, rutschfesten Arbeitsfläche zum Einsatz kommt. Vermeiden Sie insbesondere Arbeitsflächen in
staubiger oder feuchter Umgebung! Bitte achten Sie beim Öffnen Ihrer DataCourier immer darauf, dass der Koffer mit dem Koffergriff oben steht!
→ Vermeiden Sie den Einsatz Ihrer DataCourier in der Nähe extremer äußerer Wärmeeinflüsse/-quellen (z.B. Heizkörper). Schützen Sie Ihre DataCourier vor
direkter Sonneneinstrahlung!
→ Für genaue Angaben bezüglich der Temperatur der Betriebsumgebung lesen Sie bitte die Gebrauchsanleitung Ihres Notebook- bzw. Druckerherstellers.
→ Die Geräte sollten nur bei einem geöffneten Zustand des Koffers betrieben werden.
→ Nach längerem Betrieb der Geräte darf der Koffer nicht sofort geschlossen werden, um ein Abkühlen nach außen zu gewährleisten!
1
Gebrauchsanleitung DataCourier
Betriebsspannung / Ladevorgang
→ Bitte beachten Sie beim Anschluss an die Betriebsspannung (Netz), dass Sie Ihr Netzkabel zuerst mit dem Koffer und anschließend mit der Spannungsquelle verbinden!
→ Der Ladevorgang Ihrer Geräte sollte grundsätzlich bei geöffnetem Zustand Ihrer DataCourier passieren!
Lieferumfang
Lieferumfang –– DataCourier
DataCourier
(1)
1 x 220 V – Kaltgerätestecker, Kabelbaum 2 x EURO 8 und 2 x IBM
(2)
Kunststoffbox mit Kabelbaum
(3)
8 x 3M Velcro – Pads (selbstklebend)
(4)
3 x Schlüssel
(5)
Herausnehmbare Aktentasche
(6)
Gepolsterter Schultertragegurt
(4)
(3)
(5)
(2)
(6)
(1)
Ausstattung
Ausstattung –– DataCourier
DataCourier
Kofferausstattung
(1)
Gepolstertes Notebookfach
(2)
Dokumentenfach
(3)
Speziell eingepasste ABS-Box für Netzteile
(4)
Zwei Seitentaschen auf beiden Seiten
(5)
Zwei Zahlenschlösser
(6)
Verstärkter Tragegriff
(7)
Herausnehmbare Aktentasche
(6)
(1)
(2)
(5)
(3)
(7)
(4)
(4)
2
Gebrauchsanleitung DataCourier
Installation
Installation Ihres
Ihres mobilen
mobilen Druckers
Druckers
Öffnen Sie die DataCourier und gehen Sie wie folgt vor:
1)
2)
Nehmen Sie vier Klettpads und pressen Sie jeweils zwei unterschiedlich raue Seiten gegeneinander
(Abb.1 zeigt ein Paar das zusammengedrückt wird)
Jetzt haben Sie zwei Velcro® Paare mit jeweils einer Schutzschicht auf beiden Außenseiten. Entfernen Sie
eine Schutzschicht von jeweils einem Paar, um die geklebte Oberfläche freizulegen und kleben Sie die zwei
Paare in zwei Ecken auf der Unterseite Ihres Druckers (Abb. 2; weiße Klebefolie muß dann noch abgezogen
werden, Klettpads können auch in der Mitte des Druckers platziert werden)
ACHTUNG!
Bevor Sie den Drucker anbringen, überprüfen Sie seine Position auf der Klappe, da sich eine Falschpositionierung
nachteilig auf die Handhabung oder Funktion auswirken kann.
3)
Am besten lässt sich der Drucker im hochgeklappten Zustand der Vorderklappe fixieren, indem Sie den
Drucker auf der Rückseite (Akkuseite) auf die geschlossene Kabelbox legen und anschließend mittig
platzieren und gegen die Klappe drücken. Je weiter Sie den Drucker im hinteren Bereich fixieren
desto besser ist der Schwerpunkt verteilt, damit die DataCourier mit Drucker im geöffneten Zustand
nicht so leicht nach vorne kippt.
Abb. 2
Abb. 1
Bei Rückfragen wenden Sie sich bitte an [email protected].
3
Gebrauchsanleitung DataCourier
Installation
Installation der
der Steckdose
Steckdose
1)
2)
Nehmen Sie die restlichen vier Klettpads und pressen Sie jeweils zwei unterschiedlich raue Seiten gegeneinander.
Jetzt haben Sie zwei Klettpadstücke mit Schutzfilm auf jeder Seite (siehe auch Seite 3 Abb. 1).
Entfernen Sie den Schutzfilm auf einer Seite und kleben Sie die Klettpads an die Unterseite der mitgelieferten
Kunststoffbox. Drücken Sie die Abteiler an die hintere Wand der DataCourier. Jetzt können Sie die Kunststoffbox
an der linken Innenseite der DataCourier befestigen, indem Sie die restlichen Schutzfilme entfernen.
(1)
ACHTUNG!
Sie müssen zuerst das Kabel mit dem Schukostecker in die runde Durchführung (1) zur Seitentasche einführen.
(Durchführung kann links oder rechts genutzt werden). Ist bei Ihrer DataCourier bereits werkseitig ein Klettbandstück
an der linken Innenseite befestigt, so brauchen Sie nur den Schutzfilm des Gegenstücks abzuziehen und dieses an
die Unterseite der Kunststoffbox kleben. (Abb. 5)
Abb. 5
Verstauung
Verstauung der
der Netzteile
Netzteile
Wie Sie die Netzteile verstauen:
Im Innenraum der Kunstoffbox werden die Netzteile verstaut.
1)
Öffnen Sie hierzu den beweglichen Deckel. Legen Sie die Netzteile, die zusammen mit Ihrem Notebook und
Ihrem Drucker geliefert wurden, in dieses Fach (Abb. 6 (1).
2)
Verbinden Sie die Netzteile für Notebook und Drucker mit den dafür beiliegenden EURO 8 Stecker (220 V).
Durch die Öffnungen links oder rechts im Deckel (Abb. 5 (1)) führen Sie bitte die Stromversorgungskabel für
Notebook und Drucker ein. Anschließend bitte den Deckel wieder einsetzen – fertig. (Abb. 6)
(1)
Abb. 6
4
Gebrauchsanleitung DataCourier
Verbindung:
Verbindung: Notebook
Notebook -- Drucker
Drucker
Zwei Optionen gibt es um Drucker und Notebook zu verbinden:
1) Verbinden Sie Drucker und Ihr Notebook mit einem USB-Druckerkabel. Dieses Kabel gehört nicht in den
Lieferumfang der DataCourier!
→ Achten Sie auch hierbei auf eine saubere Kabelführung! Am besten führen Sie das USB-Druckerkabel um
den Drucker herum.
→ Beachten Sie weiterhin, dass das USB-Druckerkabel den Druckpapier-Auswurf nicht behindert und somit
kein Papierstau verursacht werden kann!
2) Datenübertragung zwischen Drucker und Notebook mit Bluetooth: (nur möglich wenn Druckertyp und Notebooktyp
Bluetooth unterstützt!)
Bluetooth ist ein neuartiger Funkstandard zur kabellosen Datenübertragung. Notebookseitig wird die Datenverbindung
mit Bluetooth über ein internes Interface oder ein PC-Card-Modul aufgebaut. Seitens des Druckes kann der Aufbau der
Datenverbindung z.B. über ein Compact Flash-Modul geschehen.
ACHTUNG!
Stellen Sie Ihr Notebook immer in das mittlere Fach der DataCourier zwischen die Abteiler und mit der Vorderseite nach unten,
da sonst Kabel und Stecker des Notebooks beschädigt werden können.
Bsp.: Bluetooth
Aufladen des Systems:
ACHTUNG!
Bevor Sie das Kabel der Mehrfachsteckdose in einer Wandsteckdose anschließen, lesen Sie das Benutzerhandbuch Ihres
Notebooks bzw. Druckers sorgfältig durch. Schließen Sie nie den Deckel der DataCourier während der Benutzung des Druckers
oder während des Ladevorgangs des Notebooks bzw. Druckers. Das Schließen des Deckels könnte zu Überhitzung führen.
Generell sollte die DataCourier nur auf ebenem Untergrund gestellt werden, damit die DataCourier im geöffneten Zustand
nicht kippen kann.
5
User Manual DataCourier
Dear Customer,
We thank you for choosing a DICOTA product. Before using your DataCourier for the first time, please read the following manual carefully.
DataCourier can be used with printers currently on the market, HP DJ 450, HP DJ 460, HP Officejet H470, Canon series i80/iP90 and iP100
with or without support from the Canon Portable Kit (more printers on request!). For more information please consult your dealer or check
www.dicota.com for information which Notebooks are compatible.
Table
Table of
of contents
contents
General information
6
- Work environment
6
- Operational current
7
Scope of supply
7
Features
7
- Case features
7
Installation of mobile printer
8
Installation of power socket
9
Storage of power supply units
9
Connection: Notebook – printer
10
General
General information
information –– DataCourier
DataCourier
Work Environment
In general, please take care to operate your DataCourier on a stable and skid-fast surface. Especially avoid work surroundings which are dusty or humid! When opening your
DataCourier, please make sure that the case stands with the case handle upwards!
→ Avoid operating your DataCourier near extreme heat sources (i.e. any heating elements). Protect your DataCourier from direct sunlight!
→ For exact information regarding the temperature of the work surroundings, please study the manual of your Notebook or printer manufacturer.
→ The devices should only be operated while the case is open.
→ After some time of operation, the case may not be closed immediately to ensure a cooling-off period!
6
User Manual DataCourier
Operational current / charging procedure
→ When connecting to a power socket, please ensure that the power cable is first connected to the case and then to the power socket!
→ The charging procedure should generally be done while the case is open!
Scope
Scope of
of supply
supply –– DataCourier
DataCourier
(1)
1 x 220 V power socket, cable tree 2 x EURO 8 and 2 x IBM
(2)
Synthetic box with cable tree
(3)
8 x 3M Velcro pads (self-adhesive)
(4)
3 x keys
(5)
Removable briefcase
(6)
Padded shoulder strap
(4)
(3)
(5)
(2)
(6)
(1)
Features
Features –– DataCourier
DataCourier
Case features
(1)
Padded Notebook compartment
(2)
Document compartment
(3)
Specially fitted ABS box for power supply units
(4)
Two side pockets on each side
(5)
Two combination locks
(6)
Reinforced handle
(7)
Removable briefcase
(6)
(1)
(2)
(5)
(3)
(7)
(4)
(4)
7
User Manual DataCourier
Installation
Installation of
of mobile
mobile printer
printer
Open your DataCourier and proceed as follows:
1)
2)
Take four Velcro pads and press two corresponding pairs together. (Fig. 1 showing a pair being
pressed together)
Now you have two Velcro pairs with protective films on each side. Remove the protective film on
one side of each pair to reveal the adhesive tape beneath and press them to one corner each of
your printer. (Fig. 2; the white tape must still be removed, the Velcro pads can also be placed in
the center of the printer)
CAUTION!
Before you mount the printer, please check the intended position on the flap since incorrect mounting can cause
problems during printer operation.
3)
Fig. 2
Fig. 1
The easiest way to mount the printer is on the open front flap. Mount the printer with its back
side (battery side) on the closed cable box in the center and press against the lid. The further back
you mount the printer the better for balance, since then the DataCourier does not tip over so easily.
For more information please contact us at [email protected].
8
User Manual DataCourier
Installation
Installation of
of power
power supply
supply
1)
2)
Take the remaining four Velcro pads and press two corresponding pairs together. Now you have two Velcro
pad pairs with a protective film on each side (also see Page 3, Fig. 1).
Remove the film on one side of each pad pair and press this side to the bottom of the synthetic box. Press the
divider pads to the back side of the DataCourier. Now you can attach the synthetic box to the left inner side of the
DataCourier by removing the remaining protective films.
(1)
CAUTION!
You must first insert the power plug through the round opening (!) to the side pocket (This can be done on the left
or right side). In case a Velcro pad is already attached to the inner left side, you need only remove the protective
film of the corresponding side and attach it to the bottom side of the synthetic box (Fig. 5).
Fig. 5
Storage
Storage of
of power
power supply
supply units
units
How to store the power supply units:
The power supply units are stored on the inside of the synthetic box.
1)
Open the retractable lid. Place the power supply units that belong to your printer and Notebook into the
storage space (Fig. 6 (1)).
2)
Connect the power supply units for Notebook and printer with the Euro 8 power socket (220 V) provided.
The power cables for Notebook and printer can be led through the slots on the left- and right-hand side
of the lid (Fig. 5 (1)). Then replace the lid – done! (Fig. 6)
(1)
Fig. 6
9
User Manual DataCourier
Connection
Connection Notebook
Notebook –– printer
printer
There are two options for connecting the Notebook to your printer:
1) Connect printer and Notebook with a USB cable. This cable is not included in the DataCourier!
→ Ensure correct cabling here as well! It is best to lead the USB cable around the printer.
→ Also make sure that the USB cable is not obstructing the paper bin, thus causing paper jams!
2) Data transfer between printer and Notebook via Bluetooth: (only possible if Notebook and printer
are Bluetooth-compatible!)
Bluetooth is an up-to-date radio standard enabling wireless data transfer. On behalf of the Notebook,
the connection is established via an internal interface or a PC-card module. On behalf of the printer,
the connection can be established via a Compact Flash module.
CAUTION!
Always place your Notebook in the middle compartment between the divider pads, front side down,
to prevent damaging Notebooks cables and plugs.
Charging the system:
Eg.: Bluetooth
CAUTION!
Before connecting the multi-plug cable to a power socket, read the manual of your Notebook and/or printer carefully.
Never close the DataCourier’s lid while the printer or Notebook is being operated or the Notebook is being charged.
Closing the lid can cause overheating. The DataCourier should always be placed on an even surface to prevent it
from tipping over while open.
10
Mode d´emploi DataCourier
Cher/Chère client(e),
Merci d’avoir choisi un produit DICOTA. Avant d’utiliser la mallette DataCourier pour la première fois, veuillez lire attentivement le manuel
d’utilisation suivant. La mallette DataCourier est conçue pour les imprimantes HP DJ 450, HP DJ 460, HP Officejet H470, Canon Serie
i80/iP90 et iP100 disponibles dans le commerce avec ou sans le kit Portable Canon (autres imprimantes sur demande). Adressez-vous à
votre revendeur ou reportez-vous à la rubrique «Détective produit» du site www.dicota.com pour connaître les portables compatibles.
Table
Table des
des matières
matières
Instructions générales
11
- Conditions d’utilisation
11
- Tension d’alimentation
12
Contenu de la boîte
12
Équipement
12
- Intérieur de la mallette
12
Installation de l’imprimante portable
13
Installation de la prise
14
Rangement du bloc d‘alimentation
14
Raccordement de l’ordinateur portable et de l’imprimante
15
Instructions
Instructions générales
générales –– DataCourier
DataCourier
Conditions d’utilisation
Vérifiez que la mallette DataCourier est installée sur une surface stable et antidérapante. Evitez tout particulièrement de l’installer dans un environnement humide ou poussiéreux!
Avant d’ouvrir la mallette DataCourier, vérifiez toujours qu’elle est posée, poignée du couvercle vers le haut!
→ Evitez d’installer la mallette DataCourier à proximité d’une source de chaleur extrême (par exemple, un radiateur). Tenez la mallette DataCourier à l’abri de la lumière
directe du soleil!
→ Veuillez lire le manuel d’utilisation de l’ordinateur portable ou de l’imprimante pour avoir des informations précises sur la température de l’environnement de travail.
→ Utilisez les appareils uniquement lorsque la mallette est ouverte.
→ Après une utilisation prolongée des appareils, ne fermez pas immédiatement la mallette pour permettre l’évacuation de la chaleur!
11
Mode d´emploi DataCourier
Tension d’alimentation / Recharge
→ Lors du raccordement à la source d’alimentation (au réseau), connectez le câble de raccordement d’abord à la mallette, puis à la source d’alimentation!
→ La recharge de vos appareils doit absolument être effectuée avec la mallette ouverte!
Contenu
Contenu de
de la
la boîte
boîte –– DataCourier
DataCourier
(1)
1 fiche femelle pour connexion au 220 V, 2 ensembles de câbles (8 EUROS) et 2 IBM
(2)
Boîte en matière plastique avec groupe de fils
(3)
8 bandes velcro 3M (autocollantes)
(4)
3 clés
(5)
Pochette amovible
(6)
Bandoulière matelassée
(4)
(3)
(5)
(2)
(6)
(1)
Équipement
Équipement –– DataCourier
DataCourier
Intérieur de la mallette
(1)
Compartiment pour ordinateur portable matelassé
(2)
Compartiment documents
(3)
Boîte ABS pour bloc d‘alimentation
(4)
Deux poches latérales (une de chaque côté)
(5)
Deux cadenas à chiffres
(6)
Poignée renforcée
(7)
Pochette amovible
(6)
(1)
(2)
(5)
(3)
(7)
(4)
(4)
12
Mode d´emploi DataCourier
Installation
Installation de
de l’imprimante
l’imprimante portable
portable
Ouvrez la mallette DataCourier et procédez comme suit:
1)
2)
Prenez quatre bandes Velcro® (deux bandes crochet et deux bandes velours) et rassemblez-les
pour former deux paires correspondantes (Figure 1: illustration de deux parties rassemblées).
Les deux paires Velcro® ainsi obtenues sont chacune dotée d’une protection sur les deux côtés extérieurs.
Enlevez l’une des protections de chacune des paires pour faire apparaître la partie collante et collez
les deux paires sur 2 coins inférieurs de l’imprimante (Figure 2: le film autocollant blanc doit être retiré.
Les bandes Velcro® peuvent également être disposées au millieu).
ATTENTION!
Vérifier la position de l‘imprimante sur le rabat avant de l‘installer. Un mauvais positionnement pourrait avoir des
répercussions sur son utilisation ou son fonctionnement.
3)
L‘imprimante se fixe idéalement lorsque le rabat de devant est en position relevée, en posant la partie
arrière de l‘imprimante (côté bateries) sur la boîte de câbles fermée, en prenant soin de la placer au milieu
et en l‘appuyant contre le rabat. Le poids sera réparti proportionnellenent à la profondeur de la fixation,
pour éviter que l‘imprimante ne penche vers l‘avant lorsque votre mallette DataCourier est en position ouverte.
Fig. 2
Fig. 1
Pour toute question, contactez-nous à l’adresse [email protected].
13
Mode d´emploi DataCourier
Installation
Installation de
de la
la prise
prise
1)
2)
Munissez-vous des quatre Velcro® restants (deux bandes crochet et deux bandes velours) et rassemblez-les
pour former deux paires correspondantes, dotées d’une protection de chaque côté (voir aussi figure 1 page 3).
Enlevez la protection de l’une des paires pour faire apparaître la partie collante et collez les Velcro® sur la partie
inférieure de la boîte en matière plastique. Fixez les compartiments sur la partie arrière de la DataCourier. Vous
pouvez à présent fixer la boîte en matière plastique sur la partie intérieure gauche de la DataCourier en retirant
les films de protection restants.
(1)
ATTENTION!
Le câble et la prise de terre doivent être préalablement introduits par l‘ouverture ronde (1) sur la partie arrière de la mallette.
(Le passage peut se faire par la gauche ou par la droite). Si votre DataCourier est déjà dotée d‘une bande Velcro® sur sa
partie intérieure gauche, il suffit de retirer la partie correspondante et le film de protection et de l’apposer sur le dessous de
la boîte en matière plastique (Figure 5).
Fig. 5
Rangement
Rangement du
du bloc
bloc d‘alimentation
d‘alimentation
Comment ranger le bloc d‘alimentation:
Le bloc d‘alimentation se range dans la partie intérieure de la boîte en matière plastique.
1)
Pour ce faire, ouvrez le couvercle amovible. Placez le bloc d‘alimentation livré avec votre ordinateur portable
et votre imprimante dans ce compartiment (1).
2)
Reliez le bloc d‘alimentation pour ordinateur portable et imprimante à l‘aide de la prise EURO 8 (220 V).
Faites glisser les câbles d‘alimentation de votre ordinateur et de votre imprimante par l‘ouverture gauche
ou droite du couvercle (Figure 5 (1)). Puis remettez le couvercle en place – c‘est terminé (Figure 6).
(1)
Fig. 6
14
Mode d´emploi DataCourier
Raccordement
Raccordement de
de l’ordinateur
l’ordinateur portable
portable et
et de
de l’imprimante
l’imprimante
Il y a deux manière de relier votre ordinateur et votre imprimante:
1) Raccordez l’ordinateur à l’imprimante à l’aide d’un câble USB. Ce câble n’est pas fourni avec la mallette
DataCourier!
→ Vérifiez également que le cheminement du câble n’est pas entravé! Pour une utilisation optimale,
faites passer le câble USB sur le côté de l’imprimante.
→ Vérifiez ensuite que le câble USB n’entrave pas la sortie du papier qui risquerait de provoquer un
bourrage papier!
2) Transfert des données entre l’imprimante et l’ordinateur à l’aide de la technologie Bluetooth:
(possible uniquement si l’imprimante et l’ordinateur sont équipés de la technologie Bluetooth!)
La technologie Bluetooth est une nouvelle norme pour le transfert des données sans fil. Sur l’ordinateur, le transfert des
données par Bluetooth s’effectue via une interface interne ou via une Couriere PC. Sur l’imprimante, le transfert des
données peut s’effectuer par exemple via une Couriere Compact Flash.
ATTENTION!
Placez toujours votre ordinateur portable dans le compartiment du milieu de votre mallette DataCourier, entre les
séparations, face avant vers le bas, pour éviter que les câbles et la prises n‘endommagent votre ordinateur portable.
Ex.: Bluetooth
Chargement du système:
ATTENTION!
Lisez les manuels d‘utilisation de votre ordinateur portable et de votre imprimante, avant de brancher le câble de la prise
multiple dans une prise murale. Ne fermez jamais le rabat de votre DataCourier lorsque l‘imprimante est en fonction, ou
pendant le chargement de votre ordinateur ou de votre imprimante. Cela pourrait entraîner une surchauffe des équipements.
En règle générale, il es recommandé d‘utiliser votre mallette DataCourier sur un support plane, pour en éviter le basculement.
15