1
ASSEMBLY INSTRUCTIONS
2.
Step 1: Assembly Preparation
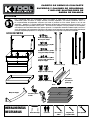
Remove all contents from box. Reference the parts list to
make sure you have all the parts.
A
CAUTION
Verify your workbench can support 150 lbs. (68 kg.).
Failure to follow this warning could result in damage to
property or personal injury.
B
NOTE
Cover workbench to prevent any damage to surface.
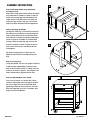
Step 2: Pry Bar Holders
Lay two legs down on the table top and attach pry bar holder
as shown in figure 2. Repeat with other two legs and pry
bar holder. NOTE: Legs are marked with UP label to indicate
which side is up.
Step 3: Attaching Casters
Turn bottom tray upside down. Align holes in locking and
non-locking casters with matching holes in the bottom
tray as shown in figure 3a. Attach using M8 Hex bolts, lock
washers and nuts from caster bolt kit and hand tighten.
3.
NOTE Ensure that both locking casters are on same
end of the cart. We suggest same side as handle.
NOTE Before moving to step 4 place a covering
on the floor (to protect the cart) and finish assembly
on the floor.
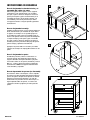
Step 4: Aligning the Legs
Make sure the drawer assembly lid is open. Place legs and
attached pry bar holders onto drawer assembly and bottom
of tray as shown in figure 4. Repeat on opposite side of
service cart. Hand tighten so all holes will line up.
3a.
4.
A
B
KTI75146
2
rev. 08/04/14