1
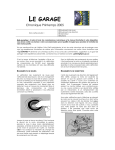
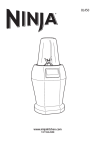
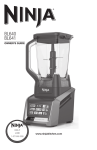
®
OWNER’S
GUIDE
BL491
w w w.ninjak i tchen.com
MANUEL DU MANUAL DEL
PROPRIÉTAIRE
USUARIO
BL491
1. 8 7 7. 6 4 6 . 5 2 8 8
BL491
®
THANK YOU!
Welcome to the Ninja® Auto-iQ™ Compact System all-purpose, customizable,
everyday kitchen assistant. The Ninja Auto-iQ Compact System features
pre-programmed settings that take the guesswork out of drink and meal making.
These programs are timed to deliver consistent, delicious results that finish on
their own so all you have to do is press a button and enjoy.
Select accessories are included. Additional accessories are available for
purchase at www.ninjakitchen.com. For a list of what is included with this
model, refer to the top of the box or online.
REGISTER YOUR PURCHASE:
www.ninjakitchen.com
TECHNICAL SPECIFICATIONS:
Voltage:
120V., 60Hz
Power:
1200 W*
Cup Capacity:
24 oz. (3 cups)
1-877-646-5288
RECORD THIS INFORMATION:
XL Multi-Serve Ninja® Capacity:48 oz. (6 cups)
Model Number:���������������������������������������������
Bowl Capacity:
Date of Purchase (Keep receipt):
THIS BOOK COVERS MODEL NUMBERS:
BL491
__________________________________________________________
MERCI!
* Maximum rating is based on the 48 oz. Ninja XL Multi-Serve and other recommended attachments
may draw significantly less power or current.
Certains accessoires sont compris. Vous pouvez acheter d’autres accessoires
en visitant le site www.ninjakitchen.com. Pour consulter la liste des
composants compris avec ce modèle, veuillez regarder le rabat supérieur de
l’emballage ou visiter le site Web.
ENREGISTREMENT DE VOTRE APPAREIL :
www.ninjakitchen.com
SPÉCIFICATIONS TECHNIQUES :
Tension :
Alimentation :
Capacité du gobelet :
1-877-646-5288
Pour toute question au sujet de votre système compact Ninja Auto-iQ, veuillez contacter
le Service à la clientèle de Ninja au 1-877-646-5288.
120V., 60Hz
1200 W*
24 oz. (3 tasses)
INSCRIVEZ CES RENSEIGNEMENTS :
Capacité du NinjaMD XL Multi-Serve : 48 oz. (6 tasses)
Numéro de modèle :�����������������������������������������
Capacité du bol:
Date d’achat (conservez le reçu) :
THIS BOOK COVERS MODEL NUMBERS:
BL491
Bienvenido al sistema compactco de asistente diario de cocina Ninja® con AutoiQ MR multipropósito y personalizable. El sistema compactco Ninja con Auto-iQ
tiene ajustes previamente programados que eliminan las incertidumbres en la
preparación de bebidas y comidas. Estos programas están temporizados para
brindar resultados constantes y deliciosos que se detienen automáticamente, de
modo que lo único que tiene que hacer es presionar un botón y disfrutar.
REGISTRE SU COMPRA:
www.ninjakitchen.com
1-877-646-5288
40 oz.
* La puissance maximale correspond à l’utilisation du Ninja XL Multi-Serve de 48 oz. et les autres
accessoires recommandés peuvent consommer significativement moins d’énergie ou de courant.
Algunos accesorios están incluidos. Accesorios adicionales están disponibles
para su compra en www.ninjakitchen.com. Por una lista de lo que viene incluido
con este modelo, consulte la parte superior de la caja o en línea.
Si tiene alguna pregunta acerca de su sistema compactco Ninja con Auto-iQ, llame a
Servicio al cliente de Ninja con Auto-iQ al 1-877-646-5288.
ESPECIFICACIONES TÉCNICAS:
Voltaje: Potencia: Capacidad del recipiente: 120V., 60Hz
1200 W*
24 oz. (3 tazas)
REGISTRE ESTA INFORMACIÓN:
Capacidad del XL Multi-Serve Ninja® : 48 oz. (6 tazas)
Número de modelo: �����������������������������������������
Capacidad del tazón:
Fecha de compra (guarde el recibo):
THIS BOOK COVERS MODEL NUMBERS:
BL491
__________________________________________________________
2
40 oz.
Bienvenue dans l’univers du système compact NinjaMD Auto-iQMC, l’assistant
polyvalent et personnalisé qui vous accompagne tous les jours dans la cuisine.
Le système compact Ninja Auto-iQ comporte des réglages préprogrammés qui
simplifient grandement la préparation des repas et des boissons. Ces réglages
comportent une durée de fonctionnement précise pour offrir des résultats
uniformes et délicieux. L’appareil s’arrête sans intervention de votre part; il suffit
d’appuyer sur un bouton et vous pourrez déguster vos recettes.
__________________________________________________________
¡GRACIAS!
If you should have a question about your Ninja Auto-iQ Compact System, please call the
Ninja Customer service line at 1-877-646-5288.
40 oz.
* La potencia máxima corresponde a la utilización de la Ninja XL Multi-Serve de 48 oz y otros
accesorios recomendados pueden significativamente menos energía o corriente.
w w w.ninjak i tchen.com
®
READ ALL INSTRUCTIONS BEFORE USE
IMPORTANT SAFEGUARDS
When using an electrical appliance, basic safety precautions should
always be observed, including the following:
WARNING
TO REDUCE THE RISK OF FIRE, ELECTRIC SHOCK OR INJURY:
1 WARNING: Never leave the appliance unattended while in use.
2 CAUTION: Blade assembly is sharp, handle with care. When
handling the blade assembly, always hold by the top of the blade
assembly.
3
CAUTION: DO NOT BLEND HOT LIQUIDS.
4 CAUTION: DO NOT process dry ingredients without adding liquid to
the cup. This product is not intended for dry blending.
5 CAUTION: Never attempt to remove the container (cup, processor
bowls, etc.) while the appliance is still running.
6IMPORTANT: Never add ingredients to the containers (processor bowl,
pitchers, etc.) before inserting the blade assembly first.
7IMPORTANT: Do not attempt to operate the container (processor bowls,
pitchers, etc.) without the lid on.
8IMPORTANT: Never run the appliance empty.
9IMPORTANT: Make sure that the motor base is plugged in for use.
10IMPORTANT: Make sure that the motor base is unplugged when not in
use.
11To protect against electrical shock, do not submerge the appliance or allow the
power cord to come into contact with water or any other liquid.
12DO NOT allow young children to operate the appliance or use as a toy. Close
supervision is necessary when any appliance is used by or near children.
13Never leave the appliance unattended when in use.
14Remove the power cord from the electrical outlet when not in use, before
disassembling parts, and before cleaning. To unplug, grasp the plug and pull
from the electrical outlet. Never pull from the power cord.
15DO NOT abuse the power cord. Never carry the appliance by the power cord or yank
it to disconnect from the electrical outlet; to unplug, grasp the plug, not the cord.
16DO NOT operate any appliance with a damaged cord or plug, after the appliance
malfunctions, or after it has been dropped or damaged in any manner. Return the
appliance to Euro-Pro Operating LLC for examination, repair or adjustment.
17DO NOT let the power cord hang over the edge of a table or counter or touch hot
surfaces such as the stove.
18Always use the appliance on a dry, level surface. Make sure the suction-cup feet
are wiped clean and no crumbs or residue are on the bottom of them.
19Keep hands, hair, clothing, and utensils out of container while processing to
reduce the risk of severe injury to persons or damage to the appliance. A scraper
may be used ONLY when the appliance is not running.
20 Avoid contact with moving parts.
21DO NOT attempt to sharpen blade assemblies.
22DO NOT use the appliance if the blade assembly is bent or damaged.
23To reduce risk of injury, never place the blade assembly on the motor base
without the proper container.
24DO NOT operate this appliance on or near any hot surfaces (such as on a gas or
electric burner or in a heated oven).
25The use of attachments or accessories (including canning jars), that are not
recommended or sold by the manufacturer may cause fire, electric shock, or
personal injury.
26DO NOT remove the container (cup, processor bowl, etc.) from the motor base
while the appliance is running.
27To reduce the risk of injury, NEVER operate the appliance without the blade
assembly installed in a container. DO NOT try to defeat the interlock mechanism;
make sure the blade is properly installed before operating the appliance.
28DO NOT expose containers (cups, processor bowls, etc.) to extreme
temperature changes.
29DO NOT overfill.
30If the appliance overheats, a thermal switch will activate and shut off the motor.
To reset, unplug the appliance and let cool down for approximately 30 minutes
before using again.
31This product is intended for household use only. DO NOT use this appliance for
anything other than its intended use. DO NOT use outdoors.
32Appliance accessories are NOT intended to be used in the microwave. DO NOT
place the container (cups, processor bowls, lids, etc.) in the microwave as it may
result in damage to the accessories.
SAVE THESE INSTRUCTIONS
POLARIZED PLUG
WARNING: To reduce the risk of electric shock, this appliance has a polarized plug (one blade is wider than the other). As a safety feature,
this plug will fit into a polarized outlet only one way. If the plug does not fit fully into the outlet, reverse the plug. If it still does not fit, contact
a qualified electrician. DO NOT force into outlet or try to modify to fit.
WARNING: Extension cords are not recommended for use with this product.
FOR HOUSEHOLD USE ONLY
1. 8 7 7. 6 4 6 . 5 2 8 8
3
®
LISEZ TOUTES LES INSTRUCTIONS AVANT L’UTILISATION
CONSIGNES DE SÉCURITÉ IMPORTANTES
Lorsque vous utilisez un appareil électrique, des mesures de sécurité élémentaires
devraient toujours être respectées, y compris les mesures suivantes :
AVERTISSEMENT
POUR RÉDUIRE LE RISQUE D’INCENDIE, D’ÉLECTROCUTION ET DE BLESSURES :
1 AVERTISSEMENT : Ne laissez jamais l’appareil sans surveillance pendant
l’utilisation.
2 MISE EN GARDE : Les lames sont tranchantes. Manipulez-les avec soin.
Lorsque vous manipulez un jeu de lames, tenez toujours le haut de l’arbre de
cette pièce.
3 MISE EN GARDE : NE MÉLANGEZ PAS DES LIQUIDES CHAUDS.
4 MISE EN GARDE : NE MÉLANGEZ PAS des ingrédients secs sans ajouter du
liquide dans le gobelet. Cet appareil n’est pas conçu pour le mélange à sec.
5 MISE EN GARDE : Ne retirez jamais le récipient (gobelet, bol du robot
culinaire, etc.) lorsque l’appareil est en marche.
6IMPORTANT : Insérez toujours le jeu de lames dans le récipient (gobelet, bol du
robot culinaire, etc.) avant d’y ajouter des ingrédients.
7IMPORTANT : Ne tentez pas de mettre l’appareil en marche sans d’abord
installer le couvercle sur le récipient (gobelet, bol du robot culinaire, etc.).
8IMPORTANT : Ne faites pas fonctionner l’appareil à vide.
9IMPORTANT : Assurez-vous que le bloc-moteur est branché avant d’utiliser
l’appareil.
10IMPORTANT : Assurez-vous que le bloc-moteur est débranché lorsque l’appareil
n’est pas utilisé.
11Pour éviter les risques d’électrocution, n’immergez pas l’appareil et assurez-vous que le
cordon d’alimentation n’entre pas en contact avec l’eau ou un autre liquide.
12NE PERMETTEZ PAS aux jeunes enfants d’utiliser l’appareil ou de s’en servir comme jouet.
Une surveillance attentive est nécessaire lors de l’emploi par des enfants ou à proximité
de ceux-ci.
13Ne laissez jamais l’appareil sans surveillance pendant l’utilisation.
14Veuillez débrancher le cordon d’alimentation de la prise de courant lorsque l’appareil
n’est pas utilisé et avant le nettoyage, l’assemblage ou le démontage des pièces. Pour
débrancher l’appareil, tirez sur la fiche et retirez-la de la prise d’alimentation. Ne tirez
jamais sur le cordon.
15PRENEZ SOIN du cordon d’alimentation. Ne transportez jamais l’appareil en le tenant par
le cordon. Ne débranchez jamais l’appareil de l’alimentation électrique en tirant sur le
cordon. Pour débrancher l’appareil, agrippez la fiche et non le cordon.
16N’UTILISEZ PAS l’appareil si sa fiche ou son cordon est endommagé(e), s’il a fait défaut
ou s’il a été échappé ou endommagé. Retournez l’appareil à Euro-Pro Operating LLC pour
vérification, réparation ou réglage.
17NE LAISSEZ PAS le cordon traîner sur le dessus d’une table ou d’un comptoir. Ne le laissez
pas entrer en contact avec des surfaces chaudes, comme la cuisinière.
18Utilisez toujours l’appareil sur une surface sèche et de niveau. Assurez-vous que les pieds
à ventouse sont propres et exempts de miettes et de résidus.
19Afin de réduire le risque de blessures graves ou de dommages à l’appareil, gardez les
mains, les cheveux, les vêtements et les ustensiles hors du récipient pendant l’utilisation.
Vous pouvez utiliser une raclette, mais SEULEMENT lorsque le mélangeur est éteint.
20 Évitez le contact avec les pièces mobiles.
21NE TENTEZ PAS d’affûter les jeux de lames.
22N’UTILISEZ PAS l’appareil si le jeu de lames est tordu ou endommagé.
23Afin de réduire les risques de blessures, ne placez jamais le jeu de lames sur le blocmoteur sans y avoir d’abord fixé le récipient adéquat.
24N’UTILISEZ PAS cet appareil sur une surface chaude ou près de celle-ci (brûleur à gaz,
plaque électrique ou four chaud).
25L’utilisation d’accessoires, y compris des bocaux de conserve, qui ne sont pas
recommandés et vendus par le fabricant peut causer un incendie ou des blessures, ou
entraîner l’électrocution.
26NE RETIREZ PAS le récipient (gobelet, bol du robot culinaire, etc.) du bloc-moteur lorsque
l’appareil est en marche.
27Pour réduire les risques de blessures, ne mettez JAMAIS l’appareil en marche sans
d’abord mettre le jeu de lames. NE TENTEZ PAS de désactiver le mécanisme de
verrouillage; assurez-vous que les lames sont installées adéquatement avant de le mettre
en marche.
28N’EXPOSEZ PAS les récipients (gobelets, bols du robot culinaire, etc.) à des changements
de température extrêmes.
29NE REMPLISSEZ PAS excessivement le récipient.
30En cas de surchauffe de l’appareil, le disjoncteur thermique s’active et coupe le moteur.
Pour le réinitialiser, débranchez l’appareil et laissez-le refroidir pendant environ 30
minutes avant de l’utiliser de nouveau.
31Cet appareil est conçu pour un usage domestique seulement. Utilisez l’appareil
UNIQUEMENT aux fins pour lesquelles il est prévu. N’UTILISEZ PAS cet appareil à
l’extérieur.
32Les accessoires accompagnant l’appareil ne sont PAS conçus pour l’utilisation dans le
four à micro-ondes. NE METTEZ PAS les récipients (gobelets, bols du robot culinaire,
couvercles, etc.) dans le four à micro-ondes, car cela pourrait endommager les
accessoires.
CONSERVEZ CES INSTRUCTIONS
FICHE POLARISÉE
AVERTISSEMENT : Pour réduire le risque de chocs électriques, cet appareil possède une fiche polarisée (une lame est plus large que l’autre).
Par mesure de sécurité, cette fiche ne peut être insérée que d’un seul côté dans une prise polarisée. Si la fiche ne s’insère pas complètement
dans la prise de courant, inversez-la. Si cela ne fonctionne toujours pas, contactez un électricien qualifié. NE FORCEZ PAS ou ne modifiez pas
la fiche pour la brancher dans une prise murale.
AVERTISSEMENT : Il n’est pas recommandé d’utiliser des rallonges électriques pour brancher cet appareil.
4
w w w.ninjak i tchen.com
POUR USAGE DOMESTIQUE SEULEMENT
®
LEA COMPLETAMENTE LAS INSTRUCCIONES ANTES DE UTILIZARLO
MEDIDAS IMPORTANTES DE SEGURIDAD
Al usar aparatos eléctricos, siempre debe seguir precauciones básicas de
seguridad, incluyendo las siguientes:
ADVERTENCIA
PARA REDUCIR EL RIESGO DE INCENDIO, DESCARGA ELÉCTRICA O DAÑOS
PERSONALES:
1 ADVERTENCIA: Nunca deje el artefacto desatendido mientras esté
funcionando.
2 CUIDADO: Las cuchillas son filosas, manéjelas con cuidado. Al
manipular las cuchillas, agárrelas siempre por la parte superior de
las mismas.
3
CUIDADO: NO LICÚE LÍQUIDOS CALIENTES.
4 CUIDADO: NO procese ingredientes secos sin agregar líquido en la
taza. Este producto no está diseñado para licuar en seco.
5 CUIDADO: Nunca saque el recipiente (taza, tazones del procesador,
etc.) mientras el artefacto esté funcionando.
6IMPORTANTE: Nunca agregue ingredientes en el recipiente (taza,
tazones del procesador, etc.) antes de colocarle el conjunto de las
cuchillas.
7IMPORTANTE: No intente hacer funcionar el recipiente (taza, tazones
del procesador, etc.) sin colocarle la tapa.
8IMPORTANTE: Nunca haga funcionar el artefacto vacío.
9IMPORTANTE: Verifique que la base del motor esté enchufada y lista
para usar.
10IMPORTANTE: Verifique que la base del motor esté desenchufada
cuando no la utilice.
11Para protegerse de una descarga eléctrica, no sumerja el artefacto ni permita que
el cable de alimentación entre en contacto con agua o cualquier otro líquido.º
12NO permita que los niños pequeños usen el artefacto o que lo traten como un
juguete. Tenga mucho cuidado al utilizar cualquier aparato eléctrico cerca de
niños.
13Nunca deje el artefacto desatendido mientras esté funcionando.
14Desenchufe el cable de alimentación del tomacorriente cuando no lo use, antes
de quitarle partes y antes de limpiarlo. Para desenchufarlo, sujete el enchufe y
retírelo del tomacorriente. Nunca tire del cable de alimentación.
15NO maltrate el cable de alimentación. Nunca levante el artefacto por el cable, o
tire del cable para desconectarlo del tomacorriente; agárrelo por el enchufe y tire
para desconectarlo.
16NO utilice ningún artefacto si el cable o el enchufe están dañados o luego de una
falla, o si ha sufrido cualquier tipo de daño. Retórnelo a Euro-Pro Operating LLC
para que sea examinado, reparado o ajustado.
17NO permita que el cable cuelgue por el borde de la mesa o mesada, o que toque
superficies calientes como la estufa.
18Use siempre el artefacto sobre una superficie seca y nivelada. Verifique que las
patas con ventosa estén limpias y que no hayan quedado migas o residuos en la
parte de abajo.
19Mantenga sus manos, cabello, ropa y utensilios fuera del recipiente al procesar
para reducir la posibilidad de daños graves a personas o de dañar la unidad.
Puede utilizar una espátula, pero ÚNICAMENTE cuando el artefacto no esté
funcionando.
20 Evite tocar las partes móviles.
21NO intente afilar las cuchillas.
22NO use el artefacto si las cuchillas están dobladas o dañadas.
23Para reducir el riesgo de heridas, nunca coloque las cuchillas en la base sin el
recipiente correspondiente.
24NO use este artefacto sobre o cerca de superficies calientes (como una estufa
eléctrica o de gas, o en un horno caliente).
25El uso de accesorios o cuchillas, incluyendo jarras no recomendados o vendidos
por el fabricante puede causar incendios, descargas eléctricas o daños
personales.
26NO saque el recipiente (taza, tazones del procesador, etc.) de la base del motor
mientras el artefacto esté funcionando.
27Para reducir el riesgo de lesiones, NUNCA use el artefacto con las cuchillas
colocadas. NO intente alterar el mecanismo de traba; verifique que las cuchillas
estén correctamente instalados antes de usar el artefacto.
28No exponga los recipientes (taza, tazones del procesador, etc.) a cambios
extremos de temperatura.
29NO lo llene de más.
30Si el artefacto recalienta, se activará un interruptor térmico que apagará el
motor. Para reiniciarlo, desenchufe el artefacto y déjelo enfriar durante unos 30
minutos antes de usarlo nuevamente.
31Este producto es para uso doméstico solamente. NO utilice este artefacto para
ningún otro destino distinto al indicado. NO lo use en el exterior.
32Los accesorios del artefacto NO están diseñados para usarlos en el microondas.
NO coloque el recipiente (taza, tazones del procesador, tapas, etc.) en el
microondas ya que podría dañarlos.
CONSERVE ESTAS INSTRUCCIONES
ENCHUFE POLARIZADO
ADVERTENCIA: Para reducir el riesgo de una descarga eléctrica, este artefacto posee un enchufe polarizado (una pata es más ancha que la
otra). Como medida de seguridad, este cable entrará únicamente en un tomacorriente polarizado. Si el enchufe no entra completamente en
el tomacorriente, inviértalo. Si aún no entra, llame a un electricista calificado. NO lo fuerce dentro del tomacorriente ni trate de modificarlo
para que calce.
ADVERTENCIA: No se recomienda usar cables de extensión con este producto.
PARA USO DOMÉSTICO SOLAMENTE
1. 8 7 7. 6 4 6 . 5 2 8 8
5
®
FEATURES:
•
•
•
Nutrient & Vitamin Extraction†
1200 Watt Motor
User Interface:
Start/Stop
Start/Stop is a manual setting that runs at High speed for 60
seconds. This button can be pressed at any time if you wish to
stop a program.
Smooth Boost™
SMOOTH BOOST YES/NO is a special feature available
when using the Auto-iQ™ EXTRACT and Auto-iQ BLEND.
This setting can be used to control the consistency of your
beverage recipes. Select SMOOTH BOOST YES when
smoother, creamier results are desired. This is the default
program for both Auto-iQ EXTRACT and Auto-iQ BLEND
programs. Select SMOOTH BOOST NO when more of a
textured consistency is desired.
Pulse
Offers greater control to help prevent over-processing or overblending. Simply hold down the button and our blades will run
at a high speed for a quick burst of power to break through ice
or chop vegetables.
Low
LOW is a manual setting that runs for 30 seconds and will
automatically shut off. On this setting, blades rotate at a
slower speed, allowing heavy recipes like doughs to be mixed.
AUTO-IQ EXTRACT†
EXTRACT should be used when blending hard, leafy, or
fibrous whole fruits and vegetables, including apples, kale,
and celery. This optimized program allows you to blend
fresh items with their skins, seeds, and stems into nutrient
extractions. Before using EXTRACT, select Smooth Boost
YES or NO depending on your desired consistency.
AUTO-IQ BLEND
BLEND can be used to make a range of beverages that do not
include hard or fibrous fresh ingredients, such as milkshakes,
protein smoothies, soft fresh-fruit smoothies, and frozen
cocktails. Before using BLEND, select SMOOTH BOOST YES
or NO depending on your desired consistency.
AUTO-IQ CHOP
CHOP is a program composed of timed pulses and pauses
to deliver consistent chopping results for a range of recipes
including ingredient prep, salsas, and ground meat. When
ingredients have reached your desired consistency, stop by
selecting AUTO-IQ CHOP or Start/Stop.
•
•
Sip & Seal® lids for drinks on the go.
Nutri Ninja® Cups and Sip & Seal lids, BPA free, and
dishwasher safe.
NOTE: The Stainless Steel Ninja® Cup is NOT dishwasher safe.
• Ninja® 40 oz. Blend and Prep Bowl & Lid, are BPA free,
dishwasher safe.
•
†
Cord Wrap located on back of the motor base.
Ice to Snow
Crushing Ice to Snow is easy – take ice cubes directly from your
freezer, and put in a dry Ninja® Cup – use the pulse feature in
short quick bursts until it’s in snow a snow like consistency.
E xtract a drink containing vitamins and nutrients
from fruits and vegetables.
6
CARACTÉRISTIQUES :
•
•
•
Extraction des vitamines† et des nutriments
Moteur de 1200W
Interface utilisateur :
Marche/arrêt « Start/Stop »
L a commande Marche/arrêt « Start/Stop » est un réglage manuel
activant l’appareil à vitesse élevée pendant 60 secondes. Enfoncez
ce bouton en tout temps pour arrêter le cycle d’un programme.
Fonction « Smooth Boost™ »
Les réglages SMOOTH BOOST YES/NO représentent une
fonction spéciale qu’il est possible d’utiliser avec les programmes
Auto-iQMC EXTRACT (extraction) et Auto-iQ BLEND (mélange). Ce
réglage permet la commande précise de la consistance de vos
boissons. Sélectionnez « SMOOTH BOOST YES » lorsque vous
souhaitez obtenir des boissons plus homogènes et crémeuses.
Il s’agit du programme par défaut pour les programmes Auto-iQ
EXTRACT (extraction) et Auto-iQ BLEND (mélange). Sélectionnez
« SMOOTH BOOST NO » lorsque vous souhaitez obtenir des
boissons à la consistance moins homogène.
Impulsions « Pulse »
Le réglage d’impulsions (« Pulse ») procure une plus grande
maîtrise pour éviter le hachage et le mélange excessif des
ingrédients. Il suffit de maintenir le bouton enfoncé et les
lames tournent plus rapidement afin d’offrir une poussée de
puissance pour broyer les glaçons ou hacher des légumes.
Vitesse basse « Low »
La vitesse basse « Low » est un réglage manuel qui
active l’appareil pendant 30 secondes avant de l’éteindre
automatiquement. Lorsque ce réglage est sélectionné, les lames
tournent plus lentement et permettent de mélanger des recettes
plus consistantes, comme de la pâte.
AUTO-IQ EXTRACT† (extraction)
Il faut utiliser le programme EXTRACT pour mélanger des
fruits et des légumes entiers qui sont durs, fibreux ou
comportent des feuilles, comme des pommes, du chou
frisé et du céleri. Ce programme optimisé vous permet de
mélanger des aliments frais avec la peau, les pépins et les
tiges pour obtenir l’extraction des nutriments. Avant d’utiliser
le programme EXTRACT (extraction), sélectionnez « Smooth
Boost YES » ou « NO », selon la consistance désirée.
AUTO-IQ BLEND (mélange)
Le programme BLEND (mélange) permet de préparer un
éventail de boissons ne contenant pas d’ingrédients frais durs
ou fibreux, comme des laits frappés, des boissons protéinées,
des frappés à base de fruits frais mous et des cocktails glacés.
Avant d’utiliser le programme BLEND (mélange), sélectionnez «
Smooth Boost YES » ou « NO », selon la consistance désirée.
Hachage AUTO-IQ CHOP
Le mode Hachage AUTO-IQ CHOP est un programme
combinant des séquences d’impulsions et des pauses dont la
durée est prédéterminée afin d’offrir des résultats uniformes
lors du hachage d’ingrédients pour la préparation d’un éventail
de recettes, dont les salsas et la viande hachée. Lorsque les
ingrédients ont la consistance désirée, éteignez l’appareil en
appuyant sur AUTO-IQ CHOP ou sur le bouton Marche/arrêt
« Start/Stop ».
• Couvercles Sip & SealMD pour des boissons à emporter.
• Gobelets Nutri NinjaMD et couvercles Sip & Seal exempts de
bisphénol A (BPA) et résistants au lave-vaisselle.
REMARQUE : Le Gobelet NinjaMD en acier inoxydable n’est PAS
résistant au lave-vaisselle.
• Bol et couvercle exempts de bisphénol A (BPA) et résistants au
lave-vaisselle.
• Support pour enrouler le cordon à l’arrière du bloc-moteur.
De la glace en neige
Il est facile de concasser de la glace – sortez des glaçons de votre
congélateur, et mettez-les dans un gobelet sec de Ninja – activez
la fonction de pulsations en courts intervalles rapides, jusqu’à ce
que la glace ait une consistance de neige.
†
E xtrait les vitamines et les nutriments des fruits et des
légumes lors de la préparation des boissons.
w w w.ninjak i tchen.com
CARACTERÍSTICAS:
Extracción de nutrientes† y vitaminas
Motor de 1200 vatios
Interfaz del usuario:
Start/Stop (encender/apagar)
El Start/Stop es un ajuste manual que funciona a alta
velocidad durante 60 segundos. Puede presionar este botón
en cualquier momento si desea detener un programa.
Smooth Boost™ SMOOTH BOOST YES/NO es una función especial que está
disponible al utilizar Auto-iQMR EXTRACT y Auto-iQ BLEND.
Esta función se puede usar para controlar la consistencia
de las recetas de sus bebidas. Seleccione SMOOTH BOOST
YES cuando quiera resultados más suaves y cremosos. Esta
es la configuración por defecto para los programas Auto-iQ
EXTRACT and Auto-iQ BLEND. Seleccione SMOOTH BOOST
NO cuando quiera una consistencia con mayor textura.
Pulse (Pulso)
Le brinda mayor control para evitar procesar o licuar de más.
Simplemente presione este botón y las cuchillas funcionarán
a alta velocidad en ráfagas rápidas para pulverizar hielo o
picar verduras. Low (baja)
LOW es un ajuste manual que funciona durante 30 segundos
y se apaga automáticamente. En este ajuste, las cuchillas
giran más lentamente, permitiendo mezclar recetas más
densas como salsas y masas.
AUTO-IQ EXTRACT†
Debe utilizar EXTRACT al licuar frutas enteras duras, con hojas
o fibrosas y verduras, incluyendo manzanas, col rizada y apio.
Este programa optimizado le permite licuar artículos frescos
sin pelarlos, sacarles las semillas y los tallos, para hacer tragos
nutritivos. Antes de usar EXTRACT, seleccione Smooth Boost
YES o NO dependiendo de la consistencia deseada.
AUTO-IQ BLEND
Se puede usar BLEND para hacer una variedad de bebidas
que no incluyan ingredientes frescos duros ni fibrosos,
como malteadas, batidos de proteínas, batidos de fruta
fresca blanda y cócteles congelados. Antes de usar BLEND,
seleccione Smooth Boost YES o NO dependiendo de la
consistencia deseada.
AUTO-IQ CHOP
AUTO-IQ CHOP es un programa compuesto de pulsos y
pausas temporizados que brinda un picado parejo para
un amplio rango de recetas, incluyendo la preparación
de ingredientes, salsas y carne picada. Una vez que los
ingredientes hayan logrado la consistencia deseada,
deténgalo presionando AUTO-IQ CHOP o Start/Stop.
• Tapas Sip & Seal® para bebidas para llevar.
• Las tazas Nutri Ninja® y las tapas Sip & Seal no contienen BPA y
son aptas para lavavajillas.
NOTA: La Taza Ninja® de acero inoxidable NO es apta para
lavavajillas.
• Tazón de 40 oz. y tapa, sin BPA, apta para lavavajilla.
• Gancho para enrollar el cable en la parte de atrás de la base.
Hielo en la nieve
Es fácil moler hielo - Tome cubos de hielo directamente de su
congelador y colóquelos en una taza Ninja® seca - Use la función
de pulsos en ráfagas cortas hasta obtener una consistencia
como la nieve.
•
•
•
†
E xtraiga el jugo con vitaminas y nutrientes de
frutas y verduras.
®
Motor Base
Bloc-moteur
Base con motor
ACCESSORIES
INCLUDED
WITH YOUR
UNIT
Nutri Ninja® Cup
Gobelet Nutri NinjaMD
Taza Nutri Ninja®
Stainless Steel Ninja® Cup
Gobelet NinjaMD en acier
inoxydable
Taza Ninja® de acero inoxidable
24 oz.
XL Multi-Serve Ninja® de 48 oz.
Blend and Prep Bowl/Lid
Bol mélange et préparation/
couvercle
Tazón mezclar y preparar/tapa del
procesador
48 oz.
40 oz.
WARNING: DO NOT BLEND HOT
LIQUIDS
AVERTISSEMENT : NE MÉLANGEZ
PAS DES LIQUIDES CHAUDS.
A DVERTENCIA: NO LICÚE LÍQUIDOS
CALIENTES.
Max liquid capacity: 40 oz.
Capacité de liquide max. : 40 oz
Capacidad máxima de líquido: 40 oz.
XL Multi-Serve 48 oz. Ninja®
NinjaMD XL Multi-Serve de 48 oz.
ACCESORIOS
INCLUIDOS
CON LA
UNIDAD
Pro Extractor Blades™
Lames Pro Extractor BladesMC
Cuchillas Pro Extractor
Blades™
24 oz.
ARNING: DO NOT BLEND HOT LIQUIDS
W
AVERTISSEMENT : NE MÉLANGEZ PAS DES LIQUIDES CHAUDS
A DVERTENCIA: NO LICÚE LÍQUIDOS CALIENTES.
ACCESSOIRES
INCLUS
AVEC VOTRE
APPAREIL
Sip & Seal® Lid
Couvercle Sip & SealMD
Tapa Sip & Seal®
1. 8 7 7. 6 4 6 . 5 2 8 8
NOTE: Sip & Seal lid and Pro Extractor Blades can be
used with all Ninja Cups.
REMARQUE : Le couvercle Sip & Seal et les lames Pro
Extractor Blades peuvent être utilisés avec tous les
gobelets Ninja.
NOTA: La tapa Sip & Seal y la cuchilla Pro Extractor
Blades se pueden usar con todas las tazas Ninja.
Chopping Blade
Lame à hacher
Cuchilla para picar
Dough Blade
Lame à pétrir
Cuchilla para amasar
7
®
or
ou
o
or
ou
o
START
STOP
PULSE
YES
SMOOTH
BOOST
EXTRACT
BLEND
NO
A
B
ASSEMBLY
ASSEMBLAGE
ARMADO
C
D
USE
UTILISATION
USO
E
F
REMOVAL
DÉMONTAGE
EXTRACCIÓN
For best results, follow the recipe/ingredient loading instructions found in your Inspiration Guide.
CAUTION: DO NOT BLEND HOT LIQUIDS.
ALLOW THE LIQUIDS OR FOODS TO COOL TO ROOM TEMPERATURE BEFORE BLENDING.
IMPORTANT: DO NOT OVERFILL. TO AVOID SPILLING, DO NOT ADD INGREDIENTS PAST THE “MAX FILL” LINE.
ASSEMBLY &
USE OF NUTRI
NINJA® CUP
OR XL MULTISERVE 48 OZ.
NINJA®
NOTE: Ninja® Auto-iQ™
Technology can sense
which container is on the
motor base. The function
lights will illuminate
depending on which
Nutri Ninja Cup is placed
on the motor base.
BEFORE FIRST USE:
•
•
•
•
•
•
2
3
4
Place the motor base on a clean, dry, level
surface such as a counter or tabletop. Press
down on the motor base to make sure the
suction cups adhere to the counter or tabletop.
Add ingredients to the Nutri Ninja cup.
Place the Pro Extractor Blades onto the cup and
tightly screw on clockwise (A) until you have a
good seal.
Turn the Nutri Ninja cup upside down and place
it onto the motor base (B), aligning the tabs on
the cup with the motor base. Rotate the Nutri
Ninja cup clockwise until it locks in place (you
will hear a click when the lock is engaged).
USE:
5
ASSEMBLY:
1
8
Remove all packaging material and labels from
the appliance.
Wash the lids, cups, blades, and Blend and Prep
Bowl in warm, soapy water with a soft cloth.
Rinse and dry thoroughly.
NOTE: The Double Wall Stainless Steel Ninja
Cup is NOT dishwasher safe.
Lids, cups, blades, and pitcher are all dishwasher
safe. It is recommended that the lids and
attachments be placed on the top rack. Ensure
that the Pro Extractor Blades™ are removed from
the cups before placing in the dishwasher.
Wipe the motor base clean with a damp cloth.
6
Once the cup is engaged, the programs
available for that attachment will illuminate.
Select the program (C) desired based on your
recipe. The Auto-iQ program will stop the
appliance automatically at the end of the
program.
To pause the program, press the selected speed
or Auto-iQ Program a second time.
w w w.ninjak i tchen.com
REMOVAL:
7
Once you have reached your desired
consistency, press the START/STOP button to
turn the program off. Turn the Nutri Ninja cup
counter-clockwise (D) and pull straight up to
remove (E).
8 Turn the cup upright and remove the Pro
Extractor Blades by twisting the Pro Extractor
Blades counter-clockwise.
9 Place the Sip & Seal® lid onto the Nutri Ninja
cup, twist to seal, and enjoy!
10 To release the motor base from the counter or
tabletop, place your hands underneath both
sides of the motor base and gently pull the unit
up and toward you (F).
®
Pour des résultats optimaux, veuillez respecter les recettes et les directives relatives à l’ajout des ingrédients dans votre guide d’inspiration.
MISE EN GARDE : NE MÉLANGEZ PAS DES LIQUIDES CHAUDS.
LAISSEZ LES LIQUIDES ET LES ALIMENTS REFROIDIR À TEMPÉRATURE AMBIANTE AVANT DE LES MÉLANGER.
IMPORTANT : NE PAS REMPLIR EXCESSIVEMENT LE RÉCIPIENT. POUR ÉVITER LES DÉGÂTS, VEILLEZ À CE QUE LES INGRÉDIENTS NE DÉPASSENT PAS LA LIGNE DE REMPLISSAGE « MAX ».
AVANT LA PREMIÈRE UTILISATION :
ASSEMBLAGE
ET UTILISATION • Retirez tous les composants d’emballage et
toutes les étiquettes de l’appareil.
DU GOBELET
•
Avec
un linge doux, lavez les couvercles,
NUTRI NINJA MD
les gobelets, les lames et le bol mélange et
OU DU NINJA MD
préparation à l’eau tiède et savonneuse.
• Rincez et séchez complètement les composants.
XL MULTISERVE DE 48 OZ. • REMARQUE : Le gobelet Ninja à double paroi
REMARQUE : La
technologie NinjaMD
Auto-iQMC détecte
automatiquement le
type de récipient fixé
au bloc-moteur. Les
témoins correspondant
aux fonctions s’allument,
selon le type de gobelet
Nutri Ninja fixé au blocmoteur.
•
•
en acier inoxydable n’est PAS résistant au
lave-vaisselle.
Les couvercles, les gobelets, les lames et le pichet
vont tous au lave-vaisselle. Il est recommandé de
placer les couvercles et les accessoires dans le
panier supérieur du lave-vaisselle. Veuillez retirer
le jeu de lames Pro Extractor BladesMC des gobelets
avant de les mettre dans le lave-vaisselle.
Essuyez le bloc-moteur avec un chiffon humide.
2
3
4
UTILISATION :
5
ASSEMBLAGE :
1
Déposez le bloc-moteur sur une surface propre,
sèche et de niveau, comme un comptoir ou une
table. Appuyez sur le bloc-moteur pour que les
ventouses adhèrent au comptoir ou à la table.
Ajoutez les ingrédients dans le gobelet
Nutri Ninja.
Vissez fermement les lames Pro Extractor
Blades sur le gobelet dans le sens des aiguilles
d’une montre jusqu’à ce que l’assemblage soit
étanche.
Retournez le gobelet Nutri Ninja et placez-le
à l’envers sur le bloc-moteur, en alignant les
onglets du gobelet avec le bloc-moteur. Faites
tourner le gobelet Nutri Ninja jusqu’à ce qu’il
se verrouille en place (vous entendrez un « clic »
lorsque le verrou est enclenché).
6
Une fois le gobelet fixé au bloc-moteur, les
témoins lumineux des programmes compatibles
s’allumeront. Sélectionnez le programme désiré
en fonction de votre recette. Le réglage Auto-iQ
arrête automatiquement l’appareil à la fin du
cycle programmé.
Pour interrompre le programme, appuyez sur
le réglage de vitesse ou le réglage Auto-iQ
préprogrammé une seconde fois.
DÉMONTAGE :
7
Lorsque vous avez obtenu la consistance
désirée, éteignez l’appareil en appuyant sur
le bouton Marche/arrêt « START/STOP ».
Faites tourner le gobelet Nutri Ninja dans le
sens contraire des aiguilles d’une montre et
soulevez-le pour le dégager de l’appareil.
8 Retournez le gobelet à l’endroit et enlevez le
jeu de lames Pro Extractor Blades en tournant
son support dans le sens contraire des aiguilles
d’une montre.
9 Mettez le couvercle Sip & SealMD sur le gobelet
Nutri Ninja, vissez-le afin qu’il soit étanche et
dégustez votre boisson!
10 Pour dégager le bloc-moteur du comptoir ou de
la table, insérez l’une de vos mains de chaque
côté du bloc-moteur et soulevez celui-ci en le
tirant doucement vers vous.
Para obtener los mejores resultados, siga las instrucciones de la receta/carga de los ingredientes que viene en la guía de instrucciones.
CUIDADO: NO LICÚE LÍQUIDOS CALIENTES.
DEJE QUE LOS LÍQUIDOS SE ENFRÍEN HASTA LA TEMPERATURA AMBIENTE ANTES DE LICUARLOS.
IMPORTANTE: NO LO LLENE DE MÁS. PARA EVITAR DERRAMES, NO AGREGUE INGREDIENTES POR ENCIMA DE LA LÍNEA DE “MAX”.
ARMADO Y USO
DE LA TAZA
NUTRI NINJA®
O DEL XL MULTISERVE NINJA® DE
48 OZ.
NOTA: La tecnoología
Ninja® Auto-iQMR puede
detectar qué jarra está
colocada en la base
del motor. Las luces de
función se encenderán
dependiendo del tipo de
taza Nutri Ninja colocada
en la base.
ANTES DE USARLA POR PRIMERA VEZ:
• Saque todo el material de embalaje y etiquetas
del artefacto.
• Lave las tapas, las tazas, el tazón mezclar y
preparar y las cuchillas con agua tibia y jabón,
usando un trapo suave.
• Enjuáguela y séquela completamente.
• NOTA: La taza Ninja de doble pared de acero
inoxidable NO es apta para lavavajillas.
• Las tapas, tazas, cuchillas y jarra son aptos para
lavavajillas. Le recomendamos colocar la tapa y
los accesorios en el estante de arriba. Asegúrese
de remover las Pro Extractor BladesMR de las
tazas antes de colocarlas en el lavavajillas.
• Limpie la base del motor con un trapo húmedo.
ARMADO:
1 Coloque la base del motor sobre una superficie
limpia, seca y nivelada como una mesada o
mesa. Presione la base del motor hacia abajo
para asegurar que las ventosas se adhieran a la
mesada o a la mesa.
2 Agregue los ingredientes en el taza Nutri Ninja.
3 Coloque la Pro Extractor Blades sobre la taza y
ajústela bien en sentido horario hasta obtener un
buen cierre.
4 Dé vuelta la taza Nutri Ninja y colóquela sobre la
base del motor, alineando las pestañas de la taza
con la base del motor. Gire la taza Nutri Ninja en
sentido horario hasta que se trabe en su lugar.
Escuchará un clic cuando se trabe.
USO:
5 Cuando se coloca la taza, se encenderán los
programas disponibles para ese accesorio.
Seleccione el programa deseado en base a su
receta. El programa Auto-iQ apagará el artefacto
automáticamente al finalizar el programa.
6 Para pausar el programa, presione la velocidad o el
programa AUTO-iQ seleccionado por segunda vez.
1. 8 7 7. 6 4 6 . 5 2 8 8
EXTRACCIÓN:
7 Una vez que haya alcanzado la consistencia
deseada, presione el botón START/STOP para
apagar el programa. Gire la taza Nutri Ninja en
sentido contra horario y levántela para removerla.
8 Dé vuelta la taza y remueva la Pro Extractor
Blades girándola en sentido contra horario.
9 ¡Coloque la tapa Sip & Seal® sobre la taza Nutri
Ninja, gírela para cerrarla y disfrute!
10 Para liberar la base del motor de la mesada o
de la mesa, coloque sus manos por debajo de
ambos costados de la base y tire suavemente
hacia arriba.
9
®
40 OZ. BLEND AND PREP BOWL
or
ou
y
PULSE
A
B
C
D
E
BLEND
F
ASSEMBLY
ASSEMBLAGE
ARMADO
CAUTION: BLADE ASSEMBLY IS
NOT LOCKED IN PLACE. IF USING
THE POUR SPOUT, ENSURE THE
LID IS FULLY LOCKED ONTO THE
BLEND AND PREP BOWL.
ASSEMBLY OF
THE BLEND AND
PREP BOWL
NOTE: Ninja Auto-iQ
Technology can sense
which container is on
the motor base. The
function lights will
illuminate depending
on which container is
placed on the motor
base.
®
10
ASSEMBLY:
™
CAUTION: THE BLADE
ASSEMBLY IS NOT LOCKED IN
PLACE. IF POURING WITH THE
LID REMOVED, ALWAYS REMOVE
THE BLADE ASSEMBLY FIRST.
WARNING: NEVER LEAVE THE APPLIANCE
UNATTENDED WHILE IN USE.
CAUTION: USE CAUTION WHEN
HANDLING THE BLADE ASSEMBLY AS IT
IS VERY SHARP.
IMPORTANT: MAKE SURE THE MOTOR
BASE IS PLUGGED IN FOR USE.
1 Holding the desired blade assembly by the
top of the shaft, place it onto the drive gear
(A) inside the Bowl. Ensure the attachment is
seated properly and is standing upright.
NOTE: THE BLADE ASSEMBLY WILL FIT
LOOSELY ON THE DRIVE GEAR.
2
3
4
5
Place the motor base on a clean, dry, level surface
such as a counter or tabletop. Press down on the
motor base to make sure the suction cups adhere to
the counter or tabletop.
Align and lower the Blend and Prep Bowl (B)
onto the motor base. Handle should be aligned
slightly to the right of the LOCK symbol on the
motor base.
Rotate the Bowl clockwise (C) until it locks in place
(you will hear a click when the lock is engaged).
The Bowl can be placed on the motor base
two ways; the handle can be on the front right
corner (D) or the front left corner (E).
w w w.ninjak i tchen.com
6
7
8
9
IMPORTANT: DO NOT
OVERFILL. TO AVOID SPILLING,
DO NOT ADD INGREDIENTS
PAST THE “MAX LIQUID” LINE.
Add the ingredients to the Bowl, making sure
that they do not exceed the highest measured
marking line on the side of the Bowl.
Holding the lid by the handle in the upright position
(F), place it on top of the Bowl aligning the triangle
( ) located on the lid with the triangle ( ) located
on the Bowl handle. Press the handle down until
you hear a click.
The triangles on the lid and the Bowl handle
MUST be aligned in order for the blender to
turn on.
Plug the power cord into the electrical outlet.
The function lights will illuminate.
®
MISE EN GARDE : LE JEU DE LAMES N’EST
PAS VERROUILLÉ DANS LE RÉCIPIENT. SI
VOUS TRANSVIDEZ UN MÉLANGE PAR LE
BEC VERSEUR, ASSUREZ-VOUS QUE LE
COUVERCLE EST BIEN VERROUILLÉ SUR LE
BOL MÉLANGE ET PRÉPARATION.
ASSEMBLAGE DU
BOL MÉLANGE ET
PRÉPARATION
REMARQUE : La
technologie NinjaMD
Auto-iQ MC détecte
automatiquement le
type de récipient fixé
au bloc-moteur. Les
témoins correspondant
aux fonctions s’allument,
selon le type de récipient
ou de gobelet fixé au
bloc-moteur.
ASSEMBLAGE :
ARMADO DEL
TAZÓN MEZCLAR
Y PREPARAR
NOTA: La tecnología
Ninja® Auto-iQ MR puede
detectar qué jarra está
colocada en la base
del motor. Las luces de
función se encenderán
dependiendo del tipo de
recipiente colocado en
la base.
2
AVERTISSEMENT : NE LAISSEZ JAMAIS
L’APPAREIL SANS SURVEILLANCE
PENDANT L’UTILISATION.
MISE EN GARDE : SOYEZ PRUDENT
LORSQUE VOUS NETTOYEZ LES JEUX
DE LAMES, CAR LES LAMES SONT
TRÈS COUPANTES.
IMPORTANT : ASSUREZ-VOUS QUE LE
BLOC-MOTEUR EST BRANCHÉ AVANT
D’UTILISER L’APPAREIL.
1 En tenant l’arbre du jeu de lames désiré, insérez
celui-ci dans le pignon d’entraînement situé
dans le bol (A). Assurez-vous que l’accessoire
est bien logé en position verticale.
REMARQUE : LE JEU DE LAMES EST
FIXÉ DE MANIÈRE AMOVIBLE DANS LE
PIGNON D’ENTRAÎNEMENT.
CUIDADO: LAS CUCHILLAS NO SE
TRABAN EN SU LUGAR. SI USA EL
PICO VERTEDOR, VERIFIQUE QUE
LA TAPA ESTÉ TRABADA EN EL
TAZÓN MEZCLAR Y PREPARAR.
MISE EN GARDE : LE JEU DE LAMES N’EST
PAS VERROUILLÉ DANS LE RÉCIPIENT.
SI VOUS TRANSVIDEZ LE CONTENU
DU RÉCIPIENT SANS LE COUVERCLE,
ENLEVEZ TOUJOURS LA LAME DE
HACHAGE D’ABORD.
3
4
5
Déposez le bloc-moteur sur une surface propre,
sèche et de niveau, comme un comptoir ou une
table. Appuyez sur le bloc-moteur pour que les
ventouses adhèrent au comptoir ou à la table.
Alignez et déposez le bol du robot culinaire
(B) sur le bloc-moteur. La poignée doit être
légèrement orientée à la droite du symbole de
verrouillage « LOCK » du bloc-moteur.
Faites tourner le bol dans le sens des aiguilles
d’une montre (C) jusqu’à ce qu’il se verrouille
en place; vous entendrez un « clic » lorsque le
verrou est enclenché.
Il est possible d’insérer le bol sur le bloc-moteur
de deux façons, soit la poignée en avant vers la
droite (D) ou vers la gauche (E).
6
7
8
9
ADVERTENCIA: NUNCA DEJE EL
ARTEFACTO DESATENDIDO MIENTRAS
ESTÉ FUNCIONANDO.
CUIDADO: TENGA CUIDADO AL
MANIPULAR LAS CUCHILLAS YA QUE
SON MUY FILOSAS.
IMPORTANTE: VERIFIQUE QUE LA BASE
DEL MOTOR ESTÉ ENCHUFADA Y LISTA
PARA USAR.
1 Sosteniendo el mecanismo de cuchillas deseado
por la parte superior del vástago (A), colóquelo
sobre el eje del motor, dentro del tazón.
Verifique que quede correctamente colocado y
en posición vertical.
NOTA: LA CUCHILLA SE APOYARÁ SIN
QUEDAR AJUSTADA SOBRE EL EJE DEL
MOTOR.
2
3
4
5
Coloque la base del motor sobre una superficie
limpia, seca y nivelada como una mesada o
mesa. Presione la base del motor hacia abajo
para asegurar que las ventosas se adhieran a la
mesada o a la mesa.
Alinee y coloque el tazón mezclar y preparar (B)
sobre la base del motor. El mango debe quedar
levemente inclinado hacia la derecha del símbolo
de “TRABA” en la base del motor.
Gire el tazón en sentido horario (C) hasta que se
trabe en su lugar. Escuchará un clic cuando se
trabe.
El tazón se puede colocar en la base del motor
de dos formas distintas; el mango puede quedar
en la esquina delantera (D) derecha o en la
delantera izquierda (E).
1. 8 7 7. 6 4 6 . 5 2 8 8
Ajoutez les ingrédients dans le bol, en vous
assurant qu’ils ne dépassent pas la ligne de
remplissage supérieure du bol.
En tenant le couvercle par la poignée, en
position verticale (F), déposez-le sur le bol
mélange et préparation en alignant le triangle
( ) sur le couvercle avec le triangle ( ) de la
poignée du bol. Enfoncez la poignée jusqu’à ce
que vous entendiez un clic.
Les triangles du couvercle et de la poignée
du bol DOIVENT être alignés; autrement, le
mélangeur ne se met pas en marche.
Branchez le cordon d’alimentation dans la prise
électrique. The function lights will illuminate.
CUIDADO: LAS CUCHILLAS
NO SE TRABAN EN SU LUGAR.
SI VIERTE SIN LA TAPA
COLOCADA, SIEMPRE REMUEVA
PREVIAMENTE LAS CUCHILLAS.
ARMADO:
IMPORTANT : NE PAS REMPLIR
EXCESSIVEMENT LE RÉCIPIENT. POUR
ÉVITER LES DÉGÂTS, VEILLEZ À CE QUE
LES INGRÉDIENTS NE DÉPASSENT PAS LA
LIGNE DE REMPLISSAGE « MAX LIQUID ».
6
7
8
9
IMPORTANTE: NO LO LLENE
DE MÁS. PARA EVITAR
DERRAMES, NO AGREGUE
INGREDIENTES POR ENCIMA DE
LA LÍNEA DE “MAX LIQUID”.
Agregue los ingredientes al tazón, teniendo
cuidado para no exceder la línea de máximo que
está en el costado del tazón.
Sosteniendo la tapa por el mango en posición
vertical (F), colóquela sobre el tazón mezclar y
preparar alineando el triángulo ( ) ubicado en
la tapa con el triángulo ( ) ubicado en el mango
del tazón. Presione el mango hacia abajo hasta
que haga clic.
Los triángulos de la tapa y del tazón DEBEN
estar alineados para que funcione la licuadora.
Enchufe el cable de alimentación en el
tomacorriente. The function lights will
illuminate.
11
®
Chopping blade
Lame à hacher
Cuchilla para picar
G
Dough blade
Lame à pétrir
Cuchilla para amasar
H
I
USE
UTILISATION
USO
CAUTION: THE CHOPPING BLADE
IS NOT LOCKED IN PLACE.
IF POURING WITH THE LID
REMOVED, ALWAYS REMOVE
THE CHOPPING BLADE FIRST.
USING THE CHOPPING BLADE:
USING THE
CAUTION: USE CAUTION WHEN
CHOPPING BLADE
HANDLING THE CHOPPING BLADE THE
& DOUGH BLADE
BLADES ARE VERY SHARP.
2
3
4
12
K
REMOVAL
DÉMONTAGE
EXTRACCIÓN
CAUTION: CHOPPING BLADE IS
NOT LOCKED IN PLACE. IF USING
THE POUR SPOUT, ENSURE THE
LID IS FULLY LOCKED ONTO THE
BLEND AND PREP BOWL.
1
J
Holding the Chopping Blade by the shaft, place
it onto the drive gear (G) inside the Bowl.
Ensure the attachment fits around the gear
shaft and that it is standing straight.
Add the ingredients and secure the Bowl lid
onto the Bowl.
Plug the power cord into the electrical outlet.
Once the Bowl is engaged, the programs
available for that attachment will illuminate.
Select the program desired based on your recipe.
The Auto-iQ™ program will stop the appliance
automatically at the end of the program.
When you have reached your desired consistency,
stop the appliance by pressing the START/STOP
button or selecting the program twice. Wait for
the chopping blade to stop turning.
USE
UTILISATION
USO
IMPORTANT: DO NOT
OVERFILL. TO AVOID SPILLING,
DO NOT ADD INGREDIENTS
PAST THE “MAX LIQUID” LINE.
REMOVAL:
USING THE DOUGH BLADE:
5
IMPORTANT: This makes 1 Lb. of dough at a time.
6
7
To remove the lid, press the release button on the
lid and pull the lid handle up to a 90° angle (H).
Turn the Bowl counter-clockwise and lift it to
remove it from the motor base (I).
To release the motor base from the counter or
tabletop, place your hands underneath both sides
of the motor base and gently pull the unit up and
toward you (J).
w w w.ninjak i tchen.com
Do not overfill or exceed. Motor may overheat.
1 Holding the Dough Blade by the shaft, place it
onto the gear shaft inside the Bowl (K). Ensure
that the attachment fits around the gear shaft
and that it is standing straight.
2 Add the ingredients and secure the Bowl lid onto
the Bowl.
3 Plug the power cord into the electrical outlet.
Press the START/STOP button to turn on the
unit. Once the Bowl is engaged, the programs
available for that attachment will illuminate.
Select LOW on the control panel and process until
ingredients come together to form a mass.
4 Once finished making the dough, stop the
appliance by pressing the START/STOP button
again or selecting the program twice. Wait for
the blade to stop turning.
®
MISE EN GARDE : LA LAME DE HACHAGE
N’EST PAS VERROUILLÉE DANS LE RÉCIPIENT.
SI VOUS TRANSVIDEZ UN MÉLANGE PAR
LE BEC VERSEUR, ASSUREZ-VOUS QUE LE
COUVERCLE EST BIEN VERROUILLÉ SUR LE
BOL MÉLANGE ET PRÉPARATION.
UTILISATION
DE LA LAME À
HACHER ET DE LA
LAME À PÉTRIR
UTILISATION DE LA LAME À HACHER :
1
2
3
4
MISE EN GARDE : SOYEZ PRUDENT LORSQUE
VOUS NETTOYEZ LA LAME À HACHER, CAR
LES LAMES SONT TRÈS COUPANTES.
En tenant l’arbre de la lame à hacher, insérez
celle-ci dans le pignon d’entraînement (G) du bol.
Assurez-vous que le jeu de lames repose sur le
pignon d’entraînement en position verticale.
Ajoutez les ingrédients et fixez le couvercle sur le bol.
Branchez le cordon d’alimentation dans la
prise électrique. Une fois le bol fixé au blocmoteur, les témoins lumineux des programmes
compatibles s’allumeront. Sélectionnez le
programme désiré en fonction de votre recette.
Le réglage Auto-iQ MC arrête automatiquement
l’appareil à la fin du cycle programmé.
Lorsque vous avez obtenu la consistance désirée,
éteignez l’appareil en appuyant sur le bouton
Marche/arrêt « START/STOP » ou en appuyant
deux fois sur le bouton du programme sélectionné.
Attendez que la lame à hacher cesse de tourner.
CUIDADO: LAS CUCHILLAS NO SE
TRABAN EN SU LUGAR. SI USA EL
PICO VERTEDOR, VERIFIQUE QUE
LA TAPA ESTÉ TRABADA EN EL
TAZÓN MEZCLAR Y PREPARAR.
USO DE LAS
CUCHILLAS PARA
PICAR Y PARA
AMASAR
2
3
4
DÉMONTAGE :
5
6
7
Pour retirer le couvercle, appuyez sur son bouton de
déclenchement, tirez sur la poignée du couvercle à
un angle de 90° et soulevez celui-ci (H).
Pour le dégager du bloc-moteur, faites tourner
le bol dans le sens contraire des aiguilles d’une
montre avant de le soulever (I).
Pour dégager le bloc-moteur du comptoir ou de
la table, insérez l’une de vos mains de chaque
côté du bloc-moteur et soulevez celui-ci en le
tirant vers vous (J).
UTILISATION DE LA LAME À PÉTRIR :
2
3
4
IMPORTANT : Ces directives permettent
de préparer 1 lb de pâte. Ne remplissez pas
excessivement le bol. Le moteur pourrait
surchauffer.
1
CUIDADO: TENGA CUIDADO AL
MANIPULAR LA CUCHILLA PARA PICAR
YA QUE ES MUY FILOSA.
Sosteniendo la cuchilla por el vástago, colóquela
sobre (G) el eje del motor, dentro del tazón. Verifique
que el accesorio quede bien ajustado sobre el eje
del motor y de que el vástago quede derecho.
Agregue los ingredientes y asegure la tapa sobre
el tazón.
Enchufe el cable de alimentación en el
tomacorriente. Cuando se coloca el tazón, se
encenderán los programas disponibles para ese
accesorio. Seleccione el programa deseado en
base a su receta. El programa Auto-iQMR apagará el
artefacto automáticamente al finalizar el programa.
Cuando haya alcanzado la consistencia deseada,
apague el artefacto presionando el botón
START/STOP o seleccionando nuevamente el
programa. Espere a que la cuchilla deje de girar.
EXTRACCIÓN:
5
6
7
Para remover la tapa, presione el botón de
liberación de la tapa y tire del mango de la tapa
hacia arriba hasta un ángulo de 90° (H).
Gire el tazón en sentido contra horario y levántelo
para sacarlo de la base del motor (I).
Para liberar la base del motor de la mesada o de
la mesa, coloque sus manos por debajo de ambos
costados de la base y tire suavemente hacia arriba
(J).
USANDO EL ACCESORIO PARA AMASAR:
IMPORTANTE: Esto prepara 1 libra de
masa por vez. No la llene de más. Podría
recalentar el motor.
1
IMPORTANT : NE PAS REMPLIR
EXCESSIVEMENT LE RÉCIPIENT. POUR
ÉVITER LES DÉGÂTS, VEILLEZ À CE QUE
LES INGRÉDIENTS NE DÉPASSENT PAS LA
LIGNE DE REMPLISSAGE « MAX LIQUID ».
Ajoutez les ingrédients et fixez le couvercle sur
le bol.
Branchez le cordon d’alimentation dans la prise
électrique. Appuyez sur le bouton Marche/arrêt
« START/STOP » pour mettre l’appareil en
marche. Une fois le bol fixé au bloc-moteur, les
témoins lumineux des programmes compatibles
s’allumeront. Sélectionnez la vitesse basse
« LOW » à l’aide du panneau de commande
et mélangez les ingrédients jusqu’à ce qu’ils
s’agglutinent pour former une masse.
Lorsque la préparation de la pâte est terminée,
éteignez l’appareil en appuyant sur le bouton
Marche/arrêt « START/STOP » ou en appuyant
deux fois sur le bouton du programme sélectionné.
Attendez que la lame cesse de tourner.
En tenant l’arbre de la lame à pétrir, insérez
celle-ci dans le pignon d’entraînement du bol
(K). Assurez-vous que le jeu de lames repose sur
le pignon d’entraînement en position verticale.
CUIDADO: LAS CUCHILLAS
NO SE TRABAN EN SU LUGAR.
SI VIERTE SIN LA TAPA
COLOCADA, SIEMPRE REMUEVA
PREVIAMENTE LAS CUCHILLAS.
USO DE LA CUCHILLA PARA PICAR:
1
MISE EN GARDE : LA LAME DE HACHAGE
N’EST PAS VERROUILLÉE DANS LE
RÉCIPIENT. SI VOUS TRANSVIDEZ LE
CONTENU DU RÉCIPIENT SANS LE
COUVERCLE, ENLEVEZ TOUJOURS LA
LAME DE HACHAGE D’ABORD.
2
3
4
IMPORTANTE: NO LO LLENE
DE MÁS. PARA EVITAR
DERRAMES, NO AGREGUE
INGREDIENTES POR ENCIMA DE
LA LÍNEA DE “MAX LIQUID”.
Agregue los ingredientes y asegure la tapa sobre
el tazón.
Enchufe el cable de alimentación en el
tomacorriente. Presione el botón START/STOP
para encender la unidad. Cuando se coloca el
tazón, se encenderán los programas disponibles
para ese accesorio. Seleccione LOW en el panel
de control y procéselo hasta que se combinen los
ingredientes y formen la masa.
Cuando haya terminado de amasar, apague el
artefacto presionando nuevamente el botón
START/STOP o seleccionando nuevamente el
programa. Espere a que la cuchilla deje de girar.
Sosteniendo el accesorio para amasar por el
vástago, colóquelo sobre el eje del motor, dentro
del tazón (K). Verifique que el accesorio quede
bien ajustado sobre el eje del motor y de que el
vástago quede derecho.
1. 8 7 7. 6 4 6 . 5 2 8 8
13
®
CARE &
MAINTENANCE
14
CLEANING:
STORING:
CAUTION: MAKE SURE THE MOTOR
BASE IS UNPLUGGED FROM THE
POWER SOURCE BEFORE INSERTING
OR REMOVING ANY ATTACHMENT AND
BEFORE CLEANING.
CAUTION: DO NOT IMMERSE THE MOTOR
BASE INTO WATER OR ANY OTHER
LIQUID.
CAUTION: HANDLE BLADES CAREFULLY
AS THE BLADES ARE VERY SHARP.
1 Separate/remove all parts from each other.
2 Clean the motor base with a damp cloth and
wipe dry.
NOTE: The Stainless Steel Ninja® Cup is NOT
dishwasher safe.
3 Place the cups, lids, blades, and bowl or pitcher
(optional accessory, not included) in the top rack
of the dishwasher.
OR
4 Carefully hand wash the cups, lids, blades, and
bowl or pitcher (optional accessory, not included)
in warm, soapy water with a soft cloth.
NOTE: If the appliance needs servicing, please
call Customer Service at 1-877-646-5288.
1
Store the Ninja Auto-iQ Compact System
upright. Secure the power cord on the back of
the base by wrapping the cord around the cord
wrap. Do not place anything on top of the unit.
Store the cups and the rest of the attachments
where they will not be damaged and won’t
cause a hazard.
w w w.ninjak i tchen.com
RESETTING THE MOTOR
THERMOSTAT:
The Ninja Auto-iQ Compact System features a
unique safety system that prevents damage to
the unit’s motor and drive system should you
inadvertently overload the appliance. If the
appliance is overloaded, the motor will stop. To reset
the appliance, follow the resetting procedure below:
1 Unplug the appliance from the electrical outlet.
2 Remove and empty the cup/bowl/pitcher
(optional accessory, not included) and ensure that
no food is jamming the cutting blades.
3 Allow the appliance to cool for approximately
30 minutes.
4 Re-install the cup/bowl/pitcher (optional
accessory, not included) onto the motor base and
re-plug the appliance into the electrical outlet.
5 Proceed with using the appliance as before
while making sure not to exceed the maximum
recommended capacities.
®
SOINS ET
ENTRETIEN
NETTOYAGE :
MISE EN GARDE : ASSUREZ-VOUS QUE
LE BLOC-MOTEUR EST DÉBRANCHÉ
AVANT D’INSÉRER OU DE RETIRER
DES ACCESSOIRES ET AVANT TOUT
NETTOYAGE.
MISE EN GARDE : N’IMMERGEZ PAS LE
BLOC-MOTEUR DANS L’EAU NI DANS UN
AUTRE LIQUIDE.
MISE EN GARDE : SOYEZ PRUDENT
LORSQUE VOUS MANIPULEZ LES LAMES,
CAR ELLES SONT TRÈS COUPANTES.
1 Retirez et désassemblez toutes les pièces.
2 Nettoyez le bloc-moteur avec un linge humide
et essuyez-le pour le sécher.
REMARQUE : Le Gobelet NinjaMD en acier
inoxydable n’est PAS résistant au lave-vaisselle.
3 Mettez les gobelets, les couvercles, les lames et le
bol ou le pichet (accessoire facultatif, non compris)
dans le panier supérieur du lave-vaisselle.
CUIDADO Y
LIMPIEZA:
MANTENIMIENTO
CUIDADO: VERIFIQUE QUE LA BASE
1
2
3
DEL MOTOR ESTÉ DESENCHUFADA DEL
TOMACORRIENTE ANTES DE COLOCAR O
SACAR CUALQUIER ACCESORIO Y ANTES
DE LIMPIARLA.
CUIDADO: NO SUMERJA LA BASE CON
EL MOTOR EN AGUA O NINGÚN OTRO
LÍQUIDO.
CUIDADO: TENGA CUIDADO AL
MANIPULAR LAS CUCHILLAS YA QUE
SON MUY FILOSAS.
Separe/remueva todas las partes.
Limpie la base del motor con un trapo húmedo y
séquela.
NOTA: La Taza Ninja® de acero inoxidable NO
es apta para lavavajillas.
Coloque las tazas, tapas, cuchillas y tazón o
jarra (accesorio opcional no incluido) en el
estante superior del lavavajillas.
OU
4 Avec un linge doux, lavez soigneusement à la
main les gobelets, les couvercles, les lames
et le bol ou le pichet (accessoire facultatif, non
compris) à l’eau savonneuse tiède.
REMARQUE : Si l’appareil doit être réparé,
veuillez appeler le Service à la clientèle au
1-877-646-5288.
RANGEMENT :
1
Rangez le système compact Ninja Auto-iQ en
position verticale. Fixez le cordon d’alimentation
à l’arrière du bloc-moteur en enroulant le
cordon autour du support d’enroulement. Ne
déposez aucun objet sur le mélangeur. Rangez
les gobelets et les autres accessoires dans une
armoire à l’abri des dommages et des risques
pour la sécurité.
O
4 Lave cuidadosamente a mano las tazas, tapas,
cuchillas y tazón o jarra (accesorio opcional
no incluido) con agua tibia y jabón, usando un
trapo suave.
NOTA: Si el artefacto necesita reparaciones,
llame a al servicio al cliente al 1-877-646-5288.
ALMACENAMIENTO:
1
Guarde el sistema compactco Ninja con AutoiQ en posición vertical. Asegure el cable de
alimentación detrás de la base, enrollándolo
en el gancho para el cable. No le coloque nada
encima. Mantenga las tazas y el resto de los
accesorios junto con el artefacto, donde no se
dañen ni representen ningún peligro.
1. 8 7 7. 6 4 6 . 5 2 8 8
RÉINITIALISATION DU THERMOSTAT
DU MOTEUR :
Le système compact Ninja Auto-iQ comporte un
mécanisme de sécurité pour prévenir les dommages
au moteur et au système d’entraînement en cas
de surcharge accidentelle de votre appareil. En
cas de surcharge de l’appareil, le moteur s’arrête
automatiquement. Pour réinitialiser l’appareil, suivez
la procédure ci-dessous :
1 Débranchez l’appareil de la prise électrique.
2 Retirez et videz le gobelet/bol/pichet (accessoire
facultatif, non compris) en vous assurant qu’il n’y
a aucun aliment qui bloque les lames.
3 Laissez refroidir l’appareil pendant environ 30
minutes.
4 Remettez le gobelet/bol/pichet (accessoire
facultatif, non compris) sur le bloc-moteur et
branchez l’appareil dans la prise électrique.
5 Utilisez l’appareil comme d’habitude, en veillant à
ne pas excéder la capacité maximale recommandée.
PARA REINICIAR EL TERMOSTATO DEL
MOTOR:
El sistema compactco Ninja con Auto-iQ tiene un
sistema exclusivo de seguridad que evita daños al
motor y al sistema de engranajes de la unidad en
caso de sobrecargas. Si el artefacto se sobrecarga,
el motor se detiene automáticamente. Para reiniciar
el artefacto, siga este procedimiento:
1 Desenchufe la unidad del tomacorriente.
2 Saque y vacíe la taza/tazón/jarra (accesorio
opcional no incluido) y verifique que no haya
quedado comida atascando las cuchillas.
3 Deje que el artefacto se enfríe durante 30
minutos.
4 Vuelva a colocar la taza/tazón/jarra (accesorio
opcional no incluido) sobre la base del
motor y vuelva a enchufar el artefacto en el
tomacorriente.
5 Siga usando el artefacto como antes, sin
exceder su capacidad máxima.
15
®
Pitcher/Lid
Pichet/couvercle
Jarra/tapa
Blade Assembly
Jeu de lames
Cuchilla
ADDITIONAL
ACCESSORIES
AVAILABLE
Select accessories are
included. Others are
available for purchase
at www.ninjakitchen.
com or by calling
1.877.646.5288.
ACCESSOIRES
SUPPLÉMENTAIRES
OFFERTS
72 oz.
Max liquid capacity: 64 oz.
Capacité de liquide max. : 64 oz
Capacidad máxima de líquido: 64 oz.
Certains accessoires sont
compris. Il est possible
d’acheter des accessoires
supplémentaires
en visitant le site
www.ninjakitchen.com
ou en appelant au
1.877.646.5288.
Nutri Ninja® Cups
Gobelets Nutri NinjaMD
Tazas Nutri Ninja®
12 tbsp. Spice & Coffee Grinder
Moulin à café et à épices de 12 c. à soupe
Moledor de café y especies de 12 C.
ACCESORIOS
ADICIONALES
DISPONIBLES
Algunos accesorios
están incluidos.
Accesorios adicionales
se pueden comprar en
www.ninjakitchen.com o
llamando al 1.877.646.5288.
12 oz.
18 oz.
32 oz.
WARNING: DO NOT BLEND HOT LIQUIDS
AVERTISSEMENT : NE MÉLANGEZ PAS DES
LIQUIDES CHAUDS.
A DVERTENCIA: NO LICÚE LÍQUIDOS CALIENTES.
AUTO
BLEND
MÉLANGE
AUTO
FROZEN DRINKS
SMOOTHIES
BOISSONS CONGELÉES
AUTO
AUTO
FOOD PURÉE
PURÉE D’ALIMENTS
ON / OFF
MARCHE
/ARRÊT
1500
WATTS
ULTRA BLEND
ULTRA MÉLANGE
AUTO
LOW / DOUGH
BAS / PÂTE
16
w w w.ninjak i tchen.com
MEDIUM
MOYEN
HIGH
ÉLEVÉ
PULSE
IMPULSION
®
Unit doesn’t turn on:
• Make sure the unit is plugged in and the
START/STOP button is pressed.
• Insert and rotate cup clockwise in the base until it
clicks into place. Display should turn on.
Unit doesn’t turn off:
• Remove cup from base by rotating cup counterclockwise and lifting out. Display should turn off.
Unplug the power cord from the outlet.
Lid/blade assembly hard to assemble:
• Set the cup on a level surface. Place the lid or
blade assembly on the top of the cup and align the
threads so that the lid/blades sit flat on the cup.
Twist clockwise so that the lid/blades evenly align
to the cup until you have a tight seal.
Food is not evenly chopped:
• For best results when chopping, make sure all
ingredients are as dry as possible. Cut pieces down
to even sizes, and reduce the amount of food in
the cup. Use the Auto-iQ™ CHOP button for best
results.
Doesn’t mix well, food gets stuck:
• Using the Auto-iQ programs is the easiest way
to achieve great results. The pulses and pauses
allow the food to settle toward the blade. If food
is routinely getting stuck, adding some liquid will
usually help.
• W hen packing the cups, start with fresh items,
then add liquids, powders/dry ingredients, and
finally frozen items or ice.
Unit moves on the counter while blending:
• Make sure the surface as well as the feet of the
unit are clean and dry.
Unit is difficult to remove from the counter for
storage:
• To release the motor base from the counter or
tabletop, place your hands underneath both sides
of the motor base and gently pull the unit up and
toward you.
Display shows Err:
• Unplug unit and wait 30 minutes before running
any program.
GUIDE DE
DÉPANNAGE
L’appareil ne se met pas en marche :
• A
ssurez-vous que l’appareil est branché et que vous avez
appuyé sur le bouton d’alimentation « START/STOP »
• Insérez le gobelet et tournez-le dans le sens
des aiguilles d’une montre jusqu’à ce que vous
entendiez un « clic ». L’affichage devrait s’allumer.
L’appareil ne s’éteint pas :
• Retirez le gobelet en le tournant dans le sens
contraire des aiguilles d’une montre, puis tirezle vers le haut pour le dégager de l’appareil.
L’affichage devrait s’éteindre. Débranchez le
cordon d’alimentation de la prise de courant.
Il est difficile d’assembler le couvercle/jeu de lames :
• Posez le gobelet sur une surface plane. Mettez
le couvercle ou le jeu de lames sur le gobelet et
alignez les filetages afin que le couvercle/jeu de
lames repose à plat sur le gobelet. Tournez le
couvercle/jeu de lames dans le sens des aiguilles
d’une montre afin que l’assemblage soit aligné
correctement et bien étanche.
Les aliments ne sont pas hachés uniformément :
• Pour des résultats optimaux lors du hachage,
assurez-vous que les ingrédients sont aussi secs que
possible. Coupez les ingrédients en morceaux de
taille uniforme et hachez de plus petites quantités
d’aliments à la fois. Utilisez le bouton Auto-iQMC CHOP
(hacher) pour obtenir des résultats optimaux.
L’appareil ne mélange pas bien les aliments;
les ingrédients bloquent les lames :
• L’utilisation des réglages Auto-iQ est le moyen le
plus simple d’obtenir d’excellents résultats. Les
impulsions et les pauses permettent aux aliments
de reposer sur les lames. En règle générale,
il suffit d’ajouter du liquide pour dégager les
aliments qui restent collés.
• W hen packing the cups, start with fresh items,
then add liquids, powders/dry ingredients, and
finally frozen items or ice.
L’appareil se déplace sur le comptoir lors
du mélange :
• A ssurez-vous que la surface sur laquelle repose
l’appareil ainsi que les pieds de celui-ci sont
propres et secs.
Il est difficile de dégager l’appareil du
comptoir pour le rangement :
•Pour dégager le bloc-moteur du comptoir ou de la
table, insérez l’une de vos mains de chaque côté
du bloc-moteur et soulevez celui-ci en le tirant
doucement vers vous.
L’écran affiche Err :
• L’écran affiche Err : Débranchez l’unité et attendez
30 minutes avant de mettre un programme en
marche.
GUÍA DE
RESOLUCIÓN DE
PROBLEMAS
La unidad no enciende:
•Verifique que la unidad esté enchufada y que se
haya presionado el botón START/STOP.
• Inserte la taza en la base y gírela en sentido horario
hasta que haga “clic”. Deberá encenderse la pantalla.
La unidad no se apaga:
• Saque la taza de la base haciéndola girar en
sentido contra horario y levantándola. Deberá
apagarse la pantalla. Desenchufe el cable de
alimentación del tomacorriente.
Es muy difícil armar la tapa/cuchilla:
• Coloque la taza en una superficie nivelada. Coloque
la tapa o el mecanismo de las cuchillas sobre la
taza y alinee las roscas para que la tapa/cuchillas
queden bien apoyadas sobre la taza. Gire en sentido
horario para que la tapa/cuchillas queden bien
alineadas con la taza hasta lograr un buen sellado.
Los alimentos no se pican de forma pareja:
• Para obtener los mejores resultados al picar,
verifique que todos los ingredientes estén lo más
secos posible. Corte los ingredientes en trocitos
del mismo tamaño y reduzca la cantidad de
comida de la taza. Use el botón Auto-iQMR CHOP
para obtener los mejores resultados.
No mezcla bien, la comida se atasca:
• L a mejor manera de obtener buenos resultados
es utilizando los programas Auto-iQ. Los pulsos
y las pausas permiten que la comida se asiente
contra la cuchilla. Si la comida se queda atascada
constantemente, agregue un poco de líquido.
• W hen packing the cups, start with fresh items,
then add liquids, powders/dry ingredients, and
finally frozen items or ice.
La unidad se mueve en la mesada al licuar:
• Verifique que la superficie y las patas de la unidad
estén limpias y secas.
Es difícil remover la unidad de la mesada para
guardarla:
• Para liberar la base del motor de la mesada o de
la mesa, coloque sus manos por debajo de ambos
costados de la base y tire suavemente hacia arriba.
La pantalla muestra Err:
• Desenchufe la unidad y espere 30 minutos antes de
usar cualquier programa.
TROUBLESHOOTING
GUIDE
1. 8 7 7. 6 4 6 . 5 2 8 8
17
®
NOTES
18
w w w.ninjak i tchen.com
®
ONE-YEAR (1) LIMITED WARRANTY
GARANTIE LIMITÉE D’UN (1) AN
GARANTÍA LIMITADA DE UN (1) AÑO
Euro-Pro Operating LLC warrants this product to be free from
material defects and workmanship for a period of one (1) year
from the date of purchase when utilized for normal household
use, subject to the following conditions, exclusions and
exceptions.
The liability of Euro-Pro Operating LLC is limited solely to the
cost of the repair or replacement of the unit at our option.
This Limited Warranty does not cover normal wear of parts
and does not apply to any unit that has been tampered with
or used for commercial purposes. This Limited Warranty
does not cover damage caused by misuse, abuse, negligent
handling or damage due to faulty packaging or mishandling
in transit. This Limited Warranty does not cover damage or
defects caused by or resulting from damages from shipping or
repairs, service or alteration to the product or any of its parts,
which have been performed by a repair person not authorized
by Euro-Pro Operating LLC.
If your appliance fails to operate properly while in use under
normal household conditions within the warranty period, you
may return the complete appliance and accessories with proof
of purchase and date, freight prepaid. For assistance with
warranty service options or customer support, please call our
customer care and product specialists at 1-877-646-5288 or
visit our website at www.ninjakitchen.com.
If the appliance is found by Euro-Pro Operating LLC to be
defective, in Euro-Pro Operating LLC’s sole discretion, we
will repair or replace it free of charge. Proof of purchase is
required and a fee of $19.95 will apply to cover the cost of
return freight.*
This Limited Warranty is extended to the original purchaser
of the unit and excludes all other legal, implied and/or
conventional warranties. The responsibility of Euro-Pro
Operating LLC if any, is limited to the specific obligations
expressly assumed by it under the terms of this Limited
Warranty. In no event is Euro-Pro Operating LLC liable for
incidental or consequential damages to anyone of any nature
whatsoever. Some states do not permit the exclusion or
limitation of incidental or consequential damages, so the
above may not apply to you.
This Limited Warranty gives you specific legal rights, and you
may also have other rights which vary from state to state or
province to province.
*IMPORTANT: Carefully pack item to avoid damage in
shipping. Be sure to include proof of purchase date and to
attach a tag to item before packing including your name,
complete address and phone number with a note giving
purchase information, model number and what you believe
is the problem with the item. We recommend you insure
the package (as damage in shipping is not covered by your
warranty). Mark the outside of your package “ATTENTION
CUSTOMER SERVICE”.
Euro-Pro Operating LLC garantit ce produit contre toute
défectuosité de matériel ou de main-d’œuvre pour une période
d’un (1) an à compter de la date d’achat lors d’utilisation dans
le cadre d’un usage domestique normal, sujet aux conditions,
exclusions et exceptions suivantes.
La responsabilité de Euro-Pro Operating LLC est limitée au coût
de réparation ou de remplacement de l’appareil, à sa seule
discrétion. Cette garantie limitée ne couvre pas l’usure normale
des pièces et ne s’applique pas aux appareils ayant été altérés ou
utilisés à des fins commerciales. Cette garantie limitée ne couvre
pas les dommages causés par une mauvaise utilisation, l’abus,
la négligence lors de la manipulation, un emballage inadéquat
ou la mauvaise manipulation en transit. Cette garantie limitée ne
couvre pas les dommages ou défauts causés par ou résultants
du transport, des réparations, de l’entretien ou de l’altération du
produit ou à ses pièces, effectués par un technicien non autorisé
par Euro-Pro Operating LLC.
Si votre appareil ne fonctionne pas comme il le devrait lors d’un
usage domestique normal pendant la période de garantie, vous
pouvez le retourner au complet avec ses accessoires, port payé.
Pour obtenir de l’assistance avec les options du service de la
garantie ou de l’assistance, veuillez appeler notre service à la
clientèle et nos spécialistes de produits au 1-877-646-5288 ou
visitez notre site Web à www.ninjakitchen.com.
Si Euro-Pro Operating LLC constate que l’appareil est défectueux,
à la seule discrétion de Euro-Pro Operating LLC, nous le
réparerons ou le remplacerons sans frais. Une preuve d’achat est
requise et un montant de 19,95 $ est nécessaire pour couvrir les
frais de retour.*
Cette garantie limitée s’applique à l’acheteur original de
l’appareil et exclut toutes les autres garanties juridiques,
implicites ou conventionnelles. La responsabilité de EuroPro Operating LLC, s’il y en a une, se limite aux obligations
spécifiques exprimées sous cette garantie limitée. En aucun cas,
Euro-Pro Operating LLC ne peut être tenu responsable d’incidents
ou de dommages indirects de toute nature que ce soit. Certains
États ou provinces n’autorisent pas l’exclusion ou la limitation de
dommages circonstanciels ou conséquents, dans ce cas, cette
disposition ne s’appliquerait pas.
Cette garantie limitée vous confère des droits juridiques
spécifiques, et d’autres droits légaux vous sont peut-être
disponibles, variant d’un État à l’autre ou d’une province à l’autre.
*IMPORTANT : Emballez soigneusement l’appareil pour éviter tout
dommage lors du transport. Assurez-vous de joindre la preuve
d’achat et d’attacher à l’appareil une étiquette mentionnant
votre nom, adresse complète ainsi que le numéro de téléphone,
de même que l’information concernant l’achat, le numéro de
modèle et le problème, selon vous, de l’appareil. Nous vous
recommandons d’assurer votre colis (puisque les dommages lors
du transport ne sont pas couverts par la garantie). Indiquez sur
l’extérieur de votre colis « ATTENTION SERVICE À LA CLIENTÈLE ».
Euro-Pro Operating LLC garantiza este producto contra defectos
de materiales y mano de obra por un término de un (1) año a partir
de la fecha de compra original, siempre que sea utilizado para uso
doméstico normal, sujeto a las siguientes condiciones, exclusiones
y excepciones.
La responsabilidad de Euro-Pro Operating LLC se limita únicamente
al costo de reparación o reemplazo de la unidad, a nuestro
criterio. Esta garantía limitada no cubre el desgaste normal de
las partes y no cubre ninguna unidad que haya sido alterada o
utilizada con fines comerciales. Esta garantía limitada no cubre
daños ocasionados por uso inadecuado, abuso, negligencia o
daños causados por embalaje inapropiado o maltrato durante
el transporte. Esta garantía limitada no cubre daños o defectos
causados o resultantes durante el transporte para su reparación
o alteraciones del producto o cualquiera de sus partes, realizadas
por una persona no autorizada por Euro-Pro Operating LLC.
Si su artefacto no funciona correctamente al utilizarlo bajo
condiciones domésticas normales dentro del período de garantía,
puede devolver el artefacto completo y los accesorios, junto con
un comprobante de la fecha de compra, pagando los gastos de
envío. Por asistencia con opciones del servicio de garantía o para
soporte al cliente, llame a nuestro centro de atención al cliente
y especialistas de productos al 1-877-646-5288 o visite nuestro
sitio web en www.ninjakitchen.com.
Si Euro-Pro Operating LLC determina que el artefacto presenta
un defecto, lo reparará o remplazará sin cargo, a su criterio. Se
requiere comprobante de compra y se aplica un cargo de $19.95
para cubrir el costo del envío de vuelta.
Esta garantía limitada es válida para el comprador original del
producto y excluye cualquier otra garantía legal, implícita y/o
convencional. La responsabilidad de Euro-Pro Operating LLC,
de existir, se limita a las obligaciones específicas asumidas
expresamente bajo los términos de esta garantía limitada. Bajo
ninguna circunstancia Euro-Pro Operating LLC será responsable
por daños incidentales o indirectos a cualquiera, de ninguna clase.
Algunos estados no permiten la exclusión o limitación de daños
consiguientes o incidentales, por lo tanto lo anterior puede no ser
válido para usted.
Esta garantía limitada le otorga derechos legales específicos,
y usted puede también tener otros derechos los que varían de
estado a estado o de provincia a provincia.
*IMPORTANTE: Embale el producto cuidadosamente para evitar
daños durante el transporte. Asegúrese de incluir un comprobante
de la fecha de compra y de colocarle una etiqueta al producto con
su nombre, dirección completa y número de teléfono, una nota
proporcionando información de la compra, número de modelo
y una descripción del problema. Le recomendamos asegurar el
paquete (puesto que la garantía no cubre daños de envío). Escriba
en el exterior del paquete “ATTENTION CUSTOMER SERVICE”.
Euro-Pro, Ninja, Nutri Ninja and Sip & Seal are registered
trademarks of Euro-Pro Operating LLC.
Auto-iQ and Pro Extractor Blades are trademarks of EuroPro Operating LLC.
Euro-Pro, Ninja, Nutri Ninja et Sip & Seal sont des marques
déposées de Euro-Pro Operating LLC.
Auto-iQ et Pro Extractor Blades sont des marques de
commerce de Euro-Pro Operating LLC.
1. 8 7 7. 6 4 6 . 5 2 8 8
Euro-Pro, Ninja, Nutri Ninja y Sip & Seal son marcas
registradas de Euro-Pro Operating LLC.
Auto-iQ y Pro Extractor Blades son marcas comerciales de
Euro-Pro Operating LLC.
19
Euro-Pro Operating LLC
Newton, MA USA 02459
Ville St. Laurent, Québec Canada H4S 1A7
For Shark Ninja U.S. Patent information visit http://www.europro.com/USPatents
Pour des renseignements sur les brevets de Shark Ninja aux É.-U., veuillez visiter http://www.europro.com/USPatents
Por información acerca de las patentes en EE.UU. de Shark Ninja, visita http://www.europro.com/USPatents
BL491_30_IB_E_F_S_150618_1
© 2015 Euro-Pro Operating LLC
Printed in China / Imprimé en Chine / Impreso en China
Illustrations may differ from actual product. We are constantly striving to improve our products, therefore the specifications
contained herein are subject to change without notice.
Les illustrations peuvent différées du produit réel. Nous essayons constamment d’améliorer nos produits, donc les clauses
contenues dans ce document peuvent changer sans préavis.
El dibujo puede no ser igual al producto real. Nosotros nos esforzamos constantemente en mejorar nuestros productos, por lo
tanto las especificaciones aquí indicadas pueden cambiar sin previo aviso.
w w w.ninjak i tchen.com
1. 8 7 7. 6 4 6 . 5 2 8 8