1
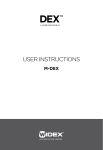
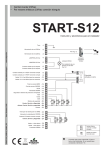
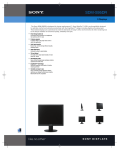
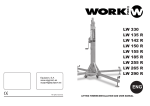
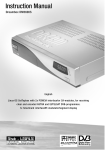
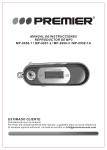
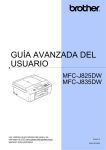
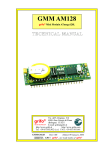
AMC 45 User Manual/Manual de Uso Rev. 13.01.01 EN WARNING !!! 1. The operating temperature & environment of this lithium battery must be: CHARGE: 0º to 45º C DISCHARGE: -20º to 55ºC STORAGE: -5º TO 35ºC 2. Before use, please read the user manual first. Any incorrect operation can lead to the battery to be heating, fire, broken, damaged or battery capacity decrease. 3. Must not be usede together with the other types of batteries like dry battery, metal high power battery, nickel-cadmium battery, etc. 4. Must not be charged if the lithium battery was burned, color changed, shape changed, leaking water or any un-normal changes. Must charge or discarge in correct operation. When it was not charged, please do not discharge it continuously. 5. Please keep the used-up or waste lithium batteries into the relevant place to be environmental protection. CAUTION RISK OF ELECTRIC SHOCK DO NOT OPEN CAUTION: Warning: Do not dismantle this product. The maintenance and inspection shuold be carried out by a qualified technician to avoid the risk of electric shock and damging the components. 6. Please do not put this unit near the rain, moisture and dusty place to avoid fire or lighting striked. 7. In order to avoid electric shock before use AC power, please refer to: a. Check the power cable, make sure it is in good condition. b. The using AC voltage should be the same as we stated in the device or manual. 8. After use the wireless transmitter, please take the battery out of it to avoid battery leaking to damage the transmitter. 9. Please only take out the USB/SD card in OFF situation to protect the USB/SD devices. CAUTIONS 1. This device can produce electronic magnetic field due to its speaker, please the unit far from PC, TV set over 60 cm, otherwise this magnetic filed will effect their picture or voice. After use, please pull out the power cable from the power socket. 2. This unit should be far from the high temperature or heat objects to avoid damage it. 3. This unit should be far from big power wireless transmitter to avoid interferences. PAG. 1 User Manual/Manual de Instrucciones AMC 45 EN 4. For the built-in li-ion battery: a. Should be charged over 4 hours before use, make sure it can be supplied power at any time. b. Should be charged over 4 hours after use to protect the battery and the power supply. 5. Please, do not use the unit in the following circumstances. Refer servicing to qualified personnel only. a. Power cable or power socket was damaged. b. Unit was drenched by water or metallic object inside it c. Some components were damaged. Features 1. All in one design for easy carrying and portable use. 2. Unit works on both AC and DC. You can also use the built-in 2.6AH li-ion battery, or with an external DC 12V power supply (not included). 3. Amplifier working in UHF band with 99 possibles frequencies auto-match from 760 to 790 MHz. 4. Low power consumption for long time operation. 5. SMT technology and SMD electronic components used in building this amplifier. 6. Bass & Treble control 7. Digital echo control. 8. Wireless microphone included 9. With microphone priority function 10. AUX input for connecting CD, MP3, etc 11. AUX output 12. Speaker output 4-8 ohm 13. USB/SD play & record in MP3 format 14. FM tuner 15. With remote controller 16. LCD display 17. Low voltage circuit protection for the built-in rechargeable battery to avoid the damage of the rechargeable battery in case of incorrect operation. 18. AA battery can be used in the wireless handheld microphone 19. 2 powerful white LEDs in front side PAG. 2 User Manual/Manual de Instrucciones AMC 45 EN 20 21 22 23 24 25 26 27 28 29 1 30 32 31 2 3 4 19 5 18 17 6 16 7 15 14 13 12 11 10 9 8 33 34 34 36 35 37 PAG. 3 User Manual/Manual de Instrucciones AMC 45 EN 1. Small LCD screen. Press the FM/USB/SD/ON/OFF button to turn ON this LCD. It displays the three functions: USB/SD/FM for your optional use. Press FM/USB/ /SD/ON/OFF button more than 3 seconds to turn OFF this LCD screen. 2. Big LCD screen Press Power ON/OFF/Charge button to turn ON the unit. It displays: W/M1 CH (0-99) ; ECHO (0-10); BASS-TREBLE (-7 to 7); MP3/AUX VOL/MIC VOL/W/M1 VOL (0-31); MAIN VOL (0-31). 3. AC power cable socket. Suitable for the AC voltage 100-250V/50-60Hz. 4. POWER ON/OFF/CHARGE BUTTON: Press this button to turn ON the amplifier. Press again to turn OFF. Charge mode is in OFF situation. Only change the amplifier in OFF. Charge time is around 4 hours. 5. VOLUME ADJUST CONTROL KNOB (0-31) Combined button & turn knob for MP3/AUX VOL/ /MIC VOL/W/M1 VOL and MAIN VOL control In POWER ON situation, press this button adjust the volume from the different sources, MP3/AUX VOL, MIC VOL, W/W1 VOL and MAIN VOL. Each pushing of this button select one source. with the source selected, turn the knob to increase or reduce the volume. PAG. 4 User Manual/Manual de Instrucciones AMC 45 EN For example, if you want to set the MP3/AUX VOL to 20, press the VOLUME ADJUST knob until the value under MP3/AUX/VOL flicks, now turn the knob clockwise or counterclockwise until reach the desire value. To change the MAIN VOL, simply turn the VOLUME ADJUST knob until the desire value. 6. SOUND EFFECTS ADJUST CONTROL KNOB Combined ECHO, Bass & Treble button and SOUND EFFECT ADJUST knob In POWER ON situation, press SOUND EFFECTS ADJUST knob one time to set BASS level, another press to set the TREBLE. Press again to set ECHO in a cycle mode. The selected feature is showed in the and the value flicking. Turn the knob until the desire value: ECHO from 0 to 10 BASS and TREBLE from -7 to 7 Without pressing the knob, turn it in order to set the ECHO value. 7. W/M CHANNEL SELECT CONTROL KNOB Wireless channel and knob to set it using the infrared sensor PAG. 5 User Manual/Manual de Instrucciones AMC 45 EN A) SELECT FREQUENCY CHANNEL (0-99): In POWER ON state, press W/M CHANNEL SELECT knob more than 3 seconds to wait for the number above the W/M1 CH in the right corner of the LCD screen is flashing, during its flashing, turn the W/M CHANNEL SELECT knob clockwise or counterclockwise to select the desired channel number from 0 to 99, then wait for its stop flashing. At this time, the channel is selected. B) MATCH FREQUENCY NUMBER (0-99). After point A, Press the W/M CHANNEL SELECT knob again, the W/M1 CH and W/M1 VOL are flashing, at this moment, open the wireless microphone battery cover and place its infrared transmitter near infrared reciever in the amplifier (see picture) till the W/M1 CH and W/M1 VOL stop flashing. Then, the amplifier and the microphone are matched. Infrared receiver in the amplifier for auto matching the UHF frequency number (0-99) Infrared transmitter inside the microphone for auto matching the UHF frequency number (0-99) 8. Dynamic microphone input connection (jack 1/4"). Its volume can be adjusted with knob (5). 9. AUX input connection (minjack 3.5 mm). Its volume can be adjusted with knob (5). 10. AUX output connection (minjack 3.5 mm). 11. SPEAKER OUTPUT 8Ω (RCA). This jack allows to connect an additional loudspeaker for, p.e., monitoring purpose. 12. DC 12V/ 2.5A input jack. For external supply 13. CHARGE LED. This LED will lit in red during built-in li-ion battery charging process. 14. INFRARED UHF wireless frequency transmitter 15. SD Card slot 16. USB port PAG. 6 User Manual/Manual de Instrucciones AMC 45 EN 17. ON/OFF MIC PRIORITY. for microphone priority purpose (dynamic and wireless), turn to ON this switch. In this situation, when are playing music from USB/SD or FM tuner and at the same time you talking through any microphone, the music volume will be down during your speaking. When you stop to speaking, the music will come back to its play volume. If you want to disable this function, switch it to OFF position. 18. MP3/FM REMOTE RECEIVING 19. ON/OFF TORCH. This button allow to lit the two white power LEDs placed in the front side. They are separated from MAIN POWER ON/OFF/CHARGE button. 20. FM/USB/SD ON/OFF. Press this button the first time as the default power ON. Press again to select mode between USB, SD or FM. Press and hold this button up 2 seconds to turn off the small LCD display and enter in Standby state. 21. A - B/MIC/AUX REC 21.1 In MP3 mode, Press the button to set the present playing audio file from the beginning point (A point) to the end point (B point). The first push will mark the beginning point, the LCD will flash "A-". Press it again to select the final point, then it will enter auto repeat play situation. In the LCD, "A-B" will flash. Push the button again to delete the repeat function and return to normal playing. 21.2 Any situation in switch ON mode, press this button more than 2 seconds to enter in MIC/AUX IN RECORD function. Use /FM UP / FM DOWN button to find out the target file to be recorded to the USB or SD card. Press this button again to star recording. Press STOP to stop the recording. 22. /SCAN FM/MP3 REC 22.1 En MP3 Stop mode, first time to press this button is to play the MP3, the LCD screen displays the present song and the elapsed time, changing between them each 5 seconds. In MP3 Play mode, press this button to Pause the MP3 play. The LCD screen display II , in Play mode, press this button to change the function from PLAY to PAUSE or vice versa. 22.2 In FM mode, press this button to search FM stations and automemorize them (AUTO SCAND & MEMORY). 22.3 In MP3 play mode, press and hold this button more than 2 seconds to enter recording function. If no any operation more than 8 seconds, it will exit from RECORD function. At this time, USB and SD can be recorded to each other. After check the devices, use the /FM UP /FM DOWN button to select "ONE", "FOL" or "ALL" record. Press the /SCAN FM/MP3 REC again to start the recording. At this time , the USB or SD flash (the target disk is flashing). Press to stop the recording. When single song is being recorded, then "ONE" will flashing in the screen. When folder is being recording, will flash "FOL" and "ALL" when all files are being recorded. PAG. 7 User Manual/Manual de Instrucciones AMC 45 EN 22.4 FM RECORDING. Press and hold /SCAN FM/MP3 REC button more /FM UP /FM DOWN than 2 seconds to enter RECORD state. Use button to find out the target recorded disk USB or SD, press again /SCAN FM/MP3 REC to start recording. At this time, the target USB or SD, press to stop the recording function. 22.5 MP3 quick copy. MP3 must be in STOP mode to quick USB or SD copy. Use /FM UP /FM DOWN to select the target recorded USB or SD disk. The chosen device will flash. Press /SCAN FM/MP3 REC button to start record. At this time, “REC” wil display for 2 seconds, USB or SD will flash. The copy speed is counted by percentage. Press STOP to stop the Record situation. 23. FOLDER+ / +10. In MP3 mode, press this button to increase 10 song for play. When the played folder has less than 10 song, it will jump to the last song. Press and hold this button more than 2 seconds to increase one folder at the present situation. 24. FM UP/ . In MP3 mode, press this button to select the next song. Press and hold to be fastly forward. In FM mode, press this button to increase 100 kHz. Press and hold to AUTO SCAN the next FM stations. 25. BACKLIGHT ON/OFF. Switch between both modes to lit or not the LCD display 26. MODE / DEL 26.1 In MP3 mode, Press this button first time, the LCD displays and “ONE”. On this situation, the device will repeat the selected file again and again. Press the button a second time, the LCD displays and “FOLDER”. On this situation, the device will plays all song in the present folder and will return to the first song, repeting the process. Press it third time, the LCD display and “ALL”. On this situation, the device will play all song of the USB/SD, returning to the first song and repeating the process. 26.2 In MP3 mode, press and hold more than 2 seconds to enter DELETE state. Press /FM UP /FM DOWN to select the file (ONE), present folder (FOL), complete folders (ALL) and to delete. Press MODE/DEL to confirm. 26.3 In MP3 mode, press and hol more than 2 seconds, but within 8 seconds no any operation, it will exit the present situation. 26.4 In MP3 mode, ress and hol more than 2 seconds, or press STOP/MEMO to exit the present situation. 27. /MEMO: 27.1 In MP3 play mode, press this button to enter STOP situation; 27.2 In FM mode, press this button to have the below functions: 27.2.1 If the MEMORY has not saved the 1-20 radio stations, to press this button, nothing will function. 27.2.2 If FM is working in any frequency, press this button to save this FM station to be no. 1, press this button again to choose any saved radio to be in function. PAG. 8 User Manual/Manual de Instrucciones AMC 45 EN 27.2.2 If FM is working in any frequency, press this button to save this FM station to be no. 1, press this button again to choose any save radio to be in fuction. 27.2.3 Manual search and save stations: In FM mode, press this button for more than 2 seconds to enter setup manual search. Use the buttons /FM UP /FM DOWN to select the station you want to memorize and save. Press it again to confirm. 28. FOLDER - / -10: In MP3 mode, press this button to reduce 10 songs for play If the current folder is less than 10 songs, skip to the last song. Press and hold this button for more than 2 seconds to go to previous folder. 29. /FM DOWN: In MP3 mode, press this button to select the last song. Press and hold this button to be fastly backwards. In FM mode, press it to decrease 100 Hz. Press and hold to AUTO SCAN the last FM radios. 30. Hanging hooked 31. Hanging hooked 32. carry handle 33. Vent 34. Torch (LED x 2) 35 6.5" full range speaker 36. DC 12V 2.6AH Li-ion battery built-in 37. Battery door & accessories kept room Technical specifications AC Power External DC Power Power output Speaker Frequency range Wireless effective range Wireless channels Full charged operating time Li-ion battery charge time Dimensions AC 100-250V /50-60 Hz; DC 12V /2.6AH Li-ion battery External DC 12V 2.5A 65W max. 6.5" - 4 Ω (full range) 760 - 790 MHz 80 m. max. 0 - 99 infrared auto match 2.5 hours in max volume playing MP3 3 -4 hours 318 x 175 x 213 mm (LxWxH) PAG. 9 User Manual/Manual de Instrucciones AMC 45 ES ATENCION !!! 1. La temperatura de funcionamiento y entorno de esta batería de litio debe ser: CARGA: 0 º a 45 º C DESCARGA: -20 º a 55 º C ALMACENAMIENTO: -5 º a 35 º C 2. Antes de usarla, lea el manual del usuario en primer lugar. Cualquier funcionamiento incorrecto puede provocar sobrecalentamiento, incendio, disminución de la capacidad o daños o la batería. 3. No debe usarse junto con los otros tipos de baterías, como batería alcalinas, metal de alta potencia, níquel-cadmio, etc 4. La batería no debe ser cargada si se quemó, el color cambia, su forma, hay fuga de liquido o cualquier cambio anormal. Por favor no cargue y descargue la batería continuamente. 5. Por favor, deposite las baterías de litio utilizadas en el lugar pertinente para ayudar a la protección del medio ambiente. CAUTION RISK OF ELECTRIC SHOCK DO NOT OPEN CAUTION: Warning: Do not dismantle this product. The maintenance and inspection shuold be carried out by a qualified technician to avoid the risk of electric shock and damging the components. 6. Por favor, no exponga esta unidad a la lluvia, la humedad y el polvo para evitar incendios o chispas eléctricas. 7. Con el fin de evitar descargas eléctricas antes de usar alimentación AC, consulte: a. Compruebe que el cable de alimentación esté en buenas condiciones. b. El uso de voltaje de CA debe ser el mismo que se indica en el dispositivo o en el manual. 8. Después de utilizar el transmisor inalámbrico, por favor saque la batería de para evitar fugas o daños en el transmisor. 9. Por favor, sólo extraiga la tarjeta de USB / SD en modo OFF para proteger el los dispositivos USB / SD conectados. PRECAUCIONES 1. Este dispositivo puede producir campos electromagnético debido a su altavoz, por favor, mantenga la unidad lejos un PC, televisor, etc, de lo contrario este campo afectará la imagen y el sonido. Después de su uso, por favor, retire el cable de alimentación de la toma de red. 2. Esta unidad debe estar alejada de altas temperaturas o elementos que desprendan calor para evitar dañarlo. 3. Esta unidad debe estar alejada de un transmisor inalámbrico de gran potencia para evitar interferencias. PAG. 10 User Manual/Manual de Instrucciones AMC 45 ES 4. Para la batería Li-ion incorporada: a. Debe ser cargada unas 4 horas antes de su uso . Asegúrese que no le falta suministro eléctrico durante todo el proceso de carga. b. Debe ser cargada unas 4 horas después de su uso para proteger la batería y el alimentador. 5. Por favor, no use la unidad en las siguientes circunstancias. Solicite ayuda a personal cualificado. a. Cable de alimentación o clavija dañados. b. Unidad estaba empapada por el agua o han caído objetos metálicos en su interior. c. Algunos componentes están dañadas. Características 1. Diseño portátil todo-en-uno para un fácil transporte 2. La unidad funciona tanto en AC y DC. También puede utilizar la batería interna de 2.6AH li-ion, o con una fuente de alimentación externa de 12 V DC (no incluida). 3. Amplificador que trabaja en la banda UHF con 99 frecuencias posibles con auto configuración desde 760 a 790 MHz. 4. Bajo consumo de energía para un funcionamiento a largo plazo. 5. Tecnología SMT y componentes electrónicos SMD utilizados en la construcción de este amplificador. 6. Control Bass y Treble 7. Control echo digital. 8. Micrófono inalámbrico (incluido) / Toma de micrófono dinámico (micro no incluido) 9. Con función de micrófono de prioridad 10. Entrada AUX para la conexión de CD, MP3, etc 11. Salida AUX 12. Salida de altavoz 4, 8 ohm 13. Reproductor/grabador USB / SD en formato MP3 14. Sintonizador de FM 15. Mando a distancia 16. Pantalla LCD 17. Circuito de protección de baja tensión para la batería recargable incorporada que evitar daños de la batería recargable en caso de funcionamiento incorrecto. 18. Pilas tipo AA para utilizar en el micrófono inalámbrico 19. 2 LEDs blancos de gran alcance en el lado frontal PAG. 11 User Manual/Manual de Instrucciones AMC 45 ES 20 21 22 23 24 25 26 27 28 29 1 30 32 31 2 3 4 19 5 18 17 6 16 7 15 14 13 12 11 10 9 8 33 34 34 36 35 37 PAG. 12 User Manual/Manual de Instrucciones AMC 45 ES 1. Pantalla LCD pequeña. Pulse el botón FM / USB / SD / ON / OFF para encender esta pantalla LCD. Muestra las tres funciones: USB / SD / FM para su uso opcional. Pulse el botón FM /USB / SD/ON/OFF más de 3 segundos para apagar la pantalla. 2. Pantalla LCD grande Pulse botón Power ON / OFF / CHARGE para encender la unidad. Muestra: W/M1 CH (0-99); ECHO (0-10); BASS-TREBLE (-7 a 7); MP3/AUX VOL / VOL MIC VOL/W/M1 (0-31); MAIN VOL (0-31). 3. Toma de alimentación AC:. Adecuado para 100-250V/50-60Hz. 4. POWER ON / OFF / CHARGE: Pulse este botón para encender la unidad. Pulse de nuevo para apagarla. El modo de carga se encuentra en situación OFF. Sólo cargue el amplificador en OFF. El tiempo de carga es de alrededor de 4 horas. 5. VOLUMEADJUST (0-31) Pulse y gire el mando y ajuste el volumen para MP3/AUX VOL/MIC VOL /W/M1 VOL y MAIN VOL En en modo POWER ON, pulse este botón para ajustar el volumen de las diferentes fuentes, MP3/AUX VOL, VOL MIC, VOL y VOL W/W1 MAIN. Cada pulsación de este botón selecciona una fuente. con la fuente seleccionada, gire el mando para aumentar o reducir el volumen. PAG. 13 User Manual/Manual de Instrucciones AMC 45 ES Por ejemplo, si desea configurar el volumen VOL MP3/AUX a 20, pulse el botón VOLUME hasta que el valor bajo MP3/AUX/VOL parpadee, ahora gire el botón hacia la derecha o hacia la izquierda hasta llegar al valor deseado. Para cambiar el MAIN VOL, simplemente gire el mando hasta que el valor deseado. 6. MANDO DE AJUSTE DE EFECTOS DE SONIDO Mando de ajuste de efectos de sonido, ECHO, Bass y Treble Estando encendido, pulse SOUND EFFECTS una vez para establecer el nivel de graves (bass), presione otra vez para ajustar los agudos (treble). Pulse de nuevo p ara configurar el ECHO. La característica seccionada se muestra y el valor parpadea Gire el mandio hasta que el valor deseado: ECHO desde 0 a 10 BASS y TREBLE desde -7 a 7 Sin presionar el botón, lo convierten en el fin de establecer el valor de ECHO. 7. MANDO DE SELECCION DE CANAL DE MICRO INALAMBRICO El canal inalámbrico y mando para configurarlo usando el sensor infrarrojo PAG. 14 User Manual/Manual de Instrucciones AMC 45 ES A) Seleccionar canal de frecuencia (0-99): Pulse W/M CHANNEL SELECT más de 3 segundos hasta que el número sobre el CH W/M1 en la esquina derecha de la pantalla LCD parpadee, durante su intermitencia, gire el mando W/M CHANNEL SELECT hacia la izquierda o la para seleccionar el número de canal deseado de 0 a 99, luego espere hasta que deje de parpadear. En este momento, el canal está seleccionado. B) Sincronizando la frecuencia (0-99). Después del punto A, presione W/M CHANNEL SELECT de nuevo, W/M1 CH y W/M1 VOL parpadean, en ese momento abra el protapilas del micrófono y sitúe el transmisor infrarrojo cerca del receptor de infrarrojos en el amplificador (ver foto) hasta que W/M1 CH y W/M1 VOL dejan de parpadear. Entonces, el amplificador y el micrófono estarán sincronizados. Receptor infrarrojo en el amplificador para auto-sincronización del número de canal UHF (0-99) Emisor infrarrojo dentro del micrófono para sincronizar el canal UHF (0-99) 8. Conexión de entrada para micrófono dinámico (jack 1/4 "). Su volumen se puede ajustar con el mando (5). 9. Conexión de entrada AUX (minjack 3,5 mm). Su volumen se puede ajustar con el mando (5). 10. Conexión de salida AUX (minjack 3,5 mm). 11. SALIDA DEL ALTAVOZ 8Ω (RCA). Este conector permite conectar un altavoz adicional para, p.e monitorización. 12. Conector de entrada DC 12V / 2.5A . Para alimentación externa 13. LED de carga. Este LED se ilumina en rojo durante el proceso de carga de la bateria Li-ion incorporada. 14. Emisor infrarrojo para el micrófono inalámbrico UHF 15. Slot para tarjetas SD 16. Puerto USB PAG. 15 User Manual/Manual de Instrucciones AMC 45 ES 17. MIC PRIORITY ON/OFF. para micrófono de prioridad (dinámico e inalámbrico), pase a ON este interruptor. Así, cuando se está reproduciendo música desde un USB / SD o sintonizador FM y, al mismo tiempo se habla a través de cualquier micrófono, el volumen de la música bajará mientras dure este estado, al parar de hablar, la música volverá a su estaqdo anterior. Si desea desactivar esta función, lleve el conmutador a la posición OFF. 18. RECEPTOR REMOTO MP3/FM 19. ON/OFF TORCH. Este botón permite encender los dos LEDs blancos colocados en el lado frontal. Están separados del botón de encendido principal. 20. FM/USB/SD ON/OFF. Pulse este botón la primera vez para encender la unidad. Pulse de nuevo para seleccionar el modo entre USB, SD o FM. Mantenga pulsado este botón hasta 2 segundos para apagar la pantalla LCD pequeña y entrar en modo standby. 21. A - B / MIC / AUX REC 21.1 En el modo MP3, pulse el botón para ajustar el archivo reproducido desde el punto inicial (punto A) hasta el punto final (punto B). La primera pulsación marcará el punto de inicio, en la pantalla LCD parpadeará "A-". Púlselo de nuevo para seleccionar el punto final, entonces entrará en modo repetición automática. En la pantalla LCD parpadeará "A-B". Pulse el botón otra vez para borrar la función de repetición y volver a la reproducción normal. 21.2 Pulse este botón durante más de 2 segundos para entrar en la función MIC/AUX IN RECORD. Use las teclas /FM UP /FM DOWN para seleccionar el archivo a grabar en un USB o SD. Presione otra vez para comenzar la grabación. Pulse STOP para detener la grabación. 22. /SCAN FM/MP3 REC 22.1 Estando MP3 y STOP, la primera vez que pulse este botón para reproducir MP3, la pantalla LCD muestra la canción actual y el tiempo transcurrido, cambiando entre ellos cada 5 segundos. En el modo de reproducción MP3, pulse este botón para pausar la reproducción de MP3. La pantalla LCD muestra II, pulselo para conmutar entre reproducción a pausa o viceversa. 22.2 En el modo FM, pulse este botón para buscar las emisoras de FM y automemorizarlas (AUTO SCAND y MEMORY). 22.3 En el modo de reproducción MP3, presione y mantenga presionado este botón durante más de 2 segundos para entraren grabación. Si no hay ninguna operación de más de 8 segundos, saldrá de este modo. En este momento, USB y SD se puede grabar el uno al otro. Después de comprobar los dispositivos, use el FM/UP / FM DOWN para seleccionar "ONE", "FOL" o disco "ALL". Pulse /SCAN FM/MP3 REC de nuevo para iniciar la grabación. En este momento, el disco de destino está parpadeando (USB o SD). Pulse para detener la grabación. Cuando grabe una canción en la pantalla parpadeará "ONE". Cuando se grabe una carpeta, parpadeará "FOL" y "ALL" cuando se están grabando todos los archivos. PAG. 16 User Manual/Manual de Instrucciones AMC 45 ES 22.4 Grabación FM. Mantenga pulsado / SCAN FM/MP3 REC más de 2 segundos para entrar en el estado RECORD. Use el botón /FM UP / /FM DOWN para seleccionar el dispositivo de destino de la grabación USB o SD, pulse de nuevo / SCAN FM/MP3 REC para grabar, pulse para detener la función de grabación. 22.5 MP3 copia rápida. MP3 debe estar en STOP para una copia rápida en USB or SD. Use el botón /FM UP /FM DOWN para seleccionar el destino USB o SD, el cual parpadeará. Presione /SCAN FM/MP3 REC para grabar En la pantalla aparece "REC" durante 2 segundos. La velocidad de copia se expresa en porcentaje. Presione STOP para detener la grabación. 23. FOLDER+ / +10. En modo MP3, pulse este botón para aumentar 10 canciones la selección. Si la carpeta tiene menos de 10 canciones, saltará a la última canción. pulsar. Mantenga pulsado este botón durante más de 2 segundos para saltar a la carpeta siguiente situación. 24. FM UP/ . En el modo MP3, pulse este botón para seleccionar la canción siguiente. presione y mantenga para desplazarse es rápidamente hacia adelante. En el modo FM, pulse este botón para aumentar 100 kHz. Pulse y mantenga para AUTO SCAN de las emisoras siguientes. 25. RETROILUMINACION ON / OFF. Cambiar entre retroiluminar o no la pantalla 26. MODE / DEL 26.1 En el modo MP3, pulse este botón en la pantalla LCD aparece "ONE" En esta situación, el dispositivo repetirá el archivo seleccionado una y otra vez. Pulse el botón una segunda vez, en la pantalla LCD aparece "FOLDER". En esta situación, el dispositivo reproduce todas las canciones de la carpeta actual, volviendo a a primera canción y repitiendo el proceso. Púlselo por tercera vez, en la pantalla LCD aparece "ALL". En esta situación, el dispositivo reproducirá todas las canciones del dispositivo USB / SD, volviendo a la primera canción y repitiendo el proceso. 26.2 En el modo MP3, presione y mantenga presionado más de 2 segundos para entrar en modo DELETE . Pulse para seleccionar el archivo (ONE), la carpeta actual (FOL), todas las carpetas (ALL) y borrar. Pulse MODE / DEL para confirmar. 26.3 En el modo MP3, presione y mantenga más de 2 segundos, pasados 8 segundos sin ninguna operación, se saldrá de la situación actual. 26.4 En el modo MP3, presione y mantenga más de 2 segundos, o pulse STOP / MEMO para salir de la situación actual. 27. / MEMO: 27.1 En el modo de reproducción MP3, pulse este botón para entrar en modo STOP. PAG. 17 User Manual/Manual de Instrucciones AMC 45 ES 27.2 En el modo FM, pulse este botón para que las siguientes funciones: 27.2.1 Si la memoria no ha guardado las 20 emisoras de radio, el pulsar este botón no tendrá ningún efecto. 27.2.2 Si la unidad está sintonizada en una emisora, pulse este botón para guardar la emisora, presione esta tecla de nuevo para elegir la emisora a funcionar. 27.2.3 Búsqueda manual y memorización de emisoras: En modo FM, pulse este botón durante más de 2 segundos para entrar en la configuración de búsqueda manual. Use los botones /FM UP /FM DOWN para seleccionar la emisora que desee memorizar y guardar. A continuación, pulse de nuevo para confirmar. 28. FOLDER - / -10: En el modo MP3, pulse este botón para bajar 10 canciones al reproducir.Si la carpeta actual tiene menos de 10 canciones, saltará a la última canción. Presione y mantenga este botón durante más de 2 segundos, para ir una carpeta atrás. 29. FM DOWN/ : En el modo MP3, pulse este botón para seleccionar la canción anterior. Presione y mantenga este botón para ser ir rápidamente hacia atrás. En el modo FM, presione para disminuir 100 Hz. Mantenga pulsado para AUTO SCAN las emisoras. 30. Enganche para bandolera 31. Enganche para bandolera 32. Asa de transporte 33. tubo de sintonia 34. (LED x 2) 35 Altavoz full range de 6.5 " 36. DC 12V 2.6AH Li-ion incorporada 37. Puerta de la batería y los accesorios Especificaciones técnicas Alimentación AC Alimentación externa DC Potencia de salida Altavoz Rango de frecuencia UHF Rango inalámbrico Canales inalámbricos Duración de la batería Tiempo de carga de la bateria Dimensiones AC 100-250V /50-60 Hz; DC 12V /2.6AH batería Li-ion DC 12V 2.5A 65W max. 6.5" - 4 Ω (todo rango) 760 - 790 MHz 80 m. max. 0 - 99 sincronización automatica con infrarrojos 2.5 horas ejecutando ficheros MP3 3 -4 horas 318 x 175 x 213 mm (LxAnxAl) PAG. 18 User Manual/Manual de Instrucciones AMC 45 This symbol on the product or on its packaging indicates that this product shall not be treated as household waste. Instead it shall be handed over to the applicable collection point for the recycling of electrical an electronic equipment. By ensuring this product is disposed of correctly, you will help prevent potential negative consequences for the environment and human health, which could otherwise be caused by inappropriate waste handling of this product. The recycling of materials will help to conserve natural resources. For more detailed information about recycling of this product, please contact your local city office, your household waste disposal service or the shop where you purchased the product. EQUIPSON, S.A. Avda. El Saler, 14 - Pol. Ind. L´Alteró, 46460 - Silla (Valencia) Spain Tel. +34 96 121 63 01 - Fax +34 96 120 02 42 www.equipson.es - [email protected]