1
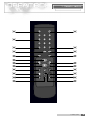
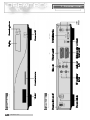
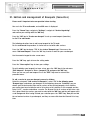
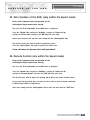
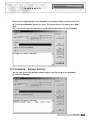
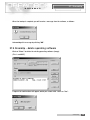
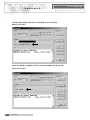
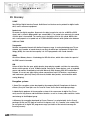
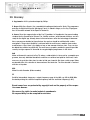
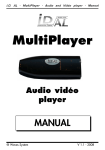
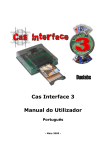
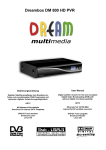
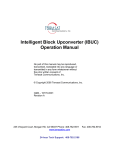
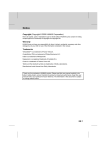
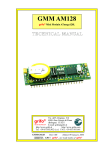
Instruction Manual
D reambox DM5600S
English
Linux OS SetTopbox with 2x PCMCIA interfacefor CA-modules, for receiving
clear and encoded ASTRA and EUTELSAT DVB-progra m m e s .
1x Smartcard interfaceRF-modulatorSegment display
1. Rem ote control
A
B
C
D
E
F
G
H
I
J
K
L
M
N
O
P
Q
R
S
T
U
V
1 . Remote control
49
2. Dre ambox vi ew s
50
2 . Dreambox views
3 . Ta b l e o f c o n t e n t s
C O N T E N T S
Chapter
Side
1.
2.
3.
4.
5.
6.
6.1
6.2
7.
7.1
7.1.1
7.1.2
7.2
8.
9.
10.
11.
12.
13.
14.
15.
16.
17.
18.
19.
20.
21.
22.
22.1
22.2
22.3
23.
24.
25.
26.
27.
27.1
27.2
27.3
27.4
27.5
27.6
28.
29.
Remote control
Dreambox views
Table of contents
Description of keys of the remote control
Important notes on operation
Safety instructions
Periods of non-use
Additional safety instructions
Getting started
HiFi amplifier
Analog
Digital
RS 232 Serial interface
Disposal notes
Selecting a language
Configuration of satellites and scanning (search)
TV mode
Radio mode
Info menu
Video recorder
Timer menu
OSD set-up
Timezone settings
Audio/Video settings
Parental Lock
Common Interface
Edition and management of own Bouquets (favourites)
Activating the Expert mode
Skip confirmation (only within Expert mode)
Hide error windows (only within Expert mode)
Service selector Help buttons (only within Expert mode)
Skin (surface of OSD) (only within Expert mode)
Remote Control (only within Expert mode)
EPG (Electronic Program Guide)
Sleeptimer
DreamUp - Operating software update
DreamUp - Preparing the software
DreamUp - Establish connection
DreamUp - Backup function
DreamUp - Delete operating software
DreamUp - Flash operating software
Reset Dreambox to factory settings
Technical Data
Glossary of terms
49
50
51
52 - 56
56
57
57
58
59
59
59
59
59
60
60
61
62
62
63
63
63
64
64
65
66
66
67
68
68
68
68
69
69
70
70
71
71
72 - 73
73 - 75
75 - 76
77 - 79
80
81 - 83
84 - 91
30.
Warranty card
92
3 . Table of contents
51
4. Description of keys
R E M O T E
C O N T R O L
4. Description of keys of the remote control
A
Dream key:
In the TV or radio mode you press the "Dream" key to open the OSD main menu.
The OSD main menu contains the following functions:
- TV mode
- Radio mode
- Information
- Settings
- Video recorder
- Timer
You can access these functions by using the navigation keys.
See: 5. Important notes on operation. Being in one of the Channel lists you press the
"Dream" key to open the service menu. The displayed options are depending on the point
from where you activate the service menu.
B
Power key:
Press and hold down the "Power" key for 3 seconds, then the Shutdown / Standby menu
will appear. Navigate to the option chosen and confirm with "OK". To put your Dreambox into
Standby mode, briefly press the "Power" key. The display shows the time. To re-activate your
Dreambox press the "Power" key again.
Reboot Now:
Goto Standby:
Sleeptimer:
C
Re-starts the operating system.
Your Dreambox switches into Standby.
You can choose a time to go off. See 26. Sleeptimer
Numeric keypad:
With the numeric keypad you select a known service number. You find the service number
in the Channel list, on the left hand side of the service name. You can also use the numeric
keypad to select a page of Video text (Tuxtext) by pressing the "Blue Option" key.
In some of the menus you may find numbers in front of the menu options.
In this case you can select the menu options directly.
D
Left/Right key:
These keys allow to go back and forward on your playlist.
When you are in a Channel list you can skip to the top with the "Left" key and to the
bottom of the list with the "Right" key.
52
4 . Description of keys of the remote control
4. De scri ption of keys
R E M O T E
F
C O N T R O L
AUDIO key:
The "AUDIO" key allows to select a sound track out of those offered by the broadcasting
s e rv i c e.
G
VIDEO key:
The "VIDEO" key allows to select one of the different formats of the Channel list
You can choose between simple, two-column and three-column list.
H
EXIT key:
With the "EXIT" key you can leave any menu.
I
OK key:
With the "OK" key you confirm your selection in the navigation of menus and Channel lists.
When no OSD menu is displayed on your screen you can get the last Channel list chosen on
the screen with the "OK" key and you can navigate as usual.
J
Up arrow key:
When no OSD menu is displayed on your screen you can switch to the next service with the
"Up arrow" key. In a Channel list you use this key to navigate dow n wa rd s .
K
Volume/ low key:
When no OSD menu is displayed on your screen you can decrease the volume with this key.
In a Channel list you use this key to navigate to the left or to skip 10 services to the top.
L
Volume/ high key:
When no OSD menu is displayed on your screen you can increase the volume with this key.
In a Channel list you use this key to navigate to the right or to skip 10 services to the bottom.
4 . Description of keys of the remote control
53
4. Description of keys
R E M O T E
M
C O N T R O L
Down arrow key:
When no OSD menu is displayed on your screen you can switch to the next service with the
"Down arrow" key.
In a Channel list you use this key to navigate upwards .
N
Sound stop key:
This key allows to stop the sound. You will see a symbol in the upper left corner of your screen.
If you press this key again the sound will be re-activated.
You can also re-activate the sound by pressing briefly "Volume low" oder "Volume high".
O
Red Option key:
The functions of this key change depending on the menu position.
In the TV mode without any OSD menu displayed on your screen you can switch directly
to the EPG of the chosen service with the "Red Option" key.
Please consider that not every service sends an EPG (Electronic Programm Guide).
P
Green Option key:
The functions of this key change depending on the menu position.
In the TV mode without any OSD menu displayed on your screen you can switch directly
to the sub channels (NvoD) of the chosen service with the "Green Option" key.
Please consider that not every service offers sub-channels.
Q
Yellow Option key:
The functions of this key change depending on the menu position.
In the TV mode without any OSD menu displayed on your screen you can switch directly
to the Audio menu of the chosen service with the "Yellow Option" key.
Please consider that not every service offers sound tra ck s .
54
4 . Description of keys of the remote control
4. Description of keys
R E M O T E
R
C O N T R O L
Blue Option key:
The functions of this key change depending on the menu position.
In the TV mode without any OSD menu displayed on your screen you can switch directly
to the Teletext of the chosen service with the "Blue Option" key.
Please consider that not every service offers Teletext (Tuxtext).
S
INFO key:
In the TV mode without any OSD menu displayed on your screen the "INFO" key calls up the
Info bar.
While the Info bar is on the screen you can access the EPG information of the chosen service
by pressing once again the "INFO" key. To stop the EPG information either press the "INFO"
key again or press the "EXIT" key.
The Info bar appears on change of programme, and shows the following data:
The feature of the Info bar depends on the chosen skin (OSD surface).
Channel number
Channel name
Current programme
Total running time
▼
Pro Siebenl
▼
▼
▼
Current time
Time elapsed
EPG available
AUDIO
Next programme
Channel options
Videotext
Encrypted
Aspect ratio
Dolby Digital Broadcast
4 . Description of keys of the remote control
55
5. Impor tant notes
I M P O R T A N T
N O T E S
"Encrypted" is highlighted in orange when the programme is being broadcast encrypted.
"Aspect ratio" is highlighted in orange when the programme is being broadcast in 16:9
format. Otherwise it is in 4:3 format. "Dolby Digital Broadcast" is highlighted in orange
when the programme is being broadcast in Dolby Digital.
When you are in a Channel list in any service of the TV or radio mode and an EPG information
is being broadcast by the service you access the EPG information of the current programme
by pressing the "INFO" key.
T
Text key:
The "Text" key covers the help function. By pressing this key in some of the menus you
access a help menu containing short explanations of the available options.
U
TV key:
In the TV mode without any OSD menu displayed on your screen you can call up the
last chosen Channel list with the "TV" key.
When you are in the radio mode you can switch back to the TV mode with this key.
V
Radio key:
In the Radio mode without any OSD menu displayed on your screen you can call up the
last chosen Channel list with the "Radio" key.
When you are in the TV mode you can switch back to the radio mode with this key.
5. Important notes on opera t i o n
The operation of the Dreambox is greatly simplified with an OSD (On Screen Display).
All available options are displayed with 4 coloured dots (red, green, yellow, blue) and can
be activated with the remote control.
The options change depending on the menu, and are labelled appropriately in each menu.
You can leave all menus and channel lists with the "EXIT" key.
The menus are in general operated with the keys on your remote control.
They are called "direction keys".
To enter a sub-menu, confirm it with the "OK" key.
56
5 . Important notes on operat i o n
6. Safety instructions
S A F E T Y
6. Safety instructions
For your protection, please read the safety instructions thouroughly before starting to use your
DM5600. The manufacturer accepts no responsibility for damage which occures as a result of
incorrect handling or from failure to observe the safety instructions.
- The unit must be positioned such that it is sufficiently ventilated.
- The cover of the unit must not be covered, and there must be sufficient distance from
other equipment. The ventilation ports of the device must always remain unobstructed,
so that the warm air can be carried away from the interior of the unit.
- Do not place any vases or other containers with fluids in them on the unit.
Water must not be allowed to drip or to spray into the unit.
-
No burning objects, such as candles or oil lamps, may be placed on the unit
- The unit must only be operated in moderate climatic conditions.
- Never open the unit yourself! There is a risk of electric shocks. Should it become
necessary to open the unit, this must be carried out by qualified personnel.
- Never introduce foreign metal objects into the slots or the ventilation ports.
WARNING!
Opening, conversion or modification of the unit leads to loss of warranty.
6.1 Periods of non-use
- If the unit is not operated for longer periods of time, it should be completely disconnec
ted from the mains power supply.
- The unit should also be disconnected from the mains supply during electrical storms.
6 . Safety instructions
57
6.2 Safety i nstruc tions
I N S T R U C T I O N S
6.2 Additional safety instructions
- Connection to the external unit (LNB)
- Switch off the DM5600 before you connect or remove the cable of the LNB.
- Connection to the television
- Switch off the DM5600 before you connect the SCART cable to your television.
- The unit must immediately be disconnected from the mains power supply if the power
cable or socket show any signs of damage.
- The unit must immediately be disconnected from the mains power supply if it is exposed
to dampness or if dampness penetrates it.
- The unit must immediately be disconnected from the mains power supply if substantial
external damage is discovered.
Do not expose your Dreambox to direct sunlight, lightning or rain.
Earthing: The LNB cable must be earthed.
The earthing system must conform to SABS 061.
Cleaning: Remove the power cable of the Dreambox from the mains socket before you
clean the Dreambox. Use a slightly damp cloth without cleaning agents.
Connect your DM5600 only to sockets which are suitable for the purpose.
Do not allow overloads to occur.
58
6.2 Safety instructions
7. Getting started
G E T T I N G
S T A R T E D
7. Getting started
Check that everything has been delivered. You should have received the following:
1
1
1
1
2
receiver DM5600
remote control
Instruction Manual (latest version available from http://www.dream-multiedia-tv.de )
warranty card
batteries (1,5V microcell)
- Check the battery polarity carefully and install the batteries supplied in the battery com
partment of the remote control.
- Before you connect the receiver, please read the safety instructions under point 6. Safety
Instructions.
- Connect the external unit (dish, LNB) with an F plug to the LNB input on the receiver.
- Connect the receiver with a Scart cable to your television (Scart socket TV), and to a
video recorder or DVD player (Scart socket VCR).
- Plug the mains cable into the receiver and then into a suitable 230 V / 50 Hz power
socket.
7.1 H I F I - a m p l i f i e r
7.1.1 A n a l o g
To connect your Dreambox to a HiFi amplifier, please use a suitable chinch cable. Connect
this to the receiver at AUDIO R/L and to a free input (e.g. AUX or CD) on your HiFi amplifier.
7.1.2 D i g i t a l
If your amplifier has a suitable optical input, connect the DIGITAL AUDIO socket on the receiver
to the optical input of the amplifier with an optical cable. Sampling frequencies of 16, 22.05,
24, 32, 44.1 and 48 kHz are available. This output also provides the Dolby Digital signal (AC3)
when this is broadcast.
7.2 RS 232 serial interface
The RS 232 interface is used to update the operating software and for pre-programming
with a PC.
7 . Getting started
59
8. Disposal notes
D I S P O S A L
N O T E S
8. Disposal notes
The packaging of the DM5600 consists exclusively of recyclable materials.
Please dispose of these appropriately to the "Dual System".
Take care that dead batteries from the remote control and electronic scrap are not disposed
of in ordinary rubbish, but are properly disposded of (return to the specialist dealer, or special
waste disposal).
9. Selecting a language
Please read 5. Important notes on operation before starting.
You are in the TV or radio mode, and no OSD menu is displayed.
Press the "Dream" key, navigate to "Settings" and confirm your settings with the "OK" key.
The menu "Settings" appears. Navigate to "System Settings" and press the "OK" key to
access the sub-menu.
Navigate to "OSD Settings" and confirm your settings with the "OK" key.
Then press the "Blue Option" key to access the language selection menu. Choose a language
and confirm with the "OK" key. After that you return automatically to the precedent menu.
You can leave any menu with the "EXIT" key.
60
8 . Disposal notes
1 0. Co n fi gu rat io n s a te ll it es
S A T E L L I T E S
10. C o n f i g u ration of satellites and scanning (search )
Please read 5. Important notes on operation before starting.
You are in the TV or radio mode, and no OSD menu is displayed.
Press the "Dream" key, navigate to "Settings" and confirm with the "OK" key.
The menu "Settings" appears. Navigate to "Service Searching" and confirm your selection
with the "OK" key. Select "Satellite configuration" and press the "OK" key. Now you can
choose out of the above "Drop Down" list either a single satellite, two satellites from DiSEqC
A/B, four satellites from DiSEqC OPT A/B, several satellites with DiSEqC rotor or the non-standard – user defined configuration. Select the appropriate configuration for your satellite unit
and confirm it with the "OK" key.
In case you want to amend satellites indicated navigate to them and change them.
In case you have chosen the option "Several satellites with DiSEqC rotor" in the satellite configuration, then in the menu "Service Searching" you have to select "Rotor settings" and
enter the parameter of your rotor into the "Rotor configuration".
After having finished the satellite and rotor configurations, go to "Automatic Transponder
Scan" in the menu "Service Searching" and press the "OK" key. In the upper "Drop Down"
list choose the satellite to be scanned with the "OK" key and again with the "OK" key put
a cross in the box in front of "clear list". Then press the "Green option" key to start search
(Satscan).
When the search is finished a list of all transponders and services found is shown.
Press the "OK" key to close this window.
Answer the following window with YES or NO depending on whether you want to scan an additional satellite. If you want to scan an additional satellite do not put a cross in the box in front
of "clear list" this time.
1 0 .C o n f i g u r ation sat e l l i t e s
61
11 . TV mo de
M O D E
11. TV mode
Please read 5. Important notes on operation before starting.
You want to go into the TV mode, and no OSD menu is displayed.
Press the "Dream" key, navigate to the "TV mode" and confirm your selection with
the "OK" key or press the "TV" key on the remote control.
Now press the "TV" or the "OK" key, to make appear one of the Channel lists.
By pressing the "OK" key you can choose the corresponding service.
By pressing the "EXIT" key you leave the Channel list.
When the Channel list is displayed you can amend the feature/contents of it.
The "Yellow option" key allows to change to the DVB Bouquets display.
The "Red option" key allows to change to the DVB TV Service display.
The "Blue option" key allows to change to the User Bouquets display.
Die "Green option" key allows to change to the satellite display.
12. RADIO mode
The operate of the radio mode is similar to the TV mode, but you do not choose the
TV but the radio key or mode.
This is applicable too for editing and assorting of favourites (Bouquets) in the radio mode.
62
1 1 . TV mode
13. INFO menu
I N F O
M E N U
13. INFO menu
Please read 5. Important notes on operation before starting.
You are in the TV or radio mode, and no OSD menu is displayed. Press the "Dream" key,
navigate to "Information" and confirm your selection with the "OK" key.
The menu "Infos" appears.
In "Streaminformation" you receive any relevant data of the chosen service.
In "About..." you receive the latest information about the operating system.
"Satellite finder" indicates the power of the signal of the chosen menu.
Close as usual every menu (window) with the "EXIT" key or confirm them with the "OK" key.
14. Video re c o rd e r
Please read 5. Important notes on operation before starting.
Press the "Dream" key, navigate to "Video recorder" and confirm your selection with the
"OK" key.
Choose this selection mode to transfer the picture of your connected video recorder to the TV.
You return by pressing the "OK" key once again.
15. Timer menu
Please read 5. Important notes on operation before starting.
You are in the TV or radio mode, and no OSD menu is displayed.
Press the "Dream" key, navigate to "Timer" and confirm your selection with the "OK" key.
The time recording list appears. You find any timer you have set up until now.
Possible types of timer are the sleeptimer and the programme change timer.
Please add timer events exclusively by EPG or the sleeptimer.
Close this menu with the "EXIT" key.
1 3 . Info menu
63
1 6 . O SD S et up
O S D
16. OSD Set up
Please read 5. Important notes on operation before starting.
You are in the TV or radio mode, and no OSD menu is displayed.
Press the "Dream" key, navigate to "Settings", navigate to "System Settings",
navigate to "OSD Settings" and press the "OK" key after each step.
Here you can find the settings for the OSD (On Screen Display)
Transparency:
Select the transparancy of the OSD
Brightness:
Select the brightness of the OSD
Contrast:
Select the contrast of the OSD
Tuxtext (Videotext) position:
Please read 5. Important notes on operation before starting.
You are in the TV or radio mode, and no OSD menu is displayed.
Press the "Yellow option" key to access the setting mode.
In this mode you set up the outer corners of the video text window.
Press the "Red option" key to calibrate the upper left side edge.
Press the "Green option" key to calibrate the bottom right side edge.
Use the direction keys to calibrate the edges. Store your settings of calibration
with the "OK" key or close this mode with the "EXIT" key.
17. Time zone settings
Please read 5. Important notes on operation before starting.
You are in the TV or radio mode, and no OSD menu is displayed.
Press the "Dream" key, navigate to "Settings", navigate to "System Settings",
navigate to "Time Settings" and press the "OK" key after each step.
64
1 6 . OSD Set up
1 8 . A u di o s et ti n gs
A U D I O
You can select and store your time zone in the "Drop Down" list of the sub-menu "Time zone
configuration". Just press the "OK" key and a list of all time zones will appear.
With the "OK" key put a cross in the box in front of "use automatically daylight saving time",
and the time will be automatically adjusted. Press the "Green option" key to store your
settings.
Choose "Time Correction" for manual set of the clock of the system.
Press the "Green option" key to set the clock.
Close as usual every menu (window) with the "EXIT" key or confirm them with the "OK" key.
18. AUDIO/VIDEO settings
Please read 5. Important notes on operation before starting.
You are in the TV or radio mode, and no OSD menu is displayed.
Press the "Dream" key, navigate to "Settings", navigate to "System Settings", navigate
to "A/V Settings" and press the "OK" key after each step.
The direction keys allow to choose the colour format which is supplied by the Scart output
of your Dreambox to the TV. Choose between CVBS (FBAS), RGB und Video.
You can also choose the aspect ratio. Choose between 4:3 Letterbox, 4:3 panscan or 16:9.
Put a tick in the box in front of "Disable WSS on 4:3" to stop your TV from changing automatically between 4:3 und 16:9.
Put a tick in the box in front of "AC3 as Standard output" and the AC3 output will be used
as standard output for each service with Dolby Digital broadcast.
Important notice: Having set up this configuration you will not have any sound unless you
connect a DSP (Digital Sound Processor) to your Dreambox.
Store your settings with the "Green option" key or leave this menu with the "EXIT" key.
1 8 . Audio/Video settings
65
19. Parental Lock
P A R E N T A L
L O C K
19. P a rental Lock
Please read 5. Important notes on operation before starting.
You are in the TV or radio mode, and no OSD menu is displayed.
Press the "Dream" key, navigate to "Settings", navigate to "Parental lock" and confirm your
settings with the "OK" key.
Put a tick in the box in front of "Parental lock" and you can enter a four-digit code of your
choice to remove services and bouquets from the Channel lists. (They are not deleted but
only removed in order to prevent that they are called up.) If you are in a Channel list you
can access this function either with the "Dream" or the "Red option" key.
Mark a cross in the box in front of "Setup lock" and enter a four digit code of your choice
to prevent any access to the menu "Settings".
Store your settings with the "Green option" key or leave this menu with the "EXIT" key.
20. Common Interface
Please read 5. Important notes on operation before starting.
You are in the TV or radio mode, and no OSD menu is displayed.
Press the "Dream" key, navigate to "Settings", navigate to "Common interface"
and confirm your settings with the "OK" key.
In this menu you can manage your Common interface module.
You can make a "reset".
You can re-initialise the module.
Normally the firm wa re of your introduced CAM is indicated in "no module".
There you can call up several other functions of your CAM.
Press the "EXIT" key to close this menu.
66
1 9 . Parental Lock
21. Bouquets
B O U Q U E T S
21. Edition and management of Bouquets (fav o u r i t e s )
Please read 5. Important notes on operation before starting.
You are in the TV or radio mode, and no OSD menu is displayed.
Press the "Dream" key, navigate to "Settings", navigate to "Service Organising"
and confirm your settings with the "OK" key.
Press the "OK" key in "Create new bouquet" to set up a new bouquet (favourites)
for the TV or radio mode.
The following describes how to add a new bouquet to the TV mode.
For the radio mode the procedure is similar but to start with radio services.
Press the "OK" key to choose "TV" in the window "Bouquet type". You access the
menu "Add new Bouquet". Press the "OK" key to enter a name for your new bouquet.
Use the numeric keypad to enter a new name.
Press the "OK” key again to leave the setting mode.
Press the "Green option” key to store your settings.
To verify whether your bouquet has been set up, press the "OK" key in the sub-menu
"Edit bouquets". Navigate to "User – bouquets (TV) and press the "OK" key.
There you can see your new bouquet. Press the "EXIT" key once to return to the
precedent menu.
To add a service to your new bouquet, proceed as follows:
Select the sub-menu "Add services to bouquets", select "TV" in the following menu
"Bouquet type" and choose your bouquet. In the following sub-menu "Satellites" you can
choose your wished service either out of services of the existant bouquets of all satellites
you receive (you have installed) or out of all services of all satellites. In this example we take
Astra 19.2 E – services and choose a service. The Channel list of all services of the Astra satellite is given. Mark the services you want to select with the "OK" key and they will appear with
a red background. After having finished your selection press the "EXIT" key. Now you can find
the red marked services in your bouquet, and they are accessible from the Channel list at any
time.
2 1 .B o u q u e t s
67
22. Expert mode
E X P E R T
M O D E
22. A c t i vating the Expert mode
Please read 5. Important notes on operation before starting.
You are in the TV or radio mode, and no OSD menu is displayed.
Press the "Dream" key, navigate to "Settings", navigate to "System Settings",
navigate to "Expert mode" and press the "OK" key after each step.
By this means you have activated the "Expert mode". This is shown by a green tick behind
the mode in the menu. To activate the "Expert mode" completely, you leave the menus
"System settings" and "Settings" with the "EXIT" key in order to access the OSD main menu.
Then, once again, you select "Settings" and you can see the new setting "Expert set-up".
22.1 Skip Confirmations (only within the Expert mode)
At "Skip Confirmations" press the "OK" key, and a green tick appears on the right hand
side of it , then any window with a request of confirmation will be oppressed.
22.2 Hide error windows (only within the Expert mode)
At "Hide error windows" press the "OK" key, and a green tick appears on the right hand
side of it , then any window with an error message will be oppressed.
22.3 S e rvice selector help buttons (only within the Expert mode)
At "Service selector help buttons" press the "OK" key, and a green tick appears on the
right hand side of it, then the couloured help buttons appear above the Channel list.
The help buttons do not become active or inactive until you reboot.
68
2 2 .A c t i v ating the Expert mode
23. Skin
S U R F A C E
O F
T H E
O S D
23. Skin (Surface of the OSD) (only within the Expert mode)
Please read 5. Important notes on operation and 22.
Activating the Expert mode before starting.
You are in the TV or radio mode, and no OSD menu is displayed.
Press the "Dream" key, navigate to "Settings", navigate to "Expert set up",
navigate to "Skin set up" and press the "OK" key after each step.
Choose your favourite skin and store your setting with the "Green option” key.
You will be asked if you want to reboot the operating system.
Press the "Green option” key again to activate the chosen skin.
A new skin does not become active until you reboot!
24. Remote Control (only within the Expert mode)
Please read 5. Important notes on operation and 22.
Activating the Expert mode before starting.
You are in the TV or radio mode, and no OSD menu is displayed.
Press the "Dream" key, navigate to "Settings", navigate to "Expert set up",
navigate to "Remote control" and press the "OK" key after each step.
The direction keys allow to adjust the repeting and de delay rate of your Remote control.
In case your Remote control does not seem to react in time or too fast to your commands,
try different possibilities of adjustment.
Store your settings with the "Green option” key or close the menu with the " E X I T ”k e y.
2 3 .S k i n
69
25. EPG
E P G
25. EPG (Electronic Program Guide)
Please read 5. Important notes on operation before starting.
You are in the TV or radio mode, and no OSD menu is displayed.
To access the EPG, press the "Red option” key. Navigate to a broadcast of your choice and
press the "OK” key to get further information about the programme. Press the "EXIT” key
to return and make another choice. To close the EPG press the "EXIT” key several times.
You also have the possibility to program a change of programme. Please proceed as follows:
Choose the broadcast to change to, then press the "Blue option” key to add this broadcast
to the timer. Now you are in the "Timer edit” menu. There you can program to change to the
broadcast at defined days. By putting a cross in the box in front of "Repeat timer” with the
"OK” key. Now you can define the days when changes should be excecuted by putting a cross
in the boxes in front of the chosen days with the " O K ”k e y. You can also influence the starting
and ending time by navigating with the direction keys and amending the time indicated.
Store your settings with the "Green option” key.
To verifyl your timer in your timer menu, navigate to the event on the timer list and press
the "OK” key.
See 15. Timer menu.
26. S l e e p t i m e r
Please read 5. Important notes on operation before starting.
You are in the TV or radio mode, and no OSD menu is displayed.
Press and hold down the "Power” key for 3 seconds to access the Shutdown / stand-by
menu. Navigate to "set sleeptimer” and press the "OK” key. With your numeric keypad
of your Remote control you can now enter a time in minutes when your Dreambox should
switch off. Store your settings with the "Green option” key.
To verify your sleeptimer navigate to the Timer menu.
See 15. Timer menu.
70
2 5 . EPG (Electronic Program Guide)
27. DreamUp
D R E A M U P
27. D reamUp - operating softwa re update
You can obtain the DreamUp software and the operating software from www.dm5600.de.
!!!! Please study these instructions thoroughly before you begin !!!!
In order to connect the Dreambox with your computer, you need a PC with a serial interface
(COM1 or COM2) and a null modem cable. In these instructions we assume that you create a
connection to your Dreambox via the COM1 interface. If many questions arise, ask your dealer
for assistance, or contact our technical hotline at www.dream-multimedia-tv.de.
The unit is switched off. Please remove all cables from your Dreambox.
Plug only the serial cable into your Dreambox.
27.1 D reamUp - preparing the softwa re
Start the DreamUp software on your computer.
Select the COM interface which you have connected with your Dreambox.
Make sure that the checkbox "Use Network” is not ticked.
You have now configured the software according to your needs.
2 7 .D r e a m U p
71
27.2 DreamUp
D R E A M U P
27.2 D reamUp - establish connection
Now click on "Connect".
The software informs you with a status message that it is prepared for a connection.
Only now should you switch on your Dreambox.
72
27.2 DreamUp
27.2 DreamUp
D R E A M U P
When you have supplied power to your Dreambox, the software prepares everything necessary
for flashing your Dreambox. Observe the status. The display indicates the progress bar "5600
boot".
This is how it looks when the software has established the connection with your Dreambox.
27.3 D reamUp - backup function
You can store the existing operating software together with the set-up of your Dreambox,
by clicking on "Backup”.
2 7 .D r e a m U p
73
27.3 DreamUp
D R E A M U P
After the click, the following window opens. This allows you to select a file name for the
image you are going to save, and store it.
After you have clicked on "Save”, the operating software is backed up.
Observe the status.
74
27.3 DreamUp
27. DreamUp
D R E A M U P
When the backup is complete, you will receive a message from the software, as follows:
A ck n owledge this message by clicking "OK”.
27.4 D reamUp - delete operating softwa re
Click on "Erase” to delete the existing operating software (image).
(This is no MUST).
A request for confirmation will appear, which you answer with a click on "Yes”.
2 7 .D r e a m U p
75
27. 4 Dr e a m U p
D R E A M U P
Observe the status.
Here you see the message that the erase has been successfully completed.
Click on "OK".
76
27.4 DreamUp
2 7. 5 Dr e a m U p
D R E A M U P
27.5 D reamUp - flash operating softwa re
Click on "Flash". You will now be asked for the operating software (image) which you
want to record. Select you image and click on "OK".
2 7 . 5 DreamUp
77
27 . 5 Dre a m U p
D R E A M U P
The operating software will then be uploaded to your Dreambox.
Observe the status.
When the upload is complete, the flash of your Dreambox will be erased.
Observe the status.
78
27.5 DreamUp
27.5 DreamUp
D R E A M U P
The uploaded image will be checked. Observe the status.
After the flashing is complete, you will receive a message from the software that everything
has been completed successfully. Click on "OK".
27.5 DreamUp
79
27.6 Dreambox
D R E A M B O X
27.6 Reset Dreambox to factory settings
Your Dreambox is now updated with the selected operating software.
Close the software programme by clicking on "Exit".
Switch off your Dreambox, remove the serial cable from the Dreambox.
Wait 30 seconds.
Plug the TV Scart plug and the coaxial cable (satellite system) into your Dreambox.
Switch on your Dreambox.
Directly after having switched on the Dre a m b o x ,p ress and hold down the upper left key on
your Dreambox, and do not release it until "999" appears in the display of your Dreambox.
Display
CI slot
Smartcard reader
This operation takes a little while, please wait.
Reset-up your Dreambox acconding to your needs.
80
27.6 Dreambox
Channel up/down
Power on/off
2 8 . Te ch n i c a l D a t a
D A T A
28. Te chnical Data
DreamBox DM5600
Features:
- 250 MHz IBM PowerPC Processor (350 Mips)
- Linux Operating System
- 2 x DVB Common-Interface slot
- 1 x Smartcard reader
- MPEG2 Hardware decoding (DVB compatible)
- Tuner variant NIMs (DVB-S, DVB-C)
- V.24/RS232 connection
- 4 digit 7-segment display
- 64 MByte RAM (working storage)
- unlimited Channel list for TV/Radio
- change of channel in less than one second
- fully automated channel search
- support for bouquet lists (indirect unlimited)
- EPG support (electronic program guide)
- support for multiple LNB switching (DiSEqC)
- adaptable OSD in many languages (skin support)
- SPDI/F optical connection AC-3 / DTS
- RF - modulator and video out chinch
- 2 x Scart connection (completely software controlled)
DBS-Tuner:
Input frequency range 950 …. 2150 MHz
Input level range - 65 dBm …. - 25 dBm
Noise figure 12 dB max.
DBS-tuner input F socket
Input impedance 75 Ohms
AFC capture range +/- 3 MHz
Demodulation Shaped QPSK
Symbol rate 2 …. 45 Mbaud/s, SCPC / MCPC
FEC Viterbi and Reed-Solomon
Viterbi rates 1/2, 2/3, 3/4, 5/6, 7/8, automatic adjustment
Roll-off factor 35 %
Demultiplexing according to ISO 13818-1
Common Interface power consumption max. 0,3A/5V
2 8 . Technical Dat a
81
2 8 . Te ch n i c a l D a t a
D A T A
Video decording:
Video compression MPEG-2 und MPEG-1 compatible
Video standard PAL G/ 25 Hz
Picture format 4:3 / 16:9
Picture material 16:9, automatic adjustment for 16:9 TV equipment (via Scart)
Letterbox filtering for 4:3 TV equipment
Audio coding:
Audio compression MPEG-1 & MPEG-2 Layer I and II
Audio Mode Dual (main/sub), S t e re o
Sampling frequencies 32 kHz, 44.1 kHz, 48 kHz, 16 kHz, 22.05 kHz, 24 kHz
Analog output:
Output level L/R 0,5 Vss to 600 Ohm
THD > 60 dB (1 Khz)
Crosstalk < -65 dB
Digital output:
Output level 0,5 Vss to 75 Ohm
Sampling frequencies 32 kHz, 44.1 kHz, 48 kHz
S/PDIF output optical (AC3)
Video output:
Output level FBAS 1 Vss +/- 0.3 dB to 75 Ohm
Video parameters:
Input level FBAS 1 Vss +/- 0.3 dB to 75 Ohm
Teletext filtering according to ETS 300 472 standard
TV Scart:
Output: FBAS,RGB,S-VHS via OSD selectable
VCR Scart:
Input: FBAS,RGB,S-VHS
Output: FBAS,S-VHS
RS 232 serial interface:
Typ RS232 bi-directional
Bit rate 115,2 kBit/s max.
Connector SUB-D-9 socket
Function update of the operating software and pre-programming
82
2 8 . Technical Dat a
2 8 . Te ch n i c a l D a t a
D A T A
LNB power supply:
LNB power 500mA max. ; short-circuit proof
LNB voltage vertical < 14V without load, > 11,5V at 400mA
LNB voltage horizontal < 20V without load, > 17,3V at 400mA
LNB switch-off in standby mode
Number of active satellite positions:
DiSEqC 1.0/1.2 SAT POSITION / SAT OPTION
DiSEqC – rotor control
Power consumption:
< 20W (in operation, horizontal polarisation / 400mA LNB power)
< 11W (in oeration, without LNB)
< 2W (deep standby mode)
Input voltage:
180V… 250V / 50Hz AC voltage +/- 15%
General:
Environmental temperature +15°C...+35°C
Atmospheric humidity < 80%
Dimensions (B x T x H): 374 mm x 230 mm x 63 mm
Weight: 1,8 kg without HDD
2 8 . Technical Dat a
83
29 . G lo ss a r y
G L O S S A R Y
29. G l o s s a ry
AC3
Dolby Digital, sound system
AGC
Automatic Gain Control. This always provides the best picture quality. It does not, h ow e v e r,
guarantee a perfect picture, as the AGC is dependent on the input signal. The poorer the input
signal, the less the AGC can manage.
Analog
An ordinary signal transmission procedure, where the fluctuations of the signal exactly correspond to the sound and picture waveforms of the source.
Aspect Ratio
Ratio of lengths of picture sides, e.g. 4:3 or 16:9
BER
Bit Error Rate. Error rate of the received bits. Should be zero.
Bouquets
A bouquet is (like a bouquet of flowers) a package of programmes from a single
Pay-TV provider.
CA
Conditional Access. Control the user's access to services and programmes which are encrypted
for copyright or commercial reasons.
CI
Common Interface - Conditional Access Module. The basic idea of the Common Interface (CI)
is as follows. There is a uniform ,s t a n d a rd interface for the many television and radio programmes, Internet and software products for which charges are levied. To enable you to receive
encrypted programmes with the satellite receivers Irdeto, C ry p t oworks, Conax Nagravision,
Viaccess, this is already equipped for the age of Common Interface. Of course, all Common
Interface options are available to you with the multi-access modules for the sat-receivers with
CI. Pay-TV programmes are normally encrypted; the screen is black, and there is no sound.
After the subscription fees or a one-time charge for the smartcard have been paid, the associated TV offerings can be seen decrypted. The CI-CA module compares the code in the box
with the one broadcast. If they match, the relevant programmes are decrypted and thus become visible.
There are CI-CA modules for different encryption systems (Cryptoworks, C o n a x ,N a gravision,
Viaccess and soon also from Irdeto). In order to watch Pay-TV programmes, as well as the CICA modules, you need a sat-receiver with Common Interface, a multi-access module with a CI
slot and the corresponding smartcard from the programme supplier.
84
2 9 .G l o s s a ry
29. Glossar y
G L O S S A R Y
29. G l o s s a ry
Coding systems
See Encryption systems.
CF
Compact Flash. Standard for a storage medium (memory card) with Flash memory, which
retains imformation even without power. CF is a scaled-down, minimally altered version of
PCMCIA memory cards with the ATA interface. This makes it possible to operate them over a
simple PCMCIA adapter without controller logic. The cards come in three variants (I, II and III),
according to their thickness. However, most devices prefer type I.
DAB
Digital Audio Broadcasting. The system offers additional capacity for data transmission. Data
compression is by MPEG-2.
Data reduction
Compression of picture and sound signals. Redundant information is omitted.
Digital
The signal transmission method of the future. Signals are transformed into binary code (0's
and 1's) and broadcast in this form. See, by contra s t ,A n a l o g. The latest digital satellite receivers implement the future by this way.
DiSE qC
Digital Satellite Equipment Control (pronounced: die-sec). Developed by Philips for Eutelsat.
Anyone who wants to receive analog and digital programs from Astra, Eutelsat, and potentially
other satellites cannot avoid DiSEqC. The set-top box delivers control signals in digital form
with which multiple antennae can be selected. In contrast to previous analog control signals
(14 / 18 volt and 22 kHz), the DiSEqc system provides a much larger numer of switching possibilities for control and monitoring of the equipment components of a receiving set-up. DiSEqC
is a trademark of the European Satellite Organization (EUTELSAT).
Dolby Digital 5.1
Dolby Digital is a sound transmission system which makes it possible to reproduce digital surround sound on a home cinema system.
Downlink
The transmission segment from the satellite to the receiving antenna on the ground is described as a downlink. Television broadcasters often use satellite transmission from the filming
location to the broadcasting station. The advantage: It is the quickest way to transport large
data volumes over long distances.
2 9 .G l o s s a ry
85
29. Glo ssary
G L O S S A R Y
29. G l o s s a ry
DTS
Digital Theater System, sound system
DVB - S / T / C
Digital Video Broadcasting. Transmission of video and sound signals in digital form. DVB-S indicates satellite transmission, DVB-T terrestrial and cable transmission of digital television signals. Numerous organisations and institutions participate in the DVB project, now including
many from countries outside Euope. Digital receivers which are developed and manufactured
according to the DVB standards can be identified by bearing the DVB logo. Digital satellite
receivers of course bear this logo.
DVD
Digital Versatile Disc
DSP
Digital Sound Processor. An audio amplifier with digital inputs for operating the AC3 sound
signals.
EPG
Electronic Program Guide. The electronic programme guide shows you information on the
broadcast selected.
Gateway
Entrance, gate. This is a computer which links two networks together. In the more precise
sense, is refers to connections between two different online systems, e.g. CompuServe and the
Internet, or between mailbox networks (Fido, Maus...) and the Internet.
I2C
The 2 should be a superscript (I squared). A bus which was developed by Philips at the end of
the 70's for entertainment electronics. It was used as the basis for the System Management
Bus (SMB) and Display Data Channel (DDC).
IDE
Integrated Drive Electronics. Type of hard disk in which the electronics for controlling the
mechanism etc. is integrated in the disk drive itself, and the controller thus does not need to
be involved in this, as previously with the AT. It is rather primitive in comparison with SCSI, but
also (somewhat) cheaper, and has therefore become established.
86
2 9 . G l o s s a ry
29. Glossar y
G L O S S A R Y
29. G l o s s a ry
IP
Internet Protocol. Level 3 protrocol in the TCP/IP communications standard. It mediates data
packets in "insecure" mode. The Internet is based on the protocol.
IR
Infrared. A wavelength which lies below that of visible light. It is used for data transmission,
e.g. for very small computers (PDAs) and for remote control units.
LCD
Liquid Crystal Display is a technology which is used in notebooks and other computers for presenting images and symbols. In contrast to LED (light emitting diode) and gas plasma technologies, LCD allows a much higher resolution than cathode ray tube technology (CRT, cathode ray
tube).
LNB /LNC
Low Noise Blockconverter / Low Noise Converter (feed system). Converts the downlink satellite
frequencies to 1.Sat-ZF. Receiver component on or in the satellite antenna, which receives the
high frequencies of the satellites, amplifies them, and converts them to the lower medium frequency.
LOF
Fixed frequency around which the high input frequency of the satellite signal is translated
(L.O.F.=Local Oscillator frequency).
MCPC
Multiple Channel Per Carrier. Transmission system which uses a single transponder for multiple
channels (see also SCPC).
MHz
Megahertz. Number of oscillations of a signal per second. Unit: Hertz. One kilohertz (kHz) corresponds to a thousand oscillations per second, one megahertz (MHz) to a million oscillations
per second, and one gigahertz (Ghz) to a billion oscillations per second.
Mini-DiSE qC
Two universal single LNBs, for digital and analog, reception can be controlled with the help of
the "Tone-Burst" analog switching signal (also known as Mini-DiSEqC). 14/18 volts and 22 kHz
are then controlled over a special DiSEqC multi-switch.
2 9 .G l o s s a ry
87
29. Glossary
G L O S S A R Y
29. G l o s s a ry
MIPS
Millions of Instructions Per Second. Measurement of millions of machine instructions carried
out per second. Wags say it stands for "Misleading Interpretation of Processor Speed". Also a
company of this name which produces processors and other chips (in RISC architecture).
MPEG2
Data reduction method for picture and sound. In contrast to the analog method where 25 full
pictures with all information are transmitted per second) the MPEG method only takes account
of the actual changes in the picture.
NVoD
Near Video on Demand. The same film is transmitted on different channels at certain time
intervals, such as quarter hourly, half hourly or hourly.
OSD
On Screen Display. When operating the receiver, the functions are displayed as an on-screen
menu, blended into the television picture. The OSD of most satellite receivers offers various
languages for its on-screen menu.
PCMCIA
Abbreviation for Personal Computer Memory Card International Association, a standard.
PCR
Program Clock Reference. A time marker is set at least every 100 milliseconds for each signal
transported in the transport stream, in order to synchronise the system time of the decoder.
PID
Packed Identification. This means that individual packages received in the transport stream
must be indentified. The identification is a four-digit-code, separated by audio and video. Thus,
for example, over-writing of SCPS signals is prevented.
PPV
Pay per view. This allows subscribers to a bouquet to book individual films or other transmissions.
88
2 9 .G l o s s a ry
29. Glossar y
G L O S S A R Y
29. G l o s s a ry
QPSK / QAM
Quadratur Phase Shift Keying is a modulation method for digital television programmes received via satellite. In cable networks, different demands are placed on the transmission of digital
signals. A different modulation process is therefore required, " Q u a d ra t u re Amplitude
Modulation" (QAM). Since a set-top box can only command one of the two procedures, it is
necessary to know the route by which digital television programmes are to be received.
RGB
Red, Green, Blue. Colour model in which the colour is defined by the proportions of red, green
and blue. Other colour models: CMY, HSV, HLS. Also the name for a particular monitor signal,
since monitors have electron beams for red, green and blue, and can thus be directly controlled.
RS232
A widely used interface between computers and other serial devices such as modems, printers
and mice. Software updates can be fed in over the RS232 connection (for Windows computers,
the COM interface).
Scart
21-pole cable connection for picture and sound transmission, for example from the satellite
receiver of video recorder to the television. The usual conncection between television and
video re c o rd e r, it is also used to connect the set-top box with both of these units. Picture and
sound can be placed back and recorded in this way.
Smartcard
Similar to a credit card, used with the CA module of the set-top box, it makes participant identification and access control for an encrypted Pay-TV or TV channel possible.
SNR
Signal to Noise Ratio. The difference between the signal level and the noise on an information
channel.
SCPC
Single Channel Per Carrier - transmission system (digital or analog), which uses a separate
carrier for each channel on a transponder (see also MCPC).
2 9 .G l o s s a ry
89
29. Glo ssary
G L O S S A R Y
29. G l o s s a ry
S/PDIF
Sony/Philips Digital Interface Format. Definition of an interface and a protocol for digital audio
data, used in consumer equipment.
Symbol rate
Parameter for digital reception. Represents the data transmission rate for an MCPC or SCPC
signal, and is stated in Megasymbols per second (MS/s). The symbol rate represents the speed
at which data is transmitted. The receiver must synchronise itself to this speed. MCPC channels usually operate at a symbol rate of 27,500 and SCPC channels with symbol rates between
4,000 and 7,000.
Transponder
Satellite transponder/channel with defined frequency range. In analog technology, one TV programme and a number of sound channels can be transmitted per transponder. In digital technology (QPSK), the transmission capacity is 6-10 TV programmes with sound channels.
UDMA
Ultra Direct Memory Access. A technology for DIE disk drives, which offers twice the speed of
the EIDE transmission mode.
USB
Universal Serial Bus. An open, public domain, plug-and-play capable serial bus for connecting
devices which operate at up to 12 Mbits/second, and also for slower devices such as keyboard,
mouse and monitor. Developed by Intel with Microsoft, IBM, Compaq, DEC, NEC and Northern
Telecom. It has only one type of plug, allows connection of up to 127 devices, asynchronous
and isochronous (precisely times) data transfer, flexible data packets, and connection while
runnig (Hotplug).
Encryption systems
1. Seca: The encryption system developed by the company Societé Européenne de Controle
d’Acces (Seca) for Canal plus was first used in France for the Canal numerique package.
2. Irdeto: Dutch producer of the encryption system of the same name for digital Pay TV, currently used in Italy, Greece and the Benelux countries as well as in many other countries. Irdeto
now belongs to the Mindport group.
3. Viaccess: the encryption developed by France Telecom, is used principally for the French
packages AB-Sat and TPS (both on eutelsat 13 degrees east). It is, however, also used by SRG
for encryption of its digital SAT programme range (restriction of the technical coverage for
licensing reasons).
90
2 9 .G l o s s a r y
2 9. G lo ssa r y
G L O S S A R Y
29. G l o s s a ry
4. Cryptoworks: A CA system developed by Philips.
5. Nagra: With Seca (Canal+) the second digital coding method used in Spain. The programme
package via Digital on Hispasat (30 degrees west) is coded in Nagra, as are Pay TV programmes in the cable network of the Spanish Telefonica.
6. Conax: Since the reorganisation of the Pay TV providers in Scandinavia, the general coding
standard for the Scandinavian Telenor. The satellite receivers, with Common Inerface, are thus
ready for the digital age. A l re a dy, almost all manufacturers offer the technology of tomorrow.
Here, everyone can decide for himself when the receiver should be outfitted with various
encryptions. The greatest flexibility is achieved with the multi-access modules from various
manufacturers. Here, there is the option of one or two common interface slots. They can also
be added later, without any difficulty. The multi-access modules provide the greatest possible
security to reign supreme in the world of encrypted digital programmes in the future.
VoD
Video on Demand. In contrast to Pay TV, where a subbscription is taken out for a complete programme, here only individual broadcasts and films are ordered and paid for. Until now, it was
necessary to go to the video store in order to find your favourite film from a wide range. Video
on demand offers this selection at home and over the television. The film selected is received
with the set-top box.
VCR
Video Cassette Recorder (Video recorder)
ZF
Satellite intermediate frequency = output frequency range of the LNC, e.g. 950 to 2050 MHz.
Created by mixing the satellite reception frequency with the oscillator frequency (L.O.F.).
Brand names here are protected by copyright and are the property of the respective name-bearers.
We reserve the rights to make technical amendments.
No responsibility can be accepted for mistakes.
2 9 .G l o s s a r y
91
30. Warranty card
W A R R A N T Y
30. Wa r ranty card
W A R R A N T Y
C A R D
Device type: ............................................................................................................................
Model:
...............................................................................................................................
Ser.- No.: ..............................................................................................................................
Mac -No.: …………………………………………………………………….........................
Service Report :
……………………………………………………………………..........................................
……………………………………………………………………..........................................
……………………………………………………………………..........................................
................
Customer address:
Name:
……………………………………………………………………………………...
Street:
……………………………………………………………………………………...
Postcode: …………………………Town: ..............................................................................
Retailer address:
Name:
……………………………………………………………………………………...
Street:
……………………………………………………………………………………...
Postcode: …………………………Town: ..............................................................................
Stamp:
..............................................................................
Date of purchase:...................................................................
92
3 0 . Warranty card