1
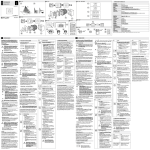
31204-31230
31204-31230
31304-31334
31304-31334
31404-31434
31404-31434
F
E
I
31200.90.0896
31200.90.0896
- 10/2007
- 10/2007
28
Bedienungsanleitung
Operating instructions
Mode d‘emploi
Manual del usuario
Istruzioni d’uso
Manual de instruções
1
2
1
2
3
4
5
6
7
8
9, 10, 11
12
1
2
3
4
5
6
7
8
9, 10, 11
12
F
1
2
3
4
5
6
7
8
9, 10, 11
12
3
4
5
6
7
8
Sicherheits Vorschriften beachten!
- Nicht in der Nähe von brennbaren Flüssigkeiten oder Gasen verwenden!
- Nicht in der Nähe von ätzenden Stoffen verwenden!
- Gerät standsicher aufstellen!
- Automatischer Anlauf!
- Nicht der Nässe aussetzen!
- Stromversorgung in Nähe des Gerätes und jederzeit leicht zugänglich!
- Vor Wartungsarbeiten das Gerät von der Stromversorgung trennen!
- Vermeiden Sie, dass Haare, Kleidung oder Schmuck in das Gerät eingezogen werden!
- NICHT den Dokumenteneinzug mit den Händen berühren!
- Das Gerät für Kinder unzugänglich aufstellen (Das Gerät ist kein Spielzeug!)
- Die Kurzschlußsicherheit der Gebäudeinstallation ist sicherzustellen (max. 20 A)!
E
Observe safety precautions!
- Do not use near combustible liquids or gases.
- Do not use near caustic substances.
- Stand shredder on a firm surface.
- Shredder starts up automatically.
- Do not expose to moisture.
- Power supply must be close to shredder and easily accessible at all times.
- Disconnect shredder from power supply before commencing maintenance work.
- Prevent hair, clothing or jewellery from being pulled into the shredder.
- DO NOT touch the feed opening.
- Keep the shredder out of children‘s reach (it is not a toy!)
- The building‘s electrical system must be fuse-protected (20 A max.).
I
Observer les consignes de sécurité !
- Ne pas utiliser à proximité de liquides ou gaz inflammables !
- Ne pas utiliser à proximité de substances corrosives !
- Installer l‘appareil de manière à ce qu‘il soit bien stable !
- Démarrage automatique !
- Ne pas exposer à l‘humidité !
- Alimentation en courant à proximité de l‘appareil et accessible à tout moment !
- Avant les travaux de maintenance, débrancher l‘appareil !
- Évitez que les cheveux, les vêtements ou les bijoux ne rentrent dans l‘appareil !
- NE PAS toucher le chargeur du document avec les mains !
- Tenir l‘appareil hors de portée des enfants (l‘appareil n‘est pas un jouet !)
- S‘assurer que l‘installation du bâtiment soit à l‘abri des courts-circuits (max. 20 A) !
1
2
3
4
5
6
7
8
9, 10, 11
12
1
2
3
4
5
6
7
8
9, 10, 11
12
1
2
3
4
5
6
7
8
9, 10, 11
12
9
10
11
12
¡Deben seguirse las precauciones de seguridad!
- ¡No utilizar cerca de líquidos o gases inflamables!
- ¡No utilizar cerca de sustancias cáusticas!
- ¡Instalar el aparato de manera estable!
- ¡Arranque automático!
- ¡No exponer a la humedad!
- ¡Alimentación eléctrica cerca del aparato y siempre fácilmente accesible!
- ¡Antes de los trabajos de mantenimiento debe desenchufarse de la alimentación eléctrica!
- ¡Evite que los cabellos, ropas o joyas puedan ser atrapados por el aparato!
- ¡NO tocar con las manos la entrada de documentos!
- Instalar el aparato fuera del alcance de los niños (¡no es un juguete!)
- ¡Debe asegurarse el seguro contra cortocircuito de la instalación del edificio (máx. 20 A)!
Osservate le norme di sicurezza!
- Non impiegate l’apparecchio in prossimità di liquidi o gas infiammabili!
- Non impiegate l’apparecchio in prossimità di materiali corrosivi!
- Collocate l’apparecchio in modo stabile!
- Avviamento automatico!
- Proteggete l’apparecchio dall’umidità!
- L’alimentazione di corrente deve trovarsi nei pressi dell’apparecchio, in un punto facilmente accessibile!
- Prima di ogni intervento di manutenzione staccate l’apparecchio dall’alimentazione di corrente!
- Fate attenzione che capelli, vestiario o gioielleria non possano venir trascinati all’interno dell’apparecchio!
- NON toccate con le mani l’alimentatore di documenti!
- Collocate l’apparecchio in modo da renderlo inaccessibile per i bambini (l’apparecchio non è un giocattolo!)
- Accertatevi che funzioni nel modo dovuto la protezione contro i cortocircuiti dell’edificio (max 20 A)!
Observar as instruções de segurança!
- Não utilizar nas imediações de líquidos ou gases combustíveis!
- Não utilizar nas imediações de substâncias cáusticas!
- Colocar o destruidor em piso firme e nivelado!
- Arranque automático!
- Não expor à humidade!
- Alimentação de corrente perto da máquina e sempre desobstruída!
- Antes de realizar qualquer trabalho de manutenção, interromper sempre a alimentação de corrente!
- Evite que cabelos, vestuário ou jóias sejam arrastados para dentro da máquina!
- NÃO tocar com as mãos na entrada de documentos!
- Manter a máquina fora do alcance de crianças (não é nenhum brinquedo!)
- Assegurar que o edifício dispõe de protecção contra curto-circuitos (máx. 20 A)!
F
2 Personen erforderlich
E
Son necesarias 2 personas
Allgemeine Angaben
E
Datos generales
2 persons required
I
Operare in 2
General information
I
Dati generali
2 personnes requises
F
Requer 2 pessoas
Généralités
Informações gerais
Betriebslautstärke im Leerlauf
1.
Noise level when idle
F
Intensité sonore en service à vide
E
Intensidad acústica durante el funcionamiento en vacío
I
Rumorosità nel funzionamento a vuoto
Ruído de funcionamento em vazio
F
F
F
F
312**
2.
in Bereitschaft
E
en espera
on standby
I
in stand by
en veille
1.
em estado operacional
in Betrieb
E
en funcionamiento
in operation
I
in azione
en service
313**
314**
3.
em funcionamento
Akustisches Signal
E
Señal acústica
Acoustic signal
I
Segnale acustico
Signal acoustique
Sinal acústico
Ölen
E
Lubricar
Oiling
I
Lubrificazione
Huilage
Olear
4
F
Transportsicherung entfernen
E
Quitar el seguro de transporte
Remove transport brace
I
Togliete il staffaggio di sicurezza
per trasporto
Retirer la protection de transport
Retirar o retentor de transporte
5
31434
31430
31422
31414
31406
31404
31334
31330
31322
d = 0,8mm
e = 12,0mm
d = 1mm
e = 4,7mm
d = 2,0mm
e = 15,0mm
59,15kg
d = 3,9mm
e = 40,0mm
d = 5,8mm
d = 3,9mm
58,15kg
d = 1,0mm
e = 4,7mm
37,0kg
d = 0,8mm
e = 12,0mm
d = 5,8mm
a = 860mm
b = 530mm
c = 480mm
d = 2,0mm
e = 15,0mm
36,5kg
d = 3,9mm
e = 40,0mm
36,5kg
d = 3,9mm
d = 0,8mm
e = 12,0mm
d = 2,0mm
e = 15,0mm
d = 3,9mm
a = 765mm
b = 460mm
c = 380mm
19,85kg
d = 3,9mm
e = 40,0mm
19,55kg
Kg
d = 5,8mm
c
31314
31306
31304
31230
31222
a = 585mm
b = 415mm
c = 310mm
a
b
31214
31206
31204
2.
S5
S6
S5
S2
19
F
16
S4
S5
S6
S2
S2
S3
8
6
7
5
DIN A4 - 70g/m2
3
20
26
15
10
17
22
12
8
6
5
31
40
23
53 dB (A)
14
6
6
5
DIN A4 - 80g/m2
5
4
25
35
E
Sujeto a modificaciones técnicas sin previo aviso.
Subject to technical modifications.
I
Ci riserviamo la possibilità di apportare modifiche tecniche.
6
7
DIN A4 - 70g/m2
DIN A4 - 80g/m2
2
52 dB (A)
46 dB (A)
47 dB (A)
52,5 dB (A)
52 dB (A)
54,5 dB (A)
220 - 240 V
100 - 120 V
52 dB (A)
220 - 240 V
100 - 120 V
51 dB (A)
220 - 240 V
100 - 120 V
51 dB (A)
117 L
Technische Änderungen vorbehalten.
Sous réserve de modifications techniques.
S4
64 L
DIN A4 - 80g/m2
13
S3
38 L
DIN A4 - 70g/m2
15
S2
52 dB (A)
S4
50 dB (A)
47 dB (A)
46 dB (A)
L
S3
47 dB (A)
S2
46,5 dB (A)
S2
50 dB (A)
DIN 32757
Sob reserva de alterações técnicas.
7
19
12
3.
F
Bedienung
E
Manejo
Operation
I
Comando
Mode d‘emploi
Utilização
1.
4.
Thermoschutzschalter
314** 100-120 V
220-240 V
100-120 V
1.
Thermal cut-out
F
Disjoncteur thermique
E
Interruptor térmico de protección
I
Interruttore termico di protezione
2.
OIL
3.
OIL
Disjuntor térmico
4mm
7mm
ON
OFF
1.1
2.
100-120 V
1.
5.
3.
8
OIL
4.
9
OIL
2.
4.
OIL
1.
2.
3.
1-3 sec
OIL
5.
OIL
3.
120 min
OIL
1.
Das Gerät schaltet bei Nichtbenutzung nach 120 Minuten in den Energiesparmodus.
Bei erneuter Benutzung, benötigt das Gerät dann 3 Sekunden bis zum Anlauf.
The shredder switches to the energy-saving mode after it has been out of use for
120 minutes. When used again, the shredder takes 3 seconds to start.
2.
F
Lorsqu‘il n‘est pas utilisé pendant 120 minutes, l‘appareil passe en mode Économie d‘énergie.
Lorsqu‘il est de nouveau utilisé, l‘appareil a besoin de 3 secondes avant de démarrer.
E
Cuando no se utiliza, el aparato pasa al modo de ahorro de energía después de
120 minutos. Cuando se usa de nuevo, el aparato tarda 3 segundos en arrancar.
I
Se non viene usato per una durata di 120 minuti, l’apparecchio passa automaticamente
in modalità di risparmio di energia. Successivamente per una rimessa in funzione
l’apparecchio ha bisogno di 3 secondi di tempo di avviamento.
Não estando a ser utilizado durante 120 minutos, o destruidor de documentos passa para o modo
economizador de energia. Voltando a ser utilizado nesse estado, precisa de 3 segundos para arrancar.
10
11
6.
A
A
B
31204 - 31230
10 min
20 min
31304 - 31334
10 min
20 min
31404 - 31434
230 V
20 min
40 min
31404 - 31434
115 V/50 Hz
10 min
40 min
31404 - 31434
115 V/60 Hz
20 min
60 min
8.
OIL
OIL
Das Gerät schaltet nach ca. A Minuten Dauerbetrieb und Überhitzung automatisch ab und
benötigt dann ca. B Minuten um abzukühlen.
The shredder switches off automatically after approx. A minutes of continuous operation
and after overheating and then takes approx. B minutes to cool down.
F
Au bout d‘env. A minutes d‘usage permanent et de surchauffe, l‘appareil s‘éteint
automatiquement et a besoin d‘env. B minutes pour refroidir.
E
El aparato se desconecta automáticamente después de A minutos aprox. de régimen
continuo y sobrecalentamiento y necesita B minutos aprox. para enfriarse.
I
Dopo circa A minuti di funzionamento ininterrotto e in caso di surriscaldamento
l’apparecchio si spegne automaticamente e impiega poi circa B minuti per raffreddarsi.
Depois de A minutos em funcionamento permanente e após sobreaquecimento, a máquina
desliga automaticamente durante aprox. B minutos até arrefecer o suficiente.
7.
1.
12
13
9.
10.
1.
2.
OIL
OIL
3.
OIL
OIL
OIL
2.
SafeTEC3 überprüft vor dem Start die Materialdichte. Ist diese zu hoch wird der Schneidvorgang nicht gestartet. Verringern Sie in diesem Fall die Blattanzahl.
SafeTEC3 stoppt den Schneidvorgang auf Zuruf oder Klopfen auf das Gerät. Betätigen Sie die
„OUT“-Taste um einen Fremdkörper aus dem Schneidwerk zu holen.
SafeTEC3 checks material density before starting. The shredding cycle will not be started
if material density is too high. In this case, feed in fewer sheets of paper.
SafeTEC3 stops the shredding process in response to calling or knocking on the casing.
Press the „OUT“ button to remove foreign particles from the cutters.
F
SafeTEC3 contrôle l‘épaisseur du matériau avant le démarrage. Si elle est trop élevée,
l‘opération de coupe n‘est pas démarrée. Diminuez dans ce cas le nombre de feuilles.
F
SafeTEC3 arrête l‘opération de coupe sur simple appel ou en cognant contre l‘appareil.
Appuyez sur la touche « OUT » pour faire sortir un corps étranger du rouleau de coupe.
E
SafeTEC3 comprueba antes de arrancar la densidad del material. Si es excesiva, no se inicia
el corte. En este caso, reduzca el número de hojas.
E
SafeTEC3 detiene el corte al gritar o golpear en el aparato. Pulse la tecla “OUT“ para sacar
un cuerpo extraño del mecanismo de corte.
I
Prima dell’avviamento SafeTEC3 controlla lo spessore del materiale. In caso di spessore
eccessivo non viene avviata l’operazione di taglio. Diminuite in tal caso il numero di fogli.
I
SafeTEC3 interrompe l’operazione di taglio se gridate o battete sull’apparecchio. Azionate il
tasto „OUT“ quando volete togliere un corpo estraneo dal dispositivo di taglio.
SafeTEC3 verifica a densidade do material antes de arrancar. Se a densidade for excessiva,
o corte não é iniciado. Nesse caso, diminua o número de folhas.
14
SafeTEC3 interrompe o processo de corte por controlo de voz ou batendo levemente com a
mão na máquina. Carregue na tecla „OUT“ para remover qualquer corpo estranho que esteja
no mecanismo de corte.
15
Alterar a regulação do microfone.
1. Ligue o destruidor de documentos.
2. Prima a tecla „ON/OFF“ durante aprox. 5 segundos.
3. Com a tecla „OUT“ pode aumentar a sensibilidade do microfone.
4. Com a tecla „IN“ pode diminuir a sensibilidade do microfone.
A fila inferior de LED indica o estado da regulação do microfone.
5. Premindo a tecla „ON/OFF“, a regulação efectuada é confirmada.
11.
Änderung der Mikrofoneinstellung.
1. Schalten Sie das Gerät ein.
2. Drücken Sie die „ON/OFF“-Taste für ca. 5 Sekunden.
3. Mit der „OUT“-Taste erhöhen Sie die Mikrofonempfindlichkeit.
4. Mit der IN“-Taste verringern Sie die Mikrofonempfindlichkeit.
4. Die untere LED-Reihe zeigt Ihnen den Status der Mikrofoneinstellung an.
5. Durch drücken der „ON/OFF“-Taste bestätigen Sie Ihre Einstellung.
Changing the microphone setting.
1. Switch the shredder on.
2. Press the „ON/OFF“ button for approx. 5 seconds.
3. Use the „OUT“ button to increase microphone sensitivity.
4. Use the „IN“ button to reduce microphone sensitivity.
The bottom row of LEDs shows you the microphone setting status.
5. Press the „ON/OFF“ button to confirm your setting.
F
Modification du réglage du micro.
1. Allumez l‘appareil.
2. Appuyez sur la touche « ON/OFF » pendant env. 5 secondes.
3. Avec la touche « OUT », vous augmentez la sensibilité du micro.
4. Avec la touche « IN », vous diminuez la sensibilité du micro.
La rangée de DEL inférieure vous affiche l‘état du réglage du micro.
5. En appuyant sur la touche « ON/OFF », confirmez votre réglage.
E
Modificación del ajuste del micrófono.
1. Conecte el aparato.
2. Pulse la tecla „ON/OFF“ durante 5 segundos aprox.
3. Aumente la sensibilidad del micrófono con la tecla „OUT“.
4. Reduzca la sensibilidad del micrófono con la tecla „IN“.
La fila de LEDs inferior le indica el estado de ajuste del micrófono.
5. Confirme su ajuste pulsando la tecla „ON/OFF“.
I
Modifica di impostazione del microfono.
1. Accendete l’apparecchio.
2. Tenete premuto per circa 5 secondi il tasto „ON/OFF“.
3. Con il tasto „OUT“ aumentate la sensibilità del microfono.
4. Con il tasto „IN“ diminuite la sensibilità del microfono.
La fila inferiore di LED indica lo stato di impostazione del microfono.
5. Premete il tasto „ON/OFF“ per confermare l’impostazione scelta.
16
1.
OIL
2.
OIL
ca. 5 sec
3.
5.
OIL
4.
OIL
17
OIL
F
Wartung
E
Mantenimiento
Maintenance
I
Manutenzione
Maintenance
3.
Manutenção
OIL
1.
OIL
1.
2.
OIL
OIL
3.
OIL
4.
OIL
OIL
5.
2.
ca. 4 sec
18
19
OIL
Modificar a regulação de fábrica para papel especial/correcção número de folhas.
1. Desligue o destruidor de documentos.
4. Mantenha a tecla „OUT“ premida por aprox. 6 segundos até a fila inferior
de LED piscar uma vez.
3. Colocar o número de folhas de papel normal ou especial que pretende e segurar no papel.
4. Manter a tecla „IN“ premida por aprox. 6 segundos até a fila inferior de LED piscar uma vez.
5. Fig. esquerda - falta papel. / Fig. direita - papel demais. Recomeçar com ponto 1.
6. A regulação de fábrica foi modificada. Volte a ligar o destruidor de documentos.
4.
Änderung der Werkseinstellung auf Spezialpapier/Korrektur der Blattleistung.
1. Schalten Sie das Gerät aus.
2. Taste „OUT“ ca. 6 Sekunden gedrückt halten, bis untere LED-Reihe 1x aufleuchtet.
3. Die gewünschte Menge Papier/Spezialpapier in das Gerät einlegen und festhalten.
4. Taste „IN“ ca. 6 Sekunden gedrückt halten, bis untere LED-Reihe 1x aufleuchtet.
5. Abb. links - zu wenig Papier. / Abb. rechts - zu viel Papier. Bitte bei 1. beginnen.
6. Die Werkseinstellung wurde geändert. Schalten Sie das Gerät wieder ein.
Changing the factory setting to special paper/correcting shredding capacity.
1. Switch the shredder off.
2. Keep the „OUT“ button pressed for approx. 6 seconds until the bottom row of
LEDs lights up once.
3. Feed the chosen quantity of paper/special paper into the document shredder and
keep hold of it.
4. Keep the „IN“ button pressed for approx. 6 seconds until the bottom row of
LEDs lights up once.
5. Fig. on left - too little paper. / Fig. on right - too much paper. Please begin at 1.
6. The factory setting has been changed. Switch the shredder back on again.
F
Modification du réglage d‘usine pour passer sur papier spécial/correction de la capacité en feuilles.
1. Éteignez l‘appareil.
2. Maintenez la touche « OUT » enclenchée pendant env. 6 secondes jusqu‘à ce que la
rangée de DEL inférieure s‘allume 1x.
3. Insérer et maintenir la quantité de papier/papier spécial dans l‘appareil.
4. Maintenez la touche « IN » enclenchée pendant env. 6 secondes jusqu‘à ce que la
rangée de DEL inférieure s‘allume 1x.
5. Fig. gauche - trop peu de papier. /fig. droite - trop de papier. Commencer par 1.
6. Le réglage d‘usine a été modifié. Rallumez l‘appareil.
E
Modificación del ajuste de fábrica para papel especial/ corrección de la capacidad de destrucción.
1. Desconecte el aparato.
4. Mantenga pulsada la tecla „OUT“ 6 segundos aprox. hasta que se encienda 1 vez la fila de LEDs inferior.
3. Introduzca la cantidad de papel normal/ especial deseada en el aparato y sujételo.
4. Mantenga pulsada la tecla „IN“ 6 segundos aprox. hasta que se encienda 1 vez la fila de LEDs inferior.
5. Fig. izquierda - muy poco papel. / Fig. derecha - demasiado papel. Empezar por 1.
6. Se ha modificado el ajuste de fábrica. Conecte de nuevo el aparato.
I
Modifica dell’impostazione fatta in fabbrica per carta speciale/correzione della prestazione in fogli.
1. Spegnete l’apparecchio.
2. Tenete premuto il tasto „OUT“ per circa 6 secondi, fino a quando si illumina 1 volta la fila inferiore di LED.
3. Inserite nell’apparecchio e tenete fermo il quantitativo desiderato di carta/carta speciale.
4. Tenete premuto il tasto „IN“ per circa 6 secondi, fino a quando si illumina 1 volta la fila inferiore di LED.
5. Fig. a sinistra - quantitativo insufficiente di carta. / Fig. a destra - quantitativo eccessivo di carta.
Prego incominciate col Punto 1.
6. L’impostazione fatta in fabbrica è stata modificata. Accendete nuovamente l’apparecchio.
20
1.
OIL
2.
OIL
ca. 6 sec
3.
4.
OIL
ca. 6 sec
5.
OIL
OIL
6.
OIL
OIL
21
5.
1.
OIL
OIL
Wiederherstellung der Werkseinstellung
1. Schalten Sie das Gerät aus.
2. Ziehen Sie den Netzstecker.
3. Halten Sie die „ON/OFF“-Taste gedrückt, während sie den Netzstecker wieder einstecken.
4. Lassen Sie nach dem 2. Signalton die „ON/OFF“-Taste wieder los.
5. Die Werkseinstellung wurde wiederhergestellt.
Restoring the factory setting
1. Switch the shredder off.
2. Unplug the shredder.
3. Keep the „ON/OFF“ button pressed while plugging the shredder back in again.
4. Release the „ON/OFF“ button after the 2nd acoustic signal.
The factory setting has been restored
F
Restauration du réglage d‘usine
1. Éteignez l‘appareil.
2. Débranchez-le.
3. Maintenez la touche « ON/OFF » enclenchée pendant que vous rebranchez l‘appareil.
4. Après le 2e signal acoustique, relâchez la touche « ON/OFF ».
Le réglage d‘usine a été restauré.
E
Restablecimiento del ajuste de fábrica
1. Desconecte el aparato.
2. Desenchufe la clavija de red.
3. Mantenga pulsada la tecla „ON/OFF“ mientras enchufa de nuevo la clavija de red.
4. Suelte de nuevo la tecla „ON/OFF“ después de la segunda señal acústica.
Se ha restablecido el ajuste de fábrica.
I
Ripristino dell’impostazione fatta in fabbrica
1. Spegnete l’apparecchio.
2. Staccate la spina di collegamento a rete.
3. Tenendo premuto il tasto „ON/OFF“, inserite nuovamente nella presa la spina
di collegamento a rete.
4. Dopo il 2° segnale acustico rilasciate il tasto „ON/OFF.
Risulta allora ripristinata l’impostazione fatta in fabbrica.
2.
3.
OIL
4.
OIL
Restabelecer a regulação de fábrica
1. Desligue o destruidor de documentos.
2. Tire a ficha de corrente da tomada.
3. Mantenha a tecla „ON/OFF“ premida enquanto volta a meter a ficha na tomada.
4. Depois de ouvir o 2º sinal de aviso, largue a tecla „ON/OFF“.
A regulação de fábrica foi restabelecida.
22
23
Bedeutung der Signale
Seite / Nr.
Bedeutung der Signale
Seite / Nr.
Meaning of signals
Page / No.
Meaning of signals
Page / No.
F
Signification des signaux
Page / n°
F
Signification des signaux
Page / n°
E
Significado de las señales
Página / Nº
E
Significado de las señales
Página / Nº
I
Significato dei segnali
Pagina / No.
I
Significato dei segnali
Pagina / No.
Significado dos símbolos
Página / Nº
Significado dos símbolos
Página / Nº
6.
Off
OIL
Papieranzahlanzeige
OIL
Off
F
Off
E
Off
I
Off
Paper quantity indicator
9/1
9 / 1.1
F
Affichage de la quantité de papier
E
Indicación de cantidad de papel
I
Indicazione del numero di fogli
Off
Indicador número de folhas
On
OIL
STOP - zuviel Papier
OIL
On
F
On
E
On
I
On
STOP - too much paper
10 / 2
F
STOP - trop de papier
E
STOP - demasiado papel
I
STOP - troppa carta
On
Behälter voll
OIL
Automatic adjustment
F
Ajustage automatique
E
Ajuste automático
I
Regolazione automatica
Waste container full
9/1
9 / 1.1
F
Réservoir plein
E
Depósito lleno
I
Contenitore pieno
Ajuste automático
Tür offen
OIL
SLEEP flashing mode
F
Mode clignotement SLEEP
E
SLEEP modo intermitente
I
SLEEP modalità lampeggio
Modo intermitente SLEEP
24
13 / 8
Depósito cheio
SLEEP Blinkmodus
OIL
14 / 9
STOP - papel demais
Automatische Justierung
OIL
14 / 9
Door open
11 / 5
F
Porte ouverte
E
Puerta abierta
I
Sportello aperto
Porta aberta
25
18 / 1
Bedeutung der Signale
Seite / Nr.
Bedeutung der Signale
Seite / Nr.
Meaning of signals
Page / No.
Meaning of signals
Page / No.
F
Signification des signaux
Page / n°
F
Signification des signaux
Page / n°
E
Significado de las señales
Página / Nº
E
Significado de las señales
Página / Nº
I
Significato dei segnali
Pagina / No.
I
Significato dei segnali
Pagina / No.
Significado dos símbolos
Página / Nº
Significado dos símbolos
Página / Nº
7.
Automatische Motorabschaltung Mikrofon
Ölen
OIL
Oiling
F
Huilage
E
Lubricar
I
Lubrificazione
Motor switches off automatically microphone
OIL
19 / 3
Olear
Automatische Motorabschaltung Überhitzung des Motors
F
Extinction automatique du moteur micro
E
Desconexión automática del motor Micrófono
I
Spegnimento automatico del motore microfono
Desligação automática do motor microfone
Motor switches off automatically motor overheated
OIL
F
Extinction automatique du moteur surchauffe du moteur
E
Desconexión automática del motor Sobrecalentamiento del motor
I
Spegnimento automatico del motore motore surriscaldato
Manuelle Justierung
OIL
12 / 6
Manual adjustment
Desligação automática do motor sobreaquecimento do motor
F
Ajustage manuel
E
Ajuste manual
I
Regolazione automatica
20 / 4
Ajuste manual
Automatische Motorabschaltung Papierstau
I
Motor switches off automatically paper jam
OIL
F
Extinction automatique du moteur bourrage de papier
E
Desconexión automática del motor Atasco de papel
I
Spegnimento automatico del motore inceppamento carta
Desligação automática do motor papel encravado
26
15 / 10
14 / 9
componenti in legno:
truciolato
fogli in laminato o legno massiccio
pannelli in laminato
piccoli componenti:
chiodi e viti in acciaio
cerniere in acciaio e zinco
pressofuso
guide, ruote ed etichette in plastica
27
rivestimento:
mediodenso
melammina