1
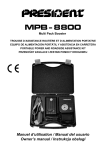
MPB -12000
Multi Pack Booster
TROUSSE D’ASSISTANCE ROUTIÈRE ET D’ALIMENTATION PORTATIVE
EQUIPO DE ALIMENTACIÓN PORTÁTIL Y ASISTENCIA EN CARRETERA
PORTABLE POWER AND ROADSIDE ASSISTANCE KIT
PRZENOŚNY ZASILACZ I ZESTAW POMOCY DROGOWEJ
Manuel d’utilisation / Manual del usuario
Owner’s manual / Instrukcja obsługi
SOMMAIRE
FRANÇAIS
INCLUS DANS L’EMBALLAGE
3
CARACTÉRISTIQUES3
BOOSTER MPB-12000
3
UTILISATION DU BOOSTER MPB-12000
3
COMPRESSEUR4
UTILISER LE COMPRESSEUR
5
DÉPANNAGE5
ENTRETIEN5
SPÉCIFICATIONS6
MISE AU REBUT DU BOOSTER MPB-12000
6
GARANTIE6
SUMARIO
ESPAÑOL
INCLUIDO EN EL EMBALAJE
7
CARACTERÍSTICAS7
BOOSTER MPB-12000
7
UTILIZACIÓN DEL MPB-12000
7
COMPRESOR DE AIRE
8
UTILIZAR EL COMPRESOR DE AIRE
9
SOLUCIÓN DE PROBLEMAS
9
MANTENIMIENTO9
ESPECIFICACIONES10
ELIMINACIÓN DEL BOOSTER MPB-12000
10
GARANTÍA10
SUMMARY
ENGLISH
WHAT’S INCLUDED
11
FEATURES11
BOOSTER MPB-12000
11
USING THE MPB-12000
11
COMPACT TIRE INFLATOR
12
USING THE COMPACT TIRE INFLATOR
13
TROUBLESHOOTING13
MAINTENANCE13
SPECIFICATIONS14
BATTERY DISPOSAL
14
WARRANTY14
SPIS TREŚCI
POLSKI
ZAWARTOŚĆ OPAKOWANIA
15
CECHY15
BOOSTER MPB-12000
15
ZASTOSOWANIE URZĄDZENIA MBP-12000
15
KOMPRESOR
16
KORZYSTANIE Z KOMPRESORA
17
ROZWIĄZYWANIE PROBLEMÓW
17
ŚRODKI OSTROŻNOŚCI
17
SPECYFIKACJA
18
UTYLIZACJA BATERII
18
GWARANCJA18
INCLUS DANS L’EMBALLAGE
•
•
•
•
•
•
Booster MPB-12000
Compresseur avec 2 embouts supplémentaires (bicyclette, ballon, etc.)
Cordon USB 2-en-1 (micro, mini)
Câble de démarrage avec pinces
Cordon d’alimentation CC : 12 ~ 15 V avec prise d’allume-cigare
Cordon d’alimentation CA :100 ~ 240 V avec prise murale
CARACTÉRISTIQUES
•
•
•
•
•
•
•
•
•
Prend en charge les moteurs : essence < 5,0 litres / diesel < 3,0 litres
Câble 12 V
Port USB de 5 V / 2,1 Ah
Sortie 12 , 16 ou 19 V CC
Lampe à LED
Pression maximum du compresseur : 5,5 bar / 80 PSI
Chargeur mural : Entrée CA : 100 ~ 240 V - 50/60 Hz - 0,6 A max / Sortie CC : 15 V - 1,0 A
Décharge en mode repos : Perte de 12 % par an
Valise de rangement
BOOSTER MPB-12000
5 Bouton d’alimentation
6 Prise d’alimentation
3 Prise USB
5 V / 2,1 A
8 Connecteur de 12 V
(sous la protection)
1 Affichage à LED
7 Commutateur
de mise en/hors
fonction
4 Prise de sortie
12, 16 ou 19 V
2 Lampe à LED
UTILISATION DU BOOSTER MPB-12000
RECHARGE DU BOOSTER MPB-12000
1.Utiliser le chargeur mural afin de recharger le booster MPB-12000 à une prise de courant, ou le chargeur CC de 13,8 V pour le recharger à la prise allume-cigare du véhicule.
2.Allumer le booster MPB-12000, mettre le commutateur ON/OFF (7) en position “ON”.
3.L’afficheur (1) indiquera 100 % et cinq barres lorsque la recharge sera terminée.
4.Débrancher le MPB-12000.
5.Éteindre le booster MPB-12000, mettre le commutateur ON/OFF (7) en position “OFF”.
Pour de meilleurs résultats, rechargez pleinement le booster MPB-12000 tous les trois mois.
3
VÉRIFIER LA CAPACITÉ DU BOOSTER MPB-12000
1.Allumer le booster MPB-12000, mettre le commutateur ON/OFF (7) en position “ON”.
2.Appuyer sur POWER (5) lorsqu’aucun appareil n’est connecté au booster MPB-12000.
3.Le nombre de barres de l’icône indique l’état de charge du booster MPB-12000 dans l’afficheur (1).
4.Éteindre le booster MPB-12000, mettre le commutateur ON/OFF (7) en position “OFF”.
DÉMARRER UN VÉHICULE
1.S’assurer que le booster MPB-12000 soit pleinement chargé.
2.Mettre tous les accessoires du véhicule (radio, climatiseur, etc.) hors fonction.
3.Brancher la pince ROUGE du câble à la borne POSITIVE (+) de la batterie du véhicule.
4.Brancher la pince NOIRE du câble à la borne NÉGATIVE (-) de la batterie du véhicule.
5.Insérer le connecteur du câble dans le connecteur 12 V (8) du booster MPB-12000. S’assurer que les
connexions soient bien établies.
6.Allumer le booster MPB-12000, mettre le commutateur ON/OFF (7) en position “ON”.
7.Démarrer le véhicule (pendant trois secondes au maximum).
Si le véhicule démarre :
• Débrancher le câble du booster MPB-12000 en premier (8), puis débrancher les pinces de la batterie.
Si le véhicule ne démarre pas :
• Attendre une minute et essayer à nouveau.
8.Éteindre le booster MPB-12000, mettre le commutateur ON/OFF (7) en position “OFF”.
RECHARGER UN APPAREIL USB DE 5 V (TABLETTE, TÉLÉPHONE CELLULAIRE,
ETC.)
1.Allumer le booster MPB-12000, mettre le commutateur ON/OFF (7) en position “ON”.
2.Brancher le connecteur 2-en-1 à la prise USB (3) du MPB-12000.
3.Brancher votre appareil à l’aide du câble mini USB ou micro USB.
4.Le MPB-12000 commence la recharge de votre appareil puis se met en veille à la fin de la charge.
5.Éteindre le booster MPB-12000, mettre le commutateur ON/OFF (7) en position “OFF”.
ACTIVER LA LAMPE À LED
1.Allumer le booster MPB-12000, mettre le commutateur ON/OFF (7) en position “ON”.
2.Un appui long (2 secondes) sur la touche POWER (5) permet d’allumer la lampe à LED.
3.un nouvel appui court sur POWER (5) permet de choisir l’un des quatre modes suivants : éclairage en
continu / clignotement S.O.S. / clignotement rapide / lampe éteinte.
4.Éteindre le booster MPB-12000, mettre le commutateur ON/OFF (7) en position “OFF”.
ALIMENTER / RECHARGER DES APPAREILS DE 12 , 16 OU 19 V CC
1.Mettre le commutateur ON/OFF (7) en position “ON”.
2.Un appui court sur la touche POWER (5) permet de choisir parmi les 3 tensions suivantes : 12 V / 16
V / 19 V CC. Voir “OUT2” dans l’afficheur à LED (1).
3.Insérez un câble (non inclus) dans la prise (4) du booster MPB-12000 pour alimenter / recharger un
appareil électronique correspondant à la tension choisie.
La tension de sortie ne peut pas être modifiée tant qu’un câble est branché dans la prise (4).
4.Une fois fini, éteindre le booster MPB-12000, mettre le commutateur ON/OFF (7) en position “OFF”.
COMPRESSEUR
•
•
•
•
•
•
•
•
Le compresseur n’est pas un jouet. Ne pas laisser à la portée des enfants.
Ne pas laisser le compresseur sans surveillance durant son utilisation.
Veiller à vous mettre en sécurité du trafic pour gonfler les pneus.
Ne pas utiliser le compresseur dans un environnement explosif, en présence de liquides inflammables, gaz ou poussières.
Ne pas exposer le compresseur à la pluie ou dans des conditions très humides.
En cas de mauvais fonctionnement électrique ou mécanique, éteindre immédiatement le compresseur.
Le sur-gonflage peut faire éclater votre élément et causer des blessures. Ne pas essayer de sur-gonfler.
Le Compresseur ne peut pas être réparé par l’utilisateur.
Ne pas utiliser le compresseur plus de 15 minutes. Il est recommandé de le laisser refroidir 15
minutes après chaque utilisation en continu de 15 minutes.
4
1 Lampe à LED
7 Bouton ON/OFF
8 Embouts
6 Connecteur
2 Valve a vis
3 Tuyau d’air de 10 cm
4 Manomètre
(PSI/bar/KPA)
5 Cordon
UTILISER LE COMPRESSEUR
Le compresseur compact permet de gonfler les pneus de voiture. Il est également doté d’adaptateurs
(8) permettant de gonfler les pneus de bicyclette, ballons, etc.
1.Brancher le connecteur (6) du compresseur au connecteur (8) du booster MPB-12000.
2.Utiliser, si nécessaire, l’embout adaptateur (8) approprié vissé à la valve (2).
3.Raccorder l’embout (2) à l’élément à gonfler.
4.Appuyer sur le bouton ON/OFF (7) vert du compresseur.
5.Interrompre (7) périodiquement le gonflage pour vérifier le manomètre afin de vous assurer de ne pas
trop gonfler l’élément.
6.Appuyer sur le bouton ON/OFF (7) vert lorsque vous avez terminé de gonfler.
Le compresseur fonctionne même si le commutateur (7) du booster MPB-12000 n’est pas en
position “ON”.
DÉPANNAGE
SI...
ESSAYEZ CECI...
Mes appareils ne se rechargent pas ou
le compresseur ne gonfle pas.
Rechargez le MPB-12000.
Assurez-vous que les éléments soient
connectés correctement.
Je n’ai pas utilisé mon MPB-12000
depuis un certain temps, et maintenant
la batterie du booster MPB-12000 est
complètement épuisée
Vous pourriez l’avoir rangé sans avoir mis
l’appareil hors fonction (7). Rechargez-le.
ENTRETIEN
User de bon sens pour entretenir votre MPB-12000. S’assurer que les connecteurs et les prises
restent propres et exempts de débris. Débrancher le MPB-12000 après la recharge. Éteindre (7) le MPB12000 et le ranger avec ses accessoires dans l’étui inclus.
5
SPÉCIFICATIONS
BOOSTER MPB-12000
- Dimensions
: 40 mm (H) x 80 mm (L) x 170 mm (P)
1,6 po (H) x 3,1 po (L) x 7,0 po (P)
- Température de fonctionnement
: -20˚ C à +60˚ C / -4˚ F à +140˚ F
- Courant de démarrage
: 200 A
- Courant de crête
: 400 A
- Puissance
: 44,4 Wh
- Cycle de vie
: 1 000 recharges
- Mode de recharge
: CC/CA 15 V / 1,0 A
- Sortie USB
: 5 V / 2,1 A
- Sortie CC
: 12 , 16 et 19 V
COMPRESSEUR
- Tension d’alimentation
: 12 V CC
- Pression maximum
: 5,5 bar / 80 PSI
- Courant maximum
: 4 A
- Courant en circuit ouvert
: < 2,5 A
- Vitesse de gonflage
: Moins de 10 minutes pour le gonflage d’un pneu de 0 à 2,7 bar
(0 à 30 PSI), basé sur un pneu de dimension 195/55R15.
- Température de fonctionnement
: -10˚ C à +60˚ C / 14˚ F à +140˚ F
- Dimensions
: 108 mm (H) x 95 mm (L) x 47 cm (P)
4.3 in. (H) x 3.7 in (L). x 1.8 in. (P)
MISE AU REBUT DU BOOSTER MPB-12000
Le booster MPB-12000 est autonome et ne comporte aucune pièce pouvant être remplacée par
l’utilisateur. Il doit être mis au rebut de manière écologique lorsque celui-ci ne retient plus la charge. La
recharge en respectant les consignes prolongera la durée de vie de l’unité.
GARANTIE
En cas de panne, les Produits (exclus les câbles, cordons d’alimentation et prise allume-cigare) sont
garantis 2 ans à compter de la date de facture. La facture délivrée avec votre commande tient lieu de
garantie. Une copie doit impérativement être jointe en cas de retour d’un Produit; le laboratoire SAV de
PRESIDENT examinera le Produit retourné et, évaluera si la réclamation est couverte par une garantie .
Si toutes ces conditions n’étaient pas remplies, aucune réparation ne pourrait être effectuée.
Si la panne du Produit est avérée et n’est pas liée à une cause d’exclusion telle qu’énumérée ci-dessous, PRESIDENT s’engage à procéder à la réparation du Produit dans les plus brefs délais.
Sont exclus de cette garantie : l’usure normale d’un Produit, le non-respect des caractéristiques de
montage et d’utilisation, la négligence, le mauvais entretien, l’utilisation non-conforme, les causes accidentelles externes (tels que chocs, chute, incendie), tous Produits modifiés ou réparés par le Client ou
par toute autre personne non autorisée expressément par PRESIDENT.
Dans ces derniers cas, le Produit pourra être retourné en l’état ou réparé sur acceptation et paiement
préalable d’un devis établi par le laboratoire SAV de PRESIDENT:
Les frais d’envoi sont à la charge de l’utilisateur. Toutefois, en cas d’application de la garantie, les frais
d’expédition retour seront à la charge de PRESIDENT.
Le Produit doit être envoyé dans son emballage d’origine ou dans un emballage approprié garantissant
une protection optimale.
Attention! Pour vos expéditions, vérifier votre emballage, PRESIDENT ne pourra pas prendre en compte
les appareils ou accessoires détériorés pendant leur acheminement.
Au-delà de la période de garantie, vous aurez toujours la possibilité de faire inspecter ou réparer votre
Produit. Dans ce cas, un devis vous sera communiqué. Si vous acceptez le devis, la réparation et le
renvoi du Produit seront effectués après réception du règlement correspondant.
6
INCLUIDO EN EL EMBALAJE
•
•
•
•
•
•
Booster MPB-12000
Compresor de aire 2 accesorios adicionales (bicicleta, pelota, etc.)
Conector USB 2-en-1 (micro, mini)
Cable de arranque con pinzas
Cable para la alimentación CC : 12 ~ 15 V con toma encendedor de cigarrillos
Cable para la alimentación CA : 100 ~ 240 V con toma mural
CARACTERÍSTICAS
• Apoya motores : gasolina < 5.0 L / diésel < 3.0 L
• Cable de 12 V
• Puerto USB de 5 V / 2,1 Ah
• Linterna LED
• Presión máxima del compresor : 5,5 bar / 80 PSI
• Cargador mural CA : Entrada 100 ~ 240 V - 50/60 Hz - 0,6 A máx. / Salida CC : 15 V - 1,0 A
• Descarga en descanso : descarga de 12% por año
•Estuche
BOOSTER MPB-12000
5 Botón de alimentación
6 Toma de alimentación
3 Toma USB
5 V / 2,1 A
8 Conector de 12 V
(debajo de la tapa)
1 Pantalla LED
7 Interruptor para
encender/apagar
4 Toma de salida
12, 16 ou 19 V
2 Linterna a LED
UTILIZACIÓN DEL MPB-12000
CARGAR EL BOOSTER MPB-12000
1.Use el cargador de pared para cargar el booster MPB-12000 a una toma de alimentación CA doméstica, o el cargador CC de 13.8V para cargarlo a la toma encendedor de cigarrillos del vehículo.
2.Encienda el booster MPB-12000 con el interruptor ON/OFF (7) en posición “ON”.
3.La pantalla (1) muestra 100% con 5 barras cuando la carga está completa.
4.Desconecte el booster MPB-12000 del adaptador de alimentación.
5.Apague el booster MPB-12000 con interruptor ON/OFF (7) en posición “OFF”.
Para mejor resultados, cargue el booster MPB-12000 completamente cada tres meses.
7
VERIFICAR DE LA CAPACIDAD DEL BOOSTER MPB-12000
1.Encienda el booster MPB-12000 con el interruptor ON/OFF (7) en posición “ON”.
2.Oprima POWER (5) sin tener ningún dispositivo conectado al cargador.
3.La cantidad de barras en el icono de la pantalla (1) indica cuanta energía queda en el cargador.
4.Apague el booster MPB-12000 con interruptor ON/OFF (7) en posición “OFF”.
ARRANCAR UN VEHÍCULO
1.Asegúrese de que el booster MPB-12000 está completamente cargado.
2.Apague todos los accesorios en el vehículo (radio, aire acondicionado, etc.)
3.Conecte la pinza ROJA del cable de arranque al polo POSITIVO (+) de la batería del vehículo.
4.Conecte la pinza NEGRA del cable de arranque al polo NEGATIVO (-) de la batería del vehículo.
5.Inserte el conector del cable en el conector 12 V (8) del booster MPB-12000. Asegúrese de que la
conexión está bien establecida.
6.Encienda el booster MPB-12000 con el interruptor ON/OFF (7) en posición “ON”.
7.Gire la llave de ignición del vehículo por (3 segundos máximo).
Si el vehículo arranca:
• Desconecte los cables de arranque del booster MPB-12000 primero (8), luego desconecte las
pinzas de la batería.
Si el vehículo no arranca
• Espere 1 minuto y trate otra vez.
8.Apague el booster MPB-12000 con interruptor ON/OFF (7) en posición “OFF”.
CARGAR UN EQUIPO USB DE 5V (TABLETA, TELÉFONO
CELULAR, ETC.)
1.Encienda el booster MPB-12000 con el interruptor ON/OFF (7) en posición “ON”.
2.Conecte el conector USB 2-en-1 a la toma USB (3) del booster MPB-12000.
3.Conecte su equipo al cable mini USB o al cable micro USB.
4.El booster MPB-12000 comienza a cargar su equipo. Se desconectará al final de la carga.
5.Apague el booster MPB-12000 con interruptor ON/OFF (7) en posición “OFF”.
ENCENDER LA LINTERNA
1.Encienda el booster MPB-12000 con el interruptor ON/OFF (7) en posición “ON”.
2.Mantenga POWER (5) oprimido durante 2 segundos para encender la linterna LED.
3.Oprima POWER (5) otra vez para circular por los 4 modos: fijo, parpadeo S.O.S., parpadeo rápido, y
linterna apagada.
4.Apague el booster MPB-12000 con interruptor ON/OFF (7) en posición “OFF”.
ALIMENTAR / CARGAR EQUIPOS DE 12, 16 O 19 V CC
1.Encienda el booster MPB-12000 con el interruptor ON/OFF (7) en posición “ON”.
2.Oprima POWER (5) para escoger la tensión: 12 V / 16 V / 19 V CC. Ver “OUT2” en la pantalla (1).
3.Inserte un cable conector (no incluido) a toma de salida (4) para alimentar / cargar equipos electrónicos que requieren la tensión escogida.
La tensión de salida no se puede cambiar si haber el cable conectado a la toma (4).
4.Cuando termine, apague el booster MPB-12000 con interruptor ON/OFF (7) en posición “OFF”.
COMPRESOR DE AIRE
•
•
•
•
•
•
•
•
El compresor no es un juguete. Mantener fuera del alcance de los niños.
No deje sin vigilancia el compresor mientras está en funcionamiento.
Asegúrese de que usted está a resguardo del tráfico para inflar los neumáticos.
No utilizar el compresor en una atmósfera explosiva en presencia de líquidos inflamables, gases o
polvo.
No exponga el compresor a la lluvia o humedad.
En caso de mal funcionamiento eléctrico o mecánico, apague inmediatamente el compresor.
El exceso de inflado puede estallar su neumático y causar lesiones. No trate de sobre-inflar.
El compresor no puede ser reparado por el usuario.
No utilice el compresor más de 15 minutos seguidos. Se recomienda dejar que se enfríe 15
minutos después de un uso continuo de 15 minutos.
8
1 Linterna a LED
7 Botón ON/OFF
8 Adaptadores
6 Conector
2 Válvula
3 Manguera de aire de
10 cm
4 Manómetro
(PSI/bar/KPA)
5 Cordón
UTILIZAR EL COMPRESOR DE AIRE
El compresor de aíre viene equipado para añadir aíre a los neumáticos de coche. Además, incluye
adaptadores (8) para añadir aíre a las ruedas de bicicletas, pelotas de deporte, etc.
1.Conecte el conector (6) del compresor de aíre al conector (8) del booster MPB-12000
2.Conecte, si es necesario, el adaptador (8) apropiado para su artículo.
3.Conecte la válvula (2) del compresor de aíre al artículo para inflarlo.
4.Oprima el botón ON/OFF (7) del compresor de aíre.
5.Interrumpir periódicamente para comprobar el manómetro e asegurarse de no sobre inflar el artículo.
6.Oprima el botón ON/OFF (7) otra vez cuando el artículo esté inflado para apagar el compresor de
aíre.
El compresor de aire funciona incluso si el interruptor del MPB-12000 no está en posición
“ON”.
SOLUCIÓN DE PROBLEMAS
SI....
TRATE ESTO...
Mis artículos no se cargan o el compresor no infla.
Recargue el booster MPB-12000.
Verifique que sus artículos están conectados correctamente.
No he usado mi MPB-12000 por un
tiempo, y ahora la unidad está completamente agotada.
Puede que la haya guardado sen ter apagado en posición “OFF.” (7). Recargue lo.
MANTENIMIENTO
Use sentido común cuando cuide de su booster MPB-12000. Asegúrese de que los conectores y los
tomas estén limpios y que no tengan escombros. Desconecte el MPB-12000 después de cargarlo. Apague (7) e guarde el booster MPB-12000 y sus accesorios en el estuche suministrado.
9
ESPECIFICACIONES
BOOSTER MPB-12000
- Tamaño
: 40 mm (A) x 80 mm (L) x 170 mm (P)
1.6 in. (A) x 3.1 in. (L) x 7.0 in. (P)
- Temperatura de operación
: - 20° C hasta +60° C / - 4° F hasta +140° F
- Corriente de comienzo
: 200 A
- Pico de corriente
: 400 A
- Potencia
: 44,4 Wh
- Ciclo de vida
: 1000 cargas
- Modo de carga
: CA/CC 15 V / 1,0 A
- Salida USB
: 5 V / 2,1 A
- Salida CC
: 12, 16 y 19 V
COMPRESOR
- Tensión de alimentación
: 12 V CC
- Presión máxima
: 5,5 bar / 80 PSI
- Corriente máxima
: 4 A
- Corriente sin descarga
: < 2,5 A
- Velocidad del inflado
: Menos de 10 minutos para inflar un neumático de 0 a 2,7 bar
(de 0 a 30 PSI) basándose en el tamaño de neumático 95/55R15.
- Temperatura de trabajo
: -10° C hasta +60° C / -14° F hasta +140° F
- Dimensiones
: 108 mm (A) x 95 mm (L) x 47 cm (P)
4.3 in. (A) x 3.7 in (L). x 1.8 in. (P)
ELIMINACIÓN DEL BOOSTER MPB-12000
El booster MPB-12000 es independiente y no puede ser reemplazado por el usuario. Debe ser eliminada correctamente cuando ya no pueda ser recargado. Prácticas de carga correctas aumentarán la
vida de la unidad.
GARANTÍA
En caso de avería, los productos (excepto cables, cables de alimentación y encendedor) tienen una
garantía de 2 años desde la fecha de la factura. La factura enviada con su pedido sirve como garantía.
Una copia siempre debe ser adjunta en caso de devolución de un producto; el laboratorio PRESIDENTE
SAV examinará el producto devuelto y evaluará si la avería está cubierta por la garantía.
Si no se cumplen todas estas condiciones, no será posible realizar la reparación.
Si el fallo del producto está probado y no está relacionado con una causa de exclusión de las que se
enumeran a continuación, PRESIDENT se compromete a reparar el producto tan pronto como sea
posible.
Quedan excluidos de esta garantía: el desgaste normal de un producto, no respetar las características
de la instalación y uso, negligencia, mantenimiento inadecuado, uso no conforme, causas accidentales
externas (como golpes, caída, fuego), todos los productos modificados o reparados por el cliente o
cualquier otra persona no autorizada expresamente por President.
En los anteriores casos, el producto puede ser devuelto en las mismas condiciones o reparado con
cargo, tras el avance y la aceptación de un presupuesto preparado por el laboratorio de President.
Los gastos de envío son a cargo del usuario. Sin embargo, en caso de aplicación de la garantía, el envío
de devolución será a cargo de President.
El producto debe enviarse en su embalaje original o en un embalaje adecuado para garantizar una
protección óptima.
¡¡Tenga cuidado!! en sus envíos, compruebe su embalaje, PRESIDENT no considerará garantía para
dispositivos dañados durante el transporte.
Más allá del período de garantía, usted todavía podrá reparar su producto. En este caso, se comunicará
un presupuesto. Si acepta el presupuesto, la reparación y devolución del producto será efectuado después de recibir el pago correspondiente.
10
WHAT’S INCLUDED
•
•
•
•
•
•
Booster MPB-12000
Compact tire inflator with 2 air needle accessories
2-1 USB cord (micro, mini)
Jumper cable with 2 clamps
DC power cord : 12 ~ 15 V with cigarette lighter plug
AC power cord : wall charger 100 ~ 240 V
FEATURES
• Supports Engines : gasoline < 5.0 L / diesel < 3.0 L
• 12 V cable
• USB Port 5 V / 2,1 Ah
• LED Flashlight
• Max. pressure for compact tire inflator: 80 PSI / 5.5 bar
• AC Charger : Input 100 ~240 V AC - 50/60 Hz - 0.6 A max. / Output : 15 V DC - 1.0 A
• Resting Discharge: 12% Loss/Year
• Carrying case
BOOSTER MPB-12000
5 Power Button
3 USB Output
5 V / 2,1 A
6 Charger Input jack
8 12V Connector
(under flap)
1 LED Display
7 Power ON/OFF
Slide
4 Output Jack
12, 16 ou 19 V
2 LED Flashlight
USING THE MPB-12000
CHARGING THE BOOSTER MPB-12000
1.Use the 120 ~ 240 V AC wall charger to connect the booster MPB-12000 to an AC home outlet or the
13.8 V vehicle charger to connect to the cigarette lighter charger.
2.Turn on the booster MPB-12000, slide ON/OFF (7) to “ON”.
3.The display (1) shows 100% with 5 bars when charging is complete.
4.Disconnect the MPB-12000 from the power adapter.
5.Turn off the booster MPB-12000, slide ON/OFF (7) to “OFF”.
For best results, fully charge the power pack every three months.
11
CHECK BATTERY CAPACITY
1.Turn on the booster MPB-12000, slide ON/OFF (7) to “ON”.
2.Press POWER (5) without any devices connected to the charger.
3.The number of bars in the battery icon on the display (1) indicate how much power is in the MPB-12000.
4.Turn off the booster MPB-12000, slide ON/OFF (7) to “OFF”.
JUMP START A VEHICLE
1.Make sure the booster MPB-12000 is fully charged.
2.Turn off all accessories on the vehicle (radio, air conditioner, etc.)
3.Connect the jumper cable’s RED clamp to the POSITIVE (+) post of the vehicle battery.
4.Connect the jumper cable’s BLACK clamp to the NEGATIVE (-) post of the vehicle battery.
5.Insert the jumper cable connector into the 12 V connector (8) of the booster MPB-12000. Be sure the
connection is solid.
6.Turn on the booster MPB-12000, slide ON/OFF (7) to “ON”.
7.Turn the vehicle ignition key for 3 seconds maximum.
If the vehicle starts:
• Disconnect the jumper cables from the MPB-12000 first (8), then disconnect the clamps from the
battery.
If the vehicle does not start:
• Wait 1 minute and try again.
8.Turn off the booster MPB-12000, slide ON/OFF (7) to “OFF”.
CHARGING A 5 V USB DEVICE (TABLET, CELL PHONE, ETC.)
1.Turn on the booster MPB-12000, slide ON/OFF (7) to “ON”.
2.Connect the 2-1 USB cord to the USB output (3) of the booster MPB-12000
3.Connect your device to either the mini USB or micro USB cable.
4.The MPB-12000 begins to charge your device. It will put on standby at the end of the charge.
5.Turn off the booster MPB-12000, slide ON/OFF (7) to “OFF”.
TURN ON FLASHLIGHT
1.Turn on the booster MPB-12000, slide ON/OFF (7) to “ON”.
2.Press and hold POWER (5) to turn on the LED flashlight.
3.Short press POWER (5) again to cycle through the 4 modes: Steady / Strobe S.O.S / Fast Strobe /
OFF.
4.Turn off the booster MPB-12000, slide ON/OFF (7) to “OFF”.
POWER / CHARGE 12, 16 OR 19 V DC DEVICES
1.Turn on the booster MPB-12000, slide ON/OFF (7) to “ON”.
2.Short press POWER (5) to cycle through the 3 DC voltage values: 12 V / 16 V / 19 V. See “OUT2” in
the display (1).
3.Insert the connector cable (not included) into the output jack (4) of the booster MPB-12000 to power /
charge the electronics device.
The voltage value cannot be change while a cable is connected to the output jack (4).
4.When finished, turn off the booster MPB-12000, slide ON/OFF (7) to “OFF”.
COMPACT TIRE INFLATOR
•
•
•
•
•
•
•
•
This is not a toy. Please keep out of reach of children
Do NOT leave the compressor unattended when in use
Make sure to stay safe and away from traffic if you have to inflate tires at roadside
Do not use the compressor in explosive atmospheres, in the presence of flammable liquids, gases or
dust
Do not expose the compressor to rain or wet conditions
In case of electrical or mechanical malfunction, immediately switch off the compressor and unplug it
Over-inflation may cause items to burst which could cause injury. Do NOT attempt to over-inflate.
The compact tire inflator cannot be serviced by the user.
12
This compact tire inflator is intended for short run use. Maximum running time should not
exceed 15 minutes and a 15 minute cool-down period is recommended before running the
compressor again.
1 LED light
7 ON/OFF button
8 adapters
6 Connector
2 Screw valve
3 4 inch Air Hose
4 Manometer
(PSI/bar/KPA)
5 Plug cord
USING THE COMPACT TIRE INFLATOR
The compact tire inflator comes equipped to add air to car tires. It also includes air needle adapters for
adding air to bicycle tires, sports balls, etc.
1.Connect the connector (6) of then compact tire inflator to the 12 V connector (8) of then booster MPB12000.
2.Connect the appropriate air needle adapter (8) to the compact tire inflator if needed.
3.Connect the screw valve (2) of the compact tire inflator to item to inflate.
4.Press the ON/OFF button (7) on the compact tire inflator.
5.Stop inflating occasionally to check the air pressure on the manometer and to be sure not to overinflate your item.
6.Press the ON/OFF button (7) again when the item is inflated to turn off the compact tire inflator.
The tire inflator works even if the slide ON/OFF (7) of the booster MPB-12000 is not “ON”.
TROUBLESHOOTING
IF...
TRY THIS...
My items are not recharging or the
compact tire inflator is not inflating.
Recharge the booster MPB-12000.
Verify that your items are correctly connected
I haven’t used my booster MPB-12000
in a while, and now the unit is completely drained.
You may have accidentally put it away with
it powered on. Recharge it.
MAINTENANCE
Use common sense when caring for your MPB-12000. Be sure the connectors and jacks remain clean
and free of debris. Unplug the MPB-12000 after charging. Store the MPB-12000 and its accessories in
the carrying case provided.
13
SPECIFICATIONS
BOOSTER MPB-12000
- Size
: 1.6 in. (H) x 3.1 in (W). x 7.0 in. (D)
40 mm (H) x 80 mm (W) x 170 mm (D)
- Operating Temperature
: - 4° F to + 140° F / - 20°C to + 60° C
- Start Current
: 200 A
- Peak Current
: 400 A
- Power
: 44,4 Wh
- Cycle life
: 1,000 charges
- Charge mode
: CC/CV 15 V / 1.0 A
- USB output
: 5 V / 2,1 A
- DC Output
: 12, 16 and 19 V
COMPACT TIRE INFLATOR
- Power Input
: 12 V DC
- Maximum Pressure
: 80 PSI / 5.5 bar
- Maximum Current
: 4 A
- Unloaded Current
: < 2.5 A
- Inflating Speed
: Less than 10 minutes to inflate tire from 0 to 30 PSI
(0 to 2.7 bar) based on tire size 195/55R15.
- Working Temperature
: 14° F to 140° F / -10° C to +60° C
- Dimensions
: 4.3 in. (H) x 3.7 in (W). x 1.8 in. (D)
108 mm (H) x 95 mm (W) x 47 cm (D)
BATTERY DISPOSAL
The booster MPB-12000 is self-contained and not consumer replaceable. It must be disposed of
properly when it no longer holds a charge. Proper charging practices will increase the life of the unit.
WARRANTY
In case of failure, the warranty applies during a term of 2 years for the products (excluding cables, power
cords and cigarette lighter) and comes into effect from the invoice date. The invoice sent with your order,
holds as a legal document for the warranty.
Any defective product requiring a repair under warranty must absolutely be returned with a purchase
proof to our PRESIDENT after-sales department. The After-sales laboratory of PRESIDENT is the only
empowered organization to decide about the application of the warranty clauses.
If the Product failure is proven and not related to a cause of exclusion as listed below, PRESIDENT
commits to repair the product as soon as possible.
Exclusions: the normal wear and tear of the product, the non-respect of the installation and use specifications, negligence, bad maintenance, the non compliant use, external damages caused by accident
(such as shocks, fall, fire), all products which have been modified or repaired by the user, defects due to
intervention made by third parties not approved by PRESIDENT.
A quotation will be done when the warranty clauses cannot be applied. In this case the shipping costs
and risks are the responsibility of the user. However, in case of application of the warranty, the return
delivery costs will be at the expense of PRESIDENT.
The product must be returned to PRESIDENT possibly in its original packing or in a suitable packaging
to ensure optimum protection.
Warning! Please check carefully your packing before sending. PRESIDENT will not accept devices or
accessories damaged during transit.
Beyond the warranty period, you will still have the possibility to inspect or repair your device. In this
case, an estimate will be communicated. If you accept the quote, the repair and shipping charges must
be paid in advance.
14
ZAWARTOŚĆ OPAKOWANIA
•
•
•
•
•
•
Przenośny zasilacz MPB-12000
Kompresor z zestawem końcówek
Konektor USB 2-1 (micro, mini)
Konektor kabli rozruchowych
Kabel zasilający 12V DC z wtyczką do zapalniczki
Adapter 15 V / 1,0 A
CECHY
•
•
•
•
•
•
•
•
Uniwersalne zaciski 12 V
Obsługuje silniki < 5,0 L (< 3,0 L Diesel)
Port USB 5 V / 2,1 Ah
Latarka LED
Kompaktowy kompresor z manometrem i zestawem końcówek
Ładowarka AC/DC
Rozładowanie baterii w stanie spoczynku – 12% w skali roku
Pokrowiec
BOOSTER MPB-12000
5 Włącznik
3 Wyjście dla
urządzeń mobilnych
5 V / 2,1 A
6 Gniazdo wejściowe
ładowarki
8 Konektor 12 V
1 Wyświetlacz LED
7 Przełącznik
ON/OFF
4 Gniazdo wyjściowe
12, 16 lub19 V
2 Latarka
ZASTOSOWANIE URZĄDZENIA MBP-12000
ŁADOWANIE URZĄDZENIA
1.Użyj 120 ~ 240 V ładowarki ściennej lub samochodowej, żeby naładować urządzenie.
2.Włącz urządzenie MPB-12000. Przełącznik MPB-12000 ON/OFF (7) ustaw w pozycji „ON”.
3.Naładowanie osiągnęło 100%, kiedy wyświetlacz (1) pokazuje 5 kresek.
4.Odłącz urządzenie MPB-12000 od ładowarki.
5.Wyłącz MPB-12000. Przełącznik ON/OFF (7) ustaw w pozycji „OFF”.
Dla lepszych rezultatów przeprowadź pełne ładowanie co 3 miesiące.
15
SPRAWDZANIE POJEMNOŚCI BATERII
1.Przełącznik MPB-12000 ON/OFF (7) ustaw w pozycji „ON”.
2.Naciśnij POWER (5) bez żadnych urządzeń podłączonych do ładowarki.
3.Liczba kresek na wyświetlaczu (1) wskazuje poziom naładowania.
4.Wyłącz MPB-12000. Przełącznik ON/OFF (7) ustaw w pozycji „OFF”.
ROZRUCH SAMOCHODU ZA POMOCĄ KABLI ROZRUCHOWYCH
1.Upewnij się, że urządzenie jest w pełni naładowane.
2.Wyłącz wszystkie akcesoria w samochodzie (radio, klimatyzacja, itp.).
3.Podłącz czerwony zacisk kabla rozruchowego z dodatnim (+) biegunem akumulatora.
4.Podłącz czarny zacisk kabla rozruchowego z ujemnym (-) biegunem akumulatora.
5.Podłącz konektor kabla rozruchowego do urządzenia (8). Upewnij się, że podłączenie jest solidne.
6.Przełącznik MPB-12000 ON/OFF (7) ustaw w pozycji „ON”.
7.Przekręć kluczyk w stacyjce na maksymalnie 3 sekundy.
Jeśli uruchomisz silnik:
• Odłącz kable rozruchowe od urządzenia (8), następie odłącz zaciski od akumulatora.
Jeżeli nie uruchomisz silnika za pierwszym razem:
• Odczekaj minutę i spróbuj ponownie.
8.Wyłącz MPB-12000. Przełącznik ON/OFF (7) ustaw w pozycji „OFF”.
ŁADOWARKA URZĄDZEŃ USB 5V (TABLET, TELEFON KOMÓRKOWY ITP)
1.Przełącznik MPB-12000 ON/OFF (7) ustaw w pozycji „ON”.
2.Podłącz ładowarkę USB 2-1 (3) do MPB-12000.
3.Podłącz swoje urządzenie do mini USB lub micro USB.
4.MPB-12000 włączy się automatycznie i zacznie ładować twoje urządzenie, wyłączy się, kiedy twoje
urządzenie będzie w pełni naładowane.
5.Wyłącz MPB-12000. Przełącznik ON/OFF (7) ustaw w pozycji „OFF”.
LATARKA
1.Przełącznik MPB-12000 ON/OFF (7) ustaw w pozycji „ON”.
2.Naciśnij POWER (5), aby włączyć latarkę.
3.Naciśnij krótko przycisk Power (5) co pozwoli Ci na wybranie 1 z 4 trybów: oświetlenie ciągłe / miganie
SOS / szybkie miganie / wyłączone.
4.Wyłącz MPB-12000. Przełącznik ON/OFF (7) ustaw w pozycji „OFF”.
ZASILACZ / ŁADOWARKA URZĄDZEŃ 12,16, 19 V
1.Przełącznik MPB-12000 ON/OFF (7) ustaw w pozycji „ON”.
2.Naciśnij krótko przycisk Power (5) co pozwoli Ci na wybranie napięcia odpowiedniego dla urządzenia
12.16 lub 19 V
3.Podłącz kabel urządzenia do gniazda (4) aby zasilić lub naładować urządzenia.
Wybrane napięcie nie może być zmieniane w czasie kiedy urządzenie jest już podłączone
4. Po zakończeniu ładowania wyłącz MPB-12000. Przełącznik ON/OFF (7) ustaw w pozycji „OFF”.
KOMPRESOR
•
•
•
•
•
•
•
Urządzenie należy przechowywać poza zasięgiem dzieci.
Nie pozostawiaj urządzenia bez nadzoru w trakcie użytkowania
Zachowaj zasady bezpieczeństwa w przypadku konieczności użycia urządzenia na poboczu drogi.
Nie używaj kompresora w pobliżu przedmiotów , płynów i gazów łatwopalnych.
Chroń urządzenie przed wilgocią i deszczem
W przypadku usterki mechanicznej lub elektrycznej wyłącz i odłącz kompresor.
Uwaga :Nadmierne napompowanie opon może spowodować ich rozerwanie opon i urazy użytkownika.
• Kompresor nie może być serwisowany przez użytkownika.
Ten kompresor przeznaczony jest do doraźnego użytku. Maksymalny czas pracy nie powinien
przekraczać 15 minut . Możliwość powtórnego użytku po 15 minutach studzenia.
16
1 Kontrolka LED
7 ON/OFF przycisk
8 Końcówki
6 Wtyczka
2 Zawór
3 4 calowy przewód
4 Manometer
(PSI/bar/KPA)
5 Kabel
KORZYSTANIE Z KOMPRESORA
Kompresorem można dopompować opony samochodowe, jak również opony rowerowe (8).
1. Podłącz wtyczkę (6) do gniazda 12 V w urządzeniu MPB 12000 (8).
2.Jeśli to konieczne dołącz do kompresora odpowiednią końcówkę.
3.Podłącz pompowany przedmiot do zaworu (2).
4.Naciśnij zielony przycisk (7) na kompresorze.
5. Obserwuj wskaźnik, sprawdzaj ciśnienie powietrza
6.Po zakończeniu pompowania naciśnij ponownie zielony przycisk (7), aby wyłączyć kompresor.
Kompresor działa nawet jeśli BOOSTER MPB 12000 nie jest włączony.
ROZWIĄZYWANIE PROBLEMÓW
JEŻELI…
SPRÓBUJ…
Twoje akcesoria nie ładują się lub kompresor nie działa.
Naładuj MPB-12000.
Sprawdź podłączenia.
Nie używałeś swojego urządzenie
przez jakiś czas i teraz jest ono całkowicie rozładowane.
Mogłeś niechcący pozostawić włączone
urządzenie. Naładuj je.
ŚRODKI OSTROŻNOŚCI
Używając urządzenie MPB-12000 zawsze zachowaj zdrowy rozsądek. Upewnij się, że konektory i
wtyczki, których używasz są czyste i wolne od zanieczyszczeń. Odłączaj po naładowaniu. Przechowuj
MPB-12000 i akcesoria w dostarczonym futerale.
17
SPECYFIKACJA
BATERIA
- Rozmiar
: 40 mm (W) x 80 mm (S) x 170 mm (G)
1,6 po (W) x 3,1 po (S) x 7,0 po (G)
- Zakres temperatury
: Od -20° C do 60°C / Od -4˚ F do +140˚ F
- Natężenie startowe
: 200 A
- Natężenie szczytowe
: 400 A
- Moc
: 44,4 Wh
- Żywotność
: 1000 cykli
- Tryb ładowania
: CC/CV 15 V, 1,0 A
- Wyjście USB
: 5 V / 2,1 A
KOMPRESOR
- Moc wejściowa
: 12 V DC
- Maksymalne ciśnienie
: 80 PSI / 5,5 bar
- Maksymalne natężenie
: 4 A
- Prąd rozładowania
: < 2,5 A
- Prędkość pompowania
: Mniej niż 10 minut od 0 do 30 PSI (od 0 do 2,7 bar) w zależności
od rozmiaru opon 195/55R15
- Zakres temperatury
: Od -10°C do 60° C / Od 14˚ F do +140˚ F
- Wymiary
: 108 mm (W) x 95 mm (S) x 47 cm (G)
4.3 in. (W) x 3.7 in (S). x 1.8 in. (G)
UTYLIZACJA BATERII
Odpowiednie ładowanie baterii wydłuży jej żywotność. Zużyte baterie można nieodpłatnie utylizować
w miejscach zbiórki na terenie gminy, lub wszędzie tam, gdzie baterie/akumulatory są sprzedawane.
GWARANCJA
W przypadku wystąpienia awarii produkty ( za wyjątkiem kabli i przewodów zasilających) są objęte
gwarancją przez 1 rok od daty wystawienia faktury lub innego dowodu zakupu. Faktura lub inny dowód
zakupu wysłane bądź wydane wraz z zamówionym towarem służą jako potwierdzenie zawarcia umowy
gwarancji. Ich kopia musi być zawsze dołączona w przypadku roszczeń z tytułu gwarancji. Serwis firmy
PRESIDENT zbada zwrócony produkt i oceni, czy roszczenie jest zasadne
i objęte gwarancją, czy też nie.
Jeżeli nie zostaną spełnione powyższe warunki naprawa gwarancyjna nie może być dokonana.
W przypadku zaistnienia awarii produkt jest sprawdzany i o ile awaria nie jest związana z przyczyną
podlegającą poniższym wyłączeniom odpowiedzialności, PRESIDENT zobowiązuje się do naprawy produktu tak szybko, jak to tylko możliwe. Naprawa zostanie dokonania w terminie nie dłuższym niż w ciągu
dni 14 - tu. W przypadku trzykrotnej naprawy tego samego elementu Klientowi przysługuje wymiana na
produkt wolny od wad.
Wyłączone z niniejszej gwarancji handlowej są awarie wynikające z: normalnego zużycia produktu,
nieprzestrzegania właściwego sposobu uruchamiania i użytkowania, niedbalstwa, zaniedbania konserwacji, użytkowania niezgodnego z przeznaczeniem, przypadkowych przyczyn zewnętrznych (takie jak
wstrząsy, upadek, pożar), wszelkich modyfikacji lub napraw dokonanych przez Klienta lub inną osobę
nie posiadającą wyraźnej i formalnej autoryzacji firmy PRESIDENT.
W przypadku zaistnienia wyłączenia odpowiedzialności gwarancyjnej, produkt może zostać zwrócony w
stanie nienaprawionym lub naprawiony odpłatnie po wcześniejszej akceptacji przez klienta prognozowanych przez serwis firmy PREZYDENT kosztów naprawy.
Koszty wysyłki ponosi Klient. Jednak w przypadku objętym niniejszą gwarancją, PRESIDENT zwraca
opłaty za wysyłkę.
Produkt powinien być przesłany w oryginalnym opakowaniu lub przynajmniej w takim, które zapewni
jego optymalną ochronę.
Uwaga! Wysyłając produkt sprawdź swoje opakowanie, PRESIDENT nie uzna uszkodzeń doznanych
podczas transportu!
18
Po upływie okresu gwarancyjnego, nadal będziesz w stanie sprawdzić lub naprawić produkt. W takim
przypadku zostanie sporządzony i przekazany do akceptacji kosztorys przedwykonawczy. Po zaakceptowaniu kosztorysu zostanie podjęta naprawa. Zwrot produktu nastąpi po otrzymaniu odpowiedniej
płatności.
Gwarancja nie wyłącza, nie ogranicza ani nie zawiesza uprawnień kupującego wynikających z przepisów o rękojmi za wady rzeczy sprzedanej.
CERTIFICATE OF CONFORMITY
DÉCLARATION DE CONFORMITÉ
DECLARACIÓN DE CONFORMIDAD
DEKLARACJA ZGODNOŚCI :
http://www.president-electronics.com/fr/Safety-Security-Systems/MPB/
We, GROUPE PRESIDENT ELECTRONICS, Route de Sète, BP 100 –
34540 Balaruc – FRANCE, declare, on our own responsibility that the
Auto mobile power supply
Brand : PRESIDENT
Model : MPB-12000
is in conformity with EMC Council Directive of 2004/108/EC :
EN 55022: 2010
EN 61000-3-2: 2006 + A1: 2009 + A2: 2009
EN 61000-3-3: 2013
EN 55024: 2010
It is possible to use CE marking to demonstrate the conformity with
EMC Directive.
Balaruc, the 2015-03-09
Jean-Gilbert MULLER
General Manager
19
1592_V1.02/02/15
SIÈGE SOCIAL/HEAD OFFICE - FRANCE
Route de Sète - BP 100 - 34540 BALARUC
Site Internet : http://www.president-electronics.com
E-mail : [email protected]