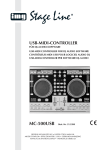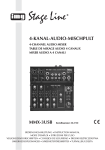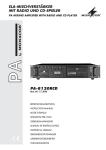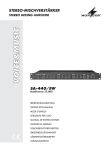
1
6-KANAL- UND 8-KANALAUDIO-MISCHPULT 6-CHANNEL AND 8-CHANNEL AUDIO MIXER TABLE DE MIXAGE AUDIO 6 CANAUX ET 8 CANAUX MIXER AUDIO A 6 CANALI E A 8 CANALI MMX-1024 MMX-1244 Bestellnummer 20.2620 Bestellnummer 20.2640 BEDIENUNGSANLEITUNG • INSTRUCTION MANUAL • MODE D’EMPLOI ISTRUZIONI PER L’USO • MANUAL DE INSTRUCCIONES • INSTRUKCJA OBSŁUGI VEILIGHEIDSVOORSCHRIFTEN • SIKKERHEDSOPLYSNINGER • SÄKERHETSFÖRESKRIFTER • TURVALLISUUDESTA D Bevor Sie einschalten … A Wir wünschen Ihnen viel Spaß mit Ihrem neuen Gerät von „img Stage Line“. Bitte lesen Sie diese Bedienungsanleitung vor dem Betrieb gründlich durch. Nur so lernen Sie alle Funktionsmöglichkeiten kennen, vermeiden Fehlbedienungen und schützen sich und Ihr Gerät vor eventuellen Schäden durch unsachgemäßen Gebrauch. Heben Sie die Anleitung für ein späteres Nachlesen auf. We wish you much pleasure with your new “img Stage Line” unit. Please read these operating instructions carefully prior to operating the unit. Thus, you will get to know all functions of the unit, operating errors will be prevented, and yourself and the unit will be protected against any damage caused by improper use. Please keep the operating instructions for later use. Der deutsche Text beginnt auf der Seite 4. The English text starts on page 7. CH GB Before switching on … F Avant toute installation … B Nous vous souhaitons beaucoup de plaisir à utiliser cet appareil “img Stage Line”. Lisez ce mode dʼemploi entièrement avant toute utilisation. Uniquement ainsi, vous pourrez apprendre lʼensemble des possibilités de fonctionnement de lʼappareil, éviter toute manipulation erronée et vous protéger, ainsi que lʼappareil, de dommages éventuels engendrés par une utilisation inadaptée. Conservez la notice pour pouvoir vous y reporter ultérieurement. Vi auguriamo buon divertimento con il vostro nuovo apparecchio di “img Stage Line”. Leggete attentamente le istruzioni prima di mettere in funzione lʼapparecchio. Solo così potete conoscere tutte le funzionalità, evitare comandi sbagliati e proteggere voi stessi e lʼapparecchio da eventuali danni in seguito ad un uso improprio. Conservate le istruzioni per poterle consultare anche in futuro. La version française se trouve page 10. Il testo italiano inizia a pagina 13. CH E Antes de la utilización … I PL Le deseamos una buena utilización para su nuevo aparato “img Stage Line”. Por favor, lea estas instrucciones de uso atentamente antes de hacer funcionar el aparato. De esta manera conocerá todas las funciones de la unidad, se prevendrán errores de operación, usted y el aparato estarán protegidos en contra de todo daño causado por un uso inadecuado. Por favor, guarde las instrucciones para una futura utilización. Prima di accendere … Przed uruchomieniem … Życzymy zadowolenia z nowego produktu “img Stage Line”. Dzięki tej instrukcji obsługi będą państwo w stanie poznać wszystkie funkcje tego urządzenia. Stosując się do instrukcji unikną państwo błędów i ewentualnego uszkodzenia urządzenia na skutek nieprawidłowego użytkowania. Prosimy zachować instrukcję. Tekst polski zaczyna się na stronie 19. La versión española comienza en la página 16. NL B S Voor u inschakelt … DK Før du tænder … Wij wensen u veel plezier met uw nieuwe apparaat van “img Stage Line”. Lees de veiligheidsvoorschriften grondig door, alvorens het apparaat in gebruik te nemen. Zo behoedt u zichzelf en het apparaat voor eventuele schade door ondeskundig gebruik. Bewaar de handleiding voor latere raadpleging. Tillykke med dit nye “img Stage Line” produkt. Læs sikkerhedsanvisningerne nøje før ibrugtagning, for at beskytte Dem og enheden mod skader, der skyldes forkert brug. Gem venligst denne betjeningsvejledning til senere brug. De veiligheidsvoorschriften vindt u op pagina 22. Sikkerhedsanvisningerne findes på side 22. Innan du slår på enheten … FIN Ennen kytkemistä … Vi önskar dig mycket glädje med din nya “img Stage Line” produkt. Läs igenom säkerhetsföreskrifterna innan enheten tas i bruk för att undvika skador till följd av felaktig hantering. Behåll instruktionerna för framtida bruk. Toivomme Sinulle paljon miellyttäviä hetkiä uuden “img Stage Line” laitteen kanssa. Ennen laitteen käyttöä pyydämme Sinua huolellisesti tutustumaan turvallisuusohjeisiin. Näin vältyt vahingoilta, joita virheellinen laitteen käyttö saattaa aiheuttaa. Ole hyvä ja säilytä käyttöohjeet myöhempää tarvetta varten. Säkerhetsföreskrifterna återfinns på sidan 23. Turvallisuusohjeet löytyvät sivulta 23. w w w.imgstageline.com 2 12 1 16 13 2 14 15 17 4 3 18 19 8 25 26 5 27 9 20 10 21 6 28 7 22 8 9 10 3 11 23 24 D A Auf der ausklappbaren Seite 3 finden Sie alle beschriebenen Bedienelemente und Anschlüsse. CH 1 Übersicht der Bedienelemente und Anschlüsse Abbildung 1: Modell MMX-1024 Abbildung 2: Modell MMX-1244 Mono-Kanal 1, die übrigen Mono-Kanäle sind identisch Stereo-Kanal 3/4 (bei MMX-1024) bzw. Stereo-Kanal 5/6 (bei MMX-1244), die übrigen Stereo-Kanäle sind identisch Summensektion und Stromversorgung Die Geräte sind nur zur Verwendung im Innenbereich geeignet. Schützen Sie sie vor Tropf- und Spritzwasser, hoher Luftfeuchtigkeit und Hitze (zulässiger Einsatztemperaturbereich 0 – 40 °C). Stellen Sie keine mit Flüssigkeit gefüllten Gefäße, z. B. Trinkgläser, auf die Geräte. 18 Eingang TAPE IN (Cinch-Buchsen Links L / Rechts R) für den Anschluss eines Recorders zur Wiedergabe oder eines anderen Wiedergabegeräts wie z. B. CD-Spieler Die im Mischpult entstehende Wärme muss durch Luftzirkulation abgegeben werden. Decken Sie darum die Lüftungsöffnungen des Gehäuses nicht ab. 19 Taste PHANTOM: bei gedrückter Taste wird für alle Eingänge MIC (1) eine 48-V-Phantomspeisung eingeschaltet Nehmen Sie das Mischpult nicht in Betrieb bzw. ziehen Sie sofort den Netzstecker des Netzgeräts aus der Steckdose, 1. wenn sichtbare Schäden am Mischpult, Netzgerät oder Netzkabel vorhanden sind, 2. wenn nach einem Sturz oder Ähnlichem der Verdacht auf einen Defekt besteht, 3. wenn Funktionsstörungen auftreten. Geben Sie die Geräte in jedem Fall zur Reparatur in eine Fachwerkstatt. Ein beschädigtes Netzkabel des Netzgeräts darf nur von einer Fachwerkstatt ersetzt werden. Hinweis: Ist zusätzlich die Taste FX TO CTRL R. (23) gedrückt, wird statt des TAPE-IN-Signals der Effektweg abgehört und angezeigt Position 23. Ziehen Sie den Netzstecker nie am Kabel aus der Steckdose, fassen Sie immer am Stecker an. 22 Taste TAPE TO MIX: bei gedrückter Taste wird das Signal des Eingangs TAPE IN (18) auf das Summensignal geschaltet Verwenden Sie für die Reinigung nur ein trockenes, weiches Tuch, auf keinen Fall Wasser oder Chemikalien. 23 Taste FX TO CTRL R.: bei gedrückter Taste wird das Signal des Effektwegs, vor dem Ausgangsregler FX SEND (20), auf die Abhörausgänge PHONES (14) und CTRL ROOM OUT (16) geschaltet und über die Pegelanzeige (27) angezeigt Werden die Geräte zweckentfremdet, nicht richtig angeschlossen, falsch bedient oder nicht fachgerecht repariert, kann keine Haftung für daraus resultierende Sach- oder Personenschäden und keine Garantie für die Geräte übernommen werden. 17 Ausgang TAPE OUT (Cinch-Buchsen Links L / Rechts R) für den Anschluss eines Recorders zur Aufnahme Beachten Sie bitte die Warnhinweise zur Phantomspeisung in Kapitel 4.1. 1 Eingang MIC (kombinierte XLR-/6,3-mmKlinkenbuchse, sym.) für den Anschluss eines Mikrofons 20 Pegelregler FX SEND für das Signal des Effekt-Ausspielwegs am Ausgang FX SEND (13) Hinweis: Für alle Mikrofoneingänge lässt sich mit dem Schalter PHANTOM eine Phantomspeisung zuschalten Position 19. 21 Taste TAPE TO CTRL ROOM: bei gedrückter Taste wird das Signal des Eingangs TAPE IN (18) auf die Abhörausgänge PHONES (14) und CTRL ROOM OUT (16) geschaltet und über die Pegelanzeige (27) angezeigt 2 Buchse INSERT (6,3-mm-Klinkenbuchse) zum Einschleifen eines Effektgeräts (z. B. Gerät zur Signalbearbeitung wie Kompressor) in den Kanalzug Steckeranschlüsse: Spitze = Send (Ausgang) Ring = Return (Eingang) Schaft = Masse 3 Regler GAIN für die Eingangsverstärkung 4 Eingang LINE IN (6,3-mm-Klinkenbuchsen Links L /Rechts R, sym.) für den Anschluss eines Geräts mit Line-Signalpegel (z. B. Keyboard) Hinweis: Bei Anschluss eines Mono-Geräts nur die Buchse L verwenden. 5 Umschalttaste zur Pegelanpassung für Geräte mit einem zu niedrigen Line-Ausgangspegel: bei gedrückter Taste wird der Eingangspegel angehoben 6 Klangregelung für die Höhen (HI), Mitten (MID) und Bässe (LO) 7 Einschalttaste LOW CUT für das Low-CutFilter (Hochpass) zum Unterdrücken unerwünschter Signalanteile unter 100 Hz, z. B. Trittschall 8 Regler FX zum Mischen des Kanalsignals auf den Effekt-Ausspielweg; der Signalabgriff ist nach dem Kanal-Pegelregler (10) 9 Mono-Kanal: Panorama-Regler PAN zum Platzieren des Mono-Signals im StereoKlangbild Stereo-Kanal: Balanceregler BAL für das Stereo-Signal 10 Pegelregler LEVEL zum Mischen des Kanalsignals auf das Summensignal 11 Übersteuerungsanzeige PEAK; leuchtet sie permanent, den Kanalpegel über den Gain-Regler (3) und/oder die Klangregelung (6) reduzieren 24 Lautstärkeregler PHONES/CONTROL ROOM für die Abhörausgänge PHONES (14) und CTRL ROOM OUT (16) 25 Betriebsanzeige POWER 26 Kontrollanzeige +48V: leuchtet bei eingeschalteter Phantomspeisung für die Eingänge MIC (1) 27 LED-Pegelanzeige; zeigt a) das Summensignal, wenn die Tasten TAPE TO CTRL ROOM (21) und FX TO CTRL R. (23) nicht gedrückt sind b) das Signal am Eingang TAPE IN (18), wenn die Taste TAPE TO CTRL ROOM gedrückt und die Taste FX TO CTRL R. nicht gedrückt ist c) das Signal des Effektwegs vor dem Ausgangsregler FX SEND (20) wenn die Taste FX TO CTRL R. gedrückt ist 28 Pegelregler MAIN MIX für das Summensignal, das auf die Ausgänge PHONES (14), CTRL ROOM OUT (16), MAIN OUT (15) und TAPE OUT (17) gegeben wird 12 Stromversorgungsbuchse auf der Rückseite zum Anschluss des beiliegenden Netzgeräts 2 Hinweise für den sicheren Gebrauch 13 Ausgang FX SEND (6,3-mm-Klinkenbuchse, asym.) des Effekt-Ausspielwegs, hier kann der Eingang eines Effektgeräts angeschlossen werden Die Geräte (Mischpult und Netzgerät) entsprechen allen relevanten Richtlinien der EU und sind deshalb mit gekennzeichnet. 14 Ausgang PHONES (6,3-mm-Klinkenbuchse) für den Anschluss eines Stereo-Kopfhörers (Impedanz mindestens 8 Ω) 15 Hauptausgang MAIN OUT für das Summensignal (6,3-mm-Klinkenbuchsen Links L / Rechts R, asym.), z. B. zum Anschluss des Verstärkers für die Beschallung oder eines zweiten Mischpults 4 16 Ausgang CTRL ROOM OUT (6,3-mm-Klinkenbuchsen Links L /Rechts R, asym.) für den Anschluss des Verstärkers einer Monitoranlage in einem separaten Regieraum WARNUNG Das Netzgerät wird mit lebensgefährlicher Netzspannung versorgt. Nehmen Sie deshalb niemals selbst Eingriffe am Gerät vor. Es besteht die Gefahr eines elektrischen Schlages. Beachten Sie auch unbedingt die folgenden Punkte: Sollen die Geräte endgültig aus dem Betrieb genommen werden, übergeben Sie sie zur umweltgerechten Entsorgung einem örtlichen Recyclingbetrieb. 3 Einsatzmöglichkeiten Dieses als Tischgerät ausgelegte Mischpult ist für Tonabmischungen für Beschallungs- oder Aufnahmezwecke geeignet. Das Modell MMX-1024 verfügt über sechs Eingangskanäle (2 mono, 4 stereo) und das Modell MMX-1244 über acht Eingangskanäle (4 mono, 4 stereo) für den Anschluss von (phantomgespeisten) Mikrofonen und Tonquellen mit Line-Ausgangspegel wie z. B. Musikinstrumente, CD-Spieler. Über Insert-Buchsen in den Mono-Kanälen können Geräte zur Klangbearbeitung eingeschleift werden. Ein Ausspielweg (Signalabgriff „post-fader“) ermöglicht den Anschluss eines Effektgeräts. Zusätzlich sind ein Wiedergabeeingang und ein Aufnahmeausgang für einen Recorder vorhanden sowie Abhörausgänge für den Anschluss eines Kopfhörers und einer Monitoranlage in einem separaten Regieraum. 4 Anschluss Vor dem Anschließen von Geräten oder vor dem Ändern bestehender Anschlüsse das Mischpult ausschalten oder die Ausgangsregler PHONES/ CONTROL ROOM (24) und MAIN MIX (28) auf Minimum stellen. 4.1 Mikrofone Mikrofone über XLR- oder 6,3-mm-Klinkenstecker an die symmetrisch beschalteten Buchsen MIC (1) der Mono-Kanäle anschließen. Der XLR-Anschluss besitzt eine Verriegelung. Zum Herausziehen des XLR-Steckers den PUSHHebel an der Buchse drücken. Bei Bedarf lässt sich für Kondensatormikrofone eine 48-V-Phantomspeisung zentral einschalten: Bei gedrückter Taste PHANTOM (19) wird auf alle Mikrofoneingänge (sowohl auf die XLR- als auch auf die Klinkenanschlüsse der Buchsen MIC) eine Phantomspeisung gegeben. Bei eingeschalteter Phantomspeisung leuchtet im Betrieb die LED +48V (26). VORSICHT Bei eingeschalteter Phantomspeisung dürfen keine Mikrofone mit asymmetrischem Ausgang angeschlossen sein. Diese Mikrofone könnten beschädigt werden. Um Schaltgeräusche zu vermeiden, die Taste PHANTOM nur betätigen, wenn das Mischpult ausgeschaltet oder die Regler PHONES/ CONTROL ROOM und MAIN MIX auf Minimum gestellt sind. 4.2 Line-Tonquellen Geräte mit Line-Ausgangspegel (z. B. Musikinstrumente) an die Eingänge LINE IN (4) der Stereo-Kanäle anschließen. Die 6,3-mm-Klinkenbuchsen für den linken (L) und rechten (R) Kanal sind symmetrisch beschaltet. Es lassen sich aber auch Geräte mit asymmetrisch beschaltetem Ausgang über 2-polige Klinkenstecker anschließen. Soll ein Mono-Gerät angeschlossen werden, nur die Buchse L verwenden. Das Mono-Signal wird dann intern auf den rechten und linken Kanal geschaltet. Ist der Cinch-Eingang TAPE IN (18) nicht von einem Recorder belegt ( Kapitel 4.4), kann auch hier ein zusätzliches Stereo-Line-Gerät angeschlossen werden (z. B. ein CD-Spieler für Hintergrundmusik in Spielpausen). 4.3 Effektgeräte 4.3.1 Effektgerät einschleifen Effektgeräte (z. B. Geräte zur Klangbearbeitung wie Kompressoren, Equalizer) lassen sich direkt in die Mono-Kanäle einschleifen: Das Kanalsignal wird nach dem Gain-Regler (3) ausgekoppelt, läuft komplett über das Effektgerät und wird an der gleichen Stelle des Signalwegs wieder in den Kanalzug zurückgeführt. Das Effektgerät an die 6,3-mm-Klinkenbuchse INSERT (2) des jeweiligen Kanals anschließen. Die Stecker müssen wie folgt angeschlossen sein: Spitze = Send (Ausgang) Ring = Return (Eingang) Schaft = Masse Zum Anschluss von Effektgeräten mit getrennten Ein- und Ausgangsbuchsen werden Y-Kabel benötigt, z. B. MCA-202 von MONACOR: Anschluss des Y-Kabels MCA-202 4.3.2 Effekt-Ausspielweg verwenden Über den Effekt-Ausspielweg können Signalanteile aus den Eingangskanälen ausgekoppelt, über ein Effektgerät (z. B. Hallgerät) geführt und nach ihrer Bearbeitung auf das Summensignal gemischt werden. Der Ausspielweg ist „postfader“ ausgelegt, d. h. der Signalabgriff ist nach dem Kanal-Pegelregler (10). 1) Den Eingang des Effektgeräts über einen 6,3-mm-Klinkenstecker mit dem Mono-Ausgang FX SEND (13) verbinden. 2) Den Ausgang des Effektgeräts über 6,3-mmKlinkenstecker an den Eingang LINE IN (4) eines freien Stereo-Kanals anschließen: L = linker Kanal, R = rechter Kanal. Bei einem Effektgerät mit Mono-Ausgang nur die Buchse L verwenden. 4.4 Recorder Ein Recorder kann an die Cinch-Buchsen TAPE IN und OUT angeschlossen werden: 1) Für die Aufnahme den Eingang des Recorders an den Stereo-Ausgang TAPE OUT (17) anschließen. Der Aufnahmeausgang erhält das mit dem Regler MAIN MIX (28) eingestellte Summensignal. 2) Für die Wiedergabe den Ausgang des Recorders an den Stereo-Eingang TAPE IN (18) anschließen. 4.5 Monitoranlage und Kopfhörer Die Tonabmischung kann über einen StereoKopfhörer und/oder über eine Monitoranlage in einem separaten Regieraum („control room“) abgehört werden. Den Kopfhörer (Mindestimpedanz 8 Ω) an die 6,3-mm-Klinkenbuchse PHONES (14) anschließen. Den Verstärker der Monitoranlage an den Ausgang CTRL ROOM OUT (16) anschließen; die 6,3-mm-Klinkenbuchsen für den linken (L) und rechten (R) Kanal sind asymmetrisch beschaltet. Informationen zu den Abhörwahlmöglichkeiten finden Sie in Kapitel 5.3. 4.6 Verstärker für die Beschallung Der Ausgang MAIN OUT (15) erhält das mit dem Regler MAIN MIX (28) eingestellte Summensignal. Hier kann der Verstärker für die Beschallung angeschlossen werden (oder ein anderes Gerät mit Line-Eingang wie z. B. ein zweites Mischpult). Die 6,3-mm-Klinkenbuchsen für den linken (L) und rechten (R) Kanal sind asymmetrisch beschaltet. 4.7 Netzgerät Zur Stromversorgung ausschließlich das beiliegende Netzgerät verwenden. Das Netzgerät mit der Stromversorgungsbuchse (12) auf der Rückseite verbinden. Den Netzstecker des Netzgeräts in eine Steckdose (230 V~/ 50 Hz) stecken. 5 Bedienung VORSICHT Stellen Sie die Lautstärke der Audioanlage und die Kopfhörerlautstärke nie sehr hoch ein. Hohe Lautstärken können auf Dauer das Gehör schädigen! Das Ohr gewöhnt sich an hohe Lautstärken und empfindet sie nach einiger Zeit als nicht mehr so hoch. Erhöhen Sie darum eine hohe Lautstärke nach der Gewöhnung nicht weiter. 5.1 Ein- und Ausschalten 1) Um Einschaltgeräusche und eine zu hohe Lautstärke zu vermeiden, vor der Inbetriebnahme die Ausgangsregler PHONES/CON- TROL ROOM (24) und MAIN MIX (28) auf Minimum stellen. 2) Je nachdem, welcher Mikrofontyp angeschlossen ist, die Taste PHANTOM (19) für die 48-V-Phantomspeisung entweder drücken oder ausrasten ( Kapitel 4.1). D A CH 3) Zum Ein- und Ausschalten des Mischpults den Schalter am Netzkabel des Netzgeräts betätigen. Bei eingeschaltetem Gerät leuchtet die Betriebsanzeige POWER (25). 5.2 Tonquellen mischen Die folgenden Bedienschritte dienen nur als Hilfestellung, es sind auch andere Vorgehensweisen möglich. 1) Als Grundeinstellung vorerst a) in allen Mono-Kanälen die Regler GAIN (3), die Klangregler (6) und die Regler PAN (9) in die Mittelstellung drehen. b) in allen Stereo-Kanälen die Tasten zur Eingangspegelanpassung (5) ausrasten und die Regler BAL (9) in die Mittelstellung drehen. c) alle Regler LEVEL (10), FX (8) und den Regler FX SEND (20) ganz nach links zurückdrehen. d) die Tasten TAPE TO CTRL ROOM (21), TAPE TO MIX (22) und FX TO CTRL R. (23) ausrasten. e) den Summenregler MAIN MIX (28) auf „0“ schieben. 2) Um einen der Mono-Kanäle auszusteuern, ein Tonsignal auf den Kanal geben und seinen Pegelregler LEVEL (10) in die Mittelposition „0“ drehen. Dann mit dem Regler GAIN (3) des Kanals die Eingangsverstärkung so einstellen, dass die LED-Pegelanzeige (27) bei 0 dB leuchtet. Danach den Klang mit den Klangreglern (6) einstellen: HI für die Höhen, MID für die Mitten, LO für die Bässe. Bei Bedarf die Taste LOW CUT (7) zum Unterdrücken tieffrequenter Störgeräusche (z. B. Trittschall, Brummen) drücken. Die Übersteuerungsanzeige PEAK (11) sollte höchstens bei Signalspitzen kurz aufleuchten. Leuchtet sie permanent, den Regler GAIN und/oder die Klangregler entsprechend zurückdrehen. Danach den Regler LEVEL wieder ganz zurückdrehen und die übrigen Mono-Kanäle auf die gleiche Weise aussteuern. 3) Muss für einen Stereo-Kanal der zugehörige Pegelregler LEVEL sehr weit aufgedreht werden, um den gewünschten Pegel zu erreichen, zur Pegelanhebung (12 dB) die Umschalttaste +4/-10 (5) im Kanalzug drücken. 4) Sind alle Einstellungen zur Pegelanpassung und alle Klangeinstellungen durchgeführt, mit den Reglern LEVEL die Signale aller verwendeten Tonquellen im gewünschten Lautstärkeverhältnis mischen. Die Regler LEVEL nicht benutzter Kanäle immer ganz nach links zurückdrehen. 5) Für die Mono-Kanäle mit den Panoramareglern PAN (9) die Mono-Signale im StereoKlangbild platzieren und für die StereoKanäle mit den Reglern BAL (9) die Balance der Stereo-Signale einstellen. 6) Wird der Effekt-Ausspielweg genutzt, siehe Kapitel 5.2.1 zum Einstellen des Effektwegs. 7) Um das Signal der Buchsen TAPE IN (18), z. B. Bandeinspielungen oder CD-Wiedergabe, auf die Signalsumme zu schalten, die Taste TAPE TO MIX (22) drücken. Soll das TAPEIN-Signal allein auf die Summe gegeben 5 D A CH werden, müssen die Pegelregler aller übrigen Tonquellen ganz zurückgedreht werden. Hinweis: Wird eine über den Ausgang TAPE OUT (17) laufende Aufnahme zeitgleich über den Eingang TAPE IN wiedergegeben, darf die Taste TAPE TO MIX nicht gedrückt sein, da sonst eine Rückkopplung auftritt. 8) Mit dem Regler MAIN MIX (28) anhand der LED-Pegelanzeige (27) die endgültige Lautstärke des Summensignals einstellen. In der Regel wird bei 0 dB eine optimale Aussteuerung erreicht. Ist der Ausgangspegel des Mischpults jedoch für das nachfolgende Gerät zu hoch oder zu niedrig, muss das Summensignal entsprechend höher oder niedriger eingestellt werden. Bei Übersteueleuchten die roten LEDs CLIP. 5.2.1 Effekt-Ausspielweg einstellen Das Effektgerät muss wie in Kapitel 4.3.2 beschrieben angeschlossen sein. 1) Damit die nachfolgenden Effekt-Einstellungen zu hören sind, vorerst den Regler FX SEND (20) und den Regler LEVEL (10) des verwendeten Eingangs, ungefähr in die mittlere Position drehen, 2) Mit den Reglern FX (8) die Signale der Eingangskanäle auf den Effektweg mischen. Mit diesen Reglern lässt sich für jeden Kanal getrennt die gewünschte Effektintensität einstellen. Hinweis: Den FX-Regler des Kanals, an dem das Effektgerät angeschlossen ist, ganz zurückdrehen, anderenfalls tritt eine Rückkopplung auf. 3) Mit dem Regler FX SEND (20) den Pegel für das Ausgangssignal des Effektwegs so einstellen, dass das Effektgerät nicht übersteuert wird. 4) Das vom Effektgerät kommende Signal mit dem Regler LEVEL (10) des verwendeten Eingangs auf das Summensignal mischen. Mit diesem Regler lässt sich die Effektintensität für alle Kanäle gemeinsam erhöhen oder verringern. 5.3 Abhören über Kopfhörer und Monitoranlage Die Tasten TAPE TO CTRL ROOM (21) und FX TO CTRL R. (23) bestimmen, welches Signal über die Ausgänge PHONES (14) und CTRL ROOM OUT (16) abgehört und von der LEDPegelanzeige (27) angezeigt wird. – Sind beide Tasten nicht gedrückt, wird das mit dem Regler MAIN MIX (28) eingestellte Summensignal abgehört und angezeigt. – Ist nur die Taste TAPE TO CTRL ROOM gedrückt, wird das Eingangssignal der Buchsen TAPE IN (18) abgehört und angezeigt (z. B. zur Hinterbandkontrolle bei einer Aufnahme). 6 Technische Daten Eingangsempfindlichkeit Mic: . . . . . . . . . . . . . . . Line In: . . . . . . . . . . . . Tape In: . . . . . . . . . . . . Insert (Return): . . . . . . Steckerbelegung XLR und Klinke 0,5 mV 60 mV 400 mV 140 mV Ausgangspegel Main Out / Tape Out . . . 800 mV (bei Anzeige 0 dB) Ctrl Room Out: . . . . . . max. 3 V FX Send: . . . . . . . . . . . max. 10 V Kopfhörerimpedanz: . . . . ≥ 8 Ω Frequenzbereich: . . . . . . 20 – 20 000 Hz Klirrfaktor: . . . . . . . . . . . . < 0,04 % Störabstand (A-bewertet) Modell MMX-1024: . . . 94 dB Modell MMX-1244: . . . 91 dB Übersprechen Modell MMX-1024: . . . -63 dB Modell MMX-1244: . . . -67 dB Klangregler Mono-Kanäle Bässe: . . . . . . . . . . . . . ±15 dB / 80 Hz Mitten: . . . . . . . . . . . . . ±15 dB / 2,5 kHz Höhen: . . . . . . . . . . . . . ±15 dB / 12 kHz Low-Cut-Filter, schaltbar: 100 Hz Phantomspeisung: . . . . . +48 V Stromversorgung: . . . . . . über beiliegendes Netzgerät an 230 V~/ 50 Hz XLR-Stecker für symmetrischen Anschluss 1 = Masse 2 = Signal + 3 = Signal - 3-poliger 6,3-mm-Klinkenstecker für symmetrischen Anschluss T = Signal + R = Signal S = Masse 2-poliger 6,3-mm-Klinkenstecker für asymmetrischen Anschluss T = Signal S = Masse 3-poliger 6,3-mm-Klinkenstecker für die Buchse INSERT T = Send (Ausgang) R = Return (Eingang) S = Masse 6,3-mm-Stereo-Klinkenstecker für den Kopfhöreranschluss T = linker Kanal R = rechter Kanal S = Masse Einsatztemperatur: . . . . . 0 – 40 °C Audioanschlüsse Mic, mono: . . . . . . . . . . XLR / 6,3-mm-Klinke (sym.) Insert: . . . . . . . . . . . . . 6,3-mm-Klinke (asym.) Line In, stereo: . . . . . . 6,3-mm-Klinke Links/Rechts (sym.) Tape In / Out, stereo: . . Cinch Links/Rechts (asym.) Main Out, stereo: . . . . . 6,3-mm-Klinke Links/Rechts (asym.) FX Send, mono: . . . . . 6,3-mm-Klinke (asym.) Phones, stereo: . . . . . . 6,3-mm-Klinke (asym.) Ctrl Room Out, stereo: 6,3-mm-Klinke Links/Rechts (asym.) Abmessungen (B × H × T) Modell MMX-1024: . . . 190 × 50 × 225 mm Modell MMX-1244: . . . 245 × 50 × 225 mm Gewicht Modell MMX-1024: . . . 1,6 kg Modell MMX-1244: . . . 1,9 kg Änderungen vorbehalten. – Ist die Taste FX TO CTRL R. gedrückt, wird das Signal des Effekt-Ausspielwegs, vor dem Effekt-Ausgangsregler FX SEND (20), abgehört und angezeigt. Die Stellung der Taste TAPE TO CTRL ROOM hat in diesem Fall keine Bedeutung. Die Abhörlautstärke mit dem Regler PHONES/ CONTROL ROOM (24) einstellen. 6 Diese Bedienungsanleitung ist urheberrechtlich für MONACOR ® INTERNATIONAL GmbH & Co. KG geschützt. Eine Reproduktion für eigene kommerzielle Zwecke – auch auszugsweise – ist untersagt. All operating elements and connections described can be found on the fold-out page 3. 1 Operating Elements and Connections Fig. 1: model MMX-1024 Fig. 2: model MMX-1244 Mono channel 1, the other mono channels are identical Stereo channel 3 / 4 (for MMX-1024) or stereo channel 5 / 6 (for MMX-1244), the other stereo channels are identical Main section and power supply 1 Input MIC (combined XLR / 6.3 mm jack, bal.) for connection of a microphone Note: For all microphone inputs a phantom power supply can be activated with the switch PHANTOM item 19. 2 Jack INSERT (6.3 mm jack) to insert an effect unit (e.g. unit for signal processing like compressor) into the channel Plug connections: tip = Send (output) ring = Return (input) sleeve = ground 3 Control GAIN for the input amplification 4 Input LINE IN (6.3 mm jacks Left L / Right R, bal.) for connection of a unit with line signal level (e. g. keyboard) Note: When connecting a mono unit, only use the jack L. 5 Selector button for level matching for units with a line output level which is too low: with the button pressed, the input level is increased 6 Equalizer for the high range (HI), midrange (MID) and bass range (LO) 7 Button LOW CUT to activate the low cut filter (high pass) to suppress undesired signal parts below 100 Hz, e. g. subsonic sound 8 Control FX to mix the channel signal to the effect send way; the signal will be picked up after the level control (10) of the channel 9 Mono channel: panorama control PAN for placing the mono signal in the stereo sound Stereo channel: balance control BAL for the stereo signal 10 LEVEL control to mix the channel signal to the master signal 11 Overload indication PEAK; if it lights up permanently, attenuate the channel level via the gain control (3) and / or the equalizer (6) 12 Power supply jack on the rear side for connection of the supplied power supply unit 13 Output FX SEND (6.3 mm jack, unbal.) of the effect send way; the input of an effect unit may be connected to this output 14 Output PHONES (6.3 mm jack) for connection of stereo headphones (minimum impedance 8 Ω) 15 Main output MAIN OUT for the master signal (6.3 mm jacks Left L/Right R, unbal.), e. g. for connection of the amplifier for PA application or a second mixer 16 Output CTRL ROOM OUT (6.3 mm jacks Left L / Right R, unbal.) for connection of the amplifier of a monitor system in a separate control room 17 Output TAPE OUT (RCA jacks Left L / Right R) for connection of a recorder for recording Do not set the mixer into operation, or immediately disconnect the mains plug of the power supply unit from the mains socket if 1. there is visible damage to the mixer, the power supply unit or to the mains cable, 2. a defect might have occurred after a drop or similar accident, 3. malfunctions occur. The units must in any case be repaired by skilled personnel. A damaged mains cable at the power supply unit must only be replaced by skilled personnel. Never pull the mains cable to disconnect the mains plug from the mains socket, always seize the plug. For cleaning only use a dry, soft cloth, never use chemicals or water. No guarantee claims for the units and no liability for any resulting personal damage or material damage will be accepted if the units are used for other purposes than originally intended, if they are not correctly connected or operated, or not repaired in an expert way. Important for U. K. Customers! The wires in this mains lead are coloured in accordance with the following code: blue = neutral brown = live As the colours of the wires in the mains lead of this appliance may not correspond with the coloured markings identifying the terminals in your plug, proceed as follows: 1. The wire which is coloured blue must be connected to the terminal which is marked with the letter N or coloured black. 2. The wire which is coloured brown must be connected to the terminal which is marked with the letter L or coloured red. 18 Input TAPE IN (RCA jacks Left L / Right R) for connection of a recorder for reproduction or another reproducer such as CD player 19 Button PHANTOM: with the button pressed a 48 V phantom power is activated for all inputs MIC (1) Please pay attention to the warning notes in chapter 4.1. 20 Level control FX SEND for the signal of the effect send way at the output FX SEND (13) 21 Button TAPE TO CTRL ROOM: with the button pressed the signal of the input TAPE IN (18) is sent to the monitoring outputs PHONES (14) and CTRL ROOM OUT (16) and indicated via the level display (27) Note: If the button FX TO CTRL R. (23) is additionally pressed, instead of the TAPE IN signal the effect way is monitored and indicated item 23. 22 Button TAPE TO MIX: with the button pressed the signal of the input TAPE IN (18) is sent to the master signal 23 Button FX TO CTRL R.: with the button pressed, the signal of the effect way, ahead of the output control FX SEND (20), is sent to the monitoring outputs PHONES (14) and CTRL ROOM OUT (16) and shown via the level indication (27) 24 Volume control PHONES / CONTROL ROOM for the monitoring outputs PHONES (14) and CTRL ROOM OUT (16) 25 POWER LED 26 Indicating LED +48 V: lights up with activated phantom power for the inputs MIC (1) 27 LED level indication; shows a) the master signal, when the buttons TAPE TO CTRL ROOM (21) and FX TO CTRL R. (23) are not pressed b) the signal at the input TAPE IN (18), when the button TAPE TO CTRL ROOM is pressed and the button FX TO CTRL R. is not pressed c) the signal of the effect way ahead of the output control FX SEND (20) when the button FX TO CTRL R. is pressed 28 Level control MAIN MIX for the master signal sent to the outputs PHONES (14), CTRL ROOM OUT (16), MAIN OUT (15) and TAPE OUT (17) 2 Safety Notes The units (mixer and power supply unit) correspond to all relevant directives of the EU and are therefore marked with . WARNING The power supply unit is supplied with hazardous mains voltage. Leave servicing to skilled personnel only. Inexpert handling or modification of the unit may cause an electric shock hazard. GB If the units are to be put out of operation definitively, take them to a local recycling plant for a disposal which is not harmful to the environment. 3 Applications This mixer designed as a tabletop unit is suited for sound mixing used for PA applications and recording applications. The model MMX-1024 is equipped with 6 input channels (2 mono, 4 stereo) and the model MMX-1244 is equipped with eight input channels (4 mono, 4 stereo) for connection of (phantom-powered) microphones and audio sources with line output level such as musical instruments, CD players. Via insert jacks in the mono channels, units for sound processing can be inserted. A send way (signal pick-up “post-fader”) allows for connection of an effect unit. In addition, a reproducing input and a recording output for a recorder are available and monitoring outputs for connection of headphones and a monitor system in a separate control room. It is essential to observe the following items: 4 Connection The units are suitable for indoor use only. Protect them against dripping water and splash water, high air humidity, and heat (admissible ambient temperature range 0 – 40 °C). Prior to connecting any units or to changing any existing connections, switch off the mixer or set the output controls PHONES / CONTROL ROOM (24) and MAIN MIX (28) to minimum. Do not place any vessels filled with liquid, e. g. drinking glasses, on the units. 4.1 Microphones The heat being generated in the mixer must be carried off by air circulation. Therefore, the air vents at the housing must not be covered. Connect microphones via XLR or 6.3 mm plugs to the balanced jacks MIC (1) of the mono channels. The XLR connection has a latching. To pull 7 GB out the XLR plug, press the PUSH lever at the jack. If required, it is possible to centrally activate a 48 V phantom power for condenser microphones: With the button PHANTOM (19) pressed, a phantom power is applied to all microphone inputs (to the XLR connections as well as to the 6.3 mm connections of the jacks MIC). With activated phantom power, the LED +48V (26) lights up during operation. CAUTION When the phantom power is activated, no microphones with unbalanced output must be connected. These microphones could be damaged. To prevent switching noise, only actuate the button PHANTOM when the mixer is switched off or when the controls PHONES / CONTROL ROOM and MAIN MIX are set to minimum. 4.2 Line audio sources Connect units with line output level (e. g. musical instruments) to the inputs LINE IN (4) of the stereo channels. The 6.3 mm jacks for the left (L) channel and the right (R) channel are balanced. However, it is also possible to connect units with unbalanced output via 2-pole 6.3 mm plugs. For connecting a mono unit, only use the jack L. Then the mono signal is internally switched to the right channel and the left channel. If the RCA input TAPE IN (18) is not used by a recorder ( chapter 4.4), an additional stereo line unit may be connected to this input (e. g. a CD player for background music in playing breaks). 4.3 Effect units 4.3.1 Inserting an effect unit Effect units (e. g. units for sound processing like compressors, equalizers) can directly be inserted into the mono channels: The channel signal is taken off after the gain control (3), it is completely routed via the effect unit and fed back into the channel at the same place of the signal way. Connect the effect unit to the 6.3 mm jack INSERT (2) of the corresponding channel. The plugs must be connected as follows: tip = Send (output) ring = Return (input) sleeve = ground For connection of effect units with separate input jacks and output jacks, Y cables are required, e. g. MCA-202 from MONACOR. 1) Connect the input of the effect unit via a 6.3 mm plug to the mono output FX SEND (13). 5.2 Mixing the audio sources 2) Connect the output of the effect unit via 6.3 mm plugs to the input LINE IN (4) of a free stereo channel: L = left channel, R = right channel. For an effect unit with mono output only use the jack L. 1) As a basic setting first a) in all mono channels: turn the controls GAIN (3), all equalizer controls (6) and the controls PAN (9) to mid-position. b) in all stereo channels: disengage the buttons for input level matching (5) and turn the controls BAL (9) to mid-position. c) turn back fully counter-clockwise all controls LEVEL (10), FX (8) and the control FX SEND (20). d) disengage the buttons TAPE TO CTRL ROOM (21), TAPE TO MIX (22) and FX TO CTRL R. (23). e) set the master control MAIN MIX (28) to “0”. 4.4 Recorder A recorder may be connected to the RCA jacks TAPE IN and OUT: 1) For recording, connect the input of the recorder to the stereo output TAPE OUT (17). The recording output receives the master signal adjusted with the control MAIN MIX (28). 2) For reproducing, connect the output of the recorder to the stereo input TAPE IN (18). 4.5 Monitor system and headphones The sound mixing may be monitored via stereo headphones and / or via a monitor system in a separate control room. Connect the headphones (minimum impedance 8 Ω) to the 6.3 mm jack PHONES (14). Connect the amplifier of the monitor system to the output CTRL ROOM OUT (16); the 6.3 mm jacks for the left (L) channel and the right (R) channel are unbalanced. Information about the possibilities of monitoring can be found in chapter 5.3. 4.6 Amplifier for PA application The output MAIN OUT (15) receives the master signal adjusted with the control MAIN MIX (28). The amplifier for PA application may be connected to this output (or another unit with line input such as a second mixer). The 6.3 mm jacks for the left (L) channel and the right (R) channel are unbalanced. 4.7 Power supply unit For power supply only use the supplied power supply unit. Connect the power supply unit to the power supply jack (12) on the rear side. Connect the mains plug of the power supply unit to a socket (230 V~/ 50 Hz). 5 Operation CAUTION Never adjust the audio system and the headphones to a very high volume. Permanent high volumes may damage your hearing! The human ear will get accustomed to high volumes which do not seem to be that high after some time. Therefore, do not further increase a high volume after getting used to it. 5.1 Switching on / off Connection of the Y cable MCA-202 4.3.2 Using the effect send way Via the effect send way, signal parts can be taken off from the input channels, routed via an effect unit (e. g. echo unit) and mixed to the master signal after processing them. The send way is “post-fader”, i. e. the signal pick-up is after the level control (10) of the channel. 8 1) To prevent switching noise and an excessive volume, set the output controls PHONES / CONTROL ROOM (24) and MAIN MIX (28) to minimum prior to operation. 2) Depending on the microphone type connected, either press or disengage the button PHANTOM (19) for the 48 V phantom power ( chapter 4.1). 3) To switch the mixer on and off, use the switch at the mains cable of the power supply unit. With the unit switched on, the POWER LED (25) lights up. The following operating steps merely serve as an aid, other procedures are also possible. 2) For level control of one of the mono channels, feed an audio signal to the channel and turn its LEVEL control (10) to mid-position “0”. Then adjust the input amplification with the control GAIN (3) of the channel so that the LED level indication (27) lights up at 0 dB. Then adjust the sound with the equalizer controls (6): HI for the high range, MID for the midrange, LO for the bass range. If required, press the button LOW CUT (7) to suppress low-frequent noise (e. g. subsonic noise, humming). The overload indication PEAK (11) should only shortly light up at signal peaks, if at all. If it lights up permanently, turn back the control GAIN and / or the equalizer controls accordingly. Then fully turn back the LEVEL control and control the level of the other mono channels in the same way. 3) If the corresponding LEVEL control for a stereo channel must be turned up to a high extent to reach the desired level, press the selector button +4/-10 (5) in the channel for level boosting (12 dB). 4) When all adjustments for level matching and all sound adjustments have been made, mix the signals of all audio sources used in the desired volume ratio with the LEVEL controls. Always turn the LEVEL controls of the channels not used fully counter-clockwise. 5) For the mono channels, place the mono signals in the stereo sound with the panorama controls PAN (9), and for the stereo channels, adjust the balance of the stereo signals with the controls BAL (9). 6) If the effect send way is used, see chapter 5.2.1 to adjust the effect way. 7) To feed the signal of the jacks TAPE IN (18), e. g. tape or CD reproduction, to the signal master, press the button TAPE TO MIX (22). For feeding only the TAPE IN signal to the master, the level controls of all other audio sources must be fully turned back. Note: When a recording made via the output TAPE OUT (17) is reproduced via the input TAPE IN at the same time, the button TAPE TO MIX must not be pressed, otherwise there will be a feedback. 8) Adjust the definite volume of the master signal with the control MAIN MIX (28) by means of the LED level indication (27). In general, an optimum level control is reached at 0 dB. However, if the output level of the mixer is too high or too low for the following unit, the master signal must be adjusted to a correspondingly higher or lower level. In case of overload the red LEDs CLIP light up. 5.2.1 Adjusting the effect send way The effect unit must be connected as described in chapter 4.3.2. 1) First turn the control FX SEND (20) and the control LEVEL (10) of the input used approx. to mid-position so that the following effect adjustments can be heard. 2) Mix the signals of the input channels to the effect way with the controls FX (8). With these controls it is possible to adjust the desired effect intensity separately for each channel. Note: Fully turn back the FX control of the channel the effect unit is connected to, otherwise there will be a feedback. 6 Specifications Input sensitivity Mic: . . . . . . . . . . . . . . . Line In: . . . . . . . . . . . . Tape In: . . . . . . . . . . . . Insert (Return): . . . . . . GB Configuration of XLR plug and 6.3 mm plug 0.5 mV 60 mV 400 mV 140 mV Output level Main Out / Tape Out: . . 800 mV (at indication 0 dB) Ctrl Room Out: . . . . . . max. 3 V FX Send: . . . . . . . . . . . max. 10 V THD: . . . . . . . . . . . . . . . . < 0.04 % 4) Mix the signal coming from the effect unit to the master signal with the LEVEL control of the input used. With this control the effect intensity for all channels can be increased or reduced together. Crosstalk model MMX-1024: . . . . -63 dB model MMX-1244: . . . . -67 dB – If both buttons are not pressed, the master signal adjusted with the control MAIN MIX (28) is monitored and indicated. – If only the button TAPE TO CTRL ROOM is pressed, the input signal at the jacks TAPE IN (18) is monitored and indicated (e. g. backtrack recording). – If the button FX TO CTRL R. is pressed, the signal of the effect send way, ahead of the effect output control FX SEND (20), is monitored and indicated. The position of button TAPE TO CTRL ROOM is not important in this case. Adjust the monitoring volume with the control PHONES / CONTROL ROOM (24). 3-pole 6.3 mm plug for balanced connection T = signal + R = signal S = ground Frequency range: . . . . . . 20 – 20 000 Hz S / N ratio (A weighted) model MMX-1024: . . . . 94 dB model MMX-1244: . . . . 91 dB The buttons TAPE TO CTRL ROOM (21) and FX TO CTRL R. (23) determine the signal to be monitored via the outputs PHONES (14) and CTRL ROOM OUT (16) and indicated via the LED level indication (27): 1 = ground 2 = signal + 3 = signal - Headphone impedance: .≥ 8 Ω 3) Adjust the level for the output signal of the effect way with the control FX SEND (20) so that the effect unit will not be overloaded. 5.3 Monitoring via headphones and monitor system XLR plug for balanced connection Equalizer of the mono channels bass range: . . . . . . . . . ±15 dB / 80 Hz midrange: . . . . . . . . . . ±15 dB / 2.5 kHz high range: . . . . . . . . . ±15 dB / 12 kHz Low Cut filter, switchable: 100 Hz Phantom power: . . . . . . . +48 V Power supply: . . . . . . . . . via supplied power supply unit connected to 230 V~ / 50 Hz 2-pole 6.3 mm plug for unbalanced connection T = signal S = ground 3-pole 6.3 mm plug for the jack INSERT T = Send (output) R = Return (input) S = ground 6.3 mm stereo plug for the headphone connection T = left channel R = right channel S = ground Ambient temperature: . . . 0 – 40 °C Audio connections Mic, mono: . . . . . . . . . . XLR / 6.3 mm jack (bal.) Insert: . . . . . . . . . . . . . 6.3 mm jack (unbal.) Line In, stereo: . . . . . . 6.3 mm jack Left / Right (bal.) Tape In / Out, stereo: . . RCA Left / Right (unbal.) Main Out, stereo: . . . . . 6.3 mm jack Left / Right (unbal.) FX Send, mono: . . . . . 6.3 mm jack (unbal.) Phones, stereo: . . . . . . 6.3 mm jack (unbal.) Ctrl Room Out, stereo: 6.3 mm jack Left / Right (unbal.) Dimensions (W × H × D) model MMX-1024: . . . . 190 × 50 × 225 mm model MMX-1244: . . . . 245 × 50 × 225 mm Weight model MMX-1024: . . . . 1.6 kg model MMX-1244: . . . . 1.9 kg Subject to technical modifications. All rights reserved by MONACOR ® INTERNATIONAL GmbH & Co. KG. No part of this instruction manual may be reproduced in any form or by any means for any commercial use. 9 F B Ouvrez le présent livret page 3, dépliable, de manière à visualiser les éléments et branchements. 17 Sortie TAPE OUT (prises RCA femelles gauche L / droit R) pour brancher un enregistreur pour enregistrer 1 Eléments et branchements 18 Entrée TAPE IN (prises RCA femelles gauche L / droit R) pour brancher un enregistreur pour la lecture ou un autre appareil de lecture tel un lecteur CD CH Schéma 1 : modèle MMX-1024 Schéma 2 : modèle MMX-1244 En aucun cas, vous ne devez pas poser dʼobjet contenant du liquide ou un verre sur lʼappareil. La chaleur dégagée par la table de mixage doit être évacuée par une circulation dʼair correcte. En aucun cas les ouïes de ventilation du boîtier ne doivent être obturées. Remarque : Si en plus la touche FX TO CTRL R. (23) est enfoncée, la voie dʼeffet est écoutée et affichée, à la place du signal TAPE IN, position 23. Ne faites pas fonctionner la table de mixage et débranchez immédiatement le bloc secteur du secteur dans les cas suivants : 1. la table de mixage, le bloc secteur ou le cordon secteur présente des dommages visibles. 2. après une chute ou accident similaire, vous avez un doute sur lʼétat de lʼappareil. 3. des dysfonctionnements apparaissent. Dans tous les cas, les dommages doivent être réparés par un technicien spécialisé. 22 Touche TAPE TO MIX : lorsque la touche est enfoncée, le signal de lʼentrée TAPE IN (18) est commuté sur le signal master Un cordon secteur endommagé du bloc secteur ne doit être remplacé que par un technicien habilité. Ne débranchez jamais lʼappareil en tirant sur le cordon secteur ; retirez toujours le cordon secteur en tirant la fiche. Pour le nettoyage, utilisez un tissu sec et doux, en aucun cas de produits chimiques ou dʼeau. Nous déclinons toute responsabilité en cas de dommages corporels ou matériels résultants si les appareils sont utilisés dans un but autre que celui pour lequel ils ont été conçus, si les appareils ne sont pas correctement branchés, utilisés ou réparés par une personne habilitée ; en outre, la garantie deviendrait caduque. Canal 1 mono, tous les autres canaux mono sont identiques Canal stéréo 3 / 4 (MMX-1024) ou canal stéréo 5 / 6 (MMX-1244), tous les autres canaux stéréo sont identiques Veuillez respecter les conseils de sécurité relatifs à lʼalimentation fantôme décrits dans le chapitre 4.1. 1 Entrée MIC (prise combinée XLR / jack 6,35 femelle, sym.) pour brancher un microphone Remarque : Pour toutes les entrées micro, on peut commuter une alimentation fantôme avec lʼinterrupteur PHANTOM, position 19. 2 Prise INSERT (prise jack 6,35 femelle) pour insérer un appareil à effets (par exemple appareil de traitement de signal tel un compresseur) dans le canal Contacts fiche : Pointe = Send (sortie) Anneau = Return (entrée) Corps = masse 3 Réglage GAIN pour lʼamplification dʼentrée 4 Entrée LINE IN (prises jack 6,35 femelles gauche L / droit R, sym.) pour brancher un appareil avec niveau de signal ligne (par exemple clavier) Remarque : Pour brancher un appareil mono, utilisez uniquement la prise L. 5 Touche de commutation pour adapter le niveau pour des appareils avec un niveau de sortie ligne trop faible : lorsque la touche est enfoncée, le niveau dʼentrée est augmenté 6 Egaliseur pour les aigus (HI), médiums (MID) et graves (LO) 7 Touche dʼactivation LOW CUT pour le filtre Low Cut (passe-haut) pour éliminer les parties de signal non souhaitées sous 100 Hz, par exemple bruits de pas 8 Réglage FX pour mixer le signal du canal sur la voie sortie dʼeffet : le signal est pris après le réglage de niveau du canal (10) 9 Canal mono : réglage PAN de panoramique pour placer le signal mono dans le son stéréo canal stéréo : réglage de balance BAL pour le signal stéréo 10 Réglage de niveau LEVEL pour mixer le signal du canal sur le signal master 11 LED PEAK témoin de surcharge : si elle brille en continu, diminuez le niveau du canal via le réglage Gain (3) et / ou lʼégaliseur (6) 20 Réglage de niveau FX SEND pour le signal de la voie sortie dʼeffet à la sortie FX SEND (13) 21 Touche TAPE TO CTRL ROOM : lorsque la touche est enfoncée, le signal de lʼentrée TAPE IN (18) est commuté sur les sorties dʼécoute PHONES (14) et CTRL ROOM OUT (16) et indiqué via le VU-mètre à LEDs (27) 23 Touche FX TO CTRL R. : lorsque la touche est enfoncée, le signal de la voie dʼeffet est commuté avant le réglage de sortie FX SEND (20), sur les sorties dʼécoute PHONES (14) et CTRL ROOM OUT (16), et affiché via le VU-mètre (27) 24 Réglage de volume PHONES / CONTROL ROOM pour les sorties dʼécoute PHONES (14) et CTRL ROOM OUT (16) 25 Témoin de fonctionnement POWER 26 LED de contrôle +48V : brille lorsque lʼalimentation fantôme pour les entrées MIC (1) est activée 27 VU-mètre à LEDs : indique a) le signal master, lorsque les touches TAPE TO CTRL ROOM (21) et FX TO CTRL R. (23) ne sont pas enfoncées b) le signal à lʼentrée TAPE IN (18), lorsque la touche TAPE TO CTRL ROOM est enfoncée et la touche FX TO CTRL R. nʼest pas enfoncée c) le signal de la voie dʼeffet avant le réglage de sortie FX SEND (20) lorsque la touche FX TO CTRL R. est enfoncée 28 Réglage de niveau MAIN MIX pour le signal master appliqué aux sorties PHONES (14), CTRL ROOM OUT (16), MAIN OUT (15) et TAPE OUT (17) 12 Prise dʼalimentation sur la face arrière pour brancher le bloc secteur livré 2 Conseils de sécurité et dʼutilisation 13 Sortie FX SEND (prise jack 6,35 femelle, asym.) pour la voie sortie dʼeffet ; on peut relier ici lʼentrée dʼun appareil à effets Les appareils (table de mixage et bloc secteur) répondent à toutes les directives nécessaires de lʼUnion européenne et portent donc le symbole . 14 Sortie PHONES (prise jack 6,35 femelle) pour brancher un casque stéréo (impédance minimale 8 Ω) 15 Sortie MAIN OUT pour le signal master (prises jack 6,35 femelles gauche L / droit R, asym.) par exemple pour brancher lʼamplificateur pour la sonorisation ou une autre table de mixage 16 Sortie CTRL ROOM OUT (prises jack 6,35 femelles gauche L / droit R, asym.) pour brancher lʼamplificateur dʼune installation moniteur dans une pièce distincte de régie 10 19 Touche PHANTOM : si la touche est enfoncée, une alimentation fantôme 48 V est activée pour toutes les entrées MIC (1) Section Master et alimentation boussures, de tout type de projections dʼeau, dʼune humidité élevée de lʼair et de la chaleur (température ambiante admissible 0 – 40 °C). AVERTISSEMENT Le bloc secteur est alimenté par une tension dangereuse. Ne touchez jamais lʼintérieur de lʼappareil car, en cas de mauvaise manipulation, vous pouvez subir une décharge électrique. Lorsque les appareils sont définitivement retirés du service, vous devez les déposer dans une usine de recyclage de proximité pour contribuer à leur élimination non polluante. 3 Possibilités dʼutilisation Cette table de mixage conçue comme appareil à poser sur une table est adaptée pour les mixages de son pour des applications de sonorisation ou dʼenregistrement. Le modèle MMX-1024 dispose de 6 canaux dʼentrée (2 mono et 4 stéréo) et le modèle MMX-1244 de 8 canaux dʼentrée (4 mono, 4 stéréo) pour brancher des microphones (à alimentation fantôme) et des sources audio avec niveau de sortie ligne, par exemple instruments de musique, lecteur CD. Via les prises Insert dans les canaux mono, on peut insérer des appareils de traitement du son. Une voie sortie (prise signal “post fader”) permet de brancher un appareil à effets. En plus, une entrée lecture et une sortie enregistrement pour un enregistreur sont prévues ainsi que des sorties dʼécoute pour brancher un casque et une installation moniteur dans une pièce de régie distincte. 4 Branchements Avant dʼeffectuer les branchements des appareils ou de modifier les branchements existants, éteignez la table de mixage ou réglez sur le minimum les réglages de sortie PHONES / CONTROL ROOM (24) et MAIN MIX (28). 4.1 Microphones Respectez scrupuleusement les points suivants : Les appareils ne sont conçus que pour une utilisation en intérieur. Protégez-les des écla- Branchez des microphones via prises XLR ou jack 6,35 mâles aux prises MIC (1) symétriques des canaux mono. Le branchement XLR pos- sède un verrouillage. Pour retirer la fiche XLR, appuyez sur le levier PUSH sur la prise. Si besoin, on peut allumer de manière centrale une alimentation fantôme 48 V pour des microphones à condensateur : lorsque la touche PHANTOM (19) est enfoncée, une alimentation fantôme est appliquée à toutes les entrées micro (aussi bien sur les prises XLR que jack des prises MIC). Lorsque lʼalimentation fantôme est allumée, la LED +48V (26) brille pendant le fonctionnement. ATTENTION Des microphones avec sortie asymétrique ne doivent pas être branchés si lʼalimentation fantôme est activée, ils pourraient être endommagés. Pour éviter tout bruit fort de commutation, nʼactivez la touche PHANTOM que lorsque la table de mixage est éteinte ou que lorsque les réglages PHONES / CONTROL ROOM et MAIN MIX sont réglés sur le minimum. appareil dʼécho) et après leur traitement, les mixer sur le signal master. La voie sortie est configurée “post-fader“, cʼest-à-dire que le signal est pris après le réglage de niveau du canal (10). 1) Reliez lʼentrée de lʼappareil à effets via une fiche jack 6,35 mâle à la sortie mono FX SEND (13). 2) Reliez la sortie de lʼappareil à effets via une fiche jack 6,35 mâle à lʼentrée LINE IN (4) dʼun canal stéréo libre : L= canal gauche, R = canal droit. Pour un appareil à effets avec sortie mono, utilisez uniquement la prise L. 4.4 Enregistreur On peut relier un enregistreur aux prises RCA TAPE IN et TAPE OUT : 1) Pour lʼenregistrement, reliez lʼentrée de lʼenregistreur à la sortie stéréo TAPE OUT (17). La sortie dʼenregistrement reçoit le signal Master réglé avec le réglage MAIN MIX (28). 2) Pour la restitution, reliez la sortie de lʼenregistreur à lʼentrée stéréo TAPE IN (18). 4.2 Sources audio ligne Reliez des appareils avec niveau de sortie ligne (par exemple instruments de musique) aux entrées LINE IN (4) des canaux stéréo. Les prises jack 6,35 femelles pour le canal gauche (L) et le canal droit (R) sont branchées en symétrique. On peut également relier des appareils avec sortie branchée en asymétrique via des fiches jack 2 pôles. Si un appareil mono doit être relié, utilisez uniquement la prise L. Le signal mono est alors commuté en interne sur le canal gauche et droit. Si lʼentrée RCA TAPE IN (18) nʼest pas utilisée par un enregistreur ( chapitre 4.4), on peut relier un appareil ligne stéréo supplémentaire (par exemple lecteur CD pour musique de fond lors de pauses de lecture). 4.3 Appareils à effets 4.3.1 Insertion dʼun appareil à effets On peut insérer directement dans les canaux mono des appareils à effets (par exemple appareils pour le traitement du son tels que compresseur, égaliseur) : le signal du canal est découplé derrière le réglage de gain (3), il passe complètement à travers lʼappareil à effet et est redirigé au même endroit de la voie de signal dans le canal. Reliez lʼappareil à effets à la prise jack 6,35 INSERT (2) du canal correspondant. Les fiches doivent être branchées comme suit : Pointe = Send (sortie) Anneau = Return (entrée) Corps = masse Pour brancher des appareils à effets avec prises dʼentrée et sortie séparées, des cordons Y sont nécessaires, par exemple MCA-202 de MONACOR : 4.5 Installation moniteur et casque Le mixage audio peut être écouté via un casque stéréo et / ou via une installation moniteur dans une pièce de régie distincte (“control room”). Reliez le casque (impédance minimale 8 Ω) à la prise jack 6,35 femelle PHONES (14). Reliez lʼamplificateur de lʼinstallation moniteur à la sortie CTRL ROOM OUT (16) ; les prises jack 6,35 femelles pour le canal gauche (L) et le canal droit (R) sont branchées en asymétrique. Vous trouverez dans le chapitre 5.3 des informations sur les possibilités de sélection dʼécoute. 4.6 Amplificateur pour la sonorisation La sortie MAIN OUT (15) reçoit le signal master réglé avec le réglage MAIN MIX (28). On peut relier ici lʼamplificateur pour la sonorisation (ou un autre appareil avec entrée ligne, par exemple une seconde table de mixage). Les prises jack 6,35 femelles pour le canal gauche (L) et le canal droit (R) sont branchées en asymétrique. 4.7 Bloc secteur Pour lʼalimentation, utilisez exclusivement le bloc secteur livré. Reliez le bloc secteur à la prise dʼalimentation (26) sur la face arrière. Reliez la fiche du bloc secteur à une prise 230 V~ / 50 Hz. 5 Utilisation ATTENTION Ne réglez jamais le volume de lʼinstallation audio et du casque trop fort. Un volume trop élevé peut, à long terme, générer des troubles de lʼaudition. Lʼoreille sʼhabitue à des volumes élevés et ne les perçoit plus comme tels au bout dʼun certain temps. Nous vous conseillons donc de régler le volume et de ne plus le modifier. 5.1 Marche / Arrêt Branchement du cordon Y MCA-202 4.3.2 Utilisation de la voie sortie dʼeffet Via la voie sortie dʼeffet, on peut découpler des parties de signal venant des canaux dʼentrée, les diriger via un appareil à effets (par exemple 1) Pour éviter tout bruit fort à lʼallumage et un volume trop élevé, avant dʼallumer la table de mixage, réglez les réglages de sortie PHONES / CONTROL ROOM (24) et MAIN MIX (28) sur le minimum. 2) Selon le type de microphone utilisé, appuyez sur la touche PHANTOM (19) pour lʼalimen- tation fantôme 48 V ou désenclenchez-la ( chapitre 4.1). 3) Pour allumer et éteindre la table de mixage, activez lʼinterrupteur sur le cordon secteur du bloc secteur. Lorsque lʼappareil est allumé, la LED POWER témoin de fonctionnement (25) brille. F B CH 5.2 Mixage des sources audio Les étapes décrites ci-après ne sont que des propositions dʼutilisation, il est possible de procéder différemment. 1) Tout dʼabord, effectuez les réglages de base : a) Dans tous les canaux mono, tournez les réglages GAIN (3), les réglages de lʼégaliseur (6) et les réglages PAN (9) sur la position médiane. b) Dans tous les canaux stéréo, désenclenchez les touches dʼadaptation du niveau dʼentrée (5) et tournez les réglages BAL (9) sur la position médiane. c) Tournez tous les réglages LEVEL (10), FX (8) et le réglage FX SEND (20) entièrement vers la gauche. d) Désenclenchez les touches TAPE TO CTRL ROOM (21), TAPE TO MIX (22) et FX TO CTRL R. (23). e) Poussez le réglage master MAIN MIX (28) sur “0”. 2) Pour gérer un des canaux mono, appliquez un signal audio sur le canal et tournez son réglage de niveau LEVEL (10) sur la position médiane “0”. Ensuite avec le réglage GAIN (3) du canal, réglez lʼamplification dʼentrée de telle sorte que le VU-mètre à LEDs (27) brille à 0 dB. Ensuite, réglez la tonalité avec les réglages de lʼégaliseur (6) : HI pour les aigus, MID pour les médiums et LO pour les graves. Si besoin, appuyez sur la touche LOW CUT (7) pour éliminer les bruits perturbateurs à basse fréquence (par exemple bruits de pas, ronflements). La LED témoin de surcharge PEAK (11) du canal ne devrait briller que brièvement pour des crêtes de signal. Si elle brille en permanence, tournez en arrière le réglage GAIN et / ou les réglages de lʼégaliseur en conséquence pour diminuer. Tournez ensuite le réglage LEVEL entièrement à gauche et réglez de la même manière les canaux mono restants. 3) Si pour un canal stéréo, le réglage de niveau LEVEL correspondant doit être tourné très loin pour atteindre le niveau souhaité, appuyez sur la touche de commutation +4/-10 (5) dans le canal pour augmenter le niveau (12 dB). 4) Une fois tous les réglages dʼadaptation de niveau et de tonalité effectués, mixez les signaux de toutes les sources audio utilisées avec les réglages LEVEL selon le rapport de volume souhaité. Tournez toujours entièrement à gauche les réglages LEVEL des canaux inutilisés. 5) Pour les canaux mono, placez avec les réglages de panoramique PAN (9) les signaux mono dans le son stéréo et pour les canaux stéréo, réglez la balance des signaux stéréo avec les réglages BAL (9). 6) Si la voie sortie dʼeffet est utilisée, reportezvous au chapitre 5.2.1 pour régler la voie dʼeffet. 7) Pour commuter le signal des prises TAPE IN (18), par exemple lecture de bande ou lecture de CD, enfoncez la touche TAPE TO MIX (22). Si seul le signal TAPE IN doit être appliqué au signal master, tournez les réglages de 11 F B CH niveau des autres sources audio entièrement vers la gauche. Remarque : Si un enregistrement en cours via la sortie TAPE OUT (17) est simultanément restitué via lʼentrée TAPE IN, il ne faut pas enfoncer la touche TAPE TO MIX, sinon il y a des effets de larsen. 8) Avec le réglage MAIN MIX (28), réglez le volume définitif du signal master en fonction des indications du VU-mètre à LEDs (27). En règle générale, le réglage est optimal à lʼaffichage de 0 dB. Si le niveau de sortie de la table de mixage est trop élevé ou trop faible pour lʼappareil suivant, diminuez ou augmentez, en conséquence, le signal master. Les LEDs rouges CLIP brillent en cas de surcharge. 5.2.1 Réglage de la voie sortie dʼeffet Lʼappareil à effets doit être relié comme décrit dans le chapitre 4.3.2. 1) Tournez le réglage de niveau FX SEND (20) et le réglage LEVEL (10) de lʼentrée utilisée tout dʼabord sur la position médiane environ pour que les réglages dʼeffets suivants soient audibles. 2) Avec les réglages FX (8), mixez les signaux des canaux dʼentrée sur la voie dʼeffet. Avec ces réglages, on peut régler séparément pour chaque canal lʼintensité dʼeffet souhaitée. Remarque : Tournez entièrement vers la gauche le réglage FX du canal auquel lʼappareil à effets est relié sinon, il y a risque de larsen. 3) Avec le réglage FX SEND (20), réglez le niveau pour le signal de sortie de la voie dʼeffet de telle sorte que lʼappareil à effets ne soit pas en surcharge. 4) Mixez le signal venant de lʼappareil à effets sur le signal master avec le réglage LEVEL (10) de lʼentrée utilisée. Avec ce réglage, il est possible dʼaugmenter ou de diminuer lʼintensité de lʼeffet, ensemble pour tous les canaux. 5.3 Ecoute via un casque et une installation moniteur Avec les touches TAPE TO CTRL ROOM (21) et FX TO CTRL R. (23), sélectionnez quel signal doit être écouté via les sorties PHONES (14) et CTRL ROOM OUT (16) et affiché via le VUmètre à LEDs (27) : – Si les deux touches ne sont pas enfoncées, le signal master réglé avec le réglage MAIN MIX (28) est écouté et affiché. 6 Caractéristiques techniques Sensibilité dʼentrée Mic : . . . . . . . . . . . . . . . Line In : . . . . . . . . . . . . Tape In : . . . . . . . . . . . Insert (Return) : . . . . . . Configurations fiches XLR et jack 6,35 0,5 mV 60 mV 400 mV 140 mV Niveau de sortie Main Out / Tape Out : . . 800 mV (pour affichage 0 dB) Ctrl Room Out : . . . . . . 3 V max. FX Send : . . . . . . . . . . 10 V max. Impédance casque : . . . . ≥ 8 Ω Bande passante : . . . . . . 20 – 20 000 Hz Taux de distorsion : . . . . < 0,04 % Rapport signal / bruit (la pondéré) Modèle MMX-1024 : . . 94 dB Modèle MMX-1244 : . . 91 dB Atténuation Modèle MMX-1024 : . . -63 dB Modèle MMX-1244 : . . -67 dB Egaliseur canaux mono Graves : . . . . . . . . . . . . ±15 dB / 80 Hz Médiums : . . . . . . . . . . ±15 dB / 2,5 kHz Aigus : . . . . . . . . . . . . . ±15 dB / 12 kHz Filtre Low Cut, commutable : . . . . . . . . . 100 Hz Alimentation fantôme : . . +48 V Alimentation : . . . . . . . . . par bloc secteur livré relié à 230 V~ / 50 Hz Fiche XLR mâle pour branchement symétrique 1 = masse 2 = signal + 3 = signal - Fiche jack 6,35 mâle 3 pôles pour branchement symétrique T = signal + R = signal S = masse Fiche jack 6,35 mâle 2 pôles pour branchement asymétrique T = signal S = masse Fiche jack 6,35 mâle 3 pôles pour la prise femelle INSERT T = Send (sortie) R = Return (entrée) S = masse Fiche jack 6,35 mâle stéréo pour le branchement casque T = canal gauche R = canal droit S = masse Température fonc. : . . . . 0 – 40 °C Branchements audio Mic, mono : . . . . . . . . . XLR / jack 6,35 (sym.) Insert : . . . . . . . . . . . . . jack 6,35 (asym.) Line In, stéréo : . . . . . . jack 6,35 gauche / droit (sym.) Tape In / Out, stéréo : . RCA gauche / droite (asym.) Main Out, stéréo : . . . . jack 6,35 gauche / droit (asym.) FX Send, mono : . . . . . jack 6,35 (asym.) Phones, stéréo : . . . . . jack 6,35 (asym.) Ctrl Room Out, stéréo : jack 6,35 gauche / droit (asym.) Dimensions (L × H × P) Modèle MMX-1024 : . . 190 × 50 × 225 mm Modèle MMX-1244 : . . 245 × 50 × 225 mm Poids Modèle MMX-1024 : . . 1,6 kg Modèle MMX-1244 : . . 1,9 kg Tout droit de modification réservé. – Si seule la touche TAPE TO CTRL ROOM est enfoncée, le signal dʼentrée des prises TAPE IN (18) est écouté et affiché (par exemple pour contrôle par lecture après écriture lors dʼun enregistrement). – Si la touche FX TO CTRL R. est enfoncée, le signal de la voie sortie dʼeffet avant le réglage de sortie dʼeffet FX SEND (20) est écouté et affiché. La position de la touche TAPE TO CTRL ROOM nʼa, dans ce cas, pas dʼinfluence. Réglez le volume dʼécoute avec le réglage PHONES / CONTROL ROOM (24). Notice dʼutilisation protégée par le copyright de MONACOR ® INTERNATIONAL GmbH & Co. KG. Toute reproduction même partielle à des fins commerciales est interdite. 12 A pagina 3, se aperta completamente, vedrete tutti gli elementi di comando e i collegamenti descritti. 1 Elementi di comando e collegamenti Figura 1: Modello MMX-1024 Figura 2: Modello MMX-1244 Canale mono 1, gli altri canali mono sono identici Canale stereo 3 / 4 (con MMX-1024) opp. canale stereo 5 / 6 (con MMX-1244), gli altri canali stereo sono identici Sezione delle somme e alimentazione 1 Ingresso MIC (presa combi XLR / jack 6,3 mm, bil.) per il collegamento di un microfono Nota: Per tutti gli ingressi per microfono, con lʼinterruttore PHANTOM si può aggiungere unʼalimentazione phantom posizione 19. 2 Presa INSERT (presa jack 6,3 mm) per inserire nel canale un apparecchio per effetti (p. es. un compressore per lʼelaborazione del suono) Contatti del connettore: punta = send (uscita) anello = return (ingresso) corpo = massa 3 Regolatore GAIN per lʼamplificazione allʼingresso 4 Ingresso LINE IN (prese jack 6,3 mm sinistra L / destra R, bil.) per il collegamento di un apparecchio con livello Line del segnale (p. es. keyboard) Nota: Collegando un apparecchio mono, usare solo la presa L. 5 Tasto di commutazione per lʼadattamento del livello per apparecchi con livello Line dʼuscita troppo basso: con il tasto premuto, si aumenta il livello dʼingresso 6 Regolazione toni per gli alti (HI), medi (MID) e bassi (LO) destra R, sbil.), p. es. per il collegamento di un amplificatore per la sonorizzazione, o di un secondo mixer 17 Uscita TAPE OUT (prese RCA sinistra L / destra R) per il collegamento di un registratore per la registrazione 18 Ingresso TAPE IN (prese RCA sinistra L / destra R) per il collegamento di un registratore per la riproduzione o di un altro apparecchio di riproduzione come p. es. di un lettore CD 20 Regolatore del livello FX SEND per il segnale del percorso dʼuscita degli effetti allʼuscita FX SEND (13) 21 Tasto TAPE TO CTRL ROOM: con il tasto premuto, il segnale dellʼingresso TAPE IN (18) è portato sulle uscite dʼascolto PHONES (14) e CTRL ROOM OUT (16) ed è visualizzato tramite lʼindicazione del livello (27) Nota: Se è premuto anche il tasto FX TO CTRL R. (23), al posto del segnale TAPE-IN viene ascoltato e visualizzato il percorso degli effetti posizione 23. 22 Tasto TAPE TO MIX: con il tasto premuto, il segnale dellʼingresso TAPE IN (18) è portato sul segnale delle somme 23 Tasto FX TO CTRL R.: con il tasto premuto, il segnale del percorso degli effetti, a monte del regolatore dʼuscita FX SEND (20), viene portato sulle uscite dʼascolto PHONES (14) e CTRL ROOM OUT (16) ed è visualizzato tramite lʼindicazione del livello (27) 24 Regolatore di volume PHONES / CONTROL ROOM per le uscite dʼascolto PHONES (14) e CTRL ROOM OUT (16) 27 Indicazione del livello tramite LED; indica a) il segnale delle somme, se non sono premuti i tasti TAPE TO CTRL ROOM (21) e FX TO CTRL R. (23) b) il segnale allʼingresso TAPE IN (18), se è premuto il tasto TAPE TO CTRL ROOM mentre non è premuto il tasto FX TO CTRL R. c) il segnale del percorso degli effetti a monte del regolatore dellʼuscita FX SEND (20) se è premuto il tasto FX TO CTRL R. 11 Spia di sovrapilotaggio PEAK; Se rimane accesa, ridurre il livello del canale per mezzo del regolatore Gain (3) e / o della regolazione toni (6) 12 Presa dʼalimentazione sul retro per il collegamento dellʻalimentatore in dotazione 13 Uscita FX SEND (presa jack 6,3 mm, sbil.) per il percorso dʼuscita degli effetti: è possibile collegare qui lʼingresso di unʼunità per effetti 14 Uscita PHONES (presa jack 6,3 mm) per il collegamento di una cuffia stereo (impedenza minima 8 Ω) 15 Uscita principale MAIN OUT per il segnale delle somme (prese jack 6,3 mm sinistra L / Non depositare sugli apparecchi dei contenitori riempiti di liquidi, p. es. bicchieri. Devʼessere garantita la libera circolazione dellʼaria per dissipare il calore che viene prodotto allʼinterno del mixer. Non coprire in nessun modo le fessure dʼaerazione. Non mettere in funzione il mixer e staccare subito la spina dellʼalimentatore dalla presa di rete se: 1. il mixer, lʼalimentatore o il cavo rete presentano dei danni visibili; 2. dopo una caduta o dopo eventi simili sussiste il sospetto di un difetto; 3. lʼapparecchio non funziona correttamente. Per la riparazione rivolgersi sempre ad unʼofficina competente. Il cavo rete, se danneggiato, deve essere sostituito solo da un laboratorio specializzato Staccare il cavo rete afferrando la spina, senza tirare il cavo. Per la pulizia usare solo un panno morbido, asciutto; non impiegare in nessun caso prodotti chimici o acqua. Nel caso dʼuso improprio, di collegamenti sbagliati, dʼimpiego scorretto o di riparazione non a regola dʼarte degli apparecchi, non si assume nessuna responsabilità per eventuali danni consequenziali a persone o a cose e non si assume nessuna garanzia per gli apparecchi. Si prega di osservare le note sullʼalimentazione phantom nel capitolo 4.1. 8 Regolatore FX per miscelare il segnale di un canale sul percorso dʼuscita dellʼeffetto; il segnale viene prelevato a valle del regolatore del livello del canale (10) 10 Regolatore del livello LEVEL per miscelare il segnale di un canale sul segnale delle somme Gli apparecchi sono previsti solo per lʼuso allʼinterno di locali. Proteggerli dallʼacqua gocciolante e dagli spruzzi dʼacqua, da alta umidità dellʼaria e dal calore (temperatura dʼimpiego ammessa fra 0 e 40 °C). 19 Tasto PHANTOM: con il tasto premuto, per tutti gli ingressi MIC (1) si attiva unʼalimentazione pianto di 48 V 25 Spia dello stato della batteria POWER Canale stereo: regolatore del bilanciamento BAL per il segnale stereo 16 Uscita CTRL ROOM OUT (prese jack 6,3 mm sinistra L / destra R, sbil.) per il collegamento dellʼamplificatore di un impianto di monitoraggio in una stanza separata 7 Tasto dʼattivazione LOW CUT per il filtro Low-cut (passa-alto) per sopprimere le parti non desiderate del segnale sotto i 100 Hz, p. es. da calpestio 9 Canale mono: regolatore panoramico PAN per collocare il segnale mono nel suono stereo Si devono osservare assolutamente anche i seguenti punti: 26 Spia +48V: è accesa quando lʼalimentazione phantom è attivata per gli ingressi MIC (1) 28 Regolatore del livello MAIN MIX per il segnale delle somme portato sulle uscite PHONES (14), CTRL ROOM OUT (16), MAIN OUT (15) e TAPE OUT (17) 2 Avvertenze di sicurezza Gli apparecchi (mixer e alimentatore) sono conformi a tutte le direttive rilevanti dellʼUE e pertanto portano la sigla . AVVERTIMENTO Lʼalimentatore funziona con pericolosa tensione di rete. Non intervenire mai personalmente al suo interno. Esiste il pericolo di una scossa elettrica. I Se si desidera eliminare gli apparecchi definitivamente, consegnarli per lo smaltimento ad unʼistituzione locale per il riciclaggio. 3 Possibilità dʼimpiego Questo mixer, previsto come apparecchio da sistemare su un tavolo, è adatto per le miscelazioni audio per sonorizzazioni e registrazioni. Il modello MMX-1024 dispone di sei canali dʼingresso (2 mono, 4 stereo) e il modello MMX-1244 di otto canali dʼingresso (4 mono, 4 stereo) per il collegamento di microfoni (con alimentazione phantom) e di sorgenti audio con livello Line, come p. es. strumenti musicali, lettori CD. Tramite le prese Insert nei canali mono, si possono inserire degli apparecchi per elaborare il suono. Un percorso dʼuscita (prelievo del segnale “post-fader”) permette il collegamento di unʼunità per effetti. In più sono presenti un ingresso per la riproduzione e unʼuscita per la registrazione tramite un registratore, nonché delle uscite dʼascolto per il collegamento di una cuffia e di un impianto di monitoraggio in una stanza separata. 4 Collegamento Prima di collegare degli apparecchi o di modificare dei collegamenti esistenti, spegnere il mixer oppure mettere i regolatori dʼuscita PHONES / CONTROL ROOM (24) e MAIN MIX (28) sul minimo. 4.1 Microfoni Per mezzo delle prese XLR o jack 6,3 mm, collegare i microfoni con le prese bilanciate MIC (1) dei canali mono. Il contatto XLR è equipaggiato 13 I con un blocco. Per sfilare il connettore XLR esercitare una pressione sulla levetta PUSH della presa. Se necessario, per i microfoni a condensatore si può attivare unʼalimentazione phantom centrale di 48 V: con il tasto PHANTOM (19) premuto, su tutti gli ingressi per microfoni (prese MIC XLR e jack) viene portata unʼalimentazione phantom. Con lʼalimentazione phantom attivata, durante il funzionamento è acceso il LED +48V (26). ATTENZIONE Con lʼalimentazione phantom attivata non devono essere collegati dei microfoni con uscita sbilanciata che potrebbero essere danneggiati. Per escludere rumori di commutazione, azionare il tasto PHANTOM solo quando il mixer è spento oppure quando i regolatori PHONES / CONTROL ROOM e MAIN MIX sono messi sul minimo. 4.2 Sorgenti audio Line Collegare gli apparecchi con uscita Line (p. es. strumenti musicali) con gli ingressi LINE IN (4) dei canali stereo. Le prese jack 6,3 mm per il canale sinistro (L) e destro (R) sono bilanciate. Tuttavia per mezzo di jack a 2 poli, è possibile collegare anche degli apparecchi con uscita sbilanciata. Se si deve collegare un apparecchio mono, usare solo la presa L. Il segnale mono sarà quindi portato internamente sul canale sinistro e destro. Se lʼingresso RCA TAPE IN (18) non è occupato da un registratore ( Capitolo 4.4), si può collegare qui un apparecchio stereo supplementare con livello Line (p. es. un lettore CD per musica di sottofondo negli intervalli). zione, dopo lʼelaborazione, sul segnale delle somme. Il percorso dʼuscita è “post-fader”, cioè il segnale viene prelevato a valle del regolatore del livello del canale (10). 2) A seconda del tipo di microfono collegato, premere o sbloccare il tasto PHANTOM (19) per lʼalimentazione phantom 48 V ( Capitolo 4.1). 1) Con un jack 6,3 mm, collegare lʼingresso dellʼunità per effetti con lʼuscita mono FX SEND (13). 3) Per accendere e spegnere il mixer, azionare lʼinterruttore sul cavo rete dellʼalimentatore. Con lʼapparecchio acceso, è accesa la spia di funzionamento POWER (25). 2) Con dei jack 6,3 mm, collegare lʼuscita dellʼunità per effetti con lʼingresso LINE IN (4) di un canale stereo libero: L = canale sinistro, R = canale destro. In caso di unʼunità per effetti con uscita mono, usare solo la presa L. 4.4 Registratore Alle prese RCA TAPE IN e OUT si può collegare un registratore: 1) Per la registrazione, collegare lʼingresso del registratore con lʼuscita stereo TAPE OUT (17). Lʼuscita di registrazione riceve il segnale delle somme impostato con il regolatore MAIN MIX (28). 2) Per la riproduzione, collegare lʼuscita del registratore con lʼingresso stereo TAPE IN (18). 4.5 Impianto di monitoraggio e cuffia La miscelazione audio può essere ascoltata tramite una cuffia stereo e / o un impianto di monitoraggio sistemato in una stanza separata (“control room”). Collegare la cuffia (impedenza minima 8 Ω) con la presa jack 6,3 mm PHONES (14). Collegare lʼamplificatore dellʼimpianto di monitoraggio con lʼuscita CTRL ROOM OUT (16); le prese jack 6,3 mm per il canale sinistro (L) e destro (R) sono sbilanciate. Delle informazioni sulle possibilità di scelta dellʼascolto si trovano nel capitolo 5.3. 4.3 Unità per effetti 4.6 Amplificatore per la sonorizzazione 4.3.1 Inserire unʼunità per effetti Le unità per effetti (p. es. apparecchi per elaborare il suono, come compressori, equalizzatori) possono essere inseriti direttamente nei canali mono: il segnale del canale viene disaccoppiato a valle del regolatore Gain (3), attraversa completamente lʼunità per effetti e viene riportato nel canale allo stesso punto del percorso del segnale. Collegare lʼunità per effetti con la presa jack 6,3 mm INSERT (2) del relativo canale. I contatti del connettore devono essere i seguenti: punta = send (uscita) anello = return (ingresso) corpo = massa Lʼuscita MAIN OUT (15) riceve il segnale delle somme impostato con il regolatore MAIN MIX (28). Qui è possibile collegare lʼamplificatore per la sonorizzazione (oppure un altro apparecchio con ingresso Line, come p. es. un secondo mixer). Le prese jack 6,3 mm per il canale sinistro (L) e destro (R) sono sbilanciate. Per il collegamento di unità per effetti con prese dʼuscita e dʼingresso separate sono richiesti di cavi a Y, p. es. MCA-202 di MONACOR: 4.7 Alimentatore Per lʼalimentazione impiegare esclusivamente lʼalimentatore in dotazione. Collegare lʼalimentatore con la presa dʼalimentazione (12) sul retro. Inserire la spina dellʼalimentatore in una presa di rete (230 V~ / 50 Hz). 5 Funzionamento ATTENZIONE Mai tenere molto alto il volume dellʼimpianto audio e della cuffia. A lungo andare, il volume eccessivo può procurare danni allʼudito! Lʼorecchio si abitua agli alti volumi e dopo un certo tempo non se ne rende più conto. Perciò non aumentare il volume successivamente. Collegamento del cavo a Y MCA-202 4.3.2 Utilizzare il percorso dʼuscita degli effetti Tramite il percorso dʼuscita degli effetti è possibile disaccoppiare parti del segnale dai canali dʼingresso, per essere inserite in unʼunità per effetti (p. es. un unità di riverbero) con miscela- 14 5.1 Accendere e spegnere 1) Per escludere rumori di commutazione e un volume troppo alto, prima della messa in funzione portare i regolatori delle uscite PHONES / CONTROL ROOM (24) e MAIN MIX (28) sul minimo. 5.2 Miscelare delle sorgenti audio I seguenti passi sono solo delle proposte; sono possibili anche altri modi per procedere. 1) Come impostazione base a) in tutti i canali mono portare i regolatori GAIN (3), dei toni (6) e PAN (9) in posizione centrale; b) in tutti i canali stereo sbloccare i tasti (5) per lʼadattamento del livello dʼingresso e portare i regolatori BAL (9) in posizione centrale; c) girare tutto a sinistra tutti i regolatori LEVEL (10), FX (8) e il regolatore FX SEND (20); d) sbloccare i tasti TAPE TO CTRL ROOM (21), TAPE TO MIX (22) e FX TO CTRL R. (23); e) spostare sullo “0” il regolatore delle somme MAIN MIX (28). 2) Per comandare uno dei canali mono, portare un segnale audio sul canale e portare il suo regolatore di livello LEVEL (10) in posizione centrale “0”. Quindi, con il regolatore GAIN (3) del canale impostare lʼamplificazione allʼingresso in modo che lʼindicazione a LED del livello (27) si accenda con 0 dB. Successivamente impostare i toni con gli appositi regolatori (6): HI per gli alti, MID per i medi, LO per i bassi. Se necessario, premere il tasto LOW CUT (7) per sopprimere delle interferenze a bassa frequenza (p. es. da calpestio, ronzio). La spia di sovrapilotaggio PEAK (11) dovrebbe accendersi brevemente al massimo con i picchi del segnale. Se dovesse rimanere accesa, occorre abbassare in corrispondenza il regolatore GAIN e / o i regolatori toni. Quindi girare nuovamente indietro il regolatore LEVEL e impostare gli altri canali mono nello stesso modo. 3) Se per un canale stereo, il relativo regolatore LEVEL si deve aprire molto per raggiungere il livello desiderato, premere il tasto di commutazione +4/-10 (5) del canale per aumentare il livello (12 dB). 4) Se sono state eseguite tutte le impostazioni per lʼadattamento del livello e tutte le impostazioni dei toni, con i regolatori LEVEL miscelare i segnali di tutte le sorgenti impiegati con il giusto rapporto del volume. Girare sempre tutto a sinistra i regolatori LEVEL dei canali non utilizzati. 5) Per i canali mono, per mezzo dei regolatori PAN (9), posizionare i segnali mono nel sound stereo, e per i canali stereo, impostare il bilanciamento fra i segnali stereo, per mezzo dei regolatori BAL (9). 6) Se si utilizza il percorso dʼuscita degli effetti, vedere il capitolo 5.2.1 per impostare il percorso dʼuscita. 7) Per portare il segnale delle prese TAPE IN (18), p. es. registrazioni da un nastro o la riproduzione di un CD, sulla somma dei segnali, premere il tasto TAPE TO MIX (22). Se il solo segnale TAPE-IN deve essere portato sulla somma, i regolatori di livello delle altre sorgenti audio devono essere abbassati completamente. Nota: Se una registrazione attivata tramite lʼuscita TAPE OUT (17) viene riprodotta contemporaneamente tramite lʼingresso TAPE IN, il tasto TAPE TO MIX non deve essere premuto; altrimenti si avrà il fenomeno di feedback. 8) Con il regolatore MAIN MIX (28), osservando lʼindicazione a LED del livello (27), impostare il volume definitivo del segnale delle somme. Di regola, la regolazione è ottimale con 0 dB. Se il livello dʼuscita del mixer è troppo alto o troppo basso per lʼapparecchio a valle, il segnale delle somme deve essere regolato più in alto o più in basso. In caso di sovrapilotaggio, si accendono i LED rossi CLIP. 5.2.1 Impostare il percorso dʼuscita degli effetti Lʼunità per effetti deve essere collegata come descritto nel capitolo 4.3.2. 1) Per poter ascoltare le regolazioni successive degli effetti, portare momentaneamente i regolatori FX SEND (20) e LEVEL (10) dellʼingresso usato circa in posizione centrale, 2) Con i regolatori FX (8) miscelare sul percorso degli effetti i segnali dei canali dʼingresso. Con questi regolatori è possibile impostare lʼintensità dellʼeffetto separatamente per ogni canale. Nota: Girare completamente indietro il regolatore FX del canale al quale è collegato lʼunità per effetti; altrimenti si manifesta il feedback. 3) Con il regolatore FX SEND (20) impostare il livello del segnale dʼuscita del percorso per effetti in modo tale che lʼunità per effetti non risulti sovrapilotata. 4) Con il regolatore LEVEL (10), miscelare il segnale proveniente dallʼunità per effetti sul segnale delle somme. Con lo stesso regolatore è possibile aumentare o ridurre lʼintensità dellʼeffetto insieme per tutti i canali. 5.3 Ascolto tramite cuffia e impianto di monitoraggio Con i tasti TAPE TO CTRL ROOM (21) e FX TO CTRL R. (23) si decide quale segnale deve essere ascoltato tramite le uscite PHONES (14) e CTRL ROOM OUT (16) e visualizzato dallʼindicazione del livello a LED (27). – Se entrambi i tasti non sono premuti, sarà ascoltato e visualizzato il segnale delle somme impostato con il regolatore MAIN MIX (28). – Se è premuto solo il tasto TAPE TO CTRL ROOM, sarà ascoltato e visualizzato il segnale dʼingresso delle prese TAPE IN (18) (p. es. controllo diretto della parte registrata). 6 Dati tecnici Sensibilità allʼingresso Mic: . . . . . . . . . . . . . . . Line In: . . . . . . . . . . . . Tape In: . . . . . . . . . . . . Insert (Return): . . . . . . I Contatti XLR e jack 0,5 mV 60 mV 400 mV 140 mV Livello dʼuscita Main Out / Tape Out . . . 800 mV (indicando 0 dB) Ctrl Room Out: . . . . . . max. 3 V FX Send: . . . . . . . . . . . max. 10 V Connettore XLR per connessione bilanciata 1 = massa 2 = segnale + 3 = segnale - Jack 6,3 mm a 3 poli per connessione bilanciata T = segnale + R = segnale S = massa Impedenza cuffia: . . . . . . ≥ 8 Ω Range di frequenze: . . . . 20 – 20 000 Hz Fattore di distorsione: . . . < 0,04 % Rapporto S/R (valutato A) Modello MMX-1024: . . 94 dB Modello MMX-1244: . . 91 dB Diafonia Modello MMX-1024: . . -63 dB Modello MMX-1244: . . -67 dB Regolatori toni canali mono Bassi: . . . . . . . . . . . . . ±15 dB / 80 Hz Medi: . . . . . . . . . . . . . . ±15 dB / 2,5 kHz Alti: . . . . . . . . . . . . . . . ±15 dB / 12 kHz Filtro low-cut, commutabile: . . . . . . . . . 100 Hz Alimentazione phantom: . +48 V Alimentazione: . . . . . . . . tramite alimentatore in dotazione con 230 V~ / 50 Hz Jack 6,3 mm a 2 poli per connessione sbilanciata T = segnale S = massa Jack 6,3 mm a 3 poli per la presa INSERT T = send (uscita) R = return (ingresso) S = massa Jack 6,3 mm stereo per la connessione della cuffia T = canale sinistro R = canale destro S = massa Temperatura dʼesercizio: 0 – 40 °C Contatti audio Mic, mono: . . . . . . . . . . XLR / jack 6,3 mm (bil.) Insert: . . . . . . . . . . . . . jack 6,3 mm (sbil.) Line In, stereo: . . . . . . jack 6,3 mm sin. / dx (bil.) Tape In / Out, stereo: . . RCA sin. / dx. (sbil.) Main Out, stereo: . . . . . jack 6,3 mm sin. / dx (sbil.) FX Send, mono: . . . . . jack 6,3 mm (sbil.) Phones, stereo: . . . . . . jack 6,3 mm (sbil.) Ctrl Room Out, stereo: jack 6,3 mm sin. / dx (sbil.) Dimensioni (l × h × p) . . . Modello MMX-1024: . . 190 × 50 × 225 mm Modello MMX-1244: . . 245 × 50 × 225 mm Peso Modello MMX-1024: . . 1,6 kg Modello MMX-1244: . . 1,9 kg Con riserva di modifiche tecniche. – Se è premuto il tasto FX TO CTRL R., sarà ascoltato e visualizzato il segnale del percorso dʼuscita dellʼeffetto a monte del regolatore dʼuscita dellʼeffetto FX SEND (20). In questo caso, la posizione del tasto TAPE TO CTRL ROOM è priva di importanza. Impostare il volume dʼascolto con il regolatore PHONES / CONTROL ROOM (24). La MONACOR ® INTERNATIONAL GmbH & Co. KG si riserva ogni diritto di elaborazione in qualsiasi forma delle presenti istruzioni per lʼuso. La riproduzione – anche parziale – per propri scopi commerciali è vietata. 15 E Todos los elementos de funcionamiento y las conexiones que se describen pueden encontrarse en la página 3 desplegable. 1 Elementos de Funcionamiento y Conexiones Fig. 1: modelo MMX-1024 Fig. 2: modelo MMX-1244 Canal mono 1, los otros canales mono son idénticos Canal estéreo 3 / 4 (para la MMX-1024) o canal estéreo 5 / 6 (para la MMX-1244), los otros canales estéreo son idénticos Sección principal y alimentación 1 Entrada MIC (combinado XLR / jack 6,3 mm, sim.) para conectar un micrófono Nota: Se puede activar una alimentación phantom para todas las entradas de micrófono con el interruptor PHANTOM punto 19. 2 Toma INSERT (jack 6,3 mm) para insertar un aparato de efectos (p. ej. un aparato para procesar la señal, como un compresor) en el canal Conectores: Punta = Send (salida) Anillo = Return (entrada) Funda = masa 3 Control GAIN para la amplificación de entrada 4 Entrada LINE IN (jacks 6,3 mm Izquierda L / Derecha R, sim.) para conectar un aparato con nivel de señal de línea (p. ej. teclado) Nota: Cuando conecte un aparato mono, utilice sólo el jack L 5 Botón selector para ajustar el nivel de aparatos con nivel de salida de línea que es demasiado bajo: Con el botón pulsado, aumenta el nivel de entrada 6 Ecualizador para el rango de agudos (HI), medios (MID) y graves (LO) 7 Botón LOW CUT para activar el filtro low cut (pasa alto) para suprimir partes de señal no deseadas por debajo de 100 Hz, p. ej. sonido subsónico 8 Control FX para mezclar la señal de canal con la vía de efecto; la señal se tomará después del control de nivel (10) del canal 9 Canal mono: Control de panorama PAN para poner la señal mono en el sonido estéreo Canal estéreo: Control de balance BAL para la señal estéreo 10 Control LEVEL para mezclar la señal de canal en la señal Master 11 Indicación de sobrecarga PEAK; Si se ilumina permanentemente, atenúe el nivel del canal con el control de ganancia (3) y/ o con el ecualizador (6) 12 Toma de alimentación de la parte posterior para conectar al alimentador entregado 13 Salida FX SEND (jack 6,3 mm, asim.) de la vía de efectos; a esta salida se puede conectar la entrada de un aparato de efectos 14 Salida PHONES (jack 6,3 mm) para conectar unos auriculares estéreo (impedancia mínima 8 Ω) 15 Salida principal MAIN OUT para la señal Master (jacks 6,3 mm Izquierda L / Derecha R, asim.), p. ej. para conectar un amplificador para megafonía o un segundo mezclador 16 Salida CTRL ROOM OUT (jacks 6,3 mm Izquierda L / Derecha R, asim.) para conectar 16 calor (temperatura 0 – 40 ºC). el amplificador de un sistema monitor en una sala de control separada 17 Salida TAPE OUT (tomas RCA Izquierda L / Derecha R) para conectar un grabador 18 Entrada TAPE (tomas RCA Izquierda L / Derecha R) para conectar un grabador para la reproducción u otro reproductor como un lector CD 19 Botón PHANTOM: Con el botón pulsado se activa una alimentación phantom de 48 V para todas las entradas MIC (1) No coloque ningún recipiente lleno de líquido encima de los aparatos, como por ejemplo un vaso. El calor que se genera en el mezclador tiene que expulsarse mediante la circulación del aire. Así pues, las rejillas de ventilación de la carcasa no deben obstruirse. No ponga el mezclador en funcionamiento y desconecte inmediatamente el enchufe de la toma de corriente si: 1. Existe algún daño visible en el mezclador, en el alimentador o en el cable de corriente. 2. Aparece algún defecto por caída o accidente similar. 3. No funciona correctamente. Sólo el personal cualificado puede reparar los aparatos bajo cualquier circunstancia. Un cable de corriente dañado en el alimentador sólo puede sustituirlo el personal cualificado. No tire nunca del cable de corriente para desconectar el enchufe de la toma de corriente, tire siempre del enchufe. Utilice sólo un paño suave y seco para la limpieza, no utilice nunca ni productos químicos ni agua. No podrá reclamarse garantía o responsabilidad alguna por cualquier daño personal o material resultante si los aparatos se utilizan para otros fines diferentes a los originalmente concebidos, si no se conectan correctamente, no se utilizan adecuadamente o no se reparan por expertos. 20 Control de nivel FX SEND para la señal de la vía de envío de efectos en la salida FX SEND (13) Nota: Si el botón FX TO CTRL R. (23) se pulsa adicionalmente, en lugar de la señal TAPE IN se monitoriza y se indica la vía de efectos punto 23. 22 Botón TAPE TO MIX: Con el botón pulsado, la señal de la entrada TAPE IN (18) se envía a la señal Master 23 Botón FX TO CTRL R.: Con el botón pulsado, la señal de la vía de efecto, antes que el control de salida FX SEND (20), se envía a las salidas de monitorización PHONES (14) y CTRL ROOM OUT (16) y se indica con el visualizador de nivel (27) 24 Control de volumen PHONES / CONTROL ROOM para las salidas de monitorización PHONES (14) y CTRL ROOM OUT (16) 25 LED POWER 26 Indicador LED +48V: Se ilumina con la alimentación phantom activada para las entradas MIC (1) 27 Indicación de nivel LED; muestra a) la señal Master, cuando los botones TAPE TO CTRL ROOM (21) y FX TO CTRL R. (23) no están pulsados b) la señal de la entrada TAPE IN (18), cuando el botón TAPE TO CTRL ROOM está pulsado y el botón FX TO CTRL R. no c) la señal de la vía de efectos por delante del control de salida FX SEND (20) cuando el botón FX TO CTRL R. está pulsado 28 Control de nivel MAIN MIX para la señal Master enviada a las salidas PHONES (14), CTRL ROOM OUT (16), MAIN OUT (15) y TAPE OUT (17) 2 Notas de Seguridad Los aparatos (mezclador y alimentador) cumplen con todas las directivas requeridas por la UE y por lo tanto están marcados con el símbolo . ADVERTENCIA El alimentador contiene un voltaje peligroso. Deje el mantenimiento en manos del personal cualificado. El manejo inexperto o la modificación del aparato pueden provocar una descarga. Es imprescindible que preste atención a los puntos siguientes: Los aparatos están adecuados para su utilización sólo en interiores. Protéjalos de goteos y salpicaduras, elevada humedad del aire y admisible: Preste atención a las notas de advertencia en el apartado 4.1. 21 Botón TAPE TO CTRL ROOM: Con el botón pulsado, la señal de la entrada TAPE IN (18) se envía a las salidas de monitorización PHONES (14) y CTRL ROOM OUT (16) y se indica con el visualizador de nivel (27) ambiente Si va a poner los aparatos fuera de servicio definitivamente, llévelos a la planta de reciclaje más cercana para que su eliminación no sea perjudicial para el medioambiente. 3 Aplicaciones Este mezclador, diseñado como aparato de sobremesa está adecuado para mezclar sonido utilizado para megafonía y grabaciones. El modelo MMX-1024 está equipado con 6 canales de entrada (2 mono, 4 estéreo) y el modelo MMX-1244 está equipado con ocho canales de entrada (4 mono, 4 estéreo) para conectar micrófonos (alimentados por phantom) y fuentes de audio con nivel de salida de línea como instrumentos musicales o lectores CD. Mediante tomas Insert en los canales mono, se pueden insertar aparatos para procesar el sonido. Una vía de envío (señal tomada “post-fader”) permite la conexión de un aparato de efectos. Además, están disponibles una entrada de reproducción y una salida de grabación para un grabador y salidas de monitorización para conectar auriculares y un sistema monitor en una sala de control separada. 4 Conexión Antes de conectar cualquier aparato o cambiar cualquier conexión existente, desconecte el mezclador o ponga los controles de salida PHONES / CONTROL ROOM (24) y MAIN MIX (28) al mínimo. 4.1 Micrófonos Conecte micrófonos mediante conectores XLR o jacks 6,3 mm a las tomas simétricas MIC (1) de los canales mono. La conexión XLR tiene un seguro. Para quitar el conector XLR, pulse la palanca PUSH de la toma. Si es necesario, se puede activar centralmente una alimentación phantom de 48 V para micrófonos de condensador: Con el botón PHANTOM (19) pulsado, se aplica una alimentación phantom a todas las entradas de micrófono (tanto a las conexiones XLR como a las conexiones jack 6,3 mm de las tomas MIC). Con la alimentación phantom activada se iluminará el LED +48V (26) durante el funcionamiento. PRECAUCIÓN Cuando la alimentación phantom está activada, no se puede conectar ningún micrófono con salida asimétrica. Estos micrófonos se podría dañar. Para prevenir el ruido de conexión, pulse el botón PHANTOM sólo cuando el mezclador esté apagado o cuando los controles PHONES / CONTROL ROOM y MAIN MIX estén al mínimo. 4.2 Fuentes de audio de línea Conecte aparatos con nivel de salida de línea (p. ej. instrumentos musicales) a las entradas LINE IN (4) de los canales estéreo. Los jacks 6,3 mm para el canal izquierdo (L) y el derecho (R) son simétricos. Sin embargo, se pueden conectar aparatos con salida asimétrica mediante jacks 6,3 mm de 2 polos. Para conectar un aparato mono, utilice sólo el jack L. Luego la señal mono se conmuta internamente al canal derecho y al canal izquierdo. Si ningún grabador utiliza la entrada RCA TAPE IN (18) [ apartado 4.4], se puede conectar un aparato de línea estéreo adicional a esta entrada (p. ej. un lector CD para música de fondo durante los descansos). 4.3 Aparatos de efectos 4.3.1 Insertar un aparato de efectos Los aparatos de efectos (p. ej. aparatos para procesar el sonido como compresores o ecualizadores) se pueden insertar directamente en los canales mono: La señal de canal se toma después del control de ganancia (3), se direcciona completamente mediante el aparato de efectos y se reenvía al canal en el mismo lugar de la vía de señal. Conecte el aparato de efectos al jack 6,3 mm INSERT (2) del canal correspondiente. Los conectores deben conectarse del siguiente modo: Punta = Send (salida) Anillo = Return (entrada) Funda = masa Para conectar un aparato de efectos con jacks de entrada y de salida separatos, se necesitan cables en Y, p. ej. MCA-202 de MONACOR. efectos (p. ej. un aparato de eco) y mezclarlas en la señal Master después de procesarlas. La vía de envío es “post-fader”, es decir que la toma de señal es después del control de nivel (10) del canal. 1) Conecte la entrada del aparato de efectos mediante un jack 6,3 mm a la salida mono FX SEND (13). 2) Conecte la salida del aparato de efectos mediante jacks 6,3 mm a la entrada LINE IN (4) de un canal estéreo libre: L = canal izquierdo, R = canal derecho. Para un aparato de efectos con salida mono utilice sólo el jack L. E 3) Para conectar o desconectar el mezclador, utilice el interruptor del cable de corriente del alimentador. Con el aparato conectado, se ilumina el LED POWER (25). 5.2 Mezclar las fuentes de audio Los siguientes pasos de funcionamiento sirven simplemente como ayuda, hay otros procedimientos posibles. 1) Primero como ajuste básico Se puede conectar un grabador a las tomas RCA TAPE IN y TAPE OUT: a) en todos los canales mono: Gire los controles GAIN (3), todos los controles del ecualizador (6) y los controles PAN (9) hasta la posición intermedia. 1) Para la grabación, conecte la entrada del grabador a la salida estéreo TAPE OUT (17). La salida de grabación recibe la señal Master ajustada con el control MAIN MIX (28). b) en todos los canales estéreo: Libere los botones para igualar el nivel de entrada (5) y gire los controles BAL (9) hasta la posición intermedia. 2) Para la reproducción, conecte la salida del grabador a la entrada estéreo TAPE IN (18). c) Gire completamente en sentido horario inverso todos los controles LEVEL (10), FX (8) y el control FX RETURN (20). 4.5 Sistema monitor y auriculares d) Libere los botones TAPE TO CTRL ROOM (21), TAPE TO MIX (22) y FX TO CTRL R. (23) 4.4 Grabador El sonido mezclado se puede monitorizar mediante auriculares estéreo y/ o mediante un sistema monitor en una sala de control separado (“control room”). Conecte los auriculares (impedancia mínima 8 Ω) al jack 6,3 mm PHONES (14). Conecte el amplificador del sistema monitor a la salida CTRL ROOM OUT (16); los jacks 6,3 mm para el canal izquierdo (L) y para el canal derecho (R) son asimétricos. Puede encontrar información sobre las posibilidades de monitorización en el apartado 5.3. 4.6 Amplificador para aplicaciones en megafonía La salida MAIN OUT (15) recibe la señal Master ajustada con el control MAIN MIX (28). El amplificador para aplicaciones en megafonía se puede conectar a esta salida (u otro aparato con entrada de línea como un segundo mezclador). Los jacks 6,3 mm para el canal izquierdo (L) y el derecho (R) son asimétricos. 4.7 Alimentador Utilice solamente el alimentador entregado para la alimentación. Conecte el alimentador a la toma de alimentación (12) de la parte posterior. Conecte el conector de corriente del alimentador a un enchufe (230 V~ / 50 Hz). 5 Funcionamiento PRECAUCIÓN No ajuste nunca el sistema de audio y los auriculares en un volumen muy elevado. Los volúmenes altos permanentes pueden dañar su oído. El oído se acostumbrará a los volúmenes altos que no lo parecen tanto después de un rato. Por lo tanto, no aumente un volumen alto después de acostumbrarse a él. e) Avance el control Master MAIN MIX (28) hasta “0”. 2) Para el control de nivel de uno de los canales mono, envíe una señal de audio al canal y gire su control LEVEL (10) hasta la posición intermedia “0”. Luego ajuste la amplificación de entrada con el control GAIN (3) del canal de modo que la indicación de nivel LED (27) se ilumina en 0 dB. Luego ajuste el sonido con los controles del ecualizador (6): HI para agudos, MID para medios, LO para graves. Si es necesario, pulse el botón LOW CUT (7) para suprimir ruidos de bajas frecuencias (p. ej. ruido subsónico, zumbidos). La indicación de sobrecarga PEAK (11) sólo se debería iluminar brevemente con picos de señal, si es que lo hace. Si se ilumina permanentemente, reduzca el control GAIN y/ o los controles del ecualizador como corresponda. Luego reduzca completamente el control LEVEL y controle el nivel de los otros canales mono del mismo modo. 3) Si el control LEVEL correspondiente para un canal estéreo tiene que aumentarse hasta un punto alto para alcanzar el nivel deseado, pulse el botón selector +4/-10 (5) en el canal para potenciar el nivel (12 dB). 4) Cuando se hayan hecho todos los ajustes para el nivel y el sonido, mezcle las señales de todas las fuentes de audio utilizadas con el volumen que quiera con los controles LEVEL. Gire siempre los controles LEVEL de los canales que no se utilicen en sentido horario inverso completamente. 5) Para los canales mono, ponga las señales mono en el sonido estéreo con los controles de panorama PAN (9), y para los canales estéreo, ajuste el balance de las señales estéreo con los controles BAL (9). 6) Si se utiliza la vía de envío de efectos, vea el apartado 5.2.1 para ajustar la vía de efectos. Conexión del cable en Y MCA-202 5.1 Conexión / Desconexión 4.3.2 Utilizar la vía de envío de efectos Mediante la vía de envío de efectos, se pueden tomar partes de la señal de los canales de entrada, direccionarlas mediante un aparato de 2) Dependiendo del tipo de micrófono conectado, pulse o libere el botón PHANTOM (19) para la alimentación phantom 48 V ( apartado 4.1). 1) Para prevenir el ruido de conexión y un volumen excesivo, ponga los controles de salida PHONES / CONTROL ROOM (24) y MAIN MIX (28) al mínimo antes del funcionamiento. 7) Para enviar la señal de las tomas TAPE IN (18), p. ej. una cinta la reproducción de un CD, a la señal Master, pulse el botón TAPE TO MIX (22). Para enviar sólo la señal TAPE IN a la Master, tienen que bajarse completa- 17 E mente los controles de nivel de las demás fuentes de audio. Nota: Cuando se reproduce una grabación hecha a través de la salida TAPE OUT (17) a través de la entrada TAPE IN al mismo tiempo, el botón TAPE TO MIX no se puede pulsar, de lo contrario habrá feedback. 8) Ajuste el volumen definido de la señal Master con el control MAIN MIX (28) mediante la indicación de nivel LED (27). Normalmente, se alcanza un control de nivel óptimo a 0 dB. Sin embargo, si el nivel de salida del mezclador es demasiado alto o demasiado bajo para el siguiente aparato, la señal Master tiene que ajustarse a un nivel superior o inferior. En caso de sobrecarga se iluminan los LEDs rojos CLIP. 5.2.1 Ajuste de la vía de envío de efectos El aparato de efectos tiene que conectarse como se describe en el apartado 4.3.2. 1) Primero aumente el control FX SEND (20) y el control LEVEL (10) de la entrada utilizada hasta la posición intermedia aproximadamente de modo que se puedan escuchar siguientes ajustes de los efectos. 2) Mezcle las señales de los canales de entrada en la vía de efectos con los controles FX (8). Con estos controles se puede ajustar la intensidad del efecto por separado para cada canal. Nota: Reduzca completamente el control FX del canal al que se ha conectado el aparato de efectos, de lo contrario aparecerá feedback. 3) Ajuste el nivel para la señal de salida de la vía de efectos con el control FX SEND (20) de modo que el aparato de efectos no se sobrecargue. 4) Mezcle la señal proveniente del aparato de efectos en la señal Master con el control LEVEL de la entrada utilizada. Con este control, la intensidad del efecto para todos los canales se puede aumentar o reducir al mismo tiempo. 5.3 Monitorización mediante auriculares y sistema monitor Los botones TAPE TO CTRL ROOM (21) y FX TO CTRL R. (23) determinan la señal que hay que monitorizar a través de las salidas PHONES (14) y CTRL ROOM OUT (16) y se indica con el visualizador de nivel LED (27): – Si no se pulsa ninguno de los botones, se monitoriza y se indica la señal Master ajustada con el control MAIN MIX (28) – Si sólo se pulsa el botón TAPE TO CTRL ROOM, se monitoriza y se indica la señal de entrada de las tomas TAPE IN (18) [p.ej. grabación backtrack]. – Si se pulsa el botón FX TO CTRL R., se monitoriza y se indica la señal de la vía de envío de efectos, antes que el control de salida de efectos FX SEND (20). La posición del botón TAPE TO CTRL ROOM no importa en este caso. Ajuste el volumen de monitorización con el control PHONES / CONTROL ROOM (24). 6 Especificaciones Sensibilidad de entrada Mic: . . . . . . . . . . . . . . . Line In: . . . . . . . . . . . . Tape In: . . . . . . . . . . . . Insert (retorno): . . . . . . 0,5 mV 60 mV 400 mV 140 mV Nivel de salida Main Out / Tape Out: . . 800 mV (en la indicación 0 dB) Ctrl Room Out: . . . . . . Máx. 3 V FX Send: . . . . . . . . . . . Máx. 10 V Configuración de conectores XLR y jack 6,3 mm Conector XLR para conexión simétrica 1 = masa 2 = señal + 3 = señal - Jack 6,3 mm de 3 polos para conexión simétrica T = señal + R = señal S = masa Impedancia de auriculares: . . . . . . . . . . .≥ 8 Ω Banda pasante: . . . . . . . 20 – 20 000 Hz THD: . . . . . . . . . . . . . . . . < 0,04 % Relación sonido / ruido (A ponderada): Modelo MMX-1024: . . . 94 dB Modelo MMX-1244: . . . 91 dB Crosstalk Modelo MMX-1024: . . . -63 dB Modelo MMX-1244: . . . -67 dB Ecualizador de los canales mono Graves: . . . . . . . . . . . . ±15 dB / 80 Hz Medios: . . . . . . . . . . . . ±15 dB / 2,5 kHz Agudos: . . . . . . . . . . . . ±15 dB / 12 kHz Filtro Low Cut, conmutable: . . . . . . . . . . 100 Hz Alimentación phantom: . . +48 V Alimentación: . . . . . . . . . mediante el alimentador entregado conectado a 230 V~ / 50 Hz Jack 6,3 mm de 2 polos para conexión asimétrica T = señal S = masa Jack 6,3 mm de 3 polos para la toma INSERT T = Send (salida) R = Return (entrada) S = masa Jack 6,3 mm estéreo para la conexión de auriculares T = canal izquierdo R = canal derecho S = masa Temperatura ambiente: . 0 – 40 °C Conexiones de audio Mic, mono: . . . . . . . . . . Toma XLR / 6,3 mm (sim.) Insert: . . . . . . . . . . . . . Jack 6,3 mm (asim.) Line In, estéreo: . . . . . Jack 6,3 mm Izquierda / Derecha (sim.) Tape In / Out, estéreo: . RCA Izquierda / Derecha (asim.) Main Out, estéreo: . . . . Jack 6,3 mm Izquierda / Derecha (asim.) FX Send, mono: . . . . . Jack 6,3 mm (asim.) Phones, estéreo: . . . . . Jack 6,3 mm (asim.) Ctrl Room Out, estéreo: Jack 6,3 mm Izquierda / Derecha (asim.) Dimensiones Modelo MMX-1024: . . . 190 × 50 × 225 mm Modelo MMX-1244: . . . 245 × 50 × 225 mm Peso Modelo MMX-1024: . . . 1,6 kg Modelo MMX-1244: . . . 1,9 kg Sujeto a modificaciones técnicas. Manual de instrucciones protegido por el copyright de MONACOR ® INTERNATIONAL GmbH & Co. KG. Toda reproducción mismo parcial para fines comerciales está prohibida. 18 Proszę otworzyć instrukcję na stronie 3. Pokazano tam rozkład elementów operacyjnych i złączy. 17 Wyjście TAPE OUT (gniazda RCA lewy L / prawy R) do podłączania urządzenia rejestrującego 1 Elementy operacyjne i złącza 18 Wejście TAPE IN (gniazda RCA lewy L / prawy R) do podłączania urządzenia odtwarzającego np. odtwarzacza CD Rys. 1: model MMX-1024 Rys. 2: model MMX-1244 Kanał mono 1, pozostałe kanały mono są identyczne 19 Przycisk PHANTOM: jeżeli przycisk jest wciśnięty, na wejściach mikrofonowych MIC (1) dostępne jest zasilanie phantom 48 V Nie należy stawiać na urządzeniu żadnych pojemników z cieczą np. szklanek. Ciepło generowane podczas pracy urządzenia musi zostać odprowadzone; dlatego należy zapewnić dostateczną wentylację wokół urządzenia. Nie należy używać urządzenia lub natychmiast odłączyć zasilanie 1. jeżeli stwierdzono widoczne uszkodzenie urządzenia, zasilacza lub kabla zasilającego, 2. jeżeli uszkodzenie mogło powstać na skutek upadku lub podobnego zdarzenia, 3. jeżeli działa niepoprawnie. W każdym przypadku, naprawę urządzenia należy zlecić specjaliście. Proszę zapoznać się z uwagami w rozdz. 4.1. Kanał stereo 3 / 4 (dla MMX-1024) lub kanał stereo 5 / 6 (dla MMX-1244), pozostałe kanały stereo są identyczne 20 Regulator FX SEND do ustawiania poziomu sygnału wysyłanego na efekt przez wyjście FX SEND (13) Sekcja główna oraz zasilania 21 Przycisk TAPE TO CTRL ROOM: jeżeli przycisk jest wciśnięty, sygnał z gniazd TAPE IN (18) zostanie przełączony na wyjścia odsłuchowe PHONES (14) i CTRL ROOM OUT (16) oraz pokazany na wskaźniku poziomu (27) Wymianę uszkodzonego kabla zasilającego zasilacz należy zlecić specjaliście. Uwaga: Jeżeli przycisk FX TO CTRL R. (23) jest dodatkowo wciśnięty, zamiast sygnału z wejścia TAPE IN odsłuchiwany i pokazywany jest sygnał z drogi efektowej punkt 23. Nie wolno odłączać urządzenia z gniazdka sieciowego ciągnąc za kabel, należy zawsze chwytać za wtyczkę. 22 Przycisk TAPE TO MIX: jeżeli przycisk jest wciśnięty, sygnał z gniazd TAPE IN (18) zostanie przełączony do sygnału master Do czyszczenia używać suchej miękkiej ściereczki. Nie stosować wody i środków chemicznych. Producent ani dostawca nie ponoszą odpowiedzialności za uszkodzenie sprzętu bądź obrażenia użytkownika, jeżeli urządzenie było używane niezgodnie z przeznaczeniem, zostało nieodpowiednio podłączone lub poddane nieautoryzowanej naprawie. 1 Wejście MIC (combo XLR / 6,3 mm, sym.) do podłączania mikrofonu Uwaga: Zasilanie phantom dla wszystkich wejść mikrofonowych włączane jest przełącznikiem PHANTOM punkt 19. 2 Wejście INSERT (gniazdo 6,3 mm) do podłączania urządzenia efektowego (np. kompresora) na kanał Konfiguracja wtyku: Czubek T = Send (wyjście) Pierścień R = Return (wejście) Obudowa S = masa 3 Regulator GAIN do ustawiania wzmocnienia wejściowego 4 Wejście LINE IN (gniazda 6,3 mm lewy L / prawy R, sym.) do podłączania urządzeń z wyjściem liniowym (np. instrumentów muzycznych) Uwaga: W przypadku podłączania urządzeń mono wykorzystywać tylko lewe gniazdo L. 23 Przycisk FX TO CTRL R.: jeżeli przycisk jest wciśnięty, sygnał z drogi efektowej, sprzed regulatorów FX SEND (20), zostanie przełączony na wyjścia odsłuchowe PHONES (14) i CTRL ROOM OUT (16) oraz pokazany na wskaźniku poziomu (27) 24 Regulator PHONES / CONTROL ROOM poziomu sygnału odsłuchowego na wyjściach PHONES (14) oraz CTRL ROOM OUT (16) 5 Przełącznik dopasowania poziomu dla urządzeń z wyjściem liniowym o niskim poziomie sygnału: przy wciśniętym przycisku poziom sygnału jest podbijany 25 Diodowy wskaźnik zasilania POWER 6 Regulatory barwy (equalizer), wysokie tony (HI), średnie tony (MID), niskie tony (LO) 27 Diodowy wskaźnik poziomu; pokazuje a) sygnał master, jeżeli przyciski TAPE TO CTRL ROOM (21) oraz FX TO CTRL R. (23) nie są wciśnięte b) sygnał z wejścia TAPE IN (18), jeżeli przycisk TAPE TO CTRL ROOM jest wciśnięty oraz przycisk FX TO CTRL R. nie jest wciśnięty c) sygnał z drogi efektowej sprzed regulatorów FX SEND (20) jeżeli przycisk FX TO CTRL R. jest wciśnięty 7 Przycisk LOW CUT do włączania filtra dolnozaporowego tłumiącego częstotliwości poniżej 100 Hz, np. zniekształcenia subsoniczne 8 Regulator FX do miksowania sygnałów z kanałów wejściowych do wysyłki na efekt; sygnały są pobierane za regulatorami poziomu (10) 9 Kanały mono: regulator panoramy PAN do ustawiania położenia sygnału mono w zmiksowanym sygnale stereo Kanały stereo: regulatory BAL do ustawiania balansu sygnałów stereo 10 Regulator LEVEL do miksowania sygnałów z kanałów wejściowych do sygnału master 11 Wskaźnik przesterowania PEAK; jeżeli dioda świeci ciągle, należy zredukować poziom sygnału regulatorem wzmocnienia (3) i / lub korektorami barwy (6) 12 Gniazdo zasilania na tylnej stronie do podłączania zasilacza 26 Diodowy wskaźnik +48V: zapala się po włączeniu zasilania phantom na wejściach MIC (1) 16 Wyjście CTRL ROOM OUT (gniazda 6,3 mm lewy L / prawy R, niesym.) do podłączania wzmacniacza systemu odsłuchowego 3 Zastosowanie 28 Regulator MAIN MIX dla sygnału master wysyłanego na wyjścia PHONES (14), CTRL ROOM OUT (16), MAIN OUT (15) oraz TAPE OUT (17) 2 Środki bezpieczeństwa 4 Podłączanie Urządzenia (mikser oraz zasilacz) spełniają wszystkie wymagania norm UE, dlatego zostało oznaczone symbolem . Przed przystąpieniem do podłączania lub zmiany połączeń, należy zawsze wyłączyć mikser lub skręcić regulatory głośności PHONES / CONTROL ROOM (24) oraz MAIN MIX (28) maksymalnie w lewo na minimum. UWAGA 14 Wyjście słuchawkowe PHONES (gniazdo 6,3 mm) do podłączania słuchawek stereo (impedancja minimum 8 Ω) 15 Wyjście główne MAIN OUT dla sygnału master (gniazda 6,3 mm lewy L / prawy R, niesym.), np. do podłączania wzmacniacza PA lub kolejnego miksera Po całkowitym zakończeniu eksploatacji, należy oddać urządzenie do punktu recyklingu. Niniejszy mikser został zaprojektowany jako urządzenie wolnostojące i przeznaczony jest do miksowania sygnałów audio w zastosowaniach PA oraz przy nagrywaniu dźwięku. Model MMX1024 wyposażony jest w 6 kanałów wejściowych (2 mono, 4 stereo), natomiast model MMX-1244 w 8 kanałów wejściowych (4 mono, 4 stereo) – pozwalających na podłączenie mikrofonów (również wymagających zasilania phantom) oraz maksymalnie czterech źródeł audio z wyjściem liniowym np. instrumentów muzycznych, odtwarzaczy CD. Gniazda insertowe na kanałach mono umożliwiają podłączenie urządzeń do przetwarzania dźwięku, natomiast dodatkowa wysyłka (post-fader) pozwala na podłączenie urządzenia efektowego. Mikser wyposażony jest ponadto w wejście i wyjście nagrywania do podłączania urządzenia rejestrującego oraz wyjście odsłuchowe sygnału głównego master poprzez słuchawki lub system odsłuchowy. 13 Wyjście FX SEND (gniazdo 6,3 mm, niesym.) do wysyłki na efekt; do podłączania wejścia urządzenia efektowego Zasilacz pracuje na niebezpiecznym napięciu. Wszelkie naprawy serwisowe należy zlecić specjaliście. Nieodpowiednia obsługa może spowodować porażenie prądem elektrycznym. Należy przestrzegać następujących zasad: Urządzenia przeznaczone są wyłącznie do pracy wewnątrz pomieszczeń. Należy chronić je przed działaniem wody, wysokiej wilgotności oraz wysokiej temperatury (dopuszczalny zakres wynosi 0 – 40 °C). PL 4.1 Mikrofony Mikrofony ze złączem XLR lub 6,3 mm należy podłączać do symetrycznych gniazd MIC (1) na kanałach mono. Gniazda XLR posiadają zatrzask. Aby odłączyć wtyk XLR należy najpierw wcisnąć dźwignię PUSH. Dla obu wejść mikrofonowych możliwe jest globalne włączenie zasilania phantom 48 V, wymaganego w przypadku mikrofonów pojemnościowych: Aby włączyć zasilanie phantom, 19 PL należy wcisnąć przycisk PHANTOM (19). Pojawia się ono na wszystkich wejściach mikrofonowych (na złączach XLR oraz 6,3 mm MIC). Włączenie zasilania phantom sygnalizowane jest zapaleniem się diody +48V (26). 2) Podłączyć wyjście urządzenia efektowego do wejścia LINE IN (4) na wolnym kanale stereo: L = lewy kanał, R = prawy kanał. W przypadku urządzenia mono, wykorzystać tylko lewe gniazdo L. UWAGA Przy włączonym zasilaniu phantom, nie wolno podłączać mikrofonów z niesymetrycznym wyjściem; mogą one ulec uszkodzeniu. 4.4 Rejestrator Aby zapobiec trzaskowi podczas włączania, należy włączać zasilanie phantom przyciskiem PHANTOM tylko przy wyłączonym mikserze lub przy skręconych na minimum regulatorach PHONES / CONTROL ROOM oraz MAIN MIX. 1) W przypadku nagrywania, podłączyć wejście rejestratora do wyjścia stereo TAPE OUT (17). Na wyjściu tym dostępny jest sygnał główny master regulowany za pomocą regulatora MAIN MIX (28). Urządzenie rejestrujące należy podłączać do gniazd RCA TAPE IN oraz OUT: 2) Do odtwarzania nagrań, podłączyć wyjście rejestratora do wejścia stereo TAPE IN (18). 4.2 Urządzenia liniowe Urządzenia audio z wyjściem liniowym (np. instrumenty muzyczne) należy podłączać do wejść LINE IN (4) na kanałach stereo. Gniazda 6,3 mm dla lewego (L) i prawego (R) kanału są symetryczne. Możliwe jest także podłączanie urządzeń z wyjściem niesymetrycznym, za pomocą 2-polowego wtyku 6,3 mm. W przypadku podłączania urządzeń mono, wykorzystywać tylko lewe gniazdo L. Sygnał wejściowy zostanie wówczas wewnętrznie przełączony na lewy i prawy kanał. Jeżeli gniazda wejściowe RCA TAPE IN (18) nie są wykorzystywane do podłączenia rejestratora ( rozdz. 4.4), można je wykorzystać do podłączenia dodatkowych urządzeń liniowych stereo (np. odtwarzacza CD dla tła muzycznego). 4.3 Urządzenie efektowe 4.3.1 Włączanie urządzeń efektowych Urządzenia efektowe (np. kompresor, korektor) można podłączać bezpośrednio na kanały mono: sygnał z kanału jest pobierany za regulatorami wzmocnienia (3), przepuszczany przez urządzenie efektowe, a następnie podawany ponownie do kanału wejściowego w tym samym miejscu. Urządzenie efektowe należy podłączać do gniazda 6,3 mm INSERT (2) na odpowiednim kanale. Konfiguracja wtyku: Czubek T = Send (wyjście) Pierścień R = Return (wejście) Obudowa S = masa Do podłączania urządzenia efektowego z osobnymi gniazdami wejściowymi i wyjściowymi należy wykorzystać kabel Y np. MCA-202 marki MONACOR. Podłączanie kabla Y MCA-202 4.3.2 Wysyłka na efekt Poprzez wysyłkę na efekt część sygnału może być pobierana z kanałów wejściowych, przepuszczana przez urządzenie efektowe (np. echo), a następnie miksowana ponownie do sygnału głównego master. Wysyłka odbywa się “post-fader”, tzn. sygnał pobierany jest za regulatorem poziomu (10) na kanale. 1) Podłączyć wejście urządzenia efektowego do wyjścia mono FX SEND (13). 20 4.5 System odsłuchowy i słuchawki Zmiksowany sygnał może być monitorowany za pomocą systemu odsłuchowego i/lub słuchawek stereo. Słuchawki (minimalna impedancja 8 Ω) należy podłączać do gniazda 6,3 mm PHONES (14). Wzmacniacz systemu odsłuchowego należy podłączać do wyjścia CTRL ROOM OUT (16); gniazda 6,3 mm dla lewego (L) i prawego kanału (R) są niesymetryczne. Więcej Informacji na temat możliwości odsłuchu podano w rozdz. 5.3. 4.6 Wzmacniacz PA Na wyjściu MAIN OUT (15) dostępny jest sygnał master, regulowany za pomocą regulatora MAIN MIX (28). Do tego wyjścia można podłączać wzmacniacz główny systemu PA (lub inne urządzenie z wejściem liniowym np. kolejny mikser). Gniazda dla lewego (L) i prawego kanału (R) są niesymetryczne. 4.7 Zasilacz Do zasilania urządzenia należy wykorzystywać wyłącznie dołączony zasilacz. Zasilacz należy podłączyć do gniazda zasilania (12) na tylnej stronie. Następnie podłączyć wtyczkę kabla zasilającego do gniazdka sieciowego (230 V~ / 50 Hz). 5 Obsługa UWAGA Nie należy ustawiać zbyt wysokiej głośności systemu audio ani na słuchawkach. Długotrwałe działanie dużej głośności może uszkodzić słuch! Ucho ludzkie przyzwyczaja się do poziomu dźwięku i po pewnym czasie nie odbiera go jako wysokiego. Dlatego nie należy zwiększać ustawionego wcześnie poziomu dźwięku. 5.1 Włączanie i wyłączanie 1) Aby zapobiec trzaskowi podczas włączania, przed włączeniem miksera ustawić regulatory PHONES / CONTROL ROOM (24) oraz MAIN MIX (28) na minimum. 2) W zależności od typu podłączanych mikrofonów, wcisnąć lub zwolnić przycisk PHANTOM (19) dla zasilania phantom 48 V ( rozdz. 4.1). 3) Do włączania i wyłączania miksera służy przełącznik na kablu zasilającym. Po włączeniu zapala się dioda POWER (25). 5.2 Miksowanie źródeł audio Poniższa kolejność działań jest tylko propozycją; inna kolejność jest również możliwa. 1) W pierwszej kolejności dokonać podstawowych ustawień a) na wszystkich kanałach mono: ustawić regulatory GAIN (3), barwy (6) oraz PAN (9) na pozycję środkową. b) na wszystkich kanałach stereo: zwolnić przyciski do dopasowywania poziomu (5) oraz ustawić regulatory BAL (9) na pozycję środkową. c) skręcić maksymalnie w lewo wszystkie regulatory LEVEL (10), FX (8) oraz FX SEND (20). d) zwolnić przyciski TAPE TO CTRL ROOM (21), TAPE TO MIX (22) oraz FX TO CTRL R. (23). e) ustawić regulator MAIN MIX (28) na “0”. 2) W celu optymalnego ustawienia regulatorów dla kanałów mono, podać sygnał audio na kanał, a następnie ustawić regulator LEVEL (10) na środkową pozycję “0”. Następnie, ustawić wzmocnienie wejściowe regulatorem GAIN (3) tak, aby wskaźnik poziomu (27) pokazywał 0 dB. Następnie ustawić barwę dźwięku regulatorami (6): HI dla wysokich, MID dla średnich i LO dla niskich tonów. Jeżeli trzeba, wcisnąć przycisk LOW CUT (7) do tłumienia niskich częstotliwości (np. zniekształceń subsonicznych, przydźwięków). Wskaźnik przesterowania PEAK (11) powinien zapalać się na krótko tylko przy osiąganiu maksymalnych wartości sygnału. Jeżeli świeci się ciągle, skręcić regulator wzmocnienia GAIN i / lub regulatory barwy. Następnie skręcić regulator LEVEL dla tego kanału i powtórzyć ustawienia dla kolejnego. 3) Jeżeli regulator poziomu LEVEL na kanałach stereo wymaga znacznego odkręcania, wcisnąć przycisk +4/-10 (5) na danym kanale, w celu podbicia poziomu (12 dB). 4) Po ustawieniu optymalnego poziomu oraz barwy, zmiksować wszystkie sygnały z kanałów wejściowych, za pomocą regulatorów głośności LEVEL. Regulatory głośności LEVEL nieużywanych kanałów skręcić maksymalnie w lewo. 5) Dla kanałów mono, za pomocą regulatorów PAN (9) ustawić położenie sygnałów w zmiksowanym sygnale stereo. Dla kanałów stereo, ustawić balans sygnałów stereo, za pomocą regulatorów BAL (9). 6) Jeżeli do miksera podłączono urządzenie efektowe, patrz rozdz. 5.2.1. 7) Aby podać sygnał wejściowy z gniazd TAPE IN (18), do sygnału master, wcisnąć przycisk TAPE TO MIX (22). Aby w sygnale master pojawił się tylko sygnał z wejścia TAPE IN, należy ustawić regulatory głośności wszystkich pozostałych kanałów na minimum. Uwaga: Jeżeli wyjście TAPE OUT (17) wykorzystywane jest do nagrywania, aby móc równocześnie odtwarzać sygnał przez wejście TAPE IN, przycisk TAPE TO MIX nie może być wciśnięty, w przeciwnym razie nastąpi sprzężenie. 8) W oparciu o wskaźnik poziomu (27), ustawić poziom głośności sygnału master za pomocą regulatora MAIN MIX (28). Poziom optymalny osiągany jest zazwyczaj dla poziomu 0 dB oraz gdy wskaźnik przesterowania CLIP, zapala się na krótko tylko przy osiąganiu maksymalnych wartości sygnału. Jeżeli jednak poziom na wyjściu jest zbyt wysoki dla kolejnych urządzeń, ustawić regulatory na niższą wartość. 5.2.1 Regulacja wysyłki na efekt Urządzenie efektowe należy podłączać zgodnie z opisem w rozdz. 4.3.2. 1) W pierwszej kolejności ustawić regulator FX SEND (20) oraz regulator LEVEL (10) wykorzystywanego wejścia na pozycję środkową, aby efekt był słyszalny. 2) Za pomocą regulatorów FX (8) zmiksować sygnały z kanałów wejściowych do wysyłki na efekt. Regulatory te pozwalają na ustawienie żądanej siły efektu niezależnie dla każdego kanału. Uwaga: Należy skręcić regulator FX na kanale, do którego podłączone jest urządzenie efektowe, w przeciwnym razie nastąpi sprzężenie. 6 Specyfikacja Czułość wejściowa Mic: . . . . . . . . . . . . . . . Line In: . . . . . . . . . . . . Tape In: . . . . . . . . . . . . Insert (Return): . . . . . . PL 0,5 mV 60 mV 400 mV 140 mV Poziom wyjściowy Main Out / Tape Out: . . 800 mV (przy wskazaniu 0 dB) Ctrl Room Out: . . . . . . max 3 V FX Send: . . . . . . . . . . . max 10 V Przesłuch model MMX-1024: . . . . -63 dB model MMX-1244: . . . . -67 dB – Jeżeli wciśnięty jest tylko przycisk TAPE TO CTRL ROOM, sygnał z wejścia TAPE IN (18) jest odsłuchiwany i pokazywany na wskaźniku poziomu (backtrack). – Jeżeli wciśnięty jest przycisk FX TO CTRL R., sygnał z wysyłki na efekt, sprzed regulatora FX SEND (20), jest odsłuchiwany i pokazywany na wskaźniku poziomu. Pozycja przycisku TAPE TO CTRL ROOM nie ma w tym przypadku znaczenia. Ustawić głośność odsłuchiwanego sygnału za pomocą regulatora PHONES / CONTROL ROOM (24). 3-polowy wtyk 6,3 mm dla sygnałów symetrycznych T = sygnał + R = sygnał S = masa THD: . . . . . . . . . . . . . . . . < 0,04 % 4) Za pomocą regulatorów LEVEL na odpowiednich kanałach, zmiksować sygnał przetworzony w urządzeniu efektowym do sygnału master. Regulator ten pozwala zwiększać lub zmniejszać intensywność efektu dla wszystkich kanałów jednocześnie. – Jeżeli oba przyciski są wyciśnięte, sygnał master, regulowany za pomocą regulatora MAIN MIX (28), jest odsłuchiwany i pokazywany na wskaźniku poziomu. 1 = masa 2 = sygnał + 3 = sygnał - Pasmo przenoszenia: . . . 20 — 20 000 Hz Stosunek S / N (ważony A) model MMX-1024: . . . . 94 dB model MMX-1244: . . . . 91 dB Za pomocą przycisków TAPE TO CTRL ROOM (21) oraz FX TO CTRL R. (23) wybrać sygnał wysyłany do systemu odsłuchowego poprzez wyjścia PHONES (14) oraz CTRL ROOM OUT (16) i pokazywany na wskaźniku (27): Wtyk XLR dla sygnałów symetrycznych Impedancja słuchawek: . ≥ 8 Ω 3) Za pomocą regulatora FX SEND (20), ustawić poziom sygnału wyjściowego wysyłanego do urządzenia efektowego. 5.3 Monitorowanie sygnału za pomocą systemu odsłuchowego i słuchawek Konfiguracja pinów w złączach XLR oraz 6,3 mm Regulatory barwy dla kanałów mono basy: . . . . . . . . . . . . . . ±15 dB / 80 Hz średnie: . . . . . . . . . . . . ±15 dB / 2,5 kHz wysokie: . . . . . . . . . . . ±15 dB / 12 kHz 2-polowy wtyk 6,3 mm dla sygnałów niesymetrycznych T = sygnał S = masa 3-polowy wtyk 6,3 mm dla gniazda INSERT T = Send (wyjście) R = Return (wejście) S = masa Filtr Low Cut, włączany: . 100 Hz Zasilanie phantom: . . . . . +48 V Zasilanie: . . . . . . . . . . . . z doł. zasilacza 230 V~ / 50 Hz Zakres temperatur: . . . . . 0 – 40 °C Złącza audio Mic, mono: . . . . . . . . . . XLR / 6,3 mm (sym.) Insert: . . . . . . . . . . . . . 6,3 mm (niesym.) Line In, stereo: . . . . . . 6,3 mm Lewy/ Prawy (sym.) Tape In / Out, stereo: . . RCA Lewy/ Prawy (niesym.) Main Out, stereo: . . . . . 6,3 mm Lewy/ Prawy (niesym.) FX Send, mono: . . . . . 6,3 mm (niesym.) Phones, stereo: . . . . . . 6,3 mm (niesym.) Ctrl Room Out, stereo: 6,3 mm Lewy/ Prawy (niesym.) wtyk stereo 6,3 mm dla słuchawek T = lewy kanał R = prawy kanał S = masa Wymiary (S × W × D) model MMX-1024: . . . . 190 × 50 × 225 mm model MMX-1244: . . . . 245 × 50 × 225 mm Waga model MMX-1024: . . . . 1,6 kg model MMX-1244: . . . . 1,9 kg Z zastrzeżeniem możliwości zmian. Instrukcje obsługi są chronione prawem copyright for MONACOR ® INTERNATIONAL GmbH & Co. KG. Przetwarzanie całości lub części instrukcji dla osobistych korzyści finansowych jest zabronione. 21 NL B Lees aandachtig de onderstaande veiligheidsvoorschriften, alvorens het apparaat in gebruik te nemen. Voor meer informatie over de bediening van het apparaat raadpleegt u de anderstalige handleidingen. Veiligheidsvoorschriften De apparaten (mengpaneel en netadapter) zijn allemaal in overeenstemming met de EU-Richtlijnen en dragen daarom het -kenmerk. WAARSCHUWING De netspanning (230 V~) van de netadapter is levensgevaarlijk. Open het apparaat niet, want door onzorgvuldige ingrepen loopt u het risico van elektrische schokken. De warmte die in het mengpaneel ontstaat, moet door ventilatie afgevoerd worden. Dek daarom de ventilatieopeningen niet af. Een beschadigd netsnoer van de netadapter mag enkel door een gekwalificeerd persoon hersteld worden. Stel het volume van de geluidsinstallatie en dat van de hoofdtelefoon nooit zeer hoog in. Langdurige blootstelling aan hoge volumes kan het gehoor beschadigen! Het gehoor raakt aangepast aan hoge volumes die na een tijdje niet meer zo hoog lijken. Verhoog daarom het volume niet nog meer, nadat u er gewoon aan bent geraakt. Trek de stekker van de netadapter nooit met het snoer uit het stopcontact, maar met de stekker zelf! Gebruik voor de reiniging uitsluitend een droge, zachte doek. Gebruik in geen geval chemicaliën of water. In geval van ongeoorloofd of verkeerd gebruik, verkeerde aansluiting, foutieve bediening of van herstelling door een niet-gekwalificeerd persoon vervalt de garantie en de verantwoordelijkheid voor hieruit resulterende materiële of lichamelijke schade. Let eveneens op het volgende: DK De apparaten zijn uitsluitend geschikt voor gebruik binnenshuis. Vermijd druip- en spatwater, plaatsen met een hoge vochtigheid en uitzonderlijk warme plaatsen (toegestaan omgevingstemperatuurbereik: 0 – 40 °C). Plaats geen met vloeistof gevulde voorwerpen zoals drinkglazen, etc. op de apparaten. Schakel het mengpaneel niet in en trek onmiddellijk de stekker van de netadapter uit het stopcontact, wanneer: 1. het mengpaneel, de netadapter of het netsnoer zichtbaar beschadigd zijn, 2. er een defect zou kunnen optreden nadat een apparaat bijvoorbeeld gevallen is, 3. een apparaat slecht functioneert. De apparaten moeten in elk geval hersteld worden door een gekwalificeerd vakman. Wanneer de apparaten definitief uit bedrijf worden genomen, bezorg ze dan voor verwerking aan een plaatselijk recyclagebedrijf. Læs nedenstående sikkerhedsoplysninger opmærksomt igennem før ibrugtagning af enheden. Bortset fra sikkerhedsoplysningerne henvises til den engelske tekst. Vigtige sikkerhedsoplysninger Enhederne (mixer og strømforsyningsenhed) overholder alle påkrævede EU regulativer og er derfor mærket med . ADVARSEL Strømforsyningsenheden benytter livsfarlig netspænding (230 V~). Overlad servicering til autoriseret personel. Forkert håndtering kan forårsage fare for elektrisk stød. Vær altid opmærksom på følgende: 22 Mixeren og strømforsyningsenheden er kun beregnet til indendørs brug. Beskyt enhederne mod vanddråber og -stænk, høj luftfugtighed og varme (tilladt omgivelsestemperatur 0 – 40 °C). Undgå at placere væskefyldte genstande, som f. eks. glas, ovenpå enhederne. Varmen, der udvikles i mixeren, skal kunne slippe ud ved hjælp af luftcirkulation. Kabinettets ventilationshuller må derfor aldrig tildækkes. Der bør aldrig skrues meget højt op for lydsystemets og hovedtelefonens lydniveau. Et permanent højt lydniveau kan skade menneskers hørelse! Det menneskelige øre vænner sig til et højt lydniveau, og efter nogen tid opfattes dette lydniveau ikke som højt. Undlad derfor at øge volumen efter tilvænning. Tag ikke mixeren i brug og tag straks strømforsyningens netstik ud af stikkontakten i følgende tilfælde: 1. hvis der er synlig skade på mixeren, strømforsyningsenheden eller strømforsyningens netkabel. 2. hvis der kan være opstået skade, efter at enheden er tabt eller lignende. 3. hvis der forekommer fejlfunktion. Enhederne skal altid repareres af autoriseret personel. Et beskadiget netkabel på strømforsyningen må kun repareres af autoriseret personel. Tag aldrig strømforsyningens netstik ud af stikkontakten ved at trække i kablet, tag fat i selve stikket. Til rengøring må kun benyttes en tør, blød klud; der må under ingen omstændigheder benyttes kemikalier eller vand. Hvis mixeren eller strømforsyningsenheden benyttes til andre formål, end den oprindeligt er beregnet til, hvis den ikke er tilsluttet korrekt, hvis den betjenes forkert, eller hvis den ikke repareres af autoriseret personel, omfattes eventuelle skader ikke af garantien. Hvis enhederne skal tages ud af drift for bestandigt, skal de bringes til en lokal genbrugsstation for bortskaffelse. Ge akt på säkerhetsinformationen innan enheten tas i bruk. Skulle ytterliggare information behövas kan den återfinnas i Manualen för andra språk. S Säkerhetsföreskrifter mer kan ge upphov till hörselskador! Örat vänjer sig vid höga volymer vilken efter ett tag inte längre verkar så hög. Därför bör man ej ytterligare höja volymen efter att man vant sig. Enheterna (mixer och nätdel) uppfyller EU direktiven och är därför märkta med symbolen . VARNING Nätdelen använder livsfarligt hög spänning internt (230 V~). For att undvika en elektrisk stöt, öppna aldrig chassiet på egen hand utan överlåt all service till auktoriserad verkstad. Ge ovillkorligen även akt på följande: Enheterna är endast avsedda för inomhusbruk. Skydda de mot vätskor, hög luftfuktighet och hög värme (tillåten omgivningstemperatur 0 – 40 °C). Placera inte föremål innehållande vätskor, t. ex. dricksglass, på enheterna. Värmen som alstras skall ledas bort genom cirkulation. Täck därför aldrig över hålen i chassiet. Justera aldrig ljudsystemet och hörlurarna till en väldigt hög ljudnivå. Permanent höga voly- Använd inte mixern och ta omedelbart ut nätdelens kontakt ur elurtaget om något av följande fel uppstår: 1. Om det finns synliga skador på mixern, nätdelen eller nätdelens elsladd. 2. Om någon av enheterna skadats av fall ed. 3. Om enheterna har andra felfunktioner. Enheterna skall alltid lagas på verkstad av utbildad personal. En skadad elsladd på nätdelen skall endast bytas på verkstad. Drag aldrig ut nätdelens kontakt genom att dra i elsladden utan ta tag i kontaktkroppen. Rengör endast med en mjuk och torr trasa, använd aldrig kemikalier eller vatten vid rengöring. Om mixern eller nätdelen används för andra ändamål än avsett, om den kopplas in felaktigt eller används på fel sätt eller inte repareras av auktoriserad personal upphör alla garantier att gälla. I dessa fall tas inget ansvar för uppkommen skada på person eller materiel. Om mixern och nätdelen skall kasseras bör de lämnas in till återvinning. Ole hyvä ja huomioi joka tapauksessa seuraavat turvallisuuteen liittyvät seikat ennen laitteen käyttöä. Laitteen toiminnasta saa lisätietoa tarvittaessa tämän laitteen muunkielisistä käyttöohjeista. FIN Turvallisuudesta Nämä laiteet (mikseri ja virtalähde) täyttävät kaikki niihin kohdistuvat EU-direktiivit ja niille on myönnetty hyväksyntä. VAROITUS Liitettävä virtalähde toimii hengenvaarallisella 230 V~ jännitteellä. Jätä huoltotoimet valtuutetulle huoltoliikkeelle. Epäpätevä huolto ja käsittely saattavat aiheuttaa sähköiskun vaaran. Ole hyvä ja huomioi seuraavat seikat: Nämä laitteet soveltuvat käytettäviksi ainoastaan sisätiloissa. Suojaa laite kosteudelta, vedeltä ja kuumuudelta (sallittu ympäröivä lämpötila 0 – 40 °C). Ole hyvä äläkä laita laitteen päälle mitään nestettä sisältävää astiaa esim. juomalasia. Laitteessa kehittyvä lämpö poistetaan ilmanvaihdolla. Tämän vuoksi laitteen tuuletusaukkoja ei saa peittää. Älä koskaan säädä audiolaitteiston eikä myöskään kuulokkeiden äänitasoa huippulukemille. Jatkuva kova äänenvoimakkuus vaurioittaa kuuloasi! Ihmiskorva tottuu koviin äänenvoimakkuuksiin, jotka eivät tunnu hetken kuluttua enää niin kovailta. Älä lisää äänenvoimakkuutta sen vuoksi, että olet jo tottunut siihen. Irrota virtalähteen johto pistorasiasta, äläkä käynnistä laitetta, jos: 1. laitteessa, virtalähteessä tai verkkovirtajohdossa on havaittava vaurio, 2. laitteiden putoaminen tai vastaava vahinko on saattanut aiheuttaa vaurion, 3. laitteessa esiintyy toimintahäiriöitä. Kaikissa näissä tapauksissa laite tulee toimittaa valtuutettuun huoltoliikkeeseen korjattavaksi. Vioittunut verkkojohto tulee korjauttaa joko valmistajalla tai valtuutetussa huoltoliikkeessä. Älä koskaan vedä verkkovirtajohtoa irti pistorasiasta itse johdosta vetämällä. Käytä puhdistamiseen pelkästään kuivaa, pehmeää kangasta. Älä käytä kemikaaleja tai vettä. Laitteen takuu raukeaa, eikä valmistaja, maahantuoja tai myyjä ota vastuuta mahdollisista välittömistä tai välillisistä vahingoista, jos laitetta (tai sen virtalähdettä) on käytetty muuhun kuin alkuperäiseen käyttötarkoitukseen, laitetta on taitamattomasti käytetty tai kytketty, tai laitetta on huollettu muussa kuin valtuutetussa huollossa. Kun laite joskus poistetaan lopullisesti käytöstä, huolehdi, että laite hävitetään asianmukaisesti jätteen käsittelylaitoksessa. 23 ® MONACOR INTERNATIONAL GmbH & Co. KG • Zum Falsch 36 • 28307 Bremen • Germany Copyright © by MONACOR INTERNATIONAL. All rights reserved. A-1238.99.01.07.2011