1
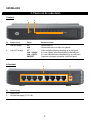
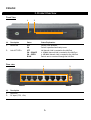
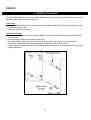
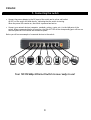
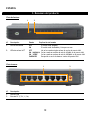
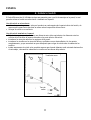
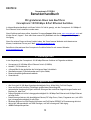
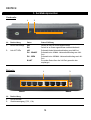
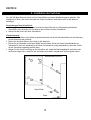
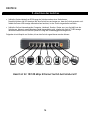
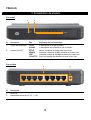
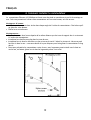
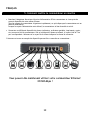
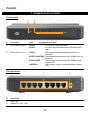
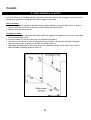
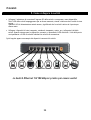
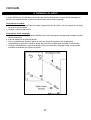
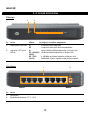
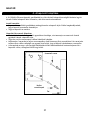
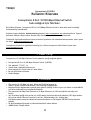
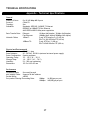
NEDERLANDS
Conceptronic C100S8A
Gebruiksaanwijzing
Gefeliciteerd met uw nieuwe
Conceptronic 8-poorts 10/100 Mbps ethernet switch.
In deze gebruiksaanwijzing vindt u stap-voor-stap instructies voor de installatie van de Conceptronic 8poorts 10/100 Mbps ethernet switch.
Bij problemen kunt u het beste naar onze support-site gaan (www.conceptronic.net - klik op ‘Support’).
Daar vindt u een database met veel gestelde vragen (FAQ).
Als u een vraag over dit product heeft die niet op onze website wordt beantwoord, kunt u ons gerust emailen op [email protected].
Ga voor meer informatie over Conceptronic producten naar de Conceptronic website:
www.conceptronic.net.
1. Inhoud verpakking
U vindt de volgende items in de verpakking van de Conceptronic 10/100 Mbps ethernet switch:
•
•
•
•
•
•
Conceptronic 8-poorts 10/100 Mbps ethernet switch (C100S8A)
Lichtnetadapter 7,5V gelijkstroom, 1A
4 rubberen pootjes voor bureaugebruik
Wandmontagekit (2 zelftappende schroeven en 2 nylon pluggen)
Deze meertalige gebruiksaanwijzing
Garantiekaart
2. Mogelijkheden
• Alle poorten zijn dual-speed 10/100 Mbps met NWay en full/half duplex.
• Store-and-forward schakeling zorgt voor gegevensintegriteit.
• Auto-polariteit corrigeert per poort eventuele verwisseling van de kabelparen voor verzenden en
ontvangen.
• Gegevenstransport met 100% kabelsnelheid (full wire speed) voor 100 Mbps snel ethernet en 10 Mbps
ethernet op alle poorten.
• Datafiltering verwijdert alle slechte pakketten (CRC align fouten, runts, fragmenten, etc.) op 100%
kabelsnelheid voor alle poorten.
• Half-duplex botsinggebaseerde back-pressure jamming en full-duplex IEEE 802.3x flow control.
• 2K zelflerende actieve tabel met MAC-adressen op basis van leeftijd (aging).
• 448 KBit buffergeheugen voor datapakketten.
1
NEDERLANDS
3. Plaats van de onderdelen
Voorkant
1
2
Nr
Beschrijving
Status
Betekenis status
1.
Aan/uit lampje
2.
Link/ACT lampjes
UIT
AAN
UIT
AAN - ORANJE
AAN - GROEN
KNIPPERT
Switch staat uit
Switch staat aan en is klaar voor gebruik
Geen netwerkverbinding aanwezig op de LAN-poort
Er is een 10 Mbit netwerkverbinding op de LAN-poort
Er is een 100 Mbit netwerkverbinding op de LAN-poort
Gegevens ontvangen/verzonden via de LAN-poort
Achterkant
Nr
Beschrijving
1.
2.
LAN-poorten
Gelijkstroomingang (7,5V 1,5A)
1
2
2
NEDERLANDS
4. Switch installeren
De 10/100 Mbps ethernet switch wordt geleverd met rubberen pootjes en wandmontagekit. Hiermee kunt
u de switch op een bureau plaatsen of aan de muur hangen.
Bureaugebruik:
• Kleef de meegeleverde rubberen voetjes aan de onderkant van de switch op de vier hoeken. Dit
voorkomt dat de switch van uw bureau glijdt.
• Zet de switch op uw bureau.
Wandmontage:
• Boor twee gaatjes in de muur met een tussenruimte gelijk aan de afstand tussen het midden van de
openingen aan de onderkant van de switch.
• Doe de nylon pluggen in de gaatjes in de muur.
• Schroef de schroeven met een schroevendraaier in de pluggen. Schroef de schroeven niet helemaal
vast: u heeft wat ruimte nodig om de switch over de schroeven te schuiven.
• Plaats de switch voorzichtig tegen de muur, zorg dat de schroeven in de bijbehorende openingen
komen en schuif de switch een stukje schuin omlaag.
3
NEDERLANDS
5. Switch aansluiten
• Sluit de lichtnetadapter aan op de DC gelijkstroomingang van de switch en op een stopcontact.
Alle lampjes van de switch knipperen even om aan te geven dat de switch wordt gestart.
Wanneer het aan/uit-lampje blijft branden, staat de switch aan en is hij klaar voor gebruik.
• Sluit uw netwerkapparaten (computer, notebook, printer, router, etc.) aan op de LAN-poorten van de
switch. Wanneer een aangesloten apparaat wordt aangezet, gaat het Link/ACT lampje van de
betreffende poort aan, waarbij de kleur de verbindingssnelheid aangeeft.
Hieronder ziet u een voorbeeld van apparaten die op de switch zijn aangesloten:
Notebook
PC
NAS
Mediaspeler
Notebook
IP-camera
PC
Router
Uw 10/100 Mbps ethernet switch is nu klaar voor gebruik!
4
ENGLISH
Conceptronic C100S8A
User Manual
Congratulations on the purchase of your
Conceptronic 8 Port 10/100 Mbps Ethernet Switch.
This user manual gives you a step-by-step explanation of how to install the Conceptronic 8 Port
10/100Mbps Ethernet Switch.
When problems occur, we advise you to go to our support-site (go to www.conceptronic.net and click
‘Support’. Here you will find the Frequently Asked Questions Database.
When you have other questions about your product and you cannot find it at our website, then contact us
by e-mail: [email protected]
For more information about Conceptronic products, please visit the Conceptronic Web Site:
www.conceptronic.net
1. Package contents
The following items are present in the package of the Conceptronic 10/100 Mbps Ethernet Switch:
•
•
•
•
•
•
Conceptronic 8 Port 10/100 Mbps Ethernet Switch (C100S8A)
Power adapter, 7.5V DC, 1A
4 rubber feet for desktop usage
Wall mount kit (2 tapping screws and 2 nylon ancors)
This multilanguage user manual
Warranty Card
2. Features
• All ports are 10/100 Mbps dual-speed, NWay enabled Full/Half duplex.
• Store and forward switching scheme ensures data integrity.
• Auto-polarity feature corrects reversed polarity on the transmit and receive twisted-pairs for each
port.
• 100% full wire speed data forwarding for 100 Mbps Fast Ethernet and 10 Mbps Ethernet on all ports.
• Data filtering eliminates all bad packets (CRC Align errors, runts, fragments, etc.) at 100% wire-speed
for all ports.
• Half-duplex collision-based back-pressure jamming and Full-duplex IEEE 802.3x flow control enabled.
• 2K active MAC address table with self learning and table aging.
• 448KBit Packet Buffer memory.
5
ENGLISH
3. Product Overview
Front View
1
2
Nr
Description
Status
Status Explanation
1.
Power LED
2.
Link/ACT LED’s
OFF
ON
OFF
ON - ORANGE
ON - GREEN
BLINK
Switch is not powered
Switch is powered and ready to use
No Network Link is created to the LAN Port
A 10 Mbit Network Link is created to the LAN Port
A 100 Mbit Network Link is created to the LAN Port
Data is sent or received through the LAN Port
Rear view
Nr
Description
1.
2.
LAN Ports
DC Input (7.5V, 1.5A)
1
2
6
ENGLISH
4. Installing the switch
The 10/100 Mbps Ethernet Switch comes with rubber feet and a wall mount kit. This allows you to use the
switch on your desk or mounted to the wall.
Desk usage:
• Stick the included rubber feet in each corner to the bottom of the switch. This will prevent the switch
from moving on your desk.
• Place the switch on your desk.
Wall mounted usage:
• Drill two holes into the wall with the same distance as the screw support holes located on the bottom
of the switch.
• Insert the nylon anchors into the holes in the wall.
• Insert the screws in the nylon anchors and fasten them with a screwdriver. Do not screw them
completely into the wall: you need some space to slide the switch onto the screws.
• Gently place the switch onto the wall with the front panel facing up or down by sliding the screws into
the provided slots.
7
ENGLISH
5. Connecting the switch
• Connect the power adapter to the DC input of the switch and to a free wall outlet.
All LED’s of the switch will blink shortly, indicating that the switch is starting.
When the power LED remains on, the switch is powered and active.
• Connect your network devices (computer, notebook, printer, router, etc.) to the LAN ports of the
switch. When a connected device is turned on, the Link/ACT LED of the corresponding port will turn on
and the Speed LED will indicate the connection speed.
Below you will see an example of connected devices to the switch:
Notebook
PC
NAS
Mediaplayer
Notebook
IP-Camera
PC
Router
Your 10/100 Mbps Ethernet Switch is now ready to use!
8
ESPAÑOL
C100S8A de Conceptronic
Manual del usuario
Felicidades por la compra de su
Switch Ethernet de 10/100 Mbps y 8 puertos de Conceptronic
Este manual de usuario le indica detalladamente cómo instalar el Switch Ethernet de 10/100 Mbps y 8
puertos de Conceptronic.
Si se producen problemas, le aconsejamos que consulte a nuestro servicio técnico (en
www.conceptronic.net y haga clic en “Support”). Aquí encontrará la base de datos de las preguntas más
frecuentes o FAQ.
Si tiene otras preguntas sobre su producto y no las encuentra en nuestro sitio web, póngase en contacto
con nosotros por correo electrónico: [email protected]
Si desea información adicional sobre los productos de Conceptronic, visite nuestro sitio web:
www.conceptronic.net
1. Contenido del paquete
El paquete del Switch Ethernet de 10/100 Mbps de Conceptronic incluye los elementos siguientes:
•
•
•
•
•
•
Switch Ethernet de 10/100 Mbps y 8 puertos de Conceptronic (C100S8A)
Adaptador de alimentación (7,5 V DC, 1 A)
4 Peanas de goma para utilizar el switch en su escritorio
Kit de montaje en la pared (2 tornillos de rosca y 2 tacos de nailon)
Guía del usuario multilingüe
Tarjeta de garantía
2. Características
• Todos los puertos tienen doble velocidad (10 /100 Mbps), modos full y half duplex con tecnología NWay.
• El modo switch de almacenamiento y reenvío garantiza la integridad de los datos.
• La función de polaridad automática corrige la polaridad invertida en la transmisión y recepción de
pares trenzados en cada puerto.
• Reenvío de datos al 100% de la velocidad de cable para Ethernet Fast de 100 Mbps y Ethernet de 10
Mbps en todos los puertos.
• El filtrado de datos elimina todos los paquetes con errores (errores de alineación de CRC, runts,
fragmentos, etc.) al 100% de la velocidad de cable en todos los puertos.
• Reducción de interferencias basadas en colisión de paquetes para modo half duplex y control de flujo
IEEE 802.3x para modo full duplex.
• Tabla de dirección MAC activa de 2K con autoaprendizaje y caducidad.
• Memoria buffer de paquetes de 448 KBit
9
ESPAÑOL
3. Resumen del producto
Vista delantera
1
2
Nº
Descripción
Estado
1.
LED de encendido
2.
LEDs de enlace/ACT
OFF
ON
OFF
ON – NARANJA
ON – VERDE
PARPADEO
Vista trasera
Nº
Descripción
1.
2.
Puertos LAN
Entrada DC (7,5 V, 1,5 A)
Explicación del estado
El switch está apagado
El switch está encendido y listo para su uso
No se ha creado ningún enlace de red en el puerto LAN
Se ha creado un enlace de red de 10 Mbit en el puerto LAN
Se ha creado un enlace de red de 100 Mbit en el puerto LAN
Recepción o envío de datos a través del puerto LAN
1
10
2
ESPAÑOL
4. Instalar el switch
El Switch Ethernet de 10/100 Mbps incluye una peana de goma y un kit de montaje en la pared, lo cual
permite colocar el switch en su escritorio o instalarlo en la pared.
Uso del switch en el escritorio:
• Adhiera la peana de goma que incluye el producto en cada esquina de la parte inferior del switch, de
manera que la peana evite que éste se mueva sobre la superficie del escritorio.
• Coloque el switch en su escritorio.
Uso del switch instalado en la pared:
• Taladre dos agujeros en la pared con una distancia entre ellos equivalente a la distancia entre los
orificios de los tornillos de soporte ubicados en la parte inferior del switch.
• Introduzca los tacos de nailon en los agujeros de la pared.
• Introduzca los tornillos en los tacos de nailon y apriételos con un destornillador. No los apriete
completamente, ya que necesitará un poco de espacio para colgar el switch sobre la cabeza de los
tornillos.
• Instale suavemente el switch en la pared de manera que el panel delantero esté orientado hacia arriba
o hacia abajo, colocando la cabeza de los tornillos en las ranuras del producto.
Tornillo de rosca
Taco de
nailon
Pared
11
ESPAÑOL
5. Conectar el switch
• Conecte el adaptador de alimentación a la entrada DC del switch y a un enchufe de pared libre.
Todos los LEDs del switch parpadearán unos segundos, lo cual indica que el switch se está iniciando.
Si el LED de encendido permanece iluminado significa que el switch está encendido y activo.
• Conecte sus dispositivos de red (ordenador de sobremesa, ordenador portátil, impresora, router, etc.) a
los puertos LAN del switch. Cuando un dispositivo conectado esté encendido, el LED de enlace/ACT del
puerto correspondiente se encenderá y el LED de velocidad indicará la velocidad de conexión.
A continuación mostramos un ejemplo de dispositivos conectados al switch:
Ordenador
portátil
PC
NAS
Reproductor
multimedia
Ordenador
portátil
Cámara IP
PC
Router
Su Switch Ethernet de 10/100 Mbps ya está listo para su uso
12
DEUTSCH
Conceptronic C100S8A
Benutzerhandbuch
Wir gratulieren Ihnen zum Kauf Ihres
Conceptronic 10/100 Mbps 8-Port Ethernet Switches.
In diesem Benutzerhandbuch wird Ihnen Schritt für Schritt gezeigt, wie der Conceptronic 10/100Mpbs 8Port Ethernet Switch installiert werden muss.
Wenn Probleme auftreten sollten, besuchen Sie unsere Support-Seite (unter www.conceptronic.net) und
klicken Sie auf ‚Support’. Dort steht Ihnen unsere FAQ-Datenbank mit den häufig gestellten Fragen zur
Verfügung.
Wenn Sie weitere Fragen zu Ihrem Produkt haben, die Sie auf unserer Webseite nicht beantworten
können, kontaktieren Sie uns per E-Mail: [email protected]
Detaillierte Informationen über Conceptronic Produkte finden Sie auf unserer Webseite:
www.conceptronic.net
1. Packungsinhalt
In der Verpackung des Conceptronic 10/100 Mbps Ethernet Switches ist Folgendes enthalten:
•
•
•
•
•
•
Conceptronic 10/100 Mbps 8-Port Ethernet Switch (C100S8A)
Netzteil 7,5V Gleichstrom, 1A
4 Gummifüße für das Aufstellen des Switches auf dem Schreibtisch
Wandhalterungsset (2 Blechschrauben und 2 Nylon-Dübel)
Dieses mehrsprachige Benutzerhandbuch
Garantiekarte
2. Eigenschaften
• Alle Ports sind 10/100 Mbps-Doppelgeschwindigkeits-Ports, NWay fähig, Full/Half Duplex.
• Store-and-Forward-Switching-Technologie gewährleistet Datenintegrität.
• Automatische Umpolung korrigiert verkehrte Polung auf den verdrillten Doppelleitungen Senden und
Empfang für jeden Port.
• Datenweitergabe mit voller Leitungsgeschwindigkeit für 100 Mbps Fast Ethernet und 10 Mbps Ethernet
auf allen Ports.
• Datenfilterung eliminiert alle beschädigten Pakete (CRC Align Errors, Runts, Fragmente usw.) mit 100%iger Leitungsgeschwindigkeit für alle Ports.
• Rückstaus aufgrund von Half-Duplex-Kollisionen und Full-Duplex IEEE 802.3x Flusssteuerung aktiviert.
• Aktive MAC-Adressentabelle mit 2000 Einträgen, mit Self-Learning und Table-Aging.
• 448KBit Paketpufferspeicher.
13
DEUTSCH
3. Gerätekomponenten
Vorderseite
1
2
Nr.
Beschreibung
Status
Status-Erklärung
1.
Power LED-Anzeige
2.
Link/ACT-LEDs
AUS
EIN
AUS
EIN - ORANGE
Switch ist nicht an Strom angeschlossen
Switch ist an Strom angeschlossen und betriebsbereit
Es besteht keine Netzwerkverbindung zum LAN-Port
Es besteht eine 10 Mbit- Netzwerkverbindung zum LANPort
Es besteht eine 100 Mbit- Netzwerkverbindung zum LANPort
Es werden Daten über den LAN-Port gesendet oder
empfangen
EIN - GRÜN
BLINKT
Rückseite
Nr.
Beschreibung
1.
2.
LAN-Anschlüsse
Gleichstromeingang (7,5V, 1,5A)
1
14
2
DEUTSCH
4. Installation des Switches
Der 100/100 Mbps Ethernet Switch wird mit Gummifüßen und einem Wandhalterungsset geliefert. Dies
ermöglicht es Ihnen, den Switch entweder auf Ihrem Schreibtisch aufzustellen oder an der Wand zu
befestigen.
Verwendung auf dem Schreibtisch:
• Befestigen Sie auf der Unterseite des Switches an allen Ecken die im Lieferumfang enthaltenen
Gummifüße. Dies verhindert ein Verrutschen des Switches auf dem Schreibtisch.
• Stellen Sie den Switch auf Ihren Schreibtisch.
Wandbefestigung:
• Bohren Sie zwei Löcher in die Wand im gleichen Abstand wie die der Schraubenlöcher an der Halterung
auf der Unterseite des Switches.
• Führen Sie die Nylon-Dübel in die Löcher in der Wand ein.
• Führen Sie die Schrauben in die Nylon-Dübel ein und ziehen Sie sie mit einem Schraubendreher an.
Schrauben Sie sie nicht vollständig in die Wand: Sie müssen ein wenig herausstehen, damit der Switch
an den Schrauben aufgehängt werden kann.
• Hängen Sie den Switch vorsichtig an den Schrauben auf, wobei die Bedienungsblende nach oben oder
nach unten zeigen kann, indem Sie die Schrauben in die dafür vorgesehenen Schlitze gleiten lassen.
Blechschraube Größe 6
Nylon-Dübel
Wand
15
DEUTSCH
5. Anschluss des Switches
• Schließen Sie das Netzteil am DC-Eingang des Switches und an einer Steckdose an.
Daraufhin blinken alle LED-Anzeigen auf dem Switch kurz und zeigen an, dass der Switch gestartet wird.
Sobald die Power-LED-Anzeige ununterbrochen leuchtet, ist der Switch eingeschaltet und aktiv.
• Schließen Sie Ihre Netzwerkgeräte (Computer, Notebook, Drucker, Router usw.) an die LAN-Ports des
Switches an. Wenn ein angeschlossenes Gerät eingeschaltet wird, schaltet die Link/ACT-LED-Anzeige
des betreffenden Ports ein und die Speed-LED zeigt die Verbindungsgeschwindigkeit an.
Folgendes ist ein Bespiel von Geräten, die an den Switch angeschlossen werden können:
Notebook
PC
NAS
Media Player
Notebook
IP-Kamera
PC
Router
Damit ist Ihr 10/100 Mbps Ethernet Switch betriebsbereit!
16
FRANÇAIS
Conceptronic C100S8A
User Manual
Nous vous félicitons pour l’achat de ce
commutateur Ethernet 10/100 Mbps à 8 ports de Conceptronic
Le présent guide d’installation vous explique étape par étape comment installer le commutateur Ethernet
10/100Mbp à 8 ports de Conceptronic.
En cas de problème, nous vous conseillons de consulter notre site web www.conceptronic.net et de
cliquer sur « Support ». Vous y trouverez les réponses aux questions les plus fréquentes (FAQ).
Pour toute autre question au sujet de notre produit, ou si vous ne trouvez pas l’information dont vous
avez besoin sur notre site web, vous pouvez nous contacter par mail : [email protected].
Pour de plus amples informations sur les produits Conceptronic, merci de visiter notre site web :
www.conceptronic.net.
1. Contenu du paquet
Le présent paquet du commutateur Ethernet 10/100Mbp à 8 ports de Conceptronic doit contenir les
éléments suivants :
•
•
•
•
•
•
Commutateur Ethernet 10/100Mbp à 8 ports de Conceptronic (C100S8A)
Adaptateur électrique de 7,5 V DC, 1 A
4 pieds en caoutchouc pour un usage sur bureau
kit de montage au mur (2 vis et 2 chevilles en nylon)
Ce guide d’utilisation multilingue
Fiche de garantie
2. Caractéristiques
• Tous les ports sont équipés d’une vitesse duale 10/100Mbps, avec la fonction NWay Full/Half duplex
activée.
• Le système de commutation Store and forward permet de protéger l’intégrité des données.
• La fonction d’auto-polarité corrige toute polarité inversée pendant la transmission et la réception des
paires torsadées pour chaque port.
• Envoi des données à la vitesse wire speed 100% full par Fast Ethernet 100 Mbps et Ethernet 10 Mbps sur
tous les ports.
• Le filtrage des données permet de supprimer toutes les erreurs de paquets (erreurs Align CRC, runts,
fragments, etc.) à une vitesse wire-speed 100 % pour tous les ports.
• Signal de jamming en contre-pression collision-based et contrôle de flux Full-duplex IEEE 802.3x activé.
• Tableau d’adresse MAC activé 2K avec auto-apprentissage et table-aging.
• Mémoire Buffer Packet de 448 Kbit.
17
FRANÇAIS
3. Présentation du produit
Vue avant
1
2
Nº
Description
État
Explication de fonctionnement
1.
Voyant d’alimentation
2.
Voyants Link/ACT
ÉTEINT
ALLUMÉ
ÉTEINT
ORANGE
VERT
CLIGNOTTE
L’interrupteur n’est pas alimenté
L’interrupteur est alimenté et prêt à l’emploi
Aucune connexion au réseau vers le port LAN
Connexion réseau de 10 Mbit existante sur le port LAN
Connexion réseau de 100 Mbit existante sur le port LAN
Envoi ou réception de données à travers le port LAN
Vue arrière
Nº
Description
1.
2.
Ports LAN
Alimentation électrique (7,5 V, 1,5 A)
1
18
2
FRANÇAIS
4. Comment installer le commutateur
Le commutateur Ethernet 10/100 Mbps est fourni avec des pieds en caoutchouc et son kit de montage au
mur. Cela vous permettra d’utiliser votre commutateur soit sur votre bureau, soit fixé au mur.
Montage sur le bureau :
• Collez les pieds en caoutchouc inclus dans chaque angle de l’arrière du commutateur. Cela évitera qu’il
ne glisse sur votre bureau.
• Placez-le sur votre bureau.
Montage au mur :
• Percez deux trous dans le mur séparés de la même distance que les trous de support des vis se trouvant
à l’arrière du commutateur.
• Introduisez les chevilles en nylon dans les trous du mur.
• Introduisez les vis dans les chevilles en nylon et serrez le tout à l’aide d’un tourne-vis. Ne serrez pas à
fond les vis dans le mur : vous aurez besoin d’un peu d’espace pour faire glisser le commutateur le long
des vis.
• Posez avec précaution le commutateur contre le mur, avec le panneau avant orienté vers le haut ou
vers le bas, en faisant glisser les vis dans les logements prévus à cet effet.
19
FRANÇAIS
5. Comment mettre le commutateur en marche
• Branchez l’adaptateur électrique à la prise d’alimentation DC du commutateur et à une prise de
courant disponible de votre maison/bureau.
Tous les voyants du commutateur clignoteront rapidement, ce qui indique que le commutateur est en
phase d’initialisation.
Lorsque le voyant d’alimentation reste allumé, le commutateur et bien branché et activé.
• Connectez vos différents dispositifs du réseau (ordinateur, ordinateur portable, imprimante, router,
etc.) aux ports LAN du commutateur. Dès qu’un dispositif réseau est allumé, le voyant Link/ACT du
port correspondant s’allumera et le voyant de la vitesse indiquera la vitesse de connexion.
Ci-dessous se trouve un exemple de dispositifs pouvant être connectés au commutateur :
Portable
PC
NAS
Mediaplayer
Portable
Caméra IP
PC
Router
Vous pouvez dès maintenant utiliser votre commutateur Ethernet
10/100 Mbps !
20
ITALIANO
Conceptronic C100S8A
Manuale d’uso
Vi ringraziamo per aver acquistato questo
Switch Ethernet 10/100 Mbps a 8 porte di Conceptronic
Il presente Manuale d’uso spiega passo a passo come installare lo Switch Ethernet 10/100Mbps a 8 porte di
Conceptronic.
In caso di problemi, si consiglia di consultare la pagina web di supporto (collegandovi con
www.conceptronic.net e facendo clic su “Support”), dove troverete il database con le domande e i quesiti
più frequenti, accompagnati dalle relative risposte.
In caso di domande e dubbi di altra natura riguardanti il prodotto e che non appariranno nel nostro sito
web, potete contattarci via e-mail al seguente indirizzo: [email protected]
Per maggiori informazioni sui prodotti di Conceptronic potete consultare la pagina web di Conceptronic:
www.conceptronic.net
1. Contenuto della confezione
La confezione contenente lo Switch Ethernet 10/100 Mbps di Conceptronic deve essere composta dai
seguenti elementi:
•
•
•
•
•
•
Switch Ethernet 10/100 Mbps a 8 porte di Conceptronic (C100S8A)
Adattatore di corrente, 7.5V DC, 1A
Quattro piedini in gomma per un uso su scrivania
Kit per montaggio a muro (due viti autofilettanti e due tasselli in nylon)
Il presente Manuale d’uso multilingue
Scheda di garanzia
2. Caratteristiche
• Tutte le porte sono dotate di velocità a 10 o a 100 Mbps, con funzione NWay attivata Full/Half duplex.
• Grazie al sistema di commutazione store and forward, si può proteggere l’integrità dei dati.
• Grazie al sistema di autopolarità è possibile corregere la polarità inversa nelle coppie intrecciate di
invio e ricezione per ogni porta.
• Invio dati con velocità full wire speed 100% per Fast Ethernet 100 Mbps e per Ethernet 10 Mbps in tutte
le porte.
• Grazie al filtraggio dei dati vengono eliminati tutti gli errori di pacchetto (errori CRC, Align, runt,
frammenti, ecc.) con wire speed 100% per tutte le porte.
• Segnale di jamming in contropressione collision-based per modalità half-duplex e controllo di flusso
full-duplex IEEE 802.3x attivato.
• Tabella di 2K indirizzo MAC attivo con autoapprendimento e table aging.
• Buffer pacchetti 448KBit.
21
ITALIANO
3. Spiegazione del prodotto
Vista frontale
1
2
N.
Descrizione
Stato
1.
LED di alimentazione
SPENTO
ACCESO
2.
LED di attività / Link
Vista posteriore
N.
Descrizione
1.
2.
Porte LAN
Ingresso DC (7.5V, 1.5A)
Spiegazione dello stato
Lo switch non viene alimentato
Lo switch viene alimentato ed è pronto per essere
usato
SPENTO
Non esiste nessuna connessione di rete verso la
porta LAN
ACCESO-ARANCIONE Esiste nessuna connessione di rete 10 Mbit verso la
porta LAN
ACCESO–VERDE
Esiste nessuna connessione di rete 100 Mbit verso
la porta LAN
LAMPEGGIA
I dati vengono inviati o ricevuti attraverso la porta
LAN
1
22
2
ITALIANO
4. Come installare lo switch
Lo Switch Ethernet 10/100 Mbps è dotato di piedini in gomma e di un kit per montaggio a muro, perché in
questo modo potrà essere usato sulla scrivania o appeso a una parete.
Uso su scrivania:
• Attaccare i piedini in gomma in dotazione in ogni angolo nella parte inferiore dello switch. In questo
modo si eviterà che lo switch si muova una volta posizionato sulla scrivania.
• Mettere lo switch sulla scrivania.
Uso appeso al muro:
• Fare due fori nel muro alla stessa distanza di quelli che appaiono nel supporto per viti che si trova nella
parte inferiore dello switch.
• Inserire i tasselli in nylon all’interno dei fori realizzati nella parete.
• Inserire le viti nei tasselli di nylon e stringerli con un cacciavite. Non avvitarli del tutto alla parete:
sarà necessario un po’ di spazio per introdurre lo switch nelle viti.
• Appendere delicatamente lo switch alla parete con il pannello frontale rivolto verso l’alto o vero il
basso infilando le apposite aperture nelle viti.
23
ITALIANO
5. Come collegare lo switch
• Collegare l’adattatore di corrente all’ingresso DC dello switch e a una presa a muro disponibile.
Tutti i LED dello switch lampeggeranno per un breve momento, stando a indicare che lo switch è stato
acceso.
Quando il LED di alimentazione resterà acceso, significherà che lo switch è attivo ed è pronto per
essere usato.
• Collegare i dispositivi di rete (computer, notebook, stampante, router, ecc.) alle porte LAN dello
switch. Quando viene acceso un dispositivo connesso, si accenderà il LED di attività / Link della porta
corrispondente e il LED di velocità indicherà la velocità di connessione.
Qui di seguito appare un esempio dei dispositivi connessi allo switch:
Notebook
PC
NAS
Lettore media Notebook
Camera IP
PC
Router
Lo Switch Ethernet 10/100 Mbps è pronto per essere usato!
24
PORTUGUÊS
Conceptronic C100S8A
Manual do utilizador
Parabéns pela compra do seu
switch de Ethernet de 8 portas 10/100 Mbps da Conceptronic.
Este manual do utilizador fornece-lhe uma explicação passo-a-passo sobre como instalar o switch de
Ethernet de 8 portas 10/100 Mbps da Conceptronic.
Quando tiver algum problema, aconselhamo-lo a consultar a nossa página de suporte (vá a
www.conceptronic.net) e clicar em ‘Support’ (Suporte). Aí vai encontrar a Base de Dados das Perguntas
Mais Frequentes.
Quando tiver outras questões sobre o seu produto e não encontrar resposta para elas na nossa página,
então contacte-nos por e-mail: [email protected]
Para mais informações sobre os produtos da Conceptronic, visite a página web da Conceptronic em:
www.conceptronic.net
1. Conteúdo da embalagem
Existem os seguintes elementos na embalagem do switch de Ethernet 10/100 Mbps da Conceptronic:
•
•
•
•
•
•
Switch de Ethernet de 8 portas 10/100 Mbps da Conceptronic (C100S8A)
Transformador, 7,5 V CC, 1 A
4 pés de borracha para colocar o switch na secretária
Kit de montagem na parede (2 parafusos de perfuração e 2 buchas)
Este manual de utilizador multilingue
Certificado de garantia
2. Características
• Todas as portas são de dupla velocidade 10/100 Mbps, NWay com possibilidade de serem half e full
duplex.
• O esquema de comutação para armazenamento e encaminhamento assegura a integridade dos dados.
• A característica de auto-polaridade corrige as polaridades reversas na transmissão e recepção de pares
torcidos para cada porta.
• Encaminhamento de dados a 100% da velocidade total para Ethernet rápida a 100 Mbps e Ethernet a 10
Mbps em todas as portas.
• A filtragem de dados elimina todos os pacotes corrompidos (erros de alinhamento CRC, runts,
fragmentos, etc.) a 100% da velocidade para todas as portas.
• Permite o controlo de fluxo de full-duplex IEEE 802.3x e controlo de congestionamento de pressão
contrária de tráfego por colisões de pacotes half-duplex.
• Tabela de MAC address 2K activo com auto-reconhecimento e renovação de endereços da tabela.
• Buffer para acomodação de pacotes de 448 Kbit.
25
PORTUGUÊS
3. O produto
Parte da frente
1
2
Nº
Descrição
Estado
Explicação do estado
1.
LED de Alimentação
2.
LED’s Link/ACT
OFF
ON
OFF
ON - LARANJA
ON - VERDE
INTERMITENTE
O switch não está ligado.
O switch está ligado e pronto a usar.
Não está criada uma ligação de rede na porta LAN
Está criada uma ligação de rede de 10 Mbit na porta LAN
Está criada uma ligação de rede de 100 Mbit na porta LAN
Os dados são enviados ou recebidos através da porta LAN
Parte de trás
Nº
Descrição
1.
2.
Portas LAN
Entrada CC (7,5 V, 1,5 A)
1
26
2
PORTUGUÊS
4. Instalação do switch
O switch de Ethernet 10/100 Mbps é fornecido com uns pés de borracha e com um kit de montagem na
parede. Isto permite-lhe usar o switch na sua secretária ou montado na parede.
Colocação na secretária:
• Cole os pés de borracha incluídos aos cantos da parte de baixo do switch. Isto vai prevenir que o switch
se mova na sua secretária.
• Coloque o switch na secretária.
Colocação do switch na parede:
• Faça dois buracos na parede à mesma distância dos orifícios de suporte dos parafusos situados na parte
de baixo do switch.
• Insira as buchas nos orifícios da parede.
• Insira os parafusos nas buchas e aperte-os com uma chave de parafusos. Não os aparafuse
completamente na parede: tem de os deixar um pouco de fora para poder encaixar o switch neles.
• Coloque cuidadosamente o switch na parede com a parte da frente virada para cima, ou para baixo,
inserindo os parafusos nos orifícios do switch.
27
PORTUGUÊS
5. Ligar o switch
• Ligue o transformador à entrada CC do switch e a uma tomada livre.
Todos os LED’s do switch irão ficar intermitentes por alguns instantes, indicando assim que o switch
está a iniciar.
Quando o LED de alimentação ficar acesso, o switch está ligado e activo.
• Ligue os seus dispositivos de rede (computador, portátil, impressora, router, etc.) às portas LAN do
switch. Quando um dispositivo estiver ligado, o LED Link/ACT da porta correspondente vai acender-se e
o LED de velocidade vai indicar a velocidade da ligação.
Abaixo, pode ver um exemplo de dispositivos ligados ao switch:
Comp. portátil
PC
NAS
Leitor
Comp. portátil
multimédia
Câmara IP
PC
Router
O seu switch de Ethernet 10/100 Mbps está agora pronto a ser usado!
28
MAGYAR
Conceptronic C100S8A
Kezelési útmutató
Köszönjük, hogy a Conceptronic 8 portos 10/100 Mb/s Ethernet
kapcsolót választotta.
Ez a kezelési útmutató lépésről lépésre elmagyarázza, miként kell a Conceptronic 8 portos 10/100 Mb/s
Ethernet kapcsolóját telepítenie.
Ha probléma jelentkezne, azt tanácsoljuk, keresse fel terméktámogatást nyújtó webhelyünket
(látogasson el a www.conceptronic.net honlapra, majd ott kattintson a „Support”-ra). Ott található
ugyanis a gyakran ismétlődő kérdések (GYIK) adatbázisa.
Ha a termékkel kapcsolatban további kérdése volna, és arra választ webhelyünkön nem talál, e-mailben
fordulhat is hozzánk: [email protected]
A Conceptronic termékekkel kapcsolatos további tájékozódás végett látogasson el Conceptronic
webhelyére: www.conceptronic.net
1. A csomag tartalma
A Conceptronic 10/100 Mb/s Ethernet kapcsolót tartalmazó csomagban az alábbiak találhatók:
•
•
•
•
•
•
Conceptronic 8 portos 10/100 Mb/s Ethernet kapcsoló (C100S8A)
Hálózati adapter, 7,5 V egyenáram, 1 A
4 gumiláb az asztali használathoz
Készlet a falra szereléshez (2 önmetsző csavar és 2 nejlon csavarcsap)
Ez a többnyelvű kezelési útmutató
Jótállási jegy
2. Jellemzők
• Minden port 10/100 Mb/s érték mellett kétsebességű, NWay szempontjából engedélyezett,
kétirányú/váltakozó kétirányú.
• A tárolás és továbbítás közötti váltás sémája biztosítja az adatintegritást.
• Automatikus polaritásbeállítási funkció korrigálja átvitelkor a fordított polaritást, egyszersmind fogadja
a sodrott érpárokat minden egyes porthoz.
• A 100%-os teljes vezetékes sebességű adattovábbítás 100 Mb/s a Fast Ethernetnél, illetve 10 Mb/s az
Ethernetnél minden port esetében.
• Az adatszűrés minden port esetében 100%-os sebesség mellett kiküszöböli az összes hibás csomagot
(CRC-igazítási hiba, különösen rövid Ethernet-keretek, részletek stb.).
• Automatikus polaritásbeállítási funkció korrigálja átvitelkor a fordított polaritást, egyszersmind fogadja
a sodrott érpárokat minden egyes port esetében.
• 2 K-s aktív MAC címtábla, tanulórendszerrel és táblázatelévüléssel.
• 448 kbit-es csomagpuffer-memória.
29
MAGYAR
3. A termék áttekintése
Elölnézet
1
2
Sz.
Leírás
Állapot
1.
Áramellátást jelző LED
2.
Kapcsolat-/ACT-jelző
LED-ek
KI
BE
KI
BE – NARANCSSÁRGA
BE - ZÖLD
VILLOG
Hátulnézet
Sz.
Leírás
1.
2.
LAN portok
Egyenáramú bemenet (7,5 V, 1,5 A)
Az állapotra vonatkozó magyarázat
A kapcsoló nincs áram alatt
A kapcsoló áram alatt van és használatkész
Nincs kialakítva hálózati kapcsolat a LAN port felé
10 Mbit-es hálózat kialakítva a LAN port felé
A 100 Mbit-es hálózat kialakítva a LAN port felé
Adatküldés, illetve –fogadás a LAN porton keresztül
1
30
2
MAGYAR
4. A kapcsoló telepítése
A 10/100 Mb/s Ethernet kapcsoló gumilábakkal és a falra történő felszerelésre szolgáló készlettel együtt
érkezik. Ezáltal a kapcsoló akár íróasztalon, akár falra szerelve használható.
Asztali használat:
• Ragassza fel a mellékelt gumilábakat mindegyik sarokra a kapcsoló alján. Ezáltal megakadályozható,
hogy a kapcsoló az asztalon elmozduljon.
• Tegye a kapcsolót az asztalra.
Használat falra szerelt állapotban:
• Fúrjon két lyukat a falba egymástól ugyanakkora távolságra, mint amennyire a csavartartó furatok
egymástól vannak a kapcsoló alján.
• Tegye be a nejlon csavarcsapot a falban kialakított lyukakba.
• Helyezze be a csavarokat a nejlon csavarcsapokba, majd húzza meg őket csavarhúzóval. Ne csavarja be
teljesen őket a falba: szükségük van ugyanis némi helyre, hogy a kapcsoló rácsúszhasson a csavarokra.
• A csavaroknak az erre a célra szolgáló hasítékokba történő becsúsztatásával óvatosan helyezze fel a
kapcsolót a falra, előlapjával felfelé vagy lefelé.
önmetsző csavar
Nejlon
csavarcsapok
Fal
31
MAGYAR
5. A kapcsoló csatlakoztatása
• Csatlakoztassa a hálózati adaptert a kapcsoló egyenáramú bemenetéhez, valamint szabad
falicsatlakozóhoz.
A kapcsoló minden LED-je kis ideig villog, jelezve, hogy a kapcsoló működni kezd.
Ha az áramellátást jelző LED folyamatosan világít, a kapcsoló áram alatt van és aktív.
• Csatlakoztassa hálózati eszközeit (számítógép, notebook, nyomtató, útválasztó stb.) a kapcsoló LAN
portjaihoz. Ha valamelyik csatlakoztatott eszközt bekapcsolja, a megfelelő port kapcsolat-/ACT-jelző
LED-je bekapcsol, egyszersmind a sebességjelző LED jelzi a kapcsolat sebességét.
Lentebb látható egy példa a kapcsolóhoz csatlakoztatott eszközökre:
Notebook
Személyi
Számítógép
Hálózatelérési
Média
rendszer
ejátszó
Notebook
IP- kamera
Személyi
számítógép
Útválasztó
Mostantól a 10/100 Mb/s Ethernet kapcsoló használatkész!
32
TÜRKÇE
Conceptronic C100S8A
Kullanıcı Kılavuzu
Conceptronic 8 Port 10/100 Mbps Ethernet Switch
Satın Aldığınız İçin Tebrikler.
Bu Kullanıcı Kılavuzu, Conceptronic 8 Port 10/100Mbps Ethernet Switch’in adım adım nasıl kurulacağı
konusunda bilgi içermektedir.
Problem ortaya çıktığında, destek sitemize gitmenizi (www.conceptronic.net adresine gidin ve ‘Support’
bölümüne tıklayın) tavsiye ederiz. Burada Sıkça Sorulan Sorular Veritabanını bulacaksınız.
Ürününüzle ilgili başka sorularınız varsa ve bunların yanıtlarını web sitemizde bulamıyorsanız, bize e-posta
ile ulaşın: [email protected]
Conceptronic ürünleri ile ilgili daha fazla bilgi için, lütfen Conceptronic Web Sitesini ziyaret edin:
www.conceptronic.net
1. Paket İçeriği
Conceptronic 10/100 Mbps Ethernet Switch paketinin içeriği aşağıdaki gibidir:
•
•
•
•
•
•
Conceptronic 8 Port 10/100 Mbps Ethernet Switch (C100S8A)
Güç adaptörü, 7.5V DC, 1A
4 lastik ayak, masaüstü kullanım için
Duvar montaj kiti (2 adet vida ve 2 adet dübel)
Bu çok dilli kullanıcı kılavuzu
Garanti Belgesi
2. Özellikler
• Tüm portlar 10/100 Mbps çift hızlı, NWay aktif Full/Half duplex’tir.
• Sakla ve gönder özellikli anahtarlama, veri bütünlüğü sağlamaktadır.
• Kutupların doğru bağlanmasına yarayan Auto-polarity özelliği ile her bir port için iletme ve alma bükülü
çift telleri üzerindeki ters kutuplaşma düzeltilir.
• Tüm portlarda 100 Mbps Fast Ethernet ve 10 Mbps Ethernet için %100 tam kablolu hıza sahip veri
iletimi.
• Veri filtreleme özelliği tüm portlar için %100 kablolu iletim hızında bozuk paketleri (CRC Align hataları,
64 byte’tan küçük Ethernet frame’leri (runt’lar), bölümlenmeler vb.) elimine eder.
• Half-duplex paket çakışması tabanlı karşı basınç bozulması ve Full-duplex IEEE 802.3x akış denetimi
etkindir.
• 2K aktif kendinden öğrenmeli ve tablo eskitmeli MAC adresi tablosu.
• 448KBit Paket Tampon bellek.
33
TÜRKÇE
3. Ürüne Genel Bakış
Ön Görünüm
1
2
Nr
Tanım
Durum
Durum Açıklaması
1.
Güç LED’i
2.
Link/ACT LED’leri
OFF (KAPALI)
ON (AÇIK)
OFF (KAPALI)
ON (AÇIK) – TURUNCU
ON (AÇIK) - YEŞİL
YANIP SÖNME
Switch’te enerji yok
Switch’te enerji var ve kullanıma hazır
LAN Portunda hiçbir Ağ Linki oluşturulamadı
LAN Portunda 10 Mbit Ağ Linki oluşturuldu
LAN Portunda 100 Mbit Ağ Linki oluşturuldu
LAN Portundan veri gönderiliyor ya da alınıyor
Arka görünüm
Nr
Tanım
1.
2.
LAN Portları
DC Giriş (7.5V, 1.5A)
1
34
2
TÜRKÇE
4. Switch Kurulumu
10/100 Mbps Ethernet Switch’in yanında lastik ayaklar ve bir duvar montaj kiti de verilmektedir. Böylece
switch’i masaüstünde ya da duvara monte edilmiş olarak kullanabilirsiniz.
Masaüstü kullanımı:
• Birlikte verilen lastik ayakları switch’in altına her bir köşeye yapıştırın. Bu ayakların sayesinde switch
masanızda hareket etmeyecektir.
• Switch’i masanıza yerleştirin.
Duvar montajlı kullanım:
• Switch’in altında yer alan vida destek delikleri ile aynı mesafede olmak üzere duvara matkapla iki adet
delik açın.
• Dübelleri duvardaki deliklere yerleştirin.
• Vidaları dübellere yerleştirin ve bir tornavida ile sıkın. Vidaları sonuna kadar sıkmayın: switch’i vidalar
üzerine oturtmak için bir miktar boşluk bırakmalısınız.
• Switch’i ön panel yukarıya ya da aşağıya bakacak şekilde askı deliklerini vidalara geçirerek yavaşça
duvara asın.
35
TÜRKÇE
5. Switch Bağlantıları
• Güç adaptörünü switch’in DC girişine ve boş bir prize takın.
Switch üzerindeki tüm LED’lerin kısa bir süre yanıp sönmesi switch’in çalışmaya başladığını gösterir.
Güç LED’i sürekli yandığı zaman switch açılmıştır/enerji gelmiştir ve aktiftir.
• Switch’in LAN portlarına ağ aygıtlarınızı (masaüstü bilgisayar, dizüstü bilgisayar, yazıcı, router vb.)
bağlayın. Switch’e bağlı bir aygıt açıldığında karşılık gelen porta ait Link/ACT LED’i de yanacak ve
Speed (Hız) LED’i bağlantı hızını gösterecektir.
Aşağıda switch’e bağlı aygıtları gösteren bir örnek göreceksiniz:
Dizüstü B.sayar PC
NAS
Mediaplayer Dizüstü B.sayar IP-Kamera
PC
Router
10/100 Mbps Ethernet Switch’iniz kullanıma hazırdır!
36
TECHNICAL SPECIFICATIONS
Appendix – Technical Specifications
General
Number of Ports:
Protocol:
Topology:
Standards:
Data Transfer Rate:
Network Cables:
8 x 10/100 Mbps MDI X ports
CSMA/CD
Star
Standards: IEEE 802.3 10BASE-T Ethernet
IEEE 802.3u 100BASE-TX Fast Ethernet
ANSI/IEEE Std 802.3 NWay auto-negotiation
Ethernet:
10 Mbps (half duplex) 20 Mbps (full duplex)
Fast Ethernet:
100Mbps (half duplex) 200Mbps (full duplex)
10BaseT:
2-pair UTP Category 3,4,5 (100 m)
EIA/TIA- 568 100-ohm STP (100 m)
100Base-TX:
2-pair UTP Cat. 5 (100 m)
EIA/TIA-568 100-ohm STP (100 m)
Physical and Environmental
DC inputs:
7.5 VDC, 1 Amp
Power Adapter:
90 - 230 VAC, 50/60 Hz (external universal power supply)
Power Consumption: 8 watts maximum
Operating Temp:
32° ~ 122° F (0° ~ 50° C)
Storage Temp:
14° ~ 158° F (-10° ~ 70° C)
Humidity:
5% ~ 90% non-condensing
Dimensions:
192.5 x118.5 x32 mm
Performance
Forwarding Mode:
Store-and-forward
MAC Address Table: Supports 2K MAC address
Packet Buffer:
448 KB
Port packet Filtering/Forwarding Rate:
10Mbps
100Mbps
37
14,880 pps per port
148,800 pps per port