1
Quick-Start Guide
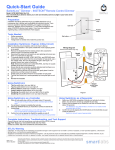
ICON PLUG-IN DIMMER (#2856D2B)
Your new Plug-In Dimmer allows you to dim and remotely control any lamp in
your home at the touch of a button.
Set Button
Status LED
Need Help? For assistance call your friendly support
762-7
7846)
representative @ 800-S
SMARTHOME (800-7
Lamp
Outlet
Installing Your Plug-In Dimmer
Step 1.
Step 2.
Two Signal Extenders (#2842P) must be installed if your home does not already have them.
Plug your lamp into the outlet at the bottom of the Plug-In Dimmer.
HINTS
• Do not use an outlet controlled by a
switch
• Be sure to leave the lamp's local
switch in the on position
Step 3.
Step 4.
Plug your Plug-In Dimmer into an unswitched wall outlet.
Step 5.
Select the Controller you would like to use and set it to Linking Mode. Refer to your Controller’s User’s Guide for detailed instructions.
If lamp is off, turn it on.
• Use to control incandescent bulbs
only.
NOTE: The following will work for most Controllers.
• On the Controller, choose the ON/OFF Button Pair you want to use for controlling your Plug-In Dimmer.
• Set the Controller to Linking Mode by pressing and holding the ON Button of the pair for 10 seconds.
Step 6.
Press and hold the black Set Button on the Plug-In Dimmer for 10 seconds. The lamp you are controlling will blink to confirm linking. Depending on the
Controller, you have about 4 minutes to perform this step before setup mode times out automatically.
Congratulations! You can now dim and remotely control your lamp.
Notes
•
The Plug-In Dimmer can be used with any incandescent lamp of 150 watts or less (minimum 10 watts) and should not be used with halogen or fluorescent lighting.
•
To reset the Plug-In Dimmer to its original factory settings, unplug it from the wall outlet and wait 10 seconds. Press and hold its SET button, plug it back in, continue holding
the SET button for 10 seconds and release. After several seconds, the Status LED will turn on, indicating a reset is complete.
•
The advanced User's Guide can be found at www.smarthome.com/2856d2b.html
Optional Settings
Setting the On-Level
The On-Level is the brightness that the lamp you are controlling will go to when you turn it on using an Controller. The On-Level is adjustable from 3% to 100% brightness.
The default is 100%.
1.
2.
3.
Using the ON/OFF Button Pair that you already linked the Plug-In Dimmer to, set the Controller to Linking Mode by pressing and holding the ON Button of the pair for 10
seconds.
NOTE
Using the BRIGHT or DIM Buttons on the Controller, adjust the brightness of the lamp you are controlling to the desired OnICON products are X10 ready. Please
Level.
consult the user’s guide on how to use
Press and hold the black SET Button on Plug-In Dimmer for 10 seconds. Both the lamp you are controlling and Plug-In
X10 with your ICON products.
Dimmer’s Status LED will blink to confirm the On-Level setting.
Manual de referencia rápida
ICON PLUG-IN DIMMER (#2856D2B)
Su nuevo regulador de luz para lámpara ICON le permite regular la intensidad
de la luz así como el control remoto de cualquier lámpara en su hogar, con sólo
presionar un botón.
¿Necesita ayuda? Para obtener asistencia llame a un
amable representante al 800-S
SMARTHOME
(800-7
762-7
7846)
botón de fijado
SET
Diodo LED
(diodo
electroluminisc
ente)
enchufe
controlado
Instalación del regulador de luz para lámpara
Paso 1
Paso 2
Paso 3
Paso 4
Paso 5
Si su casa todavía no los tiene, debe instalardos intensificadores de señales (#2842p).
Enchufe la lámpara en el enchufe que queda debajo del regulador de luz para lámpara (marcado como
"Controlled").
Enchufe el regulador de luz para lámpara en un enchufe de la pared sin interruptor.
Si la lámpara está apagada, préndala.
Escoja el control INSTEON que desea usar y prográmelo en modo de enlaces (Linking Mode). Si necesita
instrucciones detalladas, refiérase al manual del usuario para panel de control.
SUGERENCIAS
• No use un enchufe con interruptor
Asegúrese que el interruptor de la
• lámpara esté en la posición de
encendido.
Nota: Lo siguiente funcionará para la mayoría de controles INSTEON.
Utilice únicamente focos de control
• incandescente.
En el panel de control, escoja el par de botones de encendido y apagado (ON/OFF) que desea usar para
controlar su regulador para lámparas.
Programe el panel de control INSTEON en modo de enlaces oprimiendo, y manteniendo presionado por
10 segundos, el botón de encendido ON.
Paso 6
Oprima y mantenga presionado por 10 segundos el botón negro de inicio SET del regulador de luz para lámpara. La lámpara que usted está
controlando parpadeará para confirmar el enlace. Dependiendo del control INSTEON, usted tiene aproximadamente 4 minutos para completar este
paso antes de que el control automáticamente abandone el modo para ser programado.
¡FELICIDADES! Ya puede controlar sus luces a través del panel de control y su casa está optimizada por INSTEON.
NOTAS:
*
El regulador de luz para lámparas puede ser usado con cualquier lámpara incandescente de 150 watts o menos (10 watts mínimo) y no debe ser usado con luz
fluorescente o halógena.
*
Para resetear el regulador de luz para lámpara a sus valores originales como cuando se instala por primera vez. Presione y mantenga presionado el botón de inicio SET. Al
mismo tiempo que tiene presionado el botón de inicio SET Enchufe el regulador. Continúe presionando el botón SET por 10 segundos, y después suéltelo. Después de
varios segundos, el diodo LED brillará continuamente, indicando que se reseteó exitosamente.
*
El manual del usuario se encuentra en www.smarthome.com/2856d2b.html
Ajuste de la intensidad de luz
El ajuste de la intensidad de luz es la brillantez que adquirirá la lámpara que usted está controlando cuando la encienda usando el control de INSTEON. La intensidad de luz se
puede ajustar desde apagado hasta 100% de luminosidad. El nivel automático es 100%.
1.
Usando un par de botones de encendido y apagado (ON/OFF) al que ya enlazó un regulador de luz para lámpara, programe el control de INSTEON en el modo de enlaces
(linking mode) oprimiendo y manteniendo presionado por 10 segundos el botón de encendido (ON).
2.
Usando los botones de intensificación (BRIGHT) y disminución (DIM) de luz del control INSTEON, ajuste la luminosidad de la lámpara que usted está controlando con la
intensidad de luz deseada, y oprima UNA VEZ el botón de inicio SET del regulador de luz para lámparas.
3.
Presione y mantenga presionado por tres segundos el botón negro de inicio SET del regulador de luz para lámparas. Tanto la lámpara que usted está controlando como el
diodo LED del regulador de luz para lámparas parpadeará para confirmar el ajuste de intensidad de luz.
Smarthome Limited Warranty
Smarthome warrants to the original consumer of this product that, for a period of one year from the date of purchase, this product will be free from defects in material and workmanship and will
perform in substantial conformity to the description of the product in the owner's manual. This warranty shall not apply to defects or errors caused by misuse or neglect.
Garantía limitada
Smarthome garantiza al consumidor inicial de este producto, frente cualquier defecto en los materiales y en la mano de obra, por un período de uno año a partir de la fecha de compra. Smarthome
garantiza que este producto funcionará de acuerdo a lo estipulado bajo la descripción del producto en el manual del usuario. Esta garantía no se responsabiliza de ningún daño que surja como
consecuencia del mal uso de este producto, errores o negligencia causada por el usuario.
5027
© Copyright 2005 Smarthome, 16542 Millikan Ave., Irvine, CA 92606-5
800.SMART.HOME - 949.221.9200 - www.smarthome.com
rev. 011306