1
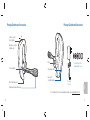
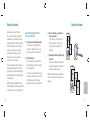
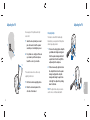
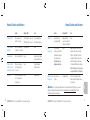
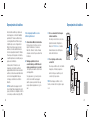
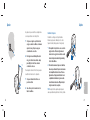
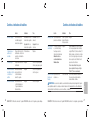
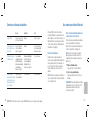
Plantronics, Inc.
345 Encinal
Santa Cruz, CA 95060
United States
Tel: 800-544-4660
www.plantronics.com
© 2009 Plantronics, Inc. All rights reserved. Plantronics, the logo design, Plantronics Voyager, QuickPair and
Sound Innovation are trademarks or registered trademarks of Plantronics, Inc. The Bluetooth® word mark and
logos are owned by the Bluetooth SIG, Inc. and any use of such marks by Plantronics, Inc. is under license. All
other trademarks are the property of their respective owners.
Patents US 5,210,791; Patents Pending
80836-01 (02/09) Printed in China
BC
Plantronics Voyager PRO
®
User Guide
Guía del usuario
FC
Welcome
Getting Assistance
Thank you for purchasing the Plantronics
Voyager PRO headset. This guide contains
instructions for setting up and using your
new headset.
The Plantronics Technical Assistance Center
is ready to assist you. You can find answers to
frequently asked questions, ask a question
using e-mail, receive service over the Internet,
or speak directly with a representative.
Visit www.plantronics.com/support or call
1-866-363-BLUE (2583).
Before using this product, please refer to the
For Your Safety guide for important product
safety and charging information.
Registering Your Product
Visit www.plantronics.com/productregistration
to register your product online so we can provide
you with the best service and technical support.
NOTE If you are considering returning
this headset, please contact the Technical
Assistance Center first.
NOTE For pairing your headset, your Passkey
(PIN code) is 0000.
Contents
Package Contents and Accessories ........................................... iv
Charging Your Headset ................................................................2
Checking the Battery Status ..............................................3
Automatic Battery Status Alerts .........................................3
Pairing Your Headset ....................................................................4
How to Pair Your Headset with
Your Phone for the First Time ............................................4
Adjusting the Fit ...........................................................................6
Changing Eartips ................................................................7
Headset Controls and Indicators..................................................8
Product Specifications ...............................................................13
EN
Using More Than One Bluetooth Phone ....................................11
How to Initiate a Call ........................................................11
How to Answer a Call While Talking
on the Other Paired Phone ...............................................11
Troubleshooting ..........................................................................12
Limited Warranty ........................................................................14
ii
ii
iii
iii
Package Contents and Accessories
Package Contents and Accessories
Volume Up (+) and
Down (-) Buttons
Mute (press +/- buttons
simultaneously)
Eartip
Call Control Button
Soft Gel Eartips (S, M, L)
and Foam Eartip Covers
Status Indicator LED
Power On/Off
Check Battery Button
Micro USB Charging Jack
Dual Microphones with Wind Screens
EN
AC Charger
(100-240v)
For a complete list of accessories available for purchase, go to www.plantronics.com.
iv
iv
1
Charging Your Headset
Charging Your Headset
Using the AC Charger
Checking the Battery Status
Automatic Battery Status Alerts
Your new headset performs best when fully
charged. Do not use your headset while it is
connected to the charger. The LED glows red
while charging.
To check the status, the headset must be powered
on. Tap the power button. The indicator light flashes
red to show the battery charge level.
When the battery charge is very low, a tone and
voice prompt in English will automatically occur.
CHARGE INDICATOR LIGHTS
CHARGING TIME
2
1.5 hours ........................
Full charge
30 minutes .....................
Minimum charge
before first use
2
NOTE Always charge at near room
temperatures; never charge battery
at temperatures below 0ºC (32ºF) or
above 40ºC (104ºF).
LOW BATTERY WARNINGS
Battery Level
✳
More than 2/3 full
✳✳
1/3 to 2/3 full
✳✳✳
Less than 1/3 full
Battery Level
Tone
Voice Prompt
30 minutes of
talk time remaining
(this alert only
occurs during
an active call)
Double high
tone every
15 minutes
“Battery Low”
repeats every
30 minutes
10 minutes
of talk time
remaining
Triple high
tone every
30 seconds
“Recharge
Battery” repeats
every 3 minutes
EN
1
Red Flashes
3
Pairing Your Headset
Before using your headset for the first
time, you must pair it with your Bluetooth®
enabled phone. Your new headset includes
Plantronics QuickPair™ Technology to simplify
the Bluetooth setup process. The first time
you turn your headset on, your headset
automatically enters pairing mode for 10
minutes. Once paired successfully, your
headset stays on for instant use.
If not successfully paired after 10 minutes, your
headset automatically powers off. When you
turn the headset on again, it automatically goes
into pairing mode until successfully paired with
a Bluetooth phone.
4
How to Pair Your Headset with Your
Phone for the First Time
1 Turn on your phone’s Bluetooth feature.
For most phones, select Settings/Tools >
Connections > Bluetooth > On. See your
phone’s user guide for more information.
2 Turn the headset on.
Press and hold the power button until the
indicator LED flashes red/blue. The headset
is now in pairing mode.
If you don’t see the red/blue flash, press and
hold the power button to turn your headset
off, and then press and hold the power
button again until you see the red/blue flash.
3 Use the commands on your phone to
locate your headset.
For most phones, select Settings/Tools >
Devices > Bluetooth > PROPlantronics.
See your phone’s user guide for more
information.
I;JJ?D=I
I^bZVcY9ViZ
E]dcZHZii^c\h
8bk[jeej^
1
HdjcYHZii^c\h
CZildg`HZgk^XZh
HZXjg^in
GZhZiHZii^c\h
2
4 If prompted for the Passkey (PIN code),
enter 0000.
Pairing is successful when the indicator on
your headset flashes blue. Your headset is
now connected and ready to use.
NOTE To pair your headset with an additional
phone, turn on the phone then repeat steps 2
through 4.
BLUETOOTH
Discover/
Search
8BK;JEEJ>
3
FHEFbWdjhed_Yi
PASSKEY
0000
4
EN
NOTE This headset is equipped with Secure
Simple Pairing (SSP). If your phone supports SSP,
you will not need to enter a Passkey (PIN code).
Pairing Your Headset
5
Adjusting the Fit
Adjusting the Fit
Ensure a proper fit for optimal sound clarity
and comfort.
1 Guide the earloop behind your ear and
place the headset so that the speaker
and eartip rest comfortably in your ear.
1
2 For optimal voice clarity, pivot the boom
2
up or down to point the microphones
toward the corner of your mouth.
1
1 Pivot the boom into an upright position.
1 To remove the eartip, grip the eartip with
your thumb and forefinger. Gently push
it into the speaker housing and rotate it
a quarter turn to the left. Gently lift the
eartip away from the headpiece.
1
the eartip with the slots on the speaker
housing. Gently push the eartip into
housing while turning it a quarter turn
to the right. The eartip will stop rotating
when it is attached.
NOTE The optional foam eartip cover can be
used for a more comfortable and stable fit.
2
EN
2 Rotate the boom and speaker to the
other side of the headset.
6
The headset comes with the medium eartip
installed, but you can replace it with the optional
small or large eartip provided.
2 To attach a new eartip, align the tabs on
The headset can be worn on either ear by
adjusting the mic boom.
2
Changing Eartips
7
Headset Controls and Indicators
Action
Indicator LED
Tone
Press power on/off
button 2 seconds.
On: blue glow for 2 seconds
On: ascending tones
Off: red glow for 2 seconds
Off: descending tones
Check if headset is
powered on
Tap call control button
or volume + or - button.
Short blue flash
None
Call answer/end
Tap call control button.
None
Single low tone followed
by low-low-high tones
Transfer a call from
headset to phone or
from phone to headset
While on a call, press
call control button for
1 second.
None
Single followed by
double low tones
Reject call
Press call control button
for 1 second during
incoming call.
None
Powering on/off
8
DURATION: TAP is under 1 second. PRESS is 1-4 seconds as directed.
Single low tone
Action
Indicator LED
Missed call
Tap any button to
clear indicator LED.
Triple purple flash
None
every 10 seconds for 5
minutes or until cleared
Tone
Mute
(during a call)
Press and hold
volume + and - buttons
simultaneously until you
hear status prompt.
Prompts only occur
during an active call.
None
Mute on: sequence starts with the
high-low tones plus voice prompt
“Mute On” (in English). 15 minutes
later just the high-low tones advise
status. Full sequence repeats every
30 minutes until Mute is de-activated.
Mute off: high-low tones followed by
voice prompt “Mute Off” (in English).
Adjust the volume
(during a call)
Tap volume + or button.
Single blue flash
Tone at each change in volume.
Double tone when min/max volume
level reached.
WARNING Do not use headsets at high volumes for an extended period of time. Doing so can cause
hearing loss. Always listen at moderate levels. See www.plantronics.com/healthandsafety for more
information on headsets and hearing.
EN
8
Headset Controls and Indicators
DURATION: TAP is under 1 second. PRESS is 1-4 seconds as directed.
9
Headset Controls and Indicators
Using More Than One Bluetooth Phone
Action
Indicator LED
Tone
Double-tap call
control button.
None
Double low tone
Voice-activated redial
(if supported by phone)
Press call control
button for 1 second.
None
Single low tone (phone
may then prompt you to
say a command)
Call indicator LED
(enable/disable)
With headset powered
on, press power,
volume + and - buttons
simultaneously for 1
second.
Turn indicator on: blue glow
increases for 2 seconds.
Turn indicator off: blue glow
fades for 2 seconds
Single low tone
Single blue flash
Single low tone
Redial
Reconnect after leaving Tap call control button.
Bluetooth range range for
more than 30 seconds
Plantronics Voyager PRO supports multipoint
technology, which allows you to use one
headset with two different Bluetooth mobile
phones. To pair your headset to a second
phone, see “Pairing Your Headset” on page 4.
How to Initiate a Call
The headset initiates or redials a call on the
phone that most recently made an outgoing call.
To use the second phone, initiate the call using
the controls on that phone. The second phone
forms an active link with the headset.
NOTE The headset cannot place a current call
on hold while answering a call from the second
phone.
How to Answer a Call While Talking on
the Other Paired Phone
To answer a second call, the current call must
be terminated or transferred back to the first
phone. To transfer the call, see “Headset
Controls” on page 8.
NOTE If you choose not to answer the second
call, and you have voice mail on the second
phone, the call will go to voice mail.
1 Terminate the current call.
Tap the call control button.
2 Answer the second call.
Tap the call control button again.
10
10
DURATION: TAP is under 1 second. PRESS is 1-4 seconds as directed.
EN
TIP To avoid issues switching between calls,
use the call control button on the headset rather
than your phone controls.
11
Troubleshooting
My phone did not
locate the headset.
Turn both your phone and headset off and on, and then repeat the pairing process
on page 4.
I could not enter
my Passkey/PIN code.
Turn both your phone and headset off and on, and then repeat the pairing process
on page 4. Your Passkey (PIN code) is 0000.
I cannot hear
caller/dial tone.
The headset may not be turned on. Tap any button. If a blue light flashes then
the headset is on. If not, then press the power on/off button for approximately 2
seconds until you hear a tone or see the indicator glow blue.
Product Specifications
Talk time*
Up to 6 hours
Standby time*
Up to 5 days or 120 hours
Range*
Up to 33 feet (10 meters)
Headset weight
Battery type
Your headset battery may be drained. Charge your battery. See “Charging Your
Headset” on page 2.
Your headset was out of range from your phone for more than 30 seconds. Move
back into range and manually reconnect by pressing the call control button.
Make sure that the headset is sitting correctly in your ear with the microphone
pointing towards the corner of your mouth. See “Adjusting the Fit” on page 6.
Check that you have not activated the Mute feature. See “Headset Controls” on
page 9.
12
Headset (HSP) and HandsFree (HFP)
Power
requirements
5V DC – 180 mA
17.5 grams
Storage/operating
temperature
32ºF - 104ºF (0-40ºC)
Rechargeable, nonreplaceable lithium ion
polymer
Charging
temperature
32ºF - 104ºF (0-40ºC)
Charge time
1.5 hours for full charge
Bluetooth version
2.1 + EDR (Enhanced Data
Rate) and Secure Simple
Pairing (SSP)
* Performance dependent on battery and may vary by
device. Audio quality degrades as you move out of
range and is dependent upon the device with which
the headset is paired.
EN
Callers cannot
hear me.
Bluetooth profiles
13
Limited Warranty
This warranty covers defects in materials and workmanship of products manufactured, sold or certified by
Plantronics which were purchased and used in the United States and Canada.
The warranty lasts for one year from the date of purchase of the products.
This warranty extends to you only if you are the end user with the original purchase receipt.
We will, at our option, repair or replace the products that do not conform to the warranty. We may use functionally equivalent reconditioned/refurbished/remanufactured/pre-owned or new products or parts.
To obtain service in the U.S., contact Plantronics at 1-866-363-BLUE (2583). To obtain service in Canada call
(800) 540-8363.
THIS IS PLANTRONICS’ COMPLETE WARRANTY FOR THE PRODUCTS.
This warranty gives you specific legal rights, and you may also have other rights that vary from state to state.
Please contact your dealer or our service center for the full details of our limited warranty, including items not
covered by this limited warranty.
EN
14
14
15
15
Bienvenido
Asistencia técnica
Gracias por comprar el audífono Voyager PRO
de Plantronics. Esta guía contiene instrucciones
para configurar y utilizar su nuevo audífono.
Si necesita ayuda, tiene a su disposición el
Centro de asistencia técnica de Plantronics.
Puede encontrar respuestas a las preguntas
más frecuentes, resolver sus dudas por correo
electrónico, recibir servicio por Internet o hablar
directamente con un representante. Visite
www.plantronics.com/support o llame al
teléfono 1-866-363-BLUE (2583).
Antes de usar este producto, lea la guía para
su seguridad, la cual contiene información
importante acerca de la seguridad y de cómo
cargar el producto.
Registro del producto
Visite www.plantronics.com/productregistration
y registre su producto en Internet para que
podamos proporcionarle el mejor servicio y
asistencia técnica posibles.
16
NOTA Su código PIN o “clave” para emparejar
el audífono es 0000.
Bienvenido..................................................................................16
Contenido de la caja y accesorios .............................................18
Carga del audífono .....................................................................20
Verificación de la carga de la batería............................... 21
Alertas automáticas del nivel de carga de la batería ....... 21
Emparejamiento del audífono.................................................... 22
Cómo emparejar el audífono con su
teléfono la primera vez ................................................... 22
Ajuste......................................................................................... 24
Cambiar los tapones ....................................................... 25
Controles e indicadores del audífono........................................ 26
Uso de más de un teléfono Bluetooth....................................... 29
Cómo iniciar una llamada ................................................ 29
Cómo contestar una llamada durante una
conversación por el otro teléfono.................................... 29
Solución de problemas.............................................................. 30
Especificaciones del producto .................................................. 31
Garantía limitada ....................................................................... 32
ES
16
NOTA Si desea devolver este audífono,
comuníquese primero con el Centro de
asistencia técnica.
Índice
17
17
Contenido de la caja y accesorios
Contenido de la caja y accesorios
Botones para subir (+)
y bajar (-) el volumen
Silenciar (presione los
botones +/- al mismo
tiempo)
Botón de control
de llamadas
Tapones de plástico blando (P, M, G)
y protectores de espuma
Tapón
LED indicador de estado
Microconector USB para carga
Micrófonos dobles con filtros de viento
Encendido/Apagado
Botón de comprobación del
nivel de carga de la batería
Cargador de CA
(100-240 V)
18
18
ES
En el siguiente sitio encontrará una lista completa de
accesorios que puede comprar: www.plantronics.com
19
19
Carga del audífono
Carga del audífono
Uso del cargador de corriente alterna
Verificación de la carga de la batería
El nuevo audífono funciona mejor cuando está
totalmente cargado. No use el audífono mientras
está conectado al cargador. El indicador LED se
ilumina en rojo durante el proceso de carga.
El audífono debe estar encendido para verificar
la carga. Toque el botón de encendido. La luz
indicadora roja parpadea para indicar el nivel de
carga.
TIEMPO DE CARGA
LUCES INDICADORAS DE CARGA
2
Parpadea en rojo
1.5 horas ........................
Carga completa
30 minutos .....................
Carga mínima
antes del primer uso
20
20
Cuando la batería está a punto de agotarse, se
escucha automáticamente un tono y un mensaje
en inglés.
ADVERTENCIAS DE BATERÍA BAJA
Carga de la batería
✳
Más de 2/3 de carga
✳✳
1/3 a 2/3 de carga
✳✳✳
Menos de 1/3 de carga
Carga de la batería
Tono
Mensaje de
advertencia
Quedan 30 minutos
de conversación
(esta advertencia
solo se escucha
durante una
llamada activa).
Dos tonos
agudos cada
15 minutos
“Battery Low”
(batería baja) se
repite cuando
quedan
30 minutos
10 minutos
de tiempo de
conversación
Tres tonos
agudos cada
30 segundos
“Recharge
Battery” (cargar
batería) se repite
cada 3 minutos
ES
1
NOTA Cargue siempre la batería a temperaturas
similares a la temperatura ambiente; nunca la
cargue a temperaturas inferiores a 0 °C (32 °F)
ni superiores a 40 °C (104 °F).
Alertas automáticas del nivel de carga de
la batería
21
21
Emparejamiento del audífono
Antes de utilizar el audífono por primera vez,
debe emparejarlo con un teléfono habilitado
para Bluetooth®. Su nuevo audífono incluye
la tecnología QuickPair de Plantronics para
simplificar el proceso de configuración del
Bluetooth. La primera vez que encienda el
audífono, éste entrará automáticamente en
modo de emparejamiento durante 10 minutos.
Una vez que esté emparejado correctamente,
el audífono permanecerá encendido para que
pueda usarlo de inmediato.
Si al transcurrir los 10 minutos no se ha
emparejado correctamente, el audífono se
apaga automáticamente. Al volver a encender el
audífono, éste entra de nuevo automáticamente
en el modo de emparejamiento hasta que
lo empareje correctamente con un teléfono
Bluetooth.
22
22
Cómo emparejar el audífono con su
teléfono la primera vez
1 Active la función Bluetooth de su teléfono.
En la mayoría de los teléfonos, seleccione
Ajustes/ Herramientas > Conexiones >
Bluetooth > Activado. Consulte el manual
del usuario de su teléfono para obtener más
información.
2 Mantenga oprimido el botón de
encendido hasta que el LED indicador
empiece a parpadear en rojo y en azul.
Eso significa que el audífono está en modo
de emparejamiento.
Si no parpadea en rojo y en azul, presione
el botón de encendido hasta apagar el
audífono y vuelva a presionarlo hasta que
vea que empieza a parpadear en rojo y en
azul.
3 Use los comandos del teléfono para
localizar su audífono.
En la mayoría de los teléfonos, seleccione
Ajustes/Herramientas > Dispositivos >
Bluetooth > PROPlantronics. Consulte el
manual del usuario de su teléfono para
obtener más información.
I;JJ?D=I
I^bZVcY9ViZ
E]dcZHZii^c\h
8bk[jeej^
1
HdjcYHZii^c\h
CZildg`HZgk^XZh
HZXjg^in
GZhZiHZii^c\h
2
4 Si se le pide que escriba su clave,
escriba 0000.
Una vez que el audífono está correctamente
emparejado, el indicador parpadea en
azul. Eso indica que el audífono ya está
conectado y listo para usarse.
NOTA Para emparejar el audífono con otro
teléfono, encienda el teléfono y repita los pasos
2 a 4.
BLUETOOTH
Discover/
Search
8BK;JEEJ>
3
FHEFbWdjhed_Yi
PASSKEY
0000
4
ES
NOTA Este audífono está equipado con SSP
(Secure Simple Pairing, emparejamiento sencillo
seguro). Si su teléfono es compatible con SSP, no
es necesario que escriba su clave (código PIN).
Emparejamiento del audífono
23
23
Ajuste
Ajuste
Asegúrese de que el audífono se adapte bien a
su oído para obtener un sonido óptimo.
1 Colóquese el gancho por detrás de la
oreja y acomode el audífono de manera
que la bocina y el tapón se apoyen
cómodamente en su oído.
1
2
2 Para lograr una claridad óptima de la
1
voz, gire el brazo hacia arriba o abajo
para dirigir los micrófonos hacia la
comisura de su boca.
Puede ajustar el brazo del micrófono para usar
el audífono del lado derecho o izquierdo.
1 Coloque el brazo del micrófono en
posición vertical.
2 Gire el brazo y la bocina hacia el otro
lado del audífono.
24
24
El audífono se entrega con el tapón mediano
instalado, pero puede cambiarlo por otro de los
tapones incluidos (más pequeño o más grande).
1 Para quitar el tapón, tómelo con sus dedos
pulgar e índice. Presiónelo ligeramente
hacia la bocina y gírelo un cuarto de vuelta
hacia la izquierda. Levántelo ligeramente y
retírelo del audífono.
1
2 Para insertar un nuevo tapón en el audífono,
alinee las pestañas del tapón con las ranuras
del compartimiento de la bocina. Presione
ligeramente el tapón para introducirlo en el
compartimiento mientras lo gira un cuarto
de vuelta hacia la derecha. El tapón dejará
de girar cuando esté acoplado.
NOTA La protección de espuma opcional puede
usarse para obtener un ajuste más cómodo y estable.
2
ES
2
Cambiar los tapones
25
25
Controles e indicadores del audífono
Encender o apagar
26
Acción
Indicador
Tono
Presione el botón de
encendido/apagado
durante dos segundos.
Encendido: brillo azul
durante dos segundos
Encendido: tonos en
aumento
Apagado: brillo rojo
durante dos segundos
Apagado: tonos en
descenso
Compruebe que el
audífono está
encendido
Toque el botón de control Flash azul breve
de llamadas. o el botón de
aumento + o disminución de volumen.
Ninguno
Contestar/colgar
Toque el botón de control
de llamadas.
Ninguno
Un solo tono grave seguido
de tonos grave-grave-agudo
Transferir una llamada
del audífono al teléfono
o del teléfono al
audífono
Durante una llamada,
presione el botón de
control de llamadas
durante 1 segundo.
Ninguno
Un solo tono seguido de
dos tonos graves
Rechazar una llamada
Presione el botón de
control de llamadas por
1 segundo durante una
llamada entrante.
Ninguno
Un solo tono grave
DURACIÓN: TOCAR se refiere a menos de 1 segundo. PRESIONAR se refiere de 1 a 4 segundos, según se indique.
Acción
Llamada perdida
Silencio(durante
una llamada)
Indicador
Tono
cada 10 segundos Ninguno
durante 5 minutos o
hasta que se borre
Silencio activado: la secuencia empieza
los botones de volumen Ninguno
con tonos agudo-grave más el mensaje
+ y - al mismo tiempo
en inglés “Mute On” (silencio activado). 15
hasta que escuche el
minutos después, el estado solo se indica
indicador de estado. Los
con los tonos agudo-grave. La secuencia
indicadores solo se
entera se repite cada 30 minutos hasta
escuchan durante una
que se desactiva el silencio.
llamada activa.
Toque cualquier botón
para borrar el indicador
Ajustar el volumen Toque el botón de
(durante una
volumen + o -.
llamada)
Un solo flash azul
Silencio desactivado: tonos agudograve seguidos del mensaje en inglés
“Mute Off” (silencio desactivado).
Tono en cada cambio de volumen. Dos
tonos cuando se alcanza el nivel de
volumen mínimo o máximo.
ADVERTENCIA: no use nunca los audífonos a un volumen alto durante periodos prolongados. Esto puede
causar pérdida de audición. Use siempre un volumen moderado. Visite www.plantronics.com/healthandsafety
donde encontrará más información acerca de los audífonos y la audición.
DURACIÓN: TOCAR se refiere a menos de 1 segundo. PRESIONAR se refiere de 1 a 4 segundos, según se indique.
ES
26
Controles e indicadores del audífono
27
27
Controles e indicadores del audífono
Acción
Indicador
Tono
Volver a marcar
Toque 2 veces el botón
de control de llamadas.
Ninguno
Dos tonos graves
Volver a marcar con la
voz (si el teléfono tiene
esta función)
Presione el botón de
control de llamadas
durante 1 segundo.
Ninguno
Un solo tono grave (el
teléfono podría pedirle
que diga una orden)
Indicador de llamadas
(activar/desactivar)
Con el audífono
encendido, presione
al mismo tiempo los
botones de encendido
y de volumen + y durante 1 segundo.
Encender el indicador:
brillo azul durante dos
segundos Apagar el
indicador: brillo rojo
durante dos segundos
Un solo tono grave
28
Un solo flash azul
Un solo tono grave
DURACIÓN: TOCAR se refiere a menos de 1 segundo. PRESIONAR se refiere de 1 a 4 segundos, según se indique.
El Voyager PRO de Plantronics admite la
tecnología multipunto, la cual le permite usar el
mismo audífono con dos teléfonos celulares con
Bluetooth distintos. Para emparejar el audífono
con un teléfono adicional, lea “Emparejamiento
del audífono” en la página 21.
Cómo contestar una llamada durante una
conversación por el otro teléfono
Cómo iniciar una llamada
NOTA Si decide no responder a la segunda
llamada y dispone de un buzón de voz en el
segundo dispositivo, la llamada se desviará al
buzón de voz.
El audífono inicia o repite la llamada en el
teléfono en el que realizó la última llamada. Para
usar el segundo teléfono, inicie la llamada con
los controles de dicho teléfono. El segundo
teléfono establece un enlace activo con el
audífono.
NOTA El audífono no puede poner la llamada en
curso en espera mientras contesta otra llamada
con el segundo teléfono.
Para contestar una segunda llamada, la llamada
en curso debe finalizarse o transferirse al
primer teléfono. Para transferir una llamada, lea
“Controles del audífono” en la página 25.
1 Finalice la llamada actual.
Toque el botón de control de llamadas.
2 Conteste la segunda llamada.
Toque nuevamente el botón de control de
llamadas.
SUGERENCIA Para evitar problemas al cambiar
de una llamada a otra, use el botón de control
de llamadas del audífono en lugar de los
controles de su teléfono.
ES
Volver a conectar
Toque el botón de
después de haber salido control de llamadas.
del radio de alcance de
Bluetooth durante más
de 30 segundos
28
Uso de más de un teléfono Bluetooth
29
29
Solución de problemas
El teléfono no pudo
localizar el audífono.
Apague y vuelva a encender el teléfono y el audífono, y repita el procedimiento de
emparejamiento descrito en la página 21.
Tiempo de
conversación*
Hasta 6 horas
Funciones de
Bluetooth
Audífono (HSP) y manos
libres (HFP)
No puedo ingresar mi
código PIN (clave).
Apague y vuelva a encender el teléfono y el audífono, y repita el procedimiento de
emparejamiento descrito en la página 21. El código PIN (o clave) es 0000.
Tiempo de espera*
Hasta 5 días o 120 horas
Hasta 10 metros
Requisitos de
alimentación
5 VCC – 180 mA
Radio de alcance*
No oigo a la persona
que llama o el tono de
marcar.
Es posible que el audífono esté apagado. Toque cualquier botón. Si se enciende
una luz azul, significa que el audífono está encendido. En caso contrario, presione
el botón de control de llamadas durante 2 segundos aproximadamente hasta que
escuche un tono o vea que el indicador se ilumina de color azul.
Peso del audífono
17.5 gramos
0-40 °C
Tipo de batería
Recargable, de polímero
de iones de litio no
reemplazable
Temperatura de
almacenamiento
y uso
Temperatura de
carga
0-40 °C
Es posible que se haya agotado la batería. Recárguela. Consulte “Carga del
audífono” en la página 19.
El audífono estuvo fuera del radio de alcance del teléfono durante más de
30 segundos. Regrese al radio de alcance y vuelva a conectar manualmente
presionando el botón de control de llamadas.
La otra persona
no me oye.
Asegúrese de que el audífono está correctamente asentado en su oreja, con el
micrófono dirigido hacia la comisura de su boca. Lea “Ajuste” en la página 23.
30
Tiempo de carga
1.5 horas para cargarse
totalmente
Versión de
Bluetooth
2.1 + EDR (Enhanced
Data Rate o velocidad
incrementada de datos)
y emparejamiento seguro
sencillo (SSP)
* El desempeño depende de la batería y puede variar
de un dispositivo a otro. La calidad del audio
disminuye a medida que se aleja del radio de alcance
y depende del dispositivo con el que el audífono esté
emparejado.
ES
Verifique que no haya activado la función de silencio. Lea “Controles del audífono”
en la página 26.
30
Especificaciones del producto
31
31
Garantía limitada
Esta garantía cubre los defectos de materiales y mano de obra de los productos fabricados, vendidos o
certificados por Plantronics que se adquieran y se utilicen en Estados Unidos y Canadá.
La garantía tiene una vigencia de un año a partir de la fecha de compra del producto.
Esta garantía sólo es válida para el usuario final en posesión de la factura de compra original.
Los productos que no cumplan con lo estipulado en esta garantía podrán, según nuestro propio criterio,
repararse o sustituirse. Con este fin, podrán utilizarse piezas o productos que funcionen de forma equivalente.
Estas piezas o productos podrán ser nuevos, de segunda mano, refabricados, renovados o reacondicionados.
Si necesita servicio en EE. UU., póngase en contacto con Plantronics llamando al 1-866-363-BLUE (2583).
Para obtener servicio técnico en Canadá, llame al (800) 540-8363.
ESTA ES LA GARANTÍA COMPLETA QUE OFRECE PLANTRONICS PARA SUS PRODUCTOS.
Esta garantía le otorga derechos legales específicos, a los que se pueden añadir otros derechos que varían
de una jurisdicción a otra. Si desea obtener más información sobre nuestra garantía limitada y los artículos
que no están cubiertos por esta garantía, póngase en contacto con su distribuidor o con el centro de servicio.
ES
32
32
33
33
ES
34
34
35
35