1
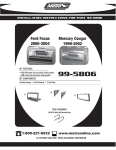
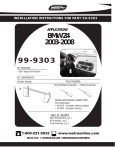
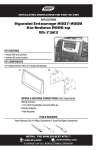
Installation instructions for AX-LCD
AX-LCD
TABLE OF CONTENTS
Connections to be made..................................... 3
Using the LCD screen......................................... 4
Axxess LCD screen 2000-up
Features
•
•
•
•
INTERFACE COMPONENTS
• LCD Screen
• DIN harness with leads
Retains the personalization menu that is lost when removing the factory radio in select applications
Micro “B” USB updatable
Adjustable 256 color LCD screen
Wire channel for flexible mounting
TOOLS REQUIRED
• Cutting tool • Crimping tool • Tape • Connectors
(example: butt-connectors, bell caps, etc.)
REV. 5/4/2015 INSTAX-LCD
APPLICATIONS
BUICK
Century
LaCrosse
Rainier
Rendezvous
Terraza
2004-2005
2005-2009
2004-2007
2002-2007
2005-2008
CADILLAC
Escalade/ESV/EXT
2003-2006
CHEVROLET
Avalanche
Camaro
2003-2006
2010-up
CHEVROLET
Cavalier
Cobalt
Corvette
Express
HHR
Impala
Kodiak
Malibu
Malibu
Malibu (classic)
2000-2005
2007-2010
2005-2013
2003-2007
2006-2011
2000-2005
2003-2009
2001-2003
2008-up
2004-2005
CAUTION: Metra recommends disconnecting the
negative battery terminal before beginning any
installation. All accessories, switches, and especially
air bag indicator lights must be plugged in before
reconnecting the battery or cycling the ignition.
NOTE: Refer to the instructions included with the
aftermarket radio.
Applications continued next page
METRA. The World’s best kits.™ 1-800-221-0932
metraonline.com
© COPYRIGHT 2004-2015 METRA ELECTRONICS CORPORATION
AX-LCD
Applications
CHEVROLET
Monte Carlo
Silverado
Silverado (classic)
Silverado 1500
Silverado 2500/3500
Sonic
Spark
SSR
Suburban
Tahoe
Trailblazer
Uplander
FIAT
500L
2000-2005
2003-2006
2007
2014-up
2015-up
2012-up
2013-up
2003-2006
2003-2006
2003-2006
2002-2009
2005-2008
2014-up
FORD
Edge
2007-2014
Escape
2008-2012
Expedition
2007-2014
Explorer
2008-up
Explorer Sport Trac
2008-2010
F-150
2009-2012
F-150
(with monochromatic screen)2013-2014
F-250/350/450/550
2011-2012
ISUZU
Ascender
H-Series
I-Series
LINCOLN
MKX
MKZ
Navigator
MAZDA
Mazda6
MERCURY
Mariner
Milan
Mountaineer
Sable
OLDSMOBILE
Alero
Bravada
Intrigue
Silhouette
PONTIAC
Aztec
G5
G6
Grand Am
Grand Prix
F-250/350/450/550
(with monochromatic screen) 2013-up
Fiesta (without MyFord Touch) 2011-up
Five Hundred
2005-2007
Focus
2008-2011
Focus (without MyFord Touch) 2012-2014
Fusion
2008-2012
Taurus
2008-2012
Taurus X
2008-2009
GMC
Envoy
Savana
Sierra
Sierra (classic)
Sierra 1500
Sierra 2500/3500
Yukon
HARLEY DAVIDSON
Electraglide
Limited
Road Glide
Streetglide
HUMMER
H2
H3/H3t
2002-2009
2003-2007
2003-2006
2007
2014-up
2015-up
2003-2006
2014-up
2014-up
2015-up
2014-up
2003-2007
2006-2010
2
2003-2008
2005-2009
2006-2008
2008-2010
2008-2009
2007-2014
2014-up
2008-2011
2008-2011
2008-2010
2008-2009
PONTIAC
Montana SV6
Solstice
Sunfire
RAM
1500/2500/3500
(without 8.4” touchscreen)
Chassis Cab 3500/4500/5500
(without 8.4” touchscreen)
Promaster
Promaster City
2005-2006
2006-2009
2000-2005
2013-up
2013-up
2014-up
2015-up
SAAB
9-7x
2005-2009
2001-2004
2002-2004
2002
2000-2004
SATURN
Aura
Relay
Sky
2006-2009
2005-2009
2007-2009
2001-2005
2007-2009
2009-2010
2001-2005
2004-2008
TOYOTA
Camry
Rav-4
Tundra
Venza
2012-2014
2013-up
2014-up
2013-up
AX-LCD
Connections to be made
The DIN harness with leads is only
for the following vehicles. For these
applications, the AX-LCD allows the
retention of the vehicles personalization menu that is lost after removing
the factory radio.
•
•
•
•
Fiat 500L 2014-up
Mazda6 2014-up
Ram 1500/2500/3500 (without 8.4”
touchscreen radio) 2013-up
Ram Chassis Cab 3500/4500/5500
(without 8.4” touchscreen radio) 2013-up
•
•
•
•
•
•
Ram Promaster 2014-up
Ram Promaster City 2015-up
Toyota Camry 2012-2014
Toyota Rav-4 2013-up
Toyota Tundra 2014-up
Toyota Venza 2013-up
For all other applications that require the AX-LCD screen, connect the DIN cable from the LCD screen
into the DIN connector on the interface. Skip the following steps for these applications.
For the Fiat 500L 2014-up,
Ram 1500/2500/3500,
Chassis Cab 3500/4500/5500 (without 8.4”
touchscreen radio) 2013-up,
Promaster 2014-up,
Promaster City 2015-up
The following connections are to be made to the
factory 52-pin connector behind the radio:
31
40
49
52
For the Toyota Camry 2012-2014, Rav-4 2013-up,
Tundra 2014-up, and Venza 2013-up
The following connections are to be made to the factory
28-pin connector behind the radio:
• Pink of the AX-LCD to pin-9
• Blue/Pink of the AX-LCD to pin-10t
For the Mazda 6 2014-up
(this is the pin view of the factory harness)
10
41
(this is the pin view of the factory harness)
The following connections are to be made to the
factory 24-pin connector behind the radio:
• Blue/Pink of the AX-LCD to pin-12
• Pink of the AX-LCD to pin-1L
• Blue/Pink of the AX-LCD to pin-1J
1
• Pink of the AX-LCD to pin-2
(this is the wire view of the factory harness)
3
44
Installation instructions for AX-LCD
Using the LCD screen
IMPORTANT WARNING
REV. 5/4/2015 INSTAX-LCD
• Press and hold the “Return/ESC” button on the LCD screen
for 5 seconds until “Select Interface” comes up.
• Select “Connection Type”, and then press “Enter”.
• Scroll up or down to “Direct Connect”, and then press “Enter”.
• Once done, press “Return/ESC” to back out of that mode.
Main menu options:
• Red adjusts the red backlighting of the LCD
(ranges from 1 to 32).
• Blue adjusts the blue backlighting of the LCD
(ranges from 1 to 32).
• Green adjusts the green backlighting of the
LCD (ranges from 1 to 32).
• Contrast adjusts the contrast of the LCD
(ranges from 1 to 100).
• Reset puts the color back to the default settings.
Note: The vehicle menu will vary from car to car.
For more information, please see the owner’s
manual that came with the vehicle.
Arrow Up - Toggles “up” through menu options
Arrow Down - Toggles “down” through
menu options
This product includes instructions for installation which must
be carefully followed. The instructions are worded in such a
manner to assume that the installer is capable of completing
these type of electronic installations. If you are unclear as
to what you are instructed to do or believe that you do not
understand the instructions so as to properly and safely
complete the installation you should consult a technician who
does have this knowledge and understanding.
Failure to follow these instructions carefully and to
install the interface as described could cause harm
to the vehicle or to safety systems on the vehicle.
Interference with certain safety systems could cause
harm to persons as well. If you have any questions in
this regard please call the Help line or Metra at
1-800-221-0932 for assistance.
Return/ESC - Return to the previous menu
Enter - Enter current menu option
KNOWLEDGE IS POWER
Enhance your installation and fabrication skills by
enrolling in the most recognized and respected
mobile electronics school in our industry.
Log onto www.installerinstitute.com or call
800-354-6782 for more information and take steps
toward a better tomorrow.
Metra recommends MECP
certified technicians
METRA. The World’s best kits.™
1-800-221-0932
metraonline.com
© COPYRIGHT 2004-2015 METRA ELECTRONICS CORPORATION
Instrucciones de instalación para AX-LCD
AX-LCD
Axxess Pantalla LCD 2000 y mas
INDICE
Conexiones a realizar......................................... 3
Uso de la pantalla LCD....................................... 4
características
COMPONENTES DE LA INTERFAZ
• Pantalla LCD
• Arneses DIN con cables
• Retiene el menú de personalización que se pierde al
retirar el radio de fábrica en algunas aplicaciones
• Micro “B“ actualizable USB
• Pantalla LCD de 256 colores ajustable
• Canal de cable para montaje flexible
Herramientas requeridas
• Cortador • Pelacables • Cinta • Conectores (p. ej., conectores a tope, tapas acampanadas, etc.)
REV. 5/4/2015 INSTAX-LCD
APLICACIONES
BUICK
Century
LaCrosse
Rainier
Rendezvous
Terraza
2004-2005
2005-2009
2004-2007
2002-2007
2005-2008
CADILLAC
Escalade/ESV/EXT
2003-2006
CHEVROLET
Avalanche
Camaro
2003-2006
2010 y mas
CHEVROLET
Cavalier
Cobalt
Corvette
Express
HHR
Impala
Kodiak
Malibu
Malibu
Malibu (clásico)
2000-2005
2007-2010
2005-2013
2003-2007
2006-2011
2000-2005
2003-2009
2001-2003
2008 y mas
2004-2005
PRECAUCIÓN: Metra recomienda desconectar el terminal
negativo de la batería antes de comenzar cualquier
instalación. Todos los accesorios, interruptores y,
especialmente, las luces indicadoras de airbag deben
estar enchufados antes de volver a conectar la batería o
comenzar el ciclo de ignición.
NOTA: Remítase a las instrucciones incluidas con el
radio de postventa.
Aplicaciones continuaron página siguiente
METRA. The World’s best kits.™ 1-800-221-0932
metraonline.com
© COPYRIGHT 2004-2015 METRA ELECTRONICS CORPORATION
AX-LCD
Aplicaciones
CHEVROLET
Monte Carlo
Silverado
Silverado (clásico)
Silverado 1500
Silverado 2500/3500
Sonic
Spark
SSR
Suburban
Tahoe
Trailblazer
Uplander
2000-2005
2003-2006
2007
2014-up
2015-up
2012 y mas
2013 y mas
2003-2006
2003-2006
2003-2006
2002-2009
2005-2008
FIAT
500L
2014 y mas
FORD
Edge
Escape
Expedition
Explorer
Explorer Sport Trac
F-150
F-150
(con pantalla monocromática)
F-250/350/450/550
2007-2014
2008-2012
2007-2014
2008 y mas
2008-2010
2009-2012
2013-2014
2011-2012
F-250/350/450/550
(con pantalla monocromática)
Fiesta (sin MyFord Touch)
Five Hundred
Focus
Focus (sin MyFord Touch)
Fusion
Taurus
Taurus X
2013 y mas
2011 y mas
2005-2007
2008-2011
2012-2014
2008-2012
2008-2012
2008-2009
GMC
Envoy
Savana
Sierra
Sierra (clásico)
Sierra 1500
Sierra 2500/3500
Yukon
2002-2009
2003-2007
2003-2006
2007
2014-up
2015-up
2003-2006
HARLEY DAVIDSON
Electraglide
Limited
Road Glide
Streetglide
HUMMER
H2
H3/H3t
ISUZU
Ascender
H-Series
I-Series
LINCOLN
MKX
MKZ
Navigator
MAZDA
Mazda6
MERCURY
Mariner
Milan
Mountaineer
Sable
OLDSMOBILE
Alero
Bravada
Intrigue
Silhouette
PONTIAC
Aztec
G5
G6
Grand Am
2014-up
2014-up
2015-up
2014-up
2003-2007
2006-2010
2
2003-2008
2005-2009
2006-2008
2008-2010
2008-2009
2007-2014
2014 y mas
2008-2011
2008-2011
2008-2010
2008-2009
2001-2004
2002-2004
2002
2000-2004
2001-2005
2007-2009
2009-2010
2001-2005
Grand Prix
Montana SV6
Solstice
Sunfire
RAM
1500/2500/3500
(sin 8,4 “con pantalla táctil)
Chassis Cab 3500/4500/5500
(sin 8,4 “con pantalla táctil)
Promaster
Promaster City
2004-2008
2005-2006
2006-2009
2000-2005
2013 y mas
2014 y mas
2015 y mas
SAAB
9-7x
2005-2009
SATURN
Aura
Relay
Sky
2006-2009
2005-2009
2007-2009
TOYOTA
Camry
Rav-4
Tundra
Venza
2012-2014
2013 y mas
2014 y mas
2013 y mas
2013 y mas
AX-LCD
Conexiones a realizar
Arneses DIN con cables es sólo
para los siguientes vehículos. Para
estas aplicaciones, la AX -LCD
permite la retención de vehículos
personalizar el menú que se
pierde después de quitar la radio
de fábrica.
•
•
•
•
Fiat 500L 2014 y mas
Mazda6 2014 y mas
Ram 1500/2500/3500 (sin 8.4“ la radio con pantalla táctil) 2013 y mas
Ram Chassis Cab 3500/4500/5500
(sin 8.4“ la radio con pantalla táctil) 2013 y mas
•
•
•
•
•
•
Ram Promaster 2014-up
Ram Promaster City 2015-up
Toyota Camry 2012-2014
Toyota Rav-4 2013 y mas
Toyota Tundra 2014 y mas
Toyota Venza 2013 y mas
Para todas las demás aplicaciones que requieren la pantalla AX -LCD , conecte el cable DIN de la pantalla
LCD en el conector DIN en la interfaz. Saltear los siguientes pasos para estas aplicaciones.
El Fiat 500L 2014 y mas, Ram
1500/2500/3500 y Chasis Cabina
3500/4500/5500 ( sin 8.4“ la radio
con pantalla táctil) 2013 y mas,
Promaster 2014 y mas,
Promaster City 2015 y mas
Las siguientes conexiones están siendo hecho al conector
de 52 patillas de fábrica detrás de la radio:
31
For the Toyota Camry 2012-2014, Rav-4 2013 y mas,
Tundra 2014 y mas, and Venza 2013 y mas
40
49
52
Las siguientes conexiones se deben hacer en el
conector de 28 pines fábrica detrás de la radio :
• Rosa del AX -LCD al pin-9
• Azul/Rosa del AX -LCD de pin-10t
Para el Mazda 6 2014 y mas
(esta es la opinión de pines del arnés de fábrica)
Las siguientes conexiones se deben hacer a la
fábrica de conector de 24 pines detrás de la radio:
1
• Rosa del AX -LCD de pin-1L
• Azul/Rosa del AX -LCD de pin-1J
(esta es la opinión de alambre del arnés de fábrica)
3
10
41
(esta es la opinión de pines del arnés de fábrica)
• Azul/Rosa del AX -LCD al pin-12
• Rosa del AX -LCD al pin-2
44
Instrucciones de instalación para AX-LCD
Uso de la pantalla LCD
REV. 5/4/2015 INSTAX-LCD
• Mantenga pulsado el botón “Return/ESC“ en la pantalla LCD durante
5 segundos hasta que aparezca “Select Interface” aparece.
• Seleccione “Tipo de conexión” , y luego presionar “Enter”.
• Desplácese hacia arriba o hacia abajo para “Direct Connect”, y luego presionar “Enter”.
• Una vez hecho esto , pulse “Return/ESC” para retirarse de ese modo.
Opciones del menú principal:
• Red ajusta la retroiluminación de color rojo de la pantalla LCD (varía de 1 a 32).
• Azul ajusta la retroiluminación azul de la pantalla LCD ( varía de 1 a 32).
• Verde ajusta la retroiluminación verde de la
LCD ( varía de 1 a 32).
• Contraste ajusta el contraste de la pantalla LCD (varía de 1 a 100).
• Restablecer pone el color a la configuración predeterminada.
Nota: El menú del vehículo puede variar de un coche a otro. Para obtener más información , consulte
el manual del usuario que viene con el vehículo.
Flecha Arriba - Alterna “arriba” a través de las opciones del menú
Flecha Abajo - Alterna “abajo “ a través de
opciones de menú
Vuelta / ESC - Volver al menú anterior
ADVERTENCIA IMPORTANTE
Este producto incluye instrucciones de instalación que
deben seguirse cuidadosamente. Dichas instrucciones están
redactadas dando por supuesto que el instalador es capaz de
completar estos tipos de instalaciones electrónicas. Si tiene
dudas respecto de lo que se le indica que haga o cree que no
comprende las instrucciones como para completar la instalación
en forma adecuada y segura, debe consultar a un técnico que
efectivamente tenga estos conocimientos y comprensión.
Si no sigue estas instrucciones con cuidado y no instala
la interfaz como se describe, podría provocar daños en el
vehículo o en los sistemas de seguridad del vehículo. La
interferencia con determinados sistemas de seguridad
también podría provocar daños a las personas. Si tiene
alguna pregunta al respecto, llame a la línea de ayuda o a
metra, al 1-800-221-0932 para obtener asistencia.
Enter - Introducir opción de menú actual
EL CONOCIMIENTO ES PODER
KMejore
NOWLEDGE
ISinstalación
POWER
sus habilidades de
y fabricación
Enhance your installation and fabrication skills by
enrolling
in the most
inscribiéndose
enrecognized
la escuelaand
derespected
dispositivos electrónicos
mobile
electronics
school in our
industry. de nuestra
móviles
más reconocida
y respetada
Log onto www.installerinstitute.com or call
industria.
Regístrese
en
www.installerinstitute.com
o
800-354-6782 for more information and take steps
toward
tomorrow. para obtener más información y
llameaalbetter
800-354-6782
avance hacia un futuro mejor.
Metra recomienda técnicos con
certificación del Programa de
Certificación en Electrónica Móvil
(Mobile Electronics Certification
Program, MECP).
METRA. The World’s best kits.™
1-800-221-0932
metraonline.com
© COPYRIGHT 2004-2015 METRA ELECTRONICS CORPORATION