1
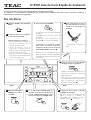
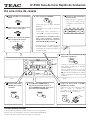
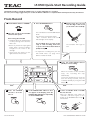
Z
LP-R500 Quick-Start Recording Guide
This Guide provides you with the simplest way to use this equipment for recording.
Of course, we strongly suggest that you consult the Owner's Manual for complete details and important safety information.
From Record
4
Set the INPUT switch to “PHONO”.
5
Place the record on the turntable
and select the speed.
Before using the turntable
• Completely loosen the transportation
screw by turning them clockwise
with a coin.
• Before use, detach the stylus guard
(white plastic cover) by pulling it
straight off the front of the
cartridge.
• Gently push the clamper to the
right to release the tone arm.
6
7
Press the RECORD button.
Gently lower the tone arm
onto the edge of the record
(or the track to be recorded).
The red indicator on the RECORD button
blinks.
The unit enters record pause mode.
“REC” indicator blinks and the J
indicator lights on the display.
The recording does not start in this
step. To start recording, make sure
to press the PLAY/PAUSE button
(G/J) in step 8 .
The turntable will begin to
turn.
• To adjust the recording level, turn the
REC LEVEL knob. See page 26 of
Owner’s manual for detail.
8
Press the PLAY/PAUSE button
(G/J) to start recording.
When the rotation of the turntable
stops, the recording will stop
automatically.
To prevent unwanted noise from the
tone arm being recorded, stop the
recording manually by using the STOP
button (H).
1
Press the POWER
switch to turn the
unit on.
CEC6P12015520
2
If the PHONO/TAPE indicator does
not appear in the display, press the
PHONO/TAPE/AUX button repeatedly
to select PHONO/TAPE.
3
Load a recordable CD-R or CD-RW
disc into the unit.
Make sure “NO TOC” and “CD-R” (or
“CD-RW”) indicators lights on the
display, or the RECORD button in step 6
will not work.
TEAC CORPORATION 0209. MA-1459A
Z
LP-R500 Quick-Start Recording Guide
From Cassette Tape
4
Set the INPUT switch to “TAPE”.
5
Set the TAPE switch to fit your
cassette tape.
The red indicator on the RECORD
button blinks.
The unit enters record pause mode.
“REC” indicator blinks and the J
indicator lights on the display.
6
Set a recorded cassette tape in
the cassette holder.
The recording does not start in this
step. To start recording, make sure
to press the PLAY/PAUSE button
(G/J) in step 9 .
Side to play
Tape
7
8
Press the RECORD button.
Press the PLAY button (y)
of cassette tape.
To prevent the beginning part
from being cut out, see page
26 of Owner's manual.
• To adjust the recording level, turn the
REC LEVEL knob. See page 26 of
Owner’s manual for detail.
9
Press the PLAY/PAUSE button (G/J)
to start recording.
When the playback of a cassette tape
finishes, the recording will stop
automatically.
Not to record excessive operation sound,
press the STOP button (H ) to stop
recording as soon as the number on a
cassette tape to be recorded finishes.
1
Press the POWER
switch to turn the
unit on.
2
If the PHONO/TAPE indicator does
not appear in the display, press the
PHONO/TAPE/AUX button repeatedly
to select PHONO/TAPE.
Manual track division
It is possible to divide the recording into tracks while recording.
While the recording is taking place, press the TRACK INCREMENT button.
The current track number will be incremented by one.
3
Load a recordable CD-R or CD-RW
disc into the unit.
Make sure “NO TOC” and “CD-R” (or
“CD-RW”) indicators lights on the
display, or the RECORD button in step 7
will not work.
Z
LP-R500 Guía de Inicio Rápido de Grabación
Esta Guía le brinda la manera más simple de utilizar este equipo para grabar.
Por supuesto, es estrictamente recomendado que usted consulte el Manual del Usuario para los detalles completos e
importantes informaciones de seguridad.
De un disco
4
5
Seleccione “PHONO” con el interruptor
INPUT.
Coloque el disco en la tornamesa
y seleccione la velocidad.
Antes de utilizar la tornamesa
• Afloje completamente el tornillo de
transporte al girarlos hacia la
derecha con una moneda.
• Antes de utilizar, retire la
protección de aguja (cubierta
plástica blanca) al deslizarla de la
parte delantera del cartucho.
• Empuje suavemente el fijador de
nivel hacia la derecha para liberar
el brazo de sintonización.
6
7
Presione el botón RECORD.
Baje suavemente el brazo
de sintonización en la orilla
del disco (o la pista que se
grabará).
El indicador rojo del botón RECORD
parpadea.
La unidad entra en modo de pausa de
grabación.
El indicador “REC” parpadea y el
indicador J se enciende en la pantalla.
La grabación no comienza en este
paso. Para comenzar a grabar,
asegúrese de presionar el botón
PLAY/PAUSE (G/J) en el paso 8 .
La tornamesa comenzará a
girar.
• Para ajustar el nivel de grabación, gire la
perilla REC LEVEL. Consulte la página 56
del Manual del usuario para obtener más
información.
8
Presione el botón PLAY/PAUSE
(G/J) para iniciar la grabación.
Cuando se interrumpe la rotación de la
tornamesa, la grabación se detendrá
automáticamente.
Para evitar que se graben los ruidos
indeseados del brazo del sintonización,
pare la grabación manualmente
utilizando el botón STOP (H).
1
Presione el interruptor
POWER para activar
la unidad.
2
Si el indicador PHONO/TAPE no
aparece en la pantalla, presione el
botón PHONO/TAPE/AUX varias
veces para seleccionar PHONO/TAPE.
3
Cargue un disco CD-R o CD-RW
grabable en la unidad.
Asegúrese de que los indicadores “NO
TOC” y “CD-R” (o “CD-RW”) se
enciendan en la pantalla o el botón
RECORD del paso 6 no funcione.
Z
LP-R500 Guía de Inicio Rápido de Grabación
De una cinta de casete
4
Seleccione “TAPE” con el interruptor
INPUT.
5
Seleccione el interruptor TAPE
para colocar la cinta casete.
6
Insérez une cassette enregistrée
dans le support de cassette.
Cara a reproducir
Cinta
7
8
Presione el botón RECORD.
El indicador rojo del botón RECORD
parpadea.
La unidad entra en modo de pausa de
grabación.
El indicador “REC” parpadea y el
indicador J se enciende en la pantalla.
Presione el botón PLAY (y)
de cinta casete.
Para evitar que el comienzo se
corte y no se incluya, consulte
la página 57 del Manual del
usuario.
La grabación no comienza en este
paso. Para comenzar a grabar,
asegúrese de presionar el botón
PLAY/PAUSE (G/J) en el paso 9 .
• Para ajustar el nivel de grabación, gire la
perilla REC LEVEL. Consulte la página 56
del Manual del usuario para obtener
más información.
9
Pulse el botón PLAY/PAUSE (G/J)
para iniciar la grabación.
Cuando la reproducción de la cinta
casete finalice, la grabación se detendrá
automáticamente.
Para no grabar excesivo ruido de
funcionamiento, presione el botón STOP
(H) para detener la grabación en cuanto
finalice el número en la cinta casete que
se grabará.
1
Presione el interruptor
POWER para activar
la unidad.
2
Si el indicador PHONO/TAPE no
aparece en la pantalla, presione el
botón PHONO/TAPE/AUX varias veces
para seleccionar PHONO/TAPE.
División Manual de Pistas
Es posible dividir la grabación en pistas durante el proceso de grabación.
Durante el proceso de grabación, presione el botón TRACK INCREMENT.
El número de la pista actual será incrementado en una unidad.
3
Cargue un disco CD-R o CD-RW
grabable en la unidad.
Asegúrese de que los indicadores “NO
TOC” y “CD-R” (o “CD-RW”) se
enciendan en la pantalla o el botón
RECORD del paso 7 no funcione.