1
Pro_Flight_radio_panel_MP.qxd
Saitek
17/04/2009
15:40
Page 1
®
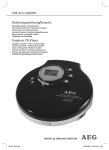
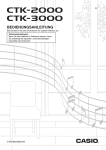
Pro Flight Radio Panel
ACT/STBY
COM 2
XPDR
DIGIT
COM 1
NAV 1
Y
ACT/STB
Y
STANDB
NAV 2
ADF
DME
COM 2
XPDR
COM 1
ACTIVE
XPDR
DIGIT
Saitek
NAV 1
NAV 2
ADF
DME
XPDR
USER MANUAL
BEDIENUNGSANLEITUNG
GUIDE D’UTILISATION
MANUALE D’USO
MANUAL DEL USUARIO
Pro_Flight_radio_panel_MP.qxd
17/04/2009
15:40
Page 2
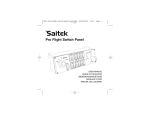
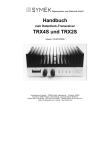
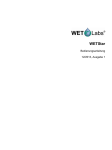
Radio mode selector
SAITEK PRO FLIGHT RADIO PANEL
Congratulations on buying the Saitek Pro Flight Radio Panel. The radio panel interacts
with Microsoft Flight Simulator X to control the cockpit radio stack communications and
navigation frequencies.
COM 1
ACT/ STBY
NAV 1
NAV 2
ADF
Installing the Pro Flight Radio Panel
DME
Fix the radio panel to the supplied mounting bracket. Insert the screws through the
holes at the corners of the panel into the bracket behind and tighten. If you already
own a Saitek Pro Flight Yoke System, you can mount the panel and bracket on top of
the yoke unit using the screws provided.
1
COM 2
Active and standby frequency switch
2
COM 2
XPDR
COM 1
XPDR
DIGIT
ACTIVE
STANDBY
ACT/ STBY
NAV 1
NAV 2
ADF
DME
XPDR
DIGIT
XPDR
Saitek
3
Outer rotary adjusts standby frequency by
increments of 1, inner rotary adjusts decimals
Installation for users of Windows® XP, XP64 and Vista
1. With your computer switched on, close down any programs that are currently
running and plug the USB cable of your panel into one of your PC’s free USB ports.
A dialogue window will open on your windows task bar saying your PC is installing
drivers. Please note that the LED screen will not light up until the panel software is
installed.
2. Insert the Installation CD into your CD or DVD drive. If the CD does not run
automatically, select Start from the Windows® Taskbar, then Run and type
D:\Setup.exe and click OK - where D:\ is letter of your disc drive. For Vista users, if
you receive the “User Account Control” prompt, click continue.
3. For XP users, when the setup wizard screen appears, click “Next” to continue. For
Vista users, when prompted “Do you want to run this program from Saitek?” and
“Do you always want to run this program from Saitek?”, click “Yes”. After reading
2
the Disclaimer, select the “I accept the terms of the Disclaimer” option and click
“Next” to continue.
4. The following screen will say “Driver setup is installing Direct Output”.
5. Once the driver installation has finished, click “Finish” to exit the installation
process.
6. You can now run a test application by going to Windows Start/Programs/Saitek/Pro
Flight Multi Panel/ or open Microsoft FS X. When you open the test application or
FS X the display of your panel will light up.
Note: If you install a Saitek X52 Pro after having installed a Pro flight panel, the
panel’s Direct Output file will be overwritten. If this happens, please reinstall the panel
software.
Using the Saitek Pro Flight Radio Panel
The Saitek Pro Flight Radio Panel allows you to adjust the communications and
navigation frequencies on your aircraft’s radio stack for communicating with air traffic
control or selecting VOR beacons or NDBs for navigation.
3
Pro_Flight_radio_panel_MP.qxd
Com1 and Com2
Nav1 and Nav2
ADF
DME
XPDR
COM 2
17/04/2009
15:40
Page 4
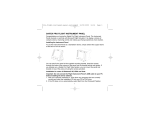
Communications channels 1 and 2
Navigation channels 1 and 2
Automatic Direction Frequency receiver
Distance Measuring Equipment
Transponder frequency code
ADF
COM 2
ADF
DME
ACT/ STBY
COM 2
ADF
XPDR
ACTIVE
STANDBY
XPDR
XPDR
DIGIT
ACTIVE
STANDBY
DME
NAV 2
DME
ACT/ STBY
NAV 2
COM 1
NAV 1
COM 1
NAV 1
COM 1
ACT/ STBY
NAV 1
NAV 2
ADF
DME
ACTIVE
STANDBY
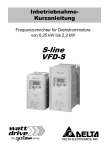
To adjust the radio stack frequencies, first select the radio mode
using the radio mode selector knob on the left of the panel. Using
the rotary controls to the right of the LED screen, adjust the values
of the standby frequency on the right side of the screen. The outer
rotary adjusts standby frequency by increments of 1 and the inner
rotary adjusts decimals. Please note, you can only adjust the standby
values and not the active values.
To make the standby values active, press the ACT/STBY switch to the right of the
panel. The standby values you have input will now move from the standby section of
the screen to the active section and vice versa.
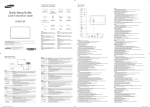
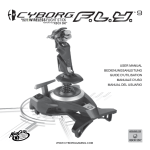
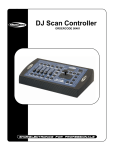
Adjusting the XPDR code
To adjust the transponder squawk code, first select XPDR on the radio mode selector
knob on the left of the panel. Turn the outer rotary to adjust digit 1 and the inner rotary
to adjust digit 2. To adjust digits 3 and 4, press the ACT/STBY button to the right of the
unit and adjust digit 3 by turning the outer rotary and digit 4 by turning the inner rotary.
4
XPDR
XPDR
DIGIT
ACTIVE
STANDBY
XPDR
COM 2
COM 1
Digit 1
NAV 1
2 3
4
ACT/ STBY
NAV 2
ADF
DME
XPDR
XPDR
DIGIT
ACTIVE
STANDBY
Troubleshooting
The radio panel controls are automatically configured to interact with FS X software.
When you open Microsoft FSX you will be asked “Do you trust this driver from Saitek?”
Click “Yes”. You will then be asked “Do you always want to load this plugin when
launching Flight Sim X?” Again, click “Yes”.
If your FS X software does not recognise the radio panel, unplug the USB cable and
plug it back in. If FS X appears not to load, this is because it is waiting for a prompt. To
5
Pro_Flight_radio_panel_MP.qxd
17/04/2009
15:40
Page 6
view the prompt window, select it either by pressing Alt + tab or by clicking on the
prompt on the Windows task bar. The prompt reads “Microsoft Flight Simulator security
warning : will happen once after install”. Click Run and when asked “would you like to
designate this module?”, click yes and FS X will continue to load.
The Pro Flight Radio panel will not register automatically if you have installed the
panel before installing FS X. To register the Pro Flight radio Panel with FS X, click on
the “Launch the Flightsim X plugin manually” icon to re-run the program.
Technical Support
Nearly all the products that are returned to us as faulty are not faulty at all - they have
just not been installed properly.
If you experience any difficulty with this product, please first visit our website
www.saitek.com. The technical support area will provide you with all the information
you need to get the most out of your product and should solve any problems you
might have.
If you do not have access to the internet, or if the website cannot answer your
question, please contact your local Saitek Technical Support Team. We aim to offer
quick, comprehensive and thorough technical support to all our users so, before you
call, please make sure you have all the relevant information at hand.
To find your local Saitek Technical Support Center, please see the separate Technical
Support Center sheet that came packaged with this product.
Conditions of Warranty
1. Warranty period is 2 years from date of purchase with proof of purchase submitted.
2. Operating instructions must be followed.
3. Specifically excludes any damages associated with leakage of batteries.
Note: Batteries can leak when left unused in a product for a period of time, so it is
advisable to inspect batteries regularly.
4. Product must not have been damaged as a result of defacement, misuse, abuse,
neglect, accident, destruction or alteration of the serial number, improper electrical
voltages or currents, repair, alteration or maintenance by any person or party other
than our own service facility or an authorized service center, use or installation of
non-Saitek replacement parts in the product or the modification of this product in
6
any way, or the incorporation of this product into any other products, or damage to
the product caused by accident, fire, floods, lightning, or acts of God, or any use
violative of instructions furnished by Saitek plc.
5. Obligations of Saitek shall be limited to repair or replacement with the same or
similar unit, at our option. To obtain repairs under this warranty, present the product
and proof of purchase (eg, bill or invoice) to the authorized Saitek Technical
Support Center (listed on the separate sheet packaged with this product)
transportation charges prepaid. Any requirements that conflict with any state or
Federal laws, rules and/or obligations shall not be enforceable in that particular
territory and Saitek will adhere to those laws, rules, and/or obligations.
6. When returning the product for repair, please pack it very carefully, preferably using
the original packaging materials. Please also include an explanatory note.
IMPORTANT: To save yourself unnecessary cost and inconvenience, please check
carefully that you have read and followed the instructions in this manual.
This warranty is in Lieu of all other expressed warranties, obligations or liabilities.
ANY IMPLIED WARRANTIES, OBLIGATIONS, OR LIABILITIES, INCLUDING BUT
NOT LIMITED TO THE IMPLIED WARRANTIES OF MERCHANTABILITY AND
FITNESS FOR A PARTICULAR PURPOSE, SHALL BE LIMITED IN DURATION TO
THE DURATION OF THIS WRITTEN LIMITED WARRANTY. Some states do not
allow limitations on how long an implied warranty lasts, so the above limitations
may not apply to you. IN NO EVENT SHALL WE BE LIABLE FOR ANY SPECIAL
OR CONSEQUENTIAL DAMAGES FOR BREACH OF THIS OR ANY OTHER
WARRANTY, EXPRESS OR IMPLIED, WHATSOEVER Some states do not allow
the exclusion or limitation of special, incidental or consequential damages, so the
above limitation may not apply to you. This warranty gives you specific legal rights,
and you may also have other rights which vary from state to state.
This symbol on the product or in the instructions means that your
electrical and electronic equipment should be disposed at the end of
its life separately from your household waste. There are separate
collection systems for recycling in the EU.
For more information, please contact the local authority or your retailer where you
purchased the product.
7
Pro_Flight_radio_panel_MP.qxd
17/04/2009
15:40
Page 8
FCC Compliance and Advisory Statement
Warning: Changes or modifications to this unit not expressly approved by the party
responsible for compliance could void the user's authority to operate the equipment.
This device complies with Part 15 of the FCC Rules. Operation is subject to the
following two conditions:
1. This device may not cause harmful interference, and;
2. This device must accept any interference received, including interference that may
cause undesired operation.
NOTE: This equipment has been tested and found to comply with the limits for a Class
B digital device, pursuant to Part 15 of the FCC Rules. These limits are designed to
provide reasonable protection against harmful interference in a residential installation.
This equipment generates, uses and can radiate radio frequency energy and, if not
installed and used in accordance with the instructions, may cause harmful interference
to radio communications. However, there is no guarantee that interference will not
occur in a particular installation. If this equipment does cause harmful interference to
radio or television reception, which can be determined by turning the equipment off
and on, the user is encouraged to try to correct the interference by one or more of the
following measures:
- Reorient or relocate the receiving antenna;
- Increase the separation between the equipment and receiver;
- Connect the equipment into an outlet on a circuit different from that to which the
receiver is connected;
- Consult the dealer or an experienced radio/TV technician for help.
Saitek Industries, 2295 Jefferson Street, Torrance, CA 90501, USA
Canada ICES-003
Operation is subject to the following two conditions:
1. This device may not cause interference, and;
2. This device must accept any interference, including interference that may cause
undesired operation of the device.
This Class B digital apparatus complies with Canadian ICES-003.
Cet appareil numérique de la classe B est conforme à la norme NMB-003 du Canada.
8
SAITEK PRO FLIGHT RADIO PANEL
Wir beglückwünschen Sie zum Kauf des Saitek Pro Flight Radio Panel. Das Radio
Panel interagiert mit Microsoft Flight Simulator X zur Steuerung der Cockpit Radio
Stack Kommunikations- und Navigationsfrequenzen.
Installation des Pro Flight Radio Panel
Befestigen Sie das Radio Panel am mitgelieferten Montagebügel. Stecken Sie die
Schrauben durch die Öffnungen an den Ecken des Panel und in die Halterung
dahinter und fixieren Sie sie. Falls Sie bereits ein Saitek Pro Flight Yoke-System
besitzen, können Sie das Panel und die Konsole auch mithilfe der mitgelieferten
Schrauben oben auf dem Yoke-System befestigen.
1
2
3
Installation für Benutzer von Windows® XP, XP64 und Vista
1. Schließen Sie bei eingeschaltetem Computer alle laufenden Programme und
schließen Sie das USB-Kabel Ihres Panel an einen freien USB-Anschluss auf
Ihrem PC an. Ein Dialogfenster erscheint auf Ihrer Windows-Taskleiste und teilt
Ihnen mit, dass Ihr PC Treiber installiert. Bitte beachten Sie, dass der LEDBildschirm nicht aufleuchtet, bis die Panel-Software installiert wurde.
2. Legen Sie die Installations-CD in das CD- oder DVD-Laufwerk ein. Falls die CD
nicht automatisch startet, wählen Sie zunächst auf der Windows® Taskleiste Start
und danach Ausführen aus, geben Sie D:\Setup.exe ein und klicken Sie auf OK. D:\
ist die Bezeichnung für Ihr CD-ROM-Laufwerk. Wenn Sie Vista benutzen und zur
"Benutzerkonten-Steuerung" gelangen, klicken Sie auf "Continue" (Fortfahren).
9
Pro_Flight_radio_panel_MP.qxd
Funkmodusauswahl
COM 2
17/04/2009
15:40
Page 10
Hinweis: Wenn Sie einen Saitek X52 Pro nach der Installation des Flight Instrument
Panel installieren, wird die Direct Output-Datei des Instrument Panel überschrieben. In
diesem Fall installieren Sie die Panel-Software neu.
Aktiv- und Hilfsfrequenzschalter
COM 1
ACT/ STBY
NAV 1
NAV 2
ADF
DME
COM 2
XPDR
COM 1
XPDR
DIGIT
ACTIVE
STANDBY
ACT/ STBY
NAV 1
NAV 2
ADF
DME
XPDR
DIGIT
XPDR
Saitek
Wenn Sie die Com- oder Nav-Frequenzen anpassen, passt der äußere Drehknopf die
Hilfsfrequenz in 1er-Schritten an, der innere Drehknopf in Dezimalschritten.
3. Für XP-Benutzer: Wenn der Installationsassistent erscheint, klicken Sie auf "Next"
(Weiter), um fortzufahren. Für Vista Benutzer: Wenn die Aufforderung "Do you want
to run this program from Saitek?" (Wollen Sie dieses Programm von Saitek
ausführen?) erscheint, klicken Sie auf "Yes" (Ja). Nachdem Sie den
Haftungsausschluss gelesen haben, wählen Sie die Option "I accept the terms of
the Disclaimer" (Ich akzeptiere die Bedingungen des Haftungsausschlusses) aus
und klicken Sie auf Next (Weiter), um fortzufahren.
4. Auf der folgenden Ansicht erscheint "Driver setup ist installing Direct Output"
(Treibersetup installiert Direct Output)
5. Sobald die Treiberinstallation abgeschlossen ist, klicken Sie "Finish" (Beenden), um
den Installationsvorgang zu beenden.
6. Sie können nun eine Testanwendung ausführen, indem Sie auf Windows
Start/Programme/Saitek/Pro Flight Multi Panel gehen oder Microsoft FS X öffnen.
Wenn Sie die Testanwendung oder FS X öffnen, leuchtet Ihr Panel auf.
10
Verwendung des Saitek Pro Flight Radio Panel
Mit dem Saitek Pro Flight Radio Panel können Sie die Kommunikations- und
Navigationsfrequenzen auf dem Radio Stack Ihres Flugzeuges zur Kommunikation mit
der Luftverkehrszentrale oder zur Auswahl von VOR-Signalstationen oder NDBs zur
Navigation anpassen.
Com1 und Com2
Kommunikationskanäle 1 und 2
Nav1 und Nav2
Navigationskanäle 1 und 2
ADF
Automatischer Richtungsfrequenzempfänger
DME
Distanzmessungsgerät
XPDR
Transponderfrequenzcode
Zur Anpassung der Radio-Stack-Frequenzen wählen Sie zuerst den Funkmodus über
den Funkmodusauswahlschalter links auf dem Panel aus. Mit den Drehknöpfen auf
der rechten Seite der LED-Anzeige passen Sie die Werte der Hilfsfrequenz auf der
COM 2
COM 1
ACT/ STBY
NAV 1
NAV 2
ADF
DME
XPDR
ACTIVE
STANDBY
ACTIVE
STANDBY
rechten Seite der Anzeige an. Der äußere Drehknopf passt die
Hilfsfrequenz in 1er-Schritten, der innere Drehknopf in
Dezimalschritten an. Bitte beachten Sie, dass Sie nur die
Hilfswerte, nicht aber die aktiven Werte anpassen können.
11
Pro_Flight_radio_panel_MP.qxd
17/04/2009
15:40
Page 12
Um die Hilfswerte zu aktivieren, drücken Sie den Schalter ACT/STBY auf der rechten
Seite des Panel. Die von Ihnen eingegebenen Hilfswerte wechseln nun vom
Hilfsabschnitt der Ansicht zum aktiven Abschnitt und umgekehrt.
ADF
COM 2
COM 1
ACT/ STBY
NAV 1
NAV 2
XPDR
XPDR
DIGIT
ACTIVE
STANDBY
DME
COM 2
COM 1
ACT/ STBY
NAV 1
NAV 2
ADF
DME
XPDR
XPDR
DIGIT
ACTIVE
STANDBY
XPDR
COM 2
COM 1
Digit 1
NAV 1
2 3
4
ACT/ STBY
NAV 2
ADF
DME
Zur Anpassung des Transponder Squawk-Code wählen Sie zuerst XPDR auf dem
Funkmodusauswahlschalter links auf dem Panel aus. Drehen Sie den äußeren
Drehknopf zur Anpassung von Stelle 1 und den inneren Drehknopf zur Anpassung von
Stelle 2. Zur Anpassung von Stellen 3 und 4 drücken Sie den Schalter ACT/STBY
rechts auf dem Gerät einmal. Passen Sie Stelle 3 durch Drehen des äußeren
Drehknopfs und Stelle 4 durch Drehen des inneren Drehknopfs an.
Fehlerbehebung
ADF
DME
Anpassen des XPDR Code
XPDR
XPDR
DIGIT
ACTIVE
STANDBY
Die Bedienteile des Radio Panel sind automatisch dafür konfiguriert, mit der FS X
Software zu interagieren. Beim Öffnen von Microsoft FSX erscheint die Frage "Do you
trust this driver from Saitek?" (Ist dieser Treiber von Saitek vertrauenswürdig?).
Klicken Sie auf "Yes" (Ja). Danach erscheint die Frage "Do you always want to load
this plugin when launching Flight Sim X?" (Wollen Sie immer dieses Plugin beim Start
von Flight Sim X laden?). Klicken Sie erneut auf "Yes" (Ja). Falls Ihre FS X Software
das Radio Panel nicht erkennt, hängen Sie das USB-Kabel ab und schließen Sie es
erneut an.
Sollte FS X nicht laden, liegt das daran, dass die Software auf eine Eingabe wartet.
Wählen Sie das Eingabe-Fenster aus, indem Sie entweder Alt + Tab drücken oder die
Eingabeaufforderung auf der Windows-Taskleiste anklicken. Die Eingabeaufforderung
lautet: "Microsoft Flight Simulator security warning : will happen once after install"
(Microsoft Flight Simulator Sicherheitshinweis: Erfolgt einmal nach der Installation).
Klicken Sie auf Ausführen. Wenn die Frage "Would you like to designate this module?"
(Wollen Sie dieses Modul zuweisen?) erscheint, klicken Sie auf Yes (Ja), und der
Ladevorgang von FS X wird fortgesetzt.
Das Pro Flight Radio Panel wird nicht automatisch registriert, wenn Sie das Pro Flight
Switch Panel vor der Installation von FS X installiert haben. Um das Pro Flight Radio
Panel bei FS X zu registrieren, klicken Sie auf das Symbol " Launch the Flightsim X
plugin manually" (Flightsim X Plugin manuell starten), um das Programm erneut
auszuführen.
12
13
Pro_Flight_radio_panel_MP.qxd
17/04/2009
15:40
Page 14
Technischer Support
Probleme - keine Angst, wir lassen Sie nicht im Stich!
Wussten Sie, dass fast alle Produkte, die als fehlerhaft an uns zurückgeschickt
werden, überhaupt nicht defekt sind? Sie wurden einfach nicht richtig installiert!
Sollten Sie Probleme mit diesem Produkt haben, besuchen Sie bitte zuerst unsere
Website www.saitek.de. Unsere Website, speziell der Bereich Technischer Support,
wurde erstellt, damit Sie von Ihrem Saitek-Produkt die bestmögliche Leistung erhalten.
Sollten Sie trotzdem noch Probleme haben oder kein Internetanschluss haben, dann
stehen Ihnen unsere Produktspezialisten im Saitek Technical Support Team zur
Verfügung, die Sie telefonisch um Rat und Hilfe bitten können.
Wir möchten, dass Sie viel Freude an Ihrem Gerät haben. Bitte rufen Sie uns an, falls
Sie Probleme oder Fragen haben. Bitte stellen Sie auch sicher, dass Sie alle
relevanten Informationen zu Hand haben, bevor Sie anrufen.
Rufnummern und Adressen finden Sie auf der mit dem Produkt gelieferten Liste der
Zentren für Technischen Support.
Garantiebedingungen
Wahl entweder repariert oder durch ein gleiches oder ähnliches Gerät ersetzt. Zur
Inanspruchnahme der Garantie sind dem autorisierten Saitek Technical Support
Center (Anschrift liegt dem Gerät in der Verpackung bei) Gerät und Kaufbeleg (z.B.
Kassenzettel oder Rechnung) frachtfrei zu übersenden.
5. Bei Einsendung des Geräts zur Reparatur ist eine angemessene Verpackung
(vorzugsweise die Originalverpackung) zu wählen und eine Schilderung des
Problems beizufügen.
6. WICHTIGER HINWEIS: Achten Sie zur Vermeidung unnötiger Kosten und
Unannehmlichkeiten darauf, die Anweisungen in dieser Bedienungsanleitung
sorgfältig durchzulesen und zu beachten.
Dieses Produkt darf am Ende seiner Lebensdauer nicht über den
normalen Haushaltsabfall entsorgt werden, sondern muss an einem
Sammelpunkt für das Recycling von elektrischen und elektronischen
Geräten abgegeben werden. Das Symbol auf dem Produkt, der
Gebrauchsanleitung oder der Verpackung weist darauf hin.
1. Die Garantiezeit beträgt 2 Jahre ab dem nachgewiesenen Kaufdatum.
2. Die Bedienungsanleitung ist zu beachten.
3. Die Garantie ist ausgeschlossen beu
Verunstaltung des Geräts, unsachgemäßer oder missbräuchlicher Benutzung,
mangelnder Sorgfalt, Unfall, Beseitigung oder Änderung der Seriennummer;
Anschluss an eine falsche Spannung oder Stromart; Reparatur, Umbau oder
Wartung des Geräts durch fremde Personen außerhalb unserer Serviceeinrichtung
oder eines autorisierten Servicecenters; Verwendung oder Einbau von nicht von
Saitek stammenden Ersatzteilen in das Gerät oder sonstigen Veränderungen:
Einbau in andere Geräte; Beschädigung des Geräts durch höhere Gewalt (z.B.
Unfall, Brand, Hochwasser oder Blitzschlag) oder eine den Anweisungen von
Saitek zuwider laufende Benutzung des Geräts.
4. Die Garantiepflicht beschränkt sich darauf, dass Saitek das Gerät nach eigener
14
15
Pro_Flight_radio_panel_MP.qxd
17/04/2009
15:41
Page 16
SAITEK PRO FLIGHT RADIO PANEL
Sélecteur de mode Radio
Félicitations pour l'achat du Saitek Pro Flight Radio Panel. Le Radio Panel interagit
avec Microsoft Flight Simulator X pour contrôler la radio du poste de pilotage et les
fréquences de navigation.
Installer le Pro Flight Radio Panel
COM 1
ACT/ STBY
NAV 1
NAV 2
ADF
DME
Fixez le Radio Panel à l'aide du support de montage. Insérez les visses à travers les
trous dans les coins du panneau, dans le support arrière et serrez. Si vous possédez
déjà un Saitek Pro Flight Yoke System, vous pouvez fixer le panneau et le support sur
le dessus du yoke en utilisant les visses fournies.
1
COM 2
Sélecteur de fréquences actives et en attentes
2
COM 2
XPDR
COM 1
XPDR
DIGIT
ACTIVE
STANDBY
ACT/ STBY
NAV 1
NAV 2
ADF
DME
XPDR
DIGIT
XPDR
Saitek
3
Lors du réglage des fréquences Com ou Nav, la molette rotative externes règle la fréquence
de veille par incréments de 1, la molette rotative interne ajuste les décimales.
Installation pour les utilisateurs de Windows® XP, XP64 et Vista
1. Votre ordinateur allumé, fermez tous les programmes qui sont actuellement en
cours d'exécution et branchez le câble USB de votre panneau dans l'un de vos
ports USB libre de votre PC. Une fenêtre de dialogue s'ouvrira dans votre barre
des tâches Windows disant que votre PC installe les pilotes. Merci de noter que
l'écran à LED ne s'allumera pas jusqu'à ce que le panneau soit installé.
2. Insérez le CD d'installation dans votre lecteur de CD ou de DVD. Si le CD ne
s'exécute pas automatiquement, sélectionnez Démarrer dans la barre des tâches
Windows ®, puis cliquez sur Exécuter et tapez D: \ Setup.exe et cliquez sur OK D: \ est la lettre de votre disque dur. Pour les utilisateurs de Vista, si la vérification
de "Contrôle de compte d'utilisateur" s'affiche, cliquez sur continuer.
16
3. Pour les utilisateurs de XP, lorsque l'écran de l'assistant d'installation apparaît,
cliquez sur "Suivant" pour continuer. Pour les utilisateurs de Vista, à l'invite "Voulezvous exécuter ce programme de chez Saitek ?" Et "Voulez-vous toujours exécuter
ce programme de Saitek ?", Cliquez sur "Oui". Après avoir lu l'avertissement,
cochez la case "J'accepte les conditions d'utilisation" et cliquez sur "Suivant" pour
continuer.
4. L'écran suivant affichera "l'installation du pilote est en train d'installer Direct
Output".
5. Une fois l'installation du pilote terminée, cliquez sur "Terminer" pour quitter le
processus d'installation.
6. Vous pouvez maintenant lancer une application de test en allant sur Windows
Démarrer / Programmes / Saitek / Pro Flight Multi Panel / ou ouvrez Microsoft FS
X. Lorsque vous ouvrez l'application de test ou FS X, l'affichage de votre panneau
s'allumera.
17
Pro_Flight_radio_panel_MP.qxd
17/04/2009
15:41
Page 18
Note: Si vous installez un Saitek X52 Pro après avoir installé un Pro flight panel, le
fichier Direct Output du Radio Panel sera écrasé. Si cela se produit, merci de
réinstaller le logiciel du Radio Panel.
droite du panneau. Les valeurs de veille que vous avez saisies vont maintenant
passer de la section veille de l'écran à la section active et vice-versa.
ADF
Utilisation du Saitek Pro Flight Radio Panel
Le Saitek Pro Flight Panel Radio vous permet d'ajuster les fréquences de
communication et de navigation sur votre appareil radio pour communiquer avec le
contrôle du trafic aérien ou sélectionnez les balises VOR ou NDB pour la navigation.
Com1 et Com2
Canaux de communication 1 et 2
Nav1 et Nav2
Canaux de navigation 1 et 2
FDA
récepteur Automatique de Direction de Fréquence
DME
Equipement de Mesure de Distance
XPDR
Transpondeur de code de fréquence
Pour ajuster la pile des fréquences radio, sélectionnez d'abord le mode radio en
COM 2
ACT/ STBY
NAV 2
ADF
DME
XPDR
ACT/ STBY
STANDBY
COM 2
COM 1
ACT/ STBY
NAV 1
NAV 2
ADF
XPDR
COM 1
NAV 1
XPDR
DIGIT
ACTIVE
DME
DME
COM 2
COM 1
NAV 1
XPDR
DIGIT
ACTIVE
STANDBY
XPDR
NAV 2
ADF
DME
COM 2
XPDR
ACTIVE
STANDBY
COM 1
Digit 1
NAV 1
2 3
4
ACT/ STBY
NAV 2
ADF
DME
ACTIVE
STANDBY
utilisant la molette de sélection de mode radio sur la gauche du
panneau. Utilisez la molette de contrôle à la droite de l'écran LED
pour régler les valeurs de la fréquence de veille sur le côté droit de
l'écran. Le contrôle rotatif externe ajuste la fréquence par
incréments de 1 et le contrôle rotatif interne ajuste décimales. Merci
de noter que vous uniquement ajuster les valeurs de veille et pas les
valeurs actives.
Pour rendre actives les valeurs de veille, appuyez sur la touche ACT/STBY sur la
18
XPDR
XPDR
DIGIT
ACTIVE
STANDBY
Ajuster le code XPDR
Pour régler le transpondeur de code Squawk, sélectionnez d'abord XPDR avec le
bouton de sélection de mode sur la gauche du panneau. Tournez le contrôle rotatif
externe pour ajuster le chiffre 1 et le contrôle rotatif interne pour ajuster chiffre 2. Pour
19
Pro_Flight_radio_panel_MP.qxd
17/04/2009
15:41
Page 20
ajuster les chiffres 3 et 4, pressez une fois le bouton ACT/STBY à droite de l'appareil
et ajustez le chiffre 3 en tournant le contrôle rotatif externe et le chiffre 4 en tournant le
contrôle rotatif interne.
Dépannage
Les contrôles du Radio Panel sont automatiquement configurés pour interagir avec le
logiciel FS X. Lorsque vous ouvrez Microsoft FSX il vous sera demandé "Avez-vous
confiance en ce pilote de chez Saitek ?". Cliquez sur "Oui". Il vous sera alors
demandé: "Voulez-vous toujours charger ce plugin lors du lancement de Flight Sim
X?". Encore une fois, cliquez sur "Oui". Si votre logiciel FS X ne reconnaît pas le
Radio Panel, débranchez le câble USB et rebarnchez-le.
Si FS X semble ne pas se charger, c'est parce que le logiciel attend une réponse.
Pour voir la fenêtre de dialogue, sélectionnez-la en pressant Alt+Tab ou en cliquant
sur la boite dans la barre des tâches Windows. La boite affiche " Alerte de sécurité
Microsoft Flight Simulator : cela arrivera après l'installation ". Cliquez sur Exécuter et
lorsque cela est demandé " Voulez-vous sélectionner ce module ? ", cliquez sur Oui et
FS X continuera son chargement.
Le Pro Flight Radio Panel ne s'enregistrera pas automatiquement si vous l'avez
installé avant le logiciel FS X. Pour enregistrer le Pro Flight Radio Panel avec FS X,
cliquez sur l'icône "Lancer manuellement le plugin Flightsim X" pour ré-exécuter le
programme.
Support Technique
Je ne peux pas démarrer. Ne vous inquiétez pas, nous sommes là pour vous aider!
La plupart des produits qui nous sont retournés comme étant défectueux ne le sont
pas du tout en réalité : ils n'ont tout simplement pas été installés correctement.
Si vous rencontrez la moindre difficulté avec ce produit, merci de vous rendre tout
d'abord sur notre site web www.saitek.com. La section Support Technique vous
fournira toute l'information dont vous avez besoin pour tirer le meilleur parti de votre
produit, et devrait vous aider à résoudre tous les problèmes que vous pourriez
éventuellement rencontrer.
Si vous n'avez pas accès à Internet, ou si vous ne trouvez pas de réponse à votre
question sur notre site web, merci de bien vouloir contacter l'équipe locale du Support
Technique Saitek. Notre objectif consiste à offrir un support technique complet et
approfondi à tous nos utilisateurs, donc, avant de nous appeler, merci de bien vouloir
vérifier que vous avez toute l'information requise à portée de main.
Pour trouver votre équipe locale du Support Technique Saitek, merci de vous référer à
la feuille " Centre de Support Technique " qui vous a été fournie dans l'emballage de
ce produit.
Conditions de garantie
1. La période de garantie est de deux ans à compter de la date d'achat, avec
soumission d'une preuve d'achat.
2. Les instructions de fonctionnement doivent être correctement suivies.
3. Le produit ne doit pas avoir été endommagé par une dégradation, une utilisation
non conforme, une négligence, un accident, une destruction ou une altération du
numéro de série, l'utilisation de voltages ou courants électriques inadaptés, la
réparation, la modification ou la maintenance par toute personne ou tiers autre que
notre propre Service Après Vente ou un centre de réparation agréé, l'utilisation ou
l'installation de pièces de remplacement qui ne soient pas des pièces Saitek, ou la
modification du produit de quelque manière que ce soit, ou l'introduction de ce
produit dans n'importe quel autre produit, ou des dommages causés au produit par
un accident, le feu, des inondations, la foudre, les catastrophes naturelles, ou toute
utilisation allant à l'encontre des instructions fournies par Saitek PLC.
4. Les obligations de Saitek sont limitées à la réparation ou au remplacement par un
produit identique ou similaire, à notre convenance. Afin d'obtenir la réparation d'un
produit sous cette garantie, veuillez présenter le produit et sa preuve d'achat (c'est
à dire le ticket de caisse ou une facture) au Centre de Support Technique Saitek
agréé (la liste vous est fournie sur une feuille séparée se trouvant également dans
l'emballage du produit), en ayant au préalable payé les frais d'envoi. Toute
condition en contradiction avec des lois, règles et/ou obligations fédérales ou
étatiques ne pourra pas être appliquée dans ce territoire spécifique et Saitek
adhèrera à ces lois, règles et/ou obligations.
Pro_Flight_radio_panel_MP.qxd
17/04/2009
15:41
Page 22
5. Lors du renvoi du produit en vue d'une réparation, veillez s'il vous plaît à l'emballer
soigneusement, en utilisant de préférence l'emballage d'origine. Merci également
de bien vouloir inclure une note explicative.
6. IMPORTANT : afin de vous permettre d'éviter des coûts et des désagréments
inutiles, merci de vérifier soigneusement que vous avez lu et suivi les instructions
figurant dans ce manuel.
Cette garantie agit en lieu et place de toutes les autres garanties, obligations et
responsabilités. TOUTES GARANTIES, OBLIGATIONS OU RESPONSABILITES
IMPLICITES, INCLUANT SANS RESTRICTION LES GARANTIES ET
CONDITIONS IMPLICITES DE QUALITE OU D'ADAPTABILITE A UN USAGE
SPECIFIQUE, SONT LIMITEES, EN DUREE, A LA DUREE DE CETTE GARANTIE
LIMITEE ECRITE. Certains Etats n'autorisent pas de restrictions de durée de la
garantie, auquel cas les restrictions décrites ci-dessus ne vous sont pas
applicables. EN AUCUN CAS NOUS NE POURRONS ETRE TENUS POUR
RESPONSABLES POUR DES DEGATS SPECIFIQUES OU RESULTANT D'UNE
INFRACTION A CETTE GARANTIE OU A TOUTE AUTRE GARANTIE,
EXPRESSE OU IMPLICITE, QUELLE QU'ELLE SOIT. Certains Etats n'autorisent
pas l'exclusion ou la restriction des dégâts accidentels, indirects, spéciaux ou
induits, auquel cas la restriction ci-dessus ne vous est pas applicable. Cette
garantie vous accorde des droits légaux spécifiques, et vous pouvez également
bénéficier d'autres droits variant d'un Etat à l'autre.
Ce symbole sur le produit ou dans le manuel signifie que votre équipement
électrique et électronique doit être, en fin de vie, jeté séparement de
vos déchets ménagés. Il existe en France des systèmes de collecte
différents pour les déchets recyclables. Pour plus d'information,
veuillez contacter les autorités locales ou le revendeur chez qui vous
avez acheté le produit.
22
PANNELLO RADIO PRO FLIGHT SAITEK
Congratulazioni per avere acquistato il Panello Radio Pro Flight Saitek. Il panello radio
interagisce con Microsoft Flight Simulator X per controllare le comunicazioni e le
frequenze di navigazione dello stack radio del cruscotto.
Installazione del Pannello Radio Pro Flight
Fissate il panello radio alle staffe di montaggio fornite. Inserite le viti nella parte
inferiore del morsetto, attraverso i fori agli angoli del pannello, e stringetele. Se
possedete già un Yoke System Pro Flight Saitek, potete montare il panello e il
morsetto sopra alla cloche utilizzando le viti fornite.
1
2
3
Installazione per gli utenti di Windows® XP, XP64 e Vista
1. Con il vostro computer acceso, chiudete tutti i programmi in esecuzione e inserite il
cavo USB del vostro pannello in una porta USB libera del vostro PC. Si apre una
finestra di dialogo nella barra degli strumenti di Windows, che dice che il vostro PC
sta installando i driver. Notate che i LED dello schermo si illuminano solo dopo
l'installazione del software del pannello.
2. Inserite il CD di installazione nel vostro drive CD o DVD. Se il CD non si avvia
automaticamente, selezionate Start nella barra degli strumenti Windows®, poi
Esegui, digitate D:\Setup.exe (dove D:\ è la lettera del vostro disco) e fate click su
OK. Per gli utenti Vista, se ricevete il messaggio "Controllo dell'account utente",
fate click su Continua.
23
Pro_Flight_radio_panel_MP.qxd
17/04/2009
15:41
Page 24
3. Per gli utenti XP, quando appare la finestra dell'assistente di impostazione, fate
click su "Avanti" per continuare. Per gli utenti Vista, quando appare il messaggio
"Volete eseguire questo programma di Saitek?" e "Volete eseguire sempre questo
programma di Saitek?", fate clic su "Sì". Dopo avere letto il Disclaimer, selezionate
l'opzione "Io accetto i termini del Disclaimer" e fate click su "Avanti" per continuare.
4. La schermata successiva dice "Driver setup sta installando Direct Output".
5. Una volta terminata l'installazione dei driver, fate click su "Fine" per uscire dal
processo di installazione.
6. Ora potete eseguire un'applicazione di test andando a Windows
Start/Programmmi/Saitek/Pro Flight Multi Panel/ o aprire Microsoft FS X. Quando
aprite l'applicazione di test o FS X il display del vostro pannello si illumina.
Nota: Se installate un X52 Pro Saitek dopo avere installato il panello Pro flight, il file
Direct Output del panello viene sovrascritto. Se questo succede, ri-installate il software
del panello.
Utilizzo del Panello Radio Pro Flight Saitek
Il Panello Radio Pro Flight Saitek vi permette di regolare le frequenze di
comunicazione e di navigazione dello stack radio del vostro aereo per comunicare con
il controllo del traffico aereo, o di selezionare i radiofari VOR o NDB per la
navigazione.
Com1 e Com2
canali di comunicazione 1 e 2
Nav1 e Nav2
canali di navigazione 1 e 2
ADF
Ricevitore Automatic Direction Frequency
DME
Distance Measuring Equipment
(Dispositivo per la misura della distanza)
XPDR
Codice di frequenza del transponder
Per regolare le frequenze dello stack radio, per prima cosa selezionate il modo radio
COM 2
COM 1
ACT/ STBY
NAV 1
Selettore modo Radio
NAV 2
Switch frequenza attiva e standby
ADF
DME
COM 2
XPDR
ACTIVE
STANDBY
ACTIVE
STANDBY
COM 1
ACT/ STBY
NAV 1
NAV 2
ADF
DME
COM 2
XPDR
COM 1
XPDR
DIGIT
ACTIVE
STANDBY
ACT/ STBY
NAV 1
NAV 2
ADF
DME
XPDR
DIGIT
XPDR
Saitek
Quando si regolano le frequenze Com o Nav, la manopola rotante esterna regola
la frequenza di standby con incrementi di 1, la manopola interna regola i decimali.
24
per mezzo del selettore del modo radio alla sinistra del panello.
Usando i controlli rotanti alla destra dello schermo LED, regolate i
valori della frequenza di standby nella parte destra dello schermo.
La manopola esterna regola la frequenza di standby con incrementi
di 1 e la manopola interna regola i decimali. Nota, potete regolare
solo i valori di standby e non i valori attivi.
Per rendere attivi i valori di standby, premete lo switch ACT/STBY alla destra del
pannello. I valori di standby che avete immesso passano dalla sezione di standby dello
schermo alla sezione attiva e viceversa.
25
Pro_Flight_radio_panel_MP.qxd
17/04/2009
15:41
Page 26
Risoluzione problemi
ADF
COM 2
COM 1
ACT/ STBY
NAV 1
NAV 2
ADF
DME
XPDR
XPDR
DIGIT
ACTIVE
STANDBY
DME
COM 2
COM 1
ACT/ STBY
NAV 1
NAV 2
ADF
DME
XPDR
XPDR
DIGIT
ACTIVE
STANDBY
XPDR
COM 2
COM 1
Digit 1
NAV 1
2 3
4
ACT/ STBY
NAV 2
ADF
DME
XPDR
XPDR
DIGIT
ACTIVE
STANDBY
Regolazione del codice XPDR
Per regolare il codice squawk del transponder, per prima cosa selezionate XPDR sulla
manopola di selezione del modo radio alla sinistra del pannello. Girate la manopola
esterna per regolare la cifra 1 e la manopola interna per regolare la cifra 2. Per
regolare le cifre 3 e 4, premete una volta il bottone ACT/STBY alla destra dell'unità e
regolate le cifra 3 girando la manopola esterna e la cifra 4 girando la manopola
interna.
26
I controlli del panello radio sono a configurati automaticamente per interagire con il
software FS X. Quando aprite Microsoft FSX vi viene chiesto "Do you trust this driver
from Saitek?" Fate Click su "Yes". Poi vi viene chiesto "Do you always want to load
this plugin when launching Flight Sim X?" fate di nuovo click su "Yes". Se il vostro
software FS X non riconosce il panello radio, scollegate il cavo USB e ricollegatelo.
Se FS X non si carica, è perché è in attesa di un prompt. Per vedere la finestra del
prompt, selezionatela premendo Alt + tab o facendo clic sul prompt sulla barra degli
strumenti di Windows. Il prompt dice "Microsoft Flight Simulator security warning : will
happen once after install". Fate click su Esegui e quando viene chiesto "would you like
to designate this module?", fate click su "sì" e FS X continuerà il caricamento.
Il pannello radio Pro Flight non registra automaticamente se avete installato il pannello
prima di installare FS X. Per registrare il pannello radio Pro Flight con FS X, fate click
sull'icona "Launch the Flightsim X plugin manually" per ri-eseguire il programma.
Avvio impossibile? Non preoccupatevi, siamo qui per aiutarti!
Quasi tutti i prodotti che ci vengono resi come difettosi non sono affatto difettosi semplicemente non sono stati installati correttamente.
Se avete delle difficoltà con questo prodotto, visitate prima di tutto il nostro sito Web
www.saitek.com. L'area dell'assistenza tecnica vi fornirà tutte le informazioni che vi
occorrono per ottenere il meglio dal vostro prodotto e per risolvere qualsiasi problema
da voi riscontrato.
Se non avete accesso a Internet o il sito Web non è in grado di rispondere alla vostra
domanda, rivolgetevi al vostro Team Assistenza Tecnica Saitek locale. Offriamo
l'assistenza tecnica rapida, vasta e completa a tutti i nostri utenti. Prima di chiamarci
accertatevi di avere tutte le informazioni pertinenti a portata di mano.
Troverete nel foglio separato fornito con questo prodotto i dati relativi al vostro Centro
di Assistenza Tecnica locale.
27
Pro_Flight_radio_panel_MP.qxd
17/04/2009
15:41
Page 28
Condizioni della garanzia
1. Il periodo di garanzia è di 2 anni dalla data d'acquisto con presentazione della
prova d'acquisto.
2. Seguire le istruzioni per il funzionamento.
3. Il prodotto non deve essere stato danneggiato a causa di deturpazione, uso errato,
abuso, negligenza, incidente, distruzione o alterazione del numero di serie,
incorrette tensioni o correnti elettriche, riparazione, modifiche o manutenzione
effettuate da qualsiasi persona o parte eccetto dal nostro servizio di manutenzione
o un centro di manutenzione autorizzato, utilizzo o installazione di parti di ricambio
non Saitek nel prodotto o la modifica di questo prodotto in qualsiasi modo, o
l'incorporazione di questo prodotto in qualsiasi altro prodotto, o danni al prodotto
provocato da incidente, incendio, inondazione, fulmini o forza maggiore, o qualsiasi
uso che contravviene alle istruzioni fornite da Saitek plc.
4. Gli obblighi di Saitek saranno limitati alla riparazione o sostituzione con la stessa
unità o con un'unità simile, a scelta di Saitek. Per ottenere le riparazioni ai sensi
della presente garanzia, presentare il prodotto e la prova d'acquisto (ad es. la
ricevuta o la fattura) al Centro Assistenza Tecnica Saitek (elencato nel foglio
separato contenuto nella confezione di questo prodotto), con le spese di trasporto
prepagate. Qualsiasi condizione eventualmente in conflitto con qualsiasi legge,
regolamento e/o obbligo statale o federale non sarà applicabile in quel territorio
particolare e Saitek aderirà a quelle leggi, regole e/o obblighi.
5. Quando il prodotto viene reso per la riparazione, imballarlo molto attentamente,
preferibilmente utilizzando i materiali d'imballaggio originali. Includere inoltre una
nota esplicativa.
6. IMPORTANTE: per risparmiare costi e inconvenienti inutili, controllare attentamente
di aver letto e seguito le istruzioni in questo manuale.
7. Questa garanzia sostituisce tutte le altre garanzie, gli obblighi o le responsabilità
esplicite. LA DURATA DI QUALSIASI GARANZIA, OBBLIGO, O RESPONSABILITÀ
IMPLICITI, COMPRESI MA NON LIMITATI ALLE GARANZIE IMPLICITE DI
RESPONSABILITÀ E IDONEITÀ PER UNO SCOPO PARTICOLARE, SARÀ
LIMITATA ALLA DURATA DELLA PRESENTE GARANZIA LIMITATA SCRITTA.
28
Alcuni Stati non consentono limitazioni sulla durata di una garanzia implicita, perciò
le suddette limitazioni possono non essere pertinenti nel vostro caso. NON
SAREMO MAI RESPONSABILI PER QUALSIASI DANNO SPECIALE O
CONSEGUENTE PER VIOLAZIONE DI QUESTA O DI QUALSIASI ALTRA
GARANZIA, ESPLICITA O IMPLICITA, DI QUALSIASI TIPO. Alcuni Stati non
consentono l'esclusione o la limitazione di danni speciali, incidentali o conseguenti,
per cui la suddetta limitazione può non applicarsi nel vostro caso. La presente
garanzia vi conferisce diritti legali speciali, e potete avere anche altri diritti che
variano da uno Stato all'altro.
Questo simbolo riportato sul prodotto o nelle istruzioni indica che, al
termine della loro vita, le apparecchiature elettriche ed elettroniche
devono essere smaltite separatamente dai rifiuti domestici.
Nell'Unione Europea sono disponibili sistemi per la raccolta separata
e il riciclaggio dei rifiuti.
Per richiedere ulteriori informazioni contattare le autorità locali o il rivenditore dove è
stato effettuato l'acquisto del prodotto.
29
Pro_Flight_radio_panel_MP.qxd
17/04/2009
15:41
Page 30
PANEL DE RADIO PRO VUELO DE SAITEK
Enhorabuena por comprar el Panel de Radio Pro Vuelo de Saitek. El panel de radio
interactúa con el Simulador de Vuelo X de Microsoft para controlar los protocolos de
comunicación de la radio de la cabina de piloto y las frecuencias de navegación.
1
2
3
3. Para usuarios de XP, cuando aparezca en la pantalla el asistente de configuración,
haga clic en "Siguiente" ("Next") para continuar. Para usuarios de Vista, cuando
reciba la indicación "¿Quiere ejecutar este programa de Saitek? ("Do you want to
run this program from Saitek?") y "¿Siempre quiere ejecutar este programa de
Saitek?" ("Do you always want to run this program from Saitek?"), haga clic en "Sí"
("Yes"). Después de leer el Descargo de Responsabilidad, seleccione la opción
"Acepto los términos del Descargo de Responsabilidad" ("I accept the terms of the
Disclaimer") y haga clic en "Siguiente" ("Next") para continuar.
4. La siguiente pantalla dirá "El controlador de configuración está instalando Salida
Directa" ("Driver setup is installing Direct Output").
5. Una vez que se haya instalado el controlador, haga clic en "Terminar" ("Finish")
para salir del proceso de instalación.
Instalación del Panel de Radio Pro Vuelo
Ajuste el panel de radio al soporte proporcionado. Inserte los tornillos por los agujeros
en las esquinas del panel en el soporte detrás y apriételos. Si ya tiene un Sistema
Yoke Pro Vuelo de Saitek, puede instalar el panel y soporte encima de la unidad Yoke
utilizando los tornillos proporcionados.
Instalación para usuarios de Windows® XP, XP64 y Vista
1. Con su ordenador encendido, cierre todos los programas que estén actualmente
en uso y conecte el cable USB de su panel en uno de los puertos USB libres de su
ordenador. Aparecerá una ventana de dialogo en su barra de tareas de Windows
diciendo que su ordenador está instalando controladores. Por favor tome nota que
la pantalla LED (Diodo Emisor de Luz) no se encenderá hasta que no instale el
software del panel.
2. Introduzca el CD de instalación en la unidad de CD o DVD. Si el CD no se ejecuta
automáticamente, seleccione Inicio (Start) de la Barra de Tareas de Windows®, a
continuación Ejecutar (Run) y escriba D:\Setup.exe y haga clic en OK - donde D:\
es una letra de su disquetera. Para usuarios de Vista, si recibe la indicación
"Control de la Cuenta de Usuario" ("User Account Control"), haga clic en continuar
(continue).
6. Ahora puede ejecutar una aplicación de prueba si va a Windows
Inicio/Programas/Saitek/Panel Múltiple Pro Vuelo/ (Windows
Selector de modo radio
COM 2
Conmutador de frecuencia en espera y activa
COM 1
ACT/ STBY
NAV 1
NAV 2
ADF
DME
COM 2
XPDR
COM 1
XPDR
DIGIT
ACTIVE
STANDBY
ACT/ STBY
NAV 1
NAV 2
ADF
DME
XPDR
DIGIT
XPDR
Saitek
Cuando ajuste las frecuencias de Comunicación o Navegación, el giratorio exterior ajusta
la frecuencia en espera en incrementos de 1 y el giratorio interior ajusta los decimales.
31
Pro_Flight_radio_panel_MP.qxd
17/04/2009
15:41
Page 32
Start/Programs/Saitek/Pro Flight Multi Panel/) o abriendo FS X Microsoft. Cuando
abra la aplicación de prueba o FS X la pantalla de su panel se encenderá.
Nota: Si instala el X52 Pro de Saitek después de haber instalado un panel Pro vuelo,
se sobrescribirá el archivo de Salida Directa del panel. Si ocurre esto, por favor
reinstale el software del panel.
Utilización del Panel de Radio Pro Vuelo de Saitek
El Panel de Radio Pro Vuelo de Saitek le permite ajustar las frecuencias de
comunicación y navegación de las capas de protocolo de la radio de su avión para
comunicar con el control de tráfico aéreo o seleccionando radiobalizas VOR o NDB
para la navegación.
espera en incrementos de 1 y el giratorio interior ajusta los decimales. Por favor tome
nota que sólo puede ajustar los valores en espera y no los valores activos.
Para poner los valores en espera como activos, presione el conmutador ACT/STBY en
la parte derecha del panel. Ahora los valores en espera que ha introducido irán de la
sección en espera de la pantalla a la sección activa y viceversa.
ADF
COM 2
Canales de comunicación 1 y 2
Nav1 y Nav2
Canales de navegación 1 y 2
ADF
Receptor automático de la Frecuencia de Dirección
EMD
Equipos de Medidas de Distancia
ADF
ACT/ STBY
ADF
DME
XPDR
XPDR
DIGIT
ACTIVE
STANDBY
XPDR
ADF
DME
COM 1
ACT/ STBY
NAV 2
STANDBY
NAV 2
COM 1
NAV 1
XPDR
DIGIT
ACTIVE
NAV 1
Código de frecuencia del transpondedor
COM 2
XPDR
DME
COM 2
XPDR
ACT/ STBY
NAV 2
DME
Com1 y Com2
COM 1
NAV 1
XPDR
ACTIVE
STANDBY
COM 2
COM 1
Digit 1
NAV 1
2 3
4
ACT/ STBY
NAV 2
ADF
ACTIVE
STANDBY
DME
XPDR
XPDR
DIGIT
ACTIVE
STANDBY
Para ajustar las frecuencias de protocolo de comunicaciones de la
radio, seleccione primero el modo radio utilizando el mando dial de
selector de modo radio a la izquierda del panel. Utilizando los
controles giratorios a la derecha de la pantalla LED (Diodo Emisor
de Luz), ajuste los valores de la frecuencia en espera en la parte
derecha de la pantalla. El giratorio exterior ajusta la frecuencia en
32
33
Pro_Flight_radio_panel_MP.qxd
17/04/2009
15:41
Page 34
Ajuste del código XPDR
Para ajustar el código discreto quark del transpondedor, seleccione primero XPDR en
el mando dial del selector de modo radio a la izquierda del panel. Gire el giratorio
exterior para ajustar el dígito 1 y el giratorio interior para ajustar el dígito 2. Para
ajustar los dígitos 3 y 4, presione el botón ACT/STBY a la derecha de la unidad una
vez y ajuste el dígito 3 girando el giratorio exterior y el dígito 4 girando el giratorio
interior.
Resolución de problemas
Los controles del panel de radio están configurados automáticamente para interactuar
con el software FS X. Cuando abra FSX Microsoft le preguntará "¿Confía en este
controlador de Saitek?" ("Do you trust this driver from Saitek?"). Haga clic en "Sí"
("Yes"). A continuación le preguntará "Siempre quiere cargar este accesorio durante el
lanzamiento del Sin de Vuelo X?" ("Do you always want to load this plug-in when
launching Flight Sims X?"). De nuevo, haga clic en "Sí" ("Yes"). Si su software FS X
no reconoce el panel de radio, desconecte el cable USB y vuelva a conectarlo.
Si parece que el FS X no se carga, es porque está esperando una instrucción. Para
ver la ventana con la instrucción, selecciónela presionando la tecla Alt + tabulador
(Alta + tab) o haciendo clic en la instrucción (prompt) en la barra de tareas de
Windows. La instrucción dirá "Aviso de seguridad del Simulador de Vuelo Microsoft:
ocurrirá una vez después de la instalación" ("Microsoft Flight Simulator security
warning: will happen once after install"). Haga clic en Ejecturar (Run) y cuando le
pregunte "¿le gustaría designar este modulo?" ("would you like to designate this
module?"), haga clic en sí (yes) y el FS X continuará cargando.
El panel de Radio Pro Vuelo no se registrará automáticamente si ha instalado el panel
antes de instalar FS X. Para registrar el Panel de Radio Pro Vuelo con FS X, haga clic
en el icono "Lanzar manualmente el accesorio del Sin de Vuelo X" ("Lunch the
Flightsim X plugin manually") para volver a ejecutar el programa.
Asistencia técnica
¿No puede empezar?: No se preocupe, ¡aquí estamos para ayudarle!
Casi la totalidad de los productos que nos devuelven como averiados no tienen
ningún fallo: es simplemente que no se han instalado correctamente.
Si experimenta alguna dificultad con este producto, rogamos que visite primeramente
nuestro sitio web: www.saitek.com.
El área de asistencia técnica le proporcionará toda la información que necesita para
obtener el mayor rendimiento de su producto y debería resolver cualesquiera
problemas que pudiese tener.
Si no dispone de acceso a Internet o si no encuentra en el sitio web respuesta a su
pregunta, rogamos que se ponga en contacto con el equipo de asistencia técnica de
Saitek. Nuestro objetivo es ofrecer asistencia técnica rápida y completa a todos
nuestros usuarios, así que le rogamos que antes de llamar tenga a mano toda la
información relevante.
Para hallar el Centro de asistencia técnica de Saitek de su localidad, rogamos que
consulte la hoja de Centros de asistencia técnica incluida en el paquete de este
producto.
Condiciones de la garantía
1. El período de garantía es de 2 años desde la fecha de compra con presentación
de comprobante.
2. Se deben seguir las instrucciones de funcionamiento.
3. El producto no se deberá haber dañado como resultado de modificación, uso
indebido, abuso, negligencia, accidente, destrucción o alteración del número de
serie, tensiones o corrientes eléctricas inadecuadas, reparación, modificación o
mantenimiento por parte de cualquier persona que no sea de nuestras
instalaciones de servicio o de un centro de servicio autorizado, uso o instalación de
piezas de repuesto que no sean de Saitek en el producto o modificación de este
producto de cualquier manera o la incorporación de este producto en cualesquiera
otros productos o daños causados por accidente, incendio, inundación, rayos o
fuerza mayor o por cualquier uso que viole las instrucciones suministradas por
Saitek plc.
4. Las obligaciones de Saitek se limitarán a reparar o sustituir la unidad por otra igual
o similar, según optemos. Para obtener reparaciones de acuerdo a esta garantía,
deberá presentar el producto y comprobante de compra (p. ej., una factura o un
35
Pro_Flight_radio_panel_MP.qxd
17/04/2009
15:41
Page 36
albarán) al Centro de asistencia técnica de Saitek autorizado (listado en una hoja
separada empaquetada con este producto) y pagando los gastos de transporte.
Cualesquiera requisitos que entren en conflicto con cualesquiera leyes, normas y/u
obligaciones estatales o federales no serán aplicables en dicho territorio en
particular y Saitek se atendrá a dichas leyes, normas y/u obligaciones.
5. Cuando se devuelva el producto para reparar, rogamos que se empaquete con
mucho cuidado, preferentemente utilizando los materiales de envasado originales.
Se ruega adjuntar una nota explicativa.
6. IMPORTANTE: Para ahorrarse costes e inconvenientes innecesarios, rogamos que
compruebe cuidadosamente que ha leído y seguido las instrucciones de este
manual.
7. Esta garantía sustituye a cualesquiera otras garantías, obligaciones o
responsabilidades explícitas. CUALESQUIERA GARANTÍAS, OBLIGACIONES O
RESPONSABILIDADES IMPLÍCITAS, INCLUYENDO, SIN LIMITARSE A LO
MISMO, LAS GARANTÍAS IMPLÍCITAS DE COMERCIABILIDAD Y APTITUD
PARA UN FIN PARTICULAR, SE LIMITARÁN EN CUANTO A DURACIÓN AL
PERÍODO DE ESTA GARANTÍA LIMITADA ESCRITA. Algunos estados no
permiten limitaciones en cuanto al tiempo de duración de una garantía implícita,
así que las limitaciones anteriores podrían no ser aplicables para usted. EN
NINGÚN CASO SEREMOS RESPONSABLES DE NINGÚN DAÑO ESPECIAL O
INDIRECTO POR INCUMPLIENTO DE ESTA O CUALESQUEIRA OTRAS
GARANTÍAS, EXPLÍCITAS O IMPLÍCITAS Y DE LA NATURALEZA QUE FUESEN.
Algunos estados no permiten la exclusión o limitación de daños especiales,
incidentales o indirectos, así que la limitación anterior podría no aplicarse a usted.
Esta garantía le da derechos legales específicos y también podría tener otros
derechos, que varían entre estados.
Este símbolo en el producto o en las instrucciones significa que no
debería tirar a la basura doméstica el equipo eléctrico o electrónico al
final de su vida útil. En los países de la UE existen sistemas de
recogida separados para reciclaje. Para más información, rogamos
que se ponga en contacto con la autoridad local o con el vendedor al que compró
el producto.
CZ
Vložte USB konektor do volného USB portu Vašeho PC.
Vložte CD-ROM priložený Saitek Pro Flight Radio Panel do mechaniky pro ctení
CD Vašeho PC. Jakmile PC detekuje CD, postupujte dle instrukcí na obrazovce,
aby byla provedena instalace ovladacu, programovacího software a zprístupnen
návod.
Pro overení správnosti funkce Saitek Pro Flight Radio Panel Kliknete ve
Windows® Taskbar na Start a vyberte Control Panel. Kliknete na ikonu Game
Controllers. V okne Game Controllers zvolte Saitek Pro Flight Radio Panel a
postupujte dle instrukcí na obrazovce.
DK
USB stikket i en ledig USB port på din PC.
Indsæt CD-rommen der kom med Saitek Pro Flight Radio Panel I dit CD drev på
din PC. Følg instruktionerne på skærmen for at installere driver softwaren og
online manualen.
For at teste at Saitek Pro Flight Radio Panel fungerer korrekt, skal du klikke på
START i Windows menuen, vælge. Kontrolpanel - klik på spilleenheder ikonet. I
vinduet vælger du Pro Flight Rudder Pedals og følger instruktionerne på
skærmen.
HR
Ukljucite USB prikljucak u dostupan USB ulaz na vašem racunalu.
Umetnite CD-ROM dostavljen sa Saitek Pro Flight Radio Panel u CD citac na
Vašem racunalu. Slijedite upute koje ce se pojaviti na vašem zaslonu kako biste
instalirali pogonske programe i pristupili on-line prirucniku.
Kako biste iskušali radi li Saitekov Saitek Pro Flight Radio Panel ispravno,
pritisnite Start na programskoj traci Windowsa® i odaberite Control Panel.
Pritisnite Game Controllers ikonu na zaslonu. U Game Controllers prozorcicu
odaberite Saitek Pro Flight Radio Panel i slijedite upute koje ce se pojaviti na
Vašem zaslonu.
HU
Polacz koncówke USB z dostepnym portem USB w komputerze PC.
Helyezze be a termékhez mellékelt CD-ROM-ot a számítógépe CD írójába.
Kövesse a monitoron megjeleno utasításokat, hogy installálja a meghajtó
37
Pro_Flight_radio_panel_MP.qxd
17/04/2009
15:41
Page 38
programot és elérje az online használati utasítást.
PT
Ahhoz, hogy ellenorizhesse, hogy a Saitek Pro Flight Radio Panel termék jól
funkcionál, kattintson a Start menübe és válassza ki a Control Panelt. Kattintson
a Game Controller ikonra, ebben az ablakban válassza ki a Saitek Pro Flight
Radio Panel terméket és kövesse a képernyon lévo utasításokat.
NL
Para testar que o Saitek Pro Flight Radio Panel está funcionando corretamente,
clique na opçâo Start (Inicio) da barra de tarefas do Windows® e seleccione
entâo Control Panel.- Clica no icon Game Controllers (Controladores de Jogo).
Na janela de Game Controllers (Controladores de Jogo) seleciona Saitek Pro
Flight Radio Panel e siga as instruções que aparecerâo no écran.
Sluit de USB connector in een beschikbare USB poort van uw computer.
Plaats de CD-ROM welke is meegeleverd met de Saitek Pro Flight Radio Panel
in de CD-Rom speler van de computer. Volg de instructies op het scherm om de
driver te installeren en om de online handleiding te raadplegen.
Om te testen of de Saitek Pro Flight Radio Panel goed functioneert, klik op
START op de windows taakbalk en selecteer Configuratiescherm. Klik op het
spelbesturings ikoontje. In het spelbesturings scherm selecteert u de Saitek Pro
Flight Radio Panel en volgt u de instructies op het scherm.
SE
För att testa att din Saitek Pro Flight Radio Panel fungerar korrekt klicka på Start
på Windows® aktivitetsfält och välj därefter Kontrollpanelen - klicka på ikonen för
Spelenheter. Välj Saitek Pro Flight Radio Panel under spelenhetsfönstret och följ
instruktionerna på skärmen.
Sett i CD-ROM platen som følger med Saitek Pro Flight Radio Panel i CDspilleren på din PC. Følg deretter instruksjonene på skjermen for å innstallere
driver-rutiner og for å komme til "online-manualen".
PL
Polacz koncówke USB z dostepnym portem USB w komputerze PC.
Umiesc zalaczony dysk CD, po czym w celu zainstalowania sterowników lub
instrukcji obslugi online, postepuj wedlug instrukcji pojawiajacych sie na ekranie.
Aby sprawdzic, czy kontroler funkcjonuje poprawnie, kliknij START na pasku
narzedzi, po czym wybierz Panel Kontrolny (Control Panel ), nastepnie kliknij w
ikone Kontrolery Gier (Game Controllers ). W oknie Kontrolery Gier (Game
Controllers ) wybierz Saitek Pro Flight Radio Panel i postepuj wedlug instrukcji
pojawiajacych sie na ekranie.
38
Koppla in USB kontakten i en ledig USB-port på din PC.
Sätt I CD-ROM skivan som medföljer Saitek Pro Flight Radio Panel i CDspelaren på din PC. Följ därefter instruktionerna på skärmen för att installera
drivrutiner och för att komma åt online maualen.
NO Koble inn USB kontakten i en ledig USB-port på din PC.
For å teste at din Saitek Pro Flight Radio Panel fungerer korrekt, klikk på Start på
Windows® aktivitetsfelt og velg deretter Kontrollpanelet - klikk på ikonet for
Spillenheter. Velg Saitek Pro Flight Radio Panel under spillenhetsvinduet og følg
instruksjonene på skjermen.
Conecte o cabo USB em qualquer porta USB disponível em seu PC.
Saitek Pro Flight Radio Panel Insira o CD que acompanha o Saitek Pro Flight
Radio Panel no CD-ROM no seu PC. Siga as instruções que aparecera no écran
para instalar o driver software e para acessar o manual online.
TR
USB ara birimini PC'nizin uygun bir USB portuna takiniz.
Saitek Pro Flight Radio Panel ile birlikte verilen CD'nizi CD sürücünüze
yerlestiriniz.. Yazilimi yüklemek ve on-line kilavuza ulasmak için ekranda çikan
talimatlari izleyiniz.
Saitek Pro Flight Radio Panel ürününün dogru çalisip çalismadigini test etmek
için, Windows® araç çubugunda bulunan Start "Baslangiç"tan, Control Panel
"Denetin Masasi"ni açin .- Game Controllers "Oyun Kumandalari" ikonuna
tiklayin. Açilan Game Controllers "Oyun Kumandalari" penceresinde Saitek Pro
Flight Radio Panel ürününü seçin ve ekrandaki talimatlari izleyin.
39
Pro_Flight_radio_panel_MP.qxd
17/04/2009
15:41
Page 40
GR
Saitek Pro Flight Radio Panel,
Saitek Pro Flight Radio Panel,
Saitek Pro Flight Radio Panel,
RU
Saitek Pro Flight Radio Panel,
Saitek Pro Flight Radio Panel,
Saitek Pro Flight Radio Panel,
Saitek Pro Flight Radio Panel
Saitek Pro Flight Radio Panel
Saitek Pro Flight Radio Panel
40
41
Pro_Flight_radio_panel_MP.qxd
17/04/2009
15:41
Page 42
© 2009 Mad Catz Interactive Asia. Saitek and Saitek logo are trademarks or registered trademarks of Mad Catz
Interactive Asia, its subsidiaries and affiliates. Saitek is owned by Mad Catz Interactive, Inc., a publicly-listed
company. Mad Catz, and the Mad Catz logo are trademarks or registered trademarks of Mad Catz, Inc., its
subsidiaries and affiliates. All other trademarks or registered trademarks are the property of their respective owners.
© 2009 Mad Catz Interactive Asia. Saitek et Saitek logo sont des marques de commerce ou des marques
déposées de Mad Catz Interactive Asia et de ses filiales ou sociétés apparentées. Saitek est une filiale de Mad
Catz Interactive, Inc., une société cotée en bourse. Mad Catz, et le logo Mad Catz sont des marques de
commerce ou des marques déposées de Mad Catz, Inc., de ses filiales ou de ses sociétés affiliées.Toutes les
autres marques de commerce, déposées ou non, appartiennent à leurs. propriétaires respectifs.
© 2009 Mad Catz Interactive Asia. Saitek y el logotipo de Saitek son marcas comerciales o marcas comerciales
registradas de Mad Catz Interactive Asia, sus subsidiarias y filiales. Saitek es propiedad de Mad Catz Interactive,
Inc., una compañía que cotiza en bolsa. Mad Catz, y el logotipo de Mad Catz son marcas comerciales o marcas
comerciales registradas de Mad Catz, Inc., sus subsidiarias y afiliados. Todas las otras marcas y copyrights son
propiedad de sus respectivos. propietarios.
UK
France
Mad Catz Europe Limited
Saitek / Mad Catz Europe Ltd.
31 Shenley Pavilions,
21, Rue d'Hauteville
Chalkdell Drive,
Esc.B, 4ème Etage,
Shenley Woods,
F-75010 Paris
Milton Keynes,
Bucks MK5 6LB
Germany
Saitek Eleftronik
Vertriebs GmbH
Landsberger Strase 400
81241 München
USA
Mad Catz inc.
7480 Mission Valley Rd
Suite 101
San Diego , CA 92108-4406
Mad Catz is a publicly traded company on the TSX/AMEX, symbol MCZ.
Les actions de Mad Catz sont cotées en bourse sur le TSX/AMEX sous le symbole MCZ.
Help center call numbers:
+1 800 659 2287 (USA)
+1 619 683 2815 (USA)
+44 (0)1454 451900 (UK)
Made in China/ Fabriqué en Chine
www.saitek.com
www.madcatz.com
42
43
Pro_Flight_radio_panel_MP.qxd
Saitek
17/04/2009
®
Pro FIight Radio Panel
www.saitek.com
Version 1.1
16/04/09
PZ69
44
15:41
Page 44