1
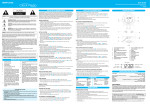
User Guide
Clock Radio
Please read these instructionscompletely
before operating this product.
InteliSet
MEMOREX-CE.COM
MC5550
I’ll Wake You Up
CAUTION
RISK OF ELECTRIC SHOCK
DO NOT OPEN
CAUTION: TO REDUCE THE RISK OF ELECTRIC SHOCK, DO NOT REMOVE COVER (OR BACK). NO USER-SERVICEABLE PARTS INSIDE. REFER SERVICING
TO QUALIFIED SERVICE PERSONNEL.
DANGEROUS VOLTAGE: The lightning flash with arrowhead symbol within an equilateral triangle is
intended to alert the user to the presence of uninsulated dangerous voltage within the product’s enclosure
that may be of sufficient magnitude to constitute a risk of electric shock to persons.
ATTENTION: The exclamation point within an equilateral triangle is intended to alert the user to the
presence of important operating and maintenance (servicing) instructions in the literature accompanying
the appliance.
WARNING: Users of this product are cautioned not to make modifications or changes that are not
approved by MEM-CE, LLC., doing so may void the compliance of this product and may result in the loss of
the user’s authority to operate the equipment.
WARNING: TO PREVENT FIRE OR SHOCK HAZARD, DO NOT USE THIS PLUG WITH AN EXTENSION CORD, RECEPTACLE OR OTHER OUTLET
UNLESS THE BLADES CAN BE FULLY INSERTED AND THERE IS NO BLADE EXPOSURE. TO PREVENT FIRE OR SHOCK HAZARD, DO NOT
EXPOSE THIS APPLIANCE TO RAIN OR MOISTURE.
This is a CLASS II apparatus with double insulation. The Caution Marking is located on the underside of the apparatus.
FCC STATEMENT: This equipment has been tested and found to comply with the limits for a Class B digital device, pursuant to part 15 of the
FCC Rules. These limits are designed to provide reasonable protection against harmful interference in a residential installation. This equipment
generates, uses and can radiate radio frequency energy and, if not installed and used in accordance with the instructions, may cause harmful
interference to radio communications. However, there is no guarantee that interference will not occur in a particular installation. If this equipment
does cause harmful interference to radio or television reception, which can be determined by turning the equipment off and on, the user is
encouraged to try to correct the interference by one or more of the following measures:
• Reorient or relocate the receiving antenna.
• Increase the separation between the equipment and receiver.
• Connect the equipment into an outlet on a circuit different from that to which the receiver is connected.
• Consult the dealer or an experienced radio/TV technician for help.
CAUTION: Any changes or modifications not expressly approved by the party responsible for compliance could void the user’s authority
to operate the equipment.
This device complies with part 15 of the FCC Rules. Operation is subject to the following two conditions: (1) This device may not cause
harmful interference, and (2) this device must accept any interference received, including interference that may cause undesired operation.
IC STATEMENT: This device complies with Industry Canada’s license-exempt RSSs. Operation is subject to the following two conditions:
(1) This device may not cause interference; and
(2) This Device must accept any interference, including interference that may cause undesired operation of the device.
IMPORTANT SAFETY INSTRUCTIONS
1. 2. 3.
4. 5. 6. 7. 8. 9.
Read these instructions. Keep these instructions.
Follow all instructions. Heed all warnings.
Do not use this apparatus near water.
Clean only with dry cloth.
Do not block any ventilation openings. Install in
accordance with the manufacturer’s instructions.
Do not install near any heat sources such as radiators,
heaters, stoves, or other apparatus (including
amplifiers) that produce heat.
Do not defeat the safety purpose of the polarized or
grounding-type plug. A polarized plug has two blades
with one wider than the other. A grounding type plug
has two blades and a third grounding prong. The wide
blade or the third prong is provided for your safety. If
the provided plug does not fit into your outlet, ask an
electrician for replace the obsolete outlet.
Protect the power cord from being walked on or
pinched particularly at plugs, convenience receptacles
and the point where they exit from the apparatus.
Only use attachments / accessories specified by the
manufacturer.
Unplug this apparatus during lightning storms or when
unused for long periods of time.
10. Refer all servicing to qualified service personnel. Servicing
is required when the apparatus has been damaged in any
way, such as power-supply cord or plug is damaged, liquid
has been spilled or objects have fallen into the apparatus,
the apparatus has been exposed to rain or moisture, does
not operate normally, or has been dropped.
11. Use only with the cart, stand, tripod, bracket, or table
specified by the manufacturer, or sold with the apparatus. When a cart is used, use
caution when moving the cart/apparatus
combination to avoid injury from tip-over.
12. The AC adaptor must not be exposed to
dripping or splashing and no objects filled
with liquids, such as vases, shall be placed on apparatus.
13. The AC plug is used as a disconnect device and it must
remain readily accessible during intended use. In order to
disconnect the apparatus from the AC power completely,
the AC plug must be removed from the AC outlet
completely.
14. The battery must not be exposed to excessive heat such
as sunshine, fire, etc. CAUTION: Danger of explosion if
battery is incorrectly replaced Replace only with the same
or equivalent type.
IMPORTANT NOTES
• Avoid installing this unit in places exposed to direct sunlight or close to heat radiating appliances such as: electric heaters, on top of other stereo equipment that radiates heat, places lacking ventilation, dusty areas, places subject to constant vibration and/or humid or moist areas.
• Operate controls and switches as described in the manual.
• Before turning on the power, make certain that the AC adapter is properly installed.
• When moving the set, be sure to first disconnect the AC adapter.
PREPARATION FOR USE
UNPACKING AND SET UP
•Remove the radio from the carton and remove all packing material from the radio. Save the packing material, if possible, in case the radio ever needs to be serviced or transported. The original carton and packing material is the only safe way to pack your radio to protect it from
damage in transit.
•Remove any descriptive labels or stickers on the front or top of the cabinet. Do not remove any
labels or stickers from the back or bottom of the cabinet.
•Note the serial number on the bottom of your radio and write this number in the space provided
on the Warranty page of this manual.
•Place your radio on a level surface such as a table, desk or shelf, convenient to an AC outlet,
out of direct sunlight, and away from sources of excess heat, dirt, dust, moisture, humidity, or
vibration.
•Unwind the Line cord connecting the AC adapter and extend it to its full length. The FM antenna
is built on the bottom of radio. It must be fully extended to provide the best FM reception.
PROTECT YOUR FURNITURE
This model is equipped with non-skid rubber ‘feet’ to prevent the product from moving when
you operate the controls. These ‘feet’ are made from non-migrating rubber material specially
formulated to avoid leaving any marks or stains on your furniture. However certain types of oil
based furniture polishes, wood preservatives, or cleaning sprays may cause the rubber ‘feet’
to soften, and leave marks or a rubber residue on the furniture. To prevent any damage to your
furniture we strongly recommend that you purchase small self-adhesive felt pads, available at
hardware stores and home improvement centers everywhere, and apply these pads to the bottom
of the rubber ‘feet’ before you place the product on fine wooden furniture.
POWER SOURCE
This radio is designed to operate on normal 120V 60Hz switching adapter. Do not attempt to
operate the radio on any other power source. You could cause damage to the radio that is not
covered by your warranty. This radio should be connected to an AC outlet that is always ‘live’.
Do not connect it to an outlet that is controlled by a wall switch. When the power to the radio is
interrupted, the built in lithium battery takes over to maintain the time and alarm settings.
To maximize the life of the lithium battery keep the radio connected to a ‘live’ AC outlet at all times.
CLOCK / TIME OPERATING INSTRUCTIONS
INITIAL TIME SETTING
IMPORTANT: The first time you connect your new InteliSet Clock Radio to the AC outlet the internal
computer will automatically set the time correctly for the Eastern Time Zone, which is the initial
default setting. The display will scan for a few seconds and then show the correct Day and Time
in the Eastern zone. If you live in the Eastern Time zone which is identical to what is displayed
when pressing and holding the TIME ZONE button, your clock will automatically be correctly set.
Otherwise you must change the default zone display to your own zone. After re-setting the time
zone this one time, it will not be necessary to repeat, even after a power interruption.
There are 7 time zones programmed into your E-Z Set clock radio as follows :
ZONE 1 — Atlantic Time
ZONE 2 — Eastern Time (Default Setting)
ZONE 3 — Central Time
ZONE 4 — Mountain Time
ZONE 5 — Pacific Time
ZONE 6 — Yukon Time
ZONE 7 — Hawaiian Time
TO CHANGE THE DEFAULT TIME ZONE DISPLAY
Hold the TIME ZONE button and then press either the TUNE UP /\ or TUNE DOWN \/ button until
your own time zone appears on the display, then release the buttons. The clock display will change
to the correct time in the time zone you selected. The clock will always return to the correct time in
the zone you selected after any power interruption.
If you move to a different time zone, simply change the default zone display to the new zone and
the Radio Alarm Clock will remember that setting for you.
DATE DISPLAY
To see the correct date at any time, press the WEEK button. The display changes from time to
Month and Date (MM/DD). For example, May 21st will appear as “ 5.21”. When you release the
WEEK button the display returns to the correct time.
YEAR DISPLAY
To see the current year, press both TIME and WEEK buttons at the same time. The display changes
from time to year. When you release both buttons the display returns to the current time.
DAYLIGHT SAVING AND LEAP YEAR ADJUSTMENTS
All Daylight Saving and Leap Year adjustments are made automatically by the InteliSet internal
computer as follows:
• Start of Daylight Saving Time:
At “2:00 AM” on the 2nd Sunday in March, the clock will automatically advance to “3:00 AM”.
• End of Daylight Saving Time:
At “3:00 AM” on the 1st Sunday in November, the clock will automatically reset to “2:00 AM”.
SETTING THE ALARM
WAKE TO BUZZER
Your InteliSet Clock Radio has two separate alarms that can be set and used independently. You
may use the alarms to wake two people at different times, or you may use one alarm for weekdays
and the other for weekend wake up times. The procedure for adjusting the wake up time is the
same for both Alarm 1 and Alarm 2.
NOTE: Alarm 1 and Alarm 2 have different buzzer sounds. You will be able to tell which alarm
is going off by the sound that it makes. Alarm 1 is a “Single beep” sound. Alarm 2 is a “Double
beep” sound.
Press AL1/VOL + button one time to select a musical note to wake up to music. Press a second
time to select bell to wake up to buzzer mode.
Press AL2/VOL – one time to select a musical note to wake up to music. Press a second time to
select buzzer mode.
The alarm will activate once you select your desired wake up alarm mode.
1. Press and hold either the AL1/VOL + or AL2/ VOL – button. The display will change from the correct time to the Alarm 1 or Alarm 2 wake up time mode.
2. While holding the AL1/VOL + or AL2/ VOL – button, press either the TUNE UP /\ or TUNE DOWN \/ button to move the display ahead or back to your desired wake up time.
3. When the desired wake up time appears on the display, release the TUNE UP /\ or TUNE DOWN \/ button.
NOTE: Be sure that you have set the wake up time correctly by observing the AM indicator. If the AM indicator is ‘On ‘ the wake up time is “PM”. If thePM indicator is ‘Off’, the wake up time is “AM”.
4. When the desired wake up time (AM or PM) appears on the display, release the AL1/VOL +
or AL2/ VOL – button.
SETTING THE ALARM WEEK MODE
Your InteliSet Clock Radio allows you to select from three different alarm operation modes for either
alarm. The alarm modes are:
1. Reconfirm the wake up time and alarm mode settings for the alarm you are using, Alarm 1 , Alarm 2, or both alarms.
2.Press AL1/VOL + or AL2/ VOL – button slightly, and repeat doing so if necessary, until ALARM 1 “BUZZER” or ALARM 2 “BUZZER” indicator is lit on the display.
3. At the selected wake up time the buzzer will sound. It will continue for one hour and then shut off automatically.
4. To stop the buzzer sooner, press the RADIO ON/OFF button. The buzzer will stop but the alarm remains set and will turn the buzzer on again at the same time on the following day (depending on the Alarm Mode setting).
5. If you do not want the alarm to turn the radio ‘ON’ the following day, press the appropriate ALARM button until the ALARM sound indicator on the display is OFF.
RADIO AND BUZZER OPERATION
You may also set one alarm for wake to RADIO and the other for wake to BUZZER. Just press
the ALARM 1 and ALARM 2 buttons to the desired status as shown on the ALARM indicators.
SNOOZE/REPEAT ALARM
When the alarm sounds you can press SNOOZE/DIMMER button on top of the unit for a few
extra minutes of sleep. The corresponding ALARM indicator will flash. The alarm will stop for
approximately 9 minutes and will then sound again. The Snooze operation may be repeated
several times if desired but after one hour the alarm will not come on again.
• Everyday – the alarm will turn on all 7 days.
• Weekdays only – the alarm will only turn on Monday through Friday;
SLEEP TO MUSIC TIMER
• Weekends only – the alarm will only turn on Saturday and Sunday.
You can program the sleep timer to play the radio for up to 90 minutes and then shut ‘Off’
automatically.
To check the Alarm Mode setting for Alarm 1, press the AL1/VOL + button and press WEEK
button, the DAY OF WEEK indicators will show you the selected alarm mode.
1. Press the SLEEP button. The display will briefly show “10” and the radio will begin to play.
After 10 minutes countdown the radio will shut off automatically. Each time you press the SLEEP button the sleep timer will start at 10 minutes. This is the sleep timer default setting.
• If it shows 7 indicators are illuminated, Everyday mode is selected.
• If it shows the Mon (Monday) through FRI (Friday), Weekdays only mode is selected.
• If only the SAT (Saturday) and SUN (Sunday) indicators are on, Weekend mode is selected.
To change the Alarm Mode setting for Alarm 1, hold the AL1/VOL + button and press the WEEK
button until the DAY OF WEEK indicators show the desired mode setting, Weekdays only, Weekends
only, or Everyday operation. Release the WEEK and AL1/VOL + buttons and the display will
return to the correct time. Follow the same procedure using the AL2/VOL – if you wish to use an
additional alarm time.
CONFIRMING WAKE UP TIMES AND ALARM MODE
Whenever you want to check the wake up time or the alarm mode settings, simply press either the
AL1/VOL + or AL2/ VOL – button. The display will change from the current time to show the alarm
time and the DAY OF WEEK indicators currently selected. Release the AL1/VOL + or AL2/ VOL –
button to return to current time.
WAKE TO RADIO
1. Turn the radio ‘On’ and select the station and volume level that you wish to hear when the alarm comes sounds, then turn the radio ‘Off’ again.
2. To increase or decrease the amount of time that the radio will play before shutting off, hold
the SLEEP button and press either the TUNE UP /\ or TUNE DOWN \/ button to change the desired sleep time, up to a maximum of “90” minutes or a minimum of “02” minutes.
NOTE: When you change the sleep timer from the 10 minute default setting to a different setting, the new setting becomes the default setting. Whenever you activate the sleep timer it will begin with your new default setting and count down to zero from that point.
3. To cancel the sleep timer before it counts down to ‘00’ and shut the radio ‘Off’ immediately, press the SNOOZE/DIMMER button.
IMPORTANT: Remember that the station and volume settings you choose for the Sleep To
Music operation are the same settings you will hear if you set the alarm for Wake To Radio the
following morning.
DIMMER CONTROL
The DIMMER control setting is “High”. If the clock display is too bright in a darkened room,
adjust the dimmer level by pressing SNOOZE/DIMMER button, when Radio is off.
RADIO OPERATION INSTRUCTIONS
2. Reconfirm the wake up time and alarm mode settings for the alarm you are using, Alarm 1, Alarm 2, or both alarms.
LISTENING TO THE RADIO
3. Press AL1/VOL + or AL2/ VOL – button repeatedly until the ALARM 1 “RADIO” or ALARM 2 “RADIO” indicator appears on the display.
1. Press the SOURCE button to turn the radio ‘On’. The FM frequency indicator will appear for a few seconds on the display.
SETTING THE TIME MANUALLY
4. At the selected wake up time the radio will turn ‘On’. It will play for one hour and then shut off automatically.
2. Set the VOLUME by pressing AL1/VOL + or AL2/ VOL – to a level that is comfortable.
Some people like to set their clocks 5 to 10 minutes fast to make sure that they will always be
on time. Even though the InteliSet Clock Radio sets the time by itself, you still have the option of
adjusting the time manually if you wish.
5. To stop the radio sooner, press the RADIO ON/OFF button. The radio will stop but the alarm remains set and will turn the radio on again at the same time on the following day (depending on the Alarm Mode setting).
a) Press TUNE UP /\ or TUNE DOWN repeatedly and the receiving frequency will go up
or down by one step.
To manually adjust the time display press and hold the TIME button, and press either the TUNE
UP /\ or TUNE DOWN \/ buttons to adjust the time. Each press of the TUNE UP /\ or TUNE DOWN
\/ buttons will change the display by one minute. If you hold the TUNE UP /\ or TUNE DOWN \/
buttons the display will continue to change slowly at first, one minute at a time. But if you continue
holding the TUNE UP /\ or TUNE DOWN \/ buttons the display will change rapidly.
6. If you do not want the alarm to turn the radio ‘ON’ the following day, press the appropriate ALARM button until the ALARM sound indicator on the display turns off.
• Leap Year:
At “12:00 Midnight” on February 28th, the calendar display will change to “2.29”,
in applicable years.
NOTE: If you manually adjust the time, your new setting is entered into the InteliSet Clock Radio
memory. If the power is interrupted, the display will return to your new setting, not the original
setting when the power is restored.
Note: To avoid missing your wake up time(even if you set the radio to a very low volume before turning off the radio) the alarm will sound at medium volume when the alarm time is reached.
3. Select your desired station using the TUNE UP /\ or TUNE DOWN controls.
b) Press and hold TUNE UP /\ or TUNE DOWN for one second then release to engage
the Auto Station Seeking, which will stop on the next strongest station signal.
4. Adjust the VOLUME to the desired listening level.
5. When you are finished listening, press the RADIO ON/OFF button to turn the radio ‘Off’.
User Guide
Clock Radio
Please read these instructionscompletely
before operating this product.
InteliSet
MEMOREX-CE.COM
MC5550
I’ll Wake You Up
RADIO OPERATION INSTRUCTIONS (con’t.)
NFC CONNECT WITH BLUETOOTH
NFC, or near-field communication, is an easy and intuitive technology that allows you to use your
smartphone for automated tasks.
STORING TO THE MEMORY
1. Make sure the radio is ON and FM is selected.
2. Tune to the desired station with the TUNE UP /\ or TUNE DOWN \/.
3.Press STORE button and “P 01” will blink, indicating the memory location to store the current listening station.
4. While “P 01 “ is blinking, pressing TUNE UP /\ or TUNE DOWN \/ can change the memory location from 1 - 20. (For example, “P 03” means the current listening station is about to be stored into the 3rd location of the memory.
5. After deciding on the memory location, press STORE button again and the current station will be stored in that preset location.
If your mobile device has NFC functionality, then placing your smartphone in close proximity, or in
contact with the NFC mark on top of this product will automatically establish a Bluetooth link
with your smartphone and the InteliSet Clock Radio.
NOTE: Make sure the SOURCE is set to Bluetooth before using the NFC function.
HANDSFREE OPERATION
If you receive an incoming call while streaming Bluetooth music or audio, you can press the
DIMMER/SNOOZE button to answer the call. After you have ended the call, the MC5550 will
continue Bluetooth playback.
6. The display will return to the frequency of the stations afterwards, and after a few seconds,
the correct time shows.
CHANGING THE LITHIUM BATTERY
RECALLING A STATION FROM THE MEMORY
1. Make sure the radio is ON and the FM is selected.
2. For Memory Mode, press MEMORY/TIME ZONE button, “P 01” will appear on the display,
and the station saved to that memory location will play.
3. While “P 01 “ is showing on the display, press TUNE UP /\ or TUNE DOWN \/ to change the memory location from 1 - 20, and the station stored in the location is tuned once the location is changed.
4. The display will return to the frequency of the stations frequency and in a few seconds, the correct time shows.
ANTENNA INFORMATION
FM - The FM antenna is built into the bottom of radio. If FM reception is weak try moving the
position and direction of the unit until you find the strongest signal.
USING AUX / LINE IN JACK
This unit is equipped with a battery back-up system in the event of a power failure. If this occurs
the clock and alarm memory continue running and when the AC power resumes, the clock will
switch back to AC power again.
NOTE: You will not see a display and alarms will not work during a power outage. The battery only
saves the correct time and alarm times in memory.
Like all batteries, eventually the built in lithium battery will need to be replaced. A number of
factors, such as, the length of time between the date the radio was manufactured and the date
you plugged it in for the first time determine the amount of time before replacement. When the
battery power drops below a certain level, the LOW BATT indicator will ‘Flash’. When you see this
indicator, you should change the battery as soon as it is convenient for you to do so. To change
the battery proceed as follows:
1.
Purchase a replacement
3V lithium battery wherever
batteries are sold. The correct battery type is CR2032 or
the equivalent.
2. Remove the battery from its
package so it is ready to install.
The InteliSet Clock Radio is equipped with AUX IN Jack to enjoy iPod, MP3 player music or other
audio source.
IMPORTANT: Leave the AC adapter connected to your AC outlet. This will provide power to the
E-Z Set computer memory while the original lithium battery is removed.
1. With the unit On, press the SOURCE button until the AUX indicator appears on the display.
3. Turn the radio face up and use a small screw driver to remove the screw securing the battery holder to the cabinet – BE CAREFUL NOT LOSE THIS SMALL SCREW!
2. Connect your iPod, MP3 player or other audio source from its earphone jack to the clock
radio AUX IN Jack with a 3.5mm Line In cable.
3. AUX indicator will illuminate when the AUX IN Jack is plugged in, and the display will change to AUX function.
4. Press play on your iPod, MP3 or other audio player and set the player volume to maximum.
5. Adjust the InteliSet Clock Radio volume to your desired listening level.
6. When finished listening, turn off the InteliSet Clock Radio and your iPod, MP3 or other audio player and disconnect the cable from the AUX IN jack.
NOTE: Once the AUX IN jack is plugged in the alarm sound will be buzzer sound only while the
alarm function is activated.
USB PORT FOR MOBILE CHARGING
The InteliSet Clock Radio also has a USB port for mobile charging of DC 5V, 500mA that you can
connect your mobile phone or USB device to for charging.
BLUETOOTH OPERATION
If the InteliSet Clock Radio has never been pair with a Bluetooth device before. You need to follow the pairing instructions below to link the unit with your Bluetooth device.
1. In standby mode, press the SOURCE button to switch to Bluetooth mode, the BT indicator LED will begin to flash. The Speaker is ready to pair with your Bluetooth device.
2. Turn on the Bluetooth function of your mobile phone or other Bluetooth enabled device and enable the search or scan function to find the MRX MC5550.
3. Select “MRX MC5550” from the device list when it appears on your device screen. You can directly link with your device on that time.
4. When turning on the MC5550 to use the next time, the unit will search for the last pair device. The BT indicator will flash rapidly indicating it is searching. If the unit finds the paired Bluetooth device, a beep is heard and the BT indicator will begin flashing and connect.
4. Remove the original battery from the holder and insert the new battery into the holder the same way, observing the positive (+) direction. Slide the holder with the new battery back into the slot in the cabinet.
4. Press the WEEK button. The display will change from ‘Time’ to ‘Month/Date’ (MM/DD). While holding the WEEK button, press the TUNE UP /\ button to select the current Month and Date.
The DAY OF WEEK indicator will change automatically as you adjust the Month/Date settings. When the correct Month and Date appears on the display, release the buttons.
8
1
3
1. Follow the instructions on before operation and install a new CR2032 lithium battery in the battery compartment.
2. Connect the InteliSet Clock Radio to your AC outlet and let the clock set itself.
9
The InteliSet Clock Radio memory is now reset and the new lithium battery will maintain it for the
next 3 to 5 years, depending on the number and duration of the power outages you experience.
2
IMPORTANT NOTE: After resetting the clock, don’t forget to reset your wake up times and alarm
mode settings, and sleep timer settings as well.
CARE AND MAINTENANCE
16
12
17
18
CARE OF CABINET
13
If the cabinet becomes dusty, wipe it with a soft cloth. If the cabinet becomes smudged or dirty,
clean it with a soft, slightly dampened cloth.
14
19
15
20
Never allow water or any liquid to get inside the unit. Never use any abrasive cleaners or cleaning
pads as these will damage the finish of your radio.
LITHIUM BATTERY PRECAUTIONS
21
22
23
24
• Dispose of the old battery properly. Do not leave it lying around where a young child or pet could play with or swallow it. If the battery is swallowed, contact a physician immediately.
• The battery may explode if mistreated. Do not attempt to recharge it or disassemble it. Do not dispose of the old battery in a fire.
The apparatus must not be exposed to dripping or splashing and objects filled with liquids, such
as vases, must not be placed on the apparatus.
This marking indicates that this product should not be disposed of with other
household wastes throughout the country. To prevent possible harm to the
environment or human health from uncontrolled waste disposal, recycle this unit
responsibly so as to promote the re-use of material resources. To return your used
device, please use return and collection systems or contact the retailer where the
product was purchased as they know how to safely recycle this product.
Daylight Saving Time is NOT observed in Hawaii, American Samoa, Guam, Puerto Rico, the
Virgin Islands and in, most of Arizona, with exception of the Navajo Indian Reservation in Arizona.
Beginning in 2007, this E-Z Set Clock Radio will automatically advance by one hour at the
beginning of Daylight Saving Time on the second Sunday in March. And it will automatically return
to Standard Time on the first Sunday in November.
To reset the clock after a total memory loss, proceed as follows:
10
4
7. Save these instructions as you will have to do this again in three to five to eight years time.
The initial default setting is “12:00 AM, Sunday , January 1st (1. 1), 2012”. If you notice that the
time on your InteliSet clock radio is completely incorrect, and the DAY OF WEEK indicator is also
wrong, press the WEEK button to see the date. If the date display is showing “1. 1 “ (January
1st), you probably experienced a total memory loss.
11
7
6. After you set the Time, reconfirm that the Day and Month/Date displays are still correct and make any final adjustments if necessary.
IMPORTANT NOTICE
If you do not change the built in lithium battery within a reasonable period of time after you see
the LOW BATT warning indicator, the lithium battery may become exhausted and will no longer
be able to supply back up power to the InteliSet internal computer. If the unit is disconnected
from the AC outlet after the battery is exhausted, or if a power interruption occurs, the InteliSet
memory will be lost and the clock will need to be reset when the power is restored. Be sure to
install a fresh lithium battery before you reset the clock, otherwise the clock will need to be reset
each time the power is interrupted. If the lithium battery is exhausted and you experience an
interruption in the AC power supply, the clock will reset itself to its initial default setting when the
power is restored.
6
5
6. Turn the radio right side up and confirm that the LOW BATT indicator is ‘Off’.
RESETTING CLOCK AFTER TOTAL MEMORY LOSS
25
5. Next, press the TIME button and the TUNE UP /\ button to set the display to the correct Time.
Be sure to confirm that you have set the time correctly to ‘AM’ or ‘PM’ by observing the
PM indicator.
5. Replace the screw that secures the battery holder in the cabinet.
WARNING: DANGER OF EXPLOSION IF BATTERY IS INCORRECTLY REPLACED. REPLACE ONLY
WITH THE SAME OR EQUIVALENT TYPE.
LOCATION OF CONTROLS
3. Press the WEEK and TIME buttons together. The display will change from ‘Time’ to ‘Year’.
While holding both TIME and WEEK buttons, press the TUNE UP /\ button to set the display to the current year, then release the buttons.
If you live in an area that does not observe Daylight Saving Time it will be necessary for you to
manually set the clock back one hour at the beginning of the Daylight Saving Time, and forward
one hour at the end of Daylight Saving Time.
A simple way to do this is to change the TIME ZONE setting. Set the clock to the next higher
numbered time zone at the beginning of Daylight Saving Time, and set the clock back to your
correct time zone at the end of Daylight Saving Time.
SPECIFICATIONS AND COMPATIBILITY
AUDIO
Frequency Range(FM)........................................................................................ 87.5-108 MHz
Speaker Impedance............................................................................................ 4Ohm x 2 pcs
GENERAL
Power Supply............................................................................. AC 120V 60Hz switch adapter
Battery Backup............................................................................... 3V CR2032 Lithium Battery
(Lithium battery will work for approximately 1year before needing to be replaced with new battery)
Dimensions.................................................................................. 145 (W) ×75 (D) ×80(H) mm
Weight........................................................................................................................0.48kgs
Specifications are subject to change without notice.
1.POWER Button
2.SNOOZE/ON/OFF/DIMMER Button
3. Bluetooth SOURCE Button
4. VOLUME + / – Buttons
5.TIME Button
6.WEEK Button
7.YEAR Button
8. TUNE/SET DOWN \/ and UP /\ Buttons
9. MEMORY/TIME ZONE Button
10.STORE Button
11.SLEEP Button
12. ALARM 1 Radio/Buzzer Indicators
13. ALARM 2 Radio/Buzzer Indicators
14.FM Indicator
15. DAY of WEEK Indicator
16.AUX Indicator
17.MIC hole
18.Bluetooth Indicator
19.MHz Indicator
20. LOW BATTERY Indicator
21. DC JACK Input
22. AUX IN Jack
23. USB CHARGING Port
24. BACKUP BATTERY Compartment
(located on back of unit)
25.NFC Touchpoint
LIMITED WARRANTY
MEM-CE, LLC. warrants this product against defects for 90 days from the date of original purchase. MEM-CE,
LLC. shall not be responsible for any lost data or other incidental or consequential damages related to this
product. Some jurisdictions do not allow limitations on how long an implied warranty lasts, or the exclusion or
limitation of incidental or consequential damages, so the above limitations or exclusions may not apply to you.
This limited warranty gives you specic legal rights, and you may have other rights which may vary from one
state, province or country to another.
PLEASE KEEP ALL PACKAGING MATERIAL FOR AT LEAST 90 DAYS IN CASE YOU NEED TO RETURN THIS
PRODUCT TO YOUR PLACE OF PURCHASE OR MEM-CE, LLC.
FOR ADDITIONAL SET-UP OR OPERATING ASSISTANCE, PLEASE VISIT OUR WEBSITE AT:
WWW.MEMOREX-CE.COM OR CONTACT CUSTOMER SERVICE: For customers calling within the
United States and Canada, call 1-877-363-6673
MEM-CE, LLC. 11485 Valley View Road, Eden Prairie, MN 55344 USA MEMOREX-CE.COM
Memorex and the Memorex logo are trademarks of Imation Corp and its affiliates. The Bluetooth® word mark and logos are
registered trademarks owned by Bluetooth SIG, Inc. and any use of such marks by Imation Corp is under license. All other
trademarks are the property of their respective owners.
Guía del usuario
Lea estas instrucciones de forma completa
antes de operar este producto.
Reloj Despertador
InteliSet
MEMOREX-CE.COM
MC5550
Lo ayudaré a Dormir Profundamente
PRECAUCIÓN
RIESGO DE DESCARGA
ELÉCTRICA NO ABRIR
PRECAUCIÓN: PARA REDUCIR EL RIESGO DE DESCARGA ELÉCTRICA, NO QUITE LA CUBIERTA (NI LA PARTE TRASERA). NO CONTIENE PIEZAS EN EL
INTERIOR QUE PUEDAN SER REPARADAS POR EL USUARIO. EL MANTENIMIENTO DEBE SER REALIZADO POR PERSONAL DE MANTENIMIENTO CALIFICADO.
VOLTAJE PELIGROSO: El rayo con el símbolo de la punta de flecha dentro de un triángulo equilátero tiene
como objetivo advertir al usuario acerca de la presencia de voltaje no aislado peligroso dentro de la caja del
producto que puede ser de magnitud suficiente para generar un riesgo de descarga eléctrica para las personas.
ATENCIÓN: El signo de exclamación dentro de un triángulo equilátero tiene como objetivo alertar al usuario
acerca de la presencia de instrucciones de funcionamiento y mantenimiento (servicio) importantes en la
bibliografía que acompaña a la aplicación.
ADVERTENCIA DE LA FCC: Este equipo puede generar o utilizar energía de radio frecuencia. Los cambios
o las modificaciones de este equipo pueden provocar interferencia perjudicial, a menos que estén expresamente
aprobadas en el manual de instrucciones. El usuario podría perder la autoridad para hacer funcionar este equipo si realiza algún
cambio o modificación no autorizados.
ADVERTENCIA: PARA EVITAR INCENDIOS O DESCARGAS ELÉCTRICAS, NO USE ESTE ENCHUFE CON UN CABLE DE EXTENSIÓN,
RECEPTÁCULO U OTRA TOMA A MENOS QUE LOS CONDUCTORES SE PUEDAN INSERTAR Y NO HAY EXPOSICIÓN. PARA EVITAR
INCENDIOS O DESCARGAS ELÉCTRICAS, NO EXPONER ESTE APARATO A LA LLUVIA O HUMEDAD.
Este es un aparato de Clase II con doble aislamiento. La marca de precaución está ubicada en la parte inferior del aparato.
DECLARACIÓN DE LA FCC: Este equipo ha sido probado y cumple con los límites para un dispositivo digital de Clase B, según la parte 15 de las
normas de la FCC. Estos límites están diseñados para proporcionar una protección razonable contra las interferencias perjudiciales en una instalación
residencial. Este equipo genera, utiliza y puede irradiar energía de radiofrecuencia y, si no se instala y utiliza de acuerdo con las instrucciones, puede
causar significantes interferencias en las comunicaciones de radio. Sin embargo, no hay garantía de que no se produzcan interferencias en una
instalación particular. Si este equipo causa interferencias perjudiciales en la recepción de radio o televisión, lo cual puede comprobarse apagándolo
y encendiéndolo, se recomienda al usuario que intente corregir la interferencia mediante una o más de las siguientes medidas:
• Reorienta o reubica la antena receptora.
• Aumenta la separación entre el equipo y el receptor.
• Conecte el equipo a una toma de un circuito distinto de la cual está conectado el receptor.
• Consulte al distribuidor o a un técnico de radio / televisión para obtener ayuda.
PRECAUCIÓN: Los cambios o modificaciones no aprobados expresamente por la parte responsable del cumplimiento podrían anular la autoridad
del usuario para operar el equipo.
Este dispositivo cumple con la parte 15 de las normas de la FCC. La operación está sujeta a las dos condiciones siguientes:
(1) Este dispositivo no puede causar interferencias perjudiciales y (2) este dispositivo debe aceptar cualquier interferencia recibida,
incluidas las interferencias que puedan provocar un funcionamiento no deseado.
IC DECLARACIÓN: Este dispositivo cumple con RSSs exentos de licencia de Industria en Canada. La operación está sujeta a las dos
condiciones siguientes: (1) Este dispositivo no puede causar interferencias; y (2) Este dispositivo debe aceptar cualquier interferencia, incluidas
las interferencias que puedan causar un funcionamiento no deseado del dispositivo.
IMPORTANTES INSTRUCCIONES DE SEGURIDAD
1. Lea estas instrucciones. Conserve estas instrucciones. Sigue
todas las instrucciones. Preste atención a todas las advertencias.
2. No utilice este aparato cerca del agua.
3. Limpie sólo con un paño seco.
4. No bloquee las aberturas de ventilación. Instálelo de acuerdo con
las instrucciones del fabricante.
5. No lo instale cerca de fuentes de calor como radiadores,
calentadores, estufas u otros aparatos (incluyendo
amplificadores) que generan calor.
6. No anule el propósito de seguridad del enchufe polarizado o
enchufe con toma de tierra. Un enchufe polarizado tiene dos
clavijas con una más ancha que la otra. Un enchufe de conexión
a tierra tiene dos clavijas y un tercer diente de tierra. La amplia
cuchilla o se proporciona la tercera clavija para su seguridad.
Si el enchufe suministrado no encaja en la toma, pida a un
electricista para reemplazar la toma obsoleta.
7. Proteja el cable de alimentación de ser pisado o aplastado,
especialmente en los enchufes, receptáculos y en el punto en el
que salen del aparato.
8. Utilice solamente los aditamentos / accesorios especificados
por el fabricante.
9. Desenchufe este aparato durante tormentas eléctricas o cuando
no esta utilizado por largos periodos de tiempo.
10. Solicite el servicio de personal de servicio calificado.
Mantenimiento se requiere cuando el aparato ha sido dañado
de alguna manera así, por ejemplo el cable de alimentación o el
enchufe está dañado; si algún líquido ha sido derramado u objetos
han caído dentro del aparato, el aparato ha sido expuesto a la
lluvia o humedad, u si no funciona normalmente o se ha caído.
11. Use únicamente con la carretilla, plataforma, trípode, soporte o mesa
especificado por el fabricante, o vendidos con el aparato. Cuando
se usa un carro, tenga cuidado al mover la combinación de carro /
aparato para evitar lesiones por un vuelco.
12. El adaptador de CA no se debe exponer a goteos
o salpicaduras de agua. Objetos con líquido,
como jarrones, no deben ser colocados sobre
el aparato.
13.) El enchufe de CA se utiliza como mecanismo de desconexión y
debe permanecer fácilmente accesible durante el uso. A fin de que
desconectar el aparato de la alimentación de CA por completo, el
enchufe de CA debe ser retirado de la toma de CA completamente.
14.) La batería no debe exponerse a calor excesivo, como el sol,
fuego, etc. PRECAUCIÓN: Peligro de explosión si se inserte la pila
de manera incorrecta. Reemplace sólo con el mismo o un tipo
equivalente.
NOTAS IMPORTANTES
• Evite instalar esta unidad en lugares expuestos a la luz solar directa o cerca de calor radiante
electrodomésticos como: calentadores eléctricos, en la parte superior de otro equipo estéreo que irradia
calor, lugares carente de ventilación, áreas polvorientas, los lugares sujetos a vibraciones constantes
y / o zonas húmedas o mojadas.
• Opere los controles e interruptores como se describe en el manual.
• Antes de encender la unidad, asegúrese de que el adaptador de CA está instalado correctamente.
• Al mover el aparato, asegúrese de desconectar primero el adaptador de CA.
PREPARACIÓN PARA USO
DESEMBALAJE Y ESTABLECIDO
•Saque la radio de la caja y retire todo el material de embalaje de la radio. Guarde el material
de embalaje, si es posible, en caso de que alguna vez necesita la radio para ser reparado o
transportados. La caja original y el material de embalaje es la única manera segura de empacar
su radio para protegerlo de daños en tránsito.
• Retire las etiquetas descriptivas o pegatinas en la parte delantera o superior del gabinete. No
retire ninguna etiqueta o pegatinas de la parte posterior o inferior del gabinete.
• Anote el número de serie en la parte inferior de su radio y escribir este número en el espacio
proporcionado en la página de garantía de este manual.
• Coloque su radio en una superficie plana, como una mesa, escritorio o estante, conveniente para
una toma de CA, fuera de la luz solar directa, y alejado de fuentes de calor excesivo, la suciedad,
el polvo, la humedad, la humedad, o vibración.
• Desenrolle el cable de la línea que conecta el adaptador de CA y extenderlo a toda su longitud. La
antena FM se construye en la parte inferior de la radio. Debe ser completamente extendida para
proporcionar la mejor recepción de FM.
PROTEGE SUS MUEBLES
Este modelo está equipado con antideslizante de caucho ‘pies’ para evitar que el producto se
mueva cuando lo hace con los controles. Estos “pies” están hechos de material de caucho sin
marcación, especialmente formulado para evitar dejar marcas o manchas en sus muebles.
Sin embargo ciertos tipos de aceite esmaltes a base de muebles, conservadores de madera, o
aerosoles de limpieza pueden hacer que el ‘pies’ de goma para suavizar y dejar marcas o un
residuo de caucho en los muebles. Para evitar cualquier daño a sus muebles le recomendamos
que usted compra pequeña autoadhesiva almohadillas de fieltro, disponible en ferreterías y centros
de mejoras para el hogar en todas partes, y aplicar estos cojines al fondo de la ‘pies’ de goma
antes de colocar el producto en muebles de madera fina.
FUENTE DE ENERGÍA
Esta radio está diseñada para funcionar con el adaptador de conmutación normal de 120V 60Hz.
No intente funcionar la radio en cualquier otra fuente de energía. Usted podría causar daños en la
radio que no es cubierto por la garantía. Esta radio debe conectarse a una toma de CA que está
siempre “en vivo”. No lo conecte a una toma controlada por un interruptor de pared. Cuando el
poder de la radio es interrumpido, el construido en la batería de litio se hace cargo de mantener
los ajustes de hora y alarma. Para maximizar la vida de la batería de litio mantener la radio
conectada a una toma de CA “en vivo” en todo momento.
AJUSTE DE LA ALRMA
Su InteliSet Radio reloj tiene dos alarmas independientes que pueden ajustarse y utilizarse de
forma independiente. Usted puede utilizar las alarmas para despertar a dos personas en diferentes
momentos, o puede utilizar una alarma para los días laborables y el otro para el fin de semana. El
procedimiento para ajustar la hora de despertar es el mismo tanto para la Alarma 1 que la Alarma 2.
DESPERTARSE CON EL TIMBRE
Pulse AL1 / VOL + botón una vez para seleccionar una nota musical para despertar a la música.
Pulse una segunda vez para seleccionar campana para despertar a modo de timbre. Presione
AL2 / VOL – una vez para seleccionar una nota musical para despertar a la música. Pulse una
segunda vez para seleccionar el modo de timbre.
1. Reconfirma la hora de despertarse y ajustes del modo de alarma para la alarma que está
utilizando, alarma 1, Alarma 2 o ambas alarmas.
La alarma se activará una vez que seleccione su estela deseada hasta el modo de alarma.
1. Mantenga pulsado el AL1 / VOL + o AL2 / VOL –. La pantalla cambiará desde el momento
correcto al modo de hora de alarma 1 o alarma 2.
2. Mientras sostiene el AL1 / VOL + o AL2 / VOL –, pulse TUNE UP / o TUNE ABAJO / para mover la
pantalla hacia delante o hacia atrás a su llamada de tiempo deseado.
3. En la hora de despertarse seleccionado el zumbador sonará. Se continuará durante una hora
y luego se apagará automáticamente.
3. Cuando aparezca la hora de despertarse deseado en la pantalla, suelte la UP TUNE / o TUNE UP /
ABAJO / botón.
5. Si usted no desea que la alarma encienda el radio ‘ON’ al día siguiente, pulse la adecuada
Botón de alarma hasta que el indicador de sonido de la alarma en la pantalla está apagado.
INSTRUCCIONES DE OPERACIÓN RELOJ / HORA
NOTA: Asegúrese de que ha establecido la hora de despertarse correctamente observando el
indicador de AM. Si el indicador de AM es ‘On’ la hora de despertarse es “PM”. Si thePM indicador
es ‘Off’, la hora de despertarse es “AM”.
FUNCIONAMIENTO DE RADIO Y TIMBRE
También puede establecer una alarma para despertar a la radio y el otro para despertarse con
el timbre. Simplemente pulse los botones de alarma 1 y alarma 2 a la situación deseada, como
se muestra en los indicadores de alarma.
AJUSTE DE LA HORA INICIAL
IMPORTANTE: La primera vez que conecte su nuevo InteliSet Radio Reloj a la toma de CA, el
equipo interno ajustará automáticamente la hora correctamente para la zona horaria del Este, que
es la configuración inicial predeterminada. La pantalla va a escanear durante unos segundos y
luego mostrara el Día y la Hora correcta en la zona oriental. Si usted vive en la zona de hora del
este que es idéntico a lo que se muestra, al presionar y mantener pulsado el botón TIME ZONE, el
reloj se ajustará automáticamente correctamente. De lo contrario, debe cambiar la pantalla de la
zona predeterminada para su propia zona. Después de volver a ajustar la hora esta vez, no será
necesario repetirlo, incluso después de una interrupción de la alimentación.
Hay 7 husos horarios programados en el aparato de radio reloj EZ de la siguiente manera:
ZONA 1 — Tiempo Atlántico
ZONA 3 — Tiempo Central
ZONA 5 — Tiempo Pacífico
ZONA 7 — Tiempo de Hawaii
ZONA 2 — Hora del Este (configuración predeterminada)
ZONA 4 — Tiempo Montaña
ZONA 6 — Tiempo Yukon
CAMBIAR EL DEFAULT HUSO HORARIO PANTALLA
Mantenga pulsado el botón TIME ZONE y luego presione la TUNE UP / o bajar el tono \ hasta su
propia zona horaria aparece en la pantalla, a continuación, suelte los botones. La pantalla del reloj
cambiará a la hora correcta en la zona horaria seleccionada. El reloj volverá siempre a la hora
correcta en la zona que ha seleccionado después de cualquier interrupción de energía.
Si se muda a una zona horaria diferente, simplemente cambia la pantalla de la zona predeterminada
a la nueva zona y el despertador de la radio recordará el establecimiento para usted
FECHA DE PANTALLA
Para ver la fecha correcta en cualquier momento, presione el botón SEMANA. La pantalla cambia
de vez en Mes y Fecha (MM / DD). Por ejemplo, 21 de Mayo aparecerá como “5,21”. Cuando
suelte el botón SEMANA la pantalla vuelve a la hora correcta.
PANTALLA AÑO
Para ver los botones del año en curso, pulse tiempo y semana a la misma hora. La pantalla cambia
de vez en años. Cuando suelte los dos botones, la pantalla regresa a la hora actual.
HORARIO DE VERANO Y SALTAR LOS AJUSTES DEL AÑO.
Todos los ajustes de horario de verano y del año bisiesto se hacen automáticamente por la
computadora interna del InteliSet como sigue:
• Inicio del horario de verano: A las “2 a.m.” en el segundo domingo de marzo, el reloj
avanzará automáticamente a “3:00 AM”..
• Fin del horario de verano: A “3:00 AM” en el 1er domingo de noviembre, el reloj se
reiniciará automáticamente a “02 a.m.”.
• Año bisiesto: A las “12:00 Medianoche” el 28 de febrero, la visualización del calendario
cambia a “2.29”, en años aplicables.
PROGRAME LA HORA MANUAMENTE
Algunas personas ajustan sus relojes 5 a 10 minutos rápido para asegurarse de que siempre van
a ser a tiempo. A pesar de que la InteliSet Radio Reloj establece el tiempo por sí mismo, usted
todavía tiene la opción de ajustar la hora manualmente si lo desea.
Para ajustar manualmente, prensa la visualización de la hora y mantenga pulsado el botón TIME, y
presione la TUNE UP / o baja el tono \ para ajustar el tiempo. Cada vez que pulse el botón TUNE UP
/ o baja el tono / los botones cambiarán la visualización en un minuto. Si mantiene el TUNE UP / o
baja el tono \ los botones de la pantalla seguirán cambiando lentamente al principio, a un minuto
a la vez. Pero si continúa presar TUNE UP / o bajar el tono \ los botones de la pantalla cambiarán
rápidamente.
NOTA: Si ajusta manualmente la hora, el nuevo ajuste se introduce en la memoria del InteliSet
Radio Reloj. Si la alimentación se interrumpe, la pantalla volverá a su nuevo entorno, no el ajuste
original cuando se restablezca la energía.
4. Cuando el tiempo de reactivación deseado (AM o PM) aparece en la pantalla,
suelte el AL1 / VOL + o AL2 / VOL –.
AJUSTE DE LA SEMANA MODO DE ALARMA
Su InteliSet Radio reloj le permite seleccionar entre tres modos de operación de alarma diferentes,
para cualquier alarma. Los modos de alarma son:
• Todos los días – la alarma se encenderá los 7 días.
• Entre semana sólo – la alarma sólo se encenderá de lunes a viernes.
• Fines de semana sólo – la alarma sólo se encenderán los sábados y domingos.
Para comprobar el ajuste del modo de alarma para la Alarma 1, pulse el AL1 / VOL + y pulse
SEMANA botón, el DÍA DE LA SEMANA indicadores le mostrará el modo de alarma seleccionado.
• Si se nota 7 indicadores se iluminan, se selecciona el modo de diario.
• Si se muestra el Mon (Lunes) a través de FRI (viernes), sólo se selecciona el modo de lunes a viernes.
• Si sólo el SAT (sábado) y SUN indicadores (domingo) están encendidos, se selecciona el modo de
fin de semana.
Para cambiar el modo de alarma ajuste de Alarma 1, mantenga el AL1 / VOL + botón y pulse
la SEMANA botón hasta que el DÍA DE LA SEMANA indicadores muestran la configuración del
modo deseado, sólo los días laborables, fines de semana solamente, o la operación diaria.
Suelte la semana y botones AL1 / VOL + y la pantalla volverá a la hora correcta. Siga el mismo
procedimiento utilizando el AL2 / VOL – si usted desea utilizar una hora de la alarma adicional.
CONFIRMANDO TIEMPOS DE DESPIERTA Y MODO DE ALARMA
Cada vez que desee comprobar el tiempo de reactivación o la configuración del modo de alarma,
simplemente presione la AL1 / VOL+ o AL2 / VOL –. La pantalla cambiará de la hora actual para
mostrar la alarma, el tiempo y el día seleccionado actualmente. Suelte el AL1 / VOL+ o AL2 / VOL–
botón para volver a la hora actual.
DESPIERTA PARA RADIO
1. Encienda la radio ‘On’ y seleccione la estación y nivel de volumen que desea oír cuando la alarma
empieza, luego gire la radio ‘Off’ de nuevo.
2. Vuelva a confirmar la hora de despertarse y ajustes del modo de alarma para la alarma que está
utilizando, alarma 1, Alarma 2 o ambas alarmas.
3. Pulse AL1 / VOL + o AL2 / VOL - varias veces hasta que la ALARMA 1 “RADIO” o ALARM 2 El
indicado “RADIO” aparece en la pantalla.
4. A la hora de despertarse seleccionada la radio se encenderá ‘On’. Se podrá ver durante una hora
y luego se apagará automáticamente.
NOTE: Alarma 1 y Alarma 2 tienen diferentes sonidos de timbre. Usted será capaz de decir que
la alarma se va fuera por el sonido que hace. Alarma 1 es un sonido “Bip único”. Alarma 2 es
una “Doble bip “.
2. Pulse AL1 / VOL + o VOL AL2 / - botón ligeramente, y haciendo lo que si es necesario, hasta
la repetición ALARMA 1 “TIMBRE” o ALARM 2 indicador “TIMBRE” se ilumina en la pantalla.
4. Para detener la alarma antes, presione el botón RADIO ON / OFF. El zumbador se detendrá,
pero la alarma permanece fija y cambiara el timbre de nuevo a la misma hora el día siguiente
(dependiendo de la configuración del modo de alarma).
SNOOZE/REPEAT ALARM
Cuando suene la alarma, puede pulsar el botón SNOOZE / DIMMER en la parte superior
de la unidad para unos pocos minutos más de sueño. El indicador ALARM correspondiente
parpadeará. La alarma se detendrá por aproximadamente 9 minutos y luego sonará otra vez.
La operación de repetición se puede repetir varias veces si se desea, pero después de una hora
la alarma no se encenderá de nuevo.
SLEEP TIMER PARA MÚSICA
Puede programar el temporizador de apagado para jugar la radio hasta por 90 minutos y luego
se apagará ‘Off’ automáticamente.
1. Pulse el botón SLEEP. La pantalla mostrará brevemente “10” y la radio comenzará a
reproducirse. Después de 10 minutos de cuenta atrás, la radio se apagará automáticamente.
Cada vez que pulse el Botón SLEEP el temporizador se iniciará a las 10 minutos. Esta es la
configuración por defecto del sueño temporizador.
2. Para aumentar o disminuir la cantidad de tiempo que la radio reproducirá antes de apagarse,
mantenga el botón SLEEP y pulse el TUNE UP / o baja el tono / botón para cambiar el tiempo
de sueño deseado, hasta un máximo de minutos “90” o un mínimo de minutos “02”.
NOTA: Al cambiar el temporizador de apagado automático de la configuración predeterminada
10 minutos a un diferente ajuste, el nuevo ajuste se convierte en el valor predeterminado.
Cada vez que se activa el temporizador de apagado, automático comenzará con su nueva
configuración predeterminada y la cuenta regresiva a cero desde ese punto.
3.) Para cancelar el temporizador de apagado antes de que la cuenta atrás para ‘00’ y cerrar la
radio ‘Off’ de inmediato, pulse el botón SNOOZE / DIMMER.
IMPORTANTE: Recuerde que los ajustes de la estación y de volumen que elija para la operación
sueña con música son los mismos ajustes que se escuchará si configura la alarma para
despertarse con la Radio la mañana siguiente.
CONTROL DE ATENUACION
El ajuste de reductor de luz es “alta”. Si el reloj es demasiado brillante en una habitación
oscura, ajuste el nivel de atenuación pulsando botón SNOOZE / DIMMER, cuando la Radio
está apagada.
INSTRUCCIONES DE OPERACIÓN DE LA RADIO
PARA ESCUCHAR LA RADIO
5. Para detener la radio antes, pulse el botón RADIO ON / OFF. La radio se detendrá pero la alarma
permanece fijen, y, encender la radio de nuevo al mismo tiempo al día siguiente (en función del
ajuste del modo de alarma).
1. Pulse el botón SOURCE para encender la radio ‘On’. El indicador de frecuencia FM aparecerá
para unos segundos en la pantalla.
6. Si usted no desea que la alarma encienda el radio ‘ON’ al día siguiente, pulse la adecuada Botón
de alarma hasta que el indicador de sonido de la alarma en la pantalla se apaga..
3. Seleccione la emisora deseada con el TUNE UP / o baja el control de tono.
a) Pulse TUNE UP / o baja el tono en varias ocasiones y la frecuencia de recepción
va a subir o ir hacia abajo en un paso.
Nota: Para evitar la pérdida de su llamada de tiempo (incluso si se establece la radio a un volumen
muy bajo antes de apagar la radio) la alarma sonará a todo volumen medio cuando se alcanza la
hora de alarma.
2. Ajuste el volumen pulsando AL1 / VOL + o AL2 / VOL - a un nivel que es cómodo.
b) Mantenga pulsado TUNE UP / o baja el tono durante un segundo y luego suelte para
participar la estación de Auto Buscando, que parará en la señal de la estación
próxima fuerte.
4. Ajuste el volumen al nivel deseado.
5. Cuando haya terminado de escuchar, pulse el botón RADIO ON / OFF para encender
la radio ‘Off’.
Guía del usuario
Lea estas instrucciones de forma completa
antes de operar este producto.
Reloj Despertador
InteliSet
MEMOREX-CE.COM
MC5550
Lo ayudaré a Dormir Profundamente
INSTRUCCIONES DE OPERACIÓN DE LA RADIO (seguido)
ALMACENAMIENTO A LA MEMORIA
1. Asegúrese de que la radio está encendida y se selecciona FM.
2. Sintonice la emisora deseada con el TUNE UP / o baja el tono.
3. Pulse el botón STORE y “P 01” parpadeará, indicando la posición de memoria para almacenar la
corriente escuchando estación.
4. Mientras “P 01” parpadea, pulsando TUNE UP / o bajar el tono / puede cambiar la memoria
ubicación de 1 - 20. (Por ejemplo, “P 03” significa que la estación de escucha actual está a
punto de ser almacenado en la tercera ubicación de la memoria.
5. Después de decidir sobre el botón, pulse STORE posición de memoria de nuevo y la emisora
actual va a ser almacenada en dicho lugar preestablecido.
6. La pantalla volverá a la frecuencia de las estaciones después, y después de unos segundos, va a
dar la hora correcta.
NFC CONEXIÓN CON BLUETOOTH
NFC, o comunicación de campo cercano, es una tecnología fácil e intuitiva que le permite utilizar
su teléfono inteligente para tareas automatizadas. Si el dispositivo móvil tiene una funcionalidad
NFC, a continuación, coloca el teléfono inteligente en las proximidades o en contacto con la
marca de la NFC en la parte superior de este producto se establezca automáticamente una
conexión Bluetooth con el smartphone y la InteliSet Radio Reloj.
NOTA: Asegúrese de que la Fuente se ha configurado Bluetooth antes de utilizar la función NFC.
FUNCIONAMIENTO MANOS LIBRES
Si recibe una llamada mientras el “streaming” de música por Bluetooth o el audio, puede pulsar
el Botón DIMMER / SNOOZE para contestar la llamada. Una vez que haya terminado la llamada, el
MC5550 va a continuar la reproducción Bluetooth.
CHANGING THE LITHIUM BATTERY CAMBIO DE LA BATERÍA DE LITIO
RECORDANDO A UNA ESTACIÓN DE LA MEMORIA
1. Asegúrese de que la radio está encendida y se selecciona la FM.
Esta unidad está equipada con un sistema de respaldo de batería en caso de una falla de energía.
Si esto ocurre la memoria del reloj y de la alarma continúan corriendo y cuando restablece la
corriente CA, el reloj va a volver a la alimentación de CA de nuevo.
2. Para el modo de memoria, pulse el botón MEMORY / HUSO HORARIO, “P 01” aparecerá en la
pantalla, y la estación guardada para esa ubicación de memoria se reproducirá.
NOTA: Usted no verá una pantalla y las alarmas no funcionarán durante un corte de energía.
Sólo la batería ahorra el tiempo correcto y las horas de alarma en la memoria.
3. Mientras “P 01” está mostrando en la pantalla, pulse TUNE UP / o baja el tono / para cambiar la
posición de memoria 1-20, y la emisora almacenada en la ubicación se sintoniza una vez que la
ubicación se cambia.
Al igual que todas las pilas, finalmente, el construido en batería de litio tendrá que ser
reemplazado. Un número de factores, tales como, la longitud de tiempo entre la fecha de
fabricación de la radio y de la fecha cuando ha conectado por primera vez determinara la
cantidad de tiempo antes de la sustitución. Cuando la energía de la batería cae por debajo de
un cierto nivel, el indicador LOW BATT se ‘Flash’. Cuando vea este indicador, se debe cambiar la
batería tan pronto como sea conveniente. Para cambiar la batería haga lo siguiente:
4. La pantalla volverá a la frecuencia de la frecuencia de las estaciones y en unos pocos
segundos, la hora correcta muestra.
INFORMACIÓN DE LA ANTENA
FM - La antena de FM está integrada en la parte inferior de radio. Si la recepción de FM es débil
trate de mover la posición y dirección de la unidad hasta que encuentre la señal más fuerte.
1.Compra un reemplazo Batería
de litio de 3V donde baterías se
venden. El Tipo de batería correcta
es CR2032 o el equivalente.
2. Retire la batería de su paquete
para instalar.
USO DE AUX Y ENTRADA DE LÍNEA
El InteliSet Radio reloj está equipado con Jack AUX IN para disfrutar de iPod, reproductor de
música MP3 u otro fuente de audio.
1. Con la unidad encendida, pulse el botón SOURCE hasta que aparezca el indicador AUX en
la pantalla.
2. Conecte su iPod, reproductor de MP3 u otra fuente de audio a partir de su toma de auriculares con
una línea de 3,5 mm cable para AUX IN.
3. El indicador AUX se ilumina cuando la toma AUX IN está conectado, y la pantalla va a cambiar a la
función AUX.
4. Pulse jugar en tu iPod, MP3 u otro reproductor de audio y ajuste el reproductor volumen al máximo.
5. Ajuste el volumen InteliSet Radio Reloj a su nivel deseado.
6. Cuando haya terminado de escuchar, apague el InteliSet Radio Reloj y el iPod, MP3 u otro audio
reproductor y desconectar el cable de la toma AUX IN.
NOTA: Una vez que la toma AUX IN está enchufado en el sonido de la alarma será zumbador.
PUERTO USB PARA CARGAR MÓVIL
El InteliSet Radio reloj también tiene un puerto USB para la carga móvil de DC 5V, 500mA que
pueda conectar su teléfono o dispositivo móvil para USB para la carga.
OPERACIÓN BLUETOOTH
Si el InteliSet Radio reloj nunca ha sido conectado con un dispositivo Bluetooth antes: Necesitas
seguir las instrucciones de emparejamiento de abajo para enlazar la unidad con el dispositivo
Bluetooth.
1. En el modo de espera, pulse el botón SOURCE para cambiar al modo de Bluetooth, el indicador BT
LED comenzará a parpadear. El altavoz está listo para emparejarse con el dispositivo Bluetooth.
2. Encienda la función Bluetooth de su teléfono móvil u otro dispositivo habilitado para Bluetooth y
habilita la función de búsqueda o exploración para encontrar el MRX MC5550.
3. Seleccione “MC5550 MRX” de la lista de dispositivos cuando aparezca en la pantalla del
dispositivo. Usted puede enlazar directamente con el dispositivo en ese momento.
4. Al encender el MC5550 y utilizar la próxima vez, la unidad buscará el último par dispositivo. El
indicador BT parpadeará indicando rápidamente lo busca. Si la unidad encuentra el emparejado
el dispositivo Bluetooth, se escucha un pitido y el indicador BT comenzará a parpadear y conectar.
IMPORTANTE: Deje el adaptador de CA conectado a la toma de corriente alterna. Esto
proporcionará energía a la memoria EZ Set mientras que se quita la batería de litio.
3.Encienda la radio boca arriba y utilice un pequeño destornillador para quitar el tornillo que sujeta
la batería titulada al gabinete - TENGA CUIDADO DE NO PERDER ESTE PEQUEÑO TORNILLO!
4. Retira la batería original del soporte e inserte la pila nueva en el soporte de la misma manera,
la observación de la (+) dirección positiva. Deslice el soporte con la nueva pila en la ranura
en el armario.
5. Sustituya el tornillo que fija el soporte de la batería en el gabinete.
6. Encienda la radio boca arriba y confirme que el indicador LOW BATT es ‘Off’.
7. Guarde estas instrucciones, ya que tendrá que hacer esto otra vez en tres a cinco a ocho años
de tiempo.
ADVERTENCIA: PELIGRO DE EXPLOSIÓN SI LA BATERÍA ES INCORRECTA. REPONER SOLAMENTE
CON EL MISMO TIPO O EQUIVALENTE.
REAJUSTE DEL RELOJ DEPUES DE LA PERDIDA TOTAL DE MEMORIA
Si usted no cambia la batería de litio en un plazo de tiempo razonable después de ver el indicador
de advertencia LOW BATT, la batería de litio puede ser agotada y ya no ser capaz de suministrar
de nuevo el encendido a la computadora interna InteliSet. Si la unidad se desconecta de la toma
de CA después de que la batería se agota, o si se produce un corte de energía, la memoria
del InteliSet se perderá y el reloj necesitará ser restablecido cuando se restablezca la energía.
Asegúrese de instalar una batería de litio fresca antes de restablecer el reloj, de lo contrario
el reloj se deberá volver a programar cada vez que se interrumpe la alimentación. Si la batería
de litio se agota y experimenta un interrupción en la fuente de alimentación de CA, el reloj se
restablecerá a su configuración predeterminada inicial cuando se restablece la alimentación.
El ajuste predeterminado inicial es “12:00 AM, domingo 1 de enero (1. 1), 2012”. Si usted nota
que la hora en su radio reloj InteliSet es completamente incorrecto, y el día de indicador SEMANA
también es incorrecto, pulse el botón semana para ver la fecha. Si la visualización de la fecha está
mostrando “1. 1 “(enero primero), es probable que experimentó una pérdida total de la memoria.
Para restablecer el reloj después de una pérdida total de la memoria, haga lo siguiente:
1. Siga las instrucciones de operación antes de instalar una nueva batería de litio CR2032 en el
compartimiento de la batería.
2. Conecte el InteliSet Radio Reloj a la toma de CA y deje que el reloj se fijó.
3. Pulse los botones de semana y la hora juntos. La pantalla cambiará de ‘Time’ a ‘Año’. Mientras
mantiene los dos botones TIME y SEMANA, pulse el botón TUNE UP / para configurar la pantalla
para el año en curso, a continuación, suelte los botones.
UBICACIÓN DE LOS CONTROLES
4. Pulse el botón SEMANA. La pantalla cambiará de ‘Time’ a ‘Mes / Día’ (MM / DD). mientras
manteniendo pulsado el botón SEMANA, pulse el botón TUNE UP / para seleccionar el mes
y la fecha actual. El indicador del DÍA DE LA SEMANA cambiará automáticamente a medida
que ajusta la configuración Mes / Fecha. Cuando el mes y la fecha correcta aparezcan en la
pantalla, suelte los botones.
5. A continuación, pulse el botón TIME y la TUNE UP / botón para ajustar la pantalla a la hora
correcta. Asegúrese de confirmar que ha configurado la hora correctamente para ‘AM’ o ‘PM’
observando el indicador de PM.
25
6
11
7
10
5
9
6. Después de configurar la hora, reconfirma que las pantallas del Día, del Mes y del Fecha
siguen siendo correctas y hace los ajustes finales si es necesario.
La memoria InteliSet Radio Reloj se ha restablecida y la nueva batería de litio mantendrá para los
próximos 3 a 5 años, dependiendo de la cantidad y duración de los cortes de energía que tenga.
4
8
1
3
NOTA IMPORTANTE: Después de reiniciar el reloj, no se olvide de restablecer su llamada de los
tiempos y de alarma, los ajustes de despierta y los ajustes del temporizador de sueño también.
CUIDADO Y MANTENIMIENTO
2
16
12
17
18
CUIDADO DE GABINETE
13
Si el mueble se ensucia, limpie con un paño suave. Si el mueble se manchada o sucia, límpielo
con un paño suave ligeramente humedecido.
14
19
15
20
Nunca permita que el agua o cualquier líquido al interior de la unidad. Nunca use limpiadores
abrasivos o pastillas de limpieza que podrían dañar el acabado de su radio.
PRECAUCIONES CON LAS PILAS DE LITIO
• Deseche la batería usada apropiadamente. No lo deje ahí donde un niño pequeño o una
mascota podría jugar con o tragarlo. Si la pila se ingiere, póngase en contacto con un médico
inmediatamente.
21
22
23
24
• La batería puede explotar si no. No intente recargarla o desmontarlo. No dispone de la batería
vieja en un incendio.
The El aparato no debe ser expuesto a goteos o salpicaduras y objetos que contengan líquidos,
tales como floreros, no deben colocarse sobre el aparato.
Esta marca indica que este producto no debe eliminarse junto con otros desechos
de los hogares de todo el país. Para evitar los posibles daños al medio ambiente o la
salud humana que representa la eliminación incontrolada de residuos, recicla esta
unidad de manera responsable para promover la reutilización de recursos materiales.
Para devolver su dispositivo usado, por favor utilice los sistemas de devolución y
recogida o póngase en contacto con el establecimiento donde el producto fue comprado, ya que
saben cómo reciclar este producto de forma segura.
AVISO IMPORTANTE
El horario de verano no se observa en Hawai, Samoa Americana, Guam, Puerto Rico, las Islas
Vírgenes y en, la mayor parte de Arizona, con excepción de la reserva india de Navajo en Arizona.
A partir de 2007, este EZ Set Radio Reloj avanzará automáticamente por una hora a partir
del horario de verano en el segundo domingo de marzo. Y volverá automáticamente a la hora
estándar en el primer domingo de noviembre.
Si usted vive en un área que no cumpla con el horario de verano, será necesario que usted
establecer manualmente el reloj una hora en el comienzo del horario de verano, y hacia adelante
una hora a la final del horario de verano.
Una manera simple de hacer esto es cambiar la configuración de zona horaria. Ajuste el reloj a la
zona horaria numerada inmediatamente superior en el comienzo de la hora de verano, y ajusta el
reloj de nuevo a su zona horaria correcta al final del horario de verano.
ESPECIFICACIONES Y COMPATIBILIDAD
AUDIO
Frecuencia Rande (FM)...................................................................................... 87.5-108 MHz
Altavoz Impídanse............................................................................................... 4Ohm x 2 pcs
GENERAL
Fuente De Alimentación.....................................................adaptador AC 120V 60Hz interruptor
Batería de reserva............................................................................3V CR2032 batería de litio
(Batería de litio funciona para aproximadamente 1 año antes de necesitar ser reemplazada por una
nueva batería)
Dimensiones................................................................................ 145 (W) ×75 (D) ×80(H) mm
Peso...........................................................................................................................0.48kgs
Las especificaciones están sujetas a cambios sin aviso previo.
1. Botón POWER (Encendido)
2. Botón SNOOZE/ON/OFF/DIMMER
(ATENUADOR ALTO/BAJO)
3. Botón de Bluetooth SOURCE
4. Botones VOLUME + / – (Subir/ Bajar)
5. Botón TIME (TIEMPO)
6. Botón WEEK (SEMANA)
7. Botón YEAR (AÑO)
8. Botones TUNE/SET DOWN \/ and UP /\
9. Botón MEMORIA / HUSO HORARIO
10. Botón STORE (MEMORIA)
11. Botón SLEEP (APAGADO AUTOMÁTICO)
12. ALARM 1 Radio Indicadores / Zumbador
13. ALARM 2 Radio Indicadores / Zumbador
14. Indicador FM
15. Día de la semana Indicador
16. Indicador AUX
17. Agujero MIC
18. Indicador Bluetooth
19. Indicador MHz
20. Indicador de BATERÍA BAJA
21. DC JACK entrada
22. Enchufe AUX (Entrada de línea)
23. Conección para USB de Carga
24. Compartimiento de la pila
(ubicado en la parte posterior de la unidad)
25. Sensor de NFC
GARANTÍA LIMITADA
MEM-CE, LLC. garantiza que los materiales y la fabricación de este producto no tienen defectos en el momento
de su compra. Si se detectara cualquier defecto material o de fabricación en los 90 días siguientes a la compra
de este producto, éste será reemplazado sin gasto alguno por su parte. Como condición para recibir el servicio
de garantía será necesario proporcionar el recibo de entrega o venta con fecha como prueba de compra. Para
más información, visite: www.MEMOREX-CE.COM. La presente garantía no será de aplicación al desgaste
normal. Salvo excepción legal, MEM-CE, LLC. no se hará responsable de ningún tipo de daño indirecto, o
consecuencial, incluido el lucro cesante. La presente garantía le otorga derechos legales especícos y es posible
que usted disfrute de otros derechos que variarán en función del país y la legislación aplicable, no quedando los
mismos afectados por esta garantía.
CONSERVE EL EMBALAJE AL MENOS 90 DIAS EN CASO QUE NECESITE DEVOLVER EL PRODUCTO AL LUGAR DE
COMPRA O A MEM-CE, LLC.
PARA ASISTENCIA ADICIONAL SOBRE LA CONFIGURACION O EL FUNCIONAMIENTO, INGRESE EN:
WWW.MEMOREX-CE.COM O COMUNIQUESE CON ATENCION AL CLIENTE:
Si llama desda EE.UU. y Canada marque 1-877-363-6673
MEM-CE, LLC. 11485 Valley View Road, Eden Prairie, MN 55344 USA MEMOREX-CE.COM
Memorex y el logotipo de Memorex son marcas comerciales de Imation Corp y sus afiliados. Todas las demás marcas
comerciales pertenecen a sus respectivos propietarios. Para obtener asistencia operativa o de configuración adicional,
o una versión electrónica de este manual del usuario, visite www.MEMOREX-CE.COM