1
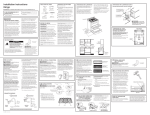
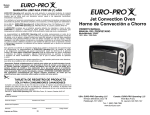
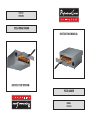
MODEL:
PS75891
PIZZA BAKER
MANUAL DEL USUARIO
INSTRUCTION MANUAL
HORNO PARA PIZZA
MODELO:
PS75891
INSTRUCCIONES IMPORTANTES DE
SEGURIDAD
LEA ESTAS INSTRUCCIONES ANTES DE HACER FUNCIONAR LA UNIDAD.
CONSERVE ESTA GUIA PARA FUTURA REFERENCIA.
ADVERTENCIA: Hay riesgos de incendio y descarga eléctrica al utilizar artefactos eléctricos. Los mismos podrían causar lesiones corporales o la muerte.
Sírvase seguir atentamente todas las instrucciones de seguridad.
Este artefacto produce calor al usarse. Deben observar las precauciones adecuadas para prevenir el riesgo de quemaduras, incendio u otras lesiones a las personas o daños a la propiedad. Al usar artefactos eléctricos, siempre se deben seguir
las precauciones básicas de seguridad para reducir el riesgo de incendios, descarga eléctrica o lesiones.
POR FAVOR SIGA ESTAS REGLAS BASICAS DE SEGURIDAD
• Nunca haga funcionar el horno para pizza sin la bandeja de migajas y la parrilla.
• Sólo las personas que hayan leído este manual están calificadas para hacer funcionar este artefacto.
•Asegúrese que el temporizador este en OFF antes de conectar el cable en el toma
corriente
• No toque la superficie del horno para pizza durante el horneado o inmediatamente
después. Se recomienda usar guantes protectores o agarraderas al hornear.
• Durante el proceso de horneado asegúrese que exista el espacio adecuado para
la circulación de aire por encima y en los costados de la unidad. No haga funcionar
este arfefacto cerca de ningún material inflamable o en contacto con el mismo.
• No intente reparar un artefacto que funcione mal, comuníquese con el Servicio al Consumidor para obtener una autorización de devolución o reparación.
• No coloque papel de cartón, plástico ni materiales similares dentro del horno para
pizza o sobre el mismo. No limpie el acabado metálico con una esponja abrasiva o
productos que desgasten la superficie.
• Use el asa al desplazar la parrilla dentro del horno para pizzas.
• Los menores no deben usar este artefacto.
• No coloque este artefacto sobre una superficie inestable.
• Es necesario supervisar atentamente el horno para pizza cuando se usa cerca de
los niños.
• No conecte el cable ni el enchufe si está mojado con agua u otro líquido.
• Desenchufe el cable del toma corriente cuando no se use el horno.
• Hay que dejar enfriar el horno para pizza antes de limpiarlo. Lea todas las instrucciones antes de usar el horno para pizza.
• No use accesorios no recomendados por el fabricante. No use la unidad si está
sobre una superficie mojada.
• Sea precavido al sacar la pizza u otras comidas calientes del horno. No intente
hornear alimentos grasosos en el horno para pizza. Use el horno para pizza sólo
como se indica en el manual.
• No intente quitar alimentos pegados dentro del horno cuando está caliente o
enchufado.
• Use el horno para pizza sólo como se indica en el manual.
This appliance has a polarized plug (one blade is wider than the other). To reduce the
risk of electric shock, the plug can fit into a polarized socket only one way. If the plug
does not fit fully in the outlet, reverse the plug. If it still does not fit, contact a qualified
electrician. Do not modify the plug in any way
SPECIAL NOTES ON CORD PLUG
SAVE THESE INSTRUCTIONS
HOUSEHOLD USE ONLY
PLEASE FOLLOW THESE BASIC SAFETY RULES WHEN USING YOUR
PIZZA BAKER OVEN.
• Only individuals that have read this manual should operate this unit.
• Never operate the Pizza Baker Oven without the crumb tray and food rack.
• If this appliance accidentally falls or becomes immersed in water while it is plugged
in, unplug immediately from the wall outlet. DO NOT REACH INTO THE WATER.
• Do not touch the outer surface of the Pizza Baker Oven during or immediately after
baking.
• During the baking process make certain that there is adequate air space above and
on the sides of the unit for air circulation.
• Do not place this appliance on an unstable surface.
• Do not clean Pizza Baker Oven with a scouring pad or harsh abrasives.
• Use Handle when sliding food rack into the Pizza Baker Oven.
• This appliance is not for use by children.
• Do not immerse cord or plug in water.
• Allow Pizza Baker time to cool before cleaning.
• Do not bake greasy foods in the oven.
• Use only with a properly grounded outlet.
• Do not leave the Pizza Baker Oven unattended when using.
This appliance produces heat during use. Proper precautions must be taken to
prevent risk of burns, fire or other injury to persons or damage to property.
When using electrical appliances, basic safety precautions should always be followed
to reduce the risk of fire, electric shock and injury.
READ THESE INSTRUCTIONS BEFORE OPERATING. KEEP THIS BOOKLET
FOR FUTURE REFERENCE.
WARNING: A risk of fire and electrical shock exists in all electrical appliances
and may cause personal injury or death. Please follow all safety instructions
carefully.
IMPORTANT SAFEGUARDS
Step 3: Slip the slot on the front of the food rack cover over the loop so the food rack
cover rests flat against the food rack.
Step 2: Lay food rack on a stable counter top with loop facing up and slightly over the
edge of the counter.
Step 1: Remove food rack cover and food rack from the pizza oven.
• Uselo sólo con un toma corriente que tenga bajada a tierra apropiada. No deje el
horno para pizza sin supervisión mientras funciona.
Conozca el horno para pizzas:
El horno para pizza se creó para honear pizza congelada de la mejor calidad y
mucho más que eso.
El horno para pizza hornea prácticamente todo lo que se puede cocinar en un horno
tostador y mucho más. Pruebe hacer sus quesadillas, pretzels, pan de ajo, pan de
queso, barritas de mozarella, bocadillos de pollo, barritas de pescado...las opciones
son casi ilimitadas.. sólo asegúrese de no hornear alimentos grasosos en el horno
para pizzas.
Remove crumb tray from the front of the oven. Using one (1) small screw and one
(1) Black knob enclosed in the parts bag, hold the black knob to the outside of the
crumb tray at the center hole and push small screw through the center from the inside
of the tray front. Thread knob onto small screw and tighten. Slide completed crumb
tray assembly back into its original position in the pizza oven.
Se puede hornear toda clase de otras comidas congeladas no grasosas y alimentos
frescos en el horno para pizza.
Handle Assembly:
ASSEMBLY INSTRUCTIONS:
Crumb Tray Assembly:
Your Pizza Baker Oven operates on 120 Volts, draws 14 amps and processes 1450
watts of power. For best results, operate your pizza oven on an individual outlet or
circuit branch.
POWER CAPACITY:
Included in your Pizza Baker Oven are a plastic grill handle and a crumb tray knob.
Accompanying these parts are the necessary screws and nuts for assembly. See
assembly instructions for details.
ASSEMBLY PARTS:
Your Pizza Baker Oven outer case and food rack front are made of heavy gauge
brushed stainless steel. The inner case and internal case parts are made from aluminized steel to protect against corrosion.
CONSTRUCTION:
Your Pizza Baker Oven is a professional restaurant quality oven designed to fit a
countertop in your kitchen, office, bar or recreation room. With the ovens dual baking elements you will be able to bake a frozen pizza start to finish in less than 15
minutes. No preheating is required. Actual baking times could vary for each product
recommended.
Your Pizza Baker Oven was created to bake the finest quality frozen pizza and
more. Your Pizza Baker Oven bakes most anything your toaster oven can bake. Try
Cheese Breads, Pretzels, Egg Rolls, Mozzarella Sticks, Chicken Fingers, Bruschetta
and Quesadillas.
GET TO KNOW YOUR PIZZA BAKER OVEN
BEFORE YOU USE
El horno para pizzas es de calidad profesional para restaurantes y está diseñado
para adaptarse a una superficie horizontal en la oficina, bar o sala de recreo. Con
los dos elementos de horneado usted podra hornear una pizza congelada, en un
ciclo completo de solo 15 minutos o menos. No es necesario precalentar.
Los tiempos de horneado reales podrían variar según las recomendaciones de cada
producto, de modo que vigile la comida con frecuencia para evitar que se hornee
demasiado.
Construcción:
La caja externa y el frente de la parrilla del horno para pizzas están hechos con
acero inoxidable 430 cepillado de calibre 22.
La caja interior y Ias piezas internas de la caja estan hechas con acero aluminizado
para protegerlas contra Ia corrosión.
Piezas para el montaje:
Con el horno para pizzas se incluyen un asa plástica para la parrilla y una perilla
para la bandeja de migajas. A estas piezas se adjuntan los tornillos y tuercas necesarios para el montaje. Vea las “Instrucciones de montaje” para consultar detalles.
Potencia:
El horno para pizza funciona en 120 voltios, 14 amperios y 1450 vatios de potencia.
Para obtener los mejores resultados, haga funcionar el horno en un toma ¬corriente
de circuito individual.
INSTRUCCIONES DE MONTAJE:
Quite la bandeja de migajas del frente del horno.
Con un (1) tornillo pequeño y una (1) perilla negra que se incluyen en la bolsa de
piezas, sujete la perilla negra contra la parte externa de la bandeja de migajas en
el agujero del medio y haga pasar el tornillo pequeño por la parte de adentro del
frente de la bandeja. Enrosque la perilla en el tornillo pequeño y ajústela. Vuelva a
deslizar el conjunto de la bandeja de migajas completa hacia su posición original en
el horno.
Emsamblaje:
Quite la cubierta de la parrilla y la parrilla del horno para pizzas. Apoye la parrilla
sobre una superficie horizontal estable con el bucle hacia arriba y sobresaliendo
ligeramente del borde de dicha superficie horizontal.
Encaje la ranura sobre la cubierta de la parrilla del bucle para que la cubierta de la
parrilla se apoye horizontalmente contra la parrilla.
Tome el conjunto del asa y haga girar el asa y el soporte para que se apoyen horizontalmente. Apoye la ranura del soporte sobre la parrilla y el bucle Use las piezas
de sujecion que hay en la bolsa de piezas. Tome un (1) tornillo grande y una tuerca
de mariposa grande. Haga pasar el tornillo grande por la ranura para sujetar el
bucle, el soporto del asa y la cubierta de la parrilla. Enrosque la tuerca en el tornillo
grande desde la parte de arriba de la unidad y ajústela. Gire hacia abajo el asa
armada y vuelva a deslizar la parrilla completa a su posición original en el horno.
Advertencia:
El montaje incorrecto de la parrilla podría hacer que la parrilla gire y se caiga
cuando saque alimentos del horno. No intente sujetar comida CALIENTE con las
manos desprotegidas al sacar alimentos del horno para pizzas.
INSTRUCCIONES PARA HORNEAR PIZZA
Mantenga congelada la pizza hasta que este lista para hornearla. En el horno cabe
una pizza regular o de corteza delgada de hasta 12 pulg. (30 cm) de diametro.
No hornee pizzas de corteza con levadura en el horno para pizzas. Coloque la
pizza sobre la parrilla y deslice la parrilla adentro del horno.
Fije el temporizador para el tiempo de horneado que desee y el horno cocinará
automáticamente la pizza a la perfección.
Debe girar el temporizador pasando la marca de 2 minutos para que se active. Para
casi todas las pizzas, el tiempo de horneado promedio es de 8 a 12 minutos según
el tipo de corteza, la consistencia de los ingredientes y las preferencias de gusto
personal.
Vigile siempre la pizza o a la mitad del ciclo de horneado y gírela si fuera necesario
para asegurar el horneado uniforme.
PAUTAS DE FUNCIONAMIENTO Y LIMPIEZA
No recomendamos usar un cable de extension sin embargo, si es necesario
usarlo, hay que ser precavido. El cable debe ser de calibre 14 marcado para un
regimen electrico de 120 voltios, 15 amperios, 1.875 vatios y dispuesto de manera
tal que no cuelgue sobre la unidad o la superficie horizontal de trabajo ya que se
pueda tirar el mismo accidentalmente o se pueden tropezar con el cable. Si el
circuito eléctrico está sobrecargado, se disparará el cortacircuitos y no funcionará el
horno para pizzas.
We do not recommend the use of an extension cord, however if an extension cord
is required caution should be used. The cord MUST be 14 gauge marked with an
electrical rating of 120V, 15A 1,875W, and arranged so that it will not drape over the
unit or the countertop.
Overloading the circuit breaker will trip your Pizza Baker Oven causing it not to function. Ensure that the outlet being used is 20 amps and separate from other appliances.
To operate your Pizza Baker Oven use the handle, pull out the food rack and place
food in the center of the rack. Replace the food rack with food and turn the timer to
your desired baking time. Timer will shut off after set time.
When finished baking remove plug from socket.
Allow cooling before cleaning.
To clean crumb tray, remove and rinse with warm soapy water. Wipe dry before placing back in oven.
Use caution when cleaning. Your Pizza Baker Oven has sharp edges on the crumb
tray and surrounding edges.
Proper cleaning and maintenances will reduce the risk of food accumulation that may
cause smoke or carbon builds up.
OPERATING AND CLEANING GUIDELINES
Put frozen pizza into the Pizza Baker. Oven can cook pizza up to 12”. Do not bake
rising dough crust pizzas in your oven. Place the pizza on the food rack and slide the
food rack into the oven. Set the timer to your desired bake time. Your Pizza Baker
will automatically bake your pizza to perfection. Remember to set the timer over 2
minutes in order to activate the timer. Baking time is 8-12 minutes depending on
crust size, topping, and personal taste preferences. (Check pizza midway through
baking, rotating if necessary to ensure even baking).
PIZZA BAKING INSTRUCTIONS
Improper assembly of the handle to the food rack could cause the food rack to rotate
and fall when food is removed from the oven. Do not attempt to grab HOT foods with
bare hands when removing food from pizza oven.
WARNING:
Step 7: Rotate the assembled handle down and slide the completed food rack back
into its original position in the pizza oven.
Step 6: Using attaching hardware found in the parts bag, take one large bolt and one
large thumb nut . Slide large bolt through the round hole, capturing the loop, handle
bracket and the food rack cover. Thread the nut onto the large bolt from the opposite
of the food rack and tighten.
Step 5: Rotate handle and food rack cover towards you together as a single unit.
Step 4: Take handle assembly and rotate the handle and bracket so they lie flat. Lay
the bracket slot over the food rack loop on top of the food rack cover.