1
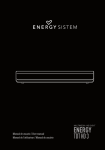
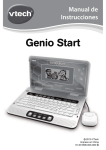
Premium V10
Blood Glucose Monitoring System
Owner’s Manual
English
Dear ForaCare Premium V10
System Owner:
Thank you for purchasing the ForaCare Premium V10 Blood Glucose
Monitoring System. This manual provides important information to help
you to use the system properly. Before using this product, please read
and follow the instructions in this Owner s Manual and any package
inserts for test strips and control solution.
Regular monitoring of your blood glucose levels can help you and your
doctor gain better control of your diabetes. Due to its compact size and
easy operation, you can use the ForaCare Premium V10 Blood Glucose
Monitoring System to easily monitor your blood glucose levels.
If you have questions, just call ForaCare Customer Care Service Center
toll-free at 1-866-469-2632. We are here for you 24 hours a day, 7 days a
week. You can also visit www.foracare.com.
Version 2.0 2012/02
311-4124100-003
3
IMPORTANT SAFETY PRECAUTIONS
READ BEFORE USE
● The meter and lancing device are for single patient use. Do not share them
with anyone including other family members! Do not use on multiple
patients!
● All parts of the kit are considered biohazardous and can potentially
transmit infectious diseases, even after you have performed cleaning and
disinfection.
For more information, please visit
1. FDA Public Health Notification: Use of Fingerstick Devices on More than One Person
Poses Risk for Transmitting Bloodborne Pathogens: Initial Communication (2010)
http://www.fda.gov/MedicalDevices/Safety/AlertsandNotices/ucm224025.htm
2. CDC Clinical Reminder: Use of Fingerstick Devices on More than One Person Poses
Risk for Transmitting Bloodborne Pathogens (2010)
http://www.cdc.gov/injectionsafety/Fingerstick-DevicesBGM.html
1. Use this device ONLY for the intended use described.
2. Do NOT use accessories which are not specified by the manufacturer.
3. Do NOT use the device if it is not working properly or if it is damaged.
4. This device does NOT serve as a cure for any symptoms or diseases. The
data measured is for reference only.
5. Before using this device to test blood glucose, read all instructions
thoroughly and practice the test. Carry out all the quality control checks as
directed.
6. Use of this instrument in a dry environment, especially if synthetic materials
are present (synthetic clothing, carpets etc.) may cause damaging static
discharges that may cause erroneous results.
7. Do NOT use this instrument in close proximity to sources of strong
electromagnetic radiation, as these may interfere with the accurate
operation.
KEEP THESE INSTRUCTIONS IN A SAFE PLACE
4
TABLE OF CONTENTS
BEFORE YOU BEGIN
Important Information
Intended Use
Test Principle
Meter Overview
Display Screen
Test Strip
Setting the Meter
06
06
07
07
08
09
10
11
THE TWO MEASURING MODES Control Solution Testing
Performing a Control Solution Test
14
15
15
TESTING WITH BLOOD SAMPLE
Preparing the Puncture Site
Alternative Site Testing
Performing a Blood Glucose Test
18
18
20
21
METER MEMORY
Reviewing Test Results
Reviewing Blood Glucose Day Average Results
Downloading Results onto a Computer
24
24
25
26
MAINTENANCE
Battery
Caring for Your Meter
Caring for Your Test Strips
Important Control Solution Information
27
27
28
31
32
SYSTEM TROUBLESHOOTING
Result Readings
Error Messages
Troubleshooting
33
33
34
36
DETAILED INFORMATION
37
SPECIFICATIONS
38
5
BEFORE YOU BEGIN
Important Information
● Severe dehydration and excessive water loss may cause readings
which are lower than actual values. If you believe you are suffering
from severe dehydration, consult a healthcare professional
immediately.
● If your blood glucose results are lower or higher than normal, and
you do not have any symptoms of illness, repeat the test. If you have
symptoms or continue to get results which are higher or lower than
normal, consult with your healthcare professional.
● Use only fresh whole blood samples to test your blood glucose. Using
other substances will lead to incorrect results.
● If you are experiencing symptoms that are inconsistent with your blood
glucose test results and you have followed all the instructions given in
this owner s manual, contact your healthcare professional.
● We do not recommend using this product on severely hypotensive
individuals or patients in shock. Readings lower than actual values may
occur for individuals experiencing a hyperglycemic-hyperosmolar state,
with or without ketosis. Please consult a healthcare professional before
use.
● Critically ill patients should not be tested with a blood glucose
monitoring system.
6
Intended Use
The ForaCare Premium V10 Blood Glucose Monitoring System is
intended for use in the quantitative measurement of glucose in fresh
capillary whole blood from the finger and the following alternative sites:
palm, forearm, upper-arm, calf and thigh. It is intended for use by people
with diabetes mellitus at home as an aid in monitoring the effectiveness
of diabetes control program. It is not intended for the diagnosis of or
screening for diabetes mellitus, and is not intended for use on neonates.
Professionals may test with capillary and venous blood sample; home use
is limited to capillary whole blood testing.
The alternative site testing in the ForaCare Premium V10 Blood Glucose
Monitoring System can be used only during steady-state blood glucose
conditions.
This meter has some speaking functions but is not intended for use by
the visually impaired.
Test Principle
Your system measures the amount of sugar (glucose) in whole blood.
The glucose testing is based on the measurement of electrical current
generated by the reaction of glucose with the reagent of the strip. The
meter measures the current, calculates the blood glucose level, and
displays the result. The strength of the current produced by the reaction
depends on the amount of glucose in the blood sample.
7
Meter Overview
1
2
2
3
6
4
5
1
Test Strip Slot
Insert test strip here to turn the meter on for testing.
2
Test Strip Ejector
Eject the used strip by sliding up this button.
3
Display Screen
4
M Button
Display the meter memory; silence a reminder alarm,
change a setting in SET mode.
5
6
8
Data Port
Download test results with a cable connection.
SET Button
Enter SET mode and confirm the meter settings.
Display Screen
3
2
1
13
4
5
12
11
6
10
9
7
8
1
Volume Symbol
8
Memory Symbol
2
Insert Test strip
3
Test Strip Symbol
10
9
Ketone Warning
Day Average
4
Test Result
11
Control Solution Mode
5
Blood Drop Symbol
12
Measurement Unit
6
Date
13
Low Battery Symbol
7
Time
9
Test Strip
Absorbent Hole
Touch to a drop of
blood here, blood will
be automatically
drawn in.
Test Strip Handle
Hold this part to
insert the test strip
into the slot.
Confirmation Window
Confirm if enough blood
has been applied to the
absorbent hole of the
strip.
Contact Bars
Insert this end of the test
strip into the test strip
slot.
ATTENTION:
The front side of test strip should face up when
inserting test strip.
Test results might be wrong if the contact bar is not fully
inserted into the test slot.
NOTE:
The ForaCare Premium V10 monitor should only be used with ForaCare
Premium V10 Test Strips. Using other test strips with this meter can produce
inaccurate results.
10
Setting the Meter
Before using your meter for the first time or if you change the meter
battery, you should check and update the settings. Make sure you
complete the steps below and have your desired settings saved.
Entering the Setting Mode
Start with the meter off (no test strip
inserted). Press SET.
1. Setting the date
until the
With the year flashing, press
correct year appears. Press SET.
until
With the month flashing, press
the correct month appears. Press SET.
until the
With the day flashing, press
correct day appears. Press SET.
2. Setting the time
until the
With the hour flashing, press
correct hour appears. Press SET.
until
With the minute flashing, press
the correct minute appears. Press SET.
11
3. Deleting the memory
on the
With dEL and a flashing
display, press
. If recorded results
does not need to be deleted from the
memory, press SET to skip.
on the
With dEL and a flashing
to delete all readings in
display, press
memory.
Screen will display “---” and “ ”, press
SET to set the speaking volume, press
to turn-off the meter.
4. Setting the speaking volume
There are eight (8) speaking volume
until the
levels to choose from. Press
desired speaking volume appears. To
confirm your selection, press SET.
Volume 0 indicates that the speaking
will
function is turned off, and
not display during testing. Volume 1
to 7 indicates speaking volume from
will be displayed
low to high, and
throughout the testing.
12
5. Choosing a language
to select L1/L2. The default
Press
language for the meter is L1, which is
English. L2 is the alternate language as
indicated in your packaging. To confirm
your selection, press SET.
Congratulations! You have completed all settings!
NOTE:
• These parameters can ONLY be changed in the setting mode.
• If the meter is idles for 3 minutes during the setting mode, it will switch off
automatically.
13
THE TWO MEASURING MODES
The meter provides you with two modes for measuring, General and QC.
USE WHEN
MODES
General
QC
any time of day without regard to time since last meal
testing with the control solution
You can switch between the two modes mode by:
1. With the meter turned off, insert a test
strip to turn on the meter. The screen will
display a flashing blood drop.
to switch between General
2. Press
and QC mode.
General
14
QC
Control Solution Testing
Our control solutions contain a known amount of glucose that reacts
with test strips and is used to ensure that the meter and test strips are
working together correctly.
Test strips, control solutions, or sterile lancets may not be included in
the kit (please check the contents on your product box). They can be
purchased separately. Please make sure you have all items prior to
testing your blood glucose.
Test with a control solution when:
● you first receive the meter,
● you first receive the meter.
● you do your weekly routine quality testing of the meter and test strips.
● you begin using a new vial of test strips.
● you suspect the meter and or test strips are not working correctly.
● your blood glucose test results are not consistent with how you feel, or
if you think the results are not accurate.
● you are practicing the testing procedure.
● you have dropped or think you may have damaged the meter.
Performing a Control Solution Test
1. Insert the test strip to turn on the
meter
and
Wait for the meter to display
.
Voice Guide
Thank you for using this product. Please
relax during measurement. Please apply
blood into the test strip.
15
until “CTL” is displayed.
2. Press
With CTL displayed, the meter will not
store your test result in memory. If you
again, the CTL will disappear
press
and this test is no longer a control
solution test.
WARNING:
When doing the control solution test CTL must be displayed so that the test
results will not be stored in the memory. Failure to have the meter in the correct
mode will result in having the control solution test results stored with your actual
blood glucose test results. This will cause an inaccurate analysis of your stored
results.
3. Apply control solution
Shake the control solution bottle thoroughly before use. Squeeze out a
drop onto the tip of the bottle cap and wipe it off using a clean tissue or
cloth. Then squeeze out another drop onto the tip of the bottle cap.
Hold the meter so that the strip is pointing downward and move the
absorbent hole of the test strip to touch the drop. Once the confirmation
window fills completely, the meter will begin counting down.
To avoid contaminating the control solution, do not directly apply control
solution onto a strip or otherwise touch the nozzle of the bottle.
16
Normal
100~165
4. Read and compare the result
After counting down to 0, the control
solution test result will appear on the
display. Compare this result with the
range printed on the test strip vial. It
should fall within the range. If not, please
read the instructions again and repeat
the control solution test.
Voice Guide
The blood glucose is (number) milligrams
per deciliter.
Out-of-range results
If you continue to have test results fall outside the range printed on the
test strip vial, the meter and strips may not be working properly. Do NOT
test your blood using this meter. Go to www.foracare.com, or call your
customer service for help.
NOTE:
• The control solution range printed on the test strip vial is for control solution
use only. It is not a recommended range for your blood glucose level.
• See the Meter Maintenance section for important information about your
control solutions.
17
TESTING WITH BLOOD SAMPLE
Preparing the Lancing Device for Blood Testing
Please follow the instructions in the lancing device insert for collecting a
blood sample.
WARNING:
To reduce the chance of infection:
• Never share a lancet or the lancing device.
• Always use a new, sterile lancet. Lancets are for single use only.
• Avoid getting hand lotion, oils, dirt, or debris in or on the lancets or the lancing
device.
• Wash and dry your hands thoroughly before and after handling the meter,
lancing device and test strips to prevent infection. For more information,
please refer to the Cleaning and Disinfection section.
• If the meter is being operated by a person who is providing testing assistance
to the user, the meter and lancing device should be decontaminated prior to
use by that person.
Sharing the lancing device and lancets may increase the risk of
spreading infectious diseases. Lancing device must not be used on
more than one person.
Preparing the Puncture Site
Rubbing the puncture site before blood extraction has a significant
influence on the accuracy of your test results.
Blood from an alternate a site that has not been rubbed exhibits a
measurably different glucose concentration than blood from the finger.
When the puncture site was rubbed prior to blood extraction, the
difference was significantly reduced.
18
Please follow the suggestions below before obtaining a drop of blood:
Wash and dry your hands before starting.
● Select the puncture site either at fingertips or another body part
(please see section Alternative Site Testing (AST) on how to select the
appropriate sites).
● Clean the puncture site using cotton moistened with 70% alcohol and
let it air dry.
● Rub the puncture site for about 20 seconds before penetration.
● Use a clear cap while setting up the lancing device.
● Fingertip testing
Press the tip of the lancing device firmly
against the lower side of your fingertip.
Press the release button to puncture your
finger, a click indicates that the puncture
is complete.
1
2
● Blood from sites other than the
fingertip
Replace the lancing device cap with the
clear cap for AST. Pull the cocking control
back until it clicks. When lancing the
forearm, upper arm, hand, thigh, or calf,
avoid lancing the areas with obvious veins
to avert excessive bleeding.
NOTE:
• Choose a different spot each time you test. Repeated punctures at the same
spot may cause soreness and calluses.
• Please consult your health care professional before you begin AST.
• It is recommended that you discard the first drop of blood as it might contain
tissue fluid, which may affect the test result.
19
Alternative Site Testing
Upper Arm
Forearm
Thigh
Suggested Test Areas
for the Hand
Calf
Important:
There are limitations with Alternative Site Testing (AST).
Please consult your health care professional before you perform AST.
When to use AST?
Food, medication, illness, stress and exercise can affect blood glucose
levels. Capillary blood at the fingertip reflects these changes faster than
capillary blood at other sites. Thus, when testing blood glucose during or
immediately after a meal, physical exercise, or any other event, take a
blood sample from your finger only.
We strongly recommend that you perform AST ONLY at the following
times:
● In a pre-meal or fasting state (more than 2 hours since the last meal).
● Two hours or more after taking insulin.
● Two hours or more after exercise.
Do NOT use AST if:
● You think your blood glucose is low.
● You are unaware of hypoglycemia.
● You are testing for hyperglycemia.
● Your AST results do not match the way you feel.
● Your routine glucose results often fluctuate.
20
Performing a Blood Glucose Test
1. Insert the test strip to turn on the
meter
and
Wait for the meter to display
.
flashing
Voice Guide
Thank you for using this product. Please
relax during measurement. Please apply
blood into the strip.
2. Select the appropriate measuring mode (General or QC) by pressing
.
For selecting the measurement mode, please refer to the TWO
MEASURING MODES .
3. Obtaining a blood sample
Use the pre-set lancing device to puncture
the chosen site. After lancing wipe away
the first drop of blood with a clean cotton
swab. Gently squeeze the punctured
area to obtain another drop of blood. Be
careful NOT to smear the blood sample.
The volume of blood sample must be at
least 0.5 microliter (μL) of volume.
( actual size)
21
4. Apply the sample
Hold the meter with the strip pointing
downward and the absorbent hole of the
test strip touching the blood drop. Blood
will be drawn in to the strip. Once the
confirmation window is completely filled,
meter begins counting down. Do not
remove the strip from the blood drop until
the meter beeps.
NOTE:
• Do not press the punctured site against the test strip or try to smear the blood.
• If you do not apply a blood sample to the test strip within 3 minutes, the meter
will automatically turn off. You must remove and reinsert the test strip to start
a new test.
• The confirmation window should be filled with blood before the meter begins
to count down. NEVER try to add more blood to the test strip after the drop of
blood has moved away. Discard the used test strip and retest with a new one.
• If you have trouble filling the confirmation window, please contact your health
care professional or our customer care service for assistance.
22
5. Read your result
The result of your blood glucose test
will appear after the meter counts
down to 0. This blood glucose result will
automatically be stored in the memory.
Voice Guide
The blood glucose is (number) milligrams
per deciliter.
6. Eject the used test strip and remove
the lancet
To eject the test strip, point the strip into
a disposal container for contaminated
items. Slide the Test Strip Ejector forward.
The meter will automatically turn itself off
after the test strip is ejected.
When removing the lancet, follow the
instructions from the lancing device
insert.
WARNING:
The used lancet and test strip may be biohazardous. Please follow the proper
procedure for discarding biohazardous waste in your area.
23
METER MEMORY
The meter stores up to 450 most recent blood glucose test results with
date and time stamp in its memory. To enter the meter memory function,
start with the meter turned off.
Reviewing Test Results
1. Press and release
will
again,
appear on the display. Press
and the first reading you see is the last
blood glucose result along with date, time
and the measurement mode.
Voice Guide
The blood glucose is (number) milligrams
per deciliter.
again to recall the next test
2. Press
results stored in the meter each time you
press. After the last test result, press
again and the meter will turn off.
Voice Guide
La glucosa en la sangre es (número) por
miligramos de decilitro.
24
Reviewing Blood Glucose Day Average Results
1.Press and release
. When
appears on the display, keep pressing
M for 3 seconds until the flashing
and then your 7-day
appears. Release
average result measured in general mode
will appear on the display.
to review 14-, 21-, 28-, 60- and 90- day average results
2.Press
stored in memory.
after the 90-day average is
3.Exit the meter memory. Press
displayed and the meter will turn off.
NOTE:
• Any time you wish to exit the memory, hold press
down for 5 seconds or
leave the meter idle for 3 minutes. The meter will turn off automatically.
• Control solution results are NOT included in the day average.
• If there are no records in memory, --- displays when you recall the test results
or review the average result.
25
Downloading Results onto a Computer
Data Transmission Via Cable
You can use the meter with the ForaCare 4-pin USB cable and the
Health Care System Software to view your test results on your personal
computer. To learn more about the Health Care System Software or to
obtain an USB cable, please visit www.foracare.com, or call our customer
care service number for further assistance.
1. Obtaining the required cable and installing the software
To download the Health Care System Software, please visit the ForaCare
Inc. website at www.foracare.com.
2. Connecting to a personal computer
Connect the cable to a USB port on your
computer. With the meter turned off,
connect the other end of the USB cable
to the meter data port. USb will appear
on the meter display, indicating that the
meter is in communication mode.
3. Data transmission
To transmit data, follow the instructions provided with the software. Test
results will be transmitted with date and time stamp. After the results
have been transmitted, remove the cable, meter will automatically turn
off.
WARNING:
While the meter is connected your computer, it will not be able to perform a
blood glucose test.
26
MAINTENANCE
Battery
Your meter comes with two 1.5V AAA size alkaline batteries.
Low Battery Signal
The meter will display the message below to alert you when the meter
power is getting low.
appears with E-b and low:
The
The power is not enough to perform testing. Please
change the batteries immediately.
Replacing the Battery
To replace the batteries, make sure that the meter is turned off.
1. Remove the battery cover.
2. Remove the old batteries and replace with two 1.5V AAA size alkaline
batteries.
3. Close the battery cover, paying close attention to the polarity of the
batteries. (If the batteries are inserted correctly, you will hear a beep ).
NOTE:
• Replacing the batteries does not affect the test results stored in the memory.
27
• As with all small batteries, these batteries should be kept away from children.
If swallowed, promptly seek medical assistance.
• Batteries might leak chemicals if unused for a long time. Remove the batteries
if you are not going to use the device for an extended period (i.e., 3 months or
more).
• Properly dispose of the batteries according to your local environmental
regulations.
Caring for Your Meter
Wash and dry your hands thoroughly before use or handling of the meter
and strips.
What is Cleaning and Disinfection?
Cleaning and disinfection are different. Cleaning is the process of
removing dirt (e.g. food debris, grease, dust), disinfection is the process
of killing germs (e.g. bacteria and viruses).
When to clean and disinfect the meter?
Clean the meter when you see any dirt on it. You should disinfect the
meter at least once a week to prevent infection.
How to clean and disinfect the meter?
The meter must be cleaned prior to the disinfection. Use one disinfecting
wipe to clean exposed surfaces of the meter thoroughly and remove any
visible dirt or blood or any other body fluid with the wipe. Use a second
wipe to disinfect the meter. Do NOT use organic solvents to clean the
meter.
We recommend using the product listed below to clean and disinfect your
meter. The recommended product contains isopropyl alcohol as its active
28
ingredient. It has been shown to be safe when used on the ForaCare
Premium V10 blood glucose meter.
► Micro-Kill+™ (Micro-Kill Plus™) by Medline
(EPA Reg. No. 59894-10-37549)
To obtain disinfecting wipes and other information, please contact
Medline at 1-800-MEDLINE (1-800-633-5463) or visit www.medline.com.
Disinfecting Procedures
1.Take out one disinfecting wipe from the package and squeeze out any
excess liquid in order to prevent damage to the meter.
2.Wipe all exterior surface of the meter
including the display and buttons.
Hold the meter with the test strip slot
pointing down and wipe the area around
the test slot, be careful not to allow
excess liquid to get inside. Keep the
meter moist with disinfection solution
contained in the wipe for a minimum of
2 minutes for Micro-Kill+™ wipes. Follow
the instructions on the package label of
disinfecting wipe. Use two or more wipes
if necessary.
3.Remove the wipe. Allow the meter surface to dry completely.
4.Discard the used wipes.
Improper system cleaning and disinfection may result in meter
malfunction. If you have a question, please contact customer service at
29
1-866-469-2632 for assistance.
This device has been validated to withstand 5,000 disinfection cycles
using the recommended disinfecting wipe/towelette. The tested number
of cycles is estimated by 1,000 tests per year on each meter and around
3 disinfection cycles per meter per day for 5 years, the expect life of
device.
Stop using the meter if you see any signs of deterioration such as the
LCD display is cracked or cloudy, the buttons no longer function, or the
outer casing is cracked. Please contact the customer service at 1-866469-2632 for a replacement meter if any of the signs of deterioration are
noticed.
The meter should be replaced after the validated number of disinfection
cycles or the warranty period, which ever comes first.
NOTE:
• Do NOT clean or disinfect the meter while performing a test.
• If the meter is being operated by a second person, the meter and lancing
device should be decontaminated prior to handling by an assistant.
• Do NOT allow cleaning or disinfecting solution to get in the test slot, battery
compartment, or strip-ejection button.
• If you do get moisture in the test strip slot, wipe it away with the corner of a
tissue.
• Always dry the meter thoroughly before using it.
• Do not spray the meter directly with cleaning solutions especially those
containing water (i.e. soapy water), as this could cause the solution to enter
the case and damage the electronic components or circuitry.
30
Meter Storage
● Storage conditions: -4°F to 140°F (-20°C to 60°C), below 95% relative
humidity.
● Always store or transport the meter in its original storage case.
● Avoid dropping and heavy impact.
● Avoid direct sunlight and high humidity.
Caring for Your Test Strips
● Storage conditions: 39.2°F to 104°F (4°C to 40°C), below 85%
relative humidity. Do NOT freeze.
● Store your test strips in their original vial only. Do not transfer to
another container.
● Store test strip packages in a cool dry place. Keep away from direct
sunlight and heat.
● After removing a test strip from the vial, immediately close the vial cap
tightly.
● Touch the test strip with clean and dry hands.
● Use each test strip immediately after removing it from the vial.
● Write the opening date on the vial label when you first opened it.
Discard remaining test strips after 3 months of first opening.
● Do not use test strips beyond the expiry date. This may cause
inaccurate results.
● Do not bend, cut, or alter a test strip in any way.
● Keep the strip vial away from children since the cap and the test strip
may be a choking hazard. If swallowed, promptly see a doctor for help.
For further information, please refer to the test strip package insert.
31
Important Control Solution Information
● Use only our control solutions with your meter.
● Do not use the control solution beyond the expiry date or 3 months
after first opening. Write the opening date on the control solution bottle
and discard the remaining solution after 3 months of first opening.
● It is recommended that the control solution test be done at room
temperature (68°F to 77°F / 20°C to 25°C). Make sure your control
solution, meter, and test strips are at this specified temperature range
before testing.
● Shake the bottle before use, discard the first drop of control solution,
and wipe off the dispenser tip to ensure a pure sample and an
accurate result.
● Store the control solution tightly closed at temperatures between
35.6°F and 86°F (2°C and 30°C). Do NOT freeze.
32
SYSTEM TROUBLESHOOTING
If you follow the recommended action but the problem persists, or error
messages other than the ones below appear, please call your local
customer service. Do not attempt to repair the meter yourself and never
try to disassemble the meter under any circumstances.
Result Readings
MESSAGE
WHAT IT MEANS
Appears when your blood glucose test result is below the lower
measurement limit, which is less than 20 mg/dL.
Appears when your result is equal to or higher than 240 mg/dL.
This indicates the possibility of ketone accumulation for type 1
diabetes. Please seek medical assistance immediately.
Appears when your blood glucose test result is higher than the
upper limit of measurement, which is 600 mg/dL.
33
Error Messages
MESSAGE
WHAT DOES
METER SAY?
WHAT IT MEANS
WHAT TO DO
Only Error Beep
Only Error Beep
Problem with the
meter.
Only Error Beep
Review the instructions
and repeat the test. If
the meter still does not
work, contact the local
distributor for assistance.
Only Error Beep
Only Error Beep Problem with the
meter.
Repeat the test with
a new test strip. If the
meter still does not
work, please contact
the customer service for
assistance.
Appears when the
Replace the batteries
batteries cannot
Only Error Beep
provide enough power immediately.
for a test.
34
MESSAGE
WHAT DOES
METER SAY?
WHAT IT MEANS
Appears when test
strip is removed while
Only Error Beep counting down, or
insufficient blood
volume.
Only Error Beep
Appears when a used
test strip is inserted.
Appears when
ambient temperature
Only Error Beep
is below system
operation range.
Appears when
Only Error Beep ambient temperature
is above system
operation range.
WHAT TO DO
Repeat the test with a
new test strip.
Repeat with a new test
strip.
System operation range
is 50°F to 104°F (10°C
to 40°C). Repeat the test
after the meter and test
strip are in the above
temperature range.
35
Troubleshooting
1. If the meter does not display a message after inserting a test strip:
POSSIBLE CAUSE
Batteries exhausted.
Test strip inserted upside down or
incompletely.
Defective meter or test strips.
WHAT TO DO
Replace the batteries.
Insert the test strip with contact
bars end first and facing up.
Please contact customer service.
2. If the test does not start counting down after applying the sample:
POSSIBLE CAUSE
Insufficient blood sample.
Defective test strip.
Sample applied after automatic
switch-off (3 minutes after last user
action).
Defective meter.
WHAT TO DO
Repeat the test using a new test strip
with larger volume of blood sample.
Repeat the test with a new test strip.
Repeat the test with a new test strip.
Apply sample only when flashing
appears on the display.
Please contact customer service.
3. If the control solution testing result is out of range:
POSSIBLE CAUSE
Error in performing the test.
WHAT TO DO
Read instructions thoroughly and
repeat the test again.
Control solution vial was poorly shaken. Shake the control solution vigorously
and repeat the test again.
Expired or contaminated control
Check the expiry date of the control
solution.
solution.
Control solution that is too warm or
Control solution, meter, and test strips
too cold.
should be at room temperature (20°C
to 25°C/68°F to 77°F) before testing.
Defective test strip.
Repeat the test with a new test strip.
Please contact customer service.
Meter malfunction.
36
DETAILED INFORMATION
The meter provides you with plasma equivalent results.
Time of day
Normal plasma glucose range for people
without diabetes (mg/dL)
Fasting and before meal
< 100 mg/dL (5.6 mmol/L)
2 hours after meals
< 140 mg/dL (7.8 mmol/L)
Source: American Diabetes Association (2010). Clinical Practice Recommendations.
Diabetes Care, 33 (Supplement 1): S1–S100.
Please consult your doctor to determine a target range that works best
for you.
37
SPECIFICATIONS
Model No.: TD-4124
Dimension & Weight: 88.67 x 55.61 x 23.07 mm, 48.8 g
Power Source: Two 1.5V AAA alkaline batteries
Display: LCD
Memory: 450 measurement results with respective date and time
External output: USB
Auto electrode insertion detection
Auto sample loading detection
Auto reaction time count-down
Auto switch-off after 3 minutes without action
Temperature Warning
Operating Condition: 50°F to 104°F (10°C to 40°C), below 85% R.H.
(non-condensing)
Storage/Transportation Conditions: -4°F to 140°F (-20°C to 60°C),
below 95% R.H.
Measurement Units: mg/dL
Measurement Range: 20 to 600 mg/dL (1.1 to 33.3 mmol/L)
This device has been tested to meet the electrical and safety requirements of: IEC/
EN 61010-1, IEC/EN 61010-2-101, EN 61326-1, IEC/EN 61326-2-6.
38
Español
Estimado usuario del Sistema
ForaCare Premium V10:
Gracias por adquirir el Sistema de Vigilancia de Glucosa en la Sangre
ForaCare Premium V10 Blood Glucose Monitoring System. Este manual
le dará información importante que le ayudará a utilizar el sistema
correctamente. Antes de usar este producto, lea y siga las instrucciones
del presente Manual del usuario y de los posibles prospectos para tiras
reactivas y soluciones de control.
Vigilar regularmente sus niveles de glucosa en la sangre puede ayudarle
a usted y a su doctor a controlar más eficientemente la diabetes. Gracias
a su tamaño compacto así como a su fácil operación, usted podrá usar el
Sistema de Vigilancia de Glucosa en la Sangre ForaCare Premium V10
para examinar los niveles de la glucosa por usted mismo y en cualquier
lugar.
Si tiene alguna pregunta, llame gratuitamente al Centro de servicios
de atención al cliente de ForaCare al número 1-866-469-2632. Le
atenderemos 24 horas al día, 7 días a la semana. También puede visitar
www.foracare.com.
Version 2.0 2012/02
311-4124100-003
39
IMPORTANTES MEDIDAS DE SEGURIDAD
LEÁSE ANTES DE SER USADO
● El medidor y la lanceta son para su uso en un único paciente. ¡No los
comparta con nadie, ni siquiera con sus familiares! ¡No usar en más de un
paciente!
● Todas las piezas del kit se consideran biopeligrosas y pueden transmitir
enfermedades contagiosas, incluso después de realizar los procedimientos
de limpieza y desinfección.
Para obtener más información, visite
1. FDA Public Health Notification: Use of Fingerstick Devices on More than One Person
Poses Risk for Transmitting Bloodborne Pathogens: Initial Communication (2010)
http://www.fda.gov/MedicalDevices/Safety/AlertsandNotices/ucm224025.htm
2. CDC Clinical Reminder: Use of Fingerstick Devices on More than One Person Poses
Risk for Transmitting Bloodborne Pathogens (2010)
http://www.cdc.gov/injectionsafety/Fingerstick-DevicesBGM.html
1. Utilice este sistema SOLAMENTE para el uso previsto.
2. NO utilice accesorios que no hayan sido suministrados por el fabricante.
3. NO utilice este aparato si sospecha que está trabajando erróneamente o
ha sufrido algún daño.
4. Este aparato NO está diseñado para curar ningún síntomao enfermedad.
que los datos de la medición son SOLO para referencia.
5. Antes de utilizar este equipo para realizar una prueba de glucosa en la
sangre, lea cuidadosamente todas las instrucciones. Lleve a cabo todos
los procedimientos indicados, como se estipula en el manual para
verificar el control de calidad.
6. Utilizando este instrumento en ambientes secos, especialmente si hay
materiales sintéticos (como ropa sintética, alfombras, etc.) ya que podría
causar descargas estáticas y originar resultados erróneos.
7. NO use este instrumento cerca de fuentes de radiación electromagnéticas,
ya que podrían interferir en su operación.
CONSERVE ESTAS INSTRUCCIONES EN UN LUGAR SEGURO
40
TABLA DE CONTENIDO
ANTES DE EMPEZAR
Información Importante
Uso Previsto
Principios de la Prueba
Apariencia y Funciones Principales del Medidor
Pantalla de Visualización
Tira Reactiva
Configurando del Medidor
06
06
07
07
08
09
10
11
LAS DOS MODALIDADES DE MEDICIÓN
Probando la Solucion de Control
Realizando una Prueba con la Solución de Control
14
15
15
HACIENDO UNA PRUEBA CON MUESTRA DE SANGRE
Preparando el Lugar de Punción
Lugar Alternativo de Prueba (LAP)
Realizando la Prueba de Glucosa en la Sangre
18
18
20
22
MEMORIA DEL MEDIDOR
Revisando los Resultados de la Prueba
Revisando los Resultados del Promedio Diario de la Glucosa en
la Sangre
Descargando los Resultados a la Computadora
25
25
26
MANTENIMIENTO
Baterías
Cuidados de su Medido
Cuidados de las Tiras Reactivas
Información Importante Sobre la Solución de Control
28
28
29
32
33
LOCALIZACION Y RESOLUCION DE PROBLEMAS EN EL SISTEMA
Leyendo Resultados
Mensages de Error
Localización y Resolución de Problemas
34
34
35
36
INFORMACIÓN DETALLADA
37
ESPECIFICACIONES
38
27
41
ANTES DE EMPEZAR
Información Importante
● La excesiva pérdida de agua y la deshidratación severa puede
causar lecturas por debajo de los valores reales. Si usted cree que
está sufriendo de deshidratación severa, consulte con su medico
inmediatamente.
● Si usted obtiene resultados de la glucosa en la sangre más altos o más
bajos de lo normal y no presenta síntomas que lo evidencien, repita la
prueba. Si presenta algún síntoma y/o continúa obteniendo resultados
irregulares, siga el tratamiento recomendado por su médico.
● Aplique solamente muestra fresca de sangre capilar para realizar la
prueba de glucosa. La aplicación de otras sustancias causará
resultados incorrectos.
● Si usted tiene síntomas que son inconsistentes con los niveles de la
glucosa en la sangre y usted ha seguido todas las instrucciones
descritas en este manual, contacte con su profesional médico.
● No recomendamos usar este producto en individuos seriamente
hipotensos o pacientes en estado de shock. Pueden ocurrir
resultados más bajos de lo normal si el individuo experimenta un
estado hiperglicémico-hiperosmolar, con o sin cetosis. Por favor
consulte con su profesional médico antes de utilizar este aparato.
● No se deben realizar análisis a pacientes gravemente enfermos con un
sistema de control de glucosa en sangre.
42
Uso Previsto
El Sistema de control de glucosa en sangre ForaCare Premium V10
se ha diseñado para su uso en la medición cuantitativa de glucosa en
sangre entera y fresca de capilar, del dedo y de los siguientes sitios
alternativos: palma de la mano, antebrazo, brazo, pantorrilla y muslo.
Está indicado para su uso para personas con diabetes mellitus en casa,
como ayuda en el control de la eficacia del programa de control de
diabetes. No está indicado para el diagnóstico o screening de diabetes
mellitus, como tampoco para su uso en neonatos.
Los análisis en sitios alternativos para el Sistema de control de
glucosa en sangre ForaCare Premium V10 solo se pueden realizar en
condiciones de glucosa en sangre estable.
Este medidor tiene función de voz (habla) pero no está diseñado para su
uso por los discapacitados visuales.
Principios de la Prueba
Su sistema mide la cantidad de azúcar (glucosa) en la sangre. La prueba
de glucosa en la sangre se basa en la medición del fluido eléctrico
generado por la reacción de la glucosa con el agente reactivo de la tira
reactiva. El medidor mide la corriente, calcula el nivel de glucosa en la
sangre y muestra el resultado. La fuerza de la corriente producido por la
reacción depende de la cantidad de glucosa en la muestra de sangre.
43
Apariencia y Funciones Principales del Medidor
1
2
2
3
6
4
5
44
1
Ranura de Prueba
Inserte la tira reactiva aquí para
encender el medidor y empezar
la prueba.
5
Puerto de Datos
Descargue los resultados
del análisis con un cable de
conexión.
2
Expulsión de la Tira Reactiva
Expulse la tira reactiva usada
empujando este botón.
6
Botón SET
Entrada y confirmación de la
configuración del medidor.
3
Pantalla de Visualización
4
Botón M
Muestre la memoria del
medidor; silencie una alarma de
recordatorio, cambie un ajuste
en modo SET.
Pantalla de Visualización
3
2
1
13
4
5
12
11
6
10
9
7
8
1
Símbolo de Volumen
8
Símbolo de Memoria
2
Insertar Tira Reactiva
3
Símbolo de Tira Reactiva
10
9
Advertencia Cetona
Promedio Diario
4
Resultados de la Prueba
11
Modo de Control de Solución
5
Símbolo de Gota de Sangre
12
Unidad de Medición
6
Fecha
13
Símbolo de Batería Agotada
7
Hora
45
Tira Reactiva
Orificio Absorbente
Aplique una gota de
sangre aquí. La sangre
será absorbida
automáticamente.
Mango de la Tira
Reactiva
Coja la tira por esta
parte para introducirla
en la ranura.
Ventana de
Confirmación
Es donde usted confirma
si ha puesto suficiente
sangre en el orificio
absorbente de la tira.
Barras de Contacto
I Inserte este extremo
de la tira reactiva dentro
de la ranura de prueba
hasta que no entre mas.
Atención:
Los resultados pueden resultar erróneos si la barra de
contacto no está totalmente insertada en la ranura de
prueba.
La parte frontal de la tira reactiva debe ser colocada
hacia arriba cuando es insertada.
NOTA:
El medidor ForaCare Premium V10 debe ser usado solamente con tiras
reactivas ForaCare Premium V10. Si usa otras tiras reactivas producirán
resultados incorrectos.
46
Configurando el Medidor
Antes de usar el medidor por primera vez o si desea cambiarle las
baterías, debe verificar y actualizar estas configuraciones. Asegúrese
de completar los pasos descritos a continuación y guardar los nuevos
cambios deseados.
Entrando a la función de configuración
Comience con el medidor apagado (sin
haber insertado la tira reactiva)
Mantenga presionando el botón SET.
1. Configurando la fecha
Con el año parpadeando, presione
hasta que el año correcto aparezca.
Presione SET.
Con el mes parpadeando, presione
hasta que el mes correcto aparezca.
Presione SET.
Con el día parpadeando, presione
hasta que el día correcto aparezca.
Presione SET.
2. Configurando la hora
Con la hora parpadeando, presione
hasta que la hora correcta aparezca.
Presione SET.
47
Con el minuto parpadeando, presione
hasta que el minuto correcto aparezca.
Presione SET.
3. Borrando la Memoria
Con los símbolos dEL y
parpadeando en pantalla, presione
y seleccione no para conservar los
resultados en memoria, luego presione
SET para saltarlos.
Cuando parpadeen los símbolos dEL
para
en la pantalla, pulse
y
eliminar todas las lecturas de la memoria.
La pantalla mostrará los símbolos “---” y
“ ”, pulse el botón SET para ajustar el
para apagar el
volumen del altavoz y
medidor.
4. Seleccionando el Volumen de la Voz
Hay ocho(8) opciones que usted puede
escoger para el volumen de voz. Pulse
hasta que aparezca el volumen de altavoz
que desee. Para confirmar su selección,
presione SET.
El volumen en 0 indica que la función de
no aparecerá
voz está apagada y
durante la prueba. El volumen de 1 a 7
indica el sonido de la voz, de (1) volumen
aparecerá en
bajo a (7) alto y
pantalla mientras se realiza la prueba.
48
5. Seleccionando el lenguaje
para seleccionar el L1/L2.
Presione
El lenguaje predeterminado es L1, que
es inglés. L2 es el idioma alternativo
indicado en el envase. Para confirmar la
selección presione SET.
¡Felicitaciones! Ha terminado de programar su medidor
NOTA:
• Estos parámetros pueden ser cambiados SOLO en modo de configuración o
programación.
• Si el medidor está sin ser utilizado durante el modo de configuración por 3
minutos, el medidor se apagará automáticamente.
49
LAS DOS MODALIDADES DE
MEDICIÓN
El medidor le provee de cuatro modalidades para la medición, General y
QC.
Cuándo usarlas
Modalidades
General
QC
A cualquier hora del día sin tomar en cuenta cuándo
fue su última comida
Probando la solución de control
Usted puede cambiar entre cada función:
1. Comience con el medidor apagado.
Inserte la tira reactiva para encender
su medidor, la pantalla va a mostrar el
símbolo de gota de sangre.
para cambiar entre la
2. Presione
función General y QC.
General
50
QC
Probando la Solución de Control
La Solución de Control contiene una cantidad conocida de glucose que
reacciona con las tiras reactivas y es usada para asegurarle que su
medidor y las tiras reactivas trabajan juntas correctamente.
Es posible que en el kit no se incluyan tiras reactivas, soluciones de
control o lancetas estériles (compruebe el contenido de la caja del
producto). Se pueden adquirir por separado. Asegúrese de que tiene
todos los artículos antes de analizarse la glucosa en sangre.
Haga una prueba para la Solución de Control cuando:
● Al adquirir por primera vez su glucómetro.
● Al menos una vez a la semana como prueba rutinaria para verificar el
funcionamiento del glucómetro y de las tiras reactivas.
● Al empezar un envase nuevo de tiras reactivas.
● Si sospecha que el glucómetro o las tiras no están funcionando
correctamente.
● Si los resultados de la prueba de glucosa en la sangre no son
consistentes a cómo se siente, o si los resultados no son exactos.
● Al practicar el proceso de la prueba.
● Si ha dejado caer el glucómetro, o si piensa que éste ha sido dañado.
Realizando una Prueba de la Solución de Control
1. Inserte la tira reactiva para encender
el medidor
Espere hasta que el medidor muestre los
y la
símbolos de la tira reactiva
.
gota de sangre
Guía de voz
Gracias por usar este producto. Por
51
favor, relájese mientras se realiza su
medición. Por favor aplique sangre en la
tira reactiva.
2. Pulse
hasta que aparezca CTL
Cuando se muestra CTL , el medidor no
almacenará el resultado del análisis en la
otra vez, CTL
memoria. Si presiona
desaparecerá y ya no estará más en la
función de prueba de solución de control.
ADVERTENCIA:
Al realizar el análisis de la solución de control, deberá mostrarse CTL de
modo que el resultado del análisis no se almacene en la memoria. Si no tiene
el medidor en el modo correcto, los resultados del análisis de la solución de
control no se almacenarán con los resultados reales del análisis de glucosa en
sangre. Debido a ello, se producirá un análisis inadecuado de los resultados
almacenados.
3. Aplicando la solución de control
Agite bien la solución de control antes de usarla. Disponga una gota en
la punta del tapón de la botella y séquela con un tissue o paño limpio. A
continuación, disponga otra gota en la punta del tapón de la botella.
Para tomar la muestra, sostenga el medidor con la tira reactiva insertada
y llévelo hasta la parte superior donde está el líquido. Toque levemente el
canal absorbente de la tira con la gota. Una vez que la ventana de
52
confirmación esté llena, el medidor empezará el conteo regresiv.
Para evitar la contaminación de la solución de control, no aplique
directamente solución de control sobre una tira ni toque de ningún otro
modo la boquilla de la botella.
Normal
100~165
4. Lea y compare los resultados
Después del conteo regresivo hasta 0,
el resultado de la solución de control
aparecerá en la pantalla. Compare este
resultado con el rango impreso en el
envase de las tiras reactivas; el resultado
debe estar dentro del rango. De no ser
así, por favor lea las instrucciones una
vez más y repita la prueba de solución de
control.
Guía de voz
La glucosa en la sangre es (número) por
miligramos de decilitro.
Resultados fuera del rang
Si al repetir la prueba el resultado sigue estando fuera de rango, el
sistema podría estar trabajando incorrectamente. NO utilice el sistema
para hacer exámenes de sangre. Contacte a su distribuidor local o bien al
servicio al cliente.
NOTA:
• El rango impreso en el envase de las tiras reactivas deben ser utilizados
únicamente para verificar la solución de control. Este rango NO es
recomendado para los niveles de su glucosa en la sangre.
• Vea la sección de Mantenimiento para obtener mayor información sobre la
solución de control.
53
HACIENDO UNA PRUEBA CON
MUESTRA DE SANGRE
Preparando el Dispositivo de Punción para Hacer la Prueba
Por favor, siga las instrucciones en el manual del dispositivo de punción
para obtener una muestra de sangre.
ADVERTENCIA:
Para reducir el riesgo de infección:
• Nunca comparta la lanceta o el dispositivo de punción.
• Siempre utilice una lanceta nueva y esterilizada. Las lancetas deben ser
utilizadas SOLO una vez.
• Al utilizar las lancetas o el dispositivo de punción evite el uso de crema de
manos, aceite, polvo o cualquier tipo de sustancia contaminante.
• Lave y séquese las manos a fondo después de manipular el medidor, la
lanceta y las tiras de muestra para evitar infecciones. Para obtener más
información, consulte el apartado Limpieza y desinfección .
• Si el medidor es usado por otra persona que ayude al usuario, sera necesario
descontaminar tanto el medidor como la lanceta antes de su uso por la
segunda persona.
Al compartir las lancetas se podría aumentar el riesgo de contraer
enfermedades infecciosas. Las lancetas no deben ser usadas por más
de una persona.
Preparando el Lugar de Punción
Para obtener una muestra más significativa de sangre en el valor de
glucosa, antes de la extracción, frote el área de punción para estimular la
perfusión de sangre.
La sangre de un lugar que no ha sido estimulado brinda una
54
concentración distinta en la medición que la sangre que ha sido extraída
del dedo. Cuando el punto de punción ha sido frotado previamente a la
extracción de la sangre, la diferencia se ve significativamente reducida.
Por favor siga las siguientes sugerencias antes de obtener la gota de
sangre: Lávese y séquese bien las manos antes de empezar.
● Seleccione el área de punción, ya sea el dedo u otra parte del cuerpo
(por favor vea la sección del Lugar Alternativo de Prueba (LAP) o
cómo escoger un lugar apropiado).
● Limpie el lugar de punción con un algodón humedecido con 70% de
alcohol y deje secar al aire.
● Frote el sitio de punción al menos 20 segundos antes de la
penetración.
● Use la tapa transparente (incluida en este equipo) mientras instala el
dispositivo de punción.
● Probando en la yema del ded
Sujete el dispositivo de punción
firmemente sobre el costado de su dedo.
Presione al botón de liberación. Usted
escuchará un clic, indicando que la
punción está completa.
1
2
● Sangre de otros lugares que no son
las yema del dedo
Reemplace el dispositivo de punción con
la tapa transparente. Deslice el botón
de expulsión hacia atrás hasta que haga
clic. Cuando obtiene sangre en la palma
de la mano, el antebrazo, el brazo, la
pantorrilla o el muslo, tenga cuidado de
la venas evidente debido a la hemorragia
excesiva.
55
NOTA:
• Escoja una área diferente cada vez que hace el examen. Repetir la punción
en el mismo lugar puede causarle dolor o crearle callosidades.
• Antes de realizar la prueba LAP, por favor primero consulte con su profesional
médico.
• Es recomendable descartar la primera gota de sangre ya que por lo general
contiene otras sustancias que podrían afectar el resultado.
Lugar Alternativo de Prueba (LAP)
Brazo
Antebrazo
Muslo
Áreas de análisis
sugeridas para la
Pantorrilla
Importante:
Existen limitaciones para llevar a cabo el LAP (Lugar Alternativo de
Prueba) Por favor consulte con su profesional medico antes de realizar
el LAP.
¿Cuándo utilizar el LAP?
La comida, medicamentos, enfermedad, tensión y los ejercicios pueden
afectar los niveles de glucosa en la sangre. La sangre capilar en la yema
de los dedos refleja estos cambios más rápido que en otras partes
del cuerpo. Cuando haga la prueba de glucosa en la sangre durante o
inmediatamente después de comer o de haber hecho ejercicios u otro
56
evento de este tipo, siempre tome la muestra de sangre únicamente de
su dedo.
Le recomendamos seriamente que usted realice el LAP SOLAMENTE en
los siguientes intervalos:
● Antes de una comida o en ayunas (espere más de 2 horas desde la
última comida).
● Dos horas o más después de aplicar insulina.
● Dos horas o más después de haber hecho ejercicios.
NO utilice el LAP si:
● Usted cree que la glucosa en la sangre está baja.
● A menudo no se dan cuenta cuando su nivel de glucosa en sangre esta
bajo.
● Usted cree que su glucosa en la sangre esta alta.
● Los resultados del LAP no corresponden a como se siente.
● Los resultados rutinarios de la glucosa fluctúan con frecuencia.
57
Realizando la Prueba de Glucosa en la Sangre
1. Inserte la tira reactiva para encender
el medidor
Espere hasta que el medidor muestre los
y la
símbolos de la tira reactiva
.
gota de sangre
Guía de voz
Gracias por usar este producto. Por
favor, relájese mientras se realiza su
medición. Por favor aplique sangre en la
tira reactiva.
2. cSeleccione el modo de medición adecuado (General o QC)
.
pulsando
Para seleccionar la función de medición, por favor refiérase a la sección
LAS DOS MODALIDADES DE MEDICIÓN .
3. Obteniendo la muestra de sangre
Utilice el dispositivo de punción
anteriormente preparado y haga la
punción en el lugar deseado. Después
de la penetración, descarte la primera
gota de sangre con un algodón limpio.
Presione el lugar de punción gentilmente
hasta obtener otra gota de sangre. Por
favor, tenga cuidado de no esparcir la
muestra de la sangre.
El volumen de la muestra debe ser de al
menos 0.5 microlitos. ( tamaño real )
58
4. Aplicando la muestra
Sujete el medidor con la tira hacia abajo,
de modo que el orificio absorbente de la
tira reactiva toque la gota de sangre. La
sangre llegará a la tira. Una vez que la
ventana de confirmación está totalmente
llena, el medidor comienza la cuenta
atrás. No quite la tira de la gota de sangre
hasta que el medidor emita un pitido.
NOTA:
• No oprima la zona de punción contra la tira reactiva ni trate de aplicar una
muestra de sangre que se haya esparcido.
• El medidor se apagará automáticamente si no aplica la muestra de sangre
en 3 minutos. Si esto ocurriera, deberá de remover y reinsertar la tira reactiva
y comenzar el procedimiento de nuevo.
• La sangre debe llenar la ventana de confirmación completamente antes de la
cuenta regresiva del medidor. Si encuentra que la ventana no está llena,
NUNCA trate de añadir más sangre a la tira reactiva. Deseche la tira reactiva y haga la prueba otra vez con una tira nueva.
• Si tiene problemas llenando la ventana de confirmación, contacte con su
médico o con el servicio al cliente de su localidad para recibir más ayuda.
59
5. Leyendo sus resultados
El resultado de la glucosa en la sangre
aparecerá en su medidor después
del conteo regresivo llegue a 0. Este
resultado de glucosa en la sangre
será almacenado en la memoria
automáticamente.
Guía de voz
La glucosa en la sangre es (número) por
miligramos de decilitro.
6. Expulse la tira reactiva y deseche la
lanceta
Para expulsar la tira reactiva, coloque
el medidor de forma que la tira esté de
frente a un basurero y oprima el botón
de expulción. El medidor se apagará
automáticamente despues de haber
expulsado la tira.
Siempre siga las instrucciones del
manual del dispositivo de punción al
remover la lanceta.
ADVERTENCIA!
La lanceta y las tiras reactivas usadas son consideradas un desecho de riesgo
biológico. Por favor, deseche de acuerdo a las recomendaciones de su médico.
60
MEMORIA DEL MEDIDOR
Su medidor almacena en la memoria los 450 resultados de las pruebas
de la glucosa en la sangre más recientes, junto con sus respectivas
fechas y horas. Para ingresar en la memoria de su medidor comience
con el medidor apagado.
Revisando los Resultados de la Prueba
1. Pulse y suelte
Pulse y suelte
otra vez y la primera lectura que
aparecerá en pantalla será el resultado
de la última medición de glucosa en la
sangre con su fecha y hora, así como el
tipo de medición.
Guía de voz
La glucosa en la sangre es (número) por
miligramos de decilitro.
para reviser los
2. Presione
resultados guardados en el medidor
cada vez que lo presiona. Después del
último resultado de la prueba, presione
otra vez y el medidor se apagará.
Guía de voz
La glucosa en la sangre es (número) por
miligramos de decilitro.
61
Revisando los Resultados del Promedio Diario
de la Glucosa
1.Pulse y suelte
. Cuando
aparezca en pantalla, mantenga el botón
Libere el botón
y el resultado
del promedio de 7 días en function
general, aparecerá en la pantalla.
para revisar los resultados medios de 14, 21, 28,
2.Pulse el botón
60 y 90 días almacenados en memoria.
3.Salir de la función de memoria. Mantenga presionado el botón
medidor se apagará mostrando el último resultado.
y el
NOTA:
• En cualquier momento que desee salir de la función de memoria, mantenga
por 5 segundos o simplemente no realice ninguna acción por
Presionado
3 minutos y el medidor se apagará automáticamente.
• Los resultados de la solución de control NO están incluidos en el promedio
diario.
• Si está usando el medidor por primera vez, --- erá mostrado cuando solicita
los resultados de prueba o revisa el resultado promedio. Esto significa que no
hay resultados de prueba en la memoria.
62
Descargando los Resultados a la Computadora
Transmisión de datos por cable
Usted puede usar su medidor con un ForaCare 4-pin USB cable y el
software del Sistema de Cuidados de la Salud (Health Care Software
System) para mirar los resultados de las pruebas en su computadora
personal. Para obtener más información acerca del Health Care System
Software o para obtener un cable USB, visite www.foracare.com, o llame
al número del servicio de atención al cliente para solicitar ayuda.
1. Adquiriendo el cable requerido e instalando el software
Para descargar el software Sistema de Cuidados de la Salud (Health Care
Software System) en su computadora visite la página web de ForaCare
Inc., www.foracare.com.
2. Conectando a una computadora
personal
Conecte el cable de transmisión a un
puerto USB de su computadora. Con
el medidor apagado, conecte el otro
extremo del cable USB al puerto de datos
del medidor. Aparecerá en pantalla USb ,
indicando que el medidor está en función
de comunicación.
3. Transmisión de datos
Siga las instrucciones suministradas por el software para transmitir los
datos. Los resultados serán transmitidos con la hora y la fecha. Una
vez transmitidos los resultados, quite el cable y el medidor se apagará
automáticamente.
ADVERTENCIA:
No se podrá realizar ninguna prueba de glucosa en la sangre mientras el
medidor esté conectado a su PC.
63
MANTENIMIENTO
Baterías
Su medidor viene con dos baterías alcalinas AA A 1.5V.
Señal de batería agotada o baja
El medidor mostrará el mensaje siguiente para avisarle cuando se estén
agotando las pilas.
aparecerá con E-b y low:
El símbolo
batería no tiene suficiente batería para
ejecutar la prueba. Tiene que cambiarla inmediatamente.
Reemplazando la baterí
Asegúrese de que el medidor está apagado antes de sacar las
baterías.
1. Retire la tapa de las pilas.
2. Retire las pilas antiguas y coloque dos pilas alcalinas de tamaño AAA
y 1,5 V.
3. Cierre la tapa de las pilas, prestando especial atención a la polaridad
de las pilas. (Si las pilas se han insertado correctamente, oirá un pitido).
NOTA:
• Reemplazando las baterías no afecta los resultados guardados en la memoria.
64
• Como con todas las baterías pequeñas, éstas deben estar fuera del alcance
de niños pequeños. En caso de que ser ingeridas, por favor busque ayuda
médica lo más pronto posible.
• Las baterías podrían derramar químicos si el aparato no se usa por mucho
tiempo. Remueva las baterías si usted no va a usar el aparato por un largo
período de tiempo (por Ej. 3 meses o más).
• Deseche las baterías de acuerdo con las regulaciones ambientales de su
localidad.
Cuidados de su Medidor
Lávese y séquese las manos a fondo antes de usar o manipular el
medidor y las tiras.
¿Qué es la limpieza y qué la desinfección?
La limpieza y la desinfección son cosas distintas. La limpieza es el
proceso de quitar suciedad (como restos de comida, grasa, polvo),
mientras que la desinfección es el proceso de matar los gérmenes (como
bacterias y virus).
Cuándo limpiar y desinfectar el medidor
Limpie el medidor cuando vea suciedad en él. Debe desinfectar el
medidor al menos una vez a la semana para impedir infecciones.
Cómo limpiar y desinfectar el medidor
Es necesario limpiar el medidor antes de su desinfección. Utilice un
paño desinfectante para limpiar las superficies expuestas del medidor
a fondo y retire la suciedad, sangre u otro líquido corporal visible con el
paño. Utilice un segundo paño para desinfectar el medidor siguiendo el
procedimiento de desinfección que se indica a continuación. NO utilice
solventes orgánicos para limpiar el medidor.
65
Recomendamos el uso del producto indicado a continuación para
limpiar y desinfectar el medidor. El producto recomendado contiene
alcohol isopropílico como ingrediente activo. Se ha demostrado que se
puede usar con seguridad en el medidor de glucosa en sangre ForaCare
Premium V10.
► Micro-Kill+™ (Micro-Kill Plus™) de Medline
(EPA Reg. No. 59894-10-37549)
Para obtener paños desinfectantes y otra información, póngase en
contacto con Medline en el número 1-800-MEDLINE (1-800-633-5463)
o visite.
Procedimientos para la desinfección
1.Saque un paño desinfectante del paquete y escúrralo para quitarle el
posible exceso de líquido, con el fin de evitar dañar el medidor.
2.Limpie todas las superficies exteriores
del medidor, incluida la pantalla y los
botones. Sujete el medidor con la ranura
para tiras reactivas hacia abajo y limpie
la zona que la rodea, cuidando no
mojar en exceso el interior de la ranura.
Mantenga el medidor húmedo con la
solución desinfectante del paño durante
al menos 2 minutos, o bien el tiempo
de contacto mínimo que especifique
el fabricante del paño desinfectante.
Siga las instrucciones que aparecen
en la etiqueta del envase del paño
desinfectante. Utilice dos o más paños en
caso necesario.
66
3.Retire el paño. Deje que se seque totalmente la superficie del medidor.
4.Deseche los paños usados
La limpieza y desinfección inadecuadas del sistema puede provocar
averías en el medidor. Si desea realizar alguna pregunta, póngase en
contacto con el servicio al cliente en el teléfono 1-866-469-2632.
Se ha validado que el dispositivo puede soportar 5.000 ciclos de
desinfección usando el paño de desinfección recomendado. El número
de ciclos comprobado se estima en 1.000 análisis al año en cada
medidor y unos 3 ciclos de desinfección de cada medidor al día durante
5 años (la vida útil esperada del dispositivo).
Deje de usar el medidor si ve algún signo de deterioro, como que la
pantalla LCD parezca rasgada o con niebla, que los botones no funcionen
o que la carcasa exterior esté rajada. Póngase en contacto con el servicio
local al cliente en el teléfono 1-866-469-2632 para solicitar un medidor
de repuesto si observa algún signo de deterioro.
El medidor debe sustituirse después del número validado de ciclos de
desinfección o del período de garantía (lo primero que suceda).
NOTA:
• NO limpie ni desinfecte el medidor mientras realiza análisis.
• Si el medidor es usado por otra persona, será necesario descontaminar tanto
el medidor como la lanceta antes de su uso por la segunda persona.
• NO permita que la solución de limpieza y desinfección acceda a la ranura para
tiras reactivas, al compartimiento de las pilas o al botón de expulsión de tiras.
• Si moja la ranura para tiras reactivas, límpiela con el pico de un tissue.
• Seque a fondo el medidor antes de su uso.
• No rocíe el medidor directamente con soluciones de limpieza, en especial las
que contengan agua (agua jabonosa), pues de este modo la solución podría
acceder a la carcasa interior y dañar los componentes o circuitos electrónicos.
67
Almacenamiento del medidor
● Condiciones de almacenamiento: -4°F a 140°F (-20°C a 60°C), bajo
un 95% de humedad relativa.
● Siempre guarde o transporte el medidor en su estuche original.
● Evite que el medidor se caiga o que sufra impactos fuertes.
● Evite la luz solar directa y la alta humedad.
Cuidados de las Tiras Reactivas
● Condiciones de almacenamient: 39.2°F a 104°F (4°C a 40°C), bajo
un 85% de humedad relativa. NO las congele.
● Almacene las tiras reactivas solamente en su envase original. No las
transfiera a otro contenedor.
● Guarde el envase de las tiras reactivas en un lugar fresco y seco.
Manténgalo alejado del calor y de la luz solar directa.
● Cierre bien el envase inmediatamente después de remover la tira
reactiva.
● Siempre manipule la tira reactiva con las manos limpias y secas.
● Use cada tira reactiva inmediatamente después de sacarla del envase.
● Escriba la fecha de expiración en la etiqueta cuando abra el frasco por
primera vez. Después de 3 meses deseche las tiras reactivas restantes.
● Nunca use tiras reactivas que estén expiradas ya que puede causar
resultados inexactos.
● No doble, corte o altere la tira reactiva de ninguna manera.
● Mantenga el envase de tiras fuera del alcance de niños, ya que de
ingerirse podría causar asfixia. De ser ingerido, busque atención
médica inmediatamente.
Para mayor información, por favor refierase al inserto en el paquete de
tiras reactivas.
68
Información Importante sobre la Solución de
Control
● Use solamente la solución de control con su medidor.
● Nunca use soluciones de control que fueron abiertas por más de 3
meses o que estén expiradas. Escriba la fecha en la que abrió el
envase de la solución de control en la etiqueta del mismo y deséchela
después de 3 meses.
● Es recomendable que la prueba para solución de control se lleve a
cabo a temperatura ambiente de (68°F a 77°F / 20°C a 25°C).
Asegúrese de que su solución de control, su medidor y sus tiras
reactivas estén dentro del rango especificado antes de realizar la
prueba.
● Agite bien el envase antes de usarlo, descarte la primera gota de
solución de control y limpie la punta del dispensador para asegurarse
de que la muestra esté pura y pueda obtener resultados exactos.
● Las condiciones de almacenamiento deben estar entre temperaturas
de 35.6°F a 86°F (2°C a30°C). NO la congele.
69
LOCALIZACION Y RESOLUCION DE
PROBLEMAS EN EL SISTEMA
Si usted sigue las acciones recomendadas pero el problema persiste,
o hay mensajes de error distintos a los que aparecen a continuación,
por favor llame a su agente de servicio al cliente local. No trate de
reparar por sí mismo el aparato y bajo ninguna circunstancia trate de
desensamblar el medidor.
Lectura de resultados
MENSAJE
Cuándo Glucosa
Aparece cuando su resultado está por debajo del límite de la
medida, que es menor de 20 mg/dL (1.1 mmol/L).
Aparece cuando el resultado es igual o mayor que 240 mg/
dL (13.3 mmol/L). Si usted tiene diabetes tipo 1, esto indica la
posibilidad de que haya una acumulación de cetona. Busque
asistencia médica de inmediato.
Aparece si el resultado del análisis de glucosa en sangre es
superior al límite superior de medida, que es 600 mg/dL (33,3
mmol/L).
70
Mensajes de Error
MENSAJE QUÉ DICE EL
MEDIDOR
QUÉ SIGNIFICA
ACCIÓN
Solo pitido
de error.
Solo pitido
de error.
Problema con el medidor.
Solo pitido
de error.
Repase las
instrucciones y repita
el análisis. Si el
problema cont nua,
por favor contacte con
el servicio al cliente
para la asistencia.
Solo pitido
de error.
Solo pitido
Problema con el medidor.
de error.
Solo pitido
de error.
Parece que la batería no
tiene suficiente energía
para hacer otra prueba.
Repita la prueba con
una nueva tira reactiva.
Si el problema cont
nua, por favor contacte
con el servicio al cliente
para la asistencia.
Remplace la
batería
inmediatamente.
71
MENSAJE QUÉ DICE EL
MEDIDOR
Solo pitido
de error.
Solo pitido
de error.
Solo pitido
de error.
Solo pitido
de error.
QUÉ SIGNIFICA
ACCIÓN
Aparece cuando la tira
reactiva se retira durante
la cuenta atrás o cuando
el volumen de sangre no
es suficiente.
Haga la prueba
con una nueva tira
reactiva.
Aparece cuando se inserta
una tira reactiva que está
usada.
Haga la prueba
con una nueva tira
reactiva.
Aparece cuando la
temperature ambiental es
más baja que la temperature
operacional del sistema.
El rango operacional
Del sistema es 50°F
a 104°F (10°C a
40°C). Repita la
prueba después de
que el medidor y la
tira reactiva estén a
temperatura ambiente.
Aparece cuando la
temperature ambiental
está por encima del rango
operacional del sistema.
Localización y Resolución de Problemas
1. Si el medidor no muestra ningún mensaje después de introducer una
tira reactiva:
CAUSAS POSIBLES
Batería agotada.
Tira reactiva colocada al revés o de
modo incompleto.
Medidor defectuoso.
72
ACCIÓN
Reemplace las baterías.
Inserte la tira reactiva hacia arriba
con las barras de contacto primero.
Por favor contacte con servicio al cliente.
2. Si la prueba no comienza después de colocar la muestra:
CAUSAS POSIBLES
ACCIÓN
Muestra de sangre insuficiente.
Repita la prueba con una nueva tira
reactiva aumentando la cantidad de la
muestra de sangre.
Tira reactiva defectuosa.
Repita la prueba con una nueva tira
reactiva.
Muestra aplicada después del apagado Repita la prueba con una nueva tira
automático (3 minutos después de la
reactiva. Apliqué la muestra solamente
última acción del usuario).
cuando
aparece en la pantalla.
Medidor defectuoso.
Por favor contacte con servicio al
cliente.
3. Si el resultado de la solución de control está fuera de rango:
CAUSAS POSIBLES
Error en la realización de la prueba.
No agitó lo suficiente la solución de
control.
Solución de control expirada o
contaminada.
La solución de control está muy
caliente o fría.
Tira reactiva defectuosa.
Malfuncionamiento del medidor.
ACCIÓN
Lea las instrucciones cuidadosamente
y repita nuevamente la prueba.
Agite vigorosamente la solución de
control y repita la prueba nuevamente.
Verifique la fecha de expiración de la
solución de control.
La solución de control, el medidor y las
tiras reactivas debe estar a temperatura
ambiente (68°F a 77°F / 20°C a 25°C),
antes de realizar la prueba.
Repita la prueba con una nueva tira
reactiva.
Por favor contacte con servicio al cliente.
INFORMACIÓN DETALLADA
El medidor proporciona resultados equivalentes en plasma.
73
Hora del día
Rango normal del plasma de la glucosa
para personas sin diabetes (mg/dL)
En ayunas o antes de comer < 100 mg/dL (5.6 mmol/L)
2 horas después de comer
< 140 mg/dL (7.8 mmol/L)
Source: American Diabetes Association (2010). Clinical Practice Recommendations.
Diabetes Care, 33 (Supplement 1): S1–S100.
Por favor consulte con su médico para determinar cual es el rango
que mejor se adapta a sus necesidades.
ESPECIFICACIONES
Modelo No.: TD-4124
Dimensiones y peso: 88.67 (L) x 55.61 (W) x 23.07(H) mm, 48.8 g
Fuente de energía: dos baterías alcalinas AA A 1.5V
Pantalla: LCD
Memoria: 450 resultados de mediciones con su fecha y hora respectiva
Salida externa: USB
Auto detección al insertar electrodo
Auto detección en la muestra de carga
Auto reacción de tiempo en cuenta regresiva
Se desconecta automáticamente después de 3 minutos sin acción
Advertencia de Temperatura
Condiciones de operación: 50°F a 104°F (10°C a 40°C), bajo un 85%
de humedad relativa (no condensando)
Storage/Transportation Conditions: -4°F a 140°F (-20°C a 60°C), bajo
un 95% de humedad relativa.
Unidad de medición: mg/dL
Rango de medición: 20 a 600 mg/dL (1.1 a 33.3 mmol/L)
74
Este aparato ha sido probado para cumplir todos los requerimientos electrónicos
y de seguridad de: IEC/EN 61010-1, IEC/EN 61010-2-101, EN 61326-1, IEC/EN
61326-2-6.
75
76
77
78
79
Premium V10
Distributed by Fora Care
Fora Care Inc.
810 Lawrence Dr, Suite 104, Newbury Park, CA 91320 USA
Products made in Taiwan
Toll Free: 1-888-307-8188 (8:30am-5:00pm PST, Mon.-Fri.)
1-866-469-2632 (24 Hours, 7 days/ week)
www.foracare.com/usa