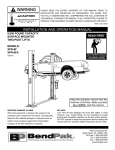
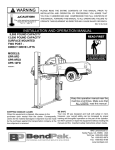
1
TRI-FLO ® Seed Wheel with Servo Operators Manual Document: TD-09-06-1039 2320 124th Road Revision: A Sabetha, Kansas 66534 PH: (785) 431-7900 FAX: (785) 431-7950 Revision Effective 09 JAN 2015 www.uscllc.com Tri - Flo ® Seed Wheel with Servo Introduction Thank you for choosing USC, LLC for your equipment needs. We appreciate your business and will work diligently to ensure that you are satisfied with your choice. OVERVIEW The purpose of this manual is to provide you with the basic information needed to operate and maintain the USC Tri - Flo ® System. It does not hold USC, LLC liable for any accidents or injuries that may occur. OPERATOR RESPONSIBILITIES As the purchaser/owner/operator of this equipment and control system, you have an obligation to install, operate, and maintain the equipment in a manner that minimizes the exposure of people in your care to any potential hazards inherent in using this equipment. It is critical that the owner of this equipment: Has a clear and documented understanding of the process this machine is being used in and of any resulting hazards or special requirements arising from this specific application. Allow only properly trained and instructed personnel to install, operate, or service this equipment. Maintain a comprehensive safety program involving all who work with this machine and other associated process equipment. Establish clear areas of staff responsibility (e.g. operation, setup, sanitation, maintenance, and repairs). Provide all personnel with necessary safety equipment. Periodically inspect the equipment to insure that the doors, covers, guards, and safety devices are in place and functioning, that all safety instructions and warning labels are intact and legible, and that the equipment is in good working order. In addition to the operating instructions, observe and enforce the applicable legal and other binding regulations, national and local codes. As the person with the most to gain or loose from working safely, it is important that you work responsibly and stay alert. By following a few simple rules, you can prevent an accident that could injure or kill you or a co-worker. Page 2 Disconnect, lockout, and tagout electrical and all other energy sources before inspecting, cleaning, servicing, repairing, or any other activity that would expose you to the hazards of electrical shock. Tri - Flo ® Seed Wheel with Servo Do not operate, clean, or service this equipment until you have read and understood the contents of this manual. If you do not understand the information in this manual, bring it to the attention of your supervisor, or call your local USC dealer for assistance. Any operator who is known or suspected to be under the influence of alcohol or drugs should not be allowed to operate the equipment. Understand and follow the safety practices required by your employer and this manual. PAY ATTENTION to what you and other personnel are doing and how these activities may affect your safety. Failure to follow these instructions may result in serious personal injury or death. RECEIVING YOUR EQUIPMENT As soon as the equipment is received, it should be carefully inspected to make certain that it has sustained no damage during shipment and that all items listed on the packing list are accounted for. If there is any damage or shortages, the purchaser must immediately notify your USC dealer. Ownership passes to purchaser when the unit leaves the USC, LLC. premises. The purchaser is responsible for unloading all components of the equipment. Document the serial number of the machine for future reference. There are three serialization labels. Each is located on the front of the frame horizontal cross member underneath each of the three hoppers. The base serial number is the same on all three. The dash number represents the three hoppers. The label shown below is under the number one hopper. Tri - Flo ® Serial Number TRI - FLO ® SERIAL NUMBER:____________________________ Page 3 Tri - Flo ® Seed Wheel with Servo Table of Contents Section Contents Section A Safety Instructions ................................................................. 5 Section B Installation ............................................................................ 18 Section C Mechanical Operation .......................................................... 24 Tri - Flo ® System Overview .................................................. 24 Bin Site System Overview ..................................................... 26 Bin Slide Gates, Underbin Conveyor, Pro Box Hopper ......... 28 Underbin Conveyor Encoder, Transfer Conveyor ................. 28 Tri - Flo ® Weigh Hopper, Slide Gate & Scale Head ............. 29 Scale Fill Conveyor, Diverter ................................................. 29 Section D Electrical Operation ............................................................. 30 Section E Troubleshooting ................................................................... 32 Section F Maintenance ......................................................................... 35 Section G Belt Tensioning Specification ............................................ 44 Section H Storage .................................................................................. 45 Section I Mechanical Drawings ........................................................... 48 Section J Limited Warranty .................................................................. 69 Page 4 Page # Tri - Flo ® Seed Wheel with Servo Safety Instructions Section A Every year accidents in the work place maim, kill and injure people. Although it may be impossible to prevent all accidents, with the right combination of training, operating practices, safety devices, and operator vigilance, the number of accidents can be significantly reduced. The purpose of this section is to educate equipment users about hazards, unsafe practices, and recommended hazard avoidance techniques. If any of the required regularly scheduled maintenance is located above the reach of the operator, they should follow the companies normal safe practices of reaching that particular height, utilizing the companies specified equipment and following normal safety precautions. When working with treatment chemicals, operators should always wear protective gloves, safety glasses, and follow the companies safety precautions in the case of any spillage or operator contamination. SAFETY WORDS AND SYMBOLS It is very important that operators and maintenance personnel understand the words and symbols that are used to communicate safety information. Safety words, their meaning and format, have been standardized for U.S. manufacturers and published by the American National Standards Institute (ANSI). The European Community (E.C.) has adopted a different format based on the International Standards Organization (I.S.O.) and applicable machinery directives. Both formats are presented below. Graphic symbols are not standardized, but most manufacturers will use some variation of the ones seen in this manual. MOTS ET SYMBOLES SÉCURITÉ Il est très important que les opérateurs et le personnel d'entretien à comprendre les mots et les symboles qui sont utilisés pour communiquer des informations de sécurité. Mots de sécurité, de leur signification et le format, ont été normalisés pour les fabricants américains et publié par l' American National Standards Institute ( ANSI ). La Communauté européenne (CE ) a adopté un format différent sur la base de l'Organisation internationale de normalisation ( ISO ) et des directives de machines applicables. Les deux formats sont présentés ci-dessous. Les symboles graphiques ne sont pas standardisés, mais la plupart des fabricants utilisent une variante de ceux observés dans ce manuel. Page 5 Tri - Flo ® Seed Wheel with Servo Indicates an imminently hazardous situation which, if not avoided, will result in death or serious injury. Indique une situation extrêmement dangereuse qui, si pas évitée, entraînera la mort ou des blessures graves. ! DANGER Indicates a potentially hazardous situation which, if not avoided, could result in death or serious injury. ! ATTENTION Indique une situation potentiellement dangereuse qui, si pas évitée, pourrait entraîner la mort ou des blessures graves. Indicates a potentially hazardous situation which, if not avoided, may result in minor or moderate injury and/or property damage. ! AVERTISSEMENT Indique une situation potentiellement dangereuse qui, si pas évitée, peut entraîner des blessures mineures ou modérées et / ou des dommages. SAFETY INSTRUCTIONS Provides additional information that the operator needs to be aware of to avoid a potentially hazardous situation. CONSIGNES DE SÉCURITÉ Fournit des informations supplémentaires que l'opérateur doit être conscient de d'éviter une situation potentiellement dangereuse. NOTICE AVIS Page 6 Notice is used to notify people of important installation, operation or maintenance information which is not hazard related. Avis est utilisé pour informer les gens des informations de maintenance qui ne est pas danger lié importante installation, l'exploitation ou. Tri - Flo ® Seed Wheel with Servo Mandatory Lockout Power Symbol. Disconnect, lockout and tagout electrical and other energy sources before inspecting, cleaning or performing maintenance on this panel. Symbole de puissance verrouillage obligatoire. Débranchez, de verrouillage et de déconsignation énergie électrique et d'autres sources avant d'inspecter, de nettoyage ou de la maintenance de ce panneau. International Safety Alert Symbol. The exclamation point (!) surrounded by a yellow triangle indicates that an injury hazard exists. However, it does not indicate the seriousness of potential injury. The exclamation point (!) is also used with the DANGER, WARNING and CAUTION symbols so the potential injury is indicated. Sécurité Symbole International Alert . Le point d'exclamation ( ! ) Entouré par un triangle jaune indique que un risque de blessure existe . Cependant, il ne indique pas la gravité des blessures potentielles. Le point d'exclamation ( ! ) Est également utilisé avec les symboles DANGER, AVERTISSEMENT et ATTENTION de sorte que le risque de blessure est indiqué. Electrocution Hazard Symbol. This symbol indicates that an electrocution hazard exists. Serious injury or death could result from contacting high voltage. Symbole de danger d'électrocution . Ce symbole indique qu'un danger d'électrocution existe. Des blessures graves ou la mort pourraient résulter de contact haute tension. Page 7 Tri - Flo ® Seed Wheel with Servo International Electrocution Hazard. This symbol indicates that an electrocution hazard exists. Serious injury or death could result from contacting high voltage. Danger d'électrocution international. Ce symbole indique qu'un danger d'électrocution existe. Des blessures graves ou la mort pourraient résulter de contact haute tension. Mandatory Read Manual Action Symbol. (I.S.O. format) This symbol instructs personnel to read the Operators Manual before servicing or operating the equipment. Obligatoire Lire Symbole d'action Manuel. ( Format ISO ) Ce symbole indique le personnel de lire le manuel de l'opérateur avant de réparer ou d'utiliser l'équipement. Mandatory Read Manual Action Symbol. This symbol instructs personnel to read the Operators Manual before servicing or operating the equipment. Obligatoire Lire Symbole d'action Manuel . Ce symbole indique le personnel de lire le manuel de l'opérateur avant de réparer ou d'utiliser l'équipement. Page 8 Tri - Flo ® Seed Wheel with Servo LOCKOUT / TAGOUT PROCEDURES Lockout/Tagout is the placement of a lock/tag on an energy isolating device in accordance with an established procedure. When taking equipment out of service to perform maintenance or repair work, always follow the lockout / tagout procedures as outlined in ANSI Z344.1 and/or OSHA Standard 1910.147. This standard “requires employers to establish a program and utilize procedures for affixing appropriate lockout devices or tagout devices to energy isolating devices and to otherwise disable machines or equipment to prevent unexpected energizing, start-up, or release of stored energy in order to prevent injury to employees.” LES PROCEDURES DE VERROUILLAGE / ETIQUETAGE Verrouillage / étiquetage est le placement d'un verrouillage / tag sur un dispositif d'isolement de l'énergie conformément à une procédure établie. Lors de la prise hors service des équipements pour effectuer la maintenance ou de réparation, toujours suivre les procédures de verrouillage / débranchement comme indiqué dans la norme ANSI Z344.1 et / ou la norme OSHA 1910.147. Cette norme "oblige les employeurs à établir un programme et appliquer des procédures pour la fixation des dispositifs de verrouillage appropriés ou des dispositifs déconsignation à l'énergie dispositifs d'isolement et d' autre machines ou équipements désactiver pour éviter énergisant inattendu, start-up, ou la libération de l'énergie stockée dans le but de prévenir les blessures aux employés." EMERGENCY STOP There is an Emergency Stop push button on all LPV Seed Treaters which is located on the Treater Control Panel. The LPV Automated Treater has an additional Emergency Stop pushbutton on the Main Control Panel. Actuators of emergency stop shall be colored RED. The background immediately around the device actuator shall be colored YELLOW. The actuator pushbutton operated device shall be of the palm or mushroom head type. ARRET D'URGENCE Il ya un bouton-poussoir d'arrêt d'urgence sur tous les traiteurs de semences LPV qui est situé sur le Panneau de configuration Traiteur. Le LPV automatisé Traiteur dispose d'une autre arrêt d'urgence bouton poussoir sur le panneau de commande principal. Actionneurs de freinage d'urgence doivent être de couleur rouge. Le fond immédiatement autour de l'actionneur de l'appareil doit être de couleur JAUNE. Le dispositif actionné actionneur de bouton-poussoir doit être de la paume ou champignons type de tête. Page 9 Tri - Flo ® Seed Wheel with Servo CONTROLLED STOP This is the stopping of machine motion by reducing the electrical command signal to 0 (zero) once the stop signal has been recognized. ARRET CONTROLE Ce est l' arrêt du mouvement de la machine en réduisant le signal de commande électrique à 0 (zéro ) dès que le signal d'arrêt a été reconnue. HAZARD REVIEW RISQUE EXAMEN Electrocution Hazard Electrocution accidents are most likely to occur during maintenance of the electrical system or when working on or near exposed high voltage wiring. This hazard does not exist when the electrical power has been disconnected, properly locked, and tagged out. Risque d'électrocution Les accidents d'électrocution sont les plus susceptibles de se produire lors de la maintenance du système électrique ou pour travailler sur ou à proximité du câblage haute tension exposé. Ne existe pas ce danger lorsque l'alimentation électrique a été déconnecté, bien verrouillé et étiquetés sur. Automatic Start Hazard This equipment may be controlled by an automated system and may start without warning. Failure to properly disconnect, lockout, and tagout all energy sources of remotely controlled equipment creates a very hazardous situation and could cause injury or even death. PLEASE STAY CLEAR AND BE ALERT. Démarrer danger automatique Cet équipement peut être contrôlé par un système auto matisé et peut démarrer sans avertissement. Sources de l'équipement contrôlé à distance non débranché correcte! AVERTISSEMENT ment, lock-out, et tous déconsignation énergie crée une situation très dangereuse et pourrait causer des blessures ou même la mort. Se IL VOUS PLAÎT rester à l'écart et d'être vigilant. Page 10 Tri - Flo ® Seed Wheel with Servo YOU are responsible for the SAFE operation and maintenance of your USC, LLC equipment . YOU must ensure that you and anyone else who is going to operate, maintain or work around the equipment be familiar with the operating and maintenance procedures and related SAFETY information contained in this manual. This manual will take you step-by-step through your working day and alert you to good safety practices that should be adhered to while operating the equipment Remember, YOU are the key to safety. Good safety practices not only protect you, but also the people around you. Make these practices a working part of your safety program. Be certain that EVERYONE operating this equipment is familiar with the recommended operating and maintenance procedures and follows all the safety precautions. Most accidents can be prevented. Do not risk injury or death by ignoring good safety practices. Equipment owners must give operating instructions to operators or employees before allowing them to operate the machine, and at least annually thereafter per OSHA (Occupational Safety and Health Administration) regulation 1928.57. The most important safety device on this equipment is a SAFE operator. It is the operator’s responsibility to read and understand ALL Safety and Operating instructions in the manual and to follow them. All accidents can be avoided. A person who has not read and understood all operating and safety instructions is not qualified to operate the machine. An untrained operator exposes himself and bystanders to possible serious injury or death. Do not modify the equipment in any way. Unauthorized modification may impair the function and/or safety and could affect the life of the equipment. Think SAFETY! Work SAFELY! GENERAL SAFETY 1. Read and understand the operator’s manual and all safety labels before operating, maintaining, adjusting or unplugging the equipment . 2. Only trained persons shall operate the equipment . An untrained operator is not qualified to operate the machine. 3. Have a first-aid kit available for use should the need arise, and know how to use it. Page 11 Tri - Flo ® Seed Wheel with Servo 4. Provide a fire extinguisher for use in case of an accident. Store in a highly visible place. 5. Do not allow children, spectators or bystanders within hazard area of machine. 6. Wear appropriate protective gear. This includes but is not limited to: A hard hat Protective shoes with slip resistant soles Protective goggles Heavy gloves Hearing protection Respirator or filter mask 7. Place all controls in neutral or off, stop motor, and wait for all moving parts to stop. Then disable power source before servicing, adjusting, repairing, or unplugging. 8. Review safety related items annually with all personnel who will be operating or maintaining the equipment. OPERATING SAFETY: 1. Read and understand the Operator’s Manual and all safety labels before using. 2. Disconnect and disable electrical supply completely and wait for all moving parts to stop before servicing, adjusting, repairing or unplugging. 3. Clear the area of bystanders, especially children, before starting. 4. Be familiar with the machine hazard area. If anyone enters hazard area, shut down machine immediately. Clear the area before restarting. 5. Keep hands, feet, hair and clothing away from all moving and/or rotating parts. 6. Stay away from overhead obstructions and power lines during operation and transporting. Electrocution can occur without direct contact. 7. Do not operate machine when any guards are removed. 8. Inspect welds and repair if needed. Page 12 Tri - Flo ® Seed Wheel with Servo SCALE CERTIFICATION WEIGHT BAR SAFETY: 1. The scale certification bar has a maximum capacity of 1000 pounds (500 pounds hung from each end). 2. An additional 500 pounds may be added for a total of 1500 pounds but must be suspended from the center of the weight bar. Any additional weight required for certification must be placed inside the hopper. REVIS REV DESCRIPTION A INITIAL DRAWING 040 WDMT SHOULD BE PAINTED BLUE. ER BRACKETS SHOULD MOVE FREELY ON CHANNEL. IS TO BE PLACED IN CENTER OF WDMT BEFORE SHIPPING. TO BE INSTALLED WHEN SHIPPING. SIONS IN PARENTHESES ARE FOR REFERENCE ONLY. cument Number 3. Make sure retaining pin is installed before hanging weights on bar. 4. Slide hanger plates equally from center of bar before adding any weights. 5. When hanging weights on bar, hang weights evenly from side to side. Quantity THIS MATERIAL IS THE CONFIDENTIAL AND PR USC, LLC. AND SHALL NOT BE USED W NAME DATE 03/12/2013 DRAWN davidw CHECKED TITLE ENG APPR Title -09-0040 1 WDMT WEIGHT BAR TRI-FLOW -09-0070 1 PIN SPGLD QCK REL RING GRIP 0.5DIA -02-0017 1 LBL ATWRK ATT WGHT BAR TRI-FL UNLESS OTHERWISE SPECIFIED DIMENSIONS ARE IN INCHES: TOLERANCES: DECIMALS ANGLES ±1° .XX=±.06 .XXX=±.031 Label Part # 09-02-0017 DO NOT SCALE DRAWING Page 13 KIT WE SIZE DWG NO D 13 File Name:13Printed 03 Tri - Flo ® Seed Wheel with Servo PLACEMENT SAFETY 1. Move only with the appropriate equipment 2. Stay away from overhead power lines when moving equipment. Electrocution can occur without direct contact. 3. Be familiar with machine hazard area. If anyone enters hazard areas, shut down machine immediately. Clear the area before restarting. 4. Operate the equipment on level ground free of debris. Anchor the equipment to prevent tipping or upending. Before placement of the equipment, be sure that ground is reasonably level. The equipment may topple or work improperly if the ground is too uneven, damaging the equipment and / or causing personal injury. Avant de placement de l'équipement, assurez-vous que sol relativement plat. L'équipement peut tomber ou mal ! AVERTISSEMENT est fonctionner si le sol est trop inégale, endommager l'équipement et / ou causer des blessures. MAINTENANCE SAFETY 1. Review the operator’s manual and all safety items before working with, maintaining or operating the equipment . 2. Place all controls in neutral or off, stop motors, disable power source, and wait for all moving parts to stop before servicing, adjusting, repairing or unplugging. 3. Follow good shop practices: Keep service area clean and dry. Be sure electrical outlets and tools are properly grounded. Use adequate light for the job at hand. 4. Keep hands, feet, hair and clothing away from all moving and/or rotating parts. 5. Clear the area of bystanders, especially children, when carrying out any maintenance and repairs or making any adjustments. 6. Before resuming work, install and secure all guards when maintenance work is completed. 7. Keep safety labels clean. Replace any sign that is damaged or not clearly visible. Page 14 Tri - Flo ® Seed Wheel with Servo SAFETY LABELS 1. Keep safety labels clean and legible at all times. 2. Replace safety labels that are missing or have become illegible. 3. Replaced parts that displayed a safety sign should also display the current sign. 4. Replacement safety labels are available. Contact USC at (785) 431-7900 . How to Install Safety Labels: Be sure that the installation area is clean and dry. Be sure temperature is above 50oF (10oC). Decide on the exact position before you remove the backing paper. Remove the smallest portion of the split backing paper. Align the sign over the specified area and carefully press the small portion with the exposed sticky backing in place. Slowly peel back the remaining paper and carefully smooth the remaining portion of the sign in place. Small air pockets can be pierced with a pin and smoothed out using the piece of sign backing paper. Located on the USC equipment you will find safety labels. Always be sure to read and follow all directions on the labels. Situé sur l'équipement USC vous trouverez des étiquettes ! AVERTISSEMENT de sécurité. Veillez à toujours lire et suivre toutes les instructions sur les étiquettes. Guards provided with USC equipment are to remain in place during operation. ! AVERTISSEMENT Gardes fournis avec des équipements USC doivent rester en place pendant le fonctionnement. Page 15 Tri - Flo ® Seed Wheel with Servo Think SAFETY! Work SAFELY! REMEMBER—If Safety Signs have been damaged, removed, become illegible, or parts replaced without safety signs, new signs must be applied. New safety signs are available from USC at (785) 431-7900. Part # 09-02-0011 Part # 09-02-0009 Part # 09-02-0001 Page 16 Tri - Flo ® Seed Wheel with Servo Part # 09-02-0001 Part # 09-02-0002 Part # 09-02-0022 Page 17 Tri - Flo ® Seed Wheel with Servo Section B Installation HIGH VOLTAGE ~ Always disconnect the power source before working on or near the control panel or lead wires. ! DANGER HAUTE TENSION ~ Toujours débrancher la source d'alimentation avant de travailler sur ou près du panneau de commande ou les câbles. HIGH VOLTAGE ~ Use insulated tools when making adjustments while the controls are under power. ! DANGER HAUTE TENSION ~ Utilisez des outils isolés lors des réglages, tandis que les commandes sont sous tension. NOTICE Permanent installation may require additional electrical cords, chemical tubing, and air lines, since each installation is unique. AVIS Installation permanente peut exiger cordons électriques, des tubes supplémentaires chimique, et les conduites d'air, puisque chaque installation est. USC equipment operates within a Group, II Class G hazardous area which contains seed dust. To avoid the possibility of an explosion ignited by static electricity, all USC equipment should be grounded by attaching a bonding strip to the metal frame and securing that strip to the factory ground point. If labeled accordingly, USC products are designed to comply with CSA 22.1 for use in a Class II, Division 2, Group G environment. When connecting the USC system power cord into a power supply, first determine if the supply is also within the hazardous area where the USC system is located. If so, we recommend that the power be hard wired into the source. Do not use a standard electrical plug for this purpose. For other acceptable methods of connecting to a power source, or any other additional miscellaneous equipment to the USC system within a hazardous location, please consult CSA 22.1, Section 18-200 and 18-274. Review the appropriate section and ensure compliance with one of the options given. When connecting to USC equipment from a remote location, and the USC equipment is in a hazardous Class II, Group G environment, customers are advised to follow the requirements within CSA 22.2 no. 25. More details may also be found in CSA 22.1 18-252 (wiring methods). There are various options covered within this section for wiring in a Class II, Group G (dust) environment. Select the best method suited for your specific location. Page 18 Tri - Flo ® Seed Wheel with Servo Équipements USC opère dans un groupe, II Classe G zone dangereuse qui contient la poussière des semences. Pour éviter la possibilité d'une explosion enflammé par l'électricité statique, tous les équipements USC devrait être mise à la terre en fixant une bande de liaison à la structure métallique et la sécurisation cette bande au point de masse du fabricant. Si étiquetés en conséquence, les produits USC sont conçus pour être conformes à la norme CSA 22.1 pour une utilisation dans une Classe II, Division 2, Groupe G environnement. Lors du raccordement du USC alimentation du système cordon dans une alimentation, d'abord déterminer si l'offre est également dans la zone dangereuse où se trouve le système USC. Si oui, nous recommandons que le pouvoir soit câblé dans la source. Ne pas utiliser une prise électrique standard à cet effet. Pour les autres méthodes acceptables de se connecter à une source d'alimentation, ou tout autre matériel divers supplémentaire au système USC dans un endroit dangereux, se il vous plaît consulter la norme CSA 22.1, Section 18-200 et 18-274. Consultez la section appropriée et assurer la conformité avec l'une des options proposées. Lors de la connexion à l'équipement USC depuis un emplacement distant et l'équipement USC est dans une classe dangereuse II, Groupe G environnement, les clients sont invités à suivre les exigences dans CSA 22.2 no. 25. Plus de détails peuvent également être trouvés dans 22,1 CSA 18-252 ( Les méthodes de câblage ). Il existe diverses options couvertes dans cette section pour le câblage dans une Classe II, Groupe G (poussière ) environnement. Sélectionnez la meilleure méthode adaptée pour votre emplacement spécifique. TRI-FLO ® SET-UP The following steps outline the initial set-up of your USC Tri - Flo ® System: 1. Confirm all equipment has been received and then contact USC, LLC or your dealer to setup a time for an installation crew to install your Tri - Flo ® System. 2. A USC trained install crew will arrive on site and perform the necessary steps for installation of the equipment. NOTICE AVIS Based on your particular Tri - Flow ® System, some additional equipment may be required for installation (i.e. fork lift(s), crane, etc. Basé sur votre particulier Tri - Flow System ®, certains équipements supplémentaires peuvent être requis pour l'installation (c.-à-chariot élévateur (s), grue, etc. Page 19 Tri - Flo ® Seed Wheel with Servo TRI-FLO ® SET-UP 3. Setup the Main Control panel at a place that is convenient to the operator. This may include attaching the automated main control panel to the Tri - Flo ®, to the wall, or to the control panel stand that will require anchoring. NOTICE AVIS USC requires that all touch screen control panels be set up inside a building or in a covered structure to protect the machine from weathering. USC exige que tous les panneaux de contrôle à écran tactile être mis en place dans un bâtiment ou dans une structure couverte pour protéger la machine des intempéries. 4. Have a certified electrician provide power to the Tri - Flo ® System. Provide convenient shutdown switches, comply with local electrical codes and ensure that the system is properly grounded and bonded. All USC control panels must be connected adhering to the same electrical requirements as specified in the main control panel on the power requirement tag (right), or the electrical schematic shipped with the piece of equipment. USC recommends that flexible conduit be used wherever possible. 5. Connect the gray cable with light blue ends to one of PJCAN connections on the bottom of the Tri - Flo ® to the Main Control Panel, then to the Treater Control panel (if applicable) then on to the Bin Site Control Panel (see page 22). 6. Connect the red cable to the PJESTOPA on the Tri - Flo ® Control panel and then to the PJESTOPB on the Main Control Panel, the PJESTOPA on the Main Control panel to the PJESTOPB on the Treater Control Panel (if applicable) then on to the Bin Site Control Panel. This cable must run from an A connection to a B connection (never A to A or B to B). Connect the two red plugs into each of the remaining open PJESTOP connections (see page 22). Page 20 Tri - Flo ® Seed Wheel with Servo 7. There is a USB port located on the bottom of the Main Control Panel that can be used to download reports to a compact flash device. The flash device must be in FAT 32 format. 8. Plug the communications cable into one of the available Ethernet ports on the Tri-Flo ® Control Panel. MAIN CONTROL PANEL 5 7 8 6 9. Connect the 19 pin yellow cable from PJ6012 on the Tri-Flo ® control panel to the shielded junction box located next the distribution spout. 10. Connect two E-Thernet cables from Tri-Flo ® contro panel to the back of the 1310 scale head. 11. Connect the green communications cable from CBL6002 on the Tri-Flo ® control panel to the servo motor. 12. Connect the orange power cable from PJ6506 on the Tri-Flo ® control panel to the servo motor. 13. Connect the black cables from PJHopper 1,2 and 3 to their respective gray junction boxes located on the inside of the horizontal frame cross members. Page 21 Tri - Flo ® Seed Wheel with Servo TRI - FLO ® CONTROL PANEL 9 6 11 8 10 12 13 BIN SITE CONTROL PANEL 5 6 Page 22 Tri - Flo ® Seed Wheel with Servo 14. Two 110V (3 Amp) plugs are located on the left side of the Main Control Panel to allow the operator to plug in a printer to print reports directly from the HMI screen (top). The second plug can be used to power a laptop computer. 15. Have the scales calibrated by a state certified professional scale technician after the USC, LLC trained technician has performed a startup session on your site. 16. Supply approximately 100-110 psi of air pressure at two locations. It is required that this air supply have an in-line customer supplied air dryer to protect the air system from contamination. From the dryer, one line goes to the bottom of the solenoid group on the side of the Bin Site Control Panel. (right) The other line goes from the dryer to the pressure regulator on the Tri - Flo ® System to operate the bin slide gates under the Tri - Flo ® weigh hoppers. Connect Air Line Here Page 23 Tri - Flo ® Seed Wheel with Servo Section C Mechanical Operation TRI - FLO ® OVERVIEW Seed Flow Diverter Hopper Full Proximity Switches Seed Flow Diverter Servo Motor Seed Overflow Guards Tri - Flo ® Control Panel Safety Guards Page 24 Scale Head & Printer Bracket Tri - Flo ® Seed Wheel with Servo TRI - FLO ® OVERVIEW Tri - Flo ® Weigh Hoppers Weigh Hopper Slide Gates Fork Lift Pockets (Required for Assembly) Weigh Hopper Load Cells Scale Verification Weight Bar Page 25 Tri - Flo ® Seed Wheel with Servo BIN SITE SYSTEM OVERVIEW Tri - Flo ® Weigh Hopper Scale Fill Conveyor Page 26 Diverter Pro Box Hopper Air-Actuated Slide Gates Reversing End of Underbin Conveyor Outlet Conveyor Transfer Conveyor Treater Tri - Flo ® Seed Wheel with Servo BIN SITE SYSTEM OVERVIEW Tri-Flo ® Weigh Hopper Scale Fill Conveyor Pro Box Hopper Underbin Conveyor Reversing End of Underbin Conveyor Diverter Transfer Conveyor Outlet Conveyor Treater Page 27 Tri - Flo ® Seed Wheel with Servo BIN SLIDE GATES An air-actuated slide gate attaches to the bottom of each bin. The slide gate sits below the manual crank gate on the bin. The flow rate of seed passing through the gate is adjusted by moving the collar on the rod that exits out of the back of the bin slide gate. Moving the collar further away from the bin slide gate will allow the gate to open more and increase seed flow. It is recommended that the manual gate be opened all the way. The system calibrates seed flow through a timing mechanism that tells the air gate to close after a given amount of seed has passed through the gate. During each run of seed, the system will constantly perform an automatic calibration that is flow rate specific. If the manual gate or the collar is adjusted, recalibration of the seed flow will need to be done. UNDERBIN CONVEYOR The underbin conveyor sits directly below each of the air-actuated slide gates that are in turn positioned directly under the manual slide gates of the bulk bins. The conveyor transports seed forward to the scale fill conveyor. The underbin conveyor may also include an option so that it can run in reverse for clean out purposes. Seed is moved inside the underbin conveyor via a crescent belt. An adjustment for the tracking of this belt is located at both the head and tail section of the conveyor. The head section also includes a viewing window and the tail section has a removable cover to help with proper adjustment. An encoder is located in the tail section of the underbin conveyor. The encoder is used to verify that the conveyor is running without any slippage at the belt. UNDERBIN CONVEYOR ENCODER (Optional) The underbin conveyor encoder is an electronic device that is connected to a non-drive shaft on the underbin conveyor. This is usually the rear conveyor shaft. The encoder sends an electrical signal to the Tri - Flo ® System whenever the shaft is spinning. That signal allows the Tri - Flo ® System to know that the belt on the underbin conveyor is traveling at the correct speed and that no slippage is occurring. This process allows the Tri - Flo ® System to perform correct auto-calibrations during each run of seed. PRO BOX HOPPER (optional) The pro box hopper is an inverted pyramid shaped hopper that is used as a means of running seed straight from a pro box into the Tri - Flo ® System. This hopper includes an adjustable slide gate for metering the flow of seed and adjustable legs for changing the height of the hopper. TRANSFER CONVEYOR (optional) The transfer conveyor is the conveyor that connects the pro box hopper to the rest of the system. This conveyor is located so that its intake hopper is directly under the pro box hopper and its discharge end is feeding into the underbin or scale fill conveyor. This conveyor can be run in the AUTO mode or be run manually via the Tri - Flo ® H-O-A screen. Page 28 Tri - Flo ® Seed Wheel with Servo SCALE FILL CONVEYOR The scale fill conveyor is a fixed conveyor that is used to transport seed from the discharge end of the underbin conveyor to the top of the weigh hopper. This conveyor’s intake hopper will sit directly under the discharge portion of the underbin conveyor and the discharge end of the scale fill conveyor will be directly above the center of the Tri-Flo ®. The scale fill conveyor is commonly used as the device that brings seed from outside of the treater building to the inside. TRI - FLO ® WEIGH HOPPER, SLIDE GATES & SCALE HEAD Once seed exits the discharge end of the scale fill conveyor, it will fall down into an inlet diverter that is located in the center of the Tri - Flo ®. Seed will then come to rest above the slide gate in one of the three weigh hoppers as it waits to be weighed. The weigh hoppers sit atop load cells. The system uses a Avery Weigh Tronics 1310 scale head to display the current weight of the seed in the weigh hoppers. The scale head communicates with the system via an Ethernet cable. Once the first hopper has been filled, seed will be diverted to the second hopper. While the second hopper is filling the first hopper will then weigh the seed and begin dumping out of its discharge gate. This process runs in a continuous flow until the system determines the total weight has left the bin. At this point the bin slide gate is closed and the program runs in the finish batch mode. Once the run is finished the system begins to shutdown the conveyers in the order specified by the time entered on the Utilities screen to assure that all seed has been cleaned out of the conveyors. The system looks to the scale head for the total weight of seed and prints a scale ticket based on that weight. NOTICE AVIS The Avery Weigh Tronics 1310 scale head will require calibration by a state certified calibration specialist in order for it to be legal for trade. Le Avery Weigh Tronics 1310 la tête de l'échelle, il faudra calibration par un spécialiste de l'étalonnage diplômé d'état pour qu'il soit légal pour le commerce. Located below each weigh hopper is an air-actuated slide gate. The slide gates each have a sensor that is positioned to read whether or not the slide gate is currently in the open or close position. This is done to ensure an accurate scale reading will always be achieved. DIVERTER (optional) The diverter is an air actuated gate that is located above the seed wheel and below the Tri - Flo ®. The diverter gate will sit in one of two positions: Treat or Bypass. When the gate is in the treat position, seed will flow into the treater to have chemical applied to it. When the gate is in the bypass position, seed will not enter the treater but instead will be carried away through a separate chute to a conveyor or holding device. The diverter can be manually actuated by pressing and holding the Treat or Bypass button in the lower right corner of the Tri-Flo ® H-O-A screen. Page 29 Tri - Flo ® Seed Wheel with Servo Section D Electrical Operation HIGH VOLTAGE ~ Always disconnect the power source before working on or near the control panel or lead wires. HAUTE TENSION ~ Toujours débrancher la source d'alimentation avant de travailler sur ou près du panneau de commande ou les câbles. ! DANGER HIGH VOLTAGE ~ Use insulated tools when making adjustments while the controls are under power. HAUTE TENSION ~ Utilisez des outils isolés lors des réglages, tandis que les commandes sont sous tension. ! DANGER AUTHORIZED PERSONNEL only shall work on the control panel. Never allow anyone who has not read and familiarized themselves with the owner’s manual to open or work on the control panels. ! ATTENTION Seules personnes autorisées doivent travailler sur le panneau de commande. Ne jamais laisser quelqu'un qui n'a pas lu et se sont familiarisés avec le manuel d'ouvrir ou de travail du propriétaire This section provides a general overview and description of the operator controls for the Tri-Flo ® System. If any of the panels are located in the hazardous area described in the installation section (see page 18), all 110VAC connections must be hard wired to a listed type 4 rated enclosure. NOTICE AVIS Page 30 USC recommends the use of surge protection device with a minimum rating of 700VA for all Automated Main Control Panels USC recommande l'utilisation de dispositif de protection contre les surtensions avec une cote minimum de 700VA pour tous les panneaux de contrôle principal automatisé Tri - Flo ® Seed Wheel with Servo General Panel Descriptions: This system consists of three panels: The Tri - Flo ® Control Panel (TFCP) is a plug connected enclosure that is located on the Tri - Flo ®. This enclosure contains the PLC components required for the Tri - Flo ® weighing system. The Main Control Panel (MCP) is the moveable enclosure that contains the PLC and touch screen HMI. This is where the operator will control all the functions of the Tri - Flo ® System. The MCP is connected to the BSCP and TFCP with two sets of cables. The MCP may also be connected to a Treater panel using these same types of cables. The first set are red braided Emergency Stop cables and the second set are grey CANBUS cables handling all of the I/O communications. (see pages 14) The MCP Remote Panel is an OPTIONAL plug connected enclosure that is connected to the Main Treater Panel with a CAT5 Ethernet cable and can be located up to 50 feet from the Treater Main Panel. These panels are serialized to the treater they are connected to. Main Control Panel Remote HMI Panel (see page 68). For the TRI - FLO ® Bin Site program manual, see document number: TD-09-06-1041 = U-Treat v3.0.00 Automation. Page 31 Tri - Flo ® Seed Wheel with Servo Section E Troubleshooting TROUBLESHOOTING Below is a table describing the most frequent problems and solutions with the USC Tri - Flo ® bin site system. For further assistance, contact USC at (785) 431-7900. Problem Possible cause Solution Tri - Flo ® : Minimum flow rate alarm. 1. Running too low capacity. 1. Adjust your air gates or manual gates. Tri - Flo ® : Indicator weight shows two pounds in bin after run. 1. Tri - Flo ® did not empty completely. 1. Open gates on the Tri - Flo ® and zero scales. Tri - Flo ® : Scale will not zero out. 1. Scale is in filing mode. 1. Exit filling mode then end run. Needs to be in shipping mode. 2. Scale is to far out of range. 2. Recalibrate scale Tri - Flo ® : Even when all three scales are zeroed on Batch, the next batch gives a negative number on one of the hoppers with an overweight Alarm. 1. Tri - Flo ® was not emptied before zeroed. 2. Wind drafts. 3. Hoppers are touching. 1. Open gates and zero scale. 2. Close doors. 3. Loosen the four mounting bolts enough to be able to move the hopper. Make the gap on both sides of the hopper as even as possible. 1. Scale heel weight has not Tri - Flo ® : If there are five been reached. pounds or less in the hopper, the system will not empty hopper. 1. Open and close the gate hopper. System is not consistently calibrating correctly. 1. 1. Bin slides gates or manual gates have been moved. 2. Underbin conveyor belt is slipping. 3. Bin slide gate is not consistently opening to the same point. 4. The operator is pressing the “Cancel Scale Fill” button before the run ends. 5. System is being paused during the run. Page 32 Ensure that the slide gate collar and manual gate is locked into place. Then recalibrate. 2. Tighten the underbin conveyor belt. 3. Check for any obstruction that may be restricting the movement of the slide gate. 4. Allow the system to shutdown on its own. 5. Make another run without pausing system. Tri - Flo ® Seed Wheel with Servo Problem Possible Cause Solution System calibration for currently selected bin is incorrect. 1. System is too far out of calibration to recalibrate automatically. 1. Recalibrate the system. Weight display not reading steady (Bouncing) 1. Wind drafts. 1. Close doors. 2. Bad load cell. 2. Replace load cell. Scale is reading incorrect weight. 1. Something is touching the scale. 2. Scale needs recalibrated. 1. Ensure that the area around the scale is clean and that nothing is leaning on or resting on the hopper. 2. Zero scale. If still incorrect, have a professional scale technician recalibrate the scale. No Tri - Flo ® slide gates will open or close when their corresponding button is pressed on the touch screen. 1. No air or not enough air is being supplied to the air regulator / filter on the frame cross member. 1. 2. The Tri - Flo ® PLC may be off. Ensure that at least 100 psi of air is being supplied to the regulator and it is adjusted for a minimum output of 45 PSI. Also, check to see that the filter is clean and no water has built up above the maximum allowed line. 2. Ensure that the Tri - Flo ® control panel has power to it, is ON and that all of the breakers inside the panel are ON as well. No bin slide gates will open or close when their corresponding button is pressed on the touch screen. 1. No air or not enough air is being supplied to the solenoid bank on the side of the bin site control panel. 2. The bin site PLC may be off. Air gate will not close fully. 1. Something is obstructing the air gate from closing. 2. Air pressure to the gate is not strong enough. Air gate is opening when it 1. Air lines to the air gate are should be closing and vice versa. reversed. 1. Ensure that at least 100 psi of air is being supplied to the solenoid bank. 2. Ensure that the bin site control panel has power to it, is ON and that all of the breakers inside the panel are ON as well. 1. Remove obstruction. 2. Ensure that the bin slide gate has at least 100 psi of air being supplied to it. If it is a Tri - Flo ® slide gate it needs at least 45 PSI. 1. Exchange air line for the proper solenoid on the back of the solenoid bank. Page 33 Tri - Flo ® Seed Wheel with Servo Problem Possible Cause Diverter is leaking seed through bypass side while in TREAT mode of operation. 1. Too low of air pressure to actuate the diverter. Solenoids are making a buzzing sound when air gates are actuated. 1. Moisture in the air system. The touch screen has warning triangles on each button. 1. The bin site PLC may be off. Solution 1. Ensure that at least 100 psi of air pressure is present at the diverter. 2. An obstruction in the diverter is stopping correct placement 2. Remove obstruction. of the diverter plate. 2. Electric actuator on solenoid bank may be faulty. 2. The Tri - Flo ® panel may be off. 1. Remove moisture from the air lines. 2. Replace the electronic actuator on the solenoid. 1. Ensure that the bin site control panel has power to it, is ON and that all of the breakers inside the panel are ON as well. 2. Ensure that the Tri - Flo ® control panel has power to it, is ON and that all of the breakers inside the panel are ON as well. Conveyor will not start in HAND or AUTO mode. 1. Conveyor motor starter is tripped. 2. Conveyor is clogged. Page 34 1. Reset motor starter. 2. Remove obstruction or debris. Tri - Flo ® Seed Wheel with Servo Maintenance Section F Proper maintenance of the Tri-Flo ® System is critical for peak performance, reliability and accuracy of this system. The following is a guideline for the type of maintenance and servicing that should be performed on this unit. Your environment and uses may require additional maintenance and service beyond this list to assure a reliable and safe unit. The operator of this unit has ultimate responsibility to identify areas of concern and rectify them before they become a hazard or safety issue. There is no substitute for a trained, alert operator. Do not put this unit into operation with any questionably maintained parts. Poor performance or a hazard may occur. ! DANGER Ne pas mettre cet appareil en service avec des pièces douteuse entretenus. La mauvaise performance ou un danger peut survenir. Do not use compressed air or water under pressure to clean any of the components of the USC equipment. ! DANGER Ne pas utiliser d'air comprimé ou de l'eau sous pression pour nettoyer l'un des composants de l'équipement USC. GREASING Use an SAE multipurpose high temperature grease with extreme pressure (EP) performance. Also acceptable is an SAE multipurpose lithium-based grease. Use a Maintenance Checklist to keep record of all scheduled maintenance. Use a hand-held grease gun for all greasing. Wipe grease fitting with a clean cloth before greasing to avoid injecting dirt and grit. Replace and repair broken fittings immediately. Storing Lubricants Your machine can operate at top efficiency only if clean lubricants are used. Use clean containers to handle all lubricants. Store them in an area protected from dust, moisture and other contaminants. NOTICE AVIS If fittings will not take grease, remove and clean thoroughly. Also clean lubricant passageway. Replace fitting if necessary. Si les raccords ne prendront pas la graisse, enlever et nettoyer. Aussi propre passage de lubrifiant. Remplacer approprié si nécessaire . Page 35 Tri - Flo ® Seed Wheel with Servo TRI-FLO ® WEIGH HOPPER, AIR REGULATOR - FILTER - DRYER DEPRESSURIZE UNIT BEFORE REMOVING BOWL. Periodically check bowl unit for cracking, damage or other deterioration. Immediately replace any bowl unit that is cracked, damaged or deteriorated. Remove micron filter and clean by tapping on surface and blowing off with compressed air. Exercise and flush the automatic drain valve. CONTROL PANEL & AIR SYSTEM Drain water from compressor daily. Drain air dryer every 40 hours of operation. Test all air solenoids for correct actuation. Inspect all exterior wiring for any kinks or damage. DIVERTER (optional) Inspect all welds and structural components for bends, cracks, and damage. Test diverter gate for proper actuation with control panel. Clean diverter tubing of any obstructions. Grease all necessary bearings. BIN SLIDE GATES Inspect all welds and structural components for bends, cracks and damage. Test slide gates for proper actuation with control panel. Remove air to gates and manually open and close gates. Check for any friction while gate is sliding. UNDERBIN CONVEYOR Inspect all welds and structural components for bends, cracks and damage. Clean out any build up of debris from the clean out door. Check the conveyor belt tension and alignment (page 40). Check the drive belt tension and alignment (page 43). Grease all necessary bearings (page 35). Remove black guard and check chain tension. Check for proper operation of conveyor while in reverse mode. Align if necessary. Check encoder for tightness to shaft and proper signal to control panel. Page 36 Tri - Flo ® Seed Wheel with Servo PRO BOX HOPPER & TRANSFER CONVEYOR (optional) Inspect all welds and structural components for bends, cracks, and damage. Clean out any build up of debris from the clean out door. Check the conveyor belt tension and alignment (page 40). Check the drive belt tension and alignment (page 43). Grease all necessary bearings (page 35). Remove black guard and check chain tension. Wipe down the motor casing with a damp cloth making sure to remove all dust that may have collected since the last maintenance date. Record the cleaning on the company required documents. If operating in a CSA 22.1, Class II, Division 2, Group G hazardous area, USC recommends this step be performed on a daily basis. Essuyez le carter moteur avec un chiffon humide en veillant à éliminer toutes les poussières qui peuvent avoir perçu depuis la dernière date de maintenance. Enregistrez le nettoyage sur la société les documents requis. Si opérant dans un CSA 22.1, Classe II, Division 2, Groupe G zone dangereuse, USC recommande cette étape être effectuée sur une base quotidienne. SCALE FILL CONVEYOR Inspect all welds and structural components for bends, cracks and damage. Clean out any build up of debris from the clean out door. Check the conveyor belt tension and alignment (page 40). Check the drive belt tension and alignment (page 43). Grease all necessary bearings (page 35). Remove black guard and check chain tension. Wipe down the motor casing with a damp cloth making sure to remove all dust that may have collected since the last maintenance date. Record the cleaning on the company required documents. If operating in a CSA 22.1, Class II, Division 2, Group G hazardous area, USC recommends this step be performed on a daily basis. Essuyez le carter moteur avec un chiffon humide en veillant à éliminer toutes les poussières qui peuvent avoir perçu depuis la dernière date de maintenance. Enregistrez le nettoyage sur la société les documents requis. Si opérant dans un CSA 22.1, Classe II, Division 2, Groupe G zone dangereuse, USC recommande cette étape être effectuée sur une base quotidienne. Page 37 Tri - Flo ® Seed Wheel with Servo TRI-FLO ® WEIGH HOPPER, SLIDE GATE & SCALE HEAD Inspect all welds and structural components for bends, cracks and damage. Check for binding on scale components. Check wiring from scale to scale head for any damage or kinks. Test slide gate for proper actuation with control panel. Check slide gate sensors for correct positioning and signal. Have scale professionally re-calibrated as necessary. Wipe down the motor casing with a damp cloth making sure to remove all dust that may have collected since the last maintenance date. Record the cleaning on the company required documents. If operating in a CSA 22.1, Class II, Division 2, Group G hazardous area, USC recommends this step be performed on a daily basis. Essuyez le carter moteur avec un chiffon humide en veillant à éliminer toutes les poussières qui peuvent avoir perçu depuis la dernière date de maintenance. Enregistrez le nettoyage sur la société les documents requis. Si opérant dans un CSA 22.1, Classe II, Division 2, Groupe G zone dangereuse, USC recommande cette étape être effectuée sur une base quotidienne. TRANSITION CONVEYOR (optional) Inspect all welds and structural components for bends, cracks and damage. Clean out any build up of debris from the clean out door. Check the conveyor belt tension and alignment (page 40). Check the drive belt tension and alignment (page 43). Grease all necessary bearings. Remove black guard and check chain tension. Wipe down the motor casing with a damp cloth making sure to remove all dust that may have collected since the last maintenance date. Record the cleaning on the company required documents. If operating in a CSA 22.1, Class II, Division 2, Group G hazardous area, USC recommends this step be performed on a daily basis. Essuyez le carter moteur avec un chiffon humide en veillant à éliminer toutes les poussières qui peuvent avoir perçu depuis la dernière date de maintenance. Enregistrez le nettoyage sur la société les documents requis. Si opérant dans un CSA 22.1, Classe II, Division 2, Groupe G zone dangereuse, USC recommande cette étape être effectuée sur une base quotidienne. Page 38 Tri - Flo ® Seed Wheel with Servo CONVEYOR MAINTENANCE SCHEDULE Proper maintenance of the USC Conveyors is critical for peak performance, reliability and accuracy of this system. The following is a guideline for the type of maintenance and servicing that should be performed on these units. Your environment and uses may require additional maintenance and service beyond this list to assure a reliable and safe unit. The operator of this unit has ultimate responsibility to identify areas of concern and rectify them before they become a hazard or safety issue. There is no substitute for a trained, alert operator. Do not put this unit into operation with any questionably maintained parts. Poor performance or a hazard may occur. ! DANGER Ne pas mettre cet appareil en service avec des pièces douteuse entretenus. La mauvaise performance ou un danger peut survenir . Every 200 hours or Annually 1. Repack wheel bearings. 2. Wash machine. 3. Check pulley bushing for wear. To inspect pulley: A. Lower the conveyor to its lowest position. B. When the conveyor has reached the lowest position, it will stop on the hinge support. C. Loosen and remove the bolt. D. Inspect the bushing on the pulley for wear. E. Reverse steps for re-assembly. Page 39 Tri - Flo ® Seed Wheel with Servo CONVEYOR SERVICING INTERVALS Every 40 hours or Weekly 1. Check the conveyor belt tension and alignment. 2. Grease conveyor bearings. A. Two bolt flanged bearings, tail roller bearings right and left (2 locations). B. Two bolt flanged bearings, drive roller bearings right and left (2 locations). C. Two bolt flanged bearings, jackshaft bearings right and left (2 locations). 3. Remove guard and check the drive belt tension and alignment. The belts will deflect approximately 1/4 to 1/2 inch when properly tensioned. 4. Check the chain tension. Adjust if required, lubricate chain and re-install guard. 5. Wipe down the motor casing with a damp cloth making sure to remove all dust that may have collected since the last maintenance date. Record the cleaning on the company required documents. If operating in a CSA 22.1, Class II, Division 2, Group G hazardous area, USC recommends this step be performed on a daily basis. Essuyez le carter moteur avec un chiffon humide en veillant à éliminer toutes les poussières qui peuvent avoir perçu depuis la dernière date de maintenance. Enregistrez le nettoyage sur la société les documents requis. Si opérant dans un CSA 22.1, Classe II, Division 2, Groupe G zone dangereuse, USC recommande cette étape être effectuée sur une base quotidienne. CONVEYING BELT TENSION AND ALIGNMENT - TAIL END A contoured belt with molded flights is used to convey material along the frame. The tension and alignment of the belt should be checked weekly, or more often if required, to be sure that it does not slip or run to one side. A properly tensioned belt will not slip when it is operating. Operating the belt with less slippage will increase the belt life and causes less stress on bearings, pulleys and shafts. Page 40 Tri - Flo ® Seed Wheel with Servo Although it is acceptable to align the belt from either the Head or the Tail (Intake) end. Tightening the belt may only be done from the Tail end of the conveyor. ! AVERTISSEMENT Même se il est acceptable d'aligner la courroie de la tête ou la queue (Intake) fin. Serrer la ceinture ne peut être fait à partir de la fin de queue du convoyeur. To maintain the belt, follow this procedure: NOTICE AVIS Place all controls in neutral or off, stop motor and disable power source before working on belt. Placez toutes les commandes au point mort ou hors tension, arrêter le moteur et désactiver la source d'alimentation avant de travailler sur la ceinture. 1. Use the take-up bolt located at the tail to set the tension of the belting. 2. If the belt needs to be tightened to prevent slippage, use the take-up adjustments on the tail end. 3. The belt is tightened by turning both take-up adjustments an equal number of turns. 4. Use the drive roller to check the alignment. The belt should be centered. 5. Turn the belt 1/2 revolution when the belt is new and check the drive and tail roller. If out of alignment, the belt will move to the loose side. Loosen the jam nut and use the bearing position bolts to set the position. Tighten jam nut. 6. Run and check again. Check frequently during the first few minutes of operation and then several times during the first 10 hours. The belt normally seats itself during the first 10 hours of operation and can be checked weekly after that. 7. The belt is properly aligned when the belt runs in the center of the head and tail rollers. Loosen this jam nuts before adjusting the bearing position bolt Use this bolt to tighten and align the belt Page 41 Tri - Flo ® Seed Wheel with Servo CONVEYING BELT ALIGNMENT - HEAD END 1. A misaligned belt will track toward the loose side. Set the tracking by loosening the bearing mounts on the tight side and using the bearing position bolt to move the end of the head roller toward the tail. Tighten the bearing mount when the belt is centered on the head roller. 2. Run the belt and check the tracking again. Loosen the tight side slightly again if required. Repeat the adjusting and checking procedure until the belt centers on the input end roller and remains centered when running. 3. Always repeat this aligning procedure when installing a new belt. Check frequently during the first 10 hours of operation. After 10 hours, the belt is normally seated and checking the alignment can be done less frequently. Tighten jam nut after adjustment Use this bolt to align the belt BELT REPLACEMENT 1. Rotate the belt until the seam is visible. 2. Move the tail roller to its loosest position. 3. Pull all the slack to the seam area. 4. Remove the wire connector and open the belt. 5. Attach one end of the replacement belt to the belt end being removed. Belt Seam 6. Pull the old belt out and the new belt will be threaded into place. 7. Disconnect the old belt. 8. Connect the ends of the new belt together and secure. 9. Set the belt tension. 10. Check and set the belt alignment Check Alignment Page 42 Tri - Flo ® Seed Wheel with Servo DRIVE BELT TENSION & ALIGNMENT Power to the conveying belt is transmitted through a V-belt. The V-belt drive system must be maintained at the proper belt tension and pulley alignment to obtain the desired performance and life. When maintaining the belt drive system for the electric drive model, follow this procedure: NOTICE AVIS Turn motor off and unplug power cord or turn off power and lock out the master panel before starting maintenance on drive belt system. Arrêter le moteur et débranchez le cordon d'alimentation ou coupez l'alimentation et verrouiller le panneau de maître avant de commencer la maintenance sur le système de courroie d'entraînement. Drive Belt Tension 1. Push on the center of the belt span with a force of approximately 5 to 10 lbs. 2. Follow the belt tensioning specification on page 44 to determine proper belt deflection. 3. Move the motor up, using the adjustment bolts, to set drive belt tension (right). 4. Close and secure guards. Drive Belt Alignment 1. Lay a straightedge across the pulley faces to check the alignment (right). Motor base adjustment 2. Use the pulley hub or the motor mounting plate slots to move the pulley to the required position for alignment. 3. Tighten hub bolts to secure pulley on shaft. 4. Check belt tension 5. Close and secure guards. Drive Belt Replacement 1. Lower motor to its loosest position. 2. Remove old belt and replace with a new one. 3. Raise motor to set the belt tension. 4. Check pulley alignment. Adjust if required. Lay a straightedge across 5. Close and secure guards. Page 43 Tri - Flo ® Seed Wheel with Servo Section G Belt Tensioning Specification V-Belt tensioning adjustment can be made using a tension meter or other type spring scale using the following procedure. After seating the belts in the groove and adjusting center distance so as to take up the slack in the belts, further increase the tension until only a slight bow on the slack side is apparent while the drive is operating under load. Stop the drive and using the meter, measure the force necessary to depress one of the center belts 1/64 inch for every inch of belt span (see sketch below). For example, a deflection for a 50 inch belt span is 50/64 or 25/32 inch. The amount of force required to deflect the belt should compare with the deflection forces noted in the table below. Also notice for V- Belts that deflection forces vary from the initial RUN - IN values which are greater (reflecting higher run-in tensioning) to the NORMAL values for after the run-in period. DEFLECTION FORCE BELT CROSS SECTION SMALLER PULLEY DIAMETER RANGE (inches) RUN - IN (lbs) NORMAL (lbs) AX 3.0 - 3.6 3.8 - 4.8 5.0 - 7.0 4 - 1/8 5 6 2 - 3/4 3 - 1/4 4 BX 3.4 - 4.2 4.4 - 5.2 5.4 - 9.4 5 - 1/4 7 - 1/8 9 3 - 1/2 4 - 3/4 6 Page 44 Tri - Flo ® Seed Wheel with Servo Storage Section H When storing the Tri - Flo ® System for long periods of time, the following procedures must be followed to reduce the chance of rust, corrosion and fatigue of the Tri - Flo ® System. You can also use these steps when storing the machine for the winter. A dust mask and protective rubber gloves shall be used when cleaning the machine. UNDERBIN CONVEYOR 1. Disconnect power. 2. Thoroughly wash the entire machine to remove all dirt, mud, debris or residue. 3. Remove yellow covers and remove any debris or build-up. 4. Remove clean out doors and thoroughly remove any debris or build-up inside of the conveyor. Ensure that the bottom pan of the underbin conveyor is free of seed. 5. Lubricate all grease fittings and chain. Make sure that all grease cavities have been filled with grease to remove any water residue from the washing. This also protects the bearing seals. 6. Re-connect power and run the underbin conveyor to help remove any additional debris. Compressed air can be used to blow out any foreign material. 7. Cover the electric motor with a water proof tarpaulin and tie securely in place. TRI-FLO® WEIGH HOPPER & SLIDE GATE 1. Thoroughly clean the weigh hopper to remove all residue from the equipment. 2. Clean the slide gate of any seed or residue that may have built up. SCALE FILL CONVEYOR 1. Disconnect power. 2. Thoroughly wash the entire machine to remove all dirt, mud, debris or residue. 3. Remove yellow covers and remove any debris or build-up. 4. Remove clean out doors and thoroughly remove any debris or build-up inside of the conveyor. Page 45 Tri - Flo ® Seed Wheel with Servo SCALE FILL CONVEYOR 5. Lubricate all grease fittings and chain. Make sure that all grease cavities have been filled with grease to remove any water residue from the washing. This also protects the bearing seals. 6. Re-connect power and run the scale fill conveyor to help remove any additional debris. Compressed air can be used to blow out any foreign material. 7. Cover the electric motor with a water proof tarpaulin and tie securely in place. PRO BOX HOPPER & TRANSFER CONVEYOR (optional) 1. Disconnect power. 2. Thoroughly wash the entire machine to remove all dirt, mud, debris or residue. 3. Remove yellow covers and remove any debris or build-up. 4. Remove clean out doors and thoroughly remove any debris or build-up inside of the conveyor. 5. Lubricate all grease fittings and chain. Make sure that all grease cavities have been filled with grease to remove any water residue from the washing. This also protects the bearing seals. 6. Re-connect power and the transfer conveyor to help remove any additional debris. Compressed air can be used to blow out any foreign material. 7. Cover the electric motor with a water proof tarpaulin and tie securely in place. 8. Tarp or place the cover on top of the pro box hopper to keep out any dirt or unwanted pests. FINAL 1. Store all portable components of the Tri - Flo ® System inside a protective building to keep them from being exposed to the weather. 2. Disconnect power to the machine and all of the components. 3. Ensure all moisture has been removed from the airlines. 4. Disconnect the supply air line to the bottom of the solenoid bank and place a plug in the fitting to keep moisture out of the system. Page 46 Tri - Flo ® Seed Wheel with Servo NOTES: Page 47 Tri - Flo ® Seed Wheel with Servo Section I Mechanical Drawings AIR MANIFOLD ASSEMBLY (05-07-0758) 7 1 2 6 4 5 3 8 13 14 10 9 12 11 Item # Part # 1 02-04-0010 FTTG BUSH .375NPT X .250NPT BRSS 1 2 02-05-0004 FTTG CPLG .375 NPT X 1.50 FM SS 1 3 02-05-0017 REDUCER .500NPT X .375 NPT 304SS 1 4 02-06-0007 ELBOW, .375-18 NPT, 45 DEG. SS 1 5 02-07-0001 NIPPLE, .375 NPT SCH. 40 304 SS 1 6 02-07-0003 FTTG NIP .375 NPT X 2.00 TBE SS 1 7 02-07-0018 NIPPLE, .250-18 NPT, SCH. 40 SS, 1.0 1 8 02-09-0019 FTTG MNFLD 4X.375NPTX.500NPT ALUM 1 9 02-14-0001 FTTG PLUG SQHD .500 NPT SS 1 10 02-14-0006 PLUG 3/8" NPT SS SQ HEAD 1 11 02-16-0049 FTTG PUSH 90 DEG .25 OD X .375 NPT 3 12 06-01-0203 SCRW MACH 10-32 X 2.25 ZP SLTD RD 2 13 06-02-0030 NUT KLOCK 10-32 ZP 2 14 07-03-0013 REGL DIAL FLTR DRAIN .25 NPT 1 Page 48 Description Qty Tri - Flo ® Seed Wheel with Servo HIGH LEVEL SENSOR ASSEMBLY (05-07-0762) 5 1 6 2 3 7 9 8 4 Item # Part # 1 02-04-0008 FTTG BUSH .750NPT X .500NPT SS 1 2 02-05-0017 FTTG BUSH .500NPT X .375NPT SS 1 3 03-08-0298 CONN CG .375NPT .115-.312 3229LTF 1 4 03-19-0017 PDL 4 VANE LVL INDI PN 1-4156 1 5 03-19-0072 SW LVL INDI MDL KAX2SPDT 24VDC 1 6 05-04-0115 WDMT LVL INDI ADJ 1 7 05-04-0175 WDMT BRKT LVL INDI ADJ 1 8 9 06-01-0189 06-03-0014 BOLT, FLG .375-16 UNC ZP GRADE 5; 1-1/4" LG NUT LOCK FLG .375-16 ZP GR5 2 2 Description Qty Page 49 Tri - Flo ® Seed Wheel with Servo SLIDE GATE VALVE ASSEMBLY (05-07-0761) 9 13 7 4 11 3 1 10 6 5 12 8 2 13 Item # Part # 1 02-02-0049 FLTR EXHAUST BRZ .125 NPT 1 2 02-16-0046 FTTG PUSH 90 DEG .250 OD X .125 NPT 3 3 03-05-0042 TMNL BARRIER STRIP IDEAL 89-608 1 4 03-07-0110 CBL PWR SELINOID 3M BLK 1 5 03-08-0298 CONN CG .375NPT .115-.312 3229LTF 3 6 03-08-0307 NUT NYLOC .375 NPT 8462 3 7 03-11-0158 ENCL 4X4X3 SCE-404SC SCE-09 GRAY 1 8 03-17-0080 VLV SOL MAC 45A-AA1-DDAJ-1KJ 1 9 06-01-0006 BOLT, .250-20 X .75 UNC ZP GRADE 5 4 10 06-02-0052 NUT LOCK 4-40 CS MMC# 90675A005 2 11 06-03-0013 NUT,LOCK, FLG .250-20 ZP SERRATTED 4 12 06-06-0079 SCRW MACH 4-40 X1.25 PHLP PHD 2 13 103935 PLT VLV MNT 1 Page 50 Description Qty NOTES: 1. THESE TWO FACES SHOULD BE FLUSH WHEN ASSEMBLED. 2. 05-09-0044 TAB GOES ON BACK SIDE OD 05-09-0044 PLATE WHEN ASSEMBLED. 3. ANTI-SLIP TAPE IS TO BE APPLIED TO TRI-FLO LEG (3 PLCS) WHEN INSTALLING FORK POCKET WELDMENT. Tri - Flo ® Seed Wheel with Servo FORKLIFT BRACKET ASSEMBLY (13-05-0268) 2 7 8 5 4 Item 6 1 3 Item # Part # 1 05-09-0043 WDMT FORK PCKT BASE 1 2 05-09-0044 WDMT FORK PCKT BRACE 1 3 06-01-0025 BOLT .500-13 X 1.50 ZP GR5 4 4 06-01-0268 BOLT .500-13 X 8.00 ZP GR5 4 5 06-03-0004 NUT NYL LOCK .500-13 ZP GR5 8 6 06-05-0005 WSHR FLAT .500 ZP 8 7 8 08-07-0048 102D5F TAPE ANTI-SLIP 2.00" X 6.00" PLT CLAMP BASE 3 2 Description Qty Page 51 Tri - Flo ® Seed Wheel with Servo HOPPER 1 ASSEMBLY (05-07-0759) 4 11 6 Item # 2 5 10 7 3 1 DO NOT TIGHTEN WITH IMPACT Item # Part # 1 03-19-0042 LDCL VISHAY 1320 2200LB CLASS III 1 2 05-03-1032 WDMT HOPP WEDGE 30 UNIT OPEN TOP 1 3 06-01-0032 BOLT, .625 X 11 X 2" UNC ZP GRADE 5 4 4 06-01-0138 BOLT, FLG .315-18 UNC ZP GRADE 5; 3/4" LG 8 5 06-01-0228 BOLT M16-2.00 X 40MM FTH 4 6 06-03-0019 NUT LOCK FLG .3125-18 ZP GR5 8 7 06-04-0005 WASHER, .625 LOCK ZP 4 8 09-01-0043 ATWL LBL USC, LLC 6" X 19" PRO-CUT 1 9 09-02-0019 LBL ATWRK TRI-FLO LOGO 1 10 11 102349 13-05-0270 PLT LDCL ATTACH ASSY HOPP EXT MTR 1 1 Page 52 Description Qty Part # 1 03-19-0042 2 05-03-1032 3 06-01-0032 4 06-01-0138 5 06-01-0228 6 06-03-0019 7 06-04-0005 8 09-01-0043 9 09-02-0019 10 102349 11 13-05-0270 Tri - Flo ® Seed Wheel with Servo HOPPER 2 & 3 ASSEMBLY (05-07-0760) 4 11 6 Item # 2 5 10 7 3 1 DO NOT TIGHTEN WITH IMPACT Item # Part # 1 03-19-0042 LDCL VISHAY 1320 2200LB CLASS III 1 2 05-03-1032 WDMT HOPP WEDGE 30 UNIT OPEN TOP 1 3 06-01-0032 BOLT, .625 X 11 X 2" UNC ZP GRADE 5 4 4 06-01-0138 BOLT, FLG .315-18 UNC ZP GRADE 5; 3/4" LG 8 5 06-01-0228 BOLT M16-2.00 X 40MM FTH 4 6 06-03-0019 NUT LOCK FLG .3125-18 ZP GR5 8 7 06-04-0005 WASHER, .625 LOCK ZP 4 8 09-01-0043 ATWL LBL USC, LLC 6" X 19" PRO-CUT 1 9 09-02-0019 LBL ATWRK TRI-FLO LOGO 1 10 11 102349 13-05-0271 PLT LDCL ATTACH ASSY HOPP EXT 1 1 Description Qty Page 53 1 03 2 05 3 06 4 06 5 06 6 06 7 06 8 09 9 09 10 10 11 13 Tri - Flo ® Seed Wheel with Servo SERVO DRIVE ASSEMBLY (05-07-0757) 11 4 18 15 5 6 8 9 10 24 1 Item # 3 17 18 2 13 29 21 25 20 12 25 19 30 21 7 16 31 22 14 Page 54 23 26 1 01- 2 01- 3 01- 4 01- 5 01- 6 01- 7 01- 8 01- 9* 01- 10 01- 11 01- 12 05 13 05 14 05 15 05 16 05 17 06 18 06 19 06 20 06 21 06 22 06 23 06 24 06 25 06 26 06 27* 09 28* 09 29 09 30 101 31 102 Tri - Flo ® Seed Wheel with Servo SERVO DRIVE ASSEMBLY (05-07-0757) Item # Part # 1 01-01-0203 SERVO MTR BMH1002T07A2A 1 2 01-01-0204 SERVO MTR GEARBOX 120MM RATIO 40 1 3 01-01-0205 SERVO MTR GEARBOX KIT SIZE 120 BMH 1 4 01-02-0096 SPKT #50 18T WTIH 1 FNSH BORE 1 5 01-02-0115 SPKT 13T 50P .500ID IDLER 2 6 01-02-0122 SPKT 18T 50P 25MM BORE 8MM KEYWAY 1 7 01-03-0048 BRG SLV 1.00 X 1.50 X 1.00 PCMPST 1 8 01-04-0002 CHAIN RLR 50 1 9 01-04-0005 CHAIN CTNG LINK 50P 1 10 01-04-0007 #50 OFFSET LINK 1 11 01-10-0005 1/4" KEY, CS - 1 1/2" LONG 1 12 05-03-1523 WDMT BRKT GBOX MNT SERVO DRV 1 13 05-04-0098 WDMT SLTR DRV CNTNS FLOW SYSTEM 1 14 05-10-3749 GRD SLTR CHAIN DRV 1 15 05-10-3811 WSHR .500 ID X 1.25 OD X .375 THK 2 16 05-11-0293 HLDR BRG SHAFT SUPP 1 17 06-01-0014 BOLT, .375-16 X 1/2 UNC ZP G5 4 18 06-01-0027 BOLT .500-13 X 2.00 ZP GR5 2 19 06-01-0071 BOLT, .375-16 X 2 1/2 ZP G5 FULL THREAD 1 20 06-01-0115 BOLT CRG .375-16 X 1.00 ZP GR5 4 21 06-01-0124 BOLT, FLG .375-16 UNC ZP GRADE 5; 3/4" LG 8 22 06-01-0189 BOLT, FLG .375-16 UNC ZP GRADE 5; 1-1/4" LG 1 23 06-01-0295 BOLT M10-1.5 X 25MM ZP 4 24 06-03-0004 NUT NYL LOCK .500-13 ZP GR5 2 25 06-03-0014 NUT LOCK FLG .375-16 ZP GR5 5 26 06-04-0003 WSHR LOCK SPLT .375 ZP 8 27 09-02-0001 ATWK LBL DANGER FINGERS 1 28 09-02-0002 ATWK LBL DANGER GUARDS 1 29 09-02-0009 ATWK LBL WARNING ROTATING PARTS 1 30 31 101AE0 10224D PLT LOWER SHAFT SUPP WSHR 1 1 Description Qty Page 55 Tri - Flo ® Seed Wheel with Servo DISTRIBUTION DRIVE ASSEMBLY (05-07-0756) 6 19 20 B C A 4 9 17 7 5 14 Page 56 Tri - Flo ® Seed Wheel with Servo DISTRIBUTION DRIVE ASSEMBLY (05-07-0756) 13 13 23 24 12 16 3 16 13 23 10 12 3 21 10 10 16 22 DETAIL A 3 2 DETAIL B 16 2 DETAIL A DETAIL B 10 22 15 2 1 DETAIL A 15 1 16 DETAIL B 8 8 1 15 18 18 11 8 11 18 11 DETAIL C DETAIL C Page 57 Tri - Flo ® Seed Wheel with Servo DISTRIBUTION DRIVE ASSEMBLY (05-07-0756) Item # Part # 1 01-04-0054 SPG CNCL COMP .25ID X .045 X 1.25 4 2 03-08-0212 CONN TRCK 8MB12Z-5P3-CS19 1 3 03-10-0125 SW LMT SCHDR XCMD21202C12 1 4 05-03-1076B WDMT SLTR HSG CNTNS FLOW SYSTEM SMW 1 5 05-04-0118 ASSY SLTR BRG HSG CNTNS FLOW SYSTEM 1 6 05-07-0389 WDMT SLTR SPOUT CNTNS FLOW SYS 30U 1 7 5/10/3821 WSHR .25THK X 1.313ID X 3.00OD 1 8 5/10/3823 PLT UHMW 7.0 ID DIST SLIDING SEAL 1 9 05-11-0412 SHAFT DIST DRV 1.75 HEX 1 10 06-01-0094 SCRW PAN HD 8-32 X 1.00 ZP 4 11 06-01-0097 BOLT .250-20 X 2.00 ZP GR5 4 12 06-01-0124 BOLT, FLG .375-16 UNC ZP GRADE 5; 3/4" LG 2 13 06-01-0189 BOLT, FLG .375-16 UNC ZP GRADE 5; 1-1/4" LG 2 14 06-01-0224 BOLT CAP .500-13 X 1.00 BTNH 4 15 06-02-0001 NUT FULL .250-20 ZP GR5 4 16 06-02-0034 NUT 8-32 K-LOCK ZP 4 17 06-04-0016 WSHR THRST 1.0 X 1.99 X .088 PCMPST 1 18 06-05-0001 WASHER, FLAT .250 4 19 09-02-0001 ATWK LBL DANGER FINGERS 1 20 09-02-0022 ATWK LBL DANGER AUTO START 2 21 10215E PLT DIST PROOF SW BRKT CS 1 22 1021F5 BRKT CONN TRCK 1 23 24 103928 103929 COVER SWITCH GUARD 1 1 Page 58 Description Qty Tri - Flo ® Seed Wheel with Servo TRI - FLO® TOP ASSEMBLY (05-07-0763) 6 17 34 7 14 29 24 29 5 40 Page 59 Tri - Flo ® Seed Wheel with Servo TRI - FLO® TOP ASSEMBLY (05-07-0763) A 11 2 4 35 3 C 8 B Page 60 Tri - Flo ® Seed Wheel with Servo TRI - FLO® TOP ASSEMBLY (05-07-0763) 15 31 15 29 26 16 31 26 DETAIL A 29 16 DETAIL B DETAIL A DETAIL B 16 DETAIL C Page 61 THIS MATERIAL IS THE CONFIDENTIAL AND PROPRIETARY PROPERTY OF USC, LLC. AND SHALL NOT BE USED WITHOUT PERMISSION. NAME DATE L L C. 05/21/2014 DRAWN davidw Sabetha, Kansas 66534 USA U S C, Tri - Flo ® Seed Wheel with Servo TRI - FLO® TOP ASSEMBLY (05-07-0763) D E F Page 62 Tri - Flo ® Seed Wheel with Servo 31 24 TRI - FLO® TOP ASSEMBLY (05-07-0763) 24 31 24 13 24 12 21 28 13 32 DETAIL D DETAIL E 33 12 21 28 32 DETAIL D DETAIL E 33 30 22 DETAIL F Page 63 Tri - Flo ® Seed Wheel with Servo TRI - FLO® TOP ASSEMBLY (05-07-0763) G THIS MATERIAL IS THE CONFIDENTIAL AND PROPRIETARY PROPERTY OF USC, LLC. AND SHALL NOT BE USED WITHOUT PERMISSION. NAME DATE L L C. 12/30/2014 DRAWN davidw Sabetha, Kansas 66534 USA CHECKED TITLE ENG APPR U S C, 20 UNLESS OTHERWISE SPECIFIED DIMENSIONS ARE IN INCHES: TOLERANCES: FRACTIONS DECIMALS ANGLES ± 1/16 .XX=±.03 .XXX=±.005 .XXXX=±.0005 ±0.50° DO NOT SCALE DRAWING 25 38 DETAIL G Page 64 SIZE DWG NO D File Name:05-07-0763 = Top Assembly.dft Printed 01/08/15 at 15:23 SHEET 6 OF 7 REV Tri - Flo ® Seed Wheel with Servo TRI - FLO® TOP ASSEMBLY (05-07-0763) 10 10 27 27 19 41 1 36 18 9 37 39 WEIGH BAR TO BE INSTALLED UNDER HOPPER 1 Page 65 Tri - Flo ® Seed Wheel with Servo TRI - FLO® TOP ASSEMBLY (05-07-0763) Item # Part # 1 03-12-0348 PNL CNTL TRI-FLO SEED WHEEL/SERVO DRIVE 1 2 03-12-0364 PNL LOAD CELL JCT BOX TRI FLO 1 3 05-03-0900 WDMT LEG BRACE CNTNS FLOW SYSTEM 3 4 05-03-1008 WDMT BRACE LDCL PLT 3 5 05-05-0066 WDMT LEG CNTNS FLOW WH SYS OPEN TOP 3 6 05-07-0756 SHAFT DIST DRIVE 1.75 HEX 1 7 05-07-0757 ASSY SERVO DRV TRI FLO 1 8 05-07-0758 ASSY AIR MNFD TRI FLO 1 9 05-07-0759 ASSY HOPP 1 TRI FLO 1 10 05-07-0760 ASSY HOPP 2-3 TRI FLO 2 11 05-07-0761 ASSY SLD GATE VALE TRI FLO 3 12 05-07-0762 ASSY HIGH LVL INDI TRI FLO 3 13 05-09-0045 WDMT HOPP SUPP STRAP TRI-FLO 6 14 06-01-0031 BOLT,.625-11 G5 ZP 1.50 6 15 06-01-0051 BOLT, .250-20 X 1.00 UNC 316 SS 12 16 06-01-0075 BOLT, .625 X 11 X 2.50" UNC ZP GRADE 5 12 17 06-01-0096 BOLT .625-11 X 7.00 ZP GR5 3 18 06-01-0113 BOLT U .375-16 X 4.00 X 6.625 ZP 2 19 06-01-0124 BOLT, FLG .375-16 UNC ZP GRADE 5; 3/4" LG 4 20 06-01-0136 BOLT CRG .375-16 X 2.00 ZP GR5 12 21 06-01-0138 BOLT, FLG .3125-18 UNC ZP GRADE 5; 3/4" LG 6 22 06-01-0230 BOLT M16-2.00 X 50MM FTH 12 23 06-01-0270 BOLT CRG .500-13 X 1.00 ZP GR5 12 24 06-02-0005 NUT, .625-11 UNC ZP GRADE 5 15 25 06-03-0003 NUT NYL LOCK .375-16 ZP GR5 12 26 06-03-0013 NUT,LOCK, FLG .250-20 ZP SERRATTED 12 27 06-03-0014 NUT LOCK FLG .375-16 ZP GR5 8 28 06-03-0019 NUT LOCK FLG .3125-18 ZP GR5 6 29 06-04-0005 WASHER, .625 LOCK ZP 21 30 06-04-0018 WSHR LOCK SPLT M16 ZP 12 31 06-05-0006 WASHER, .625 FLAT ZP 18 32 06-09-0018 PIN CTTR .125 X 1.50 SS 6 33 06-09-0058 PIN CLVS .500 X 2.75 PLN 6 34 09-01-0003 10233F ATWK LBL MADE IN USA YEL 2.50X2.50 PLT TRI-FLO SHIPPING BRKT 1 3 35 Page 66 Description Qty Tri - Flo ® Seed Wheel with Servo TRI - FLO® TOP ASSEMBLY (05-07-0763) Item # Part # 36 102B71 BRKT TRI-FLO PNL 1 37 10393B CYLINDER GUARD 3 38 12-04-0023 SLIDE GATE 6.00 SQ TRI-FLO SIMPLE 3 39 13-05-0263 40 41 13-05-0268 13-10-0019 Description KIT WEIGHT BAR TRI-FLOW KIT FORK PCKT ASSY TRI-FL KIT BOLT INDI PNTR ESTP Qty 1 1 1 Page 67 Tri - Flo ® Seed Wheel with Servo OPTIONAL REMOTE HMI PANEL ASSEMBLY (13-12-0340) There is an optional remote Automated Treater Control Panel. It allows the operator to run the treater from up to 50 feet away. If it is ordered with the treater, it will come with the HMI operation screen already installed. If it is added later as an upgrade, the HMI will be removed from the original Control Panel and installed in the remote panel. A plug is included in the kit to plug the hole in the main panel after the HMI is removed. The remote panel comes with a 10 foot power cord. Page 68 Tri - Flo ® Seed Wheel with Servo USC Limited Warranty Section J USC, LLC, (Manufacturer) warrants its seed treating equipment as follows: 1. Limited Warranty: Manufacturer warrants that the Products sold hereunder will be free from defects in material and workmanship for a period of 18 months from date of shipment. If the Products do not conform to this Limited Warranty during the warranty period, Buyer shall notify Manufacturer in writing of the claimed defects and demonstrate to Manufacturer satisfaction that said defects are covered by this Limited Warranty. If the defects are properly reported to Manufacturer within the warranty period, and the defects are of such type and nature as to be covered by this warranty, Manufacturer shall, at its expense, furnish replacement Products or, at Manufacturer’s option, replacement parts for the defective products. Shipping and installation of the replacement Products or replacement parts shall be at the Buyer’s expense. 2. Other Limits: THE FOREGOING IS IN LIEU OF ALL OTHER WARRANTIES, EXPRESSED OR IMPLIED, INCLUDING BUT NOT LIMITED TO THE IMPLIED WARRANTIES OF MERCHANTABILITY AND FITNESS FOR A PARTICULAR PURPOSE. Manufacturer does not warrant against damages or defects arising from improper installation (where installation is by persons other than Manufacturer), against defects in products or components not manufactured by Manufacturer, or against damages resulting from such non-Manufacturer made products or components. Manufacturer passes on to the Buyer the warranty it received (if any) from the maker of such non-Manufacturer made products or components. This warranty also does not apply to Products upon which repairs and/or modifications have been effected or attempted by persons other than pursuant to written authorization by Manufacturer. Manufacturer does not warrant against casualties or damages resulting from misuse and/or abuse of product(s), acts of nature, effects of weather, including effects of weather due to outside storage, accidents, or damages incurred during transportation by common carrier. 3. Exclusive Obligation: THIS WARRANTY IS EXCLUSIVE. The sole and exclusive obligation of Manufacturer shall be to repair or replace the defective Products in the manner and for the period provided above. Manufacturer shall not have any other obligation with respect to the Products or any part thereof, whether based on contract, tort, strict liability or otherwise. Under no circumstances, whether based on this Limited Warranty or otherwise, shall Manufacturer be liable for incidental, special, or consequential damages. 4. Other Statements: Manufacturer’s employees or representatives’ oral or other written statements do not constitute warranties, shall not be relied upon by Buyer, and are not a part of the contract for sale or this limited warranty. 5. Return Policy: Approval is required prior to returning goods to USC, LLC. A restocking fee will apply. 6. Entire Obligation: This Limited Warranty states the entire obligation of Manufacturer with respect to the Products. If any part of this Limited Warranty is determined to be void or illegal, the remainder shall remain in full force and effect. Page 69 USC, LLC 2320 124th road Sabetha, KS 66534 PHONE: (785) 431-7900 FAX: (785) 431-7950 EMAIL: [email protected] WEB: www.uscllc.com