1
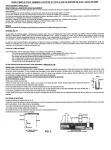
Operations Manual
Manuel d’opérations
Gladiator 1050 Ride-On
Sweeper
Code: 19676
Serial Number:
Numéro de série : ______________________
Date of Purchase:
Date d’achat: _________________________
More info / Plus d’info : www.dustbane.ca
2015-04
07774
INTRODUCTION / GENERAL WARNINGS
Welcome on
on board!
board!
Welcome
We thank
thankyou
youforfor
choosing
and congratulate
you for
We
choosing
IPCDustbane
and congratulate
you for purchasing
purchasing
the Gladiator 1050 Ride-On.
the
Genius 050
sweeper
was especially
designed
to safety
guarantee
safety and
AThis
sweeper
especially
designed to
guarantee
and concern
for
concern
for the environment.
the
environment.
The innovative
innovativedesign,
design,the
the
robust
trustworthy
structure
The
robust
andand
trustworthy
structure
and and
the
the
recyclable
components
make
the
Gladiator
1050
a
truly
unique
recyclable components make Genius 050. a truly unique machine.
machine.
Before
using your machine, we advise you to carefully read this
Before using
machine, we
advise
youcharacteristics
to carefully read
this
handbook.
It isyour
an invaluable
guide
to the
of your
manual.
It
is
an
invaluable
guide
to
the
characteristics
of
your
machine and will help you use it correctly.
machine
and it
will
help youprecious
use it correctly.
In
particular,
provides
information concerning safety,
In particular, it provides precious information concerning safety,
integrity and concern for the environment.
integrity and concern for the environment.
is not your case, contact an authorised service centre.
· Always use ORIGINAL spare parts. You can purchase these from a
dealer or authorised retailer.
Disconnect the machine from the mains before carrying out any
maintenance operation.
· Do not remove guards that need to be removed with the aid of
tools.
· Do not wash the machine with direct jets of pressurised water or
with corrosive substances.
· Every 200 hours of work, have the machine checked by an authorised
service centre.
· This product is classified as RAEE type special waste and is covered
by the requisites of the new environmental protection regulations
(2002/96/CE RAEE). It must be disposed of separately from ordinary
waste in compliance with current legislation and standards.
ENGLISH
English
English
(Translation
(Translation
ofof
original
original
instructions)
instructions)
INTRODUCTION
This instruction handbook contains guidelines and practical
information concerning the use, adjustment and routine maintenance
of your new machine.
Your machine has been designed and built to offer the best in terms
of performance, comfort and ease-of-use in a variety of different
conditions. Before delivery, your machine has been checked at our
factory and by our dealer to guarantee that it is handed over to you in
perfect working order. To maintain the machine in this condition and
ensure problem-free operation, strictly follow the instructions given
in the handbook. Before attempting to use the machine, read this
handbook and keep it to hand for any future consultation. The words
RIGHT and LEFT always refer to the direction in which the machine
is travelling. If you have any doubts concerning the machine, do not
hesitate to contact your dealer. Dealers will offer you competent
personnel, original spare parts and all the equipment you will need.
NEVER use the machine without its guards and safety systems. For
your safety, make sure all guards and safety systems are closed and
correctly mounted before starting the machine.
GENERAL SAFETY RULES
To prevent damage and bodily harm, strictly follow the safety rules below.
Read the safety labels on the machine and do not cover them for any reason
whatsoever. Replace them if they are damaged or become unreadable.
· The storage temperature ranges from 0° to + 50°C.
· The optimal working temperature should range from 0° and + 40°C.
· The ambient humidity must range from 30 to 95 %.
· Do not use the machine as means of transport.
· Do not use solvents or similar substances to clean the machine.
· Avoid running the brushes when the machine is still, to prevent damage
the floor.
· Do not use the machine to draw up inflammable liquid.
· If fires break out, use a dry-chemical extinguisher. DO NOT USE WATER.
· Do not bump against shelves or scaffolding when there is a risk of objects
falling over.
· Adapt the speed of the machine to the conditions of adherence.
· Avoid using the machine if its stability is not guaranteed.
·If you notice that the machine is not working properly, make sure this does
not depend on failure to carry out the routine maintenance operations. If this
Special waste. Do not dispose of with
ordinary waste.
- USE AND STORAGE IN ENVIRONMENTS WHERE THERE IS A RISK OF
EXPLOSION IS PROHIBITED.
MODIFICATIONS AND IMPROVEMENTS
Our company policy is based on the continuous improvement of our
products. We therefore reserve the right to apply modifications and
improvements whenever we believe these are necessary, without
having to upgrade the machines previously sold.
SAFETY
Accident-prevention is also your responsibility.
No accident-prevention plan can be effective without the total cooperation of the person directly responsible for machine operation.
Most accidents that occur in a company, during work or transport are
caused by failure to observe the basic rules concerning safety.
A careful and prudent user is the best guarantee against accidents
and will prove to be much more effective than even the strictest
accident-prevention plan.
During work, pay attention to the persons standing in the area to
clean, especially children.
SERIAL NUMBER – CE MARKING
Make sure the machine is fitted with a plate featuring the serial number
and the CE mark. It is affixed in the position shown in Fig. If the plate is
not in place, contact your retailer immediately.
--
3
English (Translation of original instructions)
UNPACKING
ENGLISH
Unpack your machine with great care, avoiding any manoeuvre that
could lead to damage.
Once you have unpacked it, make sure all parts are in a good
condition. If you notice any damage, DO NOT use the machine and
contact your retailer immediately.
For reasons concerning packaging and transport, some parts and
optional items may be supplied disassembled. To assemble them,
follow the instructions given in this handbook in the respective
sections.
A)
- Selection of displayed data
B)
- Display
C)
- Key and indicator of work programme D)
- Key and indicator of work programme 2
E)
- Key and indicator of work programme 3
F)
- Filter shaker ON button
G)
- ON-OFF button and aspirator motor indicator
H)
- Side brush speed adjustment knob
I)
- Button to start/stop the engine (Dual Version)
L)
- Ignition key
M)
- Forward/reverse button
N)
- Waste bin “full” indicator (Optional)
O)
- Claxon
P)
- Light switch
Q)
- Emergency
R)
- Maximum speed adjustment knob
S)
- Drive board alarm indicator, identifies the error code on the board
according to the frequency with which the LED flashes.
Contents of the package
N° Machine
N° or 2 Side brush
N° 2
Keys for starting
N° Use and maintenance handbook
N° Declaration of conformity
N° Warranty coupon
---Batteries (if purchased)
N° Battery connection kit
N° Battery charger (if purchased)
The DP version also features the operating instructions of the
engine.
If you notice that any of the above are missing, contact your retailer
immediately.
In the absence of malfunctions, the status LED is steadily on while
the machine is in operation.
NOTE
To prevent it from getting lost during transport, the
keys have been put inside the envelope containing the technical
literature.
PREPARING THE MACHINE
Either in the petrol or in the DP version, the machine calls for a set
of 24 V batteries.
The machine can be supplied in three options:
. Batteries supplied with the machine, fitted and filled with acid,
ready for use.
2. Batteries supplied and fitted dry (without the liquid electrolyte).
3. Batteries not supplied.
Make sure the packaging materials (bags – cartons – pallets – hooks
– etc.) are put
away, out of the reach of children.
Precautions to take before starting the machine:
Raise the bonnet carrying the seat by pushing it forward towards the
steering wheel and check which option applies to your machine.
To facilitate transport, the side brush (or brushes) is not mounted in
its expected working position.
To put it in place, read the – Preparing a new machine – section.
THE CONTROLS AND THE CONTROL PANEL
If the batteries are fitted, open up one of the vent caps of each battery
and check if they are filled with electrolyte.
)
3)
4)
5)
5A)
4
- Brake lock pedal and parking brake pedal
- Flap raising pedal
- Accelerator pedal
- Right hand side brush control lever
- Left hand side brush control lever
-2-
English
English
(Translation
(Translation
ofof
original
original
instructions)
instructions)
a) Check the level of electrolyte and top up if necessary (use only
distilled water).
b) Recharge (see the MAINTENANCE section and the battery
instruction handbook).
3- If the machine has been supplied without batteries, these must be
purchased and installed accordingly.
Competent battery specialists should preferably be contacted to
choose and install the new batteries.
ENGLISH
- If the batteries are already filled:
2 - If the batteries are supplied without liquid (i.e. dry), they must
be filled with sulphuric acid (density from .27 to .29 kg at 25°C),
according to the instructions given in the next paragraph and in the
battery handbook.
Filling batteries with acid.
Pay particular attention when you are handling sulphuric acid. This
substance is corrosive. If it comes into contact with your skin or eyes,
wash with plenty of fresh water and seek medical assistance.
Batteries must be filled in a ventilated area.
The electrical connection cables supplied with the machine may be
used to connect the batteries.
Once the batteries have been installed, connect the battery connector
to the machine.
If the machine is in the DP version, it must be filled with lead-free
petrol , depending on the engine. A label indicating the kind of fuel
to use is in any case applied near the fuel cap.
Check the level of oil in the engine (see the “MAINTENANCE”
chapter).
Fill the cells (or single elements) of the batteries with acid. The correct
level is indicated in the battery instruction handbooks.
After an hour, top up the cells, if necessary, with more acid.
Let the batteries rest – with the machine stopped – for another
hour and then refill, in accordance to the instructions given in the
handbook provided with the battery (refer to the “MAINTENANCE”
section). During the charging operations, all battery caps must be
open.
-3-
5
English (Translation of original instructions)
REMOVING THE BATTERIES
ENGLISH
When removing the batteries, the operator must be equipped with suitable
personal protection devices (gloves, goggles, overalls, safety shoes, etc) to
reduce the risk of accidents.
Make sure the switches on the control panel are in the“0”position (off) and the
machine is turned off. Keep away from naked flames, do not short circuit the
battery poles, do not cause sparks and do not smoke. Proceed as follows.
• disconnect the battery wiring and bridge terminals from the battery poles.
• if necessary, remove the devices fixing the battery to the base of the
machine.
• lift the batteries from the compartment using suitable lifting equipment.
When the machine is running with the endothermic engine, make sure
the cooling fan is running too. If the alternator overheats, the overheating
protection device it is fitted with will stop the machine with the “ENGINE
PAUSE” error code.
USING THE MACHINE
TURNING ON THE MACHINE
Fit in the ignition key and turn it clockwise. Three zeros will come up on
the display for about three seconds, followed by the voltage rating of
the battery.
The operator’s seat features a safety device that disables traction (forward
and reverse) when the operator gets up from his seat.
NOTE: temporary activation of the indicator lights on the console and of
the horn is to be considered normal.
To switch the machine ON, select either forward or reverse on the button
on the steering wheel. Then press the accelerator pedal and the machine
will start moving.
AUTO-POWER-ON/OFF
An automatic system turns the machine functions on and off
automatically.
When one of the three work programmes is selected by pressing the P,
P2 or P3 button, the following functions are temporarily activated: centre
brush, suction motor, side brushes. The LED of the chosen programme
and the centre brush LED come on at the same time.
If the accelerator pedal is not pressed, after a few seconds the functions
shut down and the three LEDS start flashing. The sweeper is now in AUTOPOWER-OFF mode. All functions are automatically reactivated when the
user presses the accelerator pedal: AUTO-POWER-ON.
Let at least three seconds pass after you have turned off the machine,
before turning it on again.
Check the state of the batteries on the appropriate display.
The display has two functions: Voltmeter and Hour meter.
The voltmeter features an undervoltage checking function which
automatically disables all services, traction excluded, if the battery charge
level drops below 20.5V (“FLAT BATTERY” flashes on the display)
In this case, recharge the battery (see the “MAINTENANCE” section and
the battery handbook).
If the battery charge level is suitably high, you can start your work.
If the machine features a petrol engine, first start the engine.
NOTE: When the accelerator is released all the machine functions are
automatically switched off, with the exception of the endothermic
engine, which will be switched off after approximately 6 seconds (AUTO
POWER OFF).
USING THE WORK PROGRAMMES
After turning on the machine and starting the engine, if necessary,
choose among the three available programmes, the one best suiting
your requirements by pressing one of the three keys.
STARTING/STOPPING THE PETROL ENGINE
To start the endothermic engine, push toggle switch I towards
its START position (see switchboard); the toggle switch will flick
automatically back to its initial position.
N.B.: if the engine does not start immediately, the maximum activation
time of the starter motor must not exceed 5 seconds for a petrol
engine . These activation intervals can be repeated after a short
resting time (approximately 8 – 0 sec.).
To stop the motor, flick toggle switch I to OFF.
-4-
6
English
English
(Translation
(Translation
ofof
original
original
instructions)
instructions)
BUTTON (Light cleaning, indoors, concrete, quartz, smooth floors,
etc.)
BUTTON 2 (Medium cleaning, carpet or other surfaces)
BUTTON 3 (Heavy duty cleaning, outdoors, asphalt or rough surfaces
with rubble, etc.).
NOTE: the parameters of programmes , 2 and 3 are factory set. To
modify any of the settings, contact the retailer’s service centre.
Adjust maximum forward movement speed according to the working
conditions
The version featuring an engine can guarantee the same working
efficiency even when the motor is off, for instance when the fuel has
run out or when working in closed environments.
The working autonomy, in this case, will depend on the capacity
(Amperes/hour) of the batteries installed, on the intensity of the work
programme chosen and on the battery charge status.
To guarantee the working life of the batteries, the machine features
some safety systems:
ENGLISH
FURTHER PERFORMANCES OF THE MACHINE FEATURING AN
ENGINE
- When the battery voltage drops below 20.5 Volt, all machine
functions, with the exception of the traction system, are automatically
stopped. When this situation occurs, recharge the batteries or turn
on the engine.
Lower the left and/or right side brush by pulling out and lowering
the relevant knob.
NOTE: the relevant left or right indicator light will come on.
To move the brushes back to their OFF position, pull up the knobs.
The speed of the side brushes can be changed using the adjustment
knob shown in the figure.
2- Protection against excessive battery charging
Being fitted with a current generator featuring an electronic circuit,
that acts as voltage regulator, the machine can correctly charge the
battery without damaging it with an excessive charge.
In fact, when the battery has been properly charged, it will except
no further charging energy.
3- Using the machine with a battery or engine
Further to the tests effected and the results obtained from the
evaluation of the energy consumption of our hybrid system, we can
affirm that Genius 050 can work autonomously. In other words, the
machine does not have to be stopped to recharge the set of batteries
. Tests have been made with all three programmes at the user’s
disposal, namely P, P2 and P3, on asphalted surfaces and normal
slopes, and the sweeper has worked autonomously.
However, being the machine designed also for heavy duty working
conditions (slopes of over 6%, extremely rough surfaces to clean),
the batteries may need to be recharged.
In this case, we recommend the use of an intelligent battery
charge with a IUIa charging curve and a final proportional charge,
appropriately designed for this kind of machine and of a suitable size
for the battery installed.
After you have ended your work, disable the selected programme (2-3) and turn off the engine by flicking the toggle switch ‘I’ to OFF.
Before leaving the machine, make sure that the side brushes are raised
from the floor, the parking brake is engaged and that the ignition key
has been take out of the instrument board.
The machine features a red emergency stop button.
Press this button (the red warning light will come on) to bring all
machine functions, engine included, to an immediate stop. To restart
the machine, press the red button down and start up the functions
requested.
If you are using the machine on wet ground, it is essential to protect
the machine’s paper filters by turning off the aspirator motor with
the ON/OFF button.
-5-
7
English (Translation of original instructions)
intervals.
EMPTYING THE WASTE BIN
2) by means of an electric filter shaker that is manually started
ENGLISH
Just a simple command is needed to keep the filter in perfect
working order: press the button marked ‘F’ and hold it down for a few
seconds. Repeat this operation 4 or 5 times.
Remember that the cleaner the filter, the better the results of your
cleaning session. It is recommended to carry this operation
out at the end of each work cycle.
NOTE: dusty environments
If you are using the machine in a dusty environment (e.g. sawmills
– warehouses where haulage vehicles pass, etc.), it is a good idea to
use the filter shaker more frequently.
3) by manually cleaning the filter
If operating the filter shaker is not enough to keep the filter clean
- and in any case every 20 hours of work - clean the filter manually.
Before carrying out any kind of intervention on the machine, make
sure it is turned off and that all functions are deactivated. To obtain
this condition, turn the switch marked ‘L’ to OFF.
-Move to the waste container.
2-Pull lever that locks/releases the bin.
3-Pull out the bin and empty it.
4-Refit the bin and lock it in place with lever
° Remove the rear box from the machine
2° Take the filter out of its seat by turning the two fixing handles.
3° Blow compressed air onto the side of the filter featuring the
protective net (at a pressure of 6 bar at the most).
4° Refit the filters and the rear panel.
FITTING AND REPLACING THE SIDE BRUSHES
To facilitate transport, the side brush (or brushes) is not fitted in its
expected working position.
To fit the brush in its correct working position, proceed as follows:
- Pull up the brush knob.
2- Loosen the screw on the shaft of the side brush motor.
3- Remove the key protection.
4- Place the brush with its flange on the shaft.
5- Tighten the fixing screw.
To replace worn side brushes, carry out the operations listed above.
Important : raise and lower the side brushes while the machine is
running.
REPLACING LIGHT BULBS
CLEANING AND SERVICING THE FILTER
The filter is a very important component of the machine and essential
for correct operation.
Proper filter maintenance will allow you to obtain the best
performance from your machine.
The filter can be cleaned in any of the following three ways:
) by means of the automatic cleaning system
According to the chosen work programme, the machine is
programmed to automatically clean the filter at regular preset
-6-
8
To replace the front light bulb:
Remove the front cover by loosening the fixing screws.
Replace the bulb, making sure that the new bulb has suitable electrical
features.
Refit the front cover.
English
English
(Translation
(Translation
ofof
original
original
instructions)
instructions)
REPLACING THE CENTRE BRUSH
ENGLISH
Caution: this operation must be carried out with the machine off and
the key removed.
Remove the worn brush.
This machine features a system for automatically adjusting the
pressure exerted and compensating for wear.
The need to replace the central brush is highlighted on the display
by the wording “BRUSH WORN OUT”
Remove the adapter of the brush stem and fit it onto the new brush.
Maintain the same inclination of the bristles.
(See the next figure).
To replace the centre brush, proceed as follows:
Open up the door on the left hand side of the machine by loosening
the knob, as shown in the figure.
Unscrew and remove the knobs that fix the brush housing cover
Refit the adapter and mount the new brush. Make sure the adapter
is inserted into the hub.
Remove the cover of the brush compartment.
-7-
9
English (Translation of original instructions)
Refit the cover of the brush compartment and tighten the knobs by
following the disassembly instructions in reverse order.
ENGLISH
· The battery must be recharged in a sufficiently ventilated area
· Open up all the caps of the battery cells.
· Connect the battery connector to the battery charger.
Connect the battery charger to the mains (the mains voltage and
frequency ratings must correspond to those of the battery charger).
MAINTENANCE,
CHECKING AND RECHARGING THE BATTERY
Check the level of electrolyte inside the batteries regularly.
The battery compartment is under the operator’s seat. Raise the
bonnet and open the caps on the cells. If necessary, top up with
distilled water.
The level of electrolyte is indicated in the battery instruction
handbook.
· After charging, disconnect the battery from the charger and hook it up
to the machine.
Put the caps back on and clean the top surface of the battery.
IMPORTANT: check the battery level every 00 hours.
After you have filled the battery, close the cells with their caps and
clean the top surface.
Pay the utmost attention when you are handling the battery liquid,
as it is corrosive. In the event of contact with your skin or eyes, wash
with plenty of fresh water and seek medical assistance.
ADJUSTING THE BRAKE
If the service brake or parking brake is not effective enough, it can be
adjusted by acting on the front wheel. Loosen locknut B by turning
screw A and then tighten locknut B again.
Whenever necessary, charge the battery according to the following
instructions:
· Turn the machine off with the main key.
· Raise the bonnet.
· Disconnect the machine’s battery connector.
-8-
10
English (Translation of original instructions)
SUMMARY TABLE
IMPORTANT: these operations must be carried out with the machine off and the key removed.
All routine and corrective maintenance operations must be effected by competent personnel or at an authorised service centre.
NOTE: the life of the battery strictly relates to regular periodic maintenance (checking the level and density of the electrolyte).
If the machine has not been used for a long time (for instance 4-6 weeks), it is in any case necessary to recharge the batteries to guarantee
that the voltage level never drops below the threshold value of 20.5 V.
If not used, batteries tend to lose their charge.
A:
B:
C:
D:
E:
ENGLISH
MAINTENANCE OF THE BATTERY VERSION
upon delivery
every 30 hours
every 50 hours
every 00 hours
every 400 hours
CHECK
A
Battery liquid and voltage levels
□
Check the brushes (or charcoal) of all electric motors and replace if worn
Tightness of the belts
Brake adjustment
B
C
E
□
or every 2
weeks
□
□
□
□
□
Filter shaker
Tightness of the nuts and screws
□
State of the side brush
Clean the panel filter
Tightness of the bin, filter, flap gaskets
D
□
□
□
□
11
SECURITY CODE
MOTOR PAUSE
SECURITY CODE
MACHINE BEHAVIOUR
POSSIBLE INTERVENTION
ENGLISH
HAVING GONE UP A STEEP SLOPE, THIS
MAY BE NORMAL. LEAVE THE ENGINE TO
TRACTION
ENGINE
OVERHEATS
TO
95°C
OR
THE TRACTION IS BLOCKED TROUBLESHOOTING TABLE
THE ALTERNATOR OVERHEATS TO 50°C COOL DOWN FOR 20 MINUTES. CHECK
THAT THE COOLING FAN IS WORKING
CORRECTLY.INTERVENTION
CHECK THAT THE BRAKE IS
POSSIBLE
ERROR DESCRIPTION
MACHINE BEHAVIOUR
NOT BLOCKED. CHECK THAT THE TRACTION
WHEEL SPINS
HAVING
GONEFREELY.
UP A STEEP SLOPE, THIS
MOTOR PAUSE
THE TRACTION IS BLOCKED
TRACTION PAUSE
THE TRACTION IS BLOCKED
TRACTION ENGINE OVERHEATS TO 95°C OR MAY BE NORMAL. LEAVE THE ENGINE TO
THE ALTERNATOR OVERHEATS TO 50°C COOL DOWN FOR 20 MINUTES. CHECK
THAT THE COOLING FAN IS WORKING
THE ATMOSPHERIC
THE ELECTRONIC CONTROL CIRCUIT IF
CORRECTLY.
CHECK THATTEMPERATURE
THE BRAKE IS
IS
HIGH,
STOPCHECK
THE THAT
MACHINE
FOR 20
OVERHEATS TO > 85°C
NOT
BLOCKED.
THE TRACTION
MINUTES
ANDFREELY.
THEN RESTART IT. IF THE
WHEEL SPINS
PROBLEM PERSISTS, CALL THE SERVICE
CENTRE
TRACTION PAUSE
BRUSH CURRENT
THE TRACTION IS BLOCKED
THE OPERATING FUNCTIONS STOP
THE ELECTRONIC CONTROL CIRCUIT
EXCESSIVE
DRAW OR CENTRAL
OVERHEATSPOWER
TO > 85°C
BRUSH LOCK
CHANGE THE OIL
BRUSH CURRENT
THIS APPEARS ONLY IF THE MACHINE
IS
FITTED
WITH AN
ENDOTHERMIC
THE
OPERATING
FUNCTIONS
STOP
ENGINE
IT IS ACTIVATED ONLY AFTER 99 WORKING ENGINE OIL REPLACEMENT SIGNAL (TO
RESET PRESS THE DISPLAY BUTTON FOR
HOURS
EXCESSIVE POWER DRAW OR CENTRAL CHECK THE BRUSH RUNS SMOOTHLY AND
5
SECONDS
OIL HOUR COUNTER
CHECK
FOR ON
ANYTHE
IMPEDIMENTS
(STRING,
BRUSH LOCK
SCREEN)
NYLON OR OTHER)
BATTERY
RESERVE
CHANGE THE
OIL
WARNING
THAT
THE
BATTERY
IS
THIS APPEARS
ONLY
IF THE
MACHINE
ALMOST
IS
FITTEDFLAT
WITH AN ENDOTHERMIC
ALMOST FLAT
NO INTERVENTION
REQUIRED
OTHER
THIS
HAPPENSONLY
WHEN
THE
BAT TERY ENGINE
OIL REPLACEMENT
SIGNAL
(TO
IT IS ACTIVATED
AFTER
99 WORKING
THAN
BATTERY
VOLTAGE
RESET CHARGING
PRESS THE THE
DISPLAY
BUTTON FOR
HOURS FALLS BELOW 2V
5 SECONDS ON THE OIL HOUR COUNTER
SCREEN)
IF FOR 3 CONSECUTIVE SECONDS THE RECHARGE THE BATTERY
VOLTAGE READ BY THE KEY IS LESS THAN
20,
3V HAPPENS WHEN THE BAT TERY NO INTERVENTION REQUIRED OTHER
THIS
THAN CHARGING THE BATTERY
VOLTAGE FALLS BELOW 2V
FLAT BATTERY
THE
BLOCKED
THE MACHINE
MACHINEIS FUNCTIONS
ALL
STOP WITH THE EXCEPTION OF THE
TRACTION
RECHARGE THE BATTERY
IF
IF FOR
FOR 3
3 CONSECUTIVE
CONSECUTIVE SECONDS
SECONDS THE
THE RECHARGE THE BATTERY
VOLTAGE
VOLTAGE READ
READ BY
BY THE
THE KEY
KEY IS
IS LESS
LESS THAN
THAN
8V3V
20,
BRUSH WORN OUT
THE MACHINE CONTINUES TO RUN
BATTERY WORN OUT
THE MACHINE IS BLOCKED
THE BRUSH NO LONGER APPLIES SUITABLE REPLACE THE CENTRAL BRUSH
PRESSURE TO THE FLOOR AS IT IS WORN
OUT
IF FOR 3 CONSECUTIVE SECONDS THE RECHARGE THE BATTERY
VOLTAGE READ BY THE KEY IS LESS THAN
8V
BRUSH WORN OUT
THE MACHINE CONTINUES TO RUN
ENGINE
FLAT BATTERY
BATTERY RESERVE
BATTERY WORN OUT
12
ERROR DESCRIPTION
English (Translation of original instructions)
THE MACHINE FUNCTIONS ALL
STOP WITH THE EXCEPTION OF THE
TRACTION THAT THE BATTERY IS
WARNING
IF THE ATMOSPHERIC TEMPERATURE
CHECK
THESTOP
BRUSH
RUNS
SMOOTHLY
IS HIGH,
THE
MACHINE
FORAND
20
CHECK
FOR
ANYTHEN
IMPEDIMENTS
(STRING,
MINUTES
AND
RESTART IT.
IF THE
NYLON
OR PERSISTS,
OTHER) CALL THE SERVICE
PROBLEM
CENTRE
THE BRUSH NO LONGER APPLIES SUITABLE REPLACE THE CENTRAL BRUSH
PRESSURE TO THE FLOOR AS IT IS WORN
OUT
English (Translation of original instructions)
If the machine drive is interrupted, the error code should be identified by means of the status LED.
In the absence of malfunctions, the status LED is steadily on while the machine is in operation. If a malfunction is detected, the status LED
provides two types of information, a slow flash (2 Hz) or a rapid flash (4 Hz) to indicate the severity of the malfunction.
Malfunctions with a slow flash are cancelled automatically once the malfunction has been repaired and the machine functions normally
again.
Malfunctions with a rapid flash (“*” in the table) are considered more serious. The machine must be turned of to reset operation after repairing
the malfunction.
The indication of severity remains active for 0 seconds, after which the status LED flashes constantly showing a two digit malfunction code
until the repairs have been carried out.
For example, error code “,4” is displayed as follows:
□
□□□□
example alarm code ,4
LED CODES
.
.2
.3
.4
.5
2.
2.3
3.
3.2
3.3
3.4
3.5
4.
4.2
4.3
4.4
□
□
□
□
□
DESCRIPTION
□
□□
□□□
□□□□
□□□□□
□□
□□
ENGLISH
Drive board alarms
□
□□□
Overheating > 92°
Accelerator malfunction
Speed limiter potentiometer malfunction
Undervoltage malfunction
Overvoltage malfunction
Principal contactor actuator opening failure
Principal contactor actuator closing failure
□□□
□□□
□□□
□□□
□□□
□
□□
□□□
□□□□
□□□□□
Accelerator potentiometer malfunction
□□□□
□□□□
□□□□
□□□□
□
□□
□□□
□□□□
Motor short circuit
Brake activation malfunction
Low battery voltage
Brake deactivation malfunction
HPD malfunction (incorrect regulation of accelerator potentiometer)
Incorrect motor voltage/short circuit in motor
EEPROM malfunction
Short circuit in motor/EEPROM error
13
Français (Traduction du mode d’emploi original)
bord!!
Bienvenue à bord
vousremercions
remercionspour
pour
avoir
choisi
et nousd’avoir
vous
Nous vous
avoir
préféré
IPCDustbane
et vous félicitons
félicitons
pour l’achat
de050.
la Gladiator 1050.
choisi
le modèle
Genius
Cettebalayeuse
balayeuse
est conçu
travailler
en sécurité
toute sécurité
en
Une
conçue
pour pour
travailler
en toute
dans le tout
respect
respectant
l’environnement.
de
l’environnement.
Sonligne
design
innovateur,
structuresolide
robuste
performante et
et ses
ses
Sa
innovante,
sasastructure
etetperformante
composants recyclables
recyclablesfont
fontdu
demodèle
la Gladiator
Genius1050
050 une
une balayeuse
absolument unique.
Avant d’utiliser
cettede
machine,
nous
vousvous
conseillons
fortement
de
Cependant,
avant
l’utiliser,
nous
conseillons
de lire
lire attentivement
ce manuel.
attentivement
le contenu
de ce manuel.
pour connaître
connaître chaque
et comprendre
C’est un guide indispensable pour
pièce detoutes
votre
les charactéristiques
de votre machine et vous aidera à l’utiliser
machine
et l’utiliser correctement.
correctement.
vous
donnera
de précieuse
informations
sur
Mais,
surtout, il Ilvous
donnera
deaussi
précieuses
indications
sur la sécurité
la sécurité
et la sauvegarde
de l’environnement.
et
la sauvegarde
de l’environnement.
AVANT-PROPOS
Ce manuel est destiné à servir de guide car il contient toutes les
informations pratiques sur le fonctionnement, le réglage et l’entretien
ordinaire de votre nouvelle machine.
Votre machine à été conçue et fabriquée pour assurer les meilleures
performances, un confort et une facilité d’utilisation dans une grande
variété de conditions. Avant d’être expédiée, votre machine à été
soumise à un contrôle approfondi en usine et chez notre revendeur
de façon à ce qu’elle vous soit livrée en parfaites conditions. Pour
maintenir ces conditions et garantir une utilisation sans problèmes,
il est indispensable que les opérations indiquées dans ce manuel
soient suivies. Avant d’utiliser la machine, lisez donc attentivement
ce manuel et gardez-le toujours à portée de la main pour de futures
consultations. Les indications DROITE ET GAUCHE s’entendent
toujours par rapport au sens d’avancement de la machine. En cas de
doutes, n’hésitez pas à vous adresser au revendeur pour obtenir des
éclaircissements. Il dispose d’un personnel compétent, des pièces de
rechange d’origine et de l’équipement nécessaire pour répondre à
vos besoins. Il est interdit d’utiliser la machine sans ses protections.
Pour votre sécurité, vérifiez si toutes les protections sont fermées ou
montées correctement avant de mettre la machine en route.
CONSIGNES GENERALES DE SECURITE
Les consignes indiquées ci-dessous doivent être suivies attentivement
afin de prévenir tout dégâts au personnel et à la machine.
Lisez et respectez les instructions reportées sur les étiquettes appliquées
sur la machine. Ne les recouvrez pas et remplacez-les immédiatement
par des neuves, si elles devenaientillisibles.
· La température de stockage doit être comprise entre 0° et + 50°C.
· La température d’exercice doit être comprise entre 0° et + 40°C.
· Le taux d’humidité doit être compris entre 30 et 95 %.
· Il est interdit d’utiliser la machine comme un moyen de transport.
· Il est interdit de nettoyer la machine avec des solvants ou d’autres
produits semblables.
· Les brosses ne doivent pas travailler lorsque la machine est arrêtée
pour ne pas endommager les sols.
· En cas de dysfonctionnement, vérifiez s’il n’est pas dû à une négligence
d’entretien ordinaire. Si ce n’est pas le cas, faites intervenir un centre
de service après-vente agréé.
· En cas de changement de pièces de rechange, exigez des pièces de
rechange D’ORIGINE disponibles auprès d’un revendeur agréé.
· Avant toute intervention sur la machine, coupez d’abord l’arrivée
d’énergie électrique.
· Il est interdit de démonter les protections nécessitant des outils pour
être démontées.
· Il est interdit de laver la machine avec des jets d’eau directs sous
pression ni avec des substances corrosives.
· Toutes les 200 heures d’exercice, faites contrôler la machine par un
centre de service après-vente agréé.
· Il est interdit d’aspirer des liquides inflammables.
· En cas d’incendie, utilisez un extincteur à poudres. N’UTILISEZ JAMAIS
D’EAU.
·Pendant son utilisation, veillez à ne pas heurter des rayonnages ou
des échafaudages car il y a risque de chutes d’objet.
· Adaptez la vitesse d’utilisation aux conditions d’adhérence.
Evitez les conditions d’instabilité.
Ce produit est un déchet spécial de type RAEE et répond aux prescriptions des nouvelles directives pour la protection de l’environnement (2002/96/CE RAEE). Il doit être éliminé séparément des
déchets ménagers conformément aux lois et réglementations en
vigueur.
Déchet spécial. Ne pas éliminer avec les déchets ménagers.
- UTILISATION ET STOCKAGE INTERDITS DANS LES MILIEUX A ATMOSPHERE
POTENTIELLEMENT EXPLOSIVE
MODIFICATIONS ET AMELIORATIONS
Dans un souci d’amélioration constante de nos produits, nous nous
réservons le droit d’effectuer les modifications que nous jugerons
nécessaire sans l’obligation d’en faire bénéficier les machines déjà
vendues.
SECURITE
Vous aussi, vous pouvez prévenir les accidents
Aucun programme de prévention des accidents ne peut être efficace
sans la collaboration totale du conducteur de la machine.
La plupart des accidents sont dus au non respect des plus élémentaires
règles de prudence.
Un utilisateur attentif et prudent est la meilleure garantie contre les
accidents et se révèle plus efficace que n’importe quel programme
de prévention.
Pendant le travail, faites attention aux personnes qui se trouvent dans
la zone à nettoyer, en particulier aux enfants.
N° DE SERIE – INSCRIPTION CE
Vérifiez si la plaquette d’identification reportant le N° de série et
l’inscription CE est appliquée comme illustré dans la Photo . Dans la
négative, informez-en immédiatement le revendeur.
FRANÇAIS
AVANT-PROPOS / GENERALITES
--
15
Français (Traduction du mode d’emploi original)
DEBALLAGE
Déballez soigneusement la machine en évitant les manoeuvres qui
pourraient l’endommager.
Une fois déballée, vérifiez le bon état de tous ses composants. Si
ce n’est pas le cas, N’UTILISEZ PAS la machine et adressez-vous
immédiatement à votre revendeur.
Pour des raisons d’emballage et de transport, certaines pièces et
accessoires peuvent être livrés démontés. Pour leur montage, suivez
les instructions reportées dans ce manuel dans les paragraphes
respectifs.
A)
Sélection des données affichées
B)
Afficheur
C)
Bouton et indicateur sélection programme de travail D)
Bouton et indicateur sélection programme de travail 2
E)
Bouton et indicateur sélection programme de travail 3
F)
Bouton ON moteur dispositif de nettoyage du filtre
G)
Bouton ON-OFF et indicateur moteur d’aspiration
H)
Manette de réglage vitesse brosses latérales
I)
Bouton marche / arrêt moteur Dual.Version
L)
Clé d’allumage
M)
Bouton selection marche avant/arriere
N)
Indicateur de remplissage de la benne à ordures (En option)
O)
Claxon
P)
Allumage lumieres
Q)
Urgence
R)
Bouton réglage vitesse maximale
S)
Indicateur alarme carte traction, la fréquence d’allumage de la LED
indique le code d’erreur de la carte.
Contenu de l’emballage:
N° Machine
N° ou 2 Brosse latérale
N° 2
Clés de démarrage
N° Manuel de mode d’emploi et d’entretien
N° Déclaration de conformité
N° Coupon de garantie
---Batterie ( en option )
N° KIT d’installation batterie
N° Charge-batterie (en option )
Pour la version DP, il y a aussi le Manuel de mode d’emploi et
d’entretien spécifique du moteur.
Si vous deviez constater l’absence d’un ou plusieurs des composants
ci-dessus, adressez-vous immédiatement au revendeur.
Pendant le fonctionnement, s’il n’y a pas de pannes, la LED est
constamment allumée.
NOTE: Pour éviter de les perdre pendant le transport, les clés de
démarrage sont rangées dans le sachet contenant la documentation
technique.
PREPARATION DE LA MACHINE
Veillez à ce que les éléments d’emballage (sachets – cartons – palette
– crochets- etc.) soient rangés dans une zone adéquate en dehors de
la portée des enfants.
Précautions à adopter avant de mettre la machine en route :
Pour faciliter le transport, la brosse ou les brosses latérales n’ont pas
été montées dans leur position prévue pour le fonctionnement de
la machine.
Procédez à leur montage comme décrit dans le paragraphe
– Préparation d’une machine neuve –
La version essence et la version DP de la machine
nécessite un groupe de batterie de 24 V pour fonctionner.
La machine est disponible en trois options :
. Batterie montée et remplie avec de l’acide, prête à l’emploi.
2. Batterie montée à sec (sans électrolyte).
3. Batterie non fournie.
Poussez le capot en avant vers le volant et vérifiez quelle option a
été appliquée à la machine.
DESCRIPTION DES COMMANDES ET DU TABLEAU
DE CONTROL
FRANÇAIS
Si la batterie est montée, ouvrez un des bouchons de ventilation de
chaque cellule et vérifiez s’ils sont remplis d’électrolyte
)
3)
4)
5)
5A)
- Pédale blocage frein et pedale frein de service
- Pédale actionnement déflecteur
- Pédale accélérateur
- Levier de commande brosse latérale droite
- Levier de commande brosse latérale gauche
-2-
16
Français (Traduction du mode d’emploi original)
- Si la batterie contient déjà l’électrolyte:
3- Si la machine a été livrée sans batterie, il faudra l’acheter et la
monter.
Cette opération doit être effectuée par un mécanicien spécialisé.
a) Contrôlez le niveau de l’électrolyte et faites l’appoint si nécessaire
en utilisant seulement de l’eau distillée.
b) Effectuez une recharge (Cf. paragraphe ENTRETIEN et le manuel
spécifique de la batterie).
2 - Si la batterie est livrée sans liquide (c’est à dire sèche), elle doit être
remplie avec de l’acide sulfurique spécial pour batterie (densité de
,27 à ,29 kg à 25°C ) en suivant les instructions indiquées dans le
paragraphe suivant et dans le manuel spécifique de la batterie.
Remplissage de la batterie avec de l’acide sulfurique
Cette opération doit être effectuée avec une grande attention
car l’acide est très corrosif. En cas de contact avec la peau ou les
yeux, rincez immédiatement avec de l’eau propre en abondance et
consultez un médecin.
Le remplissage doit s’effectuer dans une zone bien ventilée.
Les câbles de branchement électrique sont livrés avec la machine et
peuvent être utilisés pour le branchement de la batterie.
Après avoir installé la batterie, branchez le connecteur de la batterie
à la machine.
Si la machine est en version DP, le ravitaillement en carburant doit se
faire avec de l’essence sans plomb , en fonction des motorisations.
Quoiqu’il en soit, le type de carburant est indiqué près du bouchon
du réservoir.
Contrôlez le niveau de l’huile moteur ( cf. le chapitre «ENTRETIEN»).
FRANÇAIS
Remplissez les cellules ou chaque élément de la batterie avec de
l’acide. Le niveau correct est spécifié dans le manuel spécifique de
la batterie.
Après une heure, vérifiez le niveau et faites l’appoint, si nécessaire.
Laissez reposer la batterie encore une heure puis procédez à une
recharge après avoir consulté le paragraphe ENTRETIEN du manuel
d’instructions spécifique de la batterie. Pendant la recharge, tous les
bouchons doivent être ouverts.
-3-
17
Français (Traduction du mode d’emploi original)
DEPOSE DES BATTERIES
Lors de la dépose des batteries, l’opérateur doit être muni des équipements
de protection (gants, lunettes, combinaison, chaussures de sécurité etc.)
nécessaires pour limiter les risques d’accident;
Vérifier que tous les interrupteurs sur le panneau de commande sont sur “0”
(éteint) et que la machine est éteinte, s’éloigner de toute flamme nue, ne pas
court-circuiter les pôles des batteries, ne pas provoquer d’étincelles et ne pas
fumer, et procéder comme suit:
• débrancher les cosses du câblage batteries et du pont des pôles des
batteries.
• retirer, si nécessaire, les dispositifs d’ancrage des batteries à la machine.
• sortir les batteries du coffre en les soulevant avec des moyens de manutention
adaptés.
Chaque fois que la machine fonctionne avec le moteur endothermique,
vérifiez si le ventilateur de refroidissement est en fonction. En cas
de surchauffe de l’alternateur, une protection se déclenche en
provoquant l’arrêt de la machine et l’affichage du code d’alarme
“MOTEUR PAUSE”.
CONDUITE DE LA MACHINE
ALLUMAGE DE LA MACHINE
Introduisez la clé d’allumage et tournez-la dans le sens des aiguilles d’une
montre. L’afficheur indiquera que des zéros pendant 3 secondes environ,
ensuite la valeur du voltage de la batterie s’affichera.
Le siège du conducteur loge un dispositif de sécurité qui désactive la traction
(avant et arrière) lorsque le conducteur se lève.
NOTE : L’allumage temporaire des voyants sur le tableau de bord et le bruit
de l’avertisseur sonore sont normaux. )
Pour mettre la machine en mouvement, selectionner la marche avant ou
arriere a l’aide du bouton positionne sur le volant. Appuyez ensuite sur
la pédale de l’accélérateur et la machine démarre.
AUTO-POWER-ON/OFF
Laissez s’écouler 3 secondes au moins avant de rallumer la machine après
l’avoir éteinte.
Contrôlez la charge de la batterie à travers l’afficheur prévu à cet effet.
L’afficheur a deux fonctions : Voltmètre et compte-heures.
Le voltmètre a aussi une fonction de sécurité car il désactive automatiquement
toutes les fonctions à l’exception de la traction lorsque la batterie descend à un
voltage de 20,5V (sur l’afficheur le message “BATTERIE EPUISSE” clignote).
Dans ce cas, il faut effectuer une recharge de la batterie (Cf. chapitre «Entretien»
et le manuel spécifique de la batterie).
Si la batterie est suffisamment chargée, vous pouvez commencer à
travailler.
Si la machine est équipée d’un moteur à essence, il faut d’abord démarrer le
moteur même.
NOTE : En relâchant la pédale de l’accélérateur ou en plaçant le levier P
au point mort, on obtient l’arrêt automatique de toutes les fonctions,
sauf le moteur à essence, dans un délai de 6 secondes environ (AUTO
POWER OFF).
FRANÇAIS
UTILISATION DES PROGRAMMES DE TRAVAIL
DEMARRAGE / ARRET DU MOTEUR A ESSENCE
Pour faire démarrer le moteur endothermique, pousser le levier I vers la
position START (DÉMARRAGE) (voir le tableau de commandes) ; le retour
du levier à sa position initiale est automatique.
NB : si, pour quelque raison que ce soit, le moteur ne devait pas démarrer
immédiatement, le temps maximum d’excitation du démarreur ne doit
pas dépasser les 5 s. . Ces intervalles d’excitation peuvent être répétés s’ils
sont espacés d’une courte période de repos (environ 8 – 0 s.)
Pour couper le moteur, replacez le levier I sur OFF.
Après avoir allumé la machine et, éventuellement, démarré le moteur
à essence, sélectionnez un des trois programmes de travail prévus en
fonction du nettoyage à effectuer.
-4-
18
La machine est munie d’un système automatique de marche et arrêt des
fonctions. Quand on sélectionne un des trois programmes en appuyant
sur le bouton P, P2 ou P3, les fonctions “ Balai central ”, “ aspirateur ”, “
balais latéraux ” sont activées et la led du programme choisi ainsi que
celle du balai central s’allument.
Si on n’appuie pas sur la pédale de l’accélérateur, au bout de quelques
secondes les fonctions se bloquent et les trois leds commencent à
clignoter: la balayeuse se trouve en fonction AUTOPOWER-OFF.
Toutes les fonctions s’activent à nouveau automatiquement chaque fois
que l’utilisateur appuie sur la pédale de l’accélérateur : AUTO-POWER-ON
(MISE SOUS TENSION AUTOMATIQUE)
Français (Traduction du mode d’emploi original)
ULTERIEURES PERFORMANCES DE LA MACHINE AVEC MOTEUR A ESSENCE
La machine, équipée d’un moteur à essence, peut travailler même
avec le moteur éteint, par exemple quand il n’y a plus de carburant ou
pour travailler dans des milieux clos. L’autonomie de travail dépend
de la capacité (Ampère/heure) de la batterie installée, du programme
de travail choisi et de l’état de charge de la batterie.
Des dispositifs de sécurité ont été prévus pour garantir la durée de
la batterie :
BOUTON (Nettoyage léger intérieur ciment quartzeux, sols lisses,
etc.)
- Lorsque le voltage de la batterie descend en-dessous de 20,5 Volt,
une sécurité se déclenche automatiquement en bloquant toutes les
fonctions, sauf la traction. Dans cette condition, il faut recharger la
batterie ou démarrer le moteur à essence.
BOUTON 2 (Nettoyage moyen moquette ou autres surfaces
BOUTON 3 (Nettoyage lourd extérieur asphalte ou chaussées
accidentées avec des détritus importants).
NOTE : Les paramètres de travail des programmes – 2 – 3 ont été mis
au point en usine par le fabricant. Pour modifier ces valeurs, contactez
le service après-vente de votre revendeur.
Régler la vitesse maximale d’avancement selon les conditions de
travail.
2- Protection contre la recharge excessive de la batterie
La machine est équipée d’un générateur de courant avec circuit
électronique qui fait fonction de régulateur de tension. Il permet
de charger correctement la batterie, sans l’endommager avec des
charges excessives.
Lorsque la batterie est parfaitement chargée, elle ne recevra plus
d’autre charge.
3- Utilisation de la machine avec la batterie et le moteur à essence.
Sur la base d’essais effectués sur le terrain et sur la base des résultats
du bilan énergétique de notre système hybride, nous pouvons
affirmer que Genius 050 peut fonctionner en toute autonomie et ne
requiert donc aucun arrêt de la machine pour la recharge extérieure
du jeu de batteries . En effet, à l’occasion de plusieurs essais avec
les trois programmes à disposition de l’utilisateur (P, P2, P3) sur
des surfaces asphaltées et avec des pentes normales, la balayeuse a
fonctionné en toute autonomie.
Cependant et étant donné que la machine a été conçue pour travailler
dans des conditions difficiles (pente de 6% environ, grosse difficulté
de la surface de nettoyage, etc.), les batteries pourraient avoir besoin
de la recharge
Dans ce cas, il est conseillé d’utiliser un charge-batterie «intelligent»,
avec une courbe de charge IUI et une charge finale proportionnelle
spécialement étudiée pour ce type de machine et dimensionné au
modèle de batterie installée.
Abaissez la brosse latérale gauche ou droite en extrayant et en
abaissant les manettes prévues à cet effet.
NOTE : L’indicateur lumineux gauche ou droit s’allumera sur le tableau
de contrôle. Pour ramener les brosses latérales en position OFF,
soulevez les deux manettes correspondantes.
La vitesse des brosses latérales peut être réglée en agissant sur la
manette illustrée sur la photo.
La machine est aussi équipée d’un bouton d’arrêt d’urgence. La
pression de ce bouton (voyant rouge allumé) provoque l’arrêt
immédiat de toutes les fonctions, moteur à essence compris. Pour
réactiver la machine, pressez encore une fois le bouton rouge, puis
réactivez les opérations souhaitées.
FRANÇAIS
A la fin du travail, désactivez le programme de travail utilisé ( -2-3
) et éteignez le moteur à essence en plaçant le levier (rep. I Photo3)
sur la position OFF.
Avant de quitter la machine, vérifiez si les brosses latérales ne sont
pas en contact avec le sol, si le frein de stationnement est tiré et la
clé d’allumage est ôtée du tableau.
En cas de sol mouillé, il est indispensable, afin de préserver les filtres
en papier, de couper le moteur d’aspiration en appuyant sur le
bouton ON/OFF .
-5-
19
Français (Traduction du mode d’emploi original)
VIDAGE DE LA BENNE A ORDURES
) par nettoyage programmé
Les programmes de travail de la machine ont prévu le nettoyage
automatique et cyclique du filtre à des intervalles préétablis.
2) par l’actionnement manuel du dispositif de nettoyage du filtre
électrique
Un simple geste permet d’avoir toujours le filtre en parfaites conditions
de travail. Il suffit de presser le bouton (rep. F ) sans le lâcher pendant
quelques secondes. Répétez cette opération 4 ou 5 fois.
Plus le filtre est propre et meilleur sera le résultat du nettoyage. Il est
conseillé de le nettoyer à la fin de chaque cycle de travail.
NOTE : Environnement poussiéreux
Si la l’environnement de travail est particulièrement poussiéreux (scierie,
passage important de poids lourds, etc.), il est conseillé d’actionner le
dispositif de nettoyage du filtre plus fréquemment.
3) nettoyage manuel du filtre
Si le résultat du nettoyage du filtre avec le dispositif de nettoyage du
filtre n’est pas concluant, et de toutes façons toutes les 20 heures de
fonctionnement, il faut procéder au nettoyage manuel du filtre. Mais
avant d’intervenir sur la machine, il faut l’éteindre et désactiver toutes
ses fonctions. Pour ce faire, placez la clé de l’interrupteur (rep. L) sur OFF.
. Enlever le tiroir posterieur de la machine
L’opération de vidage doit être effectuée de la façon suivante :
-S’approcher du conteneur à déchets.
2-Tirer le levier de blocage du tiroir.
3-Extraire le tiroir et le vider.
4-Réintroduire le tiroir et le bloquer au moyen du levier .
2. Démontez les deux filtres de leur logement en tournant les 4 manettes
de fixation.
3. retirer le filtre de son siège en tournant les 2 poignées de retenue.
4. Remontez le filtre et le panneau arrière.
MONTAGE ET CHANGEMENT DES BROSSES LATERALES
Pour faciliter le transport, la brosse ou les brosses latérales n’ont pas
été montées dans leur position prévue pour le fonctionnement de
la machine.
Per monter la brosse latérale dans sa position, procédez de la façon
suivante :
- Levez la manette de la brosse.
2- Dévissez la vis de l’arbre du moteur de la brosse latérale.
3- Enlevez la protection de la clavette.
4- Montez la brosse et sa bride sur l’arbre.
5- Revissez la vis de fixation.
Procédez de la même façon pour changer les brosses latérales
usées.
FRANÇAIS
Attention : lever et baisser les brosses latérales lorsque la
machine fonctionne
NETTOYAGE DU FILTRE ET ENTRETIEN
CHANGEMENT DE L’AMPOULE
Le filtre est un composant essentiel au bon fonctionnement de la
machine. Son entretien est donc de première importance garantira
les meilleures performances à la machine
Le filtre peut ètre nettoyé de trois facons différentes:
Pour changer l’ampoule frontale, procédez de la façon
suivante :
Démontez le capot frontal en dévissant les vis de fixation.
Remplacez l’ampoule grillée par une neuve ayant les mêmes
caractéristiques électriques.
Remontez le capot frontal.
l
-6-
20
Français (Traduction du mode d’emploi original)
CHANGEMENT DE LA BROSSE CENTRALE
Attention ! Cette opération doit être effectuée avec la machine à
l’arrêt et la clé désactivée.
Retirez la brosse usée.
Cette machine est équipée du réglage automatique de la pression et
de la compensation de l’usure de la brosse centrale.
La nécessité d’effectuer le changement de la brosse centrale est
signalée par l’affichage du code d’alarme BALAI EPUISE.
Enlevez l’adaptateur du moyeu de la brosse et montez-le sur la
brosse neuve en maintenant le même sens d’inclinaison des soies
(Cf. photo suivante).
Pour changer la brosse centrale, procédez de la façon
suivante :
Ouvrez le panneau gauche de la machine en dévissant la manette
illustrée sur la photo.
FRANÇAIS
Devisser et enlever les poignees qui fixent le couvercle sur le logement
du balai
Remontez l’adaptateur et introduisez la brosse neuve en contrôlant
si l’adaptateur est entré dans le moyeu d’entraînement.
Enlevez le couvercle du logement de la brosse.
-7-
21
Français (Traduction du mode d’emploi original)
Remontez le couvercle du logement de la brosse et les manettes en
effectuant les opérations de démontage en sens inverse.
· La recharge doit s’effectuer dans un endroit bien ventilé.
· Ouvrez tous les couvercles des cellules ou des éléments de la
batterie.
· Branchez le connecteur de la batterie au charge-batterie.
Branchez le charge-batterie au secteur (le voltage et la fréquence du
secteur doivent correspondre à ceux du charge-batterie).
ENTRETIEN,
CONTROLE DE LA BATTERIE ET RECHARGE
Contrôlez régulièrement le niveau de l’électrolyte dans la batterie.
Le logement de la batterie est situé sous le siège du conducteur.
Soulevez le capot et ouvrez les bouchons des cellules. Faites l’appoint
avec de l’eau distillée en cas de besoin.
Le niveau de l’électrolyte est spécifié dans le manuel d’instruction
de la batterie.
· A la fin de la recharge, débranchez la batterie du charge-batterie et
rebranchez-la à la machine.
Refermez tous les couvercles des cellules ou des éléments et nettoyez
la surface supérieure de la batterie.
ATTENTION ! contrôlez le niveau de l’électrolyte toutes les 00 heures
de fonctionnement.
Après le remplissage, bouchez les cellules avec les bouchons et
nettoyez la superficie.
Cette opération doit être effectuée avec la plus grande attention car
le liquide de la batterie est corrosif. En cas de contact avec la peau ou
les yeux, rincez immédiatement avec de l’eau propre en abondance
et consultez un médecin.
REGLAGE DU FREIN
Lorsque l’action du frein de service ou de stationnement est
insuffisante, celle-ci peut être réglée sur la roue avant en dévissant
le contre-écrou B et en tournant la molette A puis en serrant de
nouveau le contre-écrou B.
FRANÇAIS
Lorsque c’est nécessaire, rechargez la batterie en suivant les consignes
suivantes :
· Eteignez la machine en tournant la clé de contact.
· Soulevez le capot.
· Débranchez le connecteur de la batterie de la machine.
-8-
22
Français (Traduction du mode d’emploi original)
TABLEAU RECAPITULATIF
ENTRETIEN VERSION A BATTERIE
ATTENTION ! Toutes ces opérations doivent être effectuées avec la machine à l’arrêt et la clé désactivée. Toutes les opérations d’entretien
ordinaire et extraordinaire doivent être effectuées par un personnel compétent ou auprès d’un centre de service après-vente agréé.
NOTE : la durée de la batterie dépend de la régularité de son entretien ordinaire (contrôle du niveau et densité de l’électrolyte ).
Si la machine est inutilisée de 4 à 6 semaines, il faut de toute façon recharger la batterie pour être sûr que son voltage ne descend jamais
en-dessous de 20,5 V.
En effet, une batterie inutilisée subit un phénomène de décharge automatique.
A:
A la mise en service
B:
Toutes les 30 heures
C:
Toutes les 50 heures
D:
Toutes les 00 heures
E:
Toutes les 400 heures
CONTROLE
A
Niveau de l’électrolyte et voltage de la batter
□
Contrôlez les brosses ( ou les charbons) de tous
les moteurs électriques et changez-les en cas de
besoin.
Tension des courroies
Réglage du frein
B
C
E
□
Ou toutes
les 2 sems
□
□
□
□
□
Dispositif de nettoyage du filtre
Serrage de la visserie
□
Usure de la brosse latéral
Nettoyage du filtre à panneau
□
□
□
□
FRANÇAIS
Etanchéité des joints benne, filtres, volets
D
- 0 -
23
CODE DE SECURITE
MOTEUR PAUSE
COMPORTEMENT DE LA
MACHINE
DESCRIPTION DE L’ANOMALIE
Français (Traduction SURCHAUFFE
du mode
original)
DU d’emploi
MOTEUR TRACTION
CECI EST NORMAL APRES UNE MON-
LA TRACTION SE BLOQUE
A 95°C OU SURCHAUFFE DE L’ALTERNATEUR 50°C
PETIT GUIDE DE DEPANNAGE
CODE DE SECURITE
COMPORTEMENT DE LA
MACHINE
DESCRIPTION DE L’ANOMALIE
TEE, LAISSER LE MOTEUR SE REFROIDIR
PENDANT 20 MINUTES, CONTROLER QUE
LE VENTILATEUR DE REFROIDISSEMENT
FONCTIONNE. CONTROLER QUE LE FREIN
N’EST PAS
BLOQUE’. CONTROLER
QUE LA
EVENTUELLE
INTERVENTION
ROUE DE COMMANDE TOURNE LIBREMENT
CECI EST NORMAL APRES UNE MONTEE, LAISSER LE MOTEUR SE REFROIDIR
PENDANT 20 MINUTES, CONTROLER QUE
LE VENTILATEUR DE REFROIDISSEMENT
SI LA TEMPERATURE AMBIANTE EST
FONCTIONNE. CONTROLER QUE LE FREIN
ELEVEE, ARRETER LA MACHINE PENDANT
N’EST PAS BLOQUE’. CONTROLER QUE LA
20 MINUTES ET REPARTIR. SI LE PROBLEME
ROUE DE COMMANDE TOURNE LIBREPERSISTE, APPELER LE CENTRE D’ASSIMENT
STANCE.
MOTEUR PAUSE
LA TRACTION SE BLOQUE
SURCHAUFFE DU MOTEUR TRACTION
A 95°C OU SURCHAUFFE DE L’ALTERNATEUR 50°C
TRACTION PAUSE
LA TRACTION SE BLOQUE
SURCHAUFFE DU CIRCUIT DE CONTROLE ELECTRONIQUE >80°C
COURANT BALAIS
TRACTION PAUSE
LES FONCTIONS DE TRAVAIL S’ETEILA TRACTION SE BLOQUE
GNENT
ABSORPTION EXCESSIVE OU BLOCAGE
SURCHAUFFE DU CIRCUIT DE CONTRODU BALAI CENTRAL
LE ELECTRONIQUE >80°C
CONTROLER LA CAPACITE’ DE GLISSESI LA TEMPERATURE AMBIANTE EST
MENT DU BALAI ET LA PRESENCE D’EVENELEVEE, ARRETER LA MACHINE PENDANT
TUELS OBSTACLES (CORDES,NYLON OU
20 MINUTES ET REPARTIR. SI LE PROBLEME
AUTRE)
PERSISTE, APPELER LE CENTRE D’ASSISTANCE.
VIDANGER L’HUILE
N’APPARAIT QUE SI LA MACHINE
POSSEDE UN MOTEUR ENDOTHERLES FONCTIONS DE TRAVAIL S’ETEIMIQUE
GNENT
NE S’ACTIVE QU’APRES 99 HEURES DE
FONCTIONNEMENT
ABSORPTION EXCESSIVE OU BLOCAGE
DU BALAI CENTRAL
SIGNALE LA NECESSITE DE VIDANGER
L’HUILE MOTEUR (POUR LE REMETTRE
CONTROLER LA CAPACITE’ DE GLISSEA’ ZERO, APPUYER SUR LE BOUTON
MENT DU BALAI ET LA PRESENCE D’EVENAFFICHEUR PEDANT 5 SECONDES LORS
TUELS OBSTACLES (CORDES,NYLON OU
DE L’AFFICHAGE DU COMPTEUR D’HEURES
AUTRE)
HUILE)
VIDANGER L’HUILE
RESERVE BATTERIE
N’APPARAIT QUE SI LA MACHINE
AVERTISSEMENT DE BATTERIE EN
POSSEDE UN MOTEUR ENDOTHERPHASE D’EPUISEMENT
MIQUE
NE S’ACTIVE QU’APRES 99 HEURES DE
CELA SE PRODUIT LORSQUE LA TENFONCTIONNEMENT
SION DE LA BATTERIE DESCEND SOUS
LES 2V
BATTERIE EPUISSE
LES FONCTIONS DE LA MACHINE
S’ETEIGNENT EXCEPTE LA TRACTION
SI LA TENSION LUE SUR LA CLE’
DESCEND SOUS LES 20,3V PENDANT 3
SECONDES DE SUITE
SIGNALE LA NECESSITE DE VIDANGER
AUCUNE INTERVENTION EXCEPTE CELLE
L’HUILE MOTEUR (POUR LE REMETTRE
QUI CONSISTE A’ CHARGER LA BATTERIE
A’ ZERO, APPUYER SUR LE BOUTON
AFFICHEUR PEDANT 5 SECONDES LORS
DE L’AFFICHAGE DU COMPTEUR D’HEURES
CHARGER LA BATTERIE
HUILE)
RESERVE BATTERIE
AVERTISSEMENT DE BATTERIE EN
LA MACHINE SE BLOQUE
PHASE D’EPUISEMENT
CELA SE PRODUIT LORSQUE LA TENSI LA TENSION LUE SUR LA CLE’
SION DE LA BATTERIE DESCEND SOUS
DESCEND SOUS LES 8V PENDANT 3
LES 2V
SECONDES DE SUITE
LES FONCTIONS DE LA MACHINE
S’ETEIGNENT EXCEPTE LA TRACTION
LA MACHINE CONTINUE DE TRAVAILLER
SI LA TENSION LUE SUR LA CLE’
CHARGER LA BATTERIE
DESCEND SOUS LES 20,3V PENDANT 3
LE BALAI NE PARVIENT PLUS A’ EXERCER REMPLACER LE BALAI CENTRAL
SECONDES DE SUITE
UNE PRESSION ADE’QUATE SUR LE SOL
PARCE QU’IL EST USE’
SI LA TENSION LUE SUR LA CLE’
CHARGER LA BATTERIE
DESCEND SOUS LES 8V PENDANT 3
SECONDES DE SUITE
COURANT BALAIS
BATTERIE EPUISSE
BATTERIE EPUISSE
BALAI EPUISE’
LA MACHINE SE BLOQUE
BATTERIE EPUISSE
BALAI EPUISE’
LA MACHINE CONTINUE DE TRAVAILLER
AUCUNE INTERVENTION EXCEPTE CELLE
CHARGER LA BATTERIE
QUI CONSISTE A’ CHARGER LA BATTERIE
LE BALAI NE PARVIENT PLUS A’ EXERCER REMPLACER LE BALAI CENTRAL
UNE PRESSION ADE’QUATE SUR LE SOL
PARCE QU’IL EST USE’
FRANÇAIS
- 2 -
- 2 -
24
EVENTUELLE INTERVENTION
Français (Traduction du mode d’emploi original)
Alarmes carte traction
Si la traction de la machine est interrompue la led d’état indique le code d’erreur.
Pendant le fonctionnement, s’il n’y a pas de pannes, la LED est constamment allumée. Si l’actionnement détecte une panne la LED d’état
fournit deux types d’informations, un clignotement lent (2 Hz) ou un clignotement rapide (4 hz) pour indiquer la gravité de la panne.
Les pannes avec clignotement lent sont supprimées automatiquement, une fois la panne réparée, la machine recommence à fonctionner
normalement.
Les pannes à clignotement rapide (“*” dans le tableau) sont plus graves et la machine doit être arrêtée pour rétablir le fonctionnement après
réparation de la panne.
L’indication de la gravité reste active pendant 0 secondes, après quoi la LED d’état clignote de façon continue en montrant un code
d’identification pannes à 2 chiffres tant que la réparation n’est pas effectuée.
Exemple code d’erreur “,4” est affiché de cette manière:
□
□□□□
exemple code d’alarme ,4
CODES LED
.2
.3
.4
.5
2.
2.3
3.
3.2
3.3
3.4
3.5
4.
4.2
4.3
4.4
□
□
□
□
□
□
□□
□□□
□□□□
□□□□□
□□
□□
□
□□□
Surtempérature >92°
Panne accélérateur
Panne potentiomètre limiteur de vitesse
Panne sous-voltage
Panne surtension
Panne non ouverture actionnement contacteur principal
Panne non fermeture actionnement contacteur principal
□□□
□□□
□□□
□□□
□□□
□
□□
□□□
□□□□
□□□□□
Panne du potentiomètre accélérateur
□□□□
□□□□
□□□□
□□□□
□
□□
□□□
□□□□
Court-circuit moteur
Panne activation frein
Basse tension batteries
Panne désactivation frein
Panne HPD (mauvais réglage potentiomètre accélérateur)
Tension moteur erronée / court-circuit dans le moteur
Panne EEPROM
Court-circuit dans le moteur / erreur EEPROM
FRANÇAIS
.
DESCRIPTION
- 3 -
25