1
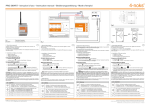
S ET DE PRISES TÉLÉCOMMANDÉES S ET DE PRISES TÉLÉCOMMANDÉES I nstructions d‘utilisation et consignes de sécurité E LECTRICAL SOCKETS O peration and Safety Notes IAN 60494 F UNKSTECKDOSEN-SET B edienungs- und Sicherheitshinweise A vant de lire le mode d‘emploi, ouvrez la page contenant les illustrations et f amiliarisez-vous ensuite avec toutes les fonctions de l‘appareil. K lappen Sie vor dem Lesen die Seite mit den Abbildungen aus und machen Sie s ich anschließend mit allen Funktionen des Gerätes vertraut. B efore reading, unfold the page containing the illustrations and familiarise yourself with all functions of the device. FR DE / AT / CH GB Instructions d‘utilisation et consignes de sécurité Bedienungs- und Sicherheitshinweise Operation and Safety Notes Page Seite Page 5 13 21 A 1 A B C 2 D Master 3 4 B ON 5 ON/OFF 6 OFF 7 LEARN 8 Table des matières Introduction Utilisation conforme...................................................................................... Page6 Fourniture....................................................................................................... Page6 Éléments de commande................................................................................ Page6 Caractéristiques............................................................................................ Page6 Sécurité Consignes de sécurité................................................................................... Page7 Préparation Préparation de la télécommande................................................................. Page8 Préparation de la prise télécommandée..................................................... Page8 Mise en service Utilisation de la prise télécommandée........................................................ Page9 Utilisation de la télécommande.................................................................... Page9 Guide de dépannage................................................................................... Page9 Nettoyage................................................................................................ Page10 Elimination................................................................................................ Page11 Garantie et S.A.V. Déclaration de garantie............................................................................... Page11 Adresse S.A.V................................................................................................ Page11 Déclaration de conformité............................................................................ Page12 Fabricant........................................................................................................ Page12 FR 5 Introduction Set de prises télécommandées 3 Touche ALL-ON / OFF (Master Introduction Prise télécommandée (ill. B) : 5 Touche manuelle ON / OFF (MARCHE / ARRÊT) 6 Témoin de fonctionnement à DEL 7 Touche LEARN (apprentissage) 8 Prise de courant avec protection enfants Q Q Utilisation conforme Le jeu de prises sans fil est conçu pour commander à distance la mise en marche et l‘extinction d‘appareils électriques. Toute modification de l’appareil est considérée comme non conforme et peut être source de graves dangers. Le fabricant décline toute responsabilité pour les dégâts issus d’une utilisation non conforme. Ne convient pas pour l’exploitation commerciale. Q Fourniture Déballer le jeu de prises sans fil et contrôler s’il est au complet. 4 prises radio 1 télécommande 4 canaux 2 piles AAA (pour la télécommande) 1 mode d‘emploi Q Éléments de commande Télécommande (ill. A) : 1 Témoin de contrôle de fonctionnement 2 Touche canal ON / OFF pour les canaux A, B, C, D 6 FR MARCHE / ARRÊT) 4 Couvercle du compartiment à pile Q Caractéristiques Télécommande RCS AAA3680-A IP20 : Piles: 2 x 1,5 V AAA Fréquence de transmission : 433,92 MHz Homologation : Le système est homologué BZT et est exempt de permis et de redevance. Portée :Selon l’environnement env. 40 m dans conditions idéales. Prises télécommandées RCE AAA3680-A IP20 FR : Tension secteur : 230 V~, 50 Hz Puissance de rupture : 15,7 A, 3.600 W Consommation en mode veille : < 0,7 W Fréquence de transmission : 433,92 MHz Introduction / Sécurité Remarque : Les prises télécommandées sont équipés d’une prise avec sécurité enfants 8 , ce qui augmente considérablement la sécurité domestique. Les contacts sont protégés de manière à exclure qu’un enfant puisse établir une connexion conductrice (par ex. avec une aiguille). Veuillez cependant tenir cet appareil hors de portée des enfants. Q Sécurité C onsignes de sécurité Veuillez lire attentivement cette notice d’utilisation et les consignes de sécurité. Ouvrez la page des illustrations avant de commencer la lecture et familiarisez-vous ensuite avec toutes les fonctions de l’appareil. Prévention de danger de mort par électrocution ! JUniquement brancher les prises télécommandées sur les prises de courant domestiques de 230 volts reliées à la terre. JAbsolument éviter l’humidité et les températures extrêmes. JUniquement utiliser les prises télécommandées dans des locaux fermés, elles ne sont pas conçues pour les applications à l’extérieur. JBien que les prises soient équipées de sécurité enfants 8 , toujours les tenir hors de porté des enfants. J Éviter toute surcharge de l’appareil. Une surcharge peut provoquer un in- cendie ou endommager l’appareil. La charge maximale des prises est d’env. 3.600 W pour chaque prise. JImmédiatement contacter le service après vente en cas de défaillance. JN’ouvrez jamais l’appareil vousmême. Exclusivement confier les réparations nécessaires au service après vente ou à un atelier électrique. JCoupez obligatoirement l‘alimentation électrique avant de nettoyer l‘appareil. Débranchez toujours dans ce cas la prise télécommandée de la prise de courant et débranchez toutes les prises branchées à la prise télécommandée. JNe branchez pas les prises télécommandée à la suite l‘une de l‘autre. JNe pas utiliser de sécurités enfants supplémentaires pour les prises télécommandées sous peine de perturber le contact entre la fiche et la prise télécommandée et de provoquer une surchauffe. Les prise télécommandées sont équipées d’une sécurité enfants prévenant l’introduction d’objets quelconques dans la prise murale. JAssurez-vous que les prises télécommandées branchées sont librement accessibles et ne sont pas recouvertes par des objets. JEn cas de dysfonctionnements, coupez immédiatement l‘appareil. JCette notice est partie intégrante de l’appareil. Veuillez donc la remettre aux autres utilisateurs. FR 7 Préparation Q Préparation Q Préparation de la télécommande (ill. A) 1.Ouvrir le compartiment à pile sur la face arrière de la télécommande en poussant le couvercle du compartiment à pile 4 vers le bas. Insérer deux piles de type AAA. Vérifier que la polarité est correcte. 2.Appuyer sur la touche ON / OFF 2 ou 3 afin de vérifier le fonctionnement de la télécommande ; le témoin de contrôle de fonctionnement 1 doit s’allumer. Q Préparation de la prise télécommandée 1.Brancher la prise télécommandée dans une prise de courant reliée à la terre et l’allumer d’une pression sur la touche ON / OFF 5 . Le témoin de fonctionnement à DEL 6 s’éclaire. 2.Diriger la télécommande vers la prise télécommandée à une distance d’env. 50 cm. 3.Appuyer sur la touche LEARN 7 de la prise télécommandée pendant env. 3 secondes et la relâcher. Le témoin de fonctionnement à DEL 6 clignote alors pendant env. 10 secondes. Pendant le clignotement, appuyer sur la touche ON de la touche de canal ON / OFF 2 désiré (A, B, C ou D) sur la télécommande. Le témoin de fonctionnement à DEL 6 reste alors éclairé 8 FR en permanence. Vous pouvez à présent allumer et éteindre à distance un consommateur connecté. 4.Répéter la procédure avec l’autre prise télécommandée. 5.Vous pouvez alors commander simultanément plusieurs prises télécommandées avec une touche canal ON / OFF 2 . Vous pouvez en outre programmer consécutivement six télécommandes et les utiliser pour un seul récepteur. Ceci permet de commander un appareil depuis jusque six endroits différents. 6.Il faut alors synchroniser chaque prise télécommandée avec le canal de la télécommande. 7.Le code de la télécommande reste mémorisé, même si vous remplacez les piles. 8.Si vous débranchez la prise télécommandée du secteur, les codes restent mémorisés à long terme. 9.Pour effacer les codes, appuyer sur la touche LEARN 7 pendant plus de 6 secondes, jusqu’à ce que le témoin de fonctionnement à DEL 6 se mette à clignoter. Tous les codes sont alors effacés. 10.Prévention de pannes : veiller à respecter un écart d’env. 50 cm entre les différentes prises télécommandées. 11.Chaque prise télécommandé est en plus équipée d’un interrupteur manuel ON / OFF 5 . Vous pouvez donc aussi allumer et éteindre la prise télécommandée sans utiliser la télécommande. Le témoin de fonctionnement à DEL 6 indique le mode MARCHE / ARRÊT de la prise télécommandée. Mise en service Q Mise en service Q Utilisation de la prise télécommandée (ill. B) 1.Introduire la prise télécommandée dans une prise de courant à contact de protection et brancher le consommateur que vous désirez commuter à distance. 2.Allumer l’appareil. La prise télécommandée peut seulement effectuer la commande si l’appareil correspondant est allumé. ATTENTION ! RISQUE D’INCENDIE ! Ne jamais brancher des appareils dont l’allumage involontaire peut provoquer un incendie ou d’autres dégâts. La charge maximale de chaque prise télécommandée est d’env. 3.600 W. Toute surcharge représente un risque d’incendie ou d’endommagement de l’appareil. 3.Appuyer sur la touche manuelle ON / OFF 5 pour allumer directement la prise télécommandée. Le témoin de fonctionnement à DEL 6 s’éclaire. Vous pouvez aussi allumer la prise télécommandée par la télécommande (voir « Utiliser la télécommande »). 4.Appuyer sur la touche manuelle ON / OFF 5 pour éteindre directement la prise télécommandée. Le témoin de fonctionnement à DEL 6 s’éteint. Vous pouvez aussi éteindre la prise télécommandée par la télécommande (voir « Utilisation de la télécommande »). Q Utilisation de la télécommande (ill. A) 1.Appuyez sur la touche (ON / OFF) 2 du canal de l’appareil que vous désirez allumer et éteindre. La télécommande commande jusque 4 prises télécommandées (séparément, groupés ou tous simultanément). 2.Actionnez la touche ALL-ON / OFF 3 pour commander simultanément toutes les prises télécommandées. Q Guide de dépannage Si la télécommande ne fonctionne pas, veuillez contrôler le système comme suit : Problème Témoin de contrôle de fonctionnement 1 de la télécommande allumé, aucune réaction Dépannage · C ontrôlez si la puissance en ampère des piles est encore suffisante. Si nécessaire, insérez de nouvelles piles. FR 9 Mise en service / Nettoyage Problème Le témoin de fonctionnement 1 de la télécommande ne s’allume pas lorsque vous appuyez sur «ON» ou «OFF» Dépannage · C ontrôlez si les piles sont correctement insérées. ·Contrôlez que les piles soient bien en contact avec les bornes, appuyer éventuellement dessus. Problème Aucune réaction du consommateur Dépannage ·Contrôler si l’appareil est allumé. ·Attribuez un nouveau code à la prise radio (voir „préparation prise radio“, point 3). ·Rapprocher la télécommande pour contrôler si la portée est suffisante. Problème Portée insuffisante Dépan- ·Pour obtenir une portée optimale, éviter si posnage sible que des murs, meubles, etc. se trouvent entre la télécomande et la prise télécommandée. ·Si la portée est temporairement faible, ceci peut être causé par une télécommande qui fonctionne sur une fréquence similaire. Lorsque cette télécommande fonctionne, la portée diminue (par ex. casque sans fil, détecteur de mouvement sans fil, sonnette sans fil, etc.). Q Nettoyage JExclure toute infiltration de liquides dans le boîtier de l’appareil. Essuyer le boîtier avec un chiffon doux. Ne jamais utiliser d’essence, solvant ou détergent susceptibles d’attaquer le plastique. jToujours débrancher la prise télécommandée de la prise murale et toutes les fiches secteurs de l’appareil avant d’effectuer le nettoyage de l’appareil. 10 FR Elimination / Garantie et S.A.V. Q Elimination e pas jeter des appaN reils électriques aux ordures ménagères ! Conformément à la Directive européenne 2012 / 19 / EC sur les appareils électriques et électroniques usagés, les appareils électriques ampoules et piles usagés doivent être collectés séparément et recyclés dans le respect de l’environnement. Pour les possibilités d’élimination de l’appareil mis au rebut, renseignez-vous auprès de votre commune. Pb ommages écologiques D en cas d’élimination incorrecte des piles ! Les piles ne font pas partie des ordures ménagères. Elles peuvent renfermer des métaux lourds toxiques et sont donc soumises au traitement des déchets spéciaux. Aussi, remettez les piles usagées à un point de collecte municipal. Q Garantie et S.A.V. Q Déclaration de garantie Indépendamment de la garantie commerciale souscrite, le vendeur reste tenu des défauts de conformité du bien et des vices rédhibitoires dans les conditions prévues aux articles L211-4 et suivants du Code de la consommation et aux articles 1641 et suivants du Code Civil. Garantie de 3 ans sur cet appareil à compter de la date d’achat. Conservez le bon de caisse à titre de preuve de votre achat. Cet appareil a été fabriqué avec soin et contrôlé consciencieusement avant de quitter nos usines. La garantie ne s’applique qu’aux vices de matériel et de fabrication dans le cas d’une utilisation correcte. La garantie est annulée en cas d’intervention sur le produit. Les droits vous revenant de par la loi ne sont pas limités par la présente garantie. En cas de recours à la garantie, prenez contact par téléphone avec le point S.A.V. Ce n’est qu’ainsi que peut être assuré un retour gratuit de votre appareil. Q Adresse S.A.V. BAT, Lindenstraße 35, 72074 Tübingen, Allemagne Mél. : [email protected] Numéro S.A.V. : +33 (0) 810 00 55 17, Coût d’un appel local à partir d’un poste fixe. Pour de plus amples informations, nous recommandons de visiter la rubrique Service / FAQ de notre site www.dvw-service.com. IAN 60494 FR 11 Garantie et S.A.V. Q Déclaration conformité de Cet appareil porte le sigle CE pour signaler sa conformité aux directives européennes ci-dessous : Directive R&TTE 1999/5/CE Directive „Basse tension“ 2006/95/CE Directive CEM 2004/108/CE 2011/65/EU RoHS II La déclaration de conformité du fabricant est jointe au produit. La déclaration de conformité est disponible au lien suivant: www.dvw-service.com/konformitaetserklaerung/ke_1049621706.pdf Q Fabricant BAT Lindenstraße 35 72074 Tübingen Allemagne H. Brennenstuhl S.A.S. 5 rue de l‘ Artisanat F-67460 Souffelweyersheim 12 FR Inhaltsverzeichnis Einleitung Bestimmungsgemäßer Gebrauch................................................................. Seite14 Lieferumfang.................................................................................................. Seite14 Bedienelemente............................................................................................. Seite14 Technische Daten.......................................................................................... Seite14 Sicherheit Sicherheitshinweise....................................................................................... Seite15 Vorbereitung Fernbedienung vorbereiten.......................................................................... Seite16 Funksteckdose vorbereiten........................................................................... Seite16 Inbetriebnahme Funksteckdose benutzen............................................................................... Seite17 Fernbedienung benutzen.............................................................................. Seite17 Fehlerhinweise............................................................................................... Seite17 Reinigung.................................................................................................. Seite18 Entsorgung............................................................................................... Seite19 Garantie und Service Garantieerklärung......................................................................................... Seite19 Serviceadresse.............................................................................................. Seite19 Konformitätserklärung................................................................................... Seite19 Hersteller........................................................................................................ Seite20 DE/AT/CH 13 Einleitung Funksteckdosen-Set Einleitung Bestimmungsgemäßer Gebrauch Das Funksteckdosen-Set ist zum ferngesteuerten Ein- und Ausschalten von Elektrogeräten geeignet. Alle Veränderungen des Gerätes sind nicht bestimmungsgemäß und können erhebliche Unfallgefahren bedeuten. Der Hersteller übernimmt für aus bestimmungswidriger Verwendung entstandene Schäden keine Haftung. Dieses Gerät ist nicht für den gewerblichen Einsatz bestimmt. Lieferumfang Prüfen Sie dieses Set nach dem Aus packen auf seinen vollständigen Inhalt. 4 Funksteckdosen 1 4-Kanal-Fernbedienung 2 Batterien AAA (für Fernbedienung) 1 Bedienungsanleitung Bedienelemente Fernbedienung (Abb. A): 1 Betriebskontroll-Leuchte 2 Kanal-ON- / OFF-Taste Kanal A, B, C, D 3 ALL-ON- / OFF-Taste (MasterEIN / AUS) 4 Batteriefachabdeckung 14 DE/AT/CH Funksteckdose (Abb. B): 5 Manuelle ON- / OFF-Taste (EIN / AUS) 6 LED-Betriebsanzeige 7 LEARN-Taste (Lernen) 8 Kinderschutz-Steckdose Technische Daten Fernbedienung RCS AAA3680-A IP20: Batterien: 2 x AAA, je 1,5 V Übertragungsfrequenz:433,92 MHz Zulassung:Das System besitzt eine allgemeine Zulassung (BZT) und ist anmeldeund gebührenfrei. Reichweite:abhängig von den Umgebungsbedingungen ca. 40 m bei optimalen Bedingungen Funksteckdose RCE AAA3680-A IP20 FR: Nennspannung:230 V∼, 50 Hz Max. Schaltleistung: 15,7 A 3.600 W Stand-by-Verbrauch:< 0,7 W Übertragungsfrequenz:433,92 MHz Hinweis: Die Funksteckdosen verfügen jeweils über eine Kinderschutz-Steckdose 8 . Dadurch wird die häusliche Sicherheit erheblich erhöht. Die Kontakte sind entsprechend geschützt, so dass Kinder keine leitende Verbindung (mit Nadeln o.ä.) herstellen können. Bewahren Sie das Gerät trotzdem außerhalb der Reichweite von Kindern auf. Sicherheit Sicherheit Sicherheitshinweise Lesen Sie diese Bedienungsanleitung und Sicherheitshinweise aufmerksam durch. Klappen Sie die Bildseite aus und machen Sie sich vor der ersten Inbetriebnahme mit allen Funktionen des Gerätes vertraut. Vermeiden Sie Lebensgefahr durch elektrischen Schlag! Schließen Sie die Funksteckdosen nur an geerdete 230 Volt Haushaltssteckdosen an. Vermeiden Sie unbedingt die Einwirkung von Feuchtigkeit und extremen Temperaturen. Verwenden Sie die Funksteckdosen nur in geschlossenen Räumen. Sie sind nicht für den Außenbereich geeignet. Bewahren Sie das Gerät trotz Kinderschutz-Steckdose 8 immer außerhalb der Reichweite von Kindern auf. Vermeiden Sie eine Überlastung des Gerätes. Bei Überlastung kann Brandgefahr oder Schaden am Gerät auftreten. Die maximale Belastbarkeit beträgt ca. 3.600 W je Funksteckdose. Wenden Sie sich bei Funktions störungen bitte sofort an die Servicestelle. Öffnen Sie das Gerät auf keinen Fall selbst. Lassen Sie notwendige Reparaturen ausschließlich von der Servicestelle oder einer ElektroFachwerkstatt ausführen. Unterbrechen Sie vor der Reinigung des Gerätes unbedingt den Stromfluss. Trennen Sie in diesem Fall immer die Funksteckdose von der Wandsteckdose und alle Netzstecker vom Gerät. Stecken Sie die Funksteckdosen nicht hintereinander. Verwenden Sie keine zusätzlichen Kindersicherungen für die Funksteckdosen. Die Verbindung zwischen Stecker und Funksteckdose könnte beeinträchtigt werden und die Gefahr der Überhitzung besteht. Die Funksteckdosen verfügen bereits über eine Kindersicherung, welche verhindert, dass Kinder irgendwelche Gegenstände in die Steckdose einbringen können. Stellen Sie sicher, dass die angeschlossenen Funksteckdosen frei zugänglich und nicht mit Gegenständen abgedeckt sind. Schalten Sie bei Störungen das Gerät sofort aus. Diese Anleitung ist ein Bestandteil des Gerätes. Geben Sie diese deshalb bei Weitergabe des Gerätes an Dritte unbedingt auch weiter. DE/AT/CH 15 Vorbereitung Vorbereitung Fernbedienung vorbereiten (Abb. A) 1.Öffnen Sie das Batteriefach auf der Rückseite der Fernbedienung, indem Sie die Batteriefachabdeckung 4 nach unten wegschieben. Setzen Sie zwei AAA-Batterien ein. Achten Sie auf die richtige Polarität. 2.Drücken Sie eine der ON- / OFFTasten 2 oder 3 , um zu prüfen, ob die Fernbedienung funktioniert; wenn ja, leuchtet die BetriebskontrollLeuchte 1 . Funksteckdose vorbereiten 1.Stecken Sie die Funksteckdose in eine geerdete Haushaltssteckdose und schalten Sie diese mit der ON- / OFF-Taste 5 ein. Die LED-Betriebsanzeige 6 leuchtet auf. 2.Halten Sie die Fernbedienung mit einem Abstand von ca. 50 cm auf die Funksteckdose gerichtet. 3.Drücken Sie die Taste LEARN 7 der Funksteckdose für ca. 3 Sekunden und lassen diese wieder los. Die LED-Betriebsanzeige 6 blinkt nun für ca. 10 Sekunden. Drücken Sie während des Blinkens die gewünschte ON-Taste der KanalON- / OFF-Taste 2 (A, B, C oder D) an der Fernbedienung. Die LED-Betriebs anzeige 6 leuchtet jetzt dauerhaft. 16 DE/AT/CH Sie können nun einen angeschlossenen Verbraucher ferngesteuert ein- oder ausschalten. 4.Wiederholen Sie diesen Vorgang mit der anderen Funksteckdose. 5.Sie können mit einer KanalON- / OFF-Taste 2 mehrere Funksteckdosen gleichzeitig schalten. Außerdem können Sie sechs Fernbedienungen nacheinander einlernen und diese für einen einzelnen Empfänger verwenden. So kann ein Gerät von bis zu sechs verschiedenen Plätzen geschaltet werden. 6.Synchronisieren Sie in diesem Fall jede Funksteckdose mit dem Kanal der Fernbedienung. 7.Der Code der Fernbedienung bleibt auch dann erhalten, wenn Sie die Batterien wechseln. 8.Wenn Sie die Funksteckdose vom Netz nehmen, bleiben die Codierungen dauerhaft gespeichert. 9.Um die Codierungen wieder zu löschen, drücken Sie die LEARNTaste 7 länger als 6 Sekunden, bis die LED-Betriebsanzeige 6 zu blinken beginnt. Alle Codierungen werden nun gelöscht. 10.Vermeiden Sie Störungen: Stellen Sie sicher, dass der Abstand zwischen den verschiedenen Funksteckdosen ca. 50 cm beträgt. 11.Jede Funksteckdose hat zusätzlich einen manuellen ON- / OFF-Schalter 5 . Sie können auch ohne Fernbedienung die Funksteckdose einoder ausschalten. Die LED-Betriebsanzeige 6 zeigt an, ob die Funksteckdose im EIN- / AUS-Modus ist. Inbetriebnahme Inbetriebnahme Funksteckdose benutzen (Abb. B) 1.Stecken Sie die Funksteckdose in eine beliebige Schutzkontaktsteckdose ein und schließen Sie den zu schaltenden Verbraucher an. 2.Schalten Sie das Verbrauchergerät ein. Die Funksteckdose kann die Schaltfunktion nur dann übernehmen, wenn das zu schaltende Gerät eingeschaltet ist. VORSICHT! BRANDGEFAHR! Schließen Sie keine Geräte an, deren unbeaufsichtigtes Einschalten Brände oder andere Schäden verursachen könnte. Die maximale Belastbarkeit je Funksteckdose beträgt ca. 3.600 W. Eine Überlastung kann Brandgefahr oder Schaden am Gerät verursachen. 3.Drücken Sie die manuelle ON- / OFF-Taste 5 , um die Funksteckdose direkt am Gerät einzuschalten. Die LED-Betriebsanzeige 6 leuchtet. Alternativ können Sie die Funksteckdose auch über die Fernbedienung einschalten (siehe „Fernbedienung benutzen“). 4.Drücken Sie die manuelle ON- / OFF-Taste 5 , um die Funksteckdose direkt am Gerät auszuschalten. Die LED-Betriebsanzeige 6 erlischt. Alternativ können Sie die Funksteckdose auch über die Fernbedienung ausschalten (siehe „Fernbedienung benutzen“). Fernbedienung benutzen (Abb. A) 1.Betätigen Sie die ON- / OFF-Taste 2 für den Kanal, dessen Verbraucher Sie ein- oder ausschalten möchten. Die Fernbedienung steuert bis zu 4 Funksteckdosen (einzeln, in Gruppen oder alle gleichzeitig). 2.Betätigen Sie die ALL-ON- / OFFTaste 3 , um alle Funksteckdosen gleichzeitig zu schalten. Fehlerhinweise Sollte die Fernschaltung nicht funktionieren, prüfen Sie bitte das System auf folgende Punkte: Prob- Betriebskontrolllem Leuchte 1 an der Fernbedienung leuchtet, keine Reaktion Ab hilfe ·Prüfen Sie, ob die AmpereLeistung der Batterien noch ausreichend ist. Setzen Sie gegebenenfalls neue Batterien ein. DE/AT/CH 17 Inbetriebnahme / Reinigung Prob- Betriebskontrolllem Leuchte 1 an der Fernbedienung leuchtet nicht beim Drücken von ON oder OFF Ab hilfe ·Prüfen Sie, ob die Batterien richtig eingelegt sind. ·Prüfen Sie, ob die Batterien guten Kontakt mit den Klemmen haben, evtl. andrücken. Prob- Keine Reaktion am lem Verbraucher Ab hilfe 18 ·Prüfen Sie, ob der Verbraucher eingeschaltet ist. ·Ordnen Sie der Funksteckdose einen neuen Code zu (siehe „Funksteckdose vorbereiten“, Punkt 3). ·Stellen Sie durch Annähern fest, ob die Reichweite ausreichend für den gewünschten Standort ist. DE/AT/CH Prob- Reichweite zu gering lem Ab hilfe ·Stellen Sie für hohe Reichweiten sicher, dass möglichst wenig Wände, Möbel etc. zwischen Fernbedienung und Funksteckdose liegen. ·Wenn die Reichweite nur zeitweise gering ist, kann der Grund in einem Sender, der auf einer ähnlichen Frequenz arbeitet, liegen. Sobald dieser Sender aktiv ist, sinkt die Reichweite (z. B. drahtlose Kopfhörer, Funkbewegungsmelder, Funkgong etc.). Reinigung Es dürfen keine Flüssigkeiten in das Innere des Gerätes gelangen. Verwenden Sie zum Reinigen des Gehäuses ein weiches Tuch. Verwenden Sie niemals Benzin, Lösungsmittel oder Reiniger, die Kunststoff angreifen. Trennen Sie vor der Reinigung immer die Funksteckdose von der Wandsteckdose und alle Netzstecker vom Gerät. Entsorgung / Garantie und Service Entsorgung E lektrogeräte nicht in den Hausmüll werfen! Gemäß Europäischer Richtlinie 2012 / 19 / EC über Elektro- und Elektronik-Altgeräte müssen verbrauchte Elektrogeräte, Leuchtmittel und Batterien getrennt gesammelt und einer umweltgerechten Wiederverwertung zugeführt werden. Möglichkeiten zur Entsorgung des ausgedienten Geräts erfahren Sie bei Ihrer Gemeinde- oder Stadtverwaltung. Pb mweltschäden durch U falsche Entsorgung der Batterien! Batterien gehören nicht in den Hausmüll. Sie können giftige Schwermetalle enthalten und unterliegen der Sondermüllbehandlung. Geben Sie deshalb verbrauchte Batterien bei einer kommunalen Sammelstelle ab. Garantie und Service Garantieerklärung 3 Jahre Garantie ab Kaufdatum auf dieses Gerät. Bitte Kassenbon als Nachweis aufbewahren. Das Gerät wurde sorgfältig produziert und vor Auslieferung gewissenhaft geprüft. Die Garantieleistung gilt nur für Material- oder Fabrikationsfehler bei sachgemäßer Verwendung. Die Garantie erlischt bei Fremdeingriff. Ihre gesetzlichen Rechte werden durch diese Garantie nicht eingeschränkt. Im Garantiefall mit der Servicestelle telefonisch in Verbindung setzen. Nur so kann eine kostenlose Einsendung Ihres Geräts gewährleistet werden. Serviceadresse BAT, Lindenstraße 35, 72074 Tübingen, Deutschland E-Mail: [email protected] Service-Tel.: 00800 48720741 Für weitere Informationen empfehlen wir den Bereich Service / FAQ‘s auf unserer Homepage www.dvw-service.com. IAN 60494 Konformitätserklärung In Übereinstimmung mit folgenden Europäischen Richtlinien wurde das CE-Zeichen angebracht: 1999/5/EG R&TTE-Richtlinie 2006/95/EG Niederspannungsrichtlinie 2004/108/EG EMV-Richtlinie 2011/65/EU RoHS II Die Konformitätserklärung des Herstellers liegt dem Produkt bei. Die Konformitätserklärung ist auch unter folgendem Link hinterlegt: www.dvw-service.com/konformitaetserklaerung/ke_1049621706.pdf DE/AT/CH 19 Garantie und Service Hersteller BAT Lindenstraße 35 72074 Tübingen Deutschland H. Brennenstuhl S.A.S. 5 rue de l‘ Artisanat F-67460 Souffelweyersheim 20 DE/AT/CH Table of contents Introduction Proper handling............................................................................................. Page22 Scope of supply............................................................................................ Page22 Control elements........................................................................................... Page22 Technical data............................................................................................... Page22 Safety Safety advice................................................................................................. Page23 Setting up Preparing the remote control........................................................................ Page24 Setting up the remote-controlled socket....................................................... Page24 Setting-up operation Using the radio-controlled socket................................................................. Page25 Using the remote-control............................................................................... Page25 Trouble-shooting............................................................................................ Page25 Cleaning..................................................................................................... Page26 Disposal...................................................................................................... Page27 Guarantee and service Guarantee..................................................................................................... Page27 Service address............................................................................................. Page27 Declaration of conformity............................................................................. Page27 Manufacturer................................................................................................. Page28 GB 21 Introduction Electrical Sockets Q Introduction Q Proper handling The radio-controlled socket set is suitable for switching electrical equipment on and off by remote control. Any alterations to this device are not in accordance with regulations and could represent significant risk of accidents. The manufacturer does not accept liability for any damage caused through the device not being used in accordance with the regulations. This device is not intended for commercial use. Q Scope of supply After you have unpacked this set, please check to make sure all the contents are complete. 4 Remote controlled sockets 1 4-channel remote control 2 Batteries AAA (for remote control) 1 Set of operating instructions Q Control elements Remote control (fig. A): 1 Power indicator light 2 Channel ON / OFF button Channel A, B, C, D 3 Master ON / OFF switch 4 Battery compartment lid 22 GB Remote-controlled socket (fig. B): 5 Manual ON / OFF button 6 LED power indicator 7 LEARN button 8 Child protection socket Q Technical data Remote control RCS AAA3680-A IP20: Batteries: 2 x AAA, each 1.5 V Transmission frequency: 433.92 MHz Licensing:The system is licensed for general use, is free of charge and does not require registration. Range:Depending on the circumstances approx. 40 m under optimum circumstances. Radio-controlled sockets RCE AAA3680-A IP20 FR: Rated voltage: 230 V~ 50 Hz Breaking capacity: 15.7 A 3.600 W Standby power consumption: < 0,7 W Transmission frequency: 433.92 MHz Advice: The radio-controlled sockets each have a child protection socket 8 , which significantly increases safety at home. The contacts are protected in such a way that children cannot stick Introduction / Safety needles or other sharp objects into them and thus get an electric shock. Nevertheless, please keep the device out of the reach of children at all times. Q Safety Safety advice Read these operating instructions and safety advice carefully. Look at the diagram page and familiarise yourself with all functions of the device before starting it up for the first time. Avoid danger to life from electric shock! JOnly connect the radio-controlled sockets to earthed 230 V~ domestic sockets. JAt all costs, avoid exposure to damp and extreme temperatures. JOnly use the radio-controlled sockets in enclosed spaces. They are not suitable for outdoor use. JDespite the child protection socket 8 , please keep the device out of the reach of children at all times. JAvoid overloading the device. Overloading can cause a fire hazard or damage to the device. The maximum capacity is approx. 3.600 W per radio-controlled socket. JPlease contact the service department immediately operational faults arise. JDo not open the device on any account. All necessary repairs should only be carried out by the service department or a specialist electrical workshop. JBefore cleaning always disconnect the device from the mains supply. In this case always remove the radiocontrolled electrical outlet socket from the mains wall socket and remove all plugs from the device. JDo not have one radio-controlled electrical outlet socket inserted behind the other. JDo not use any additional child protection devices for the radiocontrolled sockets. The connection between the plug and the radiocontrolled socket could be impaired and risk from overheating then arises. The radio-controlled sockets already have a child protection device which prevents children from putting any objects into the socket. JMake sure that the connected radio-controlled electrical outlet sockets are freely accessible and not covered by other objects. JIf the device malfunctions, switch it off immediately. JThese instructions are a component of the device. If you pass the device on to a third party, these instructions must also be handed on. GB 23 Setting up Q Setting up Q Preparing the remote control (fig. A) 1.Open the battery compartment on the back of the remote control by pushing away the battery compartment cover 4 downwards. Insert two batteries AAA. Make sure you fit the battery the right way round (polarity). 2.Press one of the ON / OFF buttons 2 or 3 to test whether the remote control works; if it does, the power indicator light will come on 1 . Q Setting up the remotecontrolled socket 1.Insert the remote-controlled socket into an earthed household socket and switch it on with the ON / OFF switch 5 . The LED operating status display 6 will come on. 2.Point the remote control at the remotecontrolled socket at a distance of approx. 50 cm. 3.Press the LEARN button 7 of the remote-controlled socket for approx. 3 seconds and release it again. The LED operating status display 6 will flash for approx. 10 seconds. While it is flashing, press the desired ON button of the channel ON / OFF button 2 (A, B, C or D) of the remote control. The LED operating status display 6 will now shine permanently. You can now 24 GB switch a connected consumer on or off using the remote control. 4.Repeat this procedure with the other remote-controlled socket. 5.You can switch several remote-controlled sockets on and off at the same time using the ON / OFF button 2 of one channel. In addition, you can programme six remote controls one after the other and use them for individual receivers. This means you can switch one appliance on and off from up to six different places. 6.In this case, synchronise every remotecontrolled socket with the channel of the remote control. 7.The coding of the remote control will be maintained even when you change the batteries. 8.If you disconnect the remote-controlled socket from the power supply, the codings will be permanently stored. 9.In order to delete the codings again, press the LEARN button 7 longer than 6 seconds until the LED operating status display 6 starts to flash. All codings will now be deleted. 10.Avoid interference: Make sure that the distance between the various remote-controlled sockets is approx. 50 cm. 11.Every remote-controlled socket also has a manual ON / OFF switch 5 . You can switch the remote-controlled socket on and off without using the remote control. The LED operating status display 6 will indicate whether the remote-controlled socket is in the ON / OFF mode. Setting-up operation Q Setting-up operation Q Using the radio-controlled socket (fig. B) 1.Put the radio-controlled socket into any shuttered socket and connect the appliance you want to operate. 2.Switch the electrical appliance on. The radio-controlled socket can only perform its switching function when the device to be controlled is switched on. ATTENTION! FIRE HAZARD! Do not attach any appliances which could cause fires or other damaged if left unattended when switched on. The maximum load of every radio-controlled socket is approx. 3.600 W. Any overload could cause a risk of fire or damage to the device. 3.Press the manual ON / OFF button 5 to switch the remote-controlled socket on directly on the appliance. The LED operating status display 6 will shine. Alternatively, you can also switch the remote-controlled socket on using the remote control (See “Using the remote control”). 4.Press the manual ON / OFF button 5 to switch the remote-controlled socket off directly on the appliance. The LED operating status display 6 will go out. Alternatively, you can also switch the remote-controlled socket off using the remote control (See “Using the remote control”). Q Using the remotecontrol (fig. A) 1.Use the button ON / OFF 2 for the channel whose device you would like to switch on or off. The remote control controls up to 4 radio-controlled sockets (individually, in groups, or all at the same time). 2.Use the ALL-ON / OFF button 3 to switch all radio-controlled sockets on or off at the same time. Q Trouble-shooting If the remote control does not work, please check the following points: Problem The operating indicator 1 on the remote control device illuminates but there is no reaction Remedy ·Check that the batteries still have enough power. If applicable put in new batteries. GB 25 Setting-up operation / Cleaning Problem No indicator light 1 on remote control when pressing “ON” or “OFF” Remedy ·Check if the batteries are inserted correctly. ·Check if the batteries have proper contact with the springs, if necessary adjust. Problem No reaction from consumer Remedy ·Check that the appliance is switched on. ·Assign new code to the remote control socket (see „preparing the remote control socket“, point 3). ·Check - by walking closer to it - that the range is correct for the desired location. Problem Range is too small Remedy ·For large ranges, ensure that as few walls and as little furniture as possible are in the way of the remote control and the radio-controlled socket. ·If the range is too small at times, the reason could be a remote control which works on a similar frequency. Whenever this remote control is active, the range declines (e.g. wireless headphones, radiocontrolled movement alarms, radio gongs etc.). Q Cleaning JEnsure that no liquids get into the inside of the device. Use a soft cloth to clean the housing. Never use petroleum, solvents or cleaners which corrode plastics. jBefore cleaning, always disconnect the radio-controlled socket from the wall socket and remove all power plugs from the device. 26 GB Disposal / Guarantee and service Q Disposal Electrical appliances must not be disposed of with domestic waste. In accordance with Council Directive 2012 / 19 / EC on waste electrical and electronic equipment (WEEE), used electrical appliances, lighting equipment and batteries have to be collected separately and recycled in an environmentally friendly way. Enquire at your city council or local government regarding the possibilities of disposing of electronic waste in a correct and environmentally friendly way. Pb Environmental damage through incorrect disposal of the batteries! Batteries should not be disposed of with domestic waste. They may contain toxic heavy metals and are subject to hazardous waste treatment rules and regulations. That is why you should dispose of used batteries at a local collection point. Q Guarantee and service Q Guarantee This appliance comes with a 3-year guarantee commencing on the date of purchase. Please keep your receipt as proof of purchase. The appliance has been produced to the highest standards and thoroughly checked before dispatch. The guarantee only applies to faults in materials or workmanship when used properly. The guarantee lapses in cases of unauthorized tampering. This guarantee does not restrict your legal rights. If you wish to make a claim under the guarantee, please telephone the service centre. Only by doing so can we ensure that your appliance is returned free of charge. Q Service address BAT, Lindenstraße 35, 72074 Tübingen, Germany E-mail: [email protected] Service Tel.: 00800 48720741 For further information, we recommend you visit the service section / FAQs of our home page www.dvw-service.com. IAN 60494 Q Declaration conformity of The CE marking has been affixed in accordance with the following European directives: 1999/5/EC R&TTE Directive 2006/95/EC Low Voltage Directive 2004/108/EC EMC Directive 2011/65/EU RoHS II A manufacturer’s Declaration of Conformity is included with the product. GB 27 Guarantee and service The Declaration of Conformity can be found under the following link: www.dvw-service.com/konformitaetserklaerung/ke_1049621706.pdf Q Manufacturer BAT Lindenstraße 35 72074 Tübingen Germany H. Brennenstuhl S.A.S. 5 rue de l‘ Artisanat F-67460 Souffelweyersheim 28 GB BAT Lindenstraße 35 72074 Tübingen Germany Version des informations · Stand der Informationen · Last Information · Update: 03 / 2014 · Ident.-No.: 0474302 032014-FR IAN 60494