1
Installation and Start-up Procedure
Installation Instructions
CAUTION:
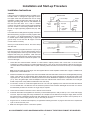
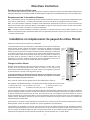
Figure 1
If the ground from the electrical panel or breaker box to
the water meter or underground copper pipe is tied to
the copper water lines and these lines are cut during
installation of a Noryl bypass valve and/or poly pipe, an
approved grounding strap must be used between the
two lines that have been cut in order to maintain
continuity. The length of the grounding strap will depend
upon the number of units being installed and/or the
amount of copper pipe being replaced with poly. See
Figure 1.
In all cases where metal pipe was originally used and is
later interrupted by poly pipe or the Noryl bypass valve
as in Figure 1 or by physical separation as in Figure 2,
to maintain proper metallic pipe bonding, an approved
ground clamp c/w not less than #6 copper conductor
must be used for continuity.
Electrical Panel
Ground Strap
Ground
From
Panel
Poly
Pipe
Copper
Pipe
Poly Pipe
Filter
c/w Plastic
Bypass
Water
Meter
Figure 2
Unfiltered Water Line for Outside & 3rd Tap Comes from Meter
Check your local electrical code for the correct clamp
and cable size.
Unfiltered Water Bypass
Loop Cut & Capped
NOTE: This timer’s programs will be out of sync if you
turn the knob too far or do not allow the drive motor to
stop completely before continuing to the next step. If this
happens while doing any procedure, rotate the knob
clockwise until the white dot lines up with the time of day
arrow and the unit will return to the service position. You
can then start again.
1.
Ground Strap Required
Because of break in continuity
Filtered Water Line in Home
Place filter with chemical feeder container on a flat surface in desired location, near a drain and 115 volt AC outlet.
Subjecting your filter to freezing or to water temperatures above 120oF (49oC) will void the warranty. Remove the valve from
the carton. Be sure the distributor tube is in place. Carefully position the valve over it and turn securely on to the fiberglass
tank.
Note: All multi media and some larger units are supplied with the media separate. Please refer to page 5 installations &
Replacement of Filter Media Pak.
2.
Attach the installation kit or bypass to the control valve. Make inlet and outlet water connections to meet applicable plumbing
codes. A 3/4” inlet line is recommended. When sweat fittings are used, solder the adapters for the inlet and outlet to the
copper pipe first. This procedure is necessary because the controls must not be subjected to temperatures above 160oF
(71oC). Then, using teflon tape, screw the adapters for the inlet, outlet and drain into the valve. CAUTION: Do not use pipe
thread compound as it may attack the materials in the valve body.
3.
On the drain, use the 1/2" hose barb supplied and a full 1/2" hose (not supplied) for the drain line and make the shortest
run to a suitable drain. The drain line must be secured in position at the end which discharges into the drain so it cannot
be inadvertently moved from the drain. An air gap may be required.
4.
Loosen the two screws on the timer cover to remove it from the timer.
5.
Automatic water filters are supplied from the factory in the backwash position, ready for start up. Turn on the water supply
to the unit. Open the supply line slowly and allow the air to escape from the filter before turning the supply water on all the
way. Allow the unit to backwash until all the air and media fines are no longer showing at the drain. This may take up to 15
minutes so you need to unplug the timer until you are ready to continue.
6.
Plug the timer in, set the time and frequency of regeneration following instruction on page 4. Allow the unit to complete the
cycle on its own from this point.
7.
Make sure the bypass valve is in the service position.
ALL GOVERNMENT CODES GOVERNING INSTALLATIONS OF THESE DEVICES MUST BE OBSERVED.
2