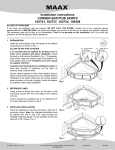
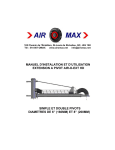
1
Installation Guide – Fjord Faucet for lavatory
Guide d’installation – Robinet Fjord pour lavabo
Guía de instalación – Grifo Fjord para lavabo
FJORD FAUCET FOR LAVATORY
ROBINET FJORD POUR LAVABO
GRIFO FJORD PARA LAVABO
200025-000-XXX
TABLE OF CONTENTS
IDENTIFICATION OF COMPONENTS . .3
TABLE DES MATIÈRES
CONTENIDO
IDENTIFICATION DES
IDENTIFICACIÓN DE LOS
COMPOSANTES . . . . . . . . . . . . . . . . . .3
COMPONENTES . . . . . . . . . . . . . . . . . . .3
LIST OF COMPONENTS . . . . . . . . . . . .4
LISTE DES COMPOSANTES . . . . . . . . .4
LISTA DE COMPONENTES . . . . . . . . . .4
WARNING . . . . . . . . . . . . . . . . . . . . . . . .5
MISE EN GARDE . . . . . . . . . . . . . . . . . .5
ADVERTENCIA . . . . . . . . . . . . . . . . . . . .5
Tools and material needed . . . . . . . . .5
Outillage et matériel requis . . . . . . . .5
Herramientas y material requiridos . . .5
VALVE INSTALLATION . . . . . . . . . . . . . .6
INSTALLATION DES VALVES . . . . . . . .6
INSTALACIÓN DE LAS VÁLVULAS . . . . . .6
INSTALL THE HANDLES . . . . . . . . . . . .6
INSTALLATION DES MANETTES . . . . .6
INSTALACIÓN DE MANERALES . . . . . . . .6
SPOUT INSTALLATION . . . . . . . . . . . .7
INSTALLATION DU BEC . . . . . . . . . . . .7
INSTALACIÓN DEL CAÑO . . . . . . . . . . .7
INSTALLING THE POP UP DRAIN . . . .8
INSTALLATION DU DRAIN
INSTALACIÓN DEL DESAGÜE
MÉCANIQUE . . . . . . . . . . . . . . . . . . . . .8
MECÁNOCO . . . . . . . . . . . . . . . . . . . . . .8
MAINTENANCE . . . . . . . . . . . . . . . . . . . .9
ENTRETIEN . . . . . . . . . . . . . . . . . . . . . . .9
MANTENIMIENTO . . . . . . . . . . . . . . . . . .9
TROUBLESHOOTING GUIDE . . . . . . . .9
GUIDE DE DÉPANNAGE . . . . . . . . . . . .9
GUÍA DE ASISTENCIA . . . . . . . . . . . . . .9
Replacing the cartridge . . . . . . . . . . . .9
Remplacement du cartouche . . . . . . .9
Reemplazar el cartucho . . . . . . . . . . .9
WARRANTY . . . . . . . . . . . . . . . . . . . . .10
GARANTIE . . . . . . . . . . . . . . . . . . . . . .10
GARANTÍA . . . . . . . . . . . . . . . . . . . . . .10
RESTRICTIONS . . . . . . . . . . . . . . . . . .10
RESTRICTIONS . . . . . . . . . . . . . . . . . .10
RESTRICCIONES . . . . . . . . . . . . . . . . .10
COMMERCIAL RESTRICTIONS . . . . . .11
RESTRICTIONS COMMERCIALES . . .11
RESTRICCIONES COMERCIALES . . .11
SERVICE GUARANTEE . . . . . . . . . . . .11
GARANTIE DE SERVICE . . . . . . . . . . .11
GARANTÍA DE SERVICIO . . . . . . . . . .11
2
Identification of components
Identification des composantes
Identificación de los componentes
15
16
6
43
14
17
13
18
1
2
12
19
3
20
4
21
5
22
7
23
26
8
28
24
27
9
25
10
29
30
31
11
32
33
42
34
35
36
41
37
40
39
38
3
List of Components / Liste des composantes / Lista de Componentes
#
Description
Description
Descripción
1
2
3
4
5
6
7
8
9
10
Fjord Handle
Set screw
Fjord Flange
Adaptor plastic
Cold water cartridge
Hot water cartridge
Fjord flange ring
Rubber washer
Metal washer
Nut
Manette Fjord
Vis de serrage
RosaceFjord
Adapteur de plastique
Cartouche eau froide
Cartouche eau chaude
Anneau de la rosace Fjord
Rondelle en caoutchouc
Rondelle de métal
Écrou
11
1/2” water valve
Valve 1/2" d'entrée d'eau
12
13
14
15
Aerator ring
Aerator
Waterproof gasket
Faucet spout
Bague de l'aérateur
Aérateur
Joint d'étanchéité
Bec de robinet
16
Drain rod button
Bouton de la tige du drain
17
18
19
20
21
22
23
24
25
26
27
28
29
30
31
32
33
34
35
36
37
Drain rod
Set screw
Threaded rod
Decorative spout ring
Rubber ring
Rubber gasket
Metal washer
Nut
Flexible hose 1/2" F x 1/4" M
Flexible hose 1/2" F x 1/4" M
Drain stopper
Drain seal gasket
Plastic ring
Nut
Adjustment screw
Connecting drain
Waterproof gasket
Raised seal gasket
Nut
Plastic gasket
Drain body
Tige du drain
Vis de serrage
Tige filetée
Anneau décoratif du bec
Anneau de caoutchouc
Joint de caoutchouc
Rondelle de métal
Écrou
Boyau flexible 1/2" F x 1/4" M
Boyau flexible 1/2" F x 1/4" M
Bouchon du drain
Joint d'étanchéité du drain
Rondelle de plastique
Écrou
Vis d'ajustement
Drain connecteur
Joint d'étanchéité
Joint d’étanchéité avec relief
Écrou
Joint de plastique
Corps de drain
38
Tail piece
About
39
40
41
42
43
Plastic gasket
Pivoting rod
Pivoting ring nut
Union
Joint de plastique
Tige pivotante (horizontale)
Écrou de la tige pivotante
Union
Maneral Fjord
Tornillos opresores
Empaque Fjord
Adaptador plástico
Cartucho de agua fría
Cartucho de agua caliente
Anillo de empaque Fjord
Arandela de goma
Arandela metálica
Tuerca
Válvula 1/2" de entrada de
agua
Anillo para aireador
Aireador
Junta hermética
Caño de grifo
Botón de la varilla del
desagüe
Varilla del desagüe
Tornillos opresores
Varilla roscada
Aro decorativo del caño
Arandela de goma
Junta de goma
Arandela metálica
Tuerca
Tubo flexible 1/2" F x 1/4" M
Tubo flexible 1/2" F x 1/4" M
Tapón del desagüe
Junta hermética del desagüe
Arandela de plástico
Tuerca
Tornillo de ajuste
Conector con el desagüe
Junta hermética
Junta hermética con relieve
Tuerca
Junta de plástico
Cuerpo del desagüe
Rebosadura de aspiración
del dreno
Junta de plástico
Varilla pivotante
Tuerca de la varilla pivotante
Unión
1/8" seal gasket
Joint d'étanchéité 1/8"
Junta hermética 1/8"
4
Part No
No de pièce
No de parte
Qty
Qté
Cant.
10011444-XXX
10011438
10002176
10002178
10024109-XXX
10004908
10004907
10004906
2
2
2
2
1
1
2
2
2
2
10004911
2
10011437-XXX
10024111-XXX
1
1
2
1
10024112-XXX
1
10024113
10011450
10024114
10024115-XXX
10024116
10024117
10024118
10024119
10024121
10024120
10004883-XXX
10004897
10004884
10004885
10004886
10004887-XXX
10008809
10004888
10004889
10004890
10004898-XXX
1
1
1
1
1
1
1
1
1
1
1
1
1
1
1
1
1
1
1
1
1
10004891-XXX
1
10004892
10004893-XXX
10004895-XXX
10004896
10024134
1
1
1
1
1
10024110-XXX
WARNING
MISE EN GARDE
ADVERTENCIA
Upon opening the box make sure all the
parts are included and that they are in good
shape. If there is a problem notify your
distributor immediately.
Lors de la réception, vérifier que toutes les
pièces sont incluses et qu’elles sont en bon
état. Si un problème survient, le signaler
immédiatement à votre distributeur.
Al abrir el embalaje, cerciorarse de que
todas las piezas van incluidas y están en
buen estado. Si surgiera algún problema,
notifíqueselo inmediatamente al distribuidor.
Warning: Always cut off the water supply
before removing or disassembling any
faucet. Open the faucet to release the water
pressure and to make sure the water supply
is indeed cut off.
Attention : toujours couper l’alimentation en
eau avant d’enlever ou de démonter un
robinet. Ouvrir le robinet pour libérer la
pression d’eau et pour vous assurer que
l’alimentation est bien coupée.
Advertencia : Cierre siempre la entrada de
agua antes de sacar o desmontar un grifo.
Abra la llave para liberar la presión de agua
y compruebe que el suministro de agua está
interrumpido.
Installing a new faucet, make sure the
cartridge is properly placed. It is possible
the cartridge becomes loose after being
handled by several people. If that is the
case, the water pressure could eject the
cartridge from the valve, causing injury and
material damage.
Lors de l’installation d’un nouveau robinet,
assurez-vous que la cartouche est bien
fixée. Il est possible que suite à la
manipulation par plusieurs personnes, la
cartouche se soit relâchée. Si c’est le cas,
la pression d’eau pourrait expulser la
cartouche de la valve, provoquant des
blessures et des dégâts matériels.
Durante la instalación de una llave nueva,
asegúrese de que el cartucho queda bien
apretado. Puede ocurrir que el cartucho se
afloje, por la manipulación de varias
personas. Si eso ocurriera, la presión de
agua podría expulsar el cartucho del cuerpo
del mezclador, lo que pudiera provocar
lesiones y daños materiales.
MAAX is not responsible for problems
caused by installations that were not
conducted in compliance with this guide
provisions.
MAAX n’est pas responsable des problèmes
causés par une installation non conforme
aux directives énoncées dans le présent
guide.
MAAX no se responsabiliza con los
problemas
provocados
por
una
instalación que viole las reglas de la
presente guía.
TOOLS AND MATERIAL NEEDED
OUTILLAGE ET MATÉRIEL REQUIS
HERRAMIENTAS Y MATERIAL REQUERIDOS
•
Measuring tape
•
Ruban à mesurer
•
Cinta métrica
•
1 1/4 in. high-speed keyhole saw
•
Scie emporte-pièce Ø 1 1/4 po
•
Sierra caladora Ø 1 1/4 in
•
Screwdriver
•
Tournevis
•
Destornillador
•
Teflon
•
Téflon
•
Cinta de teflón
•
Combination wrench
•
Clé mixte
•
Llave mixta
5
VALVE INSTALLATION
Install the hot water valve to the left and the cold
water valve to the right. Place the nuts (10), metal
washers (9) as well as the rubber washers (8)
temporarily as illustrated Fig. 1 .
Note: Ensure access to the components.
4"
(102 mm)
4"
(102 mm)
INSTALL THE HANDLES
Screw the flange rings (7) to the water valves
(11). Screw the flanges (3) to the maximum on
the valves and unscrew the rings (7) so they are
laying against the flanges (3). Tighten the nuts
(10). Fig. 2 .
Place the valves in the closed position (turn
counter-clockwise for the cold water valve and
clockwise for the hot water valve). Install the
handles (1) on the valves (the slope must face
forward) and secure into position using tightening
screws (2). Fig. 1 .
Allen 2 mm
1
2
1 1/4"
(32 mm)
3
7
Lavatory
Lavabo
Lavabo
1 1/4"
(32 mm)
INSTALLATION DES VALVES
Installer la valve d’entrée d’eau chaude à gauche
et la valve d’entrée d’eau froide à droite. Placer
les écrous (10), les rondelles de métal (9) ainsi
que les rondelles de caoutchouc (8)
temporairement tel qu’illustré Fig. 1 .
Note : Assurer un accès aux composantes.
6
8
9
10
4
INSTALLATION DES MANETTES
Visser les anneaux des rosaces (7) sur les valves
d’entrée d’eau (11). Visser les rosaces (3) au
maximum sur les valves et dévisser les anneaux (7)
de manière à ce que celles-ci soient appuyées sur
les rosaces (3). Serrer les écrous (10). Fig. 2 .
Mettre les valves en position fermée (tourner
dans le sens anti-horaire pour la valve d’eau
froide et dans le sens horaire pour la valve d’eau
chaude). Installer les manettes (1) sur les valves
(la pente doit être vers l’avant) et fixer en position
à l’aide des vis de serrage (2). Fig. 1 .
5
Hot water (Red)
Eau chaude (Rouge)
Agua caliente (Rojo)
11
Cold water
Eau froide
Agua fría
Fig. 1
INSTALACIÓN DE LAS VÁLVULAS
Instalar la válvula de entrada de agua caliente a
la izquierda, y la válvula de agua fría a la
derecha. Instalar temporalmente las tuercas (10),
las arandelas metálicas (9) así como las
arandelas de goma (8) tal como está ilustrado.
Fig. 1 .
Nota: Asegurarse del acceso libre a los
componentes.
1
3
7
INSTALACIÓN DE MANERALES
Fijar los anillos de los empaques (7) en las
válvulas de entrada de agua (11). Atornillar al
máximo los empaques (3) sobre las válvulas y
aflojar los anillos (7) de modo que éstos estén
apoyados en los empaques (3). Apretar las
tuercas (10). Fig. 2 .
Poner las válvulas en posición de cierre (girar
contra el sentido de las agujas de reloj para la
válvula de agua fría, y girar en el sentido de las
agujas de reloj para la válvula de agua caliente).
Instalar los manerales (manecillas) (1) sobre las
válvulas (la inclinación debe quedar hacia
adelante) y fijar en posición mediante tornillos
opresores (2). Fig. 1 .
8
9
10
11
Fig. 2
6
SPOUT INSTALLATION
Connect the flexible hoses (25 and 26) under
the faucet spout (15). Note: start with hose 26.
Fig. 3 .
15
Screw the threaded rod (19) under the faucet
spout (15). Note: one end of the rod is grooved
so as to be adjusting using a flat screwdriver.
12
26
25
19
Insert the spout between the water valves making
sure to install the decorative spout ring (20) and
the waterproof ring (21) under the decorative ring
(20). Fig. 3 . Over that, insert the rubber washer
(22), metal washer (23) and tighten the nut (24)
Fig. 3 .
Connect the flexible hoses (25 and 26) to the
water valves (11). Fig. 4 .
20
21
INSTALLATION DU BEC
Raccorder les boyaux flexibles (25 et 26) sous
le bec de robinet (15). Note: débuter par le
boyau 26. Fig. 3 .
22
23
24
Fig. 3
Visser la tige filetée (19) sous le bec de robinet
(15). Note: une extrémité de la tige est rainurée
pour visser à l’aide d’un tournevis plat.
Insérer le bec entre les entrées d’eau en prenant
soin d’installer l’anneau décoratif du bec (20) et
l’anneau d’étanchéité (21) sous l’anneau décoratif
(20). Fig. 3 . Par le dessous, insérer la rondelle
de caoutchouc (22), la rondelle de métal (23) et
visser l’écrou (24) Fig. 3 .
Raccorder les boyaux flexibles (25 et 26) aux
valves d’entrée d’eau (11). Fig. 4 .
15
INSTALACIÓN DEL CAÑO
20
Conectar los tubos flexibles (25 y 26) debajo del
caño de la llave (15). Nota: empezar por la
manguera 26. Fig. 3 .
Atornillar la varilla roscada (19) debajo del caño
(15). Nota: un extremo de la varilla está ranurado
de forma que hay que ajustarlo con un
destornillador plano.
Inserte el caño entre las entradas de agua
cuidando de instalar el aro decorativo del caño
(20) y la arandela hermética (21) debajo del aro
decorativo (20). Fig. 3 . Por encima, insertar la
arandela de goma (22), la arandela metálica (23)
y apretar la tuerca (24) Fig. 3 .
26
25
Conectar los tubos flexibles (25 y 26) a las
válvulas de entrada de agua (11). Fig. 4 .
Fig. 4
7
INSTALLING THE POP UP DRAIN
Place Teflon in the indicated areas Fig. 5 . Place the
drain (29) on the opening of the sink; the gasket seal
(30) can be replaced by the application of mastic. Install
the raised seal gasket (34) and tighten the nut (35).
Firmly tighten the drain mechanism (37) onto the drain
(32). Fig. 5 . Note: the horizontal rod (37) must be
pointed towards the faucet.
15
16
43
20
Insert the drain stopper (27) into the drain. Install the
pivoting rod (40) and tighten the pivoting rod bolt (41).
Unscrew the drain rod button (16) and insert the rod
(17) into the orifice under the faucet spout (15). Slide
the gasket seal (43) onto the rod (17) and retighten the
button (16) to the rod (17). Fig. 5 .
Bring the union (42) together to the pivoting rod (40)
and drain rod (17) and tighten. Fig. 6 . Adjust so the
drain stopper opens and closes effectively by screwing
or unscrewing the drain screw and nut and by adjusting
the height of the union on the rod.
32
Teflon
Téflon
17
33
Or mastic
Ou mastic
O masilla
Lavatory
Lavabo
Lavabo
34
INSTALLATION DU DRAIN
MÉCANIQUE
Mettre du téflon aux endroits indiqués Fig. 5 . Insérer le
drain (32) dans le renvoi du lavabo ; le joint d’étanchéité
(33) peut être remplacé par l’application de mastic. Enfiler le
joint d’étanchéité avec relief (34) et visser l’écrou (35).
Visser fermement le mécanisme du drain (37) au drain
(32). Fig. 5 . Note: la tige horizontale (40) doit être
orientée vers le robinet.
35
36
37
Teflon
Téflon
38
Insérer le bouchon (27) dans le drain. Installer la tige
pivotante et visser l’écrou de la tige pivotante (41).
Fig. 5
Dévisser le bouton (16) de la tige et insérer la tige (17)
dans l’orifice sous le bec de robinet (15). Glisser le joint
d’étanchéité (43) sur la tige (17) et revisser le bouton
(16) à la tige (17). Fig. 5 .
Réunir l’union (42) (dans le sens illustré) à la tige
pivotante (40) et à la tige du drain (17) puis visser
Fig. 6 . Ajuster de façon à ce que le bouchon du drain
ouvre et ferme efficacement en vissant ou en dévissant
la vis et l’écrou du bouchon du drain.
15
20
INSTALACIÓN DEL
DESAGÜE MECÁNICO
Poner teflón en los lugares indicados Fig. 5 . Insertar el
desagüe (32) en el colector del lavabo; la junta hermética
(33) puede ser remplazada por masilla. Introducir la junta
hermética con relieve (34) y apretar la tuerca (35). Apretar
con fuerza el mecanismo de desagüe (37) al desagüe (32).
Fig. 5 . Nota: la varilla horizontal (40) debe estar orientada
hacia la llave de grifo.
Insertar el tapón (27) en el desagüe. Instalar la varilla
pivotante (40) y apretar la tuerca de la varilla pivotante
(38).
Aflojar el botón (16) de la varilla e introducir la varilla
(17) en el orificio, debajo del caño de la llave (15).
Deslizar la junta hermética (43) en la varilla (17) y
volver a apretar el botón (16) a la varilla (17). Fig. 5 .
Juntar la unión (42) (en el sentido ilustrado) con la
varilla pivotante (40) y con la varilla del desagüe (17),
luego apretar Fig. 6 . Ajustar de forma que el tapón
del desagüe abra y cierre eficazmente, apretando o
aflojando la tuerca del desagüe y ajustándolo a la
altura de la unión con la varilla.
28
17
27
29
40
30
42
31
32
17
Lavatory
Lavabo
Lavabo
42
41
40
37
39
38
Fig. 6
8
MAINTENANCE
ENTRETIEN
MANTENIMIENTO
Rinse using clean water and dry with a soft
cotton cloth.
Rincer à l’eau propre et essuyer avec un chiffon
de coton doux.
Enjuague ar con agua limpia y seque con un
paño suave de algodón.
For hard to remove stain, use a soft liquid
detergent, a glass cleaning product, a liquid,
soft, non-abrasive and non-acidic cleaning
product or a non-abrasive liquid polishing
product.
Pour les souillures tenaces, utiliser un détergent
liquide doux, un produit de nettoyage pour le
verre, un produit de nettoyage liquide, doux, non
abrasif et non acide ou un produit de polissage
liquide non abrasif.
Para las manchas tenaces, utilice un detergente
líquido suave, un producto de limpieza para
cristales, un producto de limpieza líquido, suave,
no abrasivo y no ácido o un pulimento líquido no
abrasivo.
DO NOT USE ABRASIVE OR ACIDIC
PRODUCTS OR ABRASIVE CLOTHS.
NE PAS UTILISER DE PRODUITS ABRASIFS
OU ACIDES OU DE CHIFFONS RUGUEUX.
NO UTILICE PRODUCTOS ABRASIVOS
O ÁCIDOS NI PAÑOS RUGOSOS.
TROUBLESHOOTING GUIDE
GUIDE DE DÉPANNAGE
GUÍA DE ASISTENCIA
IMPORTANT: Before conducting any repairs
or adjustments, turn off the water supply.
IMPORTANT:
avant
toute
réparation
ou ajustement, couper l’alimentation en eau.
IMPORTANTE : antes de cualquier reparación
o ajuste, cortar el suministro de agua.
Problem
Water flow is low. No water flow.
Solution
Make sure the water valve is fully opened.
Make sure no hoses are being pinched.
Unscrew the aerator ring (12), remove the
aerator (13) and clean it.
Remove the rubber (5 or 6) and purge the piping.
Make sure no gasket seals are obstructing an
orifice.
Problème
Le débit d’eau est faible. Aucun débit d’eau.
Solution
Vérifier si l’alimentation en eau est ouverte à
pleine capacité.
Vérifier qu’aucun boyau ne soit plié.
Dévissez la bague aérateur (12), retirez
l'aérateur (13) et nettoyez-le.
Retirer la cartouche (5 ou 6) et purger la
tuyauterie.
Vérifier qu’aucun joint d’étanchéité n’obstrue un
orifice.
Problema
El flujo de agua es débil. Ningún caudal de agua.
Solución
Comprobar si la entrada de agua está
completamente abierta.
Comprobar ningún tubo esté doblado.
Afloje el anillo para aireador (12), sacar el
aireador (13) para limpiarlo
Sacar el cartucho (5 o 6) y purgar la tubería.
Comprobar que ninguna junta anular está
obstruyendo los orificios.
Problem
The faucet leaks.
Solution
Change the cartridge.
Problème
Le robinet dégoutte.
Solution
Changer la cartouche.
Problema
La llave de frío gotea.
Solución
Cambiar elcartucho.
Problem
The water does not stay in the sink.
Solution
Check the union adjustment (42).
Check to see if there is a leak between the
drain and the sink (Fig. 5).
Change the waterproof ring (28) around the
stopper (27).
Problème
L’eau ne reste pas dans la cuve du lavabo.
Solution
Vérifier l’ajustement de l’union (42).
Vérifier s’il y a fuite d’eau entre le drain et le
lavabo (Fig. 5).
Changer l’anneau d’étanchéité (28) autour
du bouchon (27).
Problema
El agua no permanece en la pila del lavabo.
Solución
Verificar el ajuste del unión (42).
Comprobar si hay fugas de agua entre el
desagüe y el lavabo (Fig. 5).
Cambiar la junta anular hermética (28) que
rodea al tapón (27).
REPLACING THE CARTRIDGE
Unscrew the tightening screw (2) behind
the handle (1) using an Allen key. Remove
the handle (1) and unscrew the flange from
the handle (3). Delicately remove the
plastic adapter at the end of the cartridge (5
and 6) and using pliers, unscrew the
cartridge. It is recommended you keep part
11 under the sink to prevent it from turning.
Please note: The cold water cartridge (5) is
different from the hot water cartridge (6);
the cold water cartridge (5) has small
notches in the upper part of the cartridge.
Note: The plastic adapter (4) must be
replaced on the new cartridge.
REMPLACEMENT DE LA CARTOUCHE
Dévisser la vis de serrage (2) à l’arrière de
la manette (1) à l’aide de la clé allen.
Retirer la poignée (1) et dévisser la rosace
de la poignée (3). Retirer délicatement
l’adapteur de plastique (4) au bout de la
cartouche (5 ou 6) et à l’aide de pinces
mixtes, dévisser la cartouche. Il est
recommendé de retenir la pièce 11 sous le
lavabo pour l’empêcher de tourner.
Attention: La cartouche d'eau froide (5) est
différente de la cartouche d'eau chaude (6);
la cartouche d'eau froide (5) a de petites
entailles sur la partie supérieure de la
cartouche.
Note: L'adapteur de plastique (4) doit être
replacé sur la nouvelle cartouche.
REEMPLAZAR EL CARTUCHO
Aflojar el tornillo opresor (2) detrás del
maneral (1) con una llave Allen. Retirar el
maneral (1) y aflojar el empaque del
maneral (3). Retirar con cuidado el
adaptador plástico (4) que está en el
extremo del cartucho (5 o 6) y afloje el
cartucho utilizando alicates mixtos. Se
recomienda tener sujeta la pieza 11 debajo
del lavabo para impedirla que gire.
Atención: El cartucho de agua fría (5) es
distinto del cartucho de agua caliente (6); el
cartucho de agua fría (5) tiene pequeñas
muescas en la parte superior del cartucho.
Nota: El adaptador plástico (4) debe ser
reemplazado en el nuevo cartucho.
9
WARRANTY
GARANTIE
GARANTÍA
MAAX inc. provides the following limited
guarantee on all of its products. This guarantee
is only good for the original owner-user for
personal domestic use. Additional restrictions
apply for commercial use.
MAAX inc. accorde la garantie limitée suivante
sur chacun de ses produits. Cette garantie
bénéficie uniquement au propriétaire-utilisateur
original pour usage personnel domestique. Des
restrictions additionnelles s’appliquent lors
d’utilisations commerciales.
MAAX inc. otorga la siguiente garantía limitada
para cada uno de sus productos. La garantía
sólo beneficia al propietario usuario original para
uso personal y doméstico. En caso de usos
comerciales, se aplican restricciones adicionales.
Limited life time Guarantee Against Leaks
MAAX inc. guarantees the ceramic cartridge for
the faucets against any leak resulting from
normal use by the owner-user, the contractor or
the builder. MAAX will send you the replacement
cartridge free of charge.
Garantie limitée à vie contre les fuites
MAAX inc. garantit la cartouche en céramique
de la robinetterie contre toute fuite résultant d’une
utilisation normale par le propriétaire-utilisateur,
le contracteur ou le constructeur. MAAX vous enverra
gratuitement la cartouche de remplacement.
Garantía con vida limitada contra las fugas
MAAX inc. garantiza el cartucho de cerámica de
la grifería contra cualquier escape que resultara
de una utilización normal por parte del
propietario-usuario, el contratista o el constructor.
MAAX le enviará gratis el cartucho de recambio.
Guarantee
Against
any
Material
or
Manufacturing Defect
MAAX inc. guarantees all components against
material or manufacturing defects resulting from
normal use for a period of one (1) year from the
initial product purchase date from an authorized
retailer by owner-user, contractor or builder.
Garantie contre les vices de matériel ou de
fabrication
MAAX inc. garantit toute autre composante contre
tout vice de matériel ou de fabrication, pour une
période d’un (1) an de la date initiale d’achat du
produit d’un détaillant autorisé, résultant
d’une utilisation normale par le propriétaireutilisateur, le contracteur ou le constructeur.
Garantía contra defectos de material o
fabricación
MAAX inc. garantiza todos los componentes contra
cualquier defecto de material o fabricación que
resultara de una utilización normal por un período
de uno (1) año a partir de la fecha inicial de compra
del producto a un detallista autorizado por parte del
propietario usuario, el contratista o el constructor.
Repair and Replacement
MAAX inc. will repair or replace with a product of
equivalent value, as chosen by MAAX inc., any
defective product MAAX inc. has been advised of
during the period of the guarantee. The present
guarantee is only applicable to the original
owner-user and is not transferable to any
subsequent owners.
Réparation et remplacement
MAAX inc. procédera à la réparation ou au
remplacement avec un produit de valeur
équivalente, au choix de MAAX inc., de tout
produit défectueux pour lequel MAAX inc. serait
avisé du défaut pendant la période de garantie.
La présente garantie bénéficie au propriétaireutilisateur original et n’est pas transférable à un
propriétaire subséquent.
Reparación y reemplazamiento
MAAX inc. se encargará de la reparación o
reemplazamiento de todo producto defectuoso
suministrando un producto de valor equivalente,
a elección de MAAX inc., siempre y cuando se
hubiera notificado dicho desperfecto a MAAX inc.
durante el período de garantía. La garantía sólo
beneficia al propietario usuario original y no es
transferible a otro propietario subsecuente.
RESTRICTIONS
RESTRICTIONS
RESTRICCIONES
The present guarantee is not applicable in the
event the product is not used or operated
correctly, suffers damage as the result of fault,
negligence,
improper
use,
improper
maintenance, alteration or modification of the
product, as well as the result of chemical or
natural corrosion, fire, natural catastrophes or
any other act of God, force majeure or
unexpected or uncontrollable event.
La présente garantie ne s’applique pas dans le
cas d’utilisation ou d’opération non conformes
ou incorrectes, de bris ou de dommages causés
par la faute, la négligence, l’abus, le mauvais
emploi, le mauvais usage, l’entretien impropre,
l’altération ou la modification du produit, de
même que la corrosion chimique ou naturelle, le
feu, les catastrophes naturelles ou tout autre cas
de force majeure ou cas fortuit, désastre ou
événement imprévu ou incontrôlable.
La presente garantía no se aplica en casos de
utilización o funcionamiento inapropiado o
incorrecto, roturas o daños causados por error,
descuido, abuso, empleo o utilización incorrecta,
mantenimiento inadecuado, alteración o
modificación del producto, al igual que la
corrosión química o natural, fuego, catástrofes
naturales o cualquier otro caso de fuerza mayor
o evento fortuito, desastre o evento imprevisto o
incontrolable.
The owner-user of the product, which is the
object of this present guarantee, is entirely
responsible for the installation and connecting of
the product. MAAX inc. does not conduct any
installation, make use of contractors for this
purpose or supervise installations and
consequently can not be held responsible for
any defect, breakage or damage caused or
resulting directly or indirectly from the installation
of the product. The owner-user must ensure
access to the components of the product as
described in the installation guide so that MAAX
inc. will honour the guarantee specified herein. If
access is not provided, all the inherent costs for
providing such access will be the responsibility of
the owner-user.
Le propriétaire-utilisateur du produit visé par la
présente garantie est entièrement responsable
pour l’installation et le branchement approprié de
l’appareil. MAAX inc. ne procède pas à
l’installation ni ne contracte à cet effet ni ne
supervise l’installation et conséquemment ne
peut être tenue responsable de tout défaut, bris
ou dommage causé ou résultant directement ou
indirectement de l’installation du produit. Le
propriétaire-utilisateur doit assurer un accès aux
composantes du produit tel que décrit dans le
guide d’installation afin que MAAX inc. puisse
exécuter la garantie spécifiée aux présentes. Si
un tel accès n’est pas disponible, tous les coûts
inhérents à celui-ci seront la responsabilité du
propriétaire-utilisateur.
El propietario usuario del producto cubierto por
la presente garantía tiene entera resposabilidad en
la instalación y conexiones apropiadas del artefacto.
MAAX inc. no se encarga de la instalación ni
subcontrata a nadie al respecto ni supervisa la
instalación y, por tanto, no se le puede imputar la
responsabilidad de defectos, roturas o daños
causados o que resultaran directa o indirectamente
de la instalación del producto. El propietario usuario
debe dejar libre el acceso a los componentes del
producto, tal y como queda descrito en la guía de
instalación, con objeto de que MAAX inc. pueda
ejecutar la garantía especificada en el presente
documento. De no haber dejado libre dicho acceso,
la totalidad de gastos inherentes a éste correrán por
cuenta del propietario usuario.
The present guarantee is void for any product or
equipment that was not installed or operated in
compliance with the instructions provided by
MAAX inc. and in compliance with any
regulations or laws applicable to such
installations.
La présente garantie ne s’applique pas à tout
produit ou équipement qui n’aurait pas été
installé ou opéré conformément aux instructions
fournies par MAAX inc. et conformément à tout
règlement ou loi applicable à de telles
installations.
La presente garantía no se aplica a los
productos o equipos cuya instalación o puesta
en marcha no se hubiera efectuado con arreglo
a las instrucciones proporcionadas por MAAX
inc., y en cumplimiento de los reglamentos o
leyes aplicables a instalaciones de ese tipo.
10
MAAX inc. is not responsible for any costs,
damages or claims incurred for products bought
that were not compatible with the existing
openings or structures. MAAX inc. is not
responsible for any costs, damages or claims
resulting from defects that could have been
discovered, repaired or avoided if an inspections
or verification had been conducted prior to the
installation.
MAAX inc. n’est pas responsable de tous coûts,
dommages ou réclamations encourus pour des
produits achetés qui ne seraient pas compatibles
avec les ouvertures ou structures existantes.
MAAX inc. n’est pas responsable de tous coûts,
dommages ou réclamations résultant de vices
qui auraient pu être découverts, réparés ou
évités dans le cadre d’une inspection ou d’une
vérification antérieurement à l’installation.
MAAX inc. no es responsable de cualquier gasto,
daño o reclamación ocasionados por productos que
se hubieran comprado y resultaran incompatibles
con los orificios o estructuras existentes. MAAX inc.
no es responsable de cualquier gasto, daño o
reclamación ocasionados por defectos que
hubieran podido ser descubiertos, reparados o
evitados si se hubiera efectuado una inspección o
verificación antes de la instalación.
MAAX inc. is in no way responsible for any
damage stemming from death, injury or any other
damages, losses of time, profit, inconveniences,
connected expenses, labour or material costs or
any other costs, special, incidental or
consequential resulting from the use of the product
or equipment relating to the application of the
present guarantee or resulting from the removal or
replacement of any product, element, or part
included in the present guarantee.
MAAX inc. n’est aucunement responsable de tout
dommage résultant du décès ou de blessures ni pour
tous autres dommages, pertes de temps, de profits,
inconvénients, dépenses accessoires, coûts de maind’œuvre ou de matériel ou tout autre coût, direct,
spécial, incident ou conséquent résultant de l’utilisation
du produit ou de l’équipement ou relatif à l’application
de la présente garantie ou résultant de l’enlèvement
ou du remplacement de tout produit, élément ou pièce
faisant l’objet de la présente garantie.
MAAX inc. no se responsabiliza en modo alguno por
cualquier daño que resultara del fallecimiento o
heridas ni por todos los demás daños, pérdidas de
tiempo, de ganancia, inconvenientes, gastos
accesorios, costos de mano de obra o de material, o
cualquier otro gasto directo, especial, incidente o
consecuente, que resultara de la utilización del
producto o equipo, o se refiriera a la aplicación de la
presente garantía o resultara de haber retirado o
reemplazado cualquier producto, elemento o pieza
contenidos en la presente garantía.
MAAX INC. DOES NOT MAKE ANY EXPRESS
GUARANTEE
OR
ANY
GUARANTEE
REGARDING
THE
SALE
VALUE,
ADAPTABILITY OR FOR ANY SPECIFIC USE
NOR ANY OTHER IMPLICIT OR STATUTORY
GUARANTEE REGARDING ITS PRODUCTS,
OTHER THAN THOSE SPECIFIED HEREIN.
MAAX INC. N’EFFECTUE AUCUNE GARANTIE
EXPRESSE NI AUCUNE GARANTIE DE
VALEUR MARCHANDE OU D’ADAPTABILITÉ À
UNE UTILISATION SPÉCIFIQUE NI TOUTE
AUTRE GARANTIE IMPLICITE OU STATUAIRE
RELATIVEMENT À SES PRODUITS AUTRE
QUE CELLE SPÉCIFIÉE AUX PRÉSENTES.
CON EXCEPCION DE LA GARANTIA
MENCIONADA ANTERIORMENTE, MAAX INC.
NO DA GARANTÍA ALGUNA EXPRESA NI
NINGUNA OTRA GARANTÍA RESPECTO DE
COMERCIABILIDAD O ADAPTABILIDAD A UNA
UTILIZACIÓN ESPECÍFICA NI NINGUNA OTRA
GARANTÍA IMPLÍCITA REFERENTE A SUS
PRODUCTOS.
In all cases, MAAX inc. can not be held liable for
any amount exceeding the price paid for the
product by the owner-user, the contractor or the
builder.
Dans tous les cas, MAAX inc. ne pourra être
responsable pour tout montant excédant le prix
payé pour le produit par le propriétaire-utilisateur,
le contracteur ou le constructeur.
En cualquier caso, no podrá imputarse a MAAX
inc. cualquier monto que exceda el precio que el
propietario usuario, el contratista o el
constructor hubiera pagado por el producto.
COMMERCIAL RESTRICTIONS
RESTRICTIONS COMMERCIALES
RESTRICCIONES COMERCIALES
In addition to the conditions and restrictions
mentioned above to the present guarantee, the
guarantee period for any product installed
commercially or for use in a commercial
enterprise will be limited to one (1) year from the
date of purchase from an authorised dealer.
MAAX inc. is not responsible for the loss of
usage or profit in any circumstance. In the event
the product is used for display or demonstration,
the guarantee period begins the moment the
product is put on display or used for
demonstration.
En plus des conditions et restrictions mentionnées ci-dessus à la présente garantie, la période
de garantie relative à tout produit installé dans le
cadre d’une application commerciale ou
utilisation dans le cadre d’une entreprise
commerciale sera d’une (1) année de la date
initiale de l’achat d’un détaillant autorisé. MAAX
inc. n’est pas responsable pour la perte d’usage
ou de profit dans aucune circonstance. Dans
l’éventualité où le produit est utilisé dans le cadre
d’un étalage ou d’une démonstration, la période
de garantie commence au moment où le produit
est ainsi mis en étalage ou en démonstration.
Además de las condiciones y restricciones
mencionadas en la presente garantía, el período
cubierto por la garantía relativa a cualquier producto
que se hubiera instalado dentro del marco de una
aplicación comercial, o bien a utilización en el marco de
una empresa comercial, será de un (1) año, a partir de
la fecha inicial de la compra de un comerciante
minorista autorizado. Bajo ninguna circunstancia,
MAAX inc. asumirá la responsabilidad por la pérdida de
utilización o pérdida de ganancias. En el caso en que el
producto fuera utilizado con propósitos de exhibición o
demostración, el período cubierto por la garantía
se inicia en el momento en que el producto fuera
efectivamente objeto de exhibición o demostración.
The present guarantee grants specific rights to
the owner-user and the owner-user may have
other rights that may vary from one state and/or
province to another.
La présente garantie accorde des droits
spécifiques au propriétaire-utilisateur et le
propriétaire-utilisateur peut jouir d’autres droits
pouvant varier d’un état et/ou province à l’autre.
La presente garantía otorga derechos
especificos al propietario usuario y éste puede
verse acordar otros derechos que dependen del
estado y/o la provincia donde resida.
MAAX inc. has the right to discontinue and/or
modify the models, colours and specifications of
its products and replacement parts without notice
and without any obligation.
MAAX inc. se réserve le droit de discontinuer
et/ou de modifier les modèles, couleurs et
spécifications de ses produits et des pièces de
rechange sans avis et sans encourir aucune
obligation.
MAAX inc. se reserva el derecho de discontinuar
y/o modificar los modelos, colores y
características de sus productos y piezas de
recambio sin aviso previo y sin que ello conlleve
ninguna obligación.
SERVICE GUARANTEE
GARANTIE DE SERVICE
GARANTÍA DE SERVICIO
In order to get the service offered in accordance
with the present guarantee during normal
business hours, please contact the retailer or
distributor having sold the unit or call MAAX inc.
directly.
Afin d’obtenir le service offert en vertu de la
présente garantie pendant les heures normales
d’affaires, veuillez contacter le détaillant ou le
distributeur ayant vendu l’unité ou MAAX inc.
directement.
Para obtener el servicio ofrecido en virtud de la
presente garantía, durante las horas normales
de apertura, sírvase comunicar con el minorista
o distribuidor que le vendiera la unidad o diríjase
directamente a MAAX inc.
11
Save this manual for future reference
Conservez ce manuel pour usage ultérieur
Conserve este manual para referencia futura
CANADA
ONTARIO
WESTERN CANADA
HEAD OFFICE / SIÈGE SOCIAL
600 Cameron, Sainte-Marie
Quebec G6E 1B2 Canada
After Sales Service / Service Après-Vente
Tel.: 1 877 GET MAAX (1 877 438-6229)
(418) 387-4155
Fax: 1 866 819-1324
(418) 387-9086
1850 Derry Road East
Mississauga (Ontario) L5S 1Y6 Canada
After Sales Service / Service Après-Vente
Tel.: 1 877 GET MAAX (1 877 438-6229)
Fax: 1 866 819-1324
(418) 387-9086
R.R. #3, C-65 Palisades, Armstrong
(British Columbia) V0e 1B0 Canada
Tel.: 1 800 797-9330
Fax: 1 888 514-4442
After Sales Service / Service Après-Vente
Tel.: 1 800 667-2284
WESTERN U.S.
MIDWEST
NORTHEAST
2150 Division Street
9224-73rd Avenue North
410 Bloomfield Drive
SOUTHEAST
P.O. Box 1608
Bellingham, WA 98226 USA
Minneapolis MN 55428
West Berlin, NJ 08091 USA
1625 James P. Rodgers Road
Valdosta, GA 31603 USA
Tel.: (360) 734-0616 1 800 227-7138
Tel.: (763) 424-3335
Tel.: 1 800 362-6428
Fax: (360) 733-6985 1 800 527-3368
Fax: (763) 424-9808
Fax: 1 888 355-7925
Tel.: (229) 247-2364
Customer Service: 1 800 227-7138
Customer Service: 1 800 328-2531
Customer Service: 1 800 362-6428
Fax: (229) 247-4967
Customer Service: 1 800 625-6229
www.maax.com
Printed in Canada / Imprimé au Canada / Impreso en Canada
0303
10024135