1
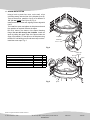
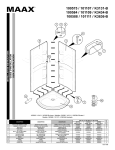
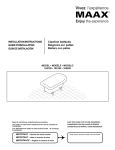
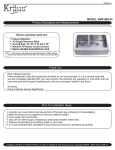
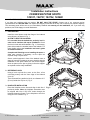
Installation instructions
CORNER BATHTUB SKIRTS
102741, 102727, 102734, 105408
IN CASE OF PROBLEMS
If you have any problems with our product, DO NOT CALL THE STORE. Contact one of our customer service
representatives at 1-888-304-4388. Our experts can advise you and will do all they can to resolve your problem diligently.
The necessary parts will be sent to you immediately. There is no warranty on the installation, but if you have any
problems, we will be happy to render assistance.
1. PREPARATION
24hours
heures
Install the wood pieces under the flange of the bathtub
using silicone, as shown in Fig. 1.
3/4" (19 mm)
ALLOW TO DRY FOR 24 HOURS.
It is essential that the bathtub be perfectly level in
order not to interfere with apron installation. Check
the level on both axis as illustrated in Fig. 1. If necessary,
place shims under the wooden base of the bathtub. For
more details, refer to the installation and user's guide
for bathtub 10012137.
3/4" (19 mm)
Silicone
Silicone
Complete wall finishing BEFORE installing the apron to
allow easy removal. If necessary, cut the apron as
required using a styrene knife.
Secure vertical supports in front of the bathtub; leave a
space in front of the support so as not to interfere with the
installation of the apron. Make sure the vertical support
does not press on the jets or piping. Incline the support
as required to allow easy installation.
Fig. 1
2. REFERENCE LINES
Using a level or plumb line, trace, on the floor, a line
coinciding exactly with the front edge of the bathtub
(Line A).
Trace a second line, parallel to line A, at a distance of 2"
(51 mm) inside line A (Line A’). Fig. 2.
2"
(51 mm)
3. KICKPLATE INSTALLATION
Place the kickplate on the floor and align it with line A’
previously drawn. Note: the kickplate extremities must
be aligned with line A. Drill 3/16” holes through the
kickplate fastening flange. Fix the kickplate to the floor
using #8 x 5/8” screws. Fig. 3.
Fig. 3
© MAAX Canada Inc., 2007
A'
Fig. 2
A
Kickplate
160, St-Joseph Blvd, Lachine (Québec) Canada H8S 2L3
www.maax.com
A'
A
2008-07-29
10015757
4. APRON INSTALLATION
Using a level or plumb line, trace, on the wall, a line
coinciding exactly with the front of the kickplate (Line B).
Trace a second line, parallel to line B, at a distance of
1/2" (13 mm) inside line B (Line B’). Fig. 4.
Install a wood bloc on the wall, aligning its front edge with
line B’.
Trial install the apron and adjust the kickplate and wood
bloc position as required. Remove the apron.
B'
B
Drill 3/16” holes in the bottom of the apron fastening
flange. Do not drill through the kickplate. Install the
apron by sliding the upper edge of the apron under the
edge of the bathtub. Fix the apron to the kickplate using
the #8 x 5/8” self-drilling screws and screw cap receivers.
Install the screw caps. Fig. 5.
Kickplate
B'
Wood bloc
2” x 2” x 1 3/4”
1/2"
(13 mm)
B
Fig. 4
Description
Part No.
Qty
Hardware bag
10020110
1
#8 x 3/4" (19 mm) screw
10017646
8
#8 x 3/4" (19 mm) self-tapping screw
10002835
10
Screw cap
10048084-003
10
Screw cap receiver
10002880
10
Wood piece
10005184
5
Screw cap
receiver
#8 x 5/8”
Screw cap
Apron
*Items included with hardware bag
Fig. 5
Apron
MAAX is a registered trademark of MAAX Canada Inc.
© MAAX Canada Inc., 2007
160, St-Joseph Blvd, Lachine (Québec) Canada H8S 2L3
www.maax.com
2008-07-29
10015757