1
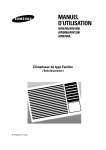
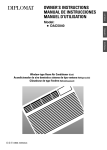
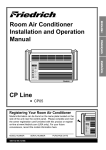
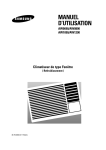
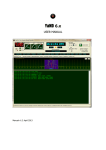
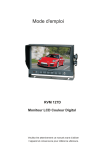
French
Owner's Manual
Safety
Instructions
English
Product
Information
Operation
Care &
Cleaning
Troubleshooting
Warranty
and Service
Read and Save These Instructions
This Owner's Guide provides specific operating instructions for your model. Use the air
conditioner only as instructed in this guide. These instructions are not meant to cover
every possible condition and situation that may occur. Common sense and caution
must be practiced when installing, operating, and maintaining any appliance.
Record Your Model and Serial Numbers
Record in the space provided below the model and serial numbers. The serial plate is
located on the outside of the cabinet, or behind filter at the bottom of unit. Reading
the numbers may be easier by using a flashlight or by removing the cabinet front as
instructed under " Care and Cleaning."
Model Number:___________________________________________________________
Serial Number:____________________________________________________________
Purchase Date:____________________________________________________________
P/N 66121653
How and Why
Your room air conditioner provides the following functions to make hot weather
living more comfortable:
*
¥
The air conditioner performs these functions by drawing room air through a filter
which traps dust and dirt particles. The air then passes over a cooling coil which
refrigerates the air and removes excess moisture. The same air is then returned to
the room - cooler , drier and cleaner . Moisture removed from the room air is carried
to the outside and evaporated. This moisture may form ice on the inside coil if the
outside temperature is below 65 degrees. Setting the air conditioner on the fastest
fan setting in FAN ONLY will defrost the coil.
Your air conditioner is designed to be easy to operate and to provide plenty of
cooling power. Your air conditioner is also more efficient than (most) older models
and may run longer to cool the room, but will use less energy due to higher energy efficiency ratings.
Capacity and
Running Time
Proper unit size is important in deciding the desired comfort for the area you want
to cool. The proper size is determined by the number of square feet in the area to
be cooled.
Whenever the heat or humidity load is above normal the air conditioner must run
longer and more often to keep the desired temperature you have selected. Under
heavy heat load conditions the air conditioner may need to run constantly to keep
the temperature you want. Allow some time to cool the room if the air conditioner
was recently turned on. Using the " AUTO START" feature will allow you to start
cooling the room prior to returning home.
At times using the fastest Fan setting to circulate the room air may make it
comfortable even though you do not have the air conditioner set to cool the air.
This will decrease your cost to use.
Normal Sounds
High Pitched Chatter
Today's high efficiency
compressors may have a
high pitched chatter during
the cooling cycle.
Vibration
Unit may vibrate and make
noise because of poor wall
or window construction or
incorrect installation.
Sound of Rushing Air
At the front of the unit,
you may hear the sound
of rushing air being moved
by the fan.
Pinging or Swishing
Droplets of water hitting
condenser during normal
operation may cause
" pinging or swishing"
sounds.
Gurgle/Hiss
" Gurgling or hissing" noise may be heard due to
refrigerant passing through evaporator during
normal operation.
2
Product
Information
*
Cools and circulates room air.
Lowers humidity by removing excess moisture. High moisture levels may
cause the air conditioner to drip excess moisture outside.
Filters out summertime dust, dirt, and some airborne impurities.
Safety
Instructions
Important Safety
Instructions
The power supply cord with
this air conditioner contains a current detection device designed to reduce the risk
of fire.
Please refer to the section ‘Operation of
Current Device’ for details.
In the event that the power supply cord is
damaged, it cannot be repaired it must be
replaced with a cord from the Product Manufacturer.
Avoid fire hazard or electric
shock. Do not use an extension cord or an
adaptor plug. Do not remove any prong from
the power cord.
Grounding type wall
receptacle
Do not, under any circumstances, cut, remove, or bypass the
grounding prong.
Power supply cord
with 3-prong grounding
plug and current
detection device (on
some models)
Read all instructions before using this air conditioner.
For Your Safety
Do not store or use gasoline or other flammable vapors and liquids in the vicinity of this or any
other appliance. Read product labels for flammability and other warnings.
Prevent Accidents
To reduce the risk of fire, electrical shock, or injury to persons when using your air conditioner,
follow basic precautions, including the following:
Be sure the electrical service is adequate for the model you have chosen. This information
can be found on the serial plate, which is located on the side of the cabinet and behind the
grille.
If the air conditioner is to be installed in a window, you will probably want to clean both
sides of the glass first. If the window is a triple-track type with a screen panel included,
remove the screen completely before installation.
Be sure the air conditioner has been securely and correctly installed according to the
separate installation instructions provided with this manual. Save this manual and the
installation instructions for possible future use in removing or reinstalling this unit.
When handling the air conditioner, be careful to avoid cuts from sharp metal fins on front
and rear coils.
Electrical Information
The complete electrical rating of your new room air conditioner is stated on the serial plate.
Refer to the rating when checking the electrical requirements.
Be sure the air conditioner is properly grounded. To minimize shock and fire hazards,
proper grounding is important. The power cord is equipped with a three-prong grounding plug for protection against shock hazards.
Your air conditioner must be used in a properly grounded wall receptacle. If the wall
receptacle you intend to use is not adequately grounded or protected by a time delay
fuse or circuit breaker, have a qualified electrician install the proper receptacle.
Do not run air conditioner with outside protective cover in place. This could result in
mechanical damage within the air conditioner.
Do not use an extension cord or an adapter plug.
READ THIS SECTION BEFORE ATTEMPTING TO OPERATE AIR CONDITIONER.
Operation of Current
Device
Plug in &
press RESET
The power supply cord contains a current device that senses damage to the power cord. To
test your power supply cord do the following:
1. Plug in the Air Conditioner.
2. The power supply cord will have TWO buttons on the plug head. Press the TEST button.
You will notice a click as the RESET button pops out.
3. Press the RESET button. Again you will notice a click as the button engages.
4. The power supply cord is now supplying electricity to the unit. (On some products this is
also indicated by a light on the plug head).
NOTES:
• Do not use this device to turn the unit on or off.
• Always make sure the RESET button is pushed in for correct operation.
• The power supply cord must be replaced if it fails to reset when either the TEST button is
pushed, or it cannot be reset. A new one can be obtained from the product manufacturer.
• If power supply cord is damaged, it CANNOT be repaired. It MUST be replaced by one
obtained from the product manufacturer.
3
Air Conditioner Features
ELECTRONIC CONTROL OPERATING INSTRUCTIONS
Before you begin, thoroughly familiarize yourself with the control panel and remote as shown
below and all its functions, then follow the symbol for the functions you desire. The unit can
be controlled by the touch pad alone or with the remote.
LIGHT
ON/OFF
AUTO COOL
FEATURE
ADJUSTS
TEMP &
TIME
ADJUSTS
TEMP &
TIME
DISPLAYS
TEMPERATURE/TIME
SLEEP MODE
FAN SPEED
FAN
SPEEDS
CHECK FILTER
RESET BUTTON
ACTIVATES
TIMER
SETS
MODES
Start
Stop
REMOTE CONTROL
w/DISPLAY &
REMOTE SENSING
BUTTON
ACTIVATES
REMOTE
THERMOSTAT
CLEAN AIR
FEATURE
(some models)
SETS FAN SPEED
Remote Temp.
Sensing Indicator
(some models)
SETS MODE
TURNS UNIT
ON OR OFF
ACTIVATES
TIMER
Operation
TOUCH PAD
Battery Size: AAA
Warning: do not mix old and new batteries. Do not mix alkaline, standard (carbon-zinc),or rechargeable(nickel-cadmium) batteries.
NOTE: The following instructions represent the Touch Pad, the same instructions can be used for the Remote Control.
TO TURN UNIT ON:
YOU WILL SEE:
DO THIS:
PRESS ON/OFF
BUTTON
4
Air Conditioner Features
(continued)
TO CHANGE TEMPERATURE
SETTING:
YOU WILL SEE:
DO THIS:
PRESS TO
RAISE
PRESS TO
LOWER
) or down ( ) button until the desired temperature is seen on the display. This temperature will be automatiNote: Tap or hold either up ( ▲
cally maintained anywhere between 60oF (16oC) and 90oF (32oC) for cooling mode. The temperature will be automatically maintained anywhere between 55oF (13oC) and 80oF (27oC) for heating mode. If you want the display to read the actual room temperature. See "To Operate
on Fan Only" section on Page 7.
▲
TO ADJUST FAN SPEEDS:
YOU WILL SEE :
DO THIS:
PRESS
TO SELECT:
FASTER
SLOWER
Press the Fan Faster button will increase the fan speed from Low (LO), to Medium (ME), to High (HI). The digital display will indicate
your chosen speed. Press the Fan Slower button will decrease the fan speed from High (HI), to Medium (ME), to Low (LO).The digital display will
indicate your chosen speed.After 5 seconds the display will revert back to the set temperature.
TO USE AUTO COOL FEATURE:
LIGHT On
YOU WILL SEE:
DO THIS:
PRESS
AUTO COOL
Note: Fan speed starts at High Speed and adjusts to a slower speed as the room temperature dictates, For example if the room doesn't
get too warm, it will stay at the slowest speed. If the room temperature rises quickly,such as a door being opened, it will automatically go
to the highest speed. The fan speeds will re-adjust back to the slowest speed as the room returns to the original set temperature.
5
Air Conditioner Features
(continued)
TO OPERATE ON FAN ONLY:
YOU WILL SEE:
LIGHT On
DO THIS:
PRESS
MODE BUTTON
CHOOSE
FAN ONLY
Note: Use this function only when cooling is not desired, such as for room air circulation or to exhaust stale air. (Remember to open the
vent during this function, but keep it closed during cooling for maximum cooling efficiency.) You can choose any fan speed you prefer. (Except "Auto Cool").
During this function, the display will show the actual room temperature, not the set temperature as in the cooling mode.
Fan Only cannot be selected when the unit is in the 'Remote Sensing' Mode. (On those units with that feature).
TO USE THE
POWER SAVER FEATURE:
YOU WILL SEE:
LIGHT On
DO THIS:
PRESS
MODE BUTTON
CHOOSE
ENERGY SAVER
Note: In this mode, the fan will continue to run for another 3 minutes after the compressor shuts off. The fan then cycles on for 2 minutes
at 10 minute intervals until the room temperature is above the set temperature, at which time the the cooling system turns back on.
LIGHT On
TIMER: DELAY START/STOP FEATURE:
YOU WILL SEE HOW MUCH TIME IS CHOSEN:
FIRST
DO THIS:
PRESS
TIMER BUTTON
THEN
DO THIS:
PRESS
TEMP/TIMER
SET BUTTON
Note 1: For Delay Stop, the unit must be in the On position.
Note 2: For Delay Start, the unit must be in the Off position.
First, PRESS TIME BUTTON
Then to adjust timer setting, tap or hold the UP arrow ( ▲ ) or the DOWN arrow (
) to change delay timer at. 5 hour increments, up to 10
hours, then by 1 hour increments up to 24 hours. The control will count down the time remaining until start (8, 7.5, 7, etc.). The Delay Start
mode automatically selects cooling with maximum Fan Speed. The temperature maintained will be the same as previously set. To change the
set temperature, press "COOL" then Up or Down arrows until the desired temperature is indicated on the display. After 5 seconds, the control will automatically change the display back to the hours remaining until the unit will start/stop. PRESSING the unit On/Off button at any
time will cancel the Delay Start/Stop function. The Delay Start/Stop Feature will work until the unit either starts or stops. Once that happens
he above steps have to be repeated again.
▲
6
Air Conditioner Features
(continued)
CHECK FILTER FEATURE:
YOU WILL SEE:
LIGHT On
Note: This feature is a reminder to clean the Air Filter (See Care and Cleaning) for more efficient operation and cooling. The LED (light) will
illuminate after 250 hours of operation. To reset after cleaning the filter, press the "Check Filter" button and the light will go off.
CLEAN AIR FEATURE (on some models):
LIGHT On
YOU WILL SEE:
DO THIS:
PRESS
CLEAN AIR
BUTTON
Note: When this feature is "ON", the electronic air purifier is energized to remove pollen and impurities from the air. To cancel this feature,
press the Clean Air button (the LIGHT will turn off).
Note: This feature can be activated on the unit touchpad ONLY.
YOU WILL SEE:
SLEEP FEATURE:
LIGHT On
DO THIS:
PRESS
SLEEP BUTTON
Note: In this "MODE" the set temperature will increase by 2 degrees F 30 minutes after the mode is selected. The temperature will then
increase by another 2 degrees F after an additional 30 minutes. This new temperature will be maintained for 7 hours before it returns to the originally selected temperature. This ends the "Sleep" MODE and the unit will continue to operate as originally programmed. The "Sleep"
MODE program can be cancelled at any time during operation by again pressing the "Sleep" button.
7
Air Conditioner Features
(continued)
INTELLGENT
REMOTE SENSING FEATURE
LIGHT pulsing On & Off intermittently.
(on some models) :
DO THIS:
PRESS REMOTE
SENSING
BUTTON ON
NOTE:Unit display shows"set"temperature
NOTE: Remote display
is actual temperature at
remote control only
Note: This feature can be activated from the remote control ONLY,the unit must be in a cooling mode.
To activate the remote sensing feature,point the remote control towards the unit and press the remote sensing button.Next,use the
buttons to set the desired temperature at the remote.(Note that the set temperature will only be displayed on the unit itself).The LIGHT on
the unit control will pulse to indicate it received the signal.The LIGHT on the remote control will pulse each time it sends a signal.It will continue to send this signal until the feature is deactivated by pressing the remote sensing button.If the unit does not receive the remote sensing
signal during any 3 minute interval,the unit will beep to indicate the remote sensing mode has ended.The display on the remote control indicates
the temperature at the remote ONLY. The unit display indicates the set temperature.
Remote Sensing:The Remote Sensing function is terminated using the remote control Start/Stop button or the Remote Sensing
Stop button, and also the main Start/Stop button on the unit.
TO TURN UNIT OFF:
FAULT CODES:
DO THIS:
PRESS ON/OFF
BUTTON
If the display reads "ES" or "AS", a sensor has failed.
Contact your Authorized Sears Service Center.
8
ADDITIONAL THINGS YOU SHOULD KNOW
Now that you have mastered the operating procedure,here are more features in your control that you should become familiar with:
The “Cool” circuit has an automatic 3 minute time delayed start if the unit is turned off and on
quickly.This prevents overheating of the compressor and possible circuit breaker tripping.The
fan will continue to run during this times.
The control will maintain the set temperature within 2 degrees Fahrenheit,between 60F and 90F degrees.
The control is capable of displaying temperature in degrees Fahrenheit or degrees Celsius.To convert from one to the other and back,
Press and hold the"TEMP/TIMER"Up (
) and Down (
) buttons together for 3 seconds.
Fresh Air Vent Control(On some models)
The Fresh Air Vent allows the air conditioner to:
1. Recirculate inside air - Vent Closed (see Fig. 1)
2. Draw fresh air into the room - Vent Open (see Fig. 2)
3. Exchange air from the room and draws fresh air into the room - Vent and Exhaust
Open (see Fig. 3)
Fig. 1 (OFF)
Fig. 2 (FRESH AIR)
Fig. 3 (VENT)
The louvers will allow you to direct the air flow Up or Down and Left or Right throughout
the room as needed.Rotate the Auger Wheel Up or Down until the desired direction is
obtained.
(4-WAY)
AUGER WHEEL
9
Care and Cleaning
Clean your air conditioner occasionally to keep it looking new. Be sure to unplug the
unit before cleaning to prevent shock or fire hazards.
Air Filter Cleaning
The air filter should be checked at least once a month to see if cleaning is necessary.
Trapped particles in the filter can build up and cause an accumulation of frost on the
cooling coils.
• Push the vent handle to the Vent Closed position (where applicable).
• Open the front panel.
• Grasp the filter by the center and pull up and out.
• Wash the filter using liquid dishwashing detergent and warm water. Rinse filter
thoroughly. Gently shake excess water from the filter. Be sure filter is thoroughly dry
before replacing.
• Or, instead of washing you may vacuum the filter clean.
Cabinet Cleaning
• Be sure to unplug the air conditioner to prevent shock or fire hazard. The cabinet and
front may be dusted with an oil-free cloth or washed with a cloth dampened in a solution
of warm water and mild liquid dishwashing detergent. Rinse thoroughly and wipe dry.
• Never use harsh cleaners, wax or polish on the cabinet front.
• Be sure to wring excess water from the cloth before wiping around the controls. Excess
water in or around the controls may cause damage to the air conditioner.
• Plug in air conditioner.
Winter Storage
If you plan to store the air conditioner during the winter, remove it carefully from the
window according to the installation instructions. Cover it with plastic or return it to the
original carton.
Energy Saving Ideas
10
Care &
Cleaning
• Do not block air flow inside with blinds, curtains or furniture; or outside with shrubs,
enclosures, or other buildings.
• The capacity of the room air conditioner must fit the room size for efficient and satisfactory
operation.
• Install the room air conditioner on the shady side of your home. A window that faces north
is best because it is shaded most of the day.
• Close the fireplace damper, floor and wall registers so cool air does not escape up the
chimney and into the duct work.
• Keep blinds and drapes in other windows closed during the sunniest part of the day.
• Clean the air filter as recommended in the section “Care and Cleaning.”
• Proper insulation and weather stripping in your home will help keep warm air out and cool
air in.
• External house shading with trees, plants or awnings will help reduce the air conditioner’s
work load.
• Operate heat producing appliances such as ranges, washers, dryers and dishwashers
during the coolest part of the day.
© Sears, Roebuck and Co.
®
Room Air Conditioner Troubleshooting Guide
THE AIR CONDITIONER WILL NOT OPERATE
Check if …
Power supply cord is disconnected.
House fuse has blown or circuit breaker tripped.
Power is OFF.
Temperature setting is warmer than room temperature.
Unit was turned OFF and ON too quickly.
Then …
Firmly push the cord into a live wall outlet with proper voltage, (Page 2)
Replace the fuse with a time delay type or reset the circuit. (Page 2)
Push ON/OFF Button to turn unit ON. (Page 5)
Set temperature to a lower setting. (Page 5)
Built-in delay will prevent compressor from turning off for 3 minutes.
Timer shut unit OFF.
Touch Pad and Remote not responding.
Push ON/OFF Button to turn unit ON. (Page 5)
Unit is in a lock-up mode. Unplug and then plug in again and the controls will reset.
THE AIR CONDITIONER BLOWS FUSES OR TRIPS CIRCUIT BREAKER
Check if …
House fuse has blown or circuit breaker tripped.
Too many electrical devices are being used on the same circuit.
Unit is rated over 7.5 amps.
Unit is plugged into an extension cord.
Unit was turned OFF and ON too quickly.
Then …
Replace the fuse with a time delay type or reset the circuit. (Page 2)
Unplug or relocate electrical devices being shared on same circuit. (Page 2)
Unit should be plugged into a single circuit outlet. (Page 2)
Do not use an extension cord to run the unit. (Page 2)
Turn unit OFF and wait 3 minutes before restarting. (Page 5)
THE AIR CONDITIONER TURNS ON AND OFF BY ITSELF
Check if …
Outside temperature is extremely hot.
POWER SAVE feature is on.
Timer turned unit ON or shut unit OFF.
Then …
Set fan speed at the fastest setting for maximum cooling. (Page 5)
POWER SAVE feature does not circulate air continually. Set mode to COOL for constant air circulation.
(Page 6)
Push ON/OFF Button to turn unit ON or OFF. (Page 5)
THE AIR CONDITIONER DOES NOT COOL THE ROOM - ICE BEHIND FRONT PANEL
Check if …
Outside temperature is below 60F
Filter is dirty.
BTU size is too large.
Then …
Set mode to FAN ONLY and fan speed to fastest setting to defrost coil. (Page 3)
Open front panel. Remove filter. Rinse or vacuum filter. Replace filter. Close Panel. (Page 10)
A lower capacity unit may be required depending on the size of the room being cooled. (Page 3)
THE AIR CONDITIONER DOES NOT COOL THE ROOM - NO ICE BEHIND FRONT PANEL
Check if …
Filter is dirty.
Temperature setting is warmer than room temperature.
Room temperature is below 60F.
Front of unit is blocked by furniture, drapes, blinds, etc.
Back of unit is blocked by leaves, dirt, branches, etc.
Doors, windows, registers, etc. are open.
Unit recently turned on.
Temperature sensor is touching the coil.
Excessive heat in the room being cooled.
Vent control is pulled open.
Then …
Open front panel. Remove filter. Rinse or vacuum filter. Replace filter. Close Panel. (Page 10)
Set temperature to a lower setting. (Page 5)
Unit is not designed to cool below 60F. (Page 3)
Clear away area in front of unit. (Page 2)
Clear away back of unit. (Page 2)
Close doors, windows, registers, etc. (Page 2)
Allow time to cool a larger room. (Page 3)
Open front panel. Remove filter. Turn end of temperature sensor away from coil. Replace filter. Close
panel. (Page 10)
Use exhaust vents while cooking or bathing. Limit use of heat producing appliances during the hottest
part of the day. (Page 2)
Push in vent control for maximum cooling. (Page 9)
THE AIR CONDITIONER RUNS TOO MUCH
Check if …
Current Unit replaced an older unit.
BTU size is too small.
Then …
Newer, higher efficiency Air Conditioner may run longer to cool the room. Total energy consumption
is less due to higher efficiency. (Page 3)
A higher capacity unit may be required depending on the size of the room being cooled. (Page 3)
WATER DRIPPING FROM AIR CONDITIONER - INSIDE ROOM
Check if …
Unit is not properly installed.
Then …
Unit should be mounted on a 1/4” downward slope to the outside (1/2 bubble on a carpenter’s level)
to provide proper drainage. Reposition or shim cabinet as necessary. DO NOT drill drain pan.
WATER DRIPPING FROM AIR CONDITIONER - OUTSIDE ROOM
Then …
Normal operation during hot and humid days. (Page 3)
THE REMOTE WILL NOT OPERATE AIR CONDITIONER
Check if …
Batteries are not installed properly.
Red Light does not flash on the remote when the remote buttons are pushed.
The remote is pointed at the unit.
Then …
Verify the plastic shipping strip is removed from the batteries and the batteries are installed properly.
(Page 4)
Verify the plastic shipping strip is removed from the batteries and the batteries are installed properly.
Install a new set of batteries. (Page 4)
The remote may not work properly when used at extreme angles to the front of the unit. (Page 4)
TYPICAL AIR CONDITIONER SOUNDS YOU MAY HEAR
Check if …
High pitched horn or pulsating noise that cycles on and off.
Rushing air sound.
Pinging or swishing sounds.
Gurgling or hissing sounds.
Beeping.
Vibration.
Then …
Compressor - Normal noise due to modern high efficiency compressors. (Page 3)
Fan / Motor - Normal noise of higher efficiency fans pushing air further into the room. (Page 3)
Condenser - Normal noise of water hitting the condenser to increase energy efficiency. (Page 3)
Evaporator - Normal noise of refrigerant passing through evaporation. (Page 3)
Electronic Control - Normal noise when electronic control settings are changed. (Page 3)
Unit Vibration - Due to poor wall or window construction or incorrect installation. (Page 3)
11
Troubleshooting
Check if …
Room is hot and humid.
Warranty
WARRANTY
Full One-Year Warranty on Air Conditioner
For one year from date of purchase, when this air conditioner is operated and
maintained for normal room cooling according to instructions in this owner’s
manual, Sears will repair it, free of charge, if defective in material or workmanship.
Full Five-Year Warranty on Sealed Refrigeration System
For five years from the date of purchase, when this air conditioner is operated and
maintained for normal room cooling according to instructions in this owner’s
manual, Sears will repair the sealed refrigeration system (consisting of refrigerant,
connecting tubing, and compressor), free of charge, if defective in material or
workmanship.
Warranty Service
Warranty service is available by contacting the nearest service center in the Canada.
SEARS CANADA INC, 222 JARVIS STREET, TORONTO, ONTARIO, CANADA M5B 2B8
Sears Service
Maintenance Agreement
“We Service What We Sell” is our assurance you can depend on Sears for service.
Your air conditioner has added value when you consider that Sears has service units
nationwide, staffed with professional technicians trained on all appliances Sears
sells. They have the knowledge and skills, tools, parts, and equipment to insure our
pledge to you that “We Service What We Sell.”
Sears Maintenance Agreement
Maintain the value of your air conditioner with a Sears Maintenance Agreement.
Sears air conditioners are designed, manufactured, and tested for years of
dependable operation. Yet, any modern appliance may require service from time to
time. The Sears Maintenance Agreement offers you an outstanding service program
for your air conditioner.
The Sears Maintenance Agreement
Warranty
and Service
•
•
•
•
Is your way to buy tomorrow’s service at today’s price.
Eliminates repair bills resulting from normal use.
Allows for as many service calls as required.
Provides an annual Preventive Maintenance Check at your request to keep your
Air Conditioner in proper running condition.
For more information, call 1-800-4-MY-HOME OR 1-800-469-4663
12
Français
Manuel d’Utilisation
Instructions de
Sécurité
English
Information de
Produit
Opération
Nettoyage
Tableau de
Dépannage
Garantie et
Service
Veuillez Lire Attentivement Ces Instructions Et Les Conserver En Lieu Sûr
Le présent Manuel d’utilisation fournit des instructions de fonctionnement spécifiques à votre modèle.
Utilisez le climatiseur uniquement comme indiqué dans ce manuel. Ces instructions n’ont pas pour
but de couvrir toutes les conditions et situations possibles. Vous devez faire preuve de bon sens et
de prudence lorsque vous installez, utilisez et entretenez tout appareil.
Notez le modèle et le numéro de série
Notez, dans l’espace réservé ci-après, le modèle et le numéro de série. Sur la plupart des modèles,
la plaque portant le numéro de série se trouve à l’extérieur du boîtier. Sur certains modèles, il vous
faudra retirer le filtre et regarder dans le coin inférieur du climatiseur, derrière la grille frontale. Pour
lire plus facilement ce numéro, utilisez une lampe de poche ou retirez l’avant du boîtier comme
indiqué à la section “ Entretien et nettoyage ”.
Numéro de Modèle :
Numéro de Série :
Date d’Achat :
P/N 66121653(fr)
Comment et Pourquoi
Le climatiseur vous offrira une température plus confortable au temps chaud.
A rafraîchir et à circuler l’air
A baisser l’humidité. Le climatiseur évacuera les goutes d’eau à humidité bien haute.
A filtrer des poussières et des cendres en été.
Ce climatiseur est plus efficace que la plupart des modèles ancienns. Il faut plus de temps pour
refroidir l’air mais c’est plus économique en énergie.
Capacité et Temps de
l’Opération
Il faut choisir un modèle propre pour une certaine surface de la pièce. La capacité doit satisfaire la
surface qu’on veut rafraîchir.
Quand il fait très chaud ou bien très humide, le climatiseur a besoin de plus temps pour atteindre
la température qu’on a secletionnée. Dans ce cas-là, le climatiseur fonctionnera plus frequement
fréquent pour maintenir la température. Il faut du temps avant la pièce est rafraîchie. Vous pouvez
sélectionner la fonction de “ AUTO START” (à Démarrer Automatiquement) pour refroidir votre
pièce avant votre arrivé chez vous.
La sélection de ventilation plus vite sans refroidissement vous fait un environment confortable.
C’est une façon de l’énergie économique.
Sons normaux
Son aigu
Les compresseurs haute
performance d’aujourd’hui
peuventmettre un son aigu
pendant le cycle de
refroidissement
Vibration
L’appareil peut vibrer et faire du
bruit si les murs ou les fenêtres
sont mal conçus ou si l’appareil n’a
pasété installé correctement.
Bruit de vent
À l’avant de l’appareil, il est
possible que vous entendiez
un bruit de vent provoqué par
l’air déplacé par le ventilateur.
Cliquetis ou bruissements
Des gouttes d’eau tombant sur
le condensateur pendant le
fonctionnement normal de
l’appareil peuvent provoquer
des cliquetis ou des
bruissements.
Gargouillements/sifflements
Peuvent être dus au frigorigène passant
par le système d’évaporation pendant le
fonctionnement normal.
2
Information de
Produit
En envoyant de l’air dans une filtre, le climatiseur réalise les fonctions ci-desus. L’air traverse les
bobines qui refroidissent de l’air et enlève nomidifé excessive. Donc l’air qui entre la pièce est sec
et propre. L’huminifé qui est enlévée de la pièce est renvoyée dehors et s’évapore. Si la
température extérieure est inférieure de 65 degrés, l’humanité pourrait former du grive dans la
bobine. If faut donc fonctionner mode de FAN ONLY (Ventilateur Uniquement) pour dégivrer la
bobine. Ce climatiseur est facile à utiliser et possède une haute capacité de refroidissement.
Instructions de
Sécurité
Consignes de sécurité
importantes
Le cordon d’alimentation
avec le climatiseur contient un dispositif de
détection de courant conçu pour réduire le
risque de feu.
Veuillez vous reporter à la section
“Fonctionnement du dispositif de courant”
pour de plus amples informations.
Si le cordon d’alimentation est
endommagé, il ne peut pas être réparé et
doit être remplacé avec un cordon du
fabricant du produit.
Évitez les risques
d’incendie et d’électrocution. N’utilisez pas
de rallonge ni d’adaptateur. Ne retirez pas
de broche du cordon d’alimentation.
Veuillez lire toutes ces consignes avant d’utiliser le climatiseur.
ATTENTION
ATTENTION
Ne coupez, retirez ou
contournez en aucun
cas la broche de
mise à la terre.
Cordon d’alimentation
à fiche de type mise à
la terre à 3 broches et
dispositif de détection
(sur certains modèles)
N Pour éviter les accidents
Pour réduire le risque d’incendie, d’électrocution ou de blessure corporelle lorsque vous utilisez le
climatiseur, prenez les précautions de base suivantes :
Assurez-vous que l’alimentation électrique est adéquate pour le modèle que vous avez choisi.
Ces informations sont disponibles sur la plaque du numéro de série, situé soit sur le côté du
boîtier, soit derrière la grille.
Si le climatiseur doit être installé sur une fenêtre, il est conseillé de laver au préalable les deux
côtés des vitres. Si la fenêtre est de type “ triple-track ” avec un écran, retirez complètement
l’écran avant de procéder à l’installation.
Assurez-vous que le climatiseur a été correctement et solidement installé
conformément aux instructions d’installation fournies avec ce manuel. Conservez ce manuel et
les instructions d’installation pour une éventuelle utilisation future (retrait ou réinstallation de
l’appareil).
Lorsque vous manipulez le climatiseur, attention à de pas vous couper avec les parties
métalliques tranchantes des bobines avant et arrière.
ATTENTION
Prise murale reliée à la
terre
Pour votre sécurité
Ne placer ni n’utilisez d’essence ou d’autres vapeurs et liquides inflammables à proximité de cet
appareil ou de tout autre appareil. Lisez les étiquettes de produits concernant l’inflammabilité, ainsi
aue le autres mises en garde.
ON Informations électriques
Les caractéristiques électriques complètes de votre nouveau climatiseur sont indiquées sur la
plaque du numéro de série. Reportez-vous à ces aractéristiques lorsque vous vérifiez les
exigences électriques.
Vérifiez que le climatiseur est correctement mis à la terre. Pour réduire les risques
d’électrocution et d’incendie, la mise à la terre correcte est primordiale. Le cordon
d’alimentation est équipé d’une prise de terre à trois broches pour assurer la protection contre
les risques d’électrocution.
Votre climatiseur doit être utilisé avec une prise murale correctement reliée à la terre. Se prise
murale que vous comptez utiliser n’est pas correctement reliée à la terre ouprotégée par un
fusible temporisé ou un disjoncteur, demandez à un électricien qualifié d’installer la prise
murale correcte.
N’utilisez pas le climatiseur en laissant le capot externe en place. Ceci risquerait de provoquer
des dommages mécaniques à l’intérieur du climatiseur.
Utilisez pas de rallonge ni d’adaptateur.
LISEZ CETTE SECTION AVANT DE TENTER D’UTILISER LE CLIMATISEUR.
Fonctionnement du
dispositif actuel
Branchez et
appuyez sur
REINITIALISER
Le cordon d’alimentation contient un dispositif de courant qui détecte la détérioration du
cordon d’alimentation. Pour tester votre cordon d’alimentation procédez comme suit:
1. Branchez le Climatiseur.
2. Le cordon d’alimentation aura DEUX boutons sur la tête de prise. Appuyez sur le bouton TEST. Vous noterez un clic tandis que le bouton REINITIALISER sort.
3. Appuyez sur le bouton REINITIALISER Vous noterez encore une fois un clic tandis que
le bouton s’enclenche.
4. Le cordon d’alimentation fournit maintenant de l’électricité à l’unité. (Sur certains produits
ceci est aussi indiqué par un voyant sur la tête de prise).
REMARQUES :
• N’utilisez pas ce dispositif pour mettre sous/hors tension l’unité.
• Toujours assurez vous que le bouton REINITIALISER est enfoncé pour un
fonctionnement correct.
• Le cordon d’alimentation doit être remplacé s’il échoue à réinitialiser lorsque ou bien le
bouton TEST est poussé, ou qu’il ne pas être réinitialisé. Un nouveau cordon est
disponible chez le fabricant du produit.
• Si le cordon d’alimentation a été endommagé, il NE PEUT PAS être réparé. Il DOIT être
remplacé par un nouveau disponible chez le fabricant du produit.
SÉLECTIONNER SELON DE DIFFÉRENTS MODÈLES SEULEMENT.
3
Utilisation du climatiseur
FONCTIONS IMPORTANTES
(sur certains modèles)
Pour réduire les risques d’incendie, d’électrocution ou de blessure corporelle,
ATTENTION
lisez les CONSIGNES DE SÉCURITÉ IMPORTANTES avant d’utiliser cet appareil
APour commencer à utiliser le climatiseur, suivez les étapes ci-après :
1. Branchez le climatiseur. (Afin d’éviter les risques d’électrocution, n’utilisez pas de rallonge ni
d’adaptateur).
2. Appuyez sur le bouton de marche/arrêt pour mettre l’appareil en marche.
3. Appuyez sur le mode “ COOL ” (climatisation).
4. Appuyez sur “ TEMP/TIME ” (température/heure), et sur les flèches vers le haut ou le bas
jusqu’à ce que la température souhaitée apparaisse.
Consultez la section “ Fonctions du climatiseur ” pour les autres fonctions.
Thermostat à distance:
La télécommande joue le rôle de thermostat à distance, permettant de contrôler une température
précisement à la place qu’il est située.
Le bouton de détection à distance permet d’activer cette fonction.
Vitesses de refroidissement et de ventilation variables :
Les paramètres du ventilateur 90 disctinct permettent d’obtenir un flux d’air optimal et de contrôler
le bruit.
Opération
Air Propre :
Système de filtrage de l’air ionique qui augmente sensiblement l’efficacité de nettoyage de l’air par
rapport aux filtres d’air conventionnels.
SEUL le bouton d’air propre du pavé tactile du climatiseur permet d’activer cette fonction.
INSTRUCTIONS DE FONCTIONNEMENT DE LA COMMANDE ÉLECTRONIQUE
Fonctions du climatiseur
Avant de commencer, familiarisez vous bien avec le panneau de commandes et la télécommande
illustrée et toutes ses fonctions, puis suivez le symbole de la fonction souhaitée. L’appareil peut
être commandé à partir du pavé tactile ou de la télécommande.
CLIMATISATION
AUTOMATIQUE
R glage de la
emp rature et
,
dl heure
ECRAN TEMPERATURE,
HEURE ET VITESSE
DU VENTILATEUR
MODE SOMMEIL
VERIFIEZ LE BOUTON
REINITIALISER
DU FILTRE
Fonction air
pur
PROGRAMMA TION DE LA
VITESSE DU
VENTILATEUR
(certains modles)
TEMP RATURE LOIGN E
SENT L INDICATEUR
(certains mod les)
Param trage du
mode
ACTIVE LE
MINUTEUR
PANNEAU DE COMMANDE
4
BOUTON DE
MARCHE/ARR T DE
L APPAREIL
POUR UTILISER LA FONCTION
AUTO COOL (climatisation automatique) :
ACTION :
Appuyez sur
AUTO COOL
(L'AUTO
REFROIDIT)
5
POUR UTILISER LA FONCTION
D’ÉCONOMIE D’ POUVOIR :
6
7
POUR ÉTEINDRE L’APPAREIL:
ACTION :
Appuyez sur la
touche de
marche/arrêt
Si les lettres “ES” ou "AS" apparaissent sur
l'afficheur, cela indique qu'un détecteur
fait défaut, Contacter votre Centre de
Service Frigidaire autorisé.
8
9
10
®
Guide De DEpannage De Salle Climatiseur.
LE CLIMATISEUR NE FONCTIONNE PAS.
Vérifiez si …
Prise murale déconnectée.
Fusible fondu ou disjoncteur déclenché.
Sans électricité
La température souhaité est plus élevée que la température de la pièce.
L’appareil a été éteint et rallumé trop rapidement.
Le temporisateur éteint le climateur OFF
Le panneau de commande est éteint.
Solution …
Enfoncez fermement dans la prise. (Page 2)
Remplacez le fusible avec un fusible temporisé ou réenclenchez le disjoncteur. (Page 2)
Appuez sur le bouton de ON/OFF pour ON (Page 5)
Réglez une température plus basse. (Page 6)
Attendez trois minutes que le panneau de commandes se réinitialise. (Page 6)
Appuez sur le bouton de ON/OFF pour ON (Page 5)
Mettez-le en marche et sélectionnez le paramètre de ventilation ou de climatisation souhaité.
FUSIBLE FONDU OU DISJONCTEUR DÉCLENCHÉ À CAUSE DU CLIMATISEUR
Vérifiez si …
Fusible fondu ou disjoncteur déclenché.
Trops d’appreils en fonction en même temps
L’appareil est de plus de 7,5 ampères
L’appareil est utilisé avec une rallonge.
L’appareil a été éteint et rallumé trop rapidement.
Solution …
Remplacez le fusible avec un fusible temporisé ou réenclenchez le disjoncteur. (Page 2)
Démarrez des appareils en même circuit. (Page 2)
L’appareil doit être utilisé avec une prise murale correctement. (Page 2)
N’utilisez pas de rallonge (Page 2)
Attendez trois minutes que le panneau de commandes se réinitialise. (Page 5)
LE CLIMATISEUR S’ALLUME ET S’ÉTEINT RAPIDEMENT
Vérifiez si …
La température extérieure est extrêmement élevée.
La fonction POWER SAVE (Mode Economique) est ON.
Le temporisateur éteint le climateur OFF
Solution …
Réglez FAN sur haute vitesse pour permettre à l’air de passer par les bobines de refroidissement plus
fréquemment. (Page 5)
POWER SAVE (Mode Economique) ne permet pas le climateur en fonction successive. Réglez au mode COOL.
(Page 6)
Appuez sur le bouton de ON/OFF pour ON (Page 5)
L’air de l’appareil ne semble pas assez froid—Du givre se forme sur la bobine de refroidissement, derrière la face avant
Vérifiez si …
La température extérieure est inférieure de 60 F
Le filtre d’ air est peut-être sale.
La capacité est trop haute en comparaison de la surface que l’apparail a servie.
Solution …
Sélectionnez le mode de ventilation uniquement (Page 3)
Retirez le panneau. Retirez le filtre. Nettoyez le filtre. Replacez le filtre.Fermez le Panneau.(Page 10)
Il faut changer à un modèle à la capacité inférieure haute. (Page 3)
L’air de l’appareil ne semble pas assez froid—Pas de formation de givre sur la bobine de refroidissement, derrière la face avant
Vérifiez si …
Le filtre d’ air est peut-être sale.
La température souhaité est plus élevée que la température de la pièce.
La température intérieure est inférieure de 60 F
L’avant de l’appareil est bloqué par des voilages, des meubles, etc.
L’avant de l’appareil est bloqué par des livres, des cendres, des stores, etc.
Les portes, les fenêtres, les bouches de chaleur, etc. sont ouverts.
L’appareil a récemment été allumé dans une pièce chaude.
La détection de température atteint la bobine
La pièce est extrêment chaude.
L’évent est en position OPEN.
Solution …
Retirez le panneau. Retirez le filtre. Nettoyez le filtre. Replacez le filtre.Fermez le Panneau.(Page 10)
Réglez une température plus basse. (Page 5)
La climatisation peut ne pas démarrer avant que la température de la pièce n’atteigne 60F. (Page 3)
Retirez ce qui bloque. (Page2)
Retirez ce qui bloque. (Page2)
Fermez les portes, les fenêtres, les bouches de chaleur, etc. (Page 2)
Laissez plus de temps pour que la chaleur accumulée s’évacue des murs, du plafond, du sol et des meubles.
(Page 3 )
Retirez le panneau. Retirez le filtre. Tournez la détection de la bobine. Replacez le filtre.Fermez le Panneau.
(Page 10)
Utilisez un ventilateur à évacuer l’air chaud de la part d’une bouche ou bien d’une cusine. (Page 2)
Réglez l’évent à la position CLOSED pour une climatisation maximale. (Page 9)
LE CLIMATISEUR FONCTIONNE LONGTEMPS.
Vérifiez si …
Un climatiseur nouveau a remplacé l’ancient.
La taille BTU est trop petite
Solution …
Le nouveau est plus économique en énergie et a besoin plus de temps pour refroidir une pièce. (Page 3)
Il faut changer à un modèle à la capacité plus haute. (Page 3)
DE L’EAU GOUTTE A L’INTERIEUR LORSQUE L’APPAREIL REFROIDIT
Vérifiez si …
Mauvaise installation.
Solution …
Tournez légèrement le climatiseur vers l’extérieur 1/4” pour permettre à l’eau de s’évacuer. Consultez les
instructions d’installation. Ne FAIT PAS de trou pour évacuer.
DE L’EAU GOUTTE A L’EXTERIEUR LORSQUE L’APPAREIL REFROIDIT
Solution …
Ceci est normal les jours très humides. (Page 3)
TÉLÉCOMMANDE À DISTANCE NE FONCTIONNE PLUS SUR LE CLIMATISEUR
Vérifiez si …
Les batteries ne sont pas placées propre.
Voyant lumineux rouge brille en appuyant le bouton.
Pointez la télécommande au climatiseur.
Solution …
Vérifiez si des plastiques sont retirées des batteries et replacez les batteries propre. (Page 4 )
Vérifiez si des plastiques sont retirées des batteries et replacez les batteries propre. Ou bien changez des
batteries nouvelles. (Page 4)
L’angle entre la télécommande et le climatiseur est extrême donc il faut changer la direction un peu. (Page 4)
BRUIT LORSQUE L’APPAREIL REFROIDIT.
Vérifiez si …
Bruit des fonctionnements périodiques
Bruit du vent
Cliquetis ou bruissements
Gargouillements/sifflements
Bruit de beep
Vibration
Solution …
Compresseur— Ceci est normal pour un compressur éfficace. (Page 3)
Ventilateur/moteur— l’avant de l’appareil, il est possible que vous entendiez un bruit de vent provoqué par l’air
déplacé par le ventilateur. (Page 3)
Condensateur-- Ceci est normal. Des gouttes d’eau tombant sur le condensateur pendant le fonctionnement normal
de l’appareil peuvent provoquer des cliquetis ou des bruissements. (Page 3)
Evaporateur— Peuvent être dus au frigorigène passant par le système d’évaporation pendant le fonctionnement
normal. (Page 3)
Contrôle électronique —Ceci est normal en appuyant sur le sélecteur. (Page 3)
mauvaise installation. Consultez les instructions d’installation(Page 3)
11
Tableau de
Dépannage
Vérifiez si …
L’appareil évacue de grandes quantités d’humidité de la pièce.
GARANTIE DU
CLIMATISEUR
GARANTIE DU CLIMATISEUR
Garantie totale d’un an
Votre appareil est protégé par Garantie totale d’un an à compter de la date d’achat initiale.
SEARS s’acquitte de tous les frais de réparation ou de remplacement des pièces présentant un
défaut de pièce ou de fabrication sous la condition que le consommateur doive utiliser le
climatiseur uniquement comme indiqué dans ce present mancel.
Garantie totale de la seconde à la cinquième année (système fermé)
A la seconde cinquième année suivant la date d’achat initiale, SEARS est responsable de réparer
ou remplacer toutes les pièces du système de réfrigération fermé (compresseur, condensateur,
évaporateur et tubes) présentant un défaut de pièce ou de fabrication sous la condition que le
consommateur doive utiliser le climatiseur uniquement comme indiqué dans ce present mancel.
Service de la Garantie
Service de la Garantie serait appliqué par le centre du service le plus près aux Etats-Unix.
SEARS CANADA INC, 222 RUE DE JARVIS, TORONTO, ONTARIO,
CANADA M5B 2B8
Service De Gâchette
Accord d’entretien
Notre promesse, “We Service What We Sell” (Nous servons ce que nous avons vendu) nous
garantit de vous offrir du propre service.
Vous aurons un appreil en valeur plus élevée par notre réseau de service national. Nous avons
des techniciens compétents et professionaux, une série complètes d’outils et de pièces à vous
servir pour suivre notre promesse, “We Service What We Sell” (Nous servons ce que nous avons
vendu).
Accord d’entretien de SEARS
Vous pouvez entretenir la valeur de votre climatiseur par l’accord d’entretien avec SEARS.
Les climatiseurs conçus, fabriqués et contrôlés par SEARS peuvent être utilisés pendant plusieurs
années. Mais, il leur faut encore du service comme tous les appareils modernes. Un accord
d’entretien avec SEARS vous promet du propre service pour votre climatiseur.
L’accord d’entretien de SEARS
•
•
•
•
est une façon d’acheter le service du future au prix d’aujourdui.
éminue les facteurs de la part d’utilisation normale.
permet assez de coups de fil.
vous offre une vérification préventive annuelle pour garantir une propre fonction de votre
climatiseur.
Pour plus d’information, faites appel 1-800-4-LE-FOYER OU 1-800-469-4663
Garantie et
Service
12